Making a shelter for a well in the form of a house, the need for such protection, design features structures, planning, preparation and technology of work.
The need for well protection

After completing the construction of a well, usually intended not only for irrigation, but also for collecting drinking water, there is a need to protect it from negative external influences. One of its options is to install an open or closed canopy over it in the form of a house.
Such a structure can perform a number of functions:
- Eliminate the possibility of clogging well water with leaves from trees, debris, chemicals for spraying green spaces and dust;
- Protect it from heating by the sun's rays in the summer heat, which reduces its quality;
- Prevent it from freezing at sub-zero air temperatures in winter;
- Close access to the well that is dangerous for children and animals;
- Serve decorative element plot, emphasizing its individuality.
Design features of a well house

Sheds for wells can take different shapes. The simplest of them is a shield on racks covering the top of the neck of the structure; the structure in the form of a log house looks more solid. The roof of a well house can be made single-pitched, ribbed, umbrella-type, or gable. Its slope may or may not be very steep.
The doors of closed canopies are usually located on two opposite sides of the structure or only on one of them. They come in casement, sliding and solid types.
It is advisable to select the material for the roof so that its color or texture is in harmony with other elements decorative design plot. The roof of a canopy, for example, can simply be painted suitable color or finish with soft tiles.
After the walls of the well house are built, their lining will look beautiful artificial stone or mosaic. The log structure of the canopy will give the spring a unique rustic flavor. When creating a frame system, its racks can be decorated with tree bark, and flowers can be planted nearby. A wooden well roof with carved patterns looks great.
Most of the decorative details of the well are not necessary to buy. Materials left over after renovation or construction of a house are quite suitable for this purpose: fragments of tiles, leftover paint, crushed granite stones, etc.
Preparatory work

Before you get to work, you need to think through the design of the future house, taking into account the general style of the site’s design. The materials used in the construction process of the structure must be beautifully combined with external finishing the remaining buildings in the yard. Most often, a well shed is made from logs, remnants of timber or boards. Such materials may be the most affordable, especially after the completion of major construction on your site. As a last resort, the missing quantity can be brought from the store.
For comfortable work It is necessary to create a platform around the well. To do this, its location should be cleared of grass, the surface of the soil should be leveled, the area should be filled with crushed stone with a layer thickness of 15-20 cm and compacted. When the work site is ready, you need to measure the diameter of the outer ring of the concrete shaft, since it largely determines the size of the well house.
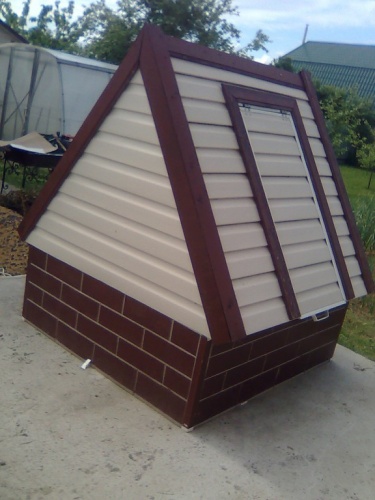
As clear example we will describe the manufacture of a gable closed canopy from timber and boards. For such a design the following materials will be needed:
- Four beams 50x50 mm, 840 mm long, for the rafters of the roof of the house;
- One meter beam 50x50 mm for its ridge and four beams of the same length, but with a cross section of 100x100 mm for the base of the frame structure;
- Two meter beams 100x50 mm for fixing the rafters;
- Two beams 100x50 mm for columnar supports;
- A log with a diameter of 250 mm and a length of 900 mm for making a well gate;
- Board 30x300 mm and 1 m long for a stand for buckets;
- Boards 20x100 mm for the installation of roof slopes and installation of gables;
- Steel corners - 4 pcs.;
- -metal rod 20 mm long, 200-300 mm long;
- L-shaped blank measuring 400x350x250 mm made of rod;
- Steel bushings - 2 pcs.;
- Steel washers with holes 26 mm;
- Door hinges - 2 pcs., latch and handle;
- Soft tiles for roofing;
- Chain and bucket.
The set of devices for work should include:
- A circular saw and an electric jigsaw are necessary for quickly processing wooden structural parts;
- A hammer drill for making holes in the well wall when attaching wooden canopy posts;
- Hammer, screwdriver, tape measure, pencil and building level.
How to make a house for a well
Work on the construction of a house includes the manufacture of a wooden frame, installation of gates, doors and installation of the roof. When creating a structure, you must proceed in the order described below.
Frame making

The distance between its sides in our example should correspond to the outer width of the well. The basis of the design is wooden frame. To make it you need to use 50x100 mm timber. It is more convenient to assemble the frame and the entire frame on the site near the well.
Two vertical posts made of timber 50x100 mm and 720 mm long should be attached to the finished frame, and then their free ends should be connected with a ridge beam 50x50 mm.
After this, it is necessary to install rafter bars, connecting them with the corners of the base of the frame with the top of the racks. To ensure a tight fit of these bars, the ends of the posts must be cut at 45 degrees from above and on both sides.
From the side of the future location of the door, a board 300-400 mm wide must be nailed to the base of the frame, on which buckets can then be placed when collecting well water.
The remaining sides should be filled with boards, but of smaller width. They are designed to strengthen and hold the manufactured structure on the well.
The finished frame of the house must be secured to the concrete head with bolts. To do this, holes should be drilled in the posts of the canopy and the head of the well, and after aligning them, insert the bolts, tightening them with nuts.
How to install a gate

To do this, you need to take a log, remove the bark and sand its surface. The length of the workpiece should be 5 cm less than the pitch between the vertical posts of the house. In this case, the edge of the gate will not touch them during operation.
The edges of the log should be covered with turns of wire or a clamp. This will allow you to maintain the round shape of the gate during its operation.
In the center of the ends of the workpiece, you need to make two 20 mm holes with a depth of 5 cm and secure their edges using metal washers. Then, during rotation on the axis, the gate seats will not be destroyed.
Similar holes must be made in the canopy posts at a height corresponding to the gate and metal bushings must be inserted into them.
Then you need to hammer a steel rod 200 mm long into the hole of the workpiece on the left, and a handle on the right. When all metal parts will be installed on the gate, it should be fixed on the posts, a chain should be attached, and a bucket should be hung from it to collect water.
How to make a door

First you need to select one side of the frame and attach three 50x50 mm bars to it, defining the opening. In accordance with its dimensions, you should assemble the door using identical boards, which must be carefully adjusted to each other, and then fastened with bars along the edges of the canvas and its diagonal.
It is more convenient to perform this work on a flat area near the well. The door should be slightly smaller than the internal dimensions of its opening. Then she won't cling to wooden parts boxes.
After assembly, you need to attach steel hinges to the door, install it on the frame of the house and secure it with nails or screws.
WITH outside you need to install a latch on the door and provide it with a handle. After checking the operation, the door should open and close easily, without clinging to anything.
Roof installation

When making a house for a well with your own hands, building a roof is the most important task. After all, it is this structural element that will serve as the main protection of the water source from bad weather and debris.
To install the roof, the slopes of the frame and its gables must be sheathed with boards, and the outermost ones should extend slightly beyond the contour of the structure. The canopy obtained in this way will cover the gables, and they will not get wet.
After sheathing, the roof must be covered with a waterproofing layer. This may be roofing felt or other material with similar properties. There is no need to hide the gables under such insulation. Usually they are coated with a special water-repellent primer, and this is enough. Waterproofing the roof will greatly extend the life of the entire structure.
Soft tiles can be used as the final covering for the roof. It is light in weight and quite suitable for this purpose. It is not recommended to use slate for the wooden frame of a well house. Under its weight, the structure can warp and after a certain time even collapse.
Decorative finishing of a house for a well

This is the final stage of making a well house. Countless finishing options can be found in the photos presented on the Internet. We will list the most accessible ones for independent implementation.
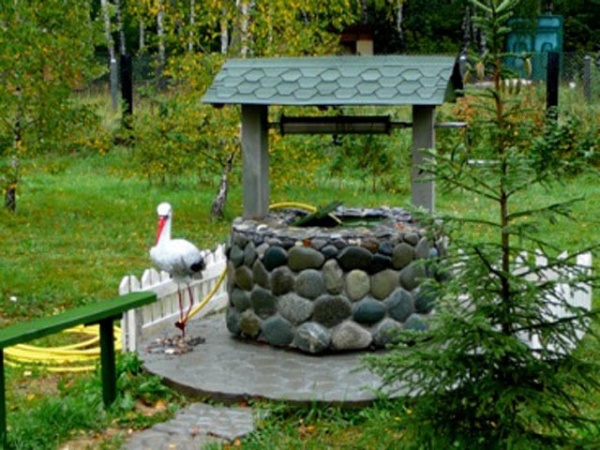
Look great on personal plot well covers made of wooden logs or with finishing that imitates solid logs. Such houses are especially good in combination with a grass lawn. The effect can be enhanced by laying large stones around the base of the well.
Wood carving is also an excellent decoration for a man-made source of drinking water. A carved house, lovingly made in the Russian style, looks beautiful at any dacha.
If you prefer a rustic flavor, a shelter for a well can be made in accordance with the folk style. Here the house is decorated with tiles.
Painting a structure in different colors is not difficult, but effective method decor. Choosing paint wisely well house you can give it almost any shade - make it purely bleached, give it an aging effect, etc.
Shelters in the form of a log house over a well can be decorated with wooden or ceramic figurines depicting people or animals.
How to build a house for a well - watch the video:
The most important thing to always remember before making a house for a well is its main function, which is to maintain the purity and quality of water. Good luck with your work!
Until recently, any piece of land on which people lived had a well. To this day, they are dug in plots to provide themselves with water for household needs. They are indispensable summer cottages, where water is centralized and supplied in limited quantities on a schedule. But even with the construction of a country house and the arrangement of a well, wells do not lose their relevance. By lowering a submersible pump into them, it is convenient to use water for irrigation, especially when there is high level groundwater. It is important not only to protect children and animals by closing it with a lid, but also to give it aesthetics. This article will talk about how to make a well head with your own hands.
Why do you need a well head?
- The head is designed not only to protect household members from accidentally falling into the well, but also to prevent debris from getting into the water.
- If the well is planned to be used and not turned into an art object, then it is necessary to provide a convenient cover and lifting mechanism. When thinking through a project, it is worth considering ease of use, and not just design and combination with the surrounding landscape.

- Well head designs can be closed or open. Their cost will depend not on the type, but on the materials used. But in an open well in winter, water can freeze, so for year-round use it is recommended to build it as a closed and insulated house.
- If desired, the open head of the well can also be made warm. In this case, not only the walls of the well itself are insulated, but also its lid. Choosing for this purpose moisture resistant thermal insulation material, such as polystyrene foam or penoplex.
Types of material for the well head
Traditional and modern finishing materials allow you to create not only functional, but also beautiful wells. They fit harmoniously into any landscape design, becoming its decoration.
- Stone. This is a labor-intensive and expensive method of finishing the well head. But the result is very beautiful and solid. In addition, such finishing material does not require any maintenance and will remain in its original form for many decades. You can use stone to lay out an entire wall around the well, or just use it to decorate the head of a well made of concrete rings. In the second case, the cost will decrease several times, and appearance won't lose.

- Wood. It will fit especially well into the landscape if there are already wooden buildings on the site, for example, wooden house or bathhouse. Like stone, wooden heads can be of two types:
- made of real timber or logs, like the walls of a house;
- simply a frame sheathed with imitation timber or a block house.
- Regardless of the material chosen, a number of requirements are imposed on the head:
- Strong and reliable walls. To strengthen them, boards are attached along the upper perimeter, which simultaneously serve as an armored belt and a water stand. In addition, they will protect wooden elements facings from water getting on them.
- Availability of cover. This will protect the water from debris and insects. And it will protect small children or animals from falling into it. It is convenient if there is a hole in the lid for the hose, then to pump out water using a pump you will not need to keep the hatch open.
- Thermal insulation. It is needed if there is a need to use the well when the temperature is below -20°C. If in winter the temperature does not drop below 15°C, then there is no need for insulation.
- Collar. Even if the well head is needed only for decoration or the water is planned to be pumped out submersible pump, it is recommended to provide a functioning lifting mechanism. There is always a chance that it will come in handy.
Construction of a well head in the form of a house
Why is a well house necessary:
- it will protect drinking water from dust, leaves, insects, branches and other debris;
- the water will not bloom or evaporate from the summer heat;
- when using spraying chemicals in the garden, they will not settle on the well cover and will not get into the water;
- on frosty days the water will not freeze;
- when creating a beautiful head on a well, it will become a decoration for the area. For this purpose, it is decorated with carved or forged elements, which you can not only make with your own hands, but also buy ready-made ones. And in the finishing use natural stone and high-quality wood.
Having made a design and created a project based on it, you can start working.
Required materials tools
- The easiest way to work with wood is, moreover, it is a natural material that will always fit into the garden landscape.
- Therefore, first of all you need to purchase required amount timber with a section of 50x50 and 100x50 mm.
- For finishing, edged boards, block houses or lining are used.
- Any roofing material is suitable for the roof, but it is good if it matches the roof on the gazebo or house. The lighter it is, the better - this ensures that the supports will withstand even heavy snowfalls.
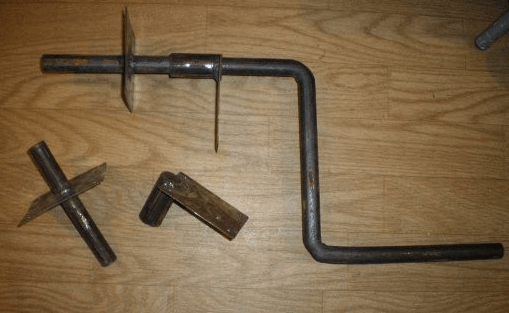
- For the lifting mechanism (gate), you need a rounded log and a strong metal rod.
Well head drawing

- Considering that all wooden elements will be outdoors all year round, you need to stock up on special protective equipment.
- To fasten wooden parts in places where the greatest load will be placed on them, you need to buy metal corners.
- Deadbolt, handle, door hinges and fasteners (screws or nails).
- Bucket and chain.
- Saw or jigsaw, level, tape measure, screwdriver or hammer, pencil.
Stages of work on creating a well house
- Depending on the chosen design, the frame of the walls and roof is made. He will bear the entire load. It is easier to assemble it on the ground and attach it ready-made to the well.
- To calculate the size of the head around the concrete rings of the well, it is necessary to measure their diameter. Based on the results obtained, a frame is assembled from a board with a cross-section of 50x100 mm. When fastening parts, you must constantly check the vertical and horizontal levels to avoid distortion.
- At the corners of the frame, vertical bars are attached, equal to the height of the house-head. In addition, 2 more vertical bars are attached to the frame from two opposite sides and connected horizontally from above with a board, resulting in the ridge of the future roof. All vertical posts are also connected to each other with bars with a section of 50x100 mm.

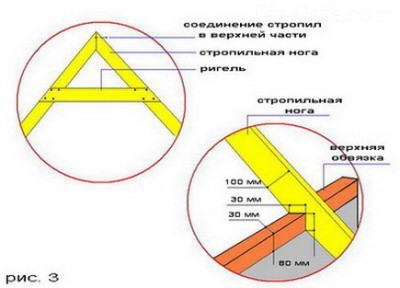
- Rafters made of 50x50 mm timber are attached from the ridge to the side frame in increments of 40-50 cm. For reliable and beautiful fastening, where they are connected to the ridge, the timbers are cut at an angle of 45 degrees. This can be done using a miter saw. For additional strength, these places are fixed with metal corners. Excess rafters are cut off, not forgetting to leave an extension.
- On the side where the door will open, you need to nail a strong and wide board (at least 300 mm). In the future, it will be convenient to place a bucket filled with water on it. On the remaining sides you can use narrower and thinner boards. Their function will be to securely fix the head on the well rings. This completes the assembly of the frame. It must be smooth and durable.
- If the well head provides insulation, then sheet moisture-resistant material is attached to the frame. In turn, slab insulation with high moisture-resistant characteristics. It is desirable that they have a tongue/groove connection, which will eliminate cold bridges and through freezing in these places.
- The next step is to install a mechanism for lowering and raising the bucket of water. It is most convenient to make it from a piece of rounded log, the diameter of which should be 15-20 cm (the larger it is, the easier it will be to lift a full bucket). The length is selected individually and depends on the size of the well head. On average, it should be only 5 cm shorter than the internal distance between walls or studs. This will allow the gate to rotate freely.

- If there is no rounded log, then take a simple one and clean it of wane, remove all irregularities, knots and sand it. The resulting workpiece is shortened to required sizes, and the edges are tightly wrapped with steel wire.
- Holes 20 mm in diameter and 50 mm deep are drilled from the ends. To protect the wood in these vulnerable areas from rotting, metal plates must be screwed on. The holes on them must match in diameter and location with those already drilled on the log.
- On the racks to which the lifting mechanism will be attached, similar holes are made with protection from metal plates. The only difference is that on the side with the lever you need to make a through hole.
- Metal bushings are inserted into both holes on the racks. And metal rods are driven into the log from the ends, slightly smaller in diameter than the bushings. One will simply fix the log, and the second has an L-shaped handle for rotation. Then the chain is fastened and wound, tying a bucket to the other end.

- The finished frame is sheathed with finishing material. If it is a block house or lining, then they have a tongue/groove connection, which ensures their tight fit. When using edged boards, even with the most careful adjustment, the formation of gaps cannot be avoided due to seasonal shrinkage of the wood and its cracking.
- Special stains or antiseptic impregnations will help protect wood from rotting. It is also allowed to apply varnish, but only one intended for use at sub-zero temperatures, otherwise it will all crack and begin to crumble.
- Alternatively, you can use plastic or metal siding. The latter not only completely replicates the appearance natural material, but even has a similar texture.
- Next, they make sheathing on the roof and be sure to attach a vapor barrier fabric. It will protect the roofing material from high humidity and condensation formation.
- Then the door is secured. To do this, you need to choose dry wood to avoid deformation and curvature during further drying. Boards are nailed onto the frame to act as a door frame.
- Having measured the size of the resulting hole, the frame of the future door is assembled on a flat surface, which should be slightly smaller. It should have right angles without curvature. The canvas is made from the same material that the house itself was sheathed with. To give the frame rigidity, diagonally with inside screw a rail with a cross section of 20x20 mm or more.
- Door hinges are attached to the wall and to the door, then it is hung and leveled. It is necessary to ensure that it closes easily and does not jam. After that, a handle and a lock are attached to it.

- The final stage is decorative finishing, if provided for by the design.
Make a well head from stone
- Let's consider a method where the walls are laid out of brick, later covering it natural stone. In this case, the walls of the head will be built according to the same principle as the walls of the house.
- The concrete ring protruding above the ground is cut down with a grinder to the required level. And the foundation is poured along its perimeter.
- On concrete base put waterproofing, for example, roofing felt. They start to do it on top brickwork in the traditional way in 1 brick, with bandaging of the seams.

- After finishing the construction of the walls, they are covered with film and left until the solution sets. Thus, the base of the well head is made with your own hands. It's time to install the gate. If the support columns for the lifting mechanism are also planned to be lined with decorative material in the future, then they are made of hollow brick, cinder block or foam concrete.
- If the well is made of modern concrete rings, then it will be difficult to line it. The fact is that factory-mixed concrete is denser than when independent batch solution, therefore, its surface is smooth, without pores or roughness.
- To give the necessary adhesion, you will have to anchor it yourself. From the outside, holes with a diameter of 5 mm are drilled in a chaotic manner to half the thickness of the concrete ring. The distance between them should vary between 10-15 cm.
- If you go deeper, then over time the anchor may become exposed in this place. Then you will need a masonry (reinforcing) mesh with a cell size of 4-5 cm. It must be completely wrapped around the ring, and the resulting allowance must be folded. But it should not fit tightly, the gap between metal mesh and leave 1 cm with a concrete ring. Bent pieces of wire with a diameter of 5 mm are driven into the prepared recesses. A mesh is tied to the resulting anchors. Such preparatory work will ensure that the base will withstand facing material of any weight - from slab sandstone to boulders.

Lining a concrete well with wood
- Thanks to the heat-saving properties of wood, there will be no problems with condensation in winter. It is thanks to these properties that since ancient times wells were made from logs.
- First you need to make a frame around the concrete ring to attach the wooden planks. A solid shield is made on each side of the future well. To do this, assemble the frame. They nail it tightly to it edged boards 25 mm thick. When all 4 shields are ready, they are coated with primer in 2 layers.
- They are applied to the well and the points where the shields come into contact with the base are marked. In the marked places, holes are made using a hammer drill and wooden blocks are attached.

- Place the shield and screw one top corner. Then, aligning it horizontally, screw the second side. The entire frame is secured in this way. The resulting voids can be filled cement mortar with shavings. This guarantees protection even from severe and prolonged frosts.
- Finishing material begins to be attached to the resulting frame. The choice is not limited in any way and depends only on the style of the site or personal preferences.
- Simply and quickly make an imitation of logs or beams using wood panels block house.
- It is better to start installation from the top. Because they make it from natural wood, then panels that are identical at first glance may turn out to be of different widths when installed. This may be a very minor difference, but asymmetrical joints are formed at the corners. Therefore, you need to slowly adjust the panels, trying to avoid distortion in the design.

Head for a well made of siding or metal
- Unlike a wooden block house, plastic panels They have ideal dimensions and always connect smoothly at the joints. But you need to remember that the richer the color of the panel (for example, dark wood), the higher the likelihood that it will fade in the sun. When the well is in the shade of trees it is not scary, but for sunny areas it is better to choose light colors material.
- The frame for cladding is prepared according to the method described above.
- The siding begins to be attached from the bottom. First, screw on the starting bar. Its horizontal level must be checked with special care. If there is a slight distortion, it will immediately affect the appearance.
- Next, the corner outer profiles are attached to the self-tapping screws. Their verticality is checked with a level.
- Now I came through the fastenings of the planks themselves. They are coming standard size 3 m, so first measure the required length and cut it. At the same time, do not forget about allowances of 1.5-2 cm, which will be inserted into corner profiles. The first bar from below clings to the starting one, and is screwed on top with self-tapping screws. The next one is inserted into it and snapped into place, which is held from below by the previous plank, and attached to the top with self-tapping screws. This is how the entire well is sewn up. The top is finished in accordance with the intended design.
Sewer well head
- In the majority country houses There is autonomous sewerage, and often its installation provides that the upper part sewer well remains above the surface of the earth. In this case, it also needs decoration.

- The principle of wall cladding remains the same. The only difference is that there is no need to make stands for the lifting mechanism, and the height of the walls is much smaller.
- Sometimes it is enough to surround it with large stones and make a decorative cover.
- Or they make circular brickwork, and lay a factory-made sewer hatch on top.
In any case, it is not only beautiful, but also functional, as additional insulation is provided.
Well head design
When choosing a well design, you should rely on the stylistic direction that already exists on the site.
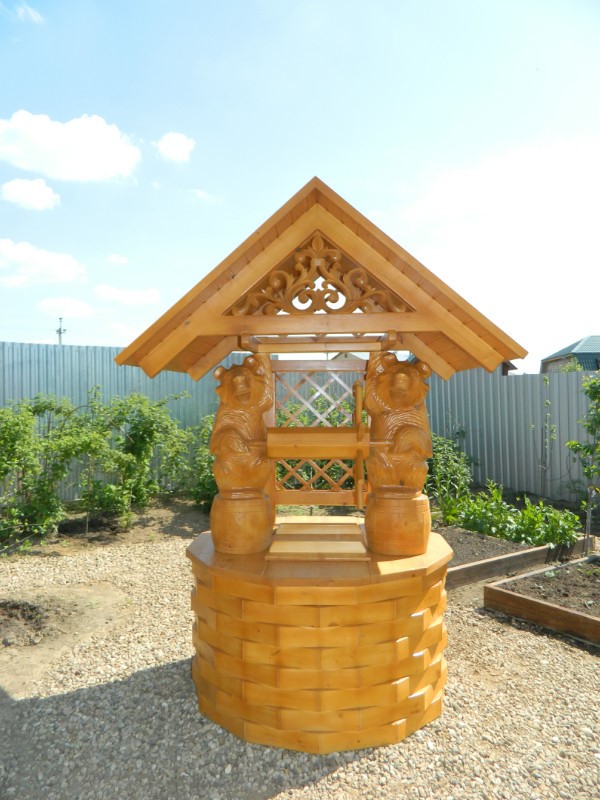
- Russian style. The most characteristic of this style is the well head in the form of a tower. For it, only real logs are used, and not their imitation. Carved wooden elements can be an additional decoration. It is better to put the same roofing material on the roof as on the house itself.

- Modern style. Its main feature is the use of modern, rather than traditional materials. Such a well head would be appropriate only if the house itself is made in high-tech style. Tiles are used for cladding, and the racks are made of metal.
- Chalet style. This is a European rustic style, so a combination of natural wood and stone is best for a well head. All materials should be deliberately rough, thick metal, stone boulders, textured wood. You can make the design lighter using forged lightweight elements.
- East style. The most popular among landscape designers are wells designed in a minimalist style. Japanese style. The main feature is a head with a hipped roof. Large stones and wood are selected to finish the well. But the Chinese style is the opposite, it is filled with a lot of luxurious and exquisite jewelry. Therefore, bright colors are chosen for the walls of the head, and the posts are made in the form of carved figures of mythical characters.

In addition to traditional style solutions, there are many design options for the well head. They are distinguished by their versatility, which allows them to look good in any landscape design.
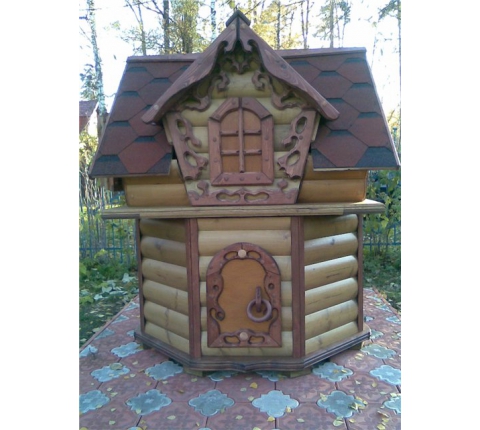
- Fairytale tower. It's deliberately bright, almost doll houses. They can be unusual shape, decorated with bright finishing materials. You can strengthen associations with the help of placed garden figurines gnomes or fairies.
- Sea style. Creating it is quite simple; for this you need to take self-explanatory attributes, such as: a rope, a barrel (which can be used instead of a bucket), an anchor, aged wood, a steering wheel instead of a lifting mechanism handle. For decorative finishing Figurines of anchors and sea animals are perfect.

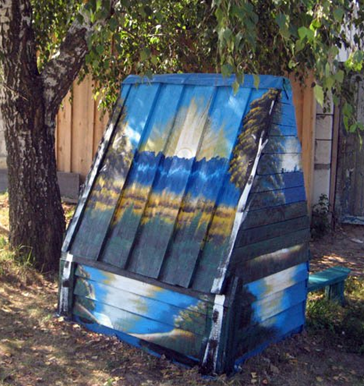
- Painting with paints. This is the most a budget option, which does not limit in artistic motives. It is enough to simply prime the concrete rings of the well with white and paint them. Or paint a brick or wooden head with white paint and paint over it.
But no matter how beautifully the head of the well is made, in order for it to look harmonious, it must be surrounded by plants. To do this, you can plant low-growing plants around it. flowering shrubs or create new compositions from flowering annuals every year. In addition, flowers can be placed in large flowerpots. In this case, they can be rearranged several times during the summer. Plant compositions are suitable for a well made in any style.
Paying tribute to traditions or simply decorating house plot, country property owners decorate wells with wooden houses various shapes: from a simple extension roof with a door to a very solid log house, reminiscent of a gazebo. Dozens of companies offer luxurious products with carved elements in the form of animals and openwork ornaments, but it is much more pleasant to build an original house for a well with your own hands near your dacha. Walls made of timber or a wide roof also have a practical purpose: they protect the water in the well shaft from debris that is blown in by the wind. From a safety point of view, the house is also important: it serves as a barrier for children and animals.
Let's look at several projects for buildings made of wood - a natural, beautiful material that is very easy and pleasant to work with.
Whatever the project, the tool is always the same - the one that is needed for wood processing. So, before starting work you should prepare:
- circular saw, electric plane(ideally a woodworking machine on which you can quickly and easily prepare all the parts);
- hacksaw and jigsaw;
- hammer;
- Phillips screwdriver;
- nail puller;
- level, pencil, tape measure (at least 3 m).

Any woodworking tool is suitable for building a well house.
Having previously made drawings of the house and made simple calculations, you can prepare the material for construction in advance.
To build a wooden structure you will need:
- timber (rounded, glued);
- edged board;
- fasteners (screws, nails);
- roofing material (roof felt, flexible tiles, slate);
- hinges, handle and latch (if there is a door).
All wooden parts should be adjusted to size, sanded, processed using protective compounds. Wood impregnated with antiseptics and varnished looks better and lasts longer.
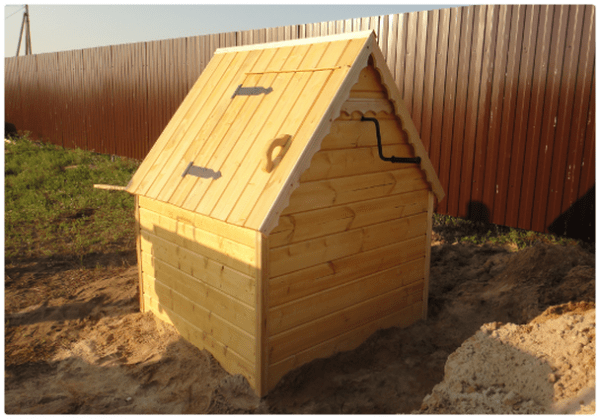
Project No. 1 – a house with a gable roof
So, we are building a roof house for a well or a well, from which water is supplied to the house using pumping station. This is a small room to protect the head of the well rings, and the door is necessary to control the operation of the pump, as well as for cleaning and disinfection.

Well house with door, built in the form of a large roof
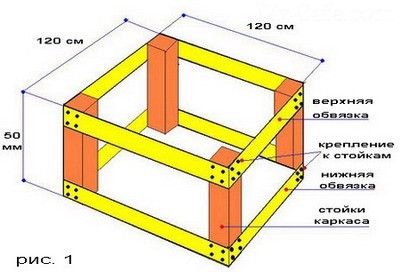
Frame construction
The main material for constructing the frame is timber and edged boards. Parts that are too voluminous will make the structure bulky, and too thin will make it fragile, so it’s worth focusing on average parameters: beam cross-section – 80 mm x 100 mm, board thickness – 40 mm. It is necessary to prepare four racks 8 cm wide and four edged boards suitable for the lower and upper frames, 12 cm wide. The boards are sawn to size in advance, then the parts of the frames are nailed to the posts one by one, so that the result is an even and reliable frame. You should pay attention to the fasteners: the length of the nails should be such that they firmly connect the two parts - approximately 10 cm.

The frame diagram clearly shows the attachment points of the upper and bottom trim to the racks
The easiest way to assemble the frame is in the following sequence: first, connect two posts at the top and bottom with boards, then fasten the remaining two posts in the same way, place both structures around the well shaft and finally connect them together with strappings.
For this project, you can build everything quickly and from scrap materials, since almost any of them - boards, beams - remain at the dacha during the construction of a house or bathhouse.
Roof structure and cladding
The construction of the roof should begin with the installation of rafter trusses - a rigid structure on which the sheathing will be attached. It is better to choose fairly strong boards (at least 3 cm thick), the length of which is 180 cm - the height of the building will depend on the length of these boards. To install the crossbar and jibs, you will need a board of smaller thickness - 2.5 cm. There should be 8 pieces of jibs, 6 pieces of rafters, 3 crossbars, each length 30 cm.

The distance between the sheathing elements must be the same
Sequence of work:
- Having cut the rafters at an angle, their upper ends are connected to each other. Self-tapping screws are used as fastening elements. Additionally, a crossbar attached 30 cm below the top point will help to fix the location of the rafters. It is better to carry out all actions by placing the parts on the ground.
- A cut is made on the rafters in the place where they will connect to the boards of the top trim. Connect the frame and rafters using nails (12 cm long).

Connection diagram of rafters with the upper frame trim
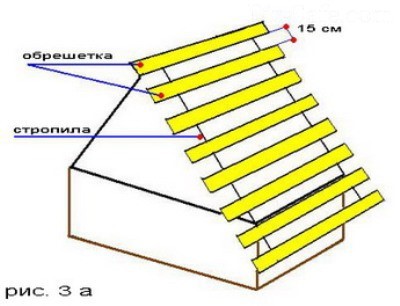
- The installation of rafters is strengthened by installing jibs. Roof trusses connected using a kind of ridge - two boards, to which the sheathing is subsequently attached. The interval between the sheathing elements is 13-15 cm. The protrusions above both walls of the building are 10 cm.
- The constructed roof is covered with roofing felt.
- The slate is mounted on the roofing felt using special fasteners. The corner joints are covered with wind boards.
Door installation
The door to the house is a kind of plank shield that is made in a simple way. Cut boards 85 cm long and 15-20 cm wide, fold them one to one and fasten them together wooden blocks with a cross section of 2.5 cm x 3 cm. Two bars are enough - one at the bottom, the other at the top. Self-tapping screws are used as fasteners, 4 pieces for each board. To ensure that the door retains its shape when moving and the boards do not “walk,” another block is nailed diagonally for rigidity.

The base and frame of the house are practically hidden under the roof, and the door is located above the base, above ground level
After covering the gables, nail down the handle and latch, then hang the door on piano hinges. The final stage is the treatment of the boards on the outside with protective agents against mold and mildew, painting with varnish or special paint for wood to match the neighboring buildings.
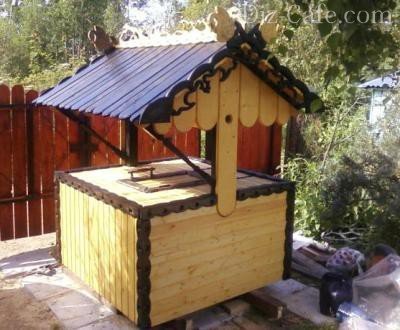
Project No. 2 – log house
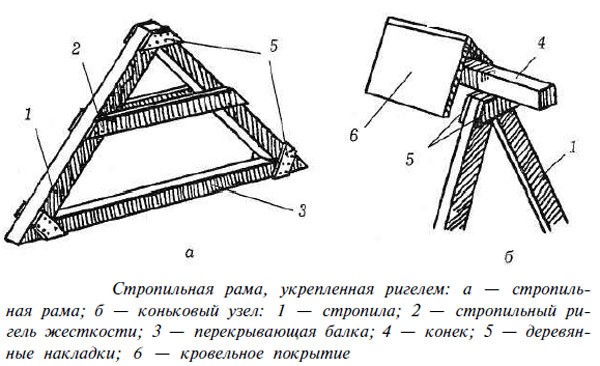
The next creation is a well house made of timber, made in a classic rustic style. This design of a well can be seen in Russian villages. Rounded logs are stacked in the form of a small log house - the size of a well, a wide roof is erected on top of two massive racks and a gate is installed to raise a bucket of water. The edges of the roof extend beyond the frame to prevent rainwater from entering the well. For stability, the racks are equipped with small supports, which also play a decorative role.

This building has three main parts: a frame base, a gate and a wide roof.
The protruding ends of the logs have figured cutouts, which also serve as decoration for the structure. The roof is covered with brightly colored waterproofing material.
For construction you need:
- rounded logs for the log house, posts and gates (sizes are selected according to the diameter of the well);
- edged board for supports and roof;
- roofing covering (slate, tiles, roofing felt);
- material for gates with handle.

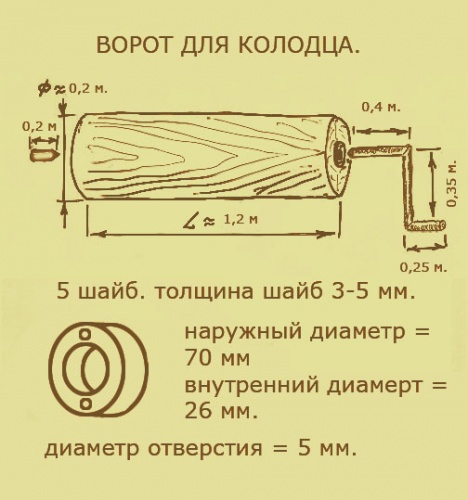
Scheme of a gate for a well with dimensions (they can be changed, but at your own peril and risk)
Project No. 3 – hexagonal frame
This house is a variant of the previous building with some features. It differs in that the frame is not traditionally quadrangular, but hexagonal. Roof slopes vary in length, so it has an asymmetrical appearance. The well is small in size, but its compactness allows the structure to be used when there is a shortage of space. A wooden wheel is a practical and at the same time decorative element.
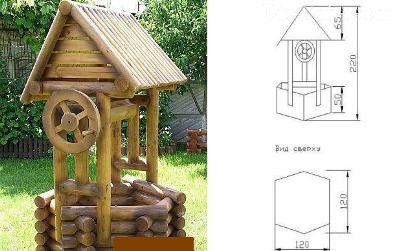
A decorative element – a wooden wheel – can be replaced with a handle for convenience
This house can be used to decorate a mine with a pump or just for decoration local area.
Structure characteristics:
- height – 220 cm;
- base diameter – 120 cm;
- for construction, a rounded beam with a diameter of 100 mm is required;
- the gable roof is covered with edged boards;
- The wood is treated on all sides with a moisture-protecting compound.

Drawing of a well with an equipped head and house
Examples of decorating well houses
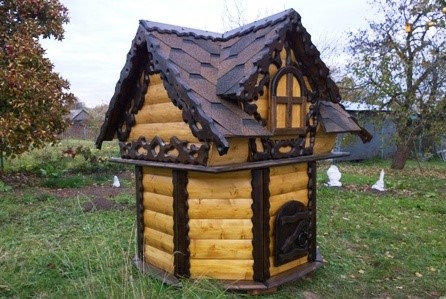
There are several ways to decorate a building. The traditional way to decorate wooden buildings is carving. A neat carved house for decorating a well in the classic Russian style is suitable for all summer cottages where wood was used in the construction of the main house.
The base and roof of the well house are decorated with carved elements painted in a contrasting color
Decoration also occurs by painting wood in different colors. By using impregnations or varnishes of different shades, you can give the structure absolutely opposite shades - from sunny yellow or bleached to dark brown, deliberately aged.
A selection of 6 will also be useful unusual ideas to design a well in the country:

Carved house for a well, decorated with a wooden figure of a bear
Sometimes an additional decoration is installed on the log house - a wooden or ceramic figurine of an animal.

A well house with a decorative element – a wheel for a gate in a “marine” style
Of course, any country house building- this is not just decor, but also the embodiment of a person’s views and taste, so every owner knows how to make a house for a well so that it is both practically useful and reflects the individuality of the owner.
In search of an independent source of water, summer residents dig a well in their local area. This perfect solution, because you can drink clean and cool water every day. An important element at the same time there is a house for a well. Now you will learn about all the intricacies of its manufacture.
The well house performs two functions at once:
- Practical.
- Decorative.
In the first case, it prevents dust, dirt, leaves, insects, chemical precipitation, direct sun rays and snow. Moreover, the water in an open mine in winter time will freeze.
Speaking of the second function, the top of the well can be designed or finished according to the exterior of your home. They use the most different designs, for example, these design options:
- in Greek style;
- carved;
- in the form of a barrel;
- from a log;
- from timber;
- teremok and others.
Kinds
- Open.
- Closed.
An open one can have a simple visor made of metal or wood. The canopy comes with a lean-to or gable roof on two pillars. The drum is fixed on the supports. Additionally, there may be a cover on the ring itself.
As for the closed ones, these are full-fledged houses that completely block the source. A door is made in the roof.
Pros of open houses:
- Easy to manufacture. It is enough to secure the knob and finish it, as well as install a small canopy or cover.
- Low cost.
- Minimum consumption of building material.
Disadvantages of open structures:
- If there is severe frost in your area, the water may freeze.
Important: when the house is open, it must be made from polystyrene foam shell.

Advantages of closed well houses:
- excellent thermal insulation;
- The rings completely overlap.
Disadvantages of a closed structure:
- will cost more;
- it will require more labor and time.
Advice: some people buy ready-made solutions. However, they are not always the most best quality. Therefore, it is more profitable to do it yourself.
Preparatory work
To make a house for a well, you need to collect tools. Its configuration will differ. For example, a set of timber requires carpentry tools. If the structure will be made of metal, then it is necessary to have welding machine and related tools.
If the roof is made of metal, then the following set of materials and tools is required:
- metal corner;
- profile pipe;
- loops;
- electrodes;
- welder mask;
- corner, tape measure;
- welder's hammer;
- level;
- welding machine;
- paint and primer, etc.
Now let's look at the basic material for a closed house:
- wooden beam for forming rafters 50 × 50 mm, length 0.85 m – 4 pcs.;
- wooden beam for forming a ridge 50 × 50 mm, length 1 m – 1 pc.;
- wooden beam for the base 100 × 100 mm, length 1 m – 4 pcs.;
- wooden beam for attaching the base and rafters 100 × 50 mm, length 1 m - 2 pcs.;
- wooden beam for columnar support 100 × 50 mm, length 1.7 m – 2 pcs.;
- log for forming a shaft over the well Ø 250 mm, length 0.9 m;
- board for a bucket stand 30 × 300 mm, length 1 m;
- board for the slope and front part 20 × 100 mm;
- metal corner – 4 pcs.;
- a metal rod Ø 20 mm up to 300 mm long, and the second L-shaped, 400 × 350 × 250 mm;
- metal bushing – 2 pcs.;
- washer hole Ø 26 mm – 5 pcs.;
- loops – 2 pcs.;
- screws, nails and other fastening materials;
- roofing material, let it be tiles;
- chain and bucket.
Important: The wood used must be well dried.
The following materials are required for a log structure:
- logs;
- logs or timber to support the roof;
- roofing felt;
- tiles;
- metal rod;
- chain and bucket;
- fastening material.
Among the tools you must have:
- drill;
- wood hacksaw;
- set of screwdrivers and drills;
- hammer;
- paint and special impregnations for wood;
- axe;
- pliers and other carpentry tools.
Drawings and dimensions
 Drawings need to be prepared. The scheme is standard. See photos for ideas. Thanks to a detailed drawing with details, you can make a beautiful well top better and faster.
How to make a header with your own hands?

We invite you to review the step-by-step construction instructions. There will be 3 variations on how to build a house, namely the frame:
- from a log;
- timber;
- metal
Log building

In fact, a log structure is built without a frame. It is necessary to have the required number of rounded logs. The structure will have 4 walls laid crosswise.

A gate, a gable roof and a roof deck will also be installed. The process boils down to this:
- Formed Bottom part. The side racks are installed immediately.
- Afterwards the frame is folded.
- Up to the top level, the logs on four sides will be equal.
- When forming the roof, the end parts are reduced according to the matryoshka principle.
- A gate rod must be mounted on the support posts on the end side.
- At the end of the work, all that remains is to make a sheathing of timber for the roof and cover it with metal tiles.
Advice: Before forming the first row, a layer of waterproofing must be laid to prevent direct contact of the log with the ground.
Timber frame
 Having decided on the dimensions, it is necessary to assemble a frame from timber with a section of 50 × 100 mm. The resulting base of the wooden house will later be sheathed. The working process is as follows:
- Having identified the side part of the structure, fix the beam (support column) on both sides. Its size will determine the height of the entire structure. Please note that the gate will be attached to these supports.
- A frame is assembled that will immediately outline the future shape of the building. The simplest option is a square.
- A timber frame is made on each side. The beams are connected to each other metal corners and self-tapping screws.
- The head may not cover the visible part of the concrete ring. In this case, it is necessary to make a frame from timber according to the type of gable roof.
- With this option, the timber will be fastened with anchors to the concrete ring.
- The frame must have elements to create rigidity.
- Rafters are also made from timber.
Metal frame

Using metal will allow you to make a well head High Quality and durable. The base will use a profile or round pipe. To form the base, you can use a stainless profile. Features of the work are as follows:
- Anchors secure two support posts made of profile pipe, which will determine the height of the frame on the well.
- Pipes are welded to the support pillars in a horizontal position. They should be laid on the top edge of the concrete ring.
- The top level will have square shape. On both sides it is attached to the vertical pillars of the support.
- The slope of the future roof is being formed. From the top of the support column, a pipe is lowered diagonally down and welded to the corner of the square section laid below. This is done on each side.
- Spacers must be welded to provide rigidity to the structure.
- An opening is formed for the future installation of the door.
Roof

The roof structure can have different shapes, such as gable, hexagonal or flat.
Flat is the simplest. It is being built on open beautiful houses. A small canopy is installed on the well. The easiest way to form it is from a metal profile:
- The supports are immediately welded to the required shape.
- Form flat roof It’s easier to apply on a flat surface.
- You weld the entire frame on the ground, and then attach the supports to the pillars, and you get a canopy over the source.
A gable roof is formed very simply:
- First, the support pillar is fixed, and then slopes are directed down from it on four sides.
- There should be room in the roof for a door if it is an enclosed house.
- If it is open, then two slopes can be assembled on the ground, and then lifted up and secured to the support pillars.
Hexagonal shape, the most complex. The principle of its manufacture is as follows:
- On the ground, assemble the upper belt of the hexagonal-shaped house.
- The support beam must be fixed in the center in a vertical position.
- Six diagonal rafters are directed towards it, forming special kind roofs.
Advice: Without accurate calculations, dimensions and skills, it will be difficult to make a hexagonal roof with your own hands.
Roof decking
Sheathing. Used for flooring a large number of building materials:
- lining;
- soft roof;
- metal tiles;
- ondulin.
The process of fixing these materials is simple, but has its own characteristics.
Lining
We are talking about wooden lining. It is attached using self-tapping screws to a wooden frame. Mounting to a metal frame is more difficult. After installation work The lining must be covered with protective antiseptics and varnish.
Soft roof
A completely flat surface is required for its installation. For example, a USB plate or other similar material is screwed to the manufactured frame. Flexible roofing is fixed using special nails.
Advice: bitumen shingles – perfect solution for hexagonal roof.
Metal tiles
Covering a canopy with metal tiles is a little more complicated than the previous two methods. Flooring sheets are attached with special screws with thermal washers to the frame. It is recommended to make the cut for the formation on a wave so that water (rain or melting snow) does not flow into the source.
Ondulin
Ondulin is attached in the same way as the previous material. For fixation, special slate nails with polypropylene heads are used. This is an excellent solution for gable and single-pitch roofs.
Gate
 The well gate can be made in a variety of options:
- from a log;
- from a metal pipe;
- from a car wheel disc;
- from reinforcement welded into a cylindrical frame.
A pipe bent in the shape of a letter - G is used as a handle. There may also be other options:
- Steering Wheel;
- handle made of polypropylene pipe.
On the Internet you will find many unusual and original ideas, from what to make a pen yourself.
Door
She may be different types:
- bivalve;
- single-leaf.
If the structure is open, then the door may be on top concrete ring. It will open on awnings or be removed from the groove.
Everyone wants their well house to last as long as possible. To do this, during operation it is recommended:
- Check the integrity of the frame once a year.
- Check the serviceability of the gate, as it most often fails.
- If the frame and covering are wooden, it is necessary to paint them every year.
- Check the integrity of the roof so that dust, rainwater, etc. do not get inside the source.
Conclusion
We examined in detail all the features of making a canopy for a well. In the prepared video material you can familiarize yourself with other nuances of this work, for example, how to decorate, design, etc.
Useful video
The videos cover many nuances and everything you need during construction:
Various variations, 65 types:
Often, owners of country houses or dachas on or near their property have a well, which must have a house, or at least a roof. Currently, there are houses for sale for wells of various types, shapes and sizes: from small wooden roof without decorations, to a carved house decorated with openwork patterns, images of animals or other elements. But, you must agree that a house for a well, created with your own hands, will please you much more.
The purpose of the well house
The well house performs several functions at once.
Firstly, it protects the water from insects, leaves, sediments containing harmful impurities, as well as various types of chemicals that are used to spray cultivated plants on the site.
Secondly, it protects from direct sunlight, which negatively affects the quality of water.
Thirdly, during the cold season, this structure prevents the water in the well from freezing.
Fourthly, it plays the role of a fence, which is very important if there are children in the house.
Well, and, of course, a well house can serve as an unusual decoration for the site.
Instructions for creating a house for a well
Let's consider the technology for creating different options for houses for a well. Regardless of which option you choose to build it, you will need to prepare the following tools and materials:
- plane, preferably electric;
- jigsaw;
- screwdriver
- nail puller;
- hacksaw;
- construction level;
- hammer;
- three-meter tape measure;
- handle;
- rounded laminated veneer lumber;
- edged boards;
- fastening parts (nails, screws, self-tapping screws, etc.);
- slate or any other roofing material;
- If you plan to install a door, you should prepare the necessary fittings: handles, door hinges and latches.

All parts must be given the proper dimensions, cleaned and treated with antiseptic agents. Such preparation will increase the service life of the wooden material.
Option #1. House - roof with two slopes
We build the frame
To create the frame you will need an edged board and timber. No need to take too massive or, conversely, too much thin materials. Since the former will give the structure an unattractive appearance, and the latter will make it too fragile. Therefore, for work it is better to take a beam with a cross-section of 8 x 10 cm, and an edged board 4 centimeters thick.
The first step is to prepare four racks, 8 cm wide. Next, you will need edged boards 12 cm wide and long enough for tying the racks. The boards are nailed to the posts one by one with nails, the length of which must be at least 10 cm. Such nails will allow you to securely connect the parts together. The result of the work done should be a stable and durable frame.
Advice ! To make the work easier, it should be carried out in the following sequence: first connect the first pair of racks using boards, and then the second. Place the resulting two structures around the well and combine them with the remaining boards.
We are building a roof
The first thing you need to do is create rafter system, on which the sheathing will subsequently be installed. The rafters are made from boards more than 3 cm thick and 180 cm long. The longer the boards are, the higher the structure will be.
For crossbars and crossbars, boards with a thickness of 2.5 cm are suitable. In total, six rafters, eight crossbars and three crossbars will be needed for the work.
The upper ends of the rafters are connected in pairs to each other, having previously cut them at the appropriate angle, and secured with self-tapping screws. In order to make the structure more durable, 30 cm below its top is mounted.
A recess is made at the place where the rafters are attached to the frame. Then the resulting structure is installed on the frame and secured with nails 12 cm long.
The fastening of the rafters is strengthened by installing jibs. You can also install a ridge to strengthen the junction of the rafters.
Roofing felt is placed on top of the sheathing, and slate is placed on top of it. The resulting corner joints are covered with wind boards.
Door installation
The house door is made quite simply. First, the boards are cut so that their width is 20 cm and length 85 cm. The cut boards are laid in a row, tightly next to each other, and secured with two wooden blocks with a cross-section of 2.5 x 3 cm. One block is attached closer to the top edge of the door, the second one is closer to the bottom. Fastening is done with self-tapping screws, four for each board. In order to fasten the boards more firmly and prevent them from moving relative to each other, another block is nailed diagonally.
The house for the well is almost completely ready, all that remains is to sheathe the gables, install a handle and latch on the door and hang it on the hinges. In order for the material to last longer and the finished structure to have a pleasant appearance, the outside is treated with an antiseptic and coated with waterproof paint and varnish.
You can also familiarize yourself with the technology for creating this version of a well house in the video below:
Option #2. House for a well in the form of a log house
This type of well house is often found in villages. It is made from logs and has a classic rustic style.

To build this version of the house you will need: rounded logs, edged boards, roofing, metal pipes or metal rods with a radius of 12 mm.
Let's look at the procedure for performing work on building a house for a well in the form of a log house.
First, logs with a diameter of 100 mm are piled into a log house. Curly protrusions are made on the protruding edges of the logs to decorate the well.
The next step is to create a gate to raise the water. The base of the gate is a rounded log with a diameter of 20 cm or more. The length of this log should be 6-10 cm less than the gap between the posts so that it does not get caught on them when turning the gate. To eliminate the possibility of deformation of the log, the sides are covered with metal wire. Next, holes with a diameter of 3 cm are made in both ends of the log, as well as in the racks. In the gate, these holes should have a depth of 5 cm, and pass through in the racks. In addition, the holes in the gate and on the posts should be located opposite each other. Then you need to prepare the pipes for attaching the gate to the posts. For this you can use water pipe or metal rods with a radius of 12 mm. One pipe is inserted through the right post into the right end of the gate. This pipe remains straight and can be of any length.
Attention ! In order for the gate to hold as securely as possible, the end of the pipe protruding from the outer edge of the post should be more than 5 cm.
The second pipe is inserted through the left post into the left end of the gate. This pipe is first bent in two places at an angle of 90 degrees as shown in the figure below.
This pipe will serve as a handle that turns the gate.
Advice ! Before bending, it is better to heat the pipe, then the bend will be not only even, but also smooth.
After the gate is installed, they proceed to installing the roof of the well house. The roof is covered roofing material. To make the house look attractive, it is better to take a brightly colored material.
The roof should be sized so that its edges extend beyond the perimeter of the log house; this will prevent rainwater and other precipitation from entering the well.
The final stage is processing the outside of all wooden surfaces structures with antiseptic agents and subsequent varnish coating.
Option #3. House for a well with a hexagonal frame at the base
This version of the well house differs from the previous design in that the log house has an unusual hexagonal shape.

In addition, to give it asymmetry, the slopes are made of different lengths and covered with edged boards.
This building is small in size, which is especially appreciated if there is no free territory on the site. An additional decorative element is a wheel mounted on the gate to raise the water. The height of the finished house is 2.2 m, and the base has a diameter of 1.2 m.

Decorating a house for a well
There are many options to turn an ordinary well house into a whole work of art.
The most popular way to decorate a house is traditional wood carving. Using this method, you can decorate the house with intricate patterns, images of animals, ornaments and other decorative elements. Well with carved wooden house will be a decoration for any site, especially if the main buildings are also made of wood.
If you don’t have enough time to carve, you can use a simpler and quick method- decoration using paint and varnish materials. So, the house can be painted in contrasting colors, or a whole picture with an interesting plot can be depicted on it.
Another decorative option is to use brick, mosaic tiles or others facing materials for designing a well.
Some people line the well all the way to the roof with natural stone.
You can also use thematic design of the well, for example, make it in the form of a fairy-tale tower or a character. Children will especially like this decor option.

A well house can become one of the main decorations of your site. It all depends only on the possibilities of your imagination and desire to bring your plans to life!