All photos from the article
Sometimes, when carrying out construction and other work using wood, it is required to make elements longer or wider, and very few people know how to do this correctly. That is why we will consider how to splice the board yourself and what methods and techniques exist. It is important to choose the option that is best suited in a given situation and will require minimal cost time and money.

Basic workflow requirements
Before we begin to consider specific options for carrying out work, it is necessary to understand what factors are observed to ensure that the result that is expected is obtained:
| Material quality | Everything is simple here: it is impossible to make durable structures out of low-quality wood, especially when it comes to joints, if they have knots, damage by woodworms, mold and other problems, then there can be no question of any reliability and durability. Pick the most best elements so as not to waste energy and money in vain |
| Humidity | Another most important parameter that should always be taken into account. Only dry elements are suitable for work, since high humidity, firstly, it reduces strength, secondly, it reduces the adhesion of the adhesive composition when it is used, and thirdly, after completion of work, no one will guarantee that in a week or a month the structure will not lead or it will not crack |
| Connection loads | It is on this indicator that the choice of one or another connection option largely depends, the greater the load, the higher the requirements for the quality of the pairing and the more difficult the process. Therefore, decide in advance which option will be used in order to guarantee a high result. |
| Using a quality tool | A lot also depends on this, especially when it comes to complex options when the connection is cut with special tools. They must provide maximum cutting quality and maximum docking accuracy, since reliability largely depends on this. |
Important!
Remember one simple rule that experts always use: to obtain the best result, it is necessary that the parameters of the elements to be joined be similar, in other words, one type of wood should be used.
![]()
Work options
All events of this kind can be divided into two large groups - rallying boards in width and length, we will consider them separately and tell you which methods are the most popular and how to implement them correctly.
Width connection
Of course, the simplest solution would be shield variant splicing, so we will start with it, first we will present a diagram of the main options, and below we will describe them in detail:

- The first method involves cutting out a cavity with a milling machine, which has trapezoidal shape and allows you to use the key as a retainer. The advantage of this solution can be called reliability, and the disadvantage is the need for milling machine or presence manual router for work, hand tool you won't get around here;
- Rallying using an end bar, which is connected to the ends of the board using the tongue-and-groove method, is used for elements of small length, since this option provides high reliability of precisely small structures. Again, you will need to work. With his help, it will be carried out quickly and efficiently;
- You can make a cutout on the end, fit the rail under it and put it on wood glue, it's also pretty interesting option which is suitable for small size structures;
- The last two options involve gluing a triangular rail, only one of them cuts into the end, and the second option involves cutting the end at an angle, you need to choose what better fit in one situation or another.
But if you want to connect the board more securely, then one of the following methods will do:
- The first option is called the connection to a smooth fugue, when it is performed, very careful grinding of the ends is required for a snug fit, after which they are lubricated with glue and connected under pressure or using special ties. This solution is suitable in cases where high load bearing capacity need not;
- The traditional groove-ridge option is often used, here it is important to ensure the optimal connection configuration, so the width of the groove and, accordingly, the tongue should not be more than a third of the total thickness of the board, it is important to cut very accurately so that the elements match perfectly, this will significantly increase the strength of the connection;
Important!
When working, a milling cutter is most often used, but the cutters can have a different configuration, you should monitor the condition of their cutting edges and sharpen or replace them in a timely manner, since the quality of the connection largely depends on the purity of the processing.
- You can use the option of cutting at an angle, it is well suited where special strength is not required, but you need to connect elements that can be used for finishing, etc .;
- The triangular thorn-groove in many respects resembles the usual one, only the configuration of the ends differs. It is also important here that the elements fit perfectly with each other, as this will ensure both the accuracy of the pairing and its maximum reliability;
- A quarter connection is simple - cuts are made for half the thickness, the length of the protrusions should not greatly exceed the thickness, the elements are lubricated with glue and compressed until the composition dries, this is a standard procedure for almost all options;
- The last type is key rallying, it does not differ from the above option when working in width, the requirements are the same.
Conclusion
Connecting the board correctly and securely means ensuring its maximum strength, it is important to follow all the recommendations and use only quality materials. The video in this article will show some of the options for carrying out the work clearly, and if you have questions or an addition, unsubscribe in the comments.
Making tight joints from wood
Professional layout with precision tools
Tight joints of wood products start with neat and precise markings. This is especially important if you are making connections by hand and marking lines serve as guides for tools. Machining accuracy depends on careful adjustment of stops, stops, reach and tilt saw blades and cutters. The steps below will help you achieve great results. This does not require unique equipment, but should choose tools that guarantee accuracy and efficiency. Also, develop the habit of following rules when measuring and marking.
- Use precise tools. For example, try, if possible, to use an accurate steel ruler instead of a tape measure with a flexible tape in most cases. Good tools cost more, but they will last you a lifetime.
- Consistency is the key to success. Use the same measurement tools throughout your project to avoid small inaccuracies that affect the quality of the connections. For example, the 300 mm marks on the two rulers may not match.
- The main thing is the result, not the measurements. In most cases, measurements should be avoided when you can use an already finished part with connection elements to mark an adjacent part. For example, having made spikes on the front wall of the box, use them to mark the “dovetails” on the blanks of the side walls.
- Use the right markup techniques and the right tools. With good marking and measuring tools, it is easier to achieve the required accuracy.
|
It is not always possible to accurately align the end of the ruler with the end of the workpiece, so in such a situation it is better, as they say, to sacrifice zero. Align the next ordinal division with the end and mark the size in accordance with it. |
To draw a thin line parallel to the edge of the workpiece, use a thickness gauge. Shows the outline of the nest on the post after determining the position of the end of the crossbar |


The sharp knife leaves the thinnest line, providing high accuracy of a marking. In some cases, the recessed line also becomes the starting position for the chisel.
Fine-tuning of machines for precise machining of parts
Machine tools and power tools will only produce great results if they are properly set up and adjusted. This page shows the main features of setting up three machines that are essential for most workshops: a saw and a planer, as well as milling table. Having prepared them for work, remember the following rules.
- First of all, make blanks of the same thickness. Start any project by cutting all pieces to the same thickness. Any differences in thickness make it difficult to obtain accurate joints and necessitate additional adjustments in grinding and sanding.
- Reasonable approach. Long boards are inconvenient to process, so it is better to immediately cut them into blanks with a small allowance, which are easier to handle, achieving the necessary accuracy.
- Double check the dimensions. The actual thickness of slabs and sheet materials, as a rule, differs from the nominal, therefore, a caliper should be used to measure them. Only after that, cut the grooves, tongues and folds of the appropriate width.
Before cutting anything, check that the blade is parallel to the slots in the table, set the cross (corner) stop to 90°, and then set the rip fence parallel to the blade. At longitudinal sawing use a clamping comb to hold the work piece firmly against the rip fence.

Align the rear table with the highest point of the cutting edge path of the knives as shown in the figure on the right. Then, using a checked square, make sure that the rip fence is set exactly at right angles to the back table. To achieve excellent result, always press the workpiece against the fence when planing. Slowly feed the board onto the rotating cutterhead. When the front end of the board passes over the knives, move the downforce forward so that the board is pressed against the back table. For best results, adjust the rear table and rip fence.

Plan to do most of your milling work in multiple passes by setting the fence to the final height or width for the last pass. Fix the position of the router after each change in the overhang of the cutter. When selecting grooves, tongues, folds and other elements of connections, use clamps similar to the clamping comb shown here. It is easy to do it yourself, it does not require a lot of material.

The final fit guarantees success
No matter how many connections you want to make on the machine, after each change in settings, always make test passes and connection samples using offcuts. Adjustment should be continued until a tight assembly of the test joint is achieved, and only then proceed to processing the details of the project. But despite all your efforts, sometimes you can find imperfections in the connections. Chips on the saw table or subtle warping of a previously planed workpiece can ruin the job and make assembly impossible. If the piece is too thick or too wide, resist the temptation to adjust the size with the help of lathes. Precise fitting is best left to hand tools.
- Little zenzubel. With its help, it is possible to quickly remove a layer with a thickness of 0.5 mm or more from a wide spike or comb. The low angle zener is especially effective when working across the fibers. The cutting edge protruding from the side allows processing inner corner close to the shoulder of the spike.
- Rasp or file. A flat rasp with a coarse cut quickly removes material, but leaves a rougher surface than a planer. A flat file is slower, but it works well for smoothing the surface.
- Sandpaper. If you need to remove very little material from a spike or other wide surface, glue a piece of 100 grit sandpaper to a suitable piece of board or cork block. Use self-adhesive sandpaper, or use regular sandpaper with spray adhesive or double-sided tape. This method allows you to process only one plane without affecting the adjacent ones, as happens if you just wrap the bar with sandpaper.
- Chisel. Blades of various widths will allow you to remove material from any hard-to-reach places. When scraping a flat surface, hold the chisel with the bevel up, pressing its flat front edge against the wood.

When using a rasp, chisel, or any other tool to remove material, take your time and regularly check the result by joining the parts.
Plan your build sequence carefully
You have carefully cut out all the details, achieved tightness in all joints and are now ready to start assembling. But before you open the bottle of glue, be sure to do a trial dry assembly (without glue). When assembling the product, determine in what order it is better to connect the parts, how many clamps are required to tightly compress all the joints, and how best to place the clamps so that there are no distortions.
Assembling large and complex projects is best broken down into several simple steps, rather than fussing around trying to glue all the pieces together in one go. For example, when making a cabinet with paneled sides, first assemble the frames with panels, and then proceed with the main assembly. This approach gives you more time to check all connections and requires fewer clamps. Another way to buy time is to use glue with an extended setting time. For example, the regular yellow Titebond adhesive makes the entire assembly in 15 minutes, while the Titebond Extend variety allows you to align the bonding within 25 minutes.
When installing clamps, make sure that their pressure is on the middle of the joint. An incorrectly installed clamp can deform the parts so that a gap forms between them. Sometimes, despite your best efforts, the connections don't come out neat. An accidentally slipped tool, inattention or unnoticed filings near the stop lead to the fact that the connection is loose or a noticeable gap appears in it.

Assemble the locker in stages, first gluing the small side paneled frames. Then you can pay more attention to each connection. Then proceed to assemble the body
How can a seemingly ruined job be salvaged?
The gap can be covered with a mixture of fast-setting epoxy adhesive with sanding dust from the same wood (the mixture should have the consistency of a thick paste). It is better to use epoxy glue instead of PVA, since the putty is inevitably smeared on the surfaces adjacent to the joint and the epoxy glue hardens without being absorbed into the wood. Excess of such a composition is easy to remove by grinding, so that there are no problems when applying the finish. Use this filling method when it comes first appearance connection, not its strength.

If, during trial assembly, the spike dangles in the socket, such a connection will not be strong. Filling the gaps with glue won't do any good, so don't be lazy to reinforce a piece that's too thin with wood. Cut out two overlays to make the spike a little thicker than required, and glue them on both sides. After drying, re-adjust the spike to the dimensions of the nest.
Turn a disadvantage into a virtue
Sometimes it is better not to hide the traces of repair, but to make them visible. In a too narrow ash thorn, two cuts were made and thin cherry wedges were inserted into them, which tightly pressed the narrow cheeks of the thorn to the edges of the socket. In other cases, such as countersunk joints, small chamfers or roundings along the ribs of the shoulders will make the loose seam less noticeable.

Replace Part
This can happen to any of us. Some mistakes do not make sense to fix for two reasons: (1) if no matter your skill and effort, the unsightly defect remains noticeable or (2) if it is faster and easier to do new part instead of the damaged one.
All photos from the article
In this article, we will review what options are available for joining wood products. And there are a great many such methods, from a simple butt joint to the most complex joint " dovetail". It is important to remember that not all of them can be done on your own, but the information below will definitely not be superfluous.

Reliable hitch - a guarantee of strength and reliability for any design
Listing the available options
All of them are distinguished by their strength and complexity, for example, the cabinet body is assembled with a seam or butt joint, less often they use a “groove” or “moustache” combination. But for the manufacture of a door frame or panel, the skill of a spike connection is useful.
Connection methods are listed below wooden parts.
Joining parts "butt"
Butt alignment is called fixing the edges. For this, fasteners and glue are usually used. But the butt joint is not very reliable, so it should be strengthened, which is not so difficult to do.

Fastening "butt" is desirable to strengthen metal mount: corners and self-tapping screws
This method is commonly used when assembling the front frame of a cabinet, where strength is not important, since the frame parts are securely attached to the cabinet itself. Compound wooden structures"Butt" is usually reinforced with lamellas or dowels, which are able to combine individual parts during gluing.
Fastening parts "in the mustache"
This combination has some differences from the previous one. When gluing the surface, the parts are beveled at an angle of 45 ° with respect to the axis. The connection of wooden parts "with a mustache" must also be strengthened with the help of additional fasteners.
Note! Typically, this method of combining is used when it is necessary to connect two pieces of molding in the corner.
Strengthening the connection of wood parts
As mentioned above, you can strengthen with the help of ordinary wooden dowels. Nagel fortifications are usually made with the help of two dowels, glued into one and the other end of the crossbar, into vertical posts, into their corresponding sockets. Exists specific instruction making the following connections:
We mark nests for dowels:
- For a clear markup, it is necessary to attach the parts to be fastened to each other.
- Draw a line with a pencil, marking the places for the dowels.

- Continue the line to the edge of each of the blanks, using a square.
- Drilling sockets for dowels:
- In order for the nest to be located exactly in the middle of the wooden part, it is necessary to use a drilling jig.
- In order for the nest to be of the required depth, it is necessary to use a sleeve for the stopper.
Advice! If you do not have a stop collar, you can replace it by putting a small piece of tape on the drill bit.
- Gathering details:
- It is necessary to apply glue to the dowel and insert it into the corresponding socket of the first part.
- We connect the parts together.
- We clamp.
- Leave for a while to let the glue dry.
Strengthening the connection with lamellas
If we compare the types of connections of wooden structures, of course, the lamellar combination wins. Let the price of such connections be a little higher, but it is very easy and convenient to work with them.
Lamels are compressed wood in the form of flattened balls. Nests for such balls are cut out using a special lamellar machine. In this case, the hole is obtained in an ideal shape. And due to the fact that the lamellae are slightly shorter than the socket, the alignment of parts during gluing is more accurate. It is very uncomfortable.
Detail is the smallest unit in the woodworking industry made from wood. Parts are made according to the dimensions indicated in the drawings in order to obtain products after assembly. Connections of parts are made with great precision.
Connections by their constructive nature are called landings. Joints in the construction of wooden parts are defined by five types of fits: tense, tight, sliding, loose and very loose fit.
Knots- these are parts of structures at the junction of parts. Connections of wooden structures are divided into types; end, side, corner T-shaped, cross-shaped, corner L-shaped and box corner connections.
Joiner connections have more than 200 options. Only connections used in practice by joiners and carpenters are considered here.
End connection (building) is such a connection of parts along the length, when one element is a continuation of another. Such joints are smooth, jagged with spikes. Additionally, they are fixed with glue, screws, overlays. Horizontal end connections withstand compressive, tensile and bending loads (Fig. 1, 2, ... 5.).
End connections of beams resisting compression
a - with a straight overlay half a tree; b - with an oblique overlay (on the "mustache"); c - with a straight half-wood overlay with a joint in an obtuse angle; g - with an oblique overlay with a joint into a spike
rice. one
End connections of the bars (extension), resisting stretching

a - in a direct overhead lock; b - in an oblique laid on lock; c - with a straight half-wood overlay with a joint in an oblique spike (in a dovetail)
rice. 2
Beam End Connections Resistant to Bending

a - with a straight half-wood overlay with an oblique joint: b - with a straight half-wood overlay with a stepped joint; in - in an oblique laid on lock with wedges and with a joint in a thorn
rice. 3
Groove splicing reinforced with wedges and bolts

Compression bar end connections

a - end-to-end with a secret hollowed-out spike; b - end-to-end with a hidden plug-in spike; c - With a straight overlay half a tree (the connection can be reinforced with bolts); g - with a direct overlay half a tree with wire fastening; e - with a straight overlay half a tree with fastening with metal clips (clamps); e - with an oblique overlay (on the "mustache") with fastening with metal clips; g - with an oblique overlay and fastening with bolts; h - marking the oblique lining; and - end-to-end with a secret tetrahedral spike
rice. 5
Lumber is increased in length, forming vertical and horizontal jagged joints (wedge lock) at the ends (Fig. 6). Such joints do not need to be under pressure during the entire bonding process, since significant frictional forces act here. Gear joints of sawn timber, made by milling, meet the first class of accuracy.
End extensions of the milling scheme for end gluing of workpieces

a - vertical (along the width of the part), gear (wedge-shaped) connection; b - horizontal (through the thickness of the part), gear (wedge-shaped) connection; c - gear joint milling; g - sawing out a gear connection; e - milling of a gear connection; e - end connection and gluing
rice. 6
Joints of wooden structures must be made carefully, in accordance with the three accuracy classes. The first class is for measuring tool High Quality, the second class - for furniture production, and the third - for building parts, agricultural implements and containers.
The lateral connection of several boards or battens with an edge is called rallying (Fig. 7). Such connections are used in the construction of floors, gates, carpentry doors, etc. Plank, rack panels are additionally reinforced with crossbars and tips. When sheathing ceilings, walls, the upper boards overlap the lower ones by 1/5 ... 1/4 of the width. The outer walls are sheathed with horizontally laid overlapping boards (Fig. 7, g). The upper board overlaps the lower one by 1/5...1/4 of the width, which ensures the removal of atmospheric precipitation.
Rallying boards

a - on a smooth fugue; b - on the plug-in rail; in - in a quarter; g, e. e - in the groove and crest (with various forms groove and ridge); g - overlap; h - with a tip in the groove; and - with a tip in a quarter; to - with overlap
rice. 7
The connection of the end of the part with the middle part of the other forms a T-shaped connection of the parts. Such compounds have a large number of variants, two of which are shown in Fig. 8. These connections (knitting) are used when pairing the lag of ceilings and partitions with the harness of the house. The connection of parts at a right or oblique angle is called a cruciform connection. Such a connection has one or two grooves (Fig. 9). Cross-shaped connections are used in the construction of roofs and trusses.
T-bar connections

a - with a hidden oblique spike (in the paw or in the dovetail); 6 - with a straight stepped overlay
rice. eight
Cross connections of bars

a - with a straight overlay half a tree; 6 - with a direct overlay of incomplete overlap; I - with landing in one nest
rice. 9
The connections of two parts with ends at a right angle are called angular. They have through and non-through spikes, open and in the dark, half-dark, overlay, half-tree, etc. (Fig. 10).
Corner end connections of blanks at right angles

a - with a single open through spike; b - with a single through hidden spike (in the dark); in - with a single deaf (non-through) thorn in the dark; g - with a single through semi-secret spike (in semi-darkness); d - with a single deaf spike in semi-darkness; e - with a triple open through spike; g - in a straight overlay half a tree; h - in a through dovetail; and - in eyelets with trimming
rice. ten
Corner joints (knitting) are used in window and door blocks, in the joints of greenhouse frames, etc.
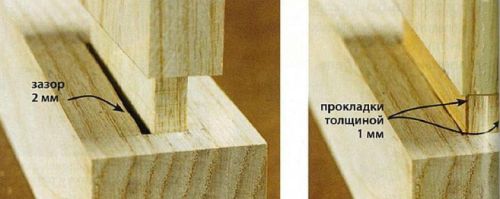
The stud joint in the dark has a stud length of at least half the width of the connected part, and the depth of the groove is 2 ... 3 mm more than the stud length. This is necessary so that the parts to be joined are easily mated with each other and there is room for excess glue in the stud socket after gluing. For door frames, an angular tenon connection is used in the dark, and to increase the size of the connected surface, in a semi-darkness. A double or triple tenon increases the strength of the gusset. However, the strength of the connection is determined by the quality of its execution.
AT furniture production a variety of corner box connections are widely used (Fig. 11). Of these, the simplest is an open end-to-end spike connection. Before making such a connection, spikes are marked with an awl at one end of the board according to the drawing. By marking the side parts of the spike with a file with fine teeth, a cut is made. Every second cut of the spike is hollowed out with a chisel. For the accuracy of the connection, they first saw through and gouge out the sockets for the spikes in one piece. It is applied to the end of another part and crushed. Then they saw through, gouge and connect the parts, cleaning the connection with a planer, as shown in fig. eleven.
Box corner joints with straight through dowels

a - sawing tenon grooves: b - marking the spikes with an awl; in - connection of a thorn with a groove; g - processing by a planer of a corner joint
rice. eleven
When connecting the parts to the "mustache" (at an angle of 45 °), the angular knitting is fixed with steel inserts, as shown in fig. 12. At the same time, make sure that one half of the insert or clamp is included in one part, and the other half is in the other. A wedge-shaped steel plate or ring is placed in the milled grooves of the parts to be joined.
Corner end connections at right angles, reinforced with metal inserts - buttons

a - S-shaped insert; b - wedge-shaped plate; in - rings
rice. 12
The corners of frames and drawers are connected with a direct open through spike connection (Fig. 13, a, b, c). With increased quality requirements (the spikes are not visible from the outside), angular knitting is performed by an oblique connection in the dark, a groove and a ridge, or an oblique connection to the rail, as shown in fig. 13, d, e, f, g and in Fig. 14.
Box corner joints at right angles

a - straight open through spikes; b - oblique open through spikes; in - open through dovetail spikes; g - into the groove on the plug-in rail end-to-end; d - in the groove and crest; e - on plug-in spikes; g - on spikes in a dovetail in semi-darkness
rice. 13
Oblique (on the "mustache") box connections at right angles

a - oblique spikes in the dark; b - oblique connection on a plug-in rail; c- oblique connection on spikes in the dark; g - oblique connection, reinforced with a trihedral rail on glue
rice. fourteen
A box structure with horizontal or vertical transverse elements (shelves, partitions) is connected using corner T-shaped joints shown in fig. fifteen.
Straight and oblique workpiece connections

a- on double connection in oblique groove and comb; b - on a straight groove and comb; in - on a trihedral groove and a crest; Mr. straight groove and flush comb; d - on straight through spikes; e - on round plug-in spikes in the dark; g - on a spike in a dovetail; h - on the groove and ridge, reinforced with nails
rice. fifteen
In connecting the elements of the upper belt of wooden trusses with the lower one, corner cuts are used. When pairing the truss elements at an angle of 45 ° or less, one notch is made in the lower element (puff) (Fig. 16, a), at an angle of more than 45 ° - two notches (Fig. 16, 6). In both cases, the end cut (cut) is perpendicular to the direction of the acting forces.
Nodes in truss elements

Additionally, the nodes are fixed with a bolt with a washer and a nut, less often with brackets.
The log walls of the house (log house) from horizontally laid logs in the corners are connected with a cut "in the paw". It can be simple or with an additional spike (shank with a pit). The marking of the cut is performed as follows: the end of the log is hewn into a square, to the length of the side of the square (along the log), so that after processing a cube is obtained. The sides of the cube are divided into 8 equal parts. Then, 1/8 part is removed from one side from below and from above, and the remaining sides are performed, as shown in Fig. 17. Templates are used to speed up the marking and the accuracy of making cuts.
Conjugation of logs of log walls

a - a simple paw; b - a paw with a wind spike; c - paw marking;: I - wind spike (pit)
rice. 17
Since ancient times, after mastering the tools of labor, a person began to build a dwelling made of wood. Having gone through evolution, a person continues to improve the construction of his home for thousands of years. Of course modern technologies simplified the construction wide opportunity for fantasy, but basic knowledge about the properties of wooden structures pass from generation to generation. Consider ways to connect wooden parts.
Consider the ways of connecting wooden parts that beginner craftsmen face. These are mainly carpentry joints passed down from generation to generation, these skills have been used for more than one century. Before joining wood, we assume that the wood has already been processed and is ready for use.
The first basic rule that should be followed when joining wooden parts is that a thin part is attached to a thicker one.
The most common ways of joining wood, which will be needed in the construction of homestead buildings, are of several types.
End connection
This is one of the most simple ways connections (rallying). With this method, it is necessary to fit the surfaces of the two elements to be joined as closely as possible. The parts are pressed tightly against each other and fastened with nails or screws.

The method is simple, but to obtain the quality of the product, several conditions must be met:
The length of the nails should be such that they, having passed through the entire thickness of the first workpiece, go in with their own sharp end into the base of another part to a depth equal to at least ⅓ of the length of the nail;
Nails should not be located on the same line, and their number should be at least two. That is, one of the nails is displaced from the center line upwards, and the second, on the contrary, downwards;
The thickness of the nails should be such that when they are hammered into the wood, a crack does not appear. Pre-drilling holes will help to avoid cracks in the wood, and the diameter of the drill should be equal to 0.7 of the diameter of the nails;
For getting best quality pre-lubricate the joints, the surfaces to be joined with glue, and it is better to use a moisture-resistant glue, such as epoxy.
Invoice connection
With this method, two parts are superimposed one on top of the other and fastened with nails, screws or bolts. Wooden blanks, with this method of connection, can be placed in one line or shifted at a certain angle relative to each other. In order for the angle of connection of the workpieces to be rigid, it is necessary to fasten the parts with at least four nails or screws in two rows of two pieces in a row.

If you fasten with only two nails, screws or bolts, then they should be placed diagonally. If the nails have a through exit through both parts, with the subsequent bending of the protruding ends, this connection method will significantly increase strength. Invoice connection is not required highly qualified masters.
Half tree connection

This method is more complex, it requires already certain skills and a more scrupulous approach to work. For such a connection, in both wooden blanks, wood is sampled to a depth equal to half their thickness, and a width equal to the width of the parts to be joined.
You can connect parts in half a tree at different angles.
It is important to observe the following rule:
So that the sampling angle on both parts is equal, and the width of both samples strictly corresponds to the width of the part. Under these conditions, the parts fit snugly against each other, and their edges will be placed in the same plane. The connection is fastened with nails, screws or bolts, and glue is still used to enhance strength. If necessary, such a connection may be partial. That is, the end of one of the workpieces is cut at a certain angle, and the corresponding sample is made in the other part. Such a connection is used for angular rallying. Both spikes (samples) in this case are cut at an angle of 45 degrees, and the joint between them is located diagonally.
Splicing to length
Such splicing of bars and beams along the length has its own characteristics.
For vertical supports, splicing is simple.
But it is a completely different matter when a beam or beam at the splicing point is subject to bending or torsion loads, in which case simple fastening nails or screws are not enough.

The parts to be joined are cut at an angle (into an oblique overlay) and compressed with bolts. The number of bolts depends on the applied loads, but there must be at least two.
Sometimes additional overlays are installed, for example, metal plates, better on both sides, top and bottom, for strength, you can additionally fasten with wire.
Cleat
Such a connection is used when laying the floor or for sheathing boards. To do this, a spike is made in the face of one board, and a groove in the other.
With this splicing, gaps between the boards are excluded, and the sheathing itself acquires beautiful view. Appropriately processed lumber enters the distribution network, where they can be purchased ready-made.

Examples of such materials are batten or lining.
Connector "socket-thorn"
This is one of the most common joints of wooden parts.
Such a connection will provide a strong, rigid and neat rallying.
It goes without saying that it requires certain skills and accuracy in work from the performer.

When making this connection, you need to remember that a poor-quality spiked connection will not add reliability and will not have a beautiful appearance.
A spike connection consists of a groove hollowed out or drilled in one of the wooden parts, as well as a spike made at the end of another attached element.
The parts must have the same thickness, but if the thickness is different, then the socket is made in the thicker part, and the spike is made in the second, thinner part. The connection is carried out on glue with additional fastening with nails, screws. When driving a screw, remember that pre-drilling will facilitate this process. It is better to hide the head of the screw, and the pilot hole should be ⅔ of the diameter of the screw and be 6 mm less than its length.
One of the very important conditions is the same humidity of the parts to be joined. If the elements to be joined have different moisture content, then when dried, the spike will decrease in size, which will lead to the destruction of the entire connection. That is why the parts to be joined must have the same humidity, close to the operating conditions. For outdoor structures, humidity should be in the range of 30-25%.
The use of wood to decorate buildings.
Choice of wood.
In carving, to perform large crafts with large elements, they often use coniferous wood as the main one. They are available, and the striped texture can be used in ornaments.
As a background for overhead and slotted threads, it is used fir.

The valuable material is cedar, its soft, with beautiful texture and a pleasant yellow-pink or light pink wood core. The wood is easy to cut, cracks little during shrinkage and is resistant to decay.

Wood pears used for highly artistic carving details, as it is durable and warps little from atmospheric influences.

Poplar, the wood is very soft and light - used to make carved decorative column or background shields for fastening the overhead thread.

It is good to use wood to make chains from round rings. apple trees. This wood is used in small crafts, in applied carvings. In this case, the springy properties of the apple tree are used.
Wood is also used lindens. Very light, well planed, well drilled and polished.

carving from oak difficult to manufacture due to its hardness.

But oak is not afraid of moisture, it does not warp. Products from natural wood very beautiful, but too expensive. Veneering is used to reduce the cost of the product. For example, veneered doors are made, by order of the client, "under the oak". We get beautiful doors, outwardly similar to natural ones, but at a much lower price.