Complete replacement of floors in a private house or apartment is quite rare. In this regard, repairs should initially be approached competently. This will help you complete it flawlessly, and the dream of smooth floors that are strong and durable can be easily realized by pouring the floor with expanded clay. This screed is considered the simplest, but very effective option for leveling floors for any modern covering.
To begin with, you should know that the distinctive qualities of expanded clay are lightness, porosity, and environmental friendliness. It is made of baked clay, very durable, and has excellent soundproofing qualities. Another plus is low thermal conductivity.
Expanded clay concrete is superior to other types of screed in many ways:
- noise absorption level;
- weight;
- thermal insulation properties;
- breathability;
- durability;
- ease of transportation;
- expanded clay is suitable for any flooring.
In order to make maximum use of all these qualities, it is important to carry out the entire process of pouring a floor with expanded clay correctly and step by step.
What will you need when working?

To begin with, the entire surface must be cleared down to the slab.
All baseboards are dismantled, debris is raked out, and all existing holes and cracks are cleaned as much as possible. If there are any necessary wires, then care should be taken to protect it from moisture. Sometimes polyethylene is enough, with which the wire is wrapped and then secured with tape. For greater reliability, a cut corrugation is also put on.
Waterproofing is an important step before pouring the floor
Before starting the main work, you should take care of waterproofing. It is especially important if the housing is not on the ground floor. In order to avoid leakage to neighbors living on lower floors, take a simple plaster mixture and seal all holes and holes with it. i.e., everything that can lead to liquid penetration downwards.
Now - about waterproofing the floor itself. There are several methods, however, the most common and cheapest is the use of hydrosol (liquid mastic).
The mastic is applied to the floor and wall with a brush. The part of the wall that is just above the border of the future floor screed is being processed. Hydrosol is applied in two layers with an interval of 3 hours. Don’t want to spend money on liquid mastic? In this case, you can spread plastic film on the floor.
In this case, several points are also taken into account:
- the film should be thick;
- spreads overlapping (40-50 cm), fastened with tape at the seams;
- The edges of the polyethylene are inserted 10 cm onto the walls above the future border of the screed.
If the waterproofing is completed, then it’s time to move on to further steps of pouring the floor with expanded clay, namely, placing beacons.
How are beacons placed?
The highest point is chosen as a reference point. The “main” beacon is placed on it, at least 6 mm high. Others should be compared to him. They are fixed with cement mortar or alabaster. If only they stood securely. In this case, everything should be done quickly enough.
Using a level of any kind, the expected edge of the screed is marked on the walls. Lines are drawn along the marks, usually using dyeing thread. Connecting the lines is important! The entire base-floor is divided by beacons into parts 1 m wide with a guideline on the line. It is easy to use them to later level the expanded clay layer.
When marking, you should take into account the height of the finishing coating in other rooms. This is necessary to avoid unnecessary thresholds. You should also take into account the presence of wires, podiums, etc. For a more reliable installation of beacons, expanded clay can be shed with a mixture. From two bags (50 kg) per 1 m2 you will get a layer of 4 cm.
Video - How beacons are placed
The easiest way to screed a floor with expanded clay
There are many known methods for arranging screeds. Let's consider the simplest, but time-consuming one. Even one person who is not very knowledgeable in construction can do it. After the surface is ready, it is covered with dry expanded clay.
What should be the thickness of the fill? At the top point - 5 - 6 cm. Laying expanded clay depending on this. Its consumption will be different in different areas; its overall uniformity is important. This is facilitated by drawn lines and installed beacons.
We must not forget about the level.
What are the proportions? There is no exact recipe. In order to select the appropriate solution, the usual mixture is made, but 3 times more water is added. Small area filled with this liquid. A mixture that does not remain on the surface and does not seep through the granules without a trace is considered normal. The solution is made “by eye”. The main thing is that no water seeps in when applying it. The resulting film should become a kind of insulation for the expanded clay. The fill dries in about 24 hours.
The final stage includes the final filling of the prepared solution.

Ready. Let it dry. You will be able to walk in a couple of days. It will take about a month for complete drying; periodically it is necessary to spray the surface with water.
Two-layer screed - method No. 2
In this way, the screed is formed in two layers. The procedure, despite its apparent complexity, is quite simple and takes little time.
How is the work done?

If you find that bubbles, holes and gaps appear, they must be filled with solution. Pull together until completely level. As in the first case, the surface will be ready in a month, plus or minus a few days. To retain moisture, you can cover it with a polyethylene film while drying.
Good to know
In what cases is a floor screed with expanded clay needed?
There are situations when pouring a floor with expanded clay is the only right solution.
- The height of the filled space is 10 cm and above.
- Weak wooden floors.
- Savings on cement and expensive mixtures are required.
- The presence of a heating system in the floor.
In the first case, this is due to the fact that if the screed is made only from cement or only from a mixture, it will be very heavy, which can negatively affect the floor slabs.
In the second, there is a clear need to lighten the entire structure. IN latest version Safety plays a big role.
A properly executed screed allows you to not think about floor repairs for a long time. The unevenness of the base is easily eliminated, and the topcoat receives strong, long-lasting support. Any heated floor is excellent on such a basis, the motto of which can rightfully be the words “cheap”, “high quality”, “fast”!
Video - Floor screed with expanded clay: technology
Screed is a floor layer that precedes the floor covering.
The type of screed depends on the purpose of the room, the condition of the base, and what material is chosen for covering the floor.
The screed levels the surface under the floor,, if necessary, insulates the floor, provides sound insulation, and provides the final layer of the floor with the design mark.
A properly selected screed makes the floor strong and durable.
The screed has a height of 3 to 20 centimeters, so it is used when it is necessary to level the base under the floor with a height difference of more than four centimeters.
This same feature makes it possible, if necessary, to make or improve it by installing such a screed under the floor on the interfloor ceiling.
Under no circumstances should such a screed be used over a heated floor, as is known, and its use will lead to thermal insulation and the screed simply will not allow heat to pass through.
If the base under the floor is much lower than the design level, a screed with expanded clay makes it possible to raise the layer to the desired height.
This type of screed is used in front of parquet and tiles. Used indoors and outdoors.
Peculiarities
 The popularity of using this type of screed is due to a number of positive properties of expanded clay - the main material of the layer:
- Small specific gravity expanded clay on average 0.95 g/cm3 makes light screed. In cases where a thick underlying layer is required, a screed with expanded clay is irreplaceable.
- The moisture content in the room is regulated because expanded clay, having natural origin, as part of the screed it breathes.
- It is not subject to corrosion: it does not burn, does not rot, and is not afraid of chemical attack.
- The porosity of expanded clay gives the screed low thermal conductivity and sound conductivity. Consequently, it will insulate the floor and protect against noise.
- Expanded clay has a super-strong shell and delegates strength and reliability to the screed.
For screeding, use expanded clay of fractions from 5 to 20 millimeters. It is recommended to use two different sizes grains for greater backfill density.
Device
- Preparing the base.
You will need: a hydraulic level, a construction level, a broom, a dustpan, a trowel.
The old floor, if any, is dismantled. The base is cleared of debris and concrete deposits. If there are holes or rusts, they are filled with cement-sand mortar. If there are communications on the floor, they are wrapped in plastic film and secured with tape.
It is necessary to waterproof the base. There are several options for doing this:
- Hydroisol is applied using a blowtorch.
- Using a brush, coat the base and part of the wall with waterproofing mastic in two layers to the height of the marks on the wall plus five centimeters. The second layer of mastic is three hours after the first.
You can waterproof it with polyethylene film with a thickness of 2 mm or more. It is laid on the base and placed on the walls 10 centimeters above the level of the planned screed. The joints of the film are taped with wide tape.
- We install beacons and perform screeding
Very important question: How do floor levels match in different rooms?
For example: the thickness of the layer of laid parquet is 30 millimeters, the thickness of the tiles is on average 9 millimeters, which means that the height of the screed in the room where the tiles are planned should be 21 millimeters higher than in the room where the parquet is planned.
This is done in order to avoid thresholds and make the floor at the same level in adjacent rooms.
 Before filling the expanded clay, determine the thickness of the layer: from the base and two centimeters below the top edge of the beacons; this difference will then be filled with cement screed.
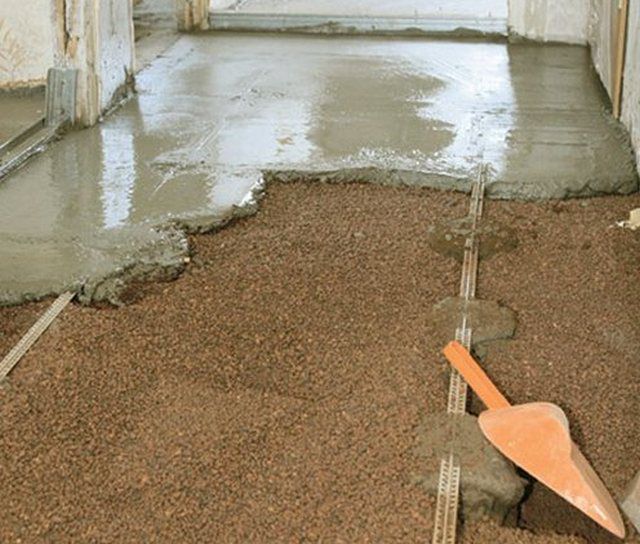
Expanded clay is poured between the beacons and leveled using the rule, focusing on the previously determined mark.
The surface of the expanded clay is lightly compacted with a masher or with feet, walking back and forth, and spilled with “cement milk” - equal parts of cement and cement-sand mixture are diluted with a large volume of water to the consistency of milk.
Thanks to this, the surface of the expanded clay layer will become hard and you can walk on it.
A day later, a screed is applied to the resulting base. Composition of cement- sand mortar:
- sand - 3 parts,
- Portland cement 400 – 1 part.
Cement-sand mortar is poured to the upper edge of the beacons and leveled using the rule. The solution dries for 14 days until completely hardened:
- A day later, when it has set, the beacons are removed, traces of them and other irregularities are filled with cement-sand mortar and rubbed with a trowel.
- After two weeks, you can lay the topcoat on the screed.
And the screed will be ready to bear full loads after 28 days.
Another way
 Expanded clay screed, as in the previous case, has two layers.
The main difference is that the first layer does not consist of dry expanded clay, subsequently spilled with a weak cement mortar, but a mixture of expanded clay with cement-sand mortar, that is, expanded clay concrete, is immediately used.
Proportions of expanded clay concrete components:
- 8 parts expanded clay,
- 3 parts sand,
- 1 part cement.
This method is convenient because expanded clay concrete can be made directly on the site of flooring, on any floor.
- Expanded clay is poured into a container, and enough water is poured to wet all the expanded clay. You will need a mixer for mixing.
- Sand and cement are added, or you can take a ready-made mixture.
- Mix again.
The mixture is mixed correctly if it turns out thick, homogeneous and without lumps. If the mixture is too dry, not enough water has been added.
Spread the mixture between the beacons to the calculated mark: leave two centimeters to the top of the beacon for the second layer.
The second layer, a regular screed, as in the first method, is applied immediately to the first without a technological break for drying. This is the advantage of the second method and its main feature.
Fill the strip between the beacons:
- the first layer is expanded clay concrete,
- followed by the second - screed, then filled in the same way next strip between lighthouses and so on.
It is important to very carefully level the second layer. The expanded clay screed will acquire the necessary strength, as with the first method, after 28 days.
Practice tips: some nuances and possible mistakes.
 The cement-sand screed (second layer) needs to be moistened with water after completion of work and until it dries completely to avoid cracks.
If you add liquid when preparing a cement-sand mortar, then moistening the surface of the screed during hardening will not be necessary.
A glass jar will help determine whether the screed has gained strength and whether it has dried enough:
Turn the jar over and place the neck on the surface of the screed; if the jar fogs up, it means that the screed is not ready for use and has not yet dried.
Neglect of strict adherence technological process manufacturing expanded clay screed, violating the regime of technological breaks to harden the layers - can lead to irreversible consequences.
A floor screed with expanded clay is a reliable foundation for any type of floor covering and will improve the environmental climate in the house.
– finishing stage, which is done to level the building base and improve the indoor microclimate. To perform this structural element, a cement-sand mortar is used, but to improve the characteristics of the material, other components are added to the composition. One of them is expanded clay. These are fired, foamed clay granules that have different dimensions and configurations. Expanded clay improves the sound, heat and waterproofing of a room. A finisher can make a screed with this filler even without experience.
Floor screed with expanded clay has its own characteristics in the device technology, advantages and disadvantages. Before choosing such a solution for flooring, it is recommended that you familiarize yourself with the technique of using the composition and the characteristics of the product.
Features and properties of the material
Material properties:
- versatility - the product is suitable for use in any room;
- moisture resistance;
- fire resistance;
- resistance to temperature changes;
- increased strength.
Pros and cons
Advantages of a product with expanded clay:
- resistance to mechanical stress even with a thin layer of screed, which allows you to make a screed with expanded clay in rooms where the floor experiences heavy loads, for example in warehouses;
- the ability to raise the floor to a greater height in the presence of strong differences in the building foundation;
- surface leveling;
- light weight, which helps to transport the product to any room;
- providing heat, hydro and sound insulation;
- use in rooms with high humidity and unheated buildings, since the material is moisture-resistant, frost-resistant and resistant to temperature changes;
- accessibility - the product is sold by construction stores;
- no deformation when the room is flooded;
- environmental friendliness;
- fire resistance even under the influence of open fire, the material does not emit toxic substances when heated;
- resistance to mold and mildew;
- protection from rodents;
- durability - the properties of the material do not change after a long period of operation;
- ease of use - you can use the composition without experience in arranging floors;
- acceptable cost.
Product Disadvantages:
- To improve the thermal insulation of a room, a screed with expanded clay, a layer of more than 10 cm, is required.
- When performing a dry screed, additional waterproofing of the surface is required, otherwise moisture will accumulate under the material on the building base. As a result, the humidity in the room will increase, which will lead to the formation of mold and mildew on wall decoration and interior items.
Features of the material
Not any expanded clay is suitable for floor screeding. The choice of product depends on the conditions of use of the product. It is recommended to focus on the humidity of the room, the degree of unevenness of the building base and the method of laying the composition.
It is not recommended to purchase material from an unverified manufacturer. Some do not adhere to GOST when manufacturing the product. In this case, the product may have an increased radiation background, which is dangerous to human health.
Expanded clay screed technology
When screeding, it is important to adhere to the rules for arranging floors. Only in this case the result of the work will be positive.
Preparatory work
- industrial mixer or other tool for mixing the solution;
- set of spatulas;
- a clean container for preparing the solution;
- rule;
- guides for the rule;
- needle roller;
- laser level;
- rollers and brushes;
- ruler and marker.
Preparing the subfloor
Before applying the material, the building base should be carefully prepared:
- Remove the old coating and free the base from the screed. This is done using a crowbar or a hammer drill.
- Next, the base is freed from dust and other contaminants. To do this, use an industrial mixer or a simple broom.
- Seal defects. Crevices and potholes are treated with a primer. Then the defects are sealed with cement-sand mortar or sealant. Work continues after the material has hardened.
- The surface is freed from grease and oil stains. To do this, it is recommended to use White Spirit or solvent.
- A primer is applied to the construction base. It is recommended to do double treatment with a drying break.
- Determine the height of the top layer of the screed. A laser level is used for this. Typically the height of the screed is 15 cm from the surface.
Waterproofing
To protect the building foundation from moisture accumulation, waterproof the surface. There are several ways to create a protective layer:
- For private houses, it is recommended to use roofing felt as a waterproofing material. The floor is treated with mastic to increase the adhesion of the surface and roofing material. The product is then laid around the perimeter of the building base. The material is laid overlapping with an overlap on the wall. Roofing felt seams are also treated with mastic.
- For apartments, it is recommended to use film as a waterproofing layer. Construction tape is used to secure the material. The material is laid around the perimeter of the building base, overlapping and overlapping the walls.
- Coating waterproofing is suitable for any type of premises. This material is a dry mixture for preparing a solution. The product is applied around the perimeter of the building base and a few centimeters are placed on the walls. Preparation rules, layer thickness and hardening time are indicated on the packaging. Only after drying the screed is poured.
Thermal insulation
To insulate a floor with expanded clay, several methods are used:
- Filling of expanded clay onto the waterproofing layer under the screed. Layer thickness - 15-20 cm. After laying the material, reinforce the surface metal mesh. Cement-sand mortar is poured onto the grate and the material is leveled. Any type of expanded clay is suitable for such an insulation layer.
- Backfilling of expanded clay under gypsum fiber sheets. The material in this case is used in the form of sand. The product is placed on a waterproofing layer. Gypsum fiber sheets are fixed on top.
- Filling of expanded clay between the floor joists. A waterproofing shelf is fixed on top of the product and a covering in the form of plywood, boards and other similar material is placed.
There are other methods of insulating a building foundation with expanded clay, but the listed options are the most popular.
Soundproofing
Expanded clay also provides sound insulation for the room. In this case, the material is laid in the same way as in the case of thermal insulation. The product is fixed to the waterproofing layer in different ways. To soundproof a room, it is recommended to choose high-density material. Only such a product absorbs noise.
Installation of beacons
Beacons are fixed as follows:
- To fix the profiles, determine the fill line. To do this, measure a height of 1.4-1.6 m on the wall and put a mark. This is the beginning of the horizon line or zero line.
- From the zero line measure the distance to the floor in different parts premises. All results must be recorded.
- Choose the most small value. This will be the high area.
- The screed lines are determined directly. The small value is reduced by another 7 cm. This standard size screeds with expanded clay. Using this value, lines are drawn along which the guides are set.
- First, profiles are installed on both sides of the building base. To do this, make an indentation of 10-15 cm from the wall. Outline two parallel lines and then mark the perimeter of the floor. The distance between the lines must be less than the length of the rule.
- Beacons are fixed. Since the waterproofing layer was installed, it is recommended to attach the guides to cement mortar. To do this, tubercles are formed from the material along the marking line at equal distances from each other. Beacons are fixed to such areas by pressing the products into the solution.
- From above they carry out the rule. This allows the guides to be aligned.
Damper tape
Damper tape- a material that is fixed around the perimeter of the wall onto a waterproofing layer. This product prevents moisture from penetrating the building base. The tape increases the waterproofing of any material. The material is fixed 1 cm above the thickness of the screed. If the width of the tape is not enough for the size of the layer, then make two rows or more.
Types of backfill
Highlight the following types backfill:
- expanded clay gravel - the size of the fractions is 20-40 mm;
- crushed expanded clay - obtained by crushing large granules, the size of such a product is 10-20 mm;
- Expanded clay sand – fraction size up to 10 mm, this product is obtained from material residues after processing granules into gravel and crushed stone.
Expanded clay gravel and crushed stone are usually used for screeding.
Filling methods
There are several ways to fill the floor with expanded clay screed.
Semi-dry screed with expanded clay
This element of the floor structure helps to level the building foundation even in the presence of strong differences. Semi-dry screed with expanded clay also serves as surface insulation. For this purpose, granules with a size of more than 20 mm are used. The thickness of the material layer is 10 cm and above. The screed is made as follows:
- The surface is covered with waterproofing material.
- Fix the guides.
- Expanded clay is poured onto the surface, the material is leveled using a rule, while compacting the product.
- The granules are filled with so-called cement laitance so that the product is securely fixed and does not penetrate into the top layer of the solution.
- A cement-sand composition or other similar product is poured on top of the expanded clay.
- The solution is leveled and work is suspended until the product hardens.
To make it easier to pour the screed, you can install a reinforcing metal grid on top of the expanded clay. This will increase the strength of the material.
Expanded clay concrete
This is a wet method of screeding a floor. This method helps to get rid of defects in the building base and distortions, as well as save mortar.
- To prepare such a product, expanded clay granules are mixed with a solution of concrete and sand. It is recommended to pre-moisten the expanded clay with water.
- It is recommended to use an industrial mixer to mix the product. This will help to obtain a solution of uniform consistency.
- Before pouring the screed, it is recommended to install profiles and a metal reinforcing grid.
- The solution is distributed over the surface and the composition is leveled.
- The profiles are dismantled, the resulting voids are filled with materials. The surface is re-leveled using the rule.
- The material is poured on top of the screed with cement mortar or a self-leveling floor product. This composition is placed on expanded clay concrete without waiting for the product to dry.
- The composition is leveled, wait until the product hardens and lay the coating.
Dry floor screed with expanded clay
For this method, screeds use expanded clay, the granules of which are small or medium in size. Professionals recommend using mixed material of different sizes. Technique for performing dry screed with expanded clay:
- A waterproofing layer is fixed to the building base.
- Install guides.
- Expanded clay is laid.
- Fix drywall, which is moisture resistant. After this, the finishing coating is immediately laid.
When screeding floors, you can not only perfectly level the surface, but also improve the heat and sound insulation properties of the coating. One of the options for this integrated approach may be leveling the floor using expanded clay. Due to low cost, simple application technology and high operational characteristics, this material is in demand by developers and owners of new apartments.
Expanded clay, used as insulation and sound insulation, is oval granules ranging in size from 1 to 20 mm. Expanded clay stones larger size, before being used for insulation, must be crushed in special mill drums. Like any building material, expanded clay has a number of advantages and certain disadvantages. TO positive qualities of expanded clay should include:
- high mechanical strength of granules, allowing this bulk material to be used as the main filler for concrete mixtures;
- low thermal conductivity and ability to absorb sound vibrations;
- chemical inertness and resistance to acidic and alkaline environments;
- low specific gravity;
- frost resistance;
- non-flammability;
- affordable price;
- the ability to perform dry or expanded clay concrete floor screed with your own hands.
In this building material rodents and insects do not settle in, mold and mildew do not grow.
At the same time, one cannot help but mention such significant disadvantages as the ability to absorb moisture and float to the surface of the concrete mixture with an increased water content in its composition. The latter factor leads to the formation of a corrugated surface. As a result, it has to be leveled with an additional layer of cement mortar or mechanical grinding of the surface.
Installing a floor screed with expanded clay is not always advisable. Moreover, there are options when the use of this material is impossible due to technical specifications production of work. However, its use will be effective if:
- creating a support cushion on the ground in the absence of a cellar and basements;
- the need to compensate for large differences in heights on the floor surface and reduce material costs for the purchase of materials;
- weak overlap or wooden planks as a basis;
- hidden gasket utility networks or heated floors in a screed layer.
The use of expanded clay, first of all, makes it possible to provide a screed option with the lowest possible costs for insulation, sound insulation and the creation of a thick layer.
Types of screeds using expanded clay and their features
When leveling and insulating floors, three technologies for floor screed with expanded clay are used:
- wet pouring with expanded clay concrete;
- dry screed;
- combined (semi-dry) option with a backfill layer.
Each method has pros and cons of screeding floors with expanded clay. The choice depends on the specific conditions and condition of the surface to be coated.
Wet screed
Monolithic filling of floors with expanded clay concrete is used only in the most extreme cases, when creating a bulk layer of insulation or using a dry screed will be impossible for some important reason. The preparation of the concrete mixture is carried out in the following sequence:
- Initially, expanded clay granules must be poured into a tray and filled with water for soaking;
- to mix the working mixture, load cement, sand and expanded clay into a concrete mixer in a ratio of 1:3:4;
- install beacons from metal profile at a distance of 1.2-1.5 meters from each other;
- When pouring concrete, level the layer using a plaster rule or a flat metal lath;
- During the setting period of the concrete mixture, the surface must be periodically moistened with water to avoid the formation of cracks.
If floating granules are visible on top of the floor, then after the concrete has hardened, they must be sanded down or the floors must be additionally filled with a thin layer of self-leveling mixture.
Dry screed
This is the simplest and most effective screed technology using expanded clay. Insulation granules are simply poured onto the floor and leveled. After this, sheets of fiberboard, plywood or gypsum fiber board are laid on the backfill and poured mortar from a mixture of sand and cement with the addition of a plasticizer or liquid soap.
The thickness of the poured dry expanded clay layer is equal to the difference in which 25 mm of the cement mortar layer and the thickness of the screed should be subtracted from the total thickness of the screed. sheet material. This method is quite accessible even to a novice builder.
Combined method
This technology is similar to dry screeding, but without the use of sheet materials for the intermediate coating. The dry method can significantly reduce financial costs, but requires certain construction skills and experience in performing the work.
Its essence lies in the fact that the surface of the bulk expanded clay layer is leveled, but not covered with sheets, but spilled with cement “milk” - a liquid mixture of cement and sand in a 1:2 ratio.

After the filling has set, the expanded clay forms a hard layer of 2-4 cm, which allows for final leveling with conventional mortar along the beacons. Instead of cement mixture It is allowed to fill with sand concrete if its thickness is 30-50 mm.

Requirements for expanded clay for screed installation
Concrete mixture, dry fill or material for combined technology can be of any faction. However, it should be understood that small granules or crushed expanded clay will provide a denser backfill and better thermal insulation. Therefore, deciding which expanded clay to use for floor screed depends on the problems that you want to solve by leveling and insulating floors.
Based on the size of the fractions, expanded clay is divided into:
- expanded clay sand with particles up to 5 mm;
- sand-crushed stone mixture up to 10 mm;
- crushed stone with granules 5-10 mm;
- gravel of two categories 10-20 and 20-40 mm.
In addition, what fraction of expanded clay is needed for floor screeding, you need to take into account the bulk density category in the range of 450-600 kg/m 3 and the strength grade from P75 to P125 MPa according to the results of mechanical pressure tests.

Determining the amount of expanded clay for screed
Calculation required material depends on the adopted technology for performing the work, the size of the granules, requirements for the strength of the coating and the brand of cement used. The brand of expanded clay concrete is determined by the volumetric ratios of M400 cement, sand and expanded clay, which should be:
- for concrete M150 – 1.0: 3.2: 5.0;
- M200 – 1.0: 2.5:4.2;
- M250 – 1.0: 1.9: 3.4;
- M300 – 1.0: 1.7: 3.2;
- M400 – 1.0: 1.1: 2.4.
To determine how much expanded clay you need for a dry screed, simply calculate the volume of the bulk layer and multiply its thickness by the area of the room.
In the case of height differences, you can take the average between the minimum and maximum values or summarize several volumes in individual areas.
When preparing a solution or concrete mixture with expanded clay as one of the fillers, it is necessary to take into account the brand of insulation based on bulk density from M250 to M800 kg/m 3 . At the minimum value, the test strength of the frozen layer will be at least 0.6 MPa, and at the maximum value - more than 4.5 MPa.
Tools and equipment for work
Work on installing floor screed using expanded clay is carried out in several stages. Each of them will require a specific set construction tools and inventory.
To prepare the base for laying layers you must have:
- hammer drill or impact drill;
- shovel or large scoop;
- construction mixer;
- buckets and spatula.
In addition to this, installing beacons will require;
- strong cord or matte fishing line;
- bubble, hydraulic or laser level;
- plastering rule and tape measure;
- construction trowel;
- pencil or marker;
- grinder for cutting profiles.
When performing a dry screed, additionally prepare a screwdriver and a tool for cutting sheets. To prepare expanded clay concrete, you will also need a concrete mixer, a mixing tray, a shovel and a bayonet shovel. In the case of combined technology, the possibility of working with reinforcing mesh should be taken into account.
Preparatory work
The quality of preparation of the base surface for the installation of expanded clay screed directly determines its quality, strength and durability.

Full complex preparatory work may include the following steps:
- cleaning of debris and remnants of old materials;
- device of hydraulic and thermal insulation;
- installation of beacons;
- securing damper tape around the perimeter of the walls.
 Damper tape.
 After clearing the garbage, wooden floors it is necessary to fix weak boards and replace rotten ones. Level and compact the soil if there is no old coating. IN concrete floors fill holes and large cracks with cement mortar and only then proceed to the next stage of work.
Hydraulic insulation and additional insulation
Due to the hydrophobic properties of expanded clay, waterproofing is a prerequisite for any screed technology. Waterproofing layer made of roll material can be laid under a layer of expanded clay, on top of it or simultaneously on both sides.
As insulation, roofing felt, waterproofing, liquid rubber or bituminous soils. The choice of material depends on the requirements for the moisture protection device and financial capabilities.
 Waterproofing film.
 It is recommended to use additional thermal insulation for rooms on the ground floor or when performing expanded clay screed on the ground. Floor insulation will reduce heat losses and save you money on heating your home. The best materials sheet foam and expanded polystyrene are used for this purpose. Their use simplifies the work and provides effective protection.
Installation of beacons and fastening of damper tape
The presence of correctly installed beacons greatly simplifies the process of leveling the screed to obtain a perfectly level horizontal surface. When doing this job:
- by measuring, the design level of the floor is determined, which is drawn on the wall in the form of a solid line;
- depending on the width of the strips being poured, the required number of beacons is calculated;
- The profile slats are fixed in the required position.

With a dry screed, the beacons must be removed after the mortar begins to set; in other cases, they can remain inside the poured layer.
The damper tape is fixed in such a way that a strip of 15-20 mm peeks out above the field level. It is necessary to compensate for temperature expansion of the self-leveling layer and prevent the formation of cracks.
 Definition scheme zero level.
 Device instructions
Combined screed with expanded clay  Scheme of a combined screed.
As mentioned above, this technology involves the presence of a dry layer of bulk material at the bottom and a wet cement pour at the top. Installing a semi-dry floor screed with expanded clay with your own hands must be done in the following order:
- cover the clean, prepared surface with roll waterproofing or cover with a layer of bituminous primer;
- fill in a layer of expanded clay with a fraction size of 5-20 mm, 30-40 mm below the future level of the screed;
- compact the bulk material well and level with the rule;
- prepare cement laitance and pour it over the surface;
- after setting, which will occur in a day, install beacons corresponding to the level of the screed on the frozen surface;
- prepare cement mortar in a ratio of 1:3 or 1:4 to sand;
- pour the solution between the beacons in strips and level it with a plaster rule;
- the top layer of the screed must be pierced with a thin rod with a pitch between holes of no more than 100 mm;
- Over the next two days, the surface must be periodically moistened with water.

The complete readiness of the screed is determined at the rate of 5-7 days for each centimeter of the cement layer. After this, you can proceed to laying the finishing floor coverings.
Wet screeds with expanded clay
“Wet” screed - pouring the base with expanded clay concrete and then leveling the surface. Laying the concrete layer is carried out in the following sequence:
- pour dry expanded clay into a tray or other container and fill it with water for 10-12 hours to soak;
- install beacons on the surface of the base that will determine the horizontal level of the future floor;
- pour into a concrete mixer wet expanded clay(4 parts), then add a little water and cement (1 part);
- After stirring for a short time, add sand (3 parts). Stir the mixture until ready - at least 4 minutes. If necessary, add water during mixing (the consistency of thick sour cream is required);
- To level the surface, use a plaster rule, which must be pulled along the beacons with transverse movements of the tool.
If, after the screed has set, floating expanded clay granules are visible on the surface, they must be sanded using a power tool. At large quantities Such granules will have to be covered with an additional layer of self-leveling mixture. The complete drying time is 28 days.
Dry screeds with expanded clay
To install a dry screed, you need to purchase fine expanded clay or crushed granules, sheet material such as chipboard or plywood, sand, cement and a plasticizer. The order of work is as follows:
- Cover the surface of the base with dry expanded clay and level the surface using a level lath. When laying a construction bubble level on the slats, periodically check the level of the layer;
- remove beacons;
- lay sheet material on the expanded clay so that it covers the entire surface;
 GVL laying diagram.
 - check the horizontal position of the sheets using a level;
- cover the second row of sheet material in the same way. The only thing that needs to be taken into account is that the shift of the seams of the second layer relative to the first should not be less than 20 cm.

After this, you can begin laying the topcoat.
You can see the construction of expanded clay screed clearly and in more detail in the video presented.
Video on the topic
Floor screed can be done using various materials. It all depends on the purpose, as well as the desired result. Under certain circumstances, a semi-dry floor screed can be installed under a “warm floor” or under any floor covering. Cases of installing a “sub-floor” on expanded clay, which is famous for its main advantages, are not uncommon. In addition, it is important to follow the technology itself so that there are no negative consequences.
Pros and cons of expanded clay
As for beacons, their number will, first of all, depend on the rule used and its length. With its length of one and a half meters, the above room will require about five beacons over the entire area. The length of such beacons is selected over the entire width of the room - three meters.
The choice of expanded clay itself is focused on granules, or rather their fraction. To calculate everything correctly and independently, just open the calculation calculator, which can be found on the Internet. In this case, it would be a good idea to turn to familiar builders for help. They'll tell you exact quantity material to be purchased. It is worth noting that the materials for underfloor heating screed do not differ in quantity.
Preparatory activities
The same preparation is performed for both conventional screeding and semi-dry screeding. That is, it makes no difference whether the floor screed is dry or semi-dry, which will be necessary for laying the floor covering. It is very important here to level the foundations where the work will be carried out. All existing cracks and pits are eliminated, if possible, using cement mortar. Bulges may be knocked off. We must not forget about the waterproofing layer, which can be ordinary polyethylene film. How better material will be selected best qualities it will be able to manifest itself during operation. 
After this, sand is poured in, acting as a cushion under the expanded clay. Usually its layer is 20-30 mm. The pillow must also be leveled using the rule. As for compacting sand, it will be sufficient to simply walk along the entire plane. In this case, the weight of a person is enough.
The choice of expanded clay is made depending on the fraction (fine, medium and large fraction). It is poured throughout the room, starting from the far corner. After filling the required layer, it should be leveled. Beacons are installed along the top of the expanded clay, serving as the basis for the subfloor level.
Profiles are used as beacons, which are mounted on the base using cement-sand mortar. Subsequently, the screed is poured, slightly overlapping the beacons, and they simply “hide” in the base of the subfloor.
Performing a semi-dry screed
When the expanded clay is poured, you can choose two options for further actions:

Not everyone knows how to make cement laitance. For this purpose, twice as much water is used as with the standard screed design. Depending on the result obtained, you should see whether it is necessary to add additional water or cement. In this form, after pouring the expanded clay, it is necessary to let the layer sit and dry for at least a day. Only after this can the semi-dry concrete floor screed be poured.
If the beacons are removable, then they are pulled out only after a few days. The resulting grooves are sealed with mortar, carefully compacted and sanded until a uniform layer is obtained.
Expanded clay with mortar
There is also an option for making a semi-dry screed, when the solution itself is mixed with expanded clay granules. This process takes much less time than in the previous case.
Expanded clay is poured into a container that is prepared in advance, which is filled with water. required quantity. Mixing is carried out using a mixer. The ready-made dry mixture is poured into this, which must be thoroughly mixed until homogeneous mass. You should be very careful with the amount of water. After all, it requires a small amount. Too much will lead to the manifestation of negative qualities.
There should be no lumps when stirring, and the granules themselves should become wet and acquire gray shade. The mixture becomes slightly thick, with a consistency reminiscent of sour cream. 
The finished solution is poured onto the prepared base to a thickness of 20-25 mm. But the thickness will depend on the evenness of the floor, as well as on the final result, which is necessary for laying the flooring. The reduction in time occurs because there is no need to wait a day for the first layer filled with cement laitance to dry and harden.
After the initial layer of the “pie”, the second and subsequent ones are performed until the “rough” floor is formed. During the work, we do not wait for the previous layers to dry. The finishing layer is not only carefully compacted, but also leveled.
Screeding a floor using a semi-dry method requires certain knowledge and experience in performing the work. Even small nuances will allow you to avoid possible problems in the future during operation. Some of them:
- When placing wires on the floor, under the future screed, they should at least be wrapped in polyethylene and also attached to the base of the floor with tape.
- To avoid cracks in the poured concrete mortar, it is best to add a plasticizer to it. It will be enough only for the finishing layer of semi-dry screed.
- Not only polyethylene film can serve as floor waterproofing, but also bitumen mastic, waterproofing, etc.
- After pouring the screed, you should