The front door will look complete only in one case - if the walls next to it are finished. As a rule, it is installed in a small recess in the opening in the wall, and on the sides of it completely ugly elements are formed, which need to be covered with something or somehow finished off. But the design process often depends on what shape the doorway is in the apartment.

Table. Types of doorways.
| Type | Brief information |
|---|---|
| This is the usual rectangular entrance that is most common. Any option for finishing slopes is suitable here, and various materials can be used, which will be discussed below. Despite the general simplicity of finishing such a doorway, many are faced with certain problems, which are most often associated with the choice of the most suitable and easy-to-use material. In general, designing a classic doorway is not so difficult, since there are no complex or curved lines here. |
| This version of the doorway looks much more impressive than the usual classic one, and is a rectangle with a rounded top in the form of an arch. Doors that fit it are more difficult to install and technically more difficult to design. Typically, sufficiently elastic materials that can be bent or plaster are used to finish slopes. Often, the door comes with special linings that precisely match the shape of the door. In general, finishing such an entrance is much more difficult than a regular one. |


Advice! If you want to have an arched entrance to your apartment, but install an ordinary rectangular door, then there is a way out. You can simply install an arched lining at the top of the doorway from the inside, but the door will look like a regular one from the outside.

Drywall slopes are a very common type of slopes.
What are slopes?
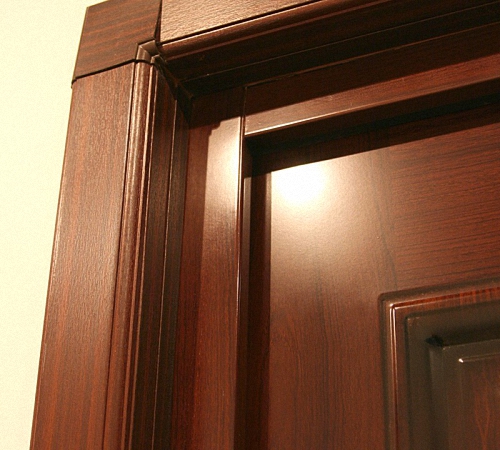
The door frame is usually called jambs, but not everyone knows that the end part of the wall where the door (or window opening) is located is called slope. By the way, some decorative overlays that are used to finish the opening are also called slopes.

The slopes themselves may have various sizes, but in any case, according to their parameters, they must fit the end part of the wall where the entrance door is installed. In general, they can have different thicknesses, but if we are talking about decorative overlays, then in order to avoid deformation and damage to the material, its thickness should be at least 1 cm.

The easiest way to design a slope is to use “L”-shaped panels
The purpose of finishing and installing slopes is to achieve a beautiful frame for the door. In any case, when the door itself is installed, the slopes will be damaged, and in general the end part of the wall does not look beautiful - it is either concrete, or brick, or any other material that becomes visible to everyone. Usually the ends are quite uneven, and simply covering them with wallpaper will not work - some preparation will be required. The slopes will also help to hide the mounting foam, anchors and other elements and substances that were used directly when installing the door. Only if there are slopes or proper finishing you can ensure that the door looks beautiful and the doorway looks finished and neat.

Note! Slopes will help achieve a certain level of heat and sound insulation - apartment residents will hear less sounds coming from the entrance. Do not assume that slopes are just a decorative component.
Basic information about door installation and design
Overall finishing front door includes three stages:
- threshold design;
- finishing of slopes;
- installation of platbands and additions.

All this work is carried out after installation itself. door leaf. As for the threshold, it must be strong enough and resistant to various types of loads. It is usually made of wood, metal, concrete. These types of materials are much more stable than the now so common PVC and can last for many years until the next door replacement.
As for platbands and extensions, they are usually used to achieve neatness in the design of the doorway. Thus, they help to hide imperfections and irregularities when the physical parameters of the wall and the very door frame that is being installed do not match. Without them, the door will look crooked and sloppy. Quite often, these elements are made from MDF, and then you don’t have to think about leveling the slopes themselves with putty. The voids between the extensions and the wall are simply filled with polyurethane foam.

Note! Platbands and extensions will also help protect the door from subsidence that may occur in the future.
The slopes are finished after the door is installed. This can be done in various ways:
- sheathing;
- finishing;
- plastering.

The last option is considered the best, as it allows you to achieve ideal evenness of the end of the wall and seal the doorway. Also, if you use your imagination, you can create an interesting unique design. And excess dust will not accumulate on top of the finishing materials.
Find out in a special article on our portal.
Prices for various types of door frames
Door frames
Selection of materials
Yes, slopes are performed protective function, but no one took away the decorative work from them either. And you can use a lot of different materials to decorate them. The main requirement for them is the absence of fragility and tendency to mechanical damage. The slopes must be finished so that they can last for many years without the need for repairs, not even major repairs, but cosmetic ones. Moreover, it is worth considering that the doorway is the place where all family members pass every day, and more than once, something constantly falls here, the door and the slopes themselves can be subject to impacts. So the material for finishing them needs to be one that can withstand all these loads for a long time and not deteriorate.
Plastering
This is a classic and the most common design option for a doorway. This method probably originated back when the very first front door was installed. A slope finished with plaster will serve faithfully for many years without complaints. The material is not afraid of temperature changes, damage, and it will perfectly hide and fill all the unevenness of the end of the wall (no other material can compare with it in this regard). Using this material you can achieve a perfectly flat plane at the end of the wall.

Plastering slopes - a method proven over the years
You can paint the plaster for beauty, cover it with wallpaper, or put some kind of pattern on it. In general, there is a lot of scope for imagination here. The main disadvantage of this method is the appearance of a large amount of dirt during the work. Also, the disadvantages include high labor costs, and it will also take time for the material to dry. If you have no experience working with plaster, then it is recommended to carefully study this issue or even invite a specialist - working with the material is not easy for a beginner.
Advice! In order for the slopes to look finished, after plastering they need to be sanded and puttied.

Prices for popular types of plaster
Plaster
This material is loved by many craftsmen, and it is readily used in the production of construction and repair work. It is universal and easy to use, and therefore can also be used for finishing slopes. This option is also called dry plaster.

The main advantages of using drywall are increasing the speed of work and simplifying it. If necessary, drywall will perfectly hide all the shortcomings. In general, the work on using it to design slopes looks like this:
- The surface is primed after cleaning it of debris;
- is being formed metal frame from profile;
- moisture-resistant wall plasterboard is cut into pieces required sizes and is fixed on the frame, forming a box;
- after installing the sheets, the cracks and the sheets themselves are puttyed (it will not be possible to glue anything onto untreated sheets of drywall or cover them with some kind of decorative composition);
- when the putty dries, you can decorate the doorway.

Note! If necessary, under the frame on which the drywall is fixed, you can lay insulation - then the apartment will be warmer.
This is also a very popular option for decorating a doorway. On at the moment MDF finishing is considered perhaps the most common. The material is resistant to various influences, does not require additional decoration, has a lot of color variations and can be matched to installed door. Veneered MDF as a whole is indistinguishable from natural wood.

Advice! If the door slopes are designed not only inside the apartment, but also outside, then it is worth purchasing a moisture-resistant MDF version.
Installing this option is simple - even a beginner can handle it. You can buy materials in advance - all that remains is to adjust them to the required dimensions, assemble the box and install it. The cavities are foamed with polyurethane foam.
Prices for polyurethane sealant
Polyurethane sealant

Unfortunately, it’s not cheap, and it’s easy to scratch. So you need to handle slopes made of this material carefully. Plus, it tends to absorb odors, and fat on it easily leaves stains.
Cladding
An excellent option for those who want as much natural wood as possible in their home. By analogy with MDF paneling, you can decorate the ends of the walls near the front door. They will look very beautiful and noble.

Installation must be done on top of a wooden sheathing. So narrow slopes cannot be covered with clapboard. Costs natural wood not cheap, so be prepared to shell out more money.
It is also worth considering that with changes in humidity and temperature, natural wood tends to deform. Before installation, it must be coated with protective compounds to prevent rotting and the spread of insects. It is also better to impregnate it with a fire retardant to reduce the level of flammability.

Advice! Instead of varnish, it is better to coat the lining with a special wax-oil composition. She will look better and more noble.
PVC slopes and polyurethane linings
Wherever PVC is used now! So the front door can be framed with it. Installation is quick, and the price of PVC slopes is quite low. But this material does not have many advantages.
PVC is fragile and easy to break. Sometimes it’s enough to just lean on it and all the work will go down the drain. The slope cannot be repaired; it will only have to be replaced. And in general, the service life of the material does not exceed a couple of years. Some people cover plastered slopes with plastic, but in reality it looks ugly and cheap.

By the way, you can also decorate the slopes with polyurethane overlays, which can imitate stucco. This option looks decent. But the price for such overlays is high. You need to glue the overlays on a flat surface, so you will still have to pre-plaster or cover the ends of the walls with plasterboard.
How does the process of decorating slopes with MDF panels take place?
Step 1. The first step is to prepare all the tools. This is a tape measure, a square, a pencil, a miter saw, sharp knife, hammer, masking tape, screwdriver, drill. You also need fastening materials and polyurethane foam.

Prices for popular models of screwdrivers
Screwdrivers
Step 2. Next you need to take measurements. The procedure is carried out after installing the door - you need to measure the width of the end part of the wall, as well as the width of the doorway. It is better to take measurements at several points vertically and horizontally.


Step 3. Now you need to make markings on the MDF strips according to the obtained dimensions. The edge along which the cut will be made must be taped with masking tape. If this is not done, unsightly chips may appear on the panel during sawing.


Step 4. Using a square, you need to draw an even cutting line.

Step 5. Taking advantage miter saw, you need to saw the workpieces.

Step 6. Now you need to collect the received additions into one design. Use a drill to drill holes for the screws. It is not recommended to screw them in directly with a screwdriver - the fasteners can damage the panels. The holes are made in several pieces at a distance of 10-15 cm from each other.


Step 8 Now you should make about 10-12 spacer elements from a wooden block.

Step 9 Spacer elements must be hammered between the wall and the box. About 3-4 pieces are hammered vertically, and 2 pieces along the upper and lower borders of the box. The block should not stick out; it must be hammered in tightly.

Step 10 Now you can install the platbands. First you need to attach the trim and measure the desired length.


Step 12 Before installing the platbands, the gaps between the wall and the frame must be foamed with foam. It will help further secure the box and provide sound and heat insulation. Excess foam can be cut off with a knife after it hardens.


Step 14 Now you need to measure and saw off the casing at the top and bottom, and then secure it with nails.

Step 15 After the structure has been assembled, you need to fix it on the door frame with masking tape for about a couple of hours. Once the foam is completely dry, the tape can be removed.

Video - How to make slopes?
Video - Finishing narrow slopes
After the main work on finishing the slopes has been completed, you can begin additional decoration. If they were plastered or decorated with plasterboard, then there is a lot of room for creativity. You can cover the slopes with paint, decorative plaster, wallpaper, draw patterns, attach laminate, stone, tiles and use other materials. The main thing is that they fit the overall style of the interior and meet all the wishes of the home owner.
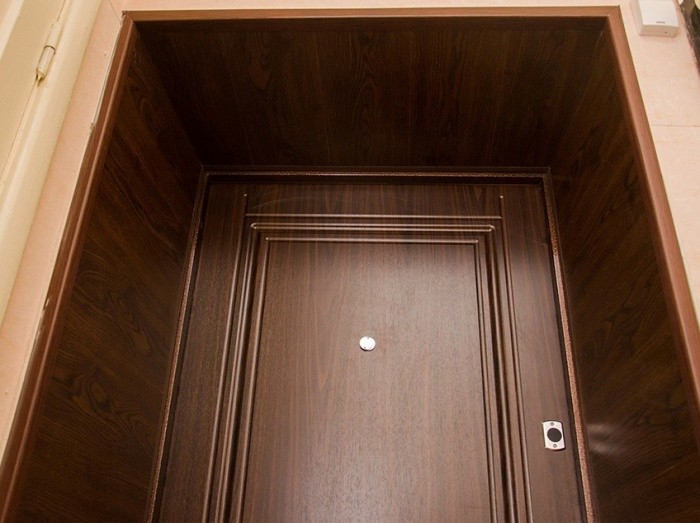
After entrance doors have been installed in an apartment or house to ensure the safety of the home, it is necessary to finishing work. From the outside, the entrance doors are improved with the help of platbands, and if there is damage to the wall, they are sealed with mortar. From the inside, everything needs to be done beautifully, and to hide the unevenness, slopes are made. You can make them yourself, there is nothing difficult about it. It is necessary to select the material, and then carry out all the work in accordance with the developed technologies.
Features of the design of entrance door slopes
If the doors are installed by professionals, then finishing the slopes is not their responsibility. You will either have to pay extra for such work or do it yourself. If you understand the sequence of finishing, you can handle it without any problems.
Slopes of entrance doors not only allow you to give a beautiful and complete look to the entrance to an apartment or house, but also hide the attachment points of the door frame, thus increasing protection against burglary. In addition, properly executed slopes help to insulate entrance doors and increase their soundproofing characteristics.
Even the most expensive and beautiful doors will look unsightly if there are no slopes at all or they are done carelessly. When designing this element, it is necessary to take into account both the material of the door leaf and frame, as well as the design of the corridor. The slopes must fit harmoniously into the interior of the room, so special attention must be paid to the choice of material for their manufacture.
Door slopes are:
- external. The entrance door is almost always mounted flush with the wall surface. To finish the external slopes, it is enough to install platbands, and if there is minor damage to the wall, they are sealed with mortar, then the wall is covered with finishing material;
External slopes are usually covered with platband
- internal. Since these elements are located inside the apartment and are constantly in sight, a wide variety of materials can be used to decorate them. different materials. Internal slopes should be in harmony not only with the material of the canvas, but also with the entire situation in the room.
Different materials can be used to decorate internal slopes, the main thing is that they are in harmony with the interior of the entrance area
For entrance door slopes you can use:
- plastering. It's cheap and reliable way, but to cope with it, you need to have certain skills. First you need to properly prepare the solution, and then evenly distribute it over the surface of the wall around the door frame;
- panels secured with glue. The walls are carefully leveled, special glue is applied to them, and then glued finishing panels. They may be made of different materials, but the principle of performing the work is the same;
- panels installed on the frame. This finishing option allows you to close uneven walls. The frame is made of metal profiles or wooden blocks, attached to the wall and panels are installed on it. Inside you can hide wires and other communications, install lighting fixtures or lay thermal insulation material.
What materials are slopes made from?
There are no ideal materials, they all have their advantages and disadvantages, and the choice depends only on the financial capabilities and taste preferences of the owner of the house or apartment. To do it correctly, you first need to familiarize yourself with the characteristics and features of all used slope finishing options:
- Drywall. This is a popular, but rather labor-intensive method. First, the sheets are attached to the wall, and then puttied and covered with finishing material. The result is a perfectly flat surface that can be painted in the desired color. Among the disadvantages, it should be noted that over time the paint will be smeared, and if wallpaper is glued, it may tear.
Using drywall to finish slopes is a popular, but rather labor-intensive option.
- Ordinary plaster. This type of finishing requires special skills to obtain a beautiful and smooth surface. After plastering the opening, it will also need to be painted or wallpapered. The main advantage of this option is its low cost. Disadvantages - the finishing coating can become damaged over time, and during operation a lot of dirt and debris is formed.
After plastering, the slopes must be finished with finishing material
- Decorative plaster. This modern look previous material, it is applied to a previously plastered surface. You can choose textured plaster or with colored chips. This coating has a long service life and beautiful appearance. Its disadvantage is that it is expensive, and also that the work is quite dirty and labor-intensive and also requires special skills.
Decorative plaster has a long service life and beautiful appearance
- MDF panels. This is the simplest and affordable way. To install MDF panels you will need simple tools, and even a novice master can cope with such a task.
Finishing slopes with MDF panels is simple and quick
- Laminate. Laminate, like MDF panels, is easy to install. It's cheap and available material, but slopes made from it will not look very presentable and will not be suitable for expensive apartments.
Laminate is not suitable for finishing entrance door slopes in apartments with expensive interiors
- Natural wood. This is an expensive and environmentally friendly material, but it is not difficult to attach. This solution is suitable when the hallway is decorated in the appropriate style. Wooden surface must be periodically treated with special compounds that protect against moisture and rot.
Natural wood is suitable when the hallway is decorated in the appropriate style
- Chipboard panels. This material has a low cost, but its service life will be short. Chipboard is afraid of moisture and high humidity begins to delaminate.
Chipboard panels are afraid of high humidity
- Extensions are ready-made special elements that are used to finish the slopes of both entrance and interior doors. You can choose a material that will exactly match the door frame. The cost of additions is higher than panels or laminate, but their appearance is more attractive.
- PVC panels. They will be cheap, and anyone can handle the installation work. home handyman. Plastic is not afraid of moisture, has a long service life, and is easy to care for. The disadvantage of PVC panels is their not very presentable appearance.
Even a beginner can finish slopes with the help of PVC panels
- Natural or artificial stone. You can create beautiful slopes from stone, which will also have a long service life and high wear resistance. The disadvantage is that laying stone requires a certain skill and a lot of time. If the slopes are finished with natural or artificial stone, then the adjacent walls must be plastered, since wallpaper or panels are not suitable in this case.
Artificial stone slopes have beautiful view and high wear resistance
- Mosaic and tiles. This is also a durable and strong material, but tiles are usually used in the kitchen, bathroom or toilet and many people do not perceive it on the slopes of entrance doors. In addition, laying tiles, and even more so mosaics, takes a long time and requires special skills.
Not all people perceive tile slopes, since this material is usually used in the kitchen and bathroom
Required tools and materials
In order to finish yourself door slopes, first you need to decide on the method of their installation. Depending on whether the surface will be plastered or the material will be laid with frame and frameless way, you may need:

The main stages of finishing the entrance door slopes
After you have decided on the method of finishing the slopes of the entrance doors and purchased necessary materials and tools, you can begin installation. Almost any home craftsman can do this work with his own hands; it is enough to carry out all the steps in accordance with the developed technologies.
Preparatory work
Although various materials are used to finish slopes, the preparatory work is carried out the same way in all cases:

Plastering
It is best to plaster the slopes of entrance doors at the stage of apartment renovation, since a lot of dirt is generated during the work.
- Surface primer. This step is necessary to ensure good adhesion of the solution.
Primer increases adhesion of materials
- Installation of beacons. Beacons are installed using a building level. They allow you to mark the thickness of the plaster application and help distribute it evenly.
Beacons help to apply the plaster in an even layer
- Installation of the corner. Using a solution, fix the corner at the junction of the wall and the slope.
The corner protects the junction of the wall and the slope
- Attaching the painting mesh. It is necessary to increase the strength of the plaster layer.
- Application of the solution. The solution is poured over the beacons, after which it is distributed as a rule.
After applying the solution, it is leveled using the rule
- Primer of the plastered surface.
- Applying finishing putty.
- Grouting the surface. The coating is processed with a fine grater to make it perfectly smooth.
To carry out grouting, use a special tool and a mesh.
- Painting. Water-based paint is usually used because it dries quickly and has virtually no odor.
Water-based paint is used to paint slopes
Video: plastering door slopes
Adhesive finish
You can glue different materials to the slopes, including drywall, laminate, MDF or chipboard panels. This method can be used when the walls do not have serious defects. Minor deviations from the level can be corrected by applying a layer of plaster, the thickness of which should not be more than 8–10 mm.
The process of installing panels using the adhesive method consists of the following steps:
- Base primer. For this purpose, special compounds are used that increase the adhesion of materials.
- Measurement of slopes. Using measuring tools, measure the dimensions of the slopes and transfer them to the material used for finishing (plasterboard, chipboard, MDF, sandwich panels). Drywall can be installed both vertically and horizontally, since then all the seams will be puttied. It is better to install MDF and chipboard panels as one sheet so that there are no joints.
Slope measurements are transferred to the material used
- Applying glue. This is done in a square-cluster manner every 15–20 cm. It is not necessary to completely cover the material with glue. A film should appear on the surface of the glue; for this you need to wait a few minutes.
The glue is applied using the square-cluster method.
- Fastening panels. They are laid starting from the top edge and pressed firmly on the places under which the glue is located. The panels can be fastened with liquid nails, polyurethane glue or polyurethane foam.
The panels are installed in place and pressed well against the supporting surface.
- Finishing. If drywall was used, then after installation it is necessary to apply a finishing coat. Laminate or MDF boards do not require additional finishing.
Video: adhesive finishing of the slope
Frame method of finishing slopes
In order to eliminate the possibility of surface deformation after applying plaster or installing heavy MDF sheets, a frame method for finishing slopes is used. To create a frame, both metal profiles and wooden blocks treated with an antiseptic can be used.
Work order:
- The surface is treated with an antiseptic primer.
- Mount vertical profiles. The outermost profile is leveled and secured with dowels. The second rack is set in accordance with the first and is also fixed.
To increase the rigidity of the frame, transverse profiles are installed
- Install wiring and insulation. If you plan to install an electric lock, a cable is laid inside the frame to connect it. Insulation (mineral wool or polystyrene foam) is also placed in the cells.
- Execute interior decoration. If these are MDF boards or laminate, then finishing not needed. Drywall is puttied and painted or covered with wallpaper.
Drywall or other finishing material is attached to the finished frame
Finishing slopes with artificial stone
To decorate the slopes of entrance doors in an original way, artificial stone or clinker tiles are often used. In this case, they follow the rule: there is more stone on the bottom, less on top. This solution allows you to smooth out the transition to other finishing materials, and the unevenness gives the slopes a more natural look.
Sequence of work:

Video: creating entrance door slopes with your own hands
The entrance door slopes can be finished in various ways. Each of the available options has its own advantages and disadvantages and is selected individually. It is advisable to take into account many factors, which include the overall interior design, possible financial costs, as well as the skills needed to complete all stages.
How to finish the slopes of the front door? This question always arises when there is a need for this kind of finishing. There can be many reasons for this work:
- Installation of a new structure. This is the most common situation. During installation work, adjacent areas are destroyed. It often happens, especially in old houses, that the old layer of slopes completely crumbles, because they are made of plaster. It is necessary to take into account new door must be installed correctly, without distortions, to eliminate subsequent repair work.
- The appearance of defects. Over time, any finish becomes unusable. The same situation occurs with slopes, especially if they frame the entrance opening. Cracks, shedding, and traces of mechanical impact appear on the surface. It is very important to assess the situation in time in order to install new door slopes without unnecessary work.
- Changing the general appearance of the room. Indeed, new cladding of entrance and interior doors with your own hands is necessary when the design of adjacent rooms changes. Sometimes it seems that the door slope is an area that does not affect general view interior This is a mistaken opinion, because even such a seemingly insignificant detail plays an important role.

Note! There is another reason for replacing slopes, which is the appearance of mold and mildew. This situation will require cleaning the surface to the ground, cleaning all affected areas and impregnating it with antiseptics. You should immediately find the reasons leading to this problem.
What material to choose for constructing slopes?
There are many options that allow you to make the front door slopes yourself.
- Plaster.
This finishing material is used everywhere. It is necessary to take into account that this option has the lowest cost. All work is carried out independently, without the use of special tools. More recently, this method was one of the main ones, but recently its popularity has begun to decline. There are many reasons for this, among which stands out - not the most beautiful visual appearance. Of course, this state of affairs can be easily corrected if you use decorative and textured plaster.
- Drywall.
The popularity of gypsum boards is only growing. This material allows you to complete all work quite quickly. But this is true for large areas. If you only finish the slopes of the front door from the inside, then there will be a need for additional manipulations. The fact is that during installation, numerous cracks (joints) appear that need to be filled with putty.
- MDF panels.
This includes laminate flooring. Such products are excellent for finishing work. The panels are installed very simply, the resulting surface has an excellent decorative appearance. But there is one drawback: if the width of the opening is greater than the material used, then it becomes necessary to join. Laminate creates less noticeable seams, but they also impair visual perception. Finishing the MDF entrance door opening
 - Natural wood.
Of course, making door slopes using natural wood is a rather expensive procedure. But we must not forget that the result is a very beautiful coating that has unlimited durability. If necessary, restoration work can be carried out. All activities must be carried out in compliance with numerous technological nuances.
- Laminated chipboard materials.
This option allows you to veneer even very wide openings. Many people mistakenly perceive laminated chipboard as exclusively a material for making furniture. In fact, thinner sheets are used for cladding areas adjacent to the front door, which have very impressive characteristics.
Advice! Currently exists large selection Chipboard. For installation, sheets are used that have a thickness of 6 to 10 mm.
- PVC panels.
Plastic slopes are an option that is more suitable for working with window openings. The fact is that this type of product often comes into disharmony with the material entrance structures. Certainly, modern technologies allow you to choose a suitable solution, but this is not always possible.
- Decorative stone and brick.
There is an opinion that this method is rapidly going out of fashion. In reality, the situation is not so sad. This material allows you to obtain an individual and reliable surface. Please note that laying out the parts will take a lot of time. Many craftsmen point out that in the future it will be very difficult to complete finishing work on the walls. After all, to work you will have to use a limited set of options. So, for example, cladding with any types of panels will be difficult - they are difficult to fit under the masonry.
- Extras.
This material is most suitable for installing slopes on interior doors. A box of such designs assumes the use of this option. Therefore, door manufacturers are developing a whole line of extensions that are completely identical in color and texture to the door leaf.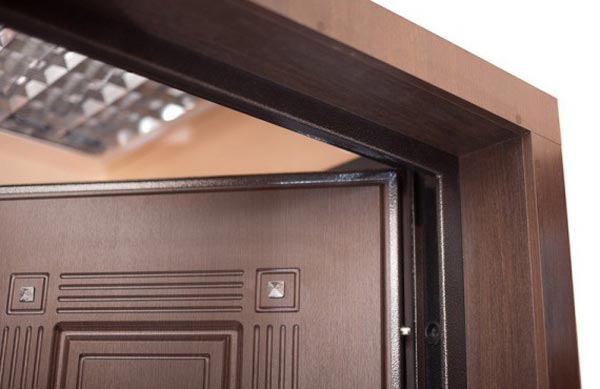
Preparatory activities
Installing slopes on the front door begins with preparation. It is important to perform the work efficiently to avoid correcting possible problems.
The activities are:
- The surface is cleaned of existing remnants of the old layer. If the coating crumbles, it should be completely removed to the base.
- If a new structure was installed, then excess polyurethane foam remains. It is cut using a stationery knife. We must not allow excess to be removed.
- All joints and cracks between the frame and the wall are coated. Sealing is carried out around the entire perimeter.
- Sections of the walls are finished with plaster. If sheet and panel materials are installed, then the entrance door slopes are sealed without thoroughly leveling the surface.
- Treatment with antiseptic and priming compounds is mandatory. This will help prevent mold and mildew from appearing. It will also improve adhesion if the door slopes are finished with decorative mixtures after installing the front door.
- Should be achieved complete absence areas that may contain small cracks. It is precisely these, sometimes unnoticeable, defects that are the source of drafts and unpleasant howls when it comes to entrance openings.

Slopes on the door are installed only after complete preparation.
Technological aspects of working with certain materials
Each of the materials has its own characteristics and technological aspects, which should be considered in more detail.
Working with plaster: simple and decorative (textured)
Slopes on the front door using ordinary plaster are made as follows:
- The required amount of mixture is prepared, which should be enough for 35-40 minutes of work. If there is a surplus, they will quickly lose their properties.
- The solution should be applied in layers equal to 1-1.5 centimeters. It is taken into account that more than two layers require reinforcement with reinforcing mesh.
- To obtain a flat surface, beacons are installed. They are fixed to a small amount of plaster.
- The existing experience should be realistically assessed. If it is not enough, then a wooden strip is laid along the outer edge along the entire perimeter. It should protrude to the width of the applied layer. That is, it will serve as a guideline in order to prevent curvature.
- After drying, the beacons are removed, which leave behind small defects. They are eliminated with a newly prepared solution. Care must be taken when removing slats. Corners can be reinforced with perforated corners.

After the surface has completely dried, the slopes for the entrance doors are finished decorative materials. This could be paint, wallpaper. But it will look much more interesting decorative plaster(). It is applied after priming:
- The decorative mixture is placed on the surface.
- With the help of various devices, the relief is formed (watch the video). If a decorative solution is used, the coating is obtained by proper smearing.
- Subsequently, depending on the material used, paint, varnish or waxing is carried out.
Thus, plaster can still be great solution for finishing slopes, especially if simple repairs or interior renovations are being carried out.
Drywall: installation with putty
How to make front door slopes using gypsum plasterboards? The work is carried out according to the following principle:

How to seal the joints and cracks that appear? Indeed, when you install plasterboard fragments on the front door yourself, finishing measures are necessary. They consist in the fact that the corners are formed using perforated pads, and the surface is covered with a layer of putty.
Installation of gypsum plaster boards differs from plastering in that the base is formed much faster. The work does not require any special skills.
MDF panels: fastening to the lathing
Finishing of slopes using MDF panels is carried out on the sheathing. This method is preferable for situations where the installation seam is more than 4 cm.
The product should be installed using the following technology:
- Mounted around the entire perimeter of the opening wooden beam. The parts are laid horizontally. Fixation is carried out using dowels.
- It is advisable to treat the planks with an antiseptic before installation.
- The resulting cells are filled with insulation.
- All areas are measured. Panels are cut out. They are tried on in their places.
- Fastening occurs with self-tapping screws that are screwed into the very edges. They will be covered with decorative corners.
- Thus, all elements are fixed to the frame.
See photos before and after finishing MDF panels:
 Sheathing MDF slopes: doorway before and after finishing
 Laminated chipboard: installation on vertical racks
Do-it-yourself door slopes using laminated chipboard are not the most best solution. But if installed correctly, the coating will be durable.
- The whole process almost completely repeats the work with MDF panels. The difference is that the wooden beam is installed vertically. That is, you need to get two racks that are fixed on each edge.
- For work, LDPS is used, which is most suitable in thickness. After taking the dimensions, the parts are cut.
- In order not to repair the material due to water ingress, all open ends are coated with sealant.
- The elements are fixed through pre-drilled holes, which at the initial depth should be slightly larger than the diameter of the cap. This will allow you to recess the screws so as not to damage the front side. All holes are covered with special wax or sealed with overlays.
- All corners and joints are covered with decorative corners.
This method is convenient if you are covering the slopes of interior doors, which are less susceptible to moisture.
PVC panels: fastening with glue
This material is less often used for such work. Also, many people mistakenly believe that they can give preference to the cheapest options. In fact, such a choice leads to the fact that the coating begins to deteriorate immediately after installation: defects appear, color changes.
Most often plastic panels fixed with glue:
- Preparatory work is carried out carefully. Differences should not be more than 2 mm per 1 m.
- The panels are cut according to the dimensions taken from the areas to be covered.
- Please note that the fastening is done with glue. Therefore, before installing slopes on the door with your own hands, all surfaces must be pre-treated. A primer is used for the walls, and the plastic is slightly sanded on the inside with sandpaper. Such procedures will increase adhesion.
- The glue is applied with a snake. It is important to consider that excess mixture is removed immediately, otherwise the surface may be damaged, which will lead to repair or replacement of parts.
- The elements are pressed against the base, but are not held in place, but immediately come off. After waiting a few minutes, they are finally installed.
- Now all that remains is to secure the decorative fragments.
 The simplest and quick way PVC installations panels on slopes - this is fastened with glue
 Modern PVC options have sufficient strength and beauty. As an alternative, sandwich panels are used.
Decorative stone and brick (tiles): the main thing is to draw up a diagram
How to make slopes on doors made of artificial stone or similar materials? The procedure is:
- It all starts with drawing up a diagram. It should reflect the actual position of the elements. If laying bricks can be outlined on paper, then more work will have to be done with stone.
- Initially, the surface is marked. It is immediately taken into account whether the parts will lie only inside the opening or frame the outer part.
- Detailing is done on the floor. It should be quite detailed.
- Now they start cladding. The stone is fixed with glue or a special mixture. It is important to consider whether suture or seamless technology will be used.
- After installation, if the surface is not protected, it is varnished.
We encourage you to additionally watch this video:
Thus, door slopes can be made of various materials. Each option is selected individually.
When carrying out repair work, many are faced with the question of how to make slopes for doors. Finishing the slopes of the front door using your own efforts is not a difficult task at first glance, but it requires effort and time.
Installing slopes for the front door
There are many options for finishing, each of which is suitable for a specific situation, depending on the allotted time and budget.
Video: Installation of a plasterboard slope on entrance doors
Necessary materials to get started
For this finishing option you will need:
- small roller;
- spatulas (long and short);
- from 5 to 10 kilograms of plaster mixture (Rotaband, Perfix, you can also choose another one at your discretion);
- paint (1 liter);
- primer (2-3 liters);
- 2-3 kilograms of putty.
Before priming the slope, the surface is carefully freed from old material. After priming, proceed directly to plastering.
Video: Do-it-yourself installation of trim on interior doors - ZOLOTYERUKI
The solution is diluted to a thick consistency. Using a large spatula, apply plaster (in a layer of no more than 1-2 centimeters) to the slope at a specific angle. Let us reveal to you a small, but at the same time very effective secret: To simplify the work, you can use paint corners. The application procedure is repeated several times, after each time the surface is primed.
After drying, it is necessary to check the evenness of the surface; if there are any unevenness or nicks, they should be eliminated.
Next, when finishing the door slopes, you need to proceed to the puttying stage. The putty is applied in several layers, usually 2-3 layers, and then the slope is cleaned with improvised means, or with a tool prepared in advance, for painting. For a better finish, it is advisable to use acrylic paint, having previously applied primer.
For faster work you can use plasterboard sheets, they will make the slope very smooth. Having cut off the required strip, you need to prime it and distribute pre-diluted thick glue over the surface at intervals of 20-25 centimeters.
Video: Installing extensions with your own hands. 2 easy ways to install extensions
After completing the work, the sheets should be carefully and carefully glued at a specific angle. In order for the plaster to stick tightly, you should hold it for 5-10 minutes; if in the end it does not stick firmly, then we hold it for another 5 minutes. Next comes the stage of puttying and painting. If you do the work conscientiously, the slopes will be pleasing to the eye.
Attention, TODAY only!
stroytroy.ru » Do it yourself » How to make slopes for interior doors with your own hands
After installing windows and doors, it is necessary to finish the slopes.
This is done not only for an attractive appearance, but also to increase heat conservation, sound insulation, and protect the polyurethane foam from destruction.
The most ideal option is the finishing of slopes with plastic.
Advantages of PVC panels
PVC panels are not afraid of high humidity. Smooth. Durable, can last for several decades.
Pairs perfectly with metal-plastic window. You can choose a color and texture to suit any interior. They come in glossy and matte finishes and have a laminated surface.
Does not require additional repair work during operation. Does not require preliminary leveling of walls. Has good noise insulation properties.
Easy to clean, just wipe off the dust with a damp cloth; its surface is not capable of absorbing dirt.
Finishing work, with the necessary experience, is completed within a few hours. To insulate a window opening, it is enough to lay polystyrene foam, expanded polystyrene or other heat-insulating material under the plastic.
Withstands temperature changes from +20 to -20 degrees. Resistant to ultraviolet radiation, abrasion and wear due to the top layer being coated with varnish that creates a protective film.
Fireproof, non-combustible material. Plastic panels are easy to install and can be easily cut with a utility knife.
Environmentally friendly, harmless to humans, animals, environment. Can be used for both interior and exterior work.
It has a fairly low cost. To finish the slopes, panels made of polyvinyl chloride (PVC) or sandwich are used.
Sendcic panels
The sandwich consists of inner and outer layers of plastic, between which there is polyurethane foam insulation; they do not require insulation.
PVC panels are hollow, but have stiffening ribs to strengthen the structure and create an air gap.
Air chambers inside the plastic increase thermal insulation and sound insulation properties.
Foamed polyvinyl chloride has recently appeared on the market. It bends easily, so it is ideal for finishing arched openings.
It has a durable outer coating and a soft inner coating, resistant to mechanical damage. The downside is the small selection of colors.
DIY slopes
For a person with little experience in construction, installing slopes from plastic panels is not particularly difficult.
To complete the work you will need:
- Starting U-shaped and F-shaped stripes;
- PVC panels;
- Thermal insulation material for slope insulation;
- Internal and external plastic corners;
- The rail is 25-30 mm wide, 8-10 mm thick;
- Sealants: silicone, liquid nails, liquid plastic;
- Electric drill for work on brickwork and a screwdriver for woodworking;
- Stapler and staples for fastening panels together;
- Self-tapping screws or dowels;
- Construction level.
Finishing sequence
After installing the windows, you need to wait a few days. For the polyurethane foam to harden, it expands enough to fill all the existing cracks.
When the foam has completely dried, cut off all its protruding parts and remove all construction waste from the window. 
We treat the entire area of the opening that will be under the plastic with antifungal compounds to prevent the formation of mold.
You can also treat the entire surface with a primer to increase strength.
We fill it, using a building level, and fasten a 25-30 mm wide, 8-10 mm thick, dowels or screws along the entire perimeter of the slope.
The lath must be smooth, dry, without traces of mold, and not damaged by insects.
We lay and glue thermal insulation material around the entire perimeter. You can use a thin layer mineral wool, polystyrene foam, polystyrene foam or other material.
The thickness of the insulation should be as wide as the lath used for the frame.
We install the starting U-shaped profile. A PVC panel will be inserted into it.
Finishing slopes of interior doors
We attach it to window frame small screws.
Screw the screws into the inner bottom part profile. Their lower part is attached to the window sill. We carry out all work using a level.
Along the outer edge we attach the F-shaped profile with its wide side to the wall.
When both profiles are secured, we check that they are level. Apply sealant inside the holes.
Cut the plastic panel to the required width using stationery knife. We insert plastic panels into the grooves of the U-shaped and F-shaped profiles.
Using liquid nails or assembly adhesive, glue the framing part of the F-shaped profile to the wall.
You need to apply glue over the entire area that the frame will occupy, press the profile, and hold until it hardens completely. 
Close the vertical and horizontal joints special finishing corner, which is secured using liquid plastic. We select corner connectors to match the color of the panels.
Important! To impart strength and density to the entire structure and protect against moisture penetration when installing slopes, all joints must be treated with sealant.
The outer part of the window opening also needs finishing. If the polyurethane foam is not sealed within a year after installing the windows, it will collapse under the influence of ultraviolet radiation and turn into dust.
To seal the outside of the window, use a vapor barrier mounting tape, plaster with Ceresite (tile adhesive), or a special window sealant (an expensive option).
Or they finish with high-quality plastic that can withstand temperature changes and sub-zero temperatures.
The outer side is finished in the same way as the inner one.
More videos on the topic:
If you save on exterior decoration, then moisture will begin to penetrate inside the slope. On internal slopes This can cause mold to form.
At the final stage of installing the front door, they begin to form the door frame slopes, which involves finishing them, hiding fasteners and giving a presentable appearance to the entire structure. There are a lot of options for making front door slopes. And they all depend on choice finishing materials from a wide range presented on the construction market.

Preparing the opening
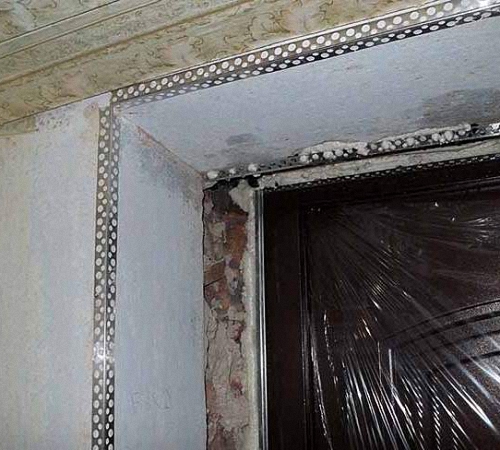
Finishing and repairing slopes of entrance metal or wooden doors by any method involves the same stages of preparatory work. After the door frame is finally secured in the opening, you should:
- ensure the tightness of the installed structure;
- clean slopes;
- Level and plaster the surfaces of the opening.
The installation gaps located between the door frame and the wall must be checked for drafts. To do this, just walk a lit lighter around the perimeter of the opening. The deviated flame will indicate the place of the intended blowing, which will need to be additionally sealed with foam. After removing the remains of the dried sealant, the surface is thoroughly cleaned of dirt and old plaster, the remains of which are swept away with a stiff brush. Further sealing is carried out by covering the polyurethane foam with an adhesive-based cement mortar.
Using putty or plaster directly over the foam layer is not allowed!
For better adhesion of the plaster layer to the surface of the walls, a deep penetration primer is first applied to them. After it dries, the slopes are leveled with a cement-sand mortar, and after some time required for its final setting, further finishing of the free sections of the opening begins.

Selection of materials and design options for slopes
Finish inner part opening can be done in several ways:
- cement-sand mortar;
- sticker of decorative materials;
- installing the sheathing on the frame.
Most in a simple way Improving the appearance of slopes is considered to be the application of plaster followed by painting or wallpapering. Like budget option complemented by the installation of platbands. Application cement mortar provides for covering the ends of the wall opening in several layers with intermediate drying. It is recommended to add antifungal primers to the composition, which should also be used to pre-treat the walls. Various finishes, such as decorative plaster, are often used as a finishing coating in interior areas.
Ceramic tiles and artificial stone are laid on glue solution. When finishing repairs to smooth surfaces of openings, drywall or laminate is fixed in the same way, using appropriate compounds. Installing a frame for door slopes is necessary when the unevenness of the walls cannot be eliminated or hard materials are used as finishing.

Installation of the sheathing frame
Perforated metal profiles are ideally suited for the frame, although in some cases wooden blocks are used. Fasteners are selected depending on the chosen design. Preliminary priming with deep-penetrating compounds will help to avoid repairs due to suddenly crumbling slopes. They will strengthen the surface and prevent its destruction as a result of mechanical stress.
Next, make markings for the sheathing, after which load-bearing elements securely fixed in place, not forgetting to reinforce them with additional jumpers. After the installation of the frame is completed, the resulting space between its elements, as well as between the profiles and the wall, is filled with mineral wool.
The possibility of insulation is one of the advantages of using a sheathing frame.
Plasterboard cladding
There are different ways to decorate doorways with moisture-resistant plasterboard. When installed on a frame, parts cut to size are secured around the perimeter of the slope with self-tapping screws. If the surface of the opening is relatively flat, then the material can be glued directly to the wall using special compounds.
First of all, the vertical cladding parts are installed. Glue mixture spread over the surface of the drywall evenly or in small portions every 10 - 15 cm. After placing the elements on the slope, their position is adjusted using a building level and left until the solution has completely set.

The formation of neat and durable corners is done by reinforcing the edges with perforated corners. This will help avoid repairs in the near future. The gaps adjacent to the wall are sealed with mortar or covered with wide platbands. The joints between the sheets are sealed with masking tape, puttied and sanded with fine abrasive. The prepared surface is covered with wallpaper or painted to match the installed door.
It should be remembered that plasterboard is not used for slopes of street doors.
Clapboard finishing
Covering the assembled frame with wood or plastic lining begins with the installation of a starting strip, from which the remaining elements are installed. First, the upper slope is covered, and then its side surfaces.
When covering door slopes with wood, it is recommended to make the frame from lumber, and use decorative nails or screws as fasteners, the heads of which are recessed and covered with plugs.
How to make slopes on interior doors with your own hands video
Possible gaps are eliminated using colored acrylic wood putty or colorless silicone. For plastic elements, special fasteners are provided.
Laminate finishing
An alternative to wood for repairs and cladding of slopes are laminated panels produced for flooring. They:
- imitate the texture and shades of various types of wood;
- do not require further finishing;
- are not difficult to install.

Fastening the laminate with the help of adhesives is carried out only on a flat, prepared surface, and laying can be done both along and across the ends of the wall opening. The elements are fixed to each other by means of lock connections, and are attached to the frame in two ways:
- with a longitudinal arrangement - in at least three places (along the edges and in the center);
- when laying transversely - through 2-3 elements with the obligatory fastening of the outer parts.
Slopes are covered with laminate only on the inside of the entrance doors. This material is not used for street and driveway use.
Plastic finish
If the renovation of the hallway involves finishing it with plastic, then lining the slopes with identical material blends harmoniously into the interior. PVC panels are produced in various colors and sizes, and finishing options using them can often claim exclusivity. In addition to conventional lamellas, there are plastic sandwich panels on the market, which have an insulating layer inside. But PVC, unfortunately, is not particularly durable.
To obtain smoother edges, it is recommended to cut the plastic to size using a jigsaw.
Slope finishing work begins with the installation of a starting plastic profile. It is attached with self-tapping screws directly to the door frame of the front door. The first lamella is installed in the profile. Next, the following elements are mounted with brackets to the wooden slats, and the last plank is closed with a special profile.
MDF finishing

MDF panels in the form of extensions are often installed on door slopes when general repairs premises. Possessing high strength and resistance to deformation, they are quite simply mounted on any surface that needs to be covered. Installation on the frame is carried out in the same way as fastening panel materials. It is possible to stick MDF onto a flat, plastered and primed surface using special compounds. For these purposes, polyurethane foam is also used.
The attractive appearance of the panels pales somewhat in comparison with their poor resistance to mechanical stress and poor tolerance to atmospheric influences. Therefore, only apartment doors are covered with MDF.
Other options
For entrance door slopes, finishers use many different materials, often combining them at their discretion. In particular, vinyl or metal siding and porcelain tiles are used for external surfaces, and for internal surfaces - tiles with a matte surface. Natural stone, metal-plastic and wood are universal materials, but each of them has its own characteristics that should be taken into account.

There are actually many options for finishing slopes, so each owner will be able to choose for himself the only acceptable method that will suit him not only in appearance, but also in price.
07/13/2015 at 12:07
Quite often you can hear another name for door jambs - these are decks, as professional builders will say. When installing jambs, all technologies and requirements must be observed.

Diagram of the existing jamb and the new door.
Features of getting started
To make a door jamb, first prepare the tools:
- level;
- hacksaw;
- roulette;
- plumb line;
- pencil or marker;
- chisel;
- plane;
- axe.

Scheme of foaming a door frame into a wall opening.
To make a door frame, it is necessary to prepare thick logs.
Slopes at the doors
If you already have certain skills in the construction field, then this will not be difficult; if you do not have them, you should trust the specialists.
First of all, the logs are laid out with wedges onto 2 or 4 blocks. After this, four-rope beams are turned from the resulting blocks: on one side, a groove is made on it for fastening to the wall, and on the other side, one quarter is removed, into which the door leaf will subsequently fit.
Tenons are cut out from the ends of the logs, which should correspond in size to the grooves on the beam. The fit must be done very precisely, since, apart from the tenons, the door frame is not secured with anything else.
Usually wooden doors are chosen for a house, but since they are the heaviest, they can turn the decks inside out when fully opened. This leads to the door not closing tightly, which in turn causes loosening. If the grooves are poorly fitted, the defective door frame will begin to manifest itself immediately: loosening will begin, the formation of cracks through which the room will be blown.
After all the preparatory work, they proceed directly to installing the door frame in its rightful place. On both sides, the width of the door frame is made equal to the depth of the tenon (fastening). The depth of the tenon will depend on the width of the decks. After this, two development options are possible.

Assembly diagram of a door frame for a log building.
In the first case, an opening is cut out along the manufactured door frame; in the second case, the opening is first cut out, and the door frame is made directly under it. Some professionals, over many years of practice, have developed the ability to do everything “by eye.”
The hole is made using a plumb line to accurately determine the vertical on the log house and everything is marked with lines that will mark the future opening. Using a level, they also mark the top and bottom, after which they begin to saw through the doorway according to the markings. If the sawn element is wide, then sawed off bars will help you install the deck, which will act as a kind of wedges. Thanks to this, the doorway can not only be rectangular shape, but even in the form of a trapezoid.
Making an external door jamb
Having an external jamb on the door adds a finished look to your renovation. In order to complete the work exterior decoration doors, you need to take several steps:
Scheme of finishing a doorway with MDF panels.
- The door frame is measured, after which the dimensions are transferred to a separate strip, which will serve as the external jamb. The color and texture are chosen by the customer from a huge variety of building materials presented on today's market.
- The sawn-off planks of the required size are aligned along the outside of the doorway, after which measurements are taken using a level and square. This is done to accurately maintain an angle of 90 degrees. If everything is done correctly, then you can nail the planks, starting from the top. The planks are nailed down either with decorative nails or with a special compressor.
- After all the work has been completed, you can proceed to the final stage of work - the threshold. It covers the inner area of the doorway. It must be aligned exactly with external parties boxes so as not to stumble.
Reconstruction of door jambs and doors
During the renovation, each of you has faced the problem of completely replacing the door frame or a small reconstruction that can completely transform the appearance of your door.
Availability in the house wooden door gives a lot of scope for the homeowner's imagination. The simplest method of restoration may be to grind the surfaces. Using sanding, you can level the surface and get rid of small chips and cracks. Sanding can remove not only paint, but also varnish. After the work is completed, the surface is cleaned of dust and reconstruction continues.
If there are deep cracks or gouges on the door, they must be smoothed out.

Door set diagram.
This work is done with a spatula using a special composition - wood putty. The mixture is produced both in a ready-to-use composition and in a powder that will need to be diluted.
After the surface is puttied, you need to wait for it to dry completely, and then perform another stage of sanding. If the door cannot be restored, then it can be completely closed, for example, with a sheet of chipboard. This option is one of those that is called “cheap and cheerful”.
The only problem with this option is that the structure is heavier, but not critical. The chipboard sheet must be adjusted very precisely so that it does not interfere with opening and closing the system.
After all the work carried out, further decor depends only on your imagination: the door can be painted in any color, decorative finishing putty or cover the door with wallpaper. In any case, the design will depend on the general mood of the room and your imagination. After finishing the decoration work, the door is varnished, which will significantly increase its service life.
The slopes on the doors are not only an insulating element of the door decoration, but also perform an aesthetic function. The process of installing slopes on doors requires special attention, because they exist different ways and finishing technologies. In this article we will consider issues related to installing slopes in various ways.
Methods for designing slopes
There are different options for installing door slopes, which are determined by the type of material, work technology, etc. When installing it yourself, it is important to follow the recommendations of specialists and detailed installation instructions. It is important to ensure that the materials used are practical and durable, and they must also perform insulating functions, especially when finishing the slopes of the front door.

The installation of door slopes must meet certain tasks, which include reliable fixation of fasteners, as well as performing a decorative function. When determining variations in the finishing of slopes, experts identify surface cladding with different materials, which are attached to the base with the assistance of mortar and plaster. Some elements can be attached to the frame base using a drill or other devices.
As finishing objects, you can veneer door slopes from laminate, plasterboard, plastic or wooden panels, MDF and the like. All materials are perfect for finishing, both for interior doors and entrance doors. IN latest version, it is necessary to ensure reliable sound insulation and complete sealing, which requires careful sealing of the slopes.
The slopes for the front door should not have any voids, which increases the strength and reliability of the cladding. You can use different finishing materials on top of the putty or mortar. The main thing is that they are combined with the interior design of the apartment or house. If a huge amount of mortar is needed for finishing, for example, to level corners, then a frame can be installed on the slopes. Its base can be wooden slats or metal profile, on which facing materials are installed.

It is worth noting that finishing the slopes under the frame will create a smoother surface than plastering. Moreover, finishing with wooden or plastic panels looks more attractive than painting the surface and so on. In particular, it is much easier to carry out telephone, electrical and other communications through frame slopes.
It is important that the doorway has a maximum service life, is durable and practically resistant to mechanical and other damage. To do this, you need to know the rules and technologies for installing slopes on doors yourself. No less importance is given to the choice facing material, which are distinguished:
1. Finishing with drywall. Such material will hide all the unevenness of the slopes. Using this option, you will get rid of unnecessary waste on purchasing putty and other solutions intended for leveling a certain area. In this case, there will be no possibility of installing a frame base.
2. Plastering the slopes on the door. This method is considered the most economical and practical, and all the work can be done independently. For this, it is important work surface cover with plaster, after which you can start finishing.
3. Plastic panels. Very often used for decoration window openings. They are rarely used in door openings, because plastic materials will stand out from the background wooden product. Moreover, this option is not reliable and durable.
4. Wooden slopes. This finishing option is the most popular. Wood is a durable and reliable material that will last for a long time. This finish will suit different room interiors.

Drywall door slopes
Drywall is not used for finishing, but is the basis for slopes. This option is used to save money on purchasing different mixtures for leveling walls. Installation work should begin with preliminary preparation surfaces, which includes cleaning the walls, as well as priming:
1. After the surface has dried, you need to take all measurements and prepare materials for finishing the slopes on the front door with your own hands. When cutting the material, make sure that some parts are cut at an angle. This is necessary for attaching parts to a tilted surface.
2. After cutting the sheets, check that all elements fit under the doorway.
3. Next, you should wait for the primer layer to dry completely, after which you can install the panels. Special glue or dowels can be used as fasteners. It is recommended to use the first option, which will allow you to fasten the sheets of drywall more evenly.
4. The installation process should begin with the installation of the side parts of the opening, and finally, the upper area can be finished.
5. Glue can be applied in a continuous strip or in separate dots, for example, every 15 centimeters.
6. After securely fixing the drywall sheets, it is necessary to finish the surface by attaching perforated corners using putty.

Finishing door slopes with plaster
This type of work does not present any particular difficulties and requires minimum costs. The process of finishing slopes with plaster has the following sequence:
1. First, the working surface must be cleaned and primed.
2. After the primer layer has dried, it is recommended to begin applying the solution to the surface of the slopes. It is recommended to use a spatula for this work.
3. To ensure that the corners of the opening are even, it is important to use perforated metal corners. They are attached to the surface using a layer of plaster and carefully covered.
4. After the plaster has dried, the surface of the slopes should be cleaned using sandpaper.
5. The last step is to treat the walls using paints and varnishes that will add aesthetics.

Finishing slopes with plastic panels
You can make door slopes with your own hands from plastic panels. The work is carried out in the following sequence:
1. First, you need to take measurements of the door slopes and cut plastic panels that would correspond to these parameters.
2. You should use an electric jigsaw, not a regular knife. This is necessary so that all parts in the cut areas are even.
3. After cutting, all panels must be checked against the doorway.
4. First, install slopes on the sides. For this purpose, a special profile is fixed to the opening using self-tapping screws.
5. Wooden slats must be attached to the edge of the wall. It is important to check the evenness of the installation elements with the assistance of the building level. Plastic panels will be attached to such slats using staples.
6. In the lower area, a plug is installed on the plastic panels, and the finishing item is inserted into the slopes on the sides and into the initial profile. The same procedure applies to finishing the slopes above the doors.
7. The last step is processing and sealing the seams using silicone. To install plastic slopes It is recommended to choose PVC sheets, as well as special sandwich panels.
Finishing slopes with wood
Wood finishing is perfect, as well as for slopes metal door, and wooden. Of course, in your work you can use materials made from natural wood, or use laminated or MDF panels. If you want to choose a material that has excellent insulating properties, then it is recommended to use MDF boards. If their parameters do not fit the dimensions of the slopes, then an excellent alternative can become a laminate.
In the beginning, installation work begin with careful sealing of the seams between the door frame and the wall surface. After this, the remaining foam must be removed, cleaned and carefully primed. Slopes can be made at right angles or with a slight slope. After determining the shape of the slopes, it is necessary to fix all the panels. When working, you must carefully monitor the correct selection of wooden planks. It is important that they have the same thickness and dimensions on both sides.
The slats or frame must be attached to the wall with the assistance of dowels, which refers to the fixation of all parts. The slopes can be attached using glue or using self-tapping screws. All gaps must be sealed with silicone sealant. Slopes made of wooden panels look very aesthetically pleasing in any interior.

Detailed instructions for installing slopes for entrance doors
Finishing work must be carried out taking into account the size of the doorway and the materials used. If when installing slopes in interior openings there is no need to do insulation, then for entrance doors a similar procedure is important element. To answer the question: how to make slopes on the front door, it is necessary to pay important attention to sealing the openings from drafts and sounds coming from the landing.
Slopes must be strong and reliable. In this case, experts suggest finishing with plaster or using different combinations. For example, you can plaster the walls on top of which MDF panels are mounted. Everyone uses items for decoration according to their own preferences. To carry out the work, you need to prepare the following materials and devices:
- polyurethane foam;
- lime, cement;
- putty, primer;
- sand;
- glue, dowels, if necessary, “liquid nails”;
- electric jigsaw;
- building level;
- brushes, spatula;
- perforated corners.
To answer the question: how to make door slopes even? - we recommend studying detailed instructions performance of work.
1. First of all, it is important to seal all the cracks. After installing the door, it is important to carefully fill all the gaps between the frame and the wall with foam. Next, you need to wait until the foam hardens. All remains must be cut off with a regular knife and the cracks carefully smoothed out.
2. Surface preparation is important for further plastering of the wall. All work takes a long time, so it is recommended to treat the surface in several layers. First, a layer of primer is applied to the wall, which will better strengthen plaster mortar. To achieve a perfectly flat surface, you need to use a beacon profile, which is fixed with dowels.

3. Next, we carry out plastering of the slopes. To make the solution, you must use cement, sand, mortar. The technology of applying the mixture to the surface must begin from the upper area of the slopes. First, the putty is applied in a thick layer, after which the excess amount is removed by leveling the wall. To ensure even slope angles, it is recommended to use a perforated profile. They are fixed on the surface of the applied plaster mixture. Next, a finishing layer of plaster is applied, which should be thin. This process will remove all unevenness and roughness.
4. The final stage is attaching the MDF panels. The base for such panels should be made of lime-cement mortar. After it dries, a layer of primer is applied to the surface. The panels must be divided into three parts, each of which must correspond to the door slopes. A layer of glue must be applied to the surface of the wall, after which the panels are applied to the wall. Such work must be done with all the details.

To understand the scheme of work, we recommend watching the video about finishing door slopes, presented at the end of the article. When finishing, you need to pay due attention to cutting the slab. To do this, all angles are carefully measured, and it is important to trim the panels at a certain angle. After cutting the plastic or wooden panel, all the parts need to be connected to check whether they correspond to the door slopes. The perfect combination finishing the slopes will be the use of wooden panels and doors made of such material.