Want to learn more about DIY mole repellers that can be effective, although not as effective as electronic devices? The most commonly used material for making a mole repeller is a plastic bottle or tin can. But if you are a radio amateur, you can try using electrical parts.
Do-it-yourself antikrot No. 1
will help you electronic circuit presented below. Various ready-made electronic devices are also used. They usually use emitters like EMX-309L1 and the like as emitters. You can also use small-sized electromagnetic relays, speakers and small-sized electric motors from old tape recorders, players and telephones.

Do-it-yourself antikrot No. 2
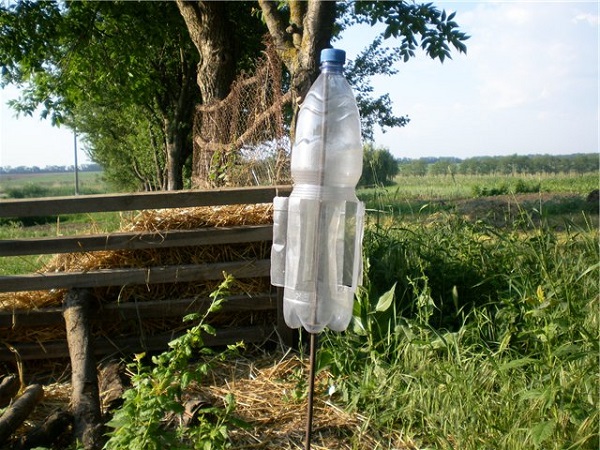
The simplest and most unpretentious way to make a mole repeller with your own hands is to simply put a plastic bottle or tin can on a metal peg dug into the ground. If you yourself don’t get tired of the constant knocking of the cans, then the moles will undoubtedly soon leave the area.
Do-it-yourself antikrot No. 3
A more effective model is a modernized bottle, in the body of which special blades are cut out so that it spins more strongly in the wind, creating more noise.
Do-it-yourself antikrot No. 4
The next most advanced and complex design, and to make it you will need several tools, such as a screwdriver and pliers. What's remarkable is that in addition to the humming noise the bottle makes when the wind blows on it, the propeller at the end of the bottle makes additional noise. So, in advertising terms, this is an improved version of a mole repeller with increased efficiency.
Do-it-yourself antikrot No. 5
With electronic filling - that’s how you can call this device. It is based on a hollow metal pipe dug into the ground, into which a cheap electronic buzzer from a Chinese battery-powered alarm clock is lowered. The top of the pipe is covered with a rag so that the sound does not spread throughout the surrounding area, and it is covered from rain with the same plastic bottle.
Do-it-yourself antikrot No. 6
And the last miracle device, made with your own hands against moles, is a giant propeller, the design of which, again, was not without tin cans.
As you can see, the basis of all the mole repellers that have been listed is the principle of creating as much noise as possible in the ground where the mole lives. And since moles do not like noise, they will leave your area.
![]()
Publ.: 2014-04-14
Change: 2017-09-20
- 1690 rub.
The SMR-801 repeller is designed for areas up to 1000 square meters. m. Used against various rodents and moles. Powered by solar panels and built-in battery.
- 1250 rub.
Tornado OZV.02 is designed to protect land from rodents and other pests (moles, shrews, gophers, rats, voles, mole crickets). For areas up to 2000 sq. m.
- 1050 rub.
Electronic earth pest repeller antikrot Tornado OZV.01, designed to protect land from the habitat of rodents and pests (moles, shrews, gophers, rats, voles, mole crickets, etc.). Power: 6 V. Effective area: 1000 sq.m.
- 1950 rub.
This repeller is for areas up to 650 sq. m. Designed to combat all common crop pests: moles, voles, shrews and others. The mole repeller SM-153 (MS-15) operates on a solar panel to which a battery is connected.
- 3450 rub.
Mole 1 (WK-0675) emits ultrasonic and sound signals that affect nervous system moles and are forced to leave the protected territory. Power supply: 4 class D alkaline batteries. Effective area: 100 sq. m.
- 2990 rub.
The mole repeller is designed to protect land plots from the habitat of rodents and pests (moles, shrews, mole crickets, etc.). Power: Solar battery + battery. Effective area: 350 sq.m.
- 1200 rub.
Many people are interested in the question: how to make turntables from plastic bottles with your own hands? The issue of maintaining cleanliness has become global environment. Indeed, walking along the streets of the city, relaxing on a river or in the forest, we often see scattered tin cans, plastic bottles. Anyone can provide all possible assistance in resolving this issue. Moreover, this process can become not only useful, but also entertaining, bringing joy and satisfaction. It's very simple! Do interesting crafts from available materials is accessible to everyone. A pinwheel made from a plastic bottle is a product that can serve as both a decoration and a toy for children, and is useful in gardens and summer cottages.
Pinwheels made from plastic bottles are most often made in the form of flowers, and serve not only for decoration, but also to determine the strength of the wind.
Making a turntable
First way
We will need materials:
- plastic bottle;
- stationery knife;
- scissors;
- marker;
- awl;
- bead;
- wooden stick.
Take a washed, label-free, dried empty plastic bottle.
The spinner blades can be positioned along the entire length of the plastic bottle.
Using a stationery knife, cut off the neck of the bottle at a distance of 10-12 cm from the cork. The resulting part is divided into 5 equal parts, lines are drawn using a marker from the base to the end of the part. The workpiece is cut along the lines, each blade is bent towards itself, the edges of the blades are cut off in a semicircle (for aesthetics). The resulting rays are alternately bent at the base to the left parallel to the neck from one cut to the other. The fold lines are smoothed well with your fingers so that the strips do not unbend.
The resulting blades are slightly turned in left side. A hole is made in the middle of the lid with an awl, and with the help of a stationery knife it is formed according to the diameter of the gel rod so that it rotates freely. By inserting the rod into the hole, pass the cord from old headphones through it to mobile phone. In a bead with inside the cord coming out of the rod is passed through. The end of the cord is tied with a knot to secure the bead. The resulting pinwheel is attached to the other end of the cord on a wooden crossbar. Decorated according to your own taste. The spinning toy for the baby is ready!
Second way
Materials and tools used:

Pinwheels can be hung on trees, which scares away birds.
- plastic bottle;
- stationery knife;
- scissors;
- marker;
- awl;
- braided cord for fishing (fishing line);
- empty gel pen refill;
- cord from old headphones for mobile phones;
- large needle;
- bead;
- wooden stick.
Using a stationery knife, cut off the bottom of the bottle at a distance of 15 cm. The resulting blank is marked into 5 equal parts. Marking is not difficult, because the bottom itself has the same number of rays. Marked with a marker and cut with scissors along the resulting lines. The strips bend towards themselves. A braided cord is threaded through a needle. Separately, the cut parts are bent to the right side parallel to the base.
They are fastened with a cord (fishing line), passing a needle through both edges of each bent part. A small end of the cord is left. Having threaded all the blades in this way, remove the needle, stretch and tie the fishing line. In the middle of the bottom, an awl is made and a hole is formed with a stationery knife according to the diameter of the gel pen refill. A headphone cord is passed through the rod, and a bead is strung on one side. The bead is secured with a cord tied in a knot.
The rod is inserted into the hole in the bottom (the bead should be on the inside), and the resulting pinwheel is tied to a wooden stick. The craft is ready.
Use of turntables
The options described above are not the only way to make turntables. Manufacturing is multifaceted. Fantasy has no boundaries. A great opportunity is to give the desired shape by transforming the blades at your own discretion. It is possible to use the item in various places, attaching it to various holders.
Pinwheels attached to a stick holder become a wonderful toy for a child, with which he can walk in warm summer weather, when a light breeze blows, and enjoy the rotating miracle. Having decorated home, garden, and country fences, we get a wonderful opportunity to enjoy a magnificent spectacle.
The turntables used on plots of land become assistants in preserving the harvest. At home they can serve as interior decoration.
Maintaining order
Let’s imagine a situation in which each of us takes full responsibility for preserving natural resources. By starting small, remembering that there are designated areas for waste, and taking used products with us, we make a significant contribution to maintaining the environment. Moreover, recyclable materials have the opportunity to find a second life in interesting, entertaining, and sometimes necessary household items.
Gardens and vegetable gardens are a good help both in terms of food and in terms of relaxation for the soul. But everything that is grown on personal plots, there are many dangers - beetles, larvae, birds, moles. And if chemicals help fight plant diseases or insect pests, then it is best to scare away birds and moles from the site, rather than destroy them. A primitive design will help with this - a windmill made from a plastic bottle, made with your own hands from scrap materials.
Waste material goes to work
Many, many different useful crafts can be made from the so-called waste material. It’s also easy to get useful things for your garden plot and vegetable garden by applying your imagination and skillful hands to seemingly unnecessary things. Many various options repellers for birds and moles can be seen in various sources, some of them are quite complex, and some are primitive. It’s worth starting to create with the simplest designs. Plastic bottles, scraps of polyethylene pipes, a broken handle from a house mop, used welding electrode, gift ribbons from already unwrapped gifts, toy bells or drink cans - anything can be used.
Design Basics
It is no coincidence that a device for scaring away birds or moles from a site has a very specific name “windmill”. The main force that makes the structure perform its function is the wind. The wind is blowing - the windmill is working. In order for such a repeller to work, it needs to catch air currents, which means it needs blades. If you set a goal, then making a windmill from plastic bottles with your own hands is quite simple. The most important part - the blades - is cut out of plastic. Moreover, the blades from the bottle will not need to be attached, because they are cut in place and simply bent. The remaining design elements will depend on the purpose of the windmill. Tools you will need for work:
- stationery knife;
- scissors;
- universal glue;
- hard wire;
- beads with a hole for wire;
- self-adhesive film or colored electrical tape.

What are birds afraid of?
Birds provide many benefits by eliminating pests. But when the harvest ripens, they are not averse to eating tasty, sweet fruits, pecking at cherries and spoiling apples, pears and plums. Making a windmill from a plastic bottle with your own hands is quite simple, if you remember that birds are afraid of moving objects. That is why turntables and scarecrows with fluttering sleeves have always helped gardeners and gardeners preserve their harvest.
How to scare away birds
A windmill made from a plastic bottle must be movable to scare away birds. The simplest and budget option- spinner. It does not require additional costly motors and batteries, because it operates on air movement. But it needs blades to catch the wind. You can make several options for such garden helpers. For example, like this.

Cut an ordinary plastic bottle in the center into four sections that can be bent without separating the parts from the whole.
Then, bending the blades so that they catch the wind, pieces of foil are glued onto them. You can use self-adhesive mirror film. It is also necessary to cut a hole in the bottom that is suitable in diameter. The finished bottle-windmill is put on the remainder plastic pipe or a mop handle. The bottle should rotate freely when the wind blows, but not dangle too much, otherwise rotation will not work. The remainder of the pipe should be long enough for the birds to see the pinwheel.
You can make a windmill from a plastic bottle with your own hands in this version - cut long blades from the base of the bottle, bend them at an angle of 45 0. The turntable diagram is shown below.

Such a windmill is mounted on a rigid base at right angles to the ground. You can secure it in any way - using a nut, if the base is threaded, using a large smooth bead, making a loop on the wire with pliers. There are many options; the master decides which one is more convenient to use. The most important thing is that the turntable rotates freely. Some craftsmen attach several of these devices to one base, decorating them with colored film or painting them acrylic paints. The result is not only functionally useful, but also a beautiful thing for a personal plot.

What are moles afraid of?
A windmill made from a plastic bottle to repel moles is a very useful thing, because moles are also pests. They eat earthworms that loosen the soil and spoil the roots and tubers of plants. Sometimes there are very, very many of these underground inhabitants appearing on the site. You should get rid of uninvited guests - moles. Moles are practically blind; you can’t scare them with some kind of flicker. But moles have good hearing. It is on this feature that the principle of scaring these animals away from the garden is based. Making a windmill from a plastic bottle with your own hands means saving the harvest, leaving underground inhabitants alive, and not flooding your garden with chemical poison.
How to scare away moles
Moles are afraid of noise, and if you place something on the site that will make noise underground, the moles will leave it, going in search of a quieter habitat. A windmill made from a plastic bottle to repel moles, the diagram of which is proposed below, works just for this outcome. In order for sound to travel well in the ground, it must be amplified using resonance. This can be achieved using a hollow pipe dug into the ground. It will amplify the sound and transmit it across the earth.

The base of the turntable can be taken from the design proposed above - blades are cut out on the body of the bottle, and the windmill itself is placed on a metal base, for example, a used electrode. Sound will be transmitted better through metal than through plastic. Then the electrode, a metal rod, must be placed in the buried pipe so that the sound from the rotation of the windmill is amplified. A do-it-yourself windmill made from a plastic bottle to preserve the harvest is a very simple design.

Pinwheel beauty
Many of those who maintain a garden or vegetable garden try to decorate the area using available materials, the same plastic bottles, for example. What craftsmen can come up with from this waste material. For example, by placing a windmill made of plastic bottles above a flowerbed, you can make it much more interesting. The classic turntable is made of 4 blades according to this scheme.

The blades can be cut out colorful bottles, then assemble them in the center using a bolt and nut or a stapler. You can decorate transparent plastic self-adhesive film or paint with acrylic. You can make more than 4 blades. In any case, such a classic windmill made from a plastic bottle, made by yourself, will be an interesting addition to the flower garden.

There are absolutely simple designs windmills-suspensions. From a small plastic bottle you can make interesting decoration- cut the bottle lengthwise in the middle into thin strips 1 centimeter wide. Then connect the upper and lower parts to form a “flashlight”: press the blades in the middle, folding them in half, but at the edges they should be bent at an angle of 45 0. Make a hole in the cork using a hot nail and insert a looped paper clip into it. You can hang a bell or shiny beads on it. The windmill pendant is ready and can be placed on a tree branch.

It’s not difficult to make a windmill from a plastic bottle with your own hands, but it will provide a lot of benefits and beauty.
With the onset of summer, many gardeners notice lumps of soil in their beds. Their presence indicates that a mole has chosen the area. This animal is dangerous because it eats root crops and violates root system plants. To save your harvest and save crops from destruction, study popular methods of making noisy turntables.
How to make a mole repeller with your own hands from plastic bottles
Keep in mind that the mammal is blind, but its hearing and sense of smell are impeccable. For this reason, it is important that the mole repeller made from a plastic bottle creates noise and vibration. This effect is achieved by blowing wind, which sets the device in motion: the blades rotate, transmitting sound waves downward: a resonance is created inside the ground, scaring off moles. Remember that to protect 6 acres you need to place about 3-4 small wind turbines.
The device is made from simple and available materials. The design may have different sizes. A windmill for a vegetable garden is created using:
- two 1.5 liter plastic bottles (use plastic of different colors or pre-paint it with acrylic paints from spray cans);
- durable scissors;
- sewed;
- pliers;
- stationery or construction knife;
- durable but easily bendable metal wire;
- four multi-colored plastic bottle caps;
- large beads.
Decide in advance on the size of the mole repellent structure. Before making a large turntable, additionally acquire:
- a high wooden pole;
- round metal pin;
- a small wooden block;
- multi-colored or transparent plastic liter bottles– you will need 4 pieces;
- two washers.
Step-by-step instructions for making a turntable
Learn the most popular method of making a mole pinwheel from a plastic bottle. The main stages of creating a craft are as follows:
- Cut the bottles in half: use a construction or stationery knife, and be extremely careful when doing the work. For a windmill, use the top of the containers.
- Using scissors, cut blades of the same size on the halves of the containers.
- Carefully bend the cut blades at the base at an angle of 45 degrees, slightly smooth out the bent elements.
- Use an awl to make holes in the center of the wings and lid.
- The bead is strung on a wire.
- The metal wire is threaded through the cap, the windmill, the second cap, the bead, the third cap, another blank, the fourth cap, the final bead.
- At the end, use pliers to make a bend to secure the elements strung on the wire.
Remember that the more parts and blades a turntable has, the louder its sound from the wind, the more spectacular appearance. If you decide to create a large mole repeller, then follow these instructions:
- Take wooden block, make a hole in it: its diameter should be slightly larger than the diameter of the installation rod.
- Secure the covers on four sides of the bar using glue or galvanized fasteners.
- On each side plastic containers cut out oval windows.
- Screw containers with holes made to the fixed lids: as a result, the slots should “look” to the sides, and not up.
- Fasten the made structure to the pin, secure it on different sides with metal washers, and cover the top of the pin with a plug.

If it is not possible to use several containers, then you can limit yourself to one. To work you will need:
- plastic bottle with a volume of 1.5-2 l;
- metal pin;
- Part water pipe;
- construction or stationery knife.
The turntable manufacturing process is very simple. Do the following:
- Find the place where the mole passed, install part of the water pipe below the detected passage.
- Take the pin, place it in the installed pipe, secure the part with a plug or using metal plate and self-tapping screws (tighten them until the caps fit snugly against the plates).
- Make a hole at the bottom of the container: its diameter should be larger than that of the pin.
- On the walls of the container, draw the letters “P” inclined to the side.
- Cut the blades according to the markings and bend them.
- Place the plastic propeller you made onto the pin: it should go all the way to the neck, screw on the cap.

Video
The issue of mole control is very relevant for summer residents. These seemingly harmless creatures can cause great harm to the garden and the products grown in it. Therefore, many are wondering how to solve this problem. Despite the mass of anti-mole remedies and devices in the city, there is one simple option that everyone can afford.
You don't need to be a skilled craftsman to create this product, and the whole job will take about 20 minutes. Intrigued? Then let's find out how to make a mole repeller from a plastic bottle.
Looking for solutions
There are a lot of requests on the Internet regarding the topic of rodent control, especially moles. Everyone wants to make sure they don't have to deal with this problem anymore. However, not everyone knows how to act in this case. Killing animals is not entirely humane, so poisons and other killing devices will not work. Often gardeners run to the store to ask for advice or buy an effective and at the same time inexpensive product. Others take a simpler path, making a mole repeller with their own hands.

But how can a plastic bottle repel moles? It's simple. All you have to do is upgrade it by constructing unique blades from a bottle that will make it spin. While rotating, the turntable will make noise. The design is quite simple:
- Plastic bottle.
- Stick.
That's all you need. The container is placed on a stick or rod, after which it will spin under the influence of the wind. Due to the fact that the rod is buried in the ground, vibration and noise repel moles. You can make many such products for the garden, the cost of which is simply meager. And most importantly, you don't have to spend a lot of time. Let's look at the instructions on how to create this simple miracle of technology.
What you need for work
The advantage of a plastic bottle repeller is that you will need a minimum set of tools and materials. Anyone can work with them, and purchasing them is not a problem at all. You can see this for yourself. Here's a list of everything you'll need:
- plastic bottle;
- steel rod or wooden stick;
- stationery knife or scissors;
- drill with a drill (in some cases this is not required).

That's the whole set. Are you surprised? It’s not worth it, because for all its simplicity, the mechanism works flawlessly. You just need to connect it all into one device.
Pay attention! The device is automatic, but only works from the wind. In calm, windless weather it will simply be useless.
Step-by-step instructions for creating a mole repeller
So, when you have everything you need, you can get started. The bottle can be of any color, shape, volume... This is not so important. Provide yourself convenient place for work. It is better to do everything at a table on a flat surface. Then no problems will arise. The instructions are as follows:
That's all, the device is ready. Now you just need to find the mole's tunnel in order to insert the rod into it. Due to the vibration and sound transmitted from the bottle along the rod into the ground, moles will not approach this place. They are afraid of such aggressive noises. If you have a large garden, then make several structures to prevent moles from appearing in another part of the garden.
Advice! Such a repeller will act not only on moles. Birds and other rodents are also very afraid of such noise. Therefore, you do not have to fear that our smaller brothers will devour your harvest.
The appearance of moles on a lawn or garden plot does not bode well, even if the animal accidentally damages the roots of plants and does not feed on crops from the garden bed. Trees, shrubs, and vegetable plants that find themselves in the hunting field of the common mole die. Within a few days, nothing remains of the ideal lawns. In addition, they destroy beneficial earthworms and throw layers of infertile soil to the surface.
A good owner cannot stand this, and begins to look for an effective and quick way to get rid of the uninvited guest and his family once and for all.
- Read - and what do they bring more - benefit or harm?
But before organizing the expulsion of a blind-sighted pest, it is necessary, at least in general terms, to become familiar with its biology. For some, their knowledge of moles ends with the cartoon about Thumbelina. But in real life moles do not count the money themselves, but force the owner of the lawn or garden plot to count the losses.
Biological characteristics of the pest
The common mole, like the hedgehog, belongs to the order of insectivores. Already from the name of the group it is clear that it cannot feed on potatoes and other underground parts of plants.
Weighing 130 g, the body length reaches 15 cm. It feeds exclusively on insects and for this, at a depth of 10-50 cm, it digs a system of underground passages with its powerful forelimbs. The nest is built at a depth of up to 2 meters. There, in the dug labyrinth, he finds food for himself: earthworms, insect larvae and other arthropods.

In the photo
To compensate for poor eyesight, it has phenomenal hearing and sense of smell. Like all animals, they love silence, so when there is strong sound exposure, they leave the developed territory. People take advantage of this weakness of his. They're on the move plastic turntables against moles and other homemade repellers made from scrap materials.
Plastic pinwheel against moles
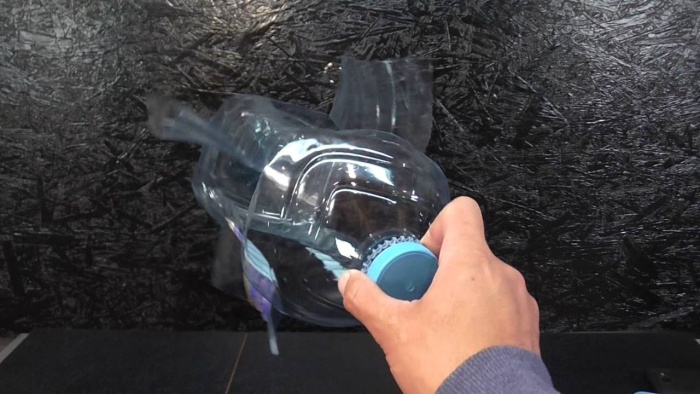
The simplest type of repeller. To make it you will need a regular plastic bottle and a metal pipe or thick steel wire, on which the mole spinner is actually put on. Several cuts are made in the bottle, which are folded back to form a kind of blade-pockets. The wind causes the blades to spin, which creates noise that resonates into the pipe and goes into the ground.

Several of these tubes can be stuck near mole holes. In windy weather, a mole repeller made from a plastic bottle creates an unpleasant vibration through its rotation, which forces the animal to go in search of a quieter habitat.
This repellent method works on European, Small and Caucasian moles. Moles in the northern regions of Russia most often do not respond to windmills. It is advisable to place several of these windmills at a distance of 10-15 meters from each other.
How to make a pinwheel from beer cans?
The design includes a metal pipe and an empty cola or beer can. The top of the can is cut out to fit onto the pipe. The same 3 cuts are made on the can. For greater noise, it is better to bend the bottom of the can. The choir performed by several noisemakers, the mole will not be able to stand it and will leave his favorite places.
Of course, making a repeller from a plastic bottle is as easy as shelling pears, but not everyone has such a desire. And there can be problems with the wind. In calm, windless weather, they will become a simple decoration of the garden plot. And the resonating noise in gusty winds may not please both the craftsmen themselves and their neighbors.

- What methods did we not use when fighting the mole? My husband dug up the entire garden. Moreover, the trenches turned out to be deep, almost as tall as a man. But every time the cunning animal turned out to be smarter than the man. The husband created drafts for him, waited for him to start closing them, and without waiting, he walked away for a minute. He comes, and the hole is closed and there is silence. Then the saga with the bottles began. They surrounded the pest like a wolf with red flags. When a storm warning was announced, such chatter began that the neighbors were the first to break down, and all this time the beast continued to surprise us with fresh mounds. We had to take our anti-mole noisemakers out of the bottles and apologize to the neighbors.
Yana, 36 years old
Alternative methods of getting rid of moles
Except homemade devices to expel pests, there are also industrial options. For example, ultrasonic repeller. The device looks like an ordinary stick with batteries inside. The device generates ultrasonic waves that are not perceived by the human auditory analyzer, but are annoying to pests.
One of the most successful decisions repeller Tornado-OZV 02 will become

In the photo
The underground inhabitants begin to panic due to constant mechanical and ultrasonic vibrations.
- The sound source itself is located at a depth of 20 cm, which eliminates the noise effect above the ground.
- Soil is a denser medium, so sound waves propagate better in it and reach a radius of 2 km.
- The device is made of impact-resistant materials that are resistant to dust and moisture. The device operates for 3 months on one set of batteries.
- The price of the Tornado repeller is 1200 rubles.
- Moles took a fancy to our site last summer. The fighting season ended in favor of the miniature animal. A plastic bottle against moles did not help. The onset of spring was met fully armed. We bought a Tornado repeller on the recommendation of a friend who himself suffered from uninvited guests. For a plot of 12 acres we bought 3 pieces. They created the Bermuda Triangle. After 3 days, the vital activity of the animals ceased. But, judging by the reviews, Tornado does not help everyone. Maybe it's the properties of the soil. We were satisfied and advised everyone who found themselves in our situation to buy it.
Svetlana Mikhailovna, 57 years old
Chemistry against moles
If all of the above remedies do not help, you can only resort to chemicals, but only to scare away animals. One of them is “Ejector concentrate Doctor Klaus from moles.” Its composition:
- citronella (oil);
- castor oil (31.1%);
- water;
- functional components.
It is best to use the product at the first signs of the presence of pests. The ejector is easy to use. First, attach a hose to it, then turn on the water and treat the area inhabited by insectivores. For preventive purposes, treatment is carried out every 2-3 weeks.

In the photo
Only the soil should be sprayed, not the plants on it. If a molehill appears where the snow is melting, then the ground is simply watered with the mixture from the ejector for 1 minute. You can also drain the underground passage itself, but first remove the top layer of soil.
The cost of one bottle is about 700 rubles.
In the fight against pests, some people make their own anti-mole pinwheels from plastic bottles, while others use innovative methods. The latter help preserve the harvest without much time and money. To ensure a guaranteed result, you should perform all actions according to the instructions and then victory will be yours.
The mole is a predator by nature. Its diet consists of larvae, small vertebrates, worms and insects. Also loves caterpillars, mole crickets and wireworms. He can get to them by breaking through long underground passages. As a result, the excess soil formed in the process of painstaking labor is pushed upward by the animal. This is how the mounds that gardeners dislike are formed. It is noteworthy that it eats precisely those pests that are capable of destroying the future harvest.
However, related problems arise - in search of something edible, moles dig long tunnels in the ground at different depths. Labyrinths laid deep in the soil damage roots and disrupt the natural microenvironment near the root system of plants. And the earthen heaps that appear on the surface spoil the appearance of the site. In general, it becomes obvious that the animal does more harm than good and then the question arises of how to get rid of moles on the site.
General information
A large number of moles appear in gardens in the first half of summer. This occurs due to the fact that the upper soil layer of forests and meadows becomes scarce and depleted. And garden associations and summer cottages with their fed “fat” soil, teeming with all kinds of living creatures, attract moles like a magnet.
During a short hunt for its food, a mole can dig up the entire area up and down, while spoiling a vegetable garden, beds with crops or a beautiful lawn. To prevent this from happening, you need to know how to get rid of an uninvited guest. If you do everything consistently, the result will be definitely positive and the mole will leave the area where he is not welcome.
There is an opinion that moles are afraid unpleasant odors. As a result, some summer residents water the garden with carbide and kerosene and scatter it around the site rotten fish and use smoke bombs. However, such methods are unlikely to suit good gardeners - is it possible to have a good rest in a plot that constantly stinks of rotten meat and kerosene?! That's why people are looking for alternative ways struggle.
Attention! Industrial enterprises have developed and produce various types of electronic repellers. But the price for them is quite high.
Experienced summer residents know that moles cannot stand any kind of noise. They do not like the sound of metal, the crack of plastic, or the ticking of an alarm clock. It is these characteristics of the animal’s character that served as the theoretical basis for the creation of various types of mole repellers.
DIY mole repeller
Since the task at hand is not to destroy the mole, but to evict it from a certain territory, for this purpose they use “noisemakers” rather than various kinds of poisons and chemicals. How to make a mole repeller with your own hands? In fact, it is not difficult and there are several types of noise structures.
Materials from which this device can be made:
- plastic bottles;
- tin cans of various shapes;
- ultrasonic and electronic devices;
- electric alarm clocks.
The leading place among homemade repellers is occupied by those made of plastic.
The most simple device in the fight against moles for your territory, use an ordinary plastic bottle placed on a metal pipe. Under gusts of wind, a plastic bottle makes an unpleasant sound and transmits vibration through the pipe. They can be heard in the animal's underground passages and he really doesn't like them. It should be noted here that wooden sticks are not suitable for these purposes, since they conduct sound worse than iron.
Windmill made from a plastic bottle
A complex option is a mole repellent in the form of a windmill. This is a kind of weather vane that works under any wind direction. When it gusts, it makes an unpleasant sound that scares away moles.
Windmill made from a plastic bottle
A mole spinner made from a plastic bottle is made as follows:
- Take an ordinary beer bottle with a volume of one and a half liters. Its shape should be classic.
- The bottle is turned over and the bottom is cut off with sharp scissors. As a rule, the classic bottle shape has a stripe near the bottom. It is along this that the cut is made.
- The finished cut bottom is turned over with the outer side up and a marker or felt-tip pen is used to draw lines along which further cuts must be made. Or rather, remove some of the plastic. The bottom has a central circle from which five rays radiate. You need to make markings from the border of the circle to the middle of the beam. Also from the middle of the circle and in the middle of the depression between the rays. This piece in the form of half a beam must be cut out.
- This manipulation is repeated with the remaining rays. And now the turntable is ready.
- A hole is punched exactly in the center of such a propeller, which should be perfect, without torn edges.
- A self-tapping screw is inserted into the pinwheel (the cap is directed inward) and screwed into the center of the bottle cap. Twist all the way until the thread runs out. To make the fixation tighter, it is possible with reverse side add a nut.
- On the neck of the bottle, strictly marking the center line, two holes are made for the nail. They must be against each other.
The windmill against moles with your own hands is almost ready. All that remains is to secure it to a pole and stick it into the ground.
To make the repelling stronger, take a metal pipe and dig it into the ground below the level of the mole's passages. A pole with a weather vane is stuck into it and secured firmly to prevent vibrations. The sound of a rattle, which is unpleasant to the mole's ears, will scare it away from the inhospitable area.
Tin repellers
Making it is quite simple. If you imagine the sound of metal regularly hitting metal, it becomes clear that it cannot be pleasant. The mole definitely doesn’t like that sound.
Tin repellers
But it’s enough to stick a piece of rebar or any other “iron” stick into the ground and hang a beer can on it. Under wind gusts, the can will beat against the metal rod and the sounds of the blows will go deep into the ground. Such a musical performance will again force the mole to say goodbye to the garden.
You can also string any number of the same beer cans onto a rope. The main thing is that the distance between them allows them to knock against each other in windy weather.
How to make a mole spinner from tin cans? It is made similar to a pinwheel from a plastic bottle. Here the blades are cut out with scissors and bent outward. Despite his small size, such a repeller will be quite loud and will quickly drive the mole out of the area.
Attention! As for ultrasonic devices, people with some experience can make them themselves.
Those who want to have an ultrasonic mole repeller on their property should turn to professionals who have a good knowledge of physics and electronics. Because explaining to an amateur how to assemble such a device is not very easy.
Such devices create vibrations inside the soil. Only the mole and other underground inhabitants can hear them. The human ear does not recognize ultrasound noise. But the animal’s excellent hearing will immediately suffer. The mole will stop excavation work in this direction and turn the underground passage in the other direction.
Sound waves having an electronic source operate like all mechanical devices. Except that they are controlled by a certain circuit. Sometimes devices with electrical noise have a vibration motor that can increase the intensity of sound underground. Buy different types Ultrasonic devices against moles are available in specialized stores, but the cost may scare off ordinary summer residents.
How to use alarm clocks against moles
Repelling moles with summer cottage using a clock mechanism is already a proven and most importantly effective thing. To do this, you need to purchase an inexpensive battery-powered alarm clock, or better yet more than one. The clock displays different times call. After which they are placed in glass jars with screw caps. Such a “gift”, previously tested for leaks, is buried in different places plot. Moles are very annoyed by the endless ticking of the clock, and even more so by the ringing of the alarm clock. In this simple way, an alarm clock against moles helps a lot.
A little more difficult option, again using a watch, is also considered very effective. To make such a homemade repeller with a clock mechanism, you will need a wide pipe (half a meter). Holes are drilled on its sides and in the lower part. The pipe is buried on one side in the ground, below the level of the mole’s underground corridors. An alarm clock is lowered into the pipe itself, to which a rope is tied for ease of further removal. The ticking mechanism creates an ultrasonic effect inside the pipe. And the mole is forced to leave the area.
Thus, using an alarm clock against moles, you can get rid of them one hundred percent. The main thing is to wait until the enemy’s nerves give in and he retreats from the battlefield.
As you can see, various types of noisemakers are excellent at scaring away moles. It is the annoying sound that complicates their life in a certain area. The most important thing is that the methods have been repeatedly tested and effective. Using them, it is quite possible to get rid of these creatures in your garden once and for all.
Moles and mole rats are very famous inhabitants of the underground kingdom. They look harmless, so many people don’t even realize how much harm they cause to garden crops. Meanwhile, gardeners declared real war on these animals. They try to drive out uninvited guests from their land in every possible way.
Some use cruel extreme measures: traps, poisoned food, and the like. More humane gardeners place solar-powered, ultrasonic or homemade mole repellers on their plots.
This article provides complete information about the dangers of moles and mole rats, and what humane and legal measures exist to combat them. And also about the types of repellers and instructions - how to make a mole repeller from a plastic bottle.
Of these two animals, the mole rat is the most dangerous. The fact is that the mole causes accidental harm - it damages the roots of plants when it digs its way through them. Moles are predators by nature, and their diet does not include plant foods. Plants become victims of mole attacks because the latter's prey most often lives in the roots and stems.

Mole rats are another matter. They have little in common with moles, although they are similar at first glance. In their appearance and habits, they are more reminiscent of wild rats, which also do a lot of harm to humans. Mole rats feed on the fruits of plants, often destroying entire beds. Gardeners place on plot of land traps, poisonous bait, flood the holes of mole rats with water, trying to save the remains of the crop. But often these measures turn out to be useless. Moreover, they are inhumane. Therefore, the only way out is to force the mole rats to leave the land on their own.
Mole repellers
Most effective means Repellers that help mole rats are also recognized today. They do not take up much space, are not conspicuous, and therefore do not spoil the landscape of the garden plot. Many gardeners have experienced the usefulness of these devices.
Progress does not stand still in this area. New, more improved models of repellers are being put on the shelves. They differ not only in shape, size and color, but also in price. Therefore, any gardener can purchase such a device and forever forget about the damaged lawn, eaten carrots and dug up flower beds with broken, once beautiful flowers.

Metal mesh against moles
However, you don’t have to go to the store for such salvation. If you have a strong desire and a little free time, you can make a mole repeller with your own hands.
Basic description of the pest May beetles, also known as May beetles, are insects of the order Coleoptera, family...Types of mole repellers
The whole variety of repellers is combined into three main groups:
- Mechanical– in the center of such devices there is a round, flattened mechanism, which by its rotation creates vibrations that are unpleasant for the animals, scaring them away.
- Biological- substances, mainly aromatic oils, placed in capsules. Their strong smell delivers discomfort moles and mole rats, forcing them to run as far away from the site as possible. Some odorous plants also act as biological repellents.
- Ultrasonic– devices that create vibration due to a built-in emitter.
The mechanism of action of the first and last types of repellers is based on the influence of sound vibrations on the well-developed hearing of a mole or mole rat. They perceive these unfamiliar sounds as a signal of nearby danger and flee.
An ultrasonic mole repeller differs from a mechanical one in one important detail: its vibrations are completely inaudible to the human ear. Plus it's very easy to use.
Among all types of repellers of this type, solar-powered mole repellers are especially worth noting. They are a structure in the form of a pin with a cap that is stuck into the ground. On the cap there is a solar battery that powers the resonant device. Unlike conventional ultrasonic repellers, these do not require battery replacement. You can install it in a place where moles and mole rats raid and never think about it again. Thus, the result is a very convenient and economical device.
 Solar-powered mole repeller
The biological type of repeller makes the life of moles on the site unbearable due to the strong and pungent odor for their sensitive nose. They also have no choice but to go away.
But if you don’t want to spend money on store-bought equipment, you can make a mole repeller with your own hands from improvised materials.
Do-it-yourself mole repeller from plastic bottles
- For the first version of a homemade repeller, you will need an empty plastic bottle, stick or tube. You need to make several wide cuts in the walls of the bottle on different sides in the form of blades and bend them back. This structure is then put on a stick and stuck into the ground. When the wind blows, the bottle will begin to spin, creating noise that will scare away moles.


- The items you will need are the same, with the addition plastic parts. You need to make 2-3 holes in the walls of the bottle and insert light, wide plastic parts into them to create a primitive fan. Then make a hole in the bottle cap with a nail and attach it to the pin. The mechanism of action is the same as in the first case.
Moles are one of the major threats among subterranean rodent pests to horticultural activities. Rodents are mainly controlled by mechanical and by chemical means. But recently, electronic devices have appeared that make it possible to fight rodents using more humane methods, driving away moles and other rodents from garden plots with emitted alarming sounds.
There are many types of electronic devices on sale, but they are expensive and do not always live up to expectations. You can verify the effectiveness of a purchased electronic device for repelling moles only after its trial operation.
The proposed version of the electronic device for repelling moles is assembled according to the original electrical diagram, tested in operation for two years and showed high operating efficiency. In the circuit, unlike industrial designs, the possibility of changing the frequency of the emitted signal is easily realized, which prevents moles from becoming accustomed to the emitted sound.
Appearance
The device for repelling moles is made from scrap materials, consumes little electricity and does not require any adjustment devices during manufacture. The housing for housing the electronic filling of the repeller was a metal can of cat food.
In the photo of the bank, which contains a mole repeller circuit that has worked for two summer seasons, half buried in the ground.
Electrical circuit and operating principle
The rodent (mole) repeller is assembled according to the electrical circuit below schematic diagram and consists of only two simple logic chips, a transistor and several passive elements placed on a printed circuit board. Distinctive feature The proposed scheme is characterized by low power consumption (a set of three AA finger elements with a capacity of 1 A*h is enough for the entire season), which is due to the emission of an audio signal with a frequency of about 480 Hz for two seconds with a frequency of once every 32 seconds. In addition, this mode of operation of the repeller has a more effective effect on moles and increases the time it takes rodents to get used to the sound.

Structurally, the circuit consists of a clock generator assembled on elements DD1.1 and DD1.2 generating a frequency of about 480 Hz, a frequency divider on the DD2 chip, a logical signal adder on DD1.3, a key transistor VT1 and an audio emitter BA1.
The frequency of the rodent repeller clock generator is determined by the values of resistance R1 and capacitor C1. By decreasing or increasing the value of R1 or C1, you can accordingly increase or decrease the frequency of the emitted sound signal.
Sound signal from the generator rectangular shape without changing the frequency, through logic element DD1.3 and current-limiting resistor R4, it is supplied to transistor VT1, turned on in key mode. In silent mode, a voltage close to zero is applied to the base of the transistor and the transistor is closed. In this mode, the current consumption of the rodent repeller is 0.1 mA. In the sound signal emission mode, the current increases to 22 mA. A simple calculation shows that when using batteries with a capacity of 1 Ah, the mole repeller will work for 9000 hours or 375 days.
From the clock generator, the signal is also sent to the counting input (pin 10) of the frequency divider DD2. Based on a positive signal drop at pin 9 of the counter, logical zero changes to logical one. In order to ensure the emission of an audio signal with a period of 32 seconds, a logical unit is supplied from pins 15, 1, 2 and 3 through diodes to the 12 pin of logic element DD1.3, locking it. As soon as a logical zero appears simultaneously at pins 15, 1, 2 and 3 of DD2, DD1.3 will pass a signal from the clock generator to the base of transistor VT1 and BA1 will begin to emit sound.
Chain C2 and R2 is used to set the output voltages of the DD2 chip to zero. When supply voltage is applied to the circuit, capacitor C2 begins to charge and a supply voltage appears at its lower terminal, which is supplied to pin R of the microcircuit. When the charging process is completed, the voltage at its lower terminal will drop to zero and will no longer affect the operation of the DD2 chip. Resistor R3 is a load for diodes VD1-VD4, so that there is somewhere for the current to flow and to eliminate interference in the absence of voltage at pin 12 of the DD1.3 microcircuit. C3 serves to suppress interference that occurs during transient processes in microcircuits.
Design and device
I came up with a design, manufactured and tested in practice the effectiveness of four devices for repelling moles, my friend, who is a big fan of growing vegetables on own plot Ivanov Gennady Vasilievich. The design is very simple to manufacture and requires virtually no financial costs. Gennady Vasilyevich kindly provided me with one of the devices for repelling moles for the preparation of this article.
The body for the mole repeller device was a metal can of dry cat food, in which all the parts were placed. The jar is hermetically sealed with a plastic lid and prevents water from getting into it from rain and when watering the garden. Any metal hermetically sealed jar is suitable for making a mole repeller. suitable size, for example from coffee.
The TK-67-NT telephone capsule, which is widely used in landline telephone handsets, is used as a sound wave emitter in the repeller. This is a simple and reliable emitter and can be taken from any old phone. The capsule emits sound well in the frequency range from 300 to 3400 Hz, which is exactly what is needed, and has an electrical impedance module at a frequency of 1000 Hz, 260 ± 52 Ohms. And most importantly, the capsule made it possible to easily solve the problem of sealing the case and at the same time greatly increase the efficiency of the mole repeller due to its original installation in the case.

The cap is unscrewed from the primer, the metal membrane is removed (pictured on the left), and it is simply attached to the bottom of the can (pictured on the right). To prevent the capsule from moving along the bottom of the can, its body is fixed at one point with a drop of silicone. You can come up with another way of fastening. The fact is that the capsule has a built-in permanent magnet, and the capsule, applied to the metal, is magnetized and holds well. You just need to limit its horizontal movement. With this type of mounting, the sound emitter is no longer the membrane, but the can itself. Due to the loose connection to the bottom of the can, the capsule vibrates during operation, and the sound produced is very unpleasant, hoarse with large nonlinear distortions. This sound turned out to be very suitable for a mole repeller.
In the jar, on the inside along the perimeter, at a height that provides placement of three batteries and a printed circuit board for the mole repeller, three corners are soldered with solder, and a round plate (second bottom) of any material with a hole in the center for wires is installed on them.

The material used for the corners is metal paper clips, but the corners can be made from any material that can be soldered with tin-lead solder, for example, copper wire, steel strips, etc. The length of the corners is selected based on the size of the flat partition - the second bottom, and its size is determined by the diameter of the neck of the jar.

On the second bottom there is a mole repeller switch to turn off the batteries when transporting the device or in case of non-use. But you don’t have to install the switch, but connect the batteries using the connector.
Since the operating conditions of the mole repeller are harsh, the temperature can range from zero to 50˚C, and to simplify the design, the batteries are connected to the wires of the device and interconnected by soldering. To prevent short circuits from the metal walls of the case, the batteries are wrapped with insulating tape.

To prevent short circuits between the tracks and elements of the printed circuit board, it is placed in a plastic bag, which is tied with thread at the point where the wires exit.

The batteries and the printed circuit board are placed on the second bottom of the case, all that remains is to close the lid and the mole repeller is ready for its intended use. It is enough to bury it in the ground to a depth that prevents water flows from entering the ground during rains and watering from the side of the lid, since it is still not completely airtight. It is enough to bury to the level of half the jar. The indicator of the turned-on state of the repeller is not provided in the circuit to prevent unnecessary expenditure of energy, since when the repeller makes a sound, it can be heard even at a considerable distance from it.
PCB
Due to the inability to manufacture a printed circuit board for a mole repeller using chemical technology, was used mechanical method removing sections of copper foil from foiled fiberglass laminate.

The location of radio components on the printed circuit board of the mole repeller is shown in the photo below.

The appearance of the printed circuit board for manufacturing by photochemical method and the location of radioelements is shown in the photograph below.

The board can be made from 1.5 mm thick fiberglass foil on one side.

A site visitor, who introduced himself as San Sanych, kindly provided his version of the rodent repellent printed circuit board, wired in a graphic editor for wiring printed circuit boards Sprint-Layout 3.0R, for which many thanks to him.
Details
Instead of a BA1 telephone capsule of the TK-67-NT type, you can use similar capsules of the TA-56M, TA-56, TON-2 or TG-7 type with a winding resistance of about 60 Ohms. Diodes, capacitors and resistors are suitable for any type.
Diodes, capacitors and resistors are suitable for any type. A transistor will do any n-p-n, but better with a minimum voltage drop between the collector and emitter. In this case, the emitted power of the sound signal will be greater without increasing the current consumption of the mole repeller.
The D1 chip of type K561LE5 can be replaced with a foreign analogue CD4001A, and type K561IE16 with a CD4020B chip.
Setting up a rodent repeller
If all radio components are in working order and installation is error-free, the mole repeller will work immediately. If desired, you can change the time parameters of the emitted sound signal. The frequency will increase as resistor R1 or capacitor C1 decreases. If there is a desire to change the frequency during operation of the mole repeller, then resistor R1 can be replaced with two series-connected, permanent and trimming resistors with a nominal value of 75 kOhm. When changing the frequency of the clock generator, it is necessary that it remains in the range from 300 to 900 Hz, since these are the audio frequencies most effectively drive away rodents.
When changing the frequency of the generator, it is necessary to take into account that the repetition period of sound signals will also change proportionally. For example, if the frequency is set twice as low - 250 Hz, then the time between beeps and the duration of the signal will also become twice as long, 64 seconds and 4 seconds, respectively. So there is an opportunity to experiment here. If desired, you can restore the previous timing parameters by transferring the diode anode from pin 3 of DD2 to pin 14.
The duration of the sound signal and the period of its repetition can be easily changed. If you remove the diode from pin 15 of DD2, then the duration of the sound signal will be 4 seconds without changing the repetition period of 32 seconds, and if you add an additional diode from pin 14 of DD2 to pin 12 of DD1.3, then the sound signal will last 1 second.