If you are bored with paint and wallpaper in wall decoration and need to come up with new and fresh solutions, then you should pay attention to natural and practical trend The interior has wooden panels. The most popular option is lining - it can have a smooth, rough or wavy surface and is excellent for finishing walls in country house or a bathhouse.


Peculiarities
Lining can be used to create modern interior V panel apartment, as well as when decorating balconies, loggias and open terraces.
Wooden lining has many advantages:
- environmentally friendly material;
- adjustment of the visual geometry of the room;
- simple and quick installation;

- strength and resistance to mechanical damage;
- there is no need to additionally prepare walls and ceilings before installing the lining;
- durability and practicality;
- goes well with other natural and artificial materials: stone, tiles, textiles, leather, wallpaper;


- hides flaws in walls and ceilings;
- allows you to hide electrical wiring and other communications;
- is an excellent heat and sound insulating material;
- It is possible to change the color and design of the walls more than once.


The material also has its disadvantages. The main disadvantage is the high cost and a decent load on the wall. It is also worth considering that although wood is an environmentally friendly material, it is susceptible to rotting, so lining requires proper care and operation. First of all, boards must be treated with paints and other special compounds for wood, as they have protective properties and help prevent mechanical defects and other damage.

Types of paints
It often happens that home owners get tired of natural wood shades in the interior and want to update the color of the walls by painting the lining. All wood products are divided into two types: decorative and protective. Some are intended for interior decoration, others - to increase service life.
All wood products can be divided into several categories, each of which solves separate problems.
- Protective means. Used for both exterior and interior decoration. From the name of such products it is clear that they must be used to protect the surface from various types of influences: mold, moisture and ultraviolet radiation. Such compositions have several degrees of protection and slow down the aging process of the material. For example, UV protectants preserve the natural wood grain and combat discoloration and darkening. Such compositions must be used to protect the lining on the balcony, terrace or any other areas exposed to direct sunlight. During processing wooden surface You need to apply a small layer of product - you can use a damp brush for this.

- Toning agents and stains. These substances form a thin layer on the surface and give it a darker shade. Such compositions do not have protective properties. They are chosen when it is necessary for the tree to “breathe”. The structure of the tinting agent itself can be weakly or strongly pigmented: the weaker the composition, the more pronounced the woody pattern remains. In this way you can regulate the degree of surface painting. The surface treated with stain must be varnished, otherwise the boards will appear dirty.


- Varnish. This substance is used when processing wood inside the house. It can make the surface matte, semi-matte or glossy, and also impart pigmented color. If you mix the varnish with a copper, the composition will obtain a uniform shade that can be applied in one layer. But experts recommend applying a transparent first layer, and then adding coloring pigments. Lucky on water based form a thin film, but dirt and dust are not absorbed. Acrylic varnishes are considered the most harmless and perform two functions at once: protective and decorative. Manufacturers also add UV protective components to some varnishes. It is recommended to use such products for summer cottage or in the bathhouse.


- Dye. This composition has a denser texture, through which the natural wood grain is not visible. The material protects the surface from mechanical factors, fungi, insects, sunlight, chemicals, moisture and fire. Paint is divided into many groups and can be latex, oil and acrylic. Before painting, experts advise using a primer or clear wood varnish, which will allow you to get an even and smooth shade. Just like with water-based paint, when applied it retains the textured pattern and does not paint over it with a thick layer, since some areas may appear unpainted or will have stains. This is a completely natural reaction of wood, since the porous surface does not always absorb paint evenly.


- Oil. This transparent or pigmented substance is quickly absorbed into the wood structure and does not form a film on the surface. The wood acquires a matte or slightly shiny finish. At the same time, the oil provides protection against the absorption of dirt, moisture, dust and fungal damage. Pigmented compounds help highlight the natural wood grain and grain.
- Wax based products. They are traditional and in an efficient way wood protection, and in addition, an excellent replacement for varnish. Manufacturers offer wax in three versions: solid, liquid and water. The last two are already ready for application, and the hard wax must be heated to a liquid state according to the instructions before use. But before this, the wood must be prepared and primed in advance, otherwise the wax may lie unevenly.


- Drying oil. This composition has recently lost its popularity. Initially, drying oil gives the wood a pleasant golden hue, but after 2-3 years the surface darkens and begins to stick. Modern manufacturers offer mixed compositions for finishing wooden surfaces both outside and inside the house. You can distinguish impregnations with a tinting effect and paints with protective characteristics and oils that contain wax.


Design
Many home owners prefer not to paint the lining and preserve the natural pattern. But in order to prolong the original appearance, the wood should still be treated, otherwise the walls may darken or acquire a blue tint. To get rid of the gray tint on wood, you will first have to sand the top layer, and then treat the surface to protect it from sunlight.
It will be more difficult to remove the blue tint - for this you need to use biological agents. Chlorine and active oxygen will help cope with the task. After treatment, the surface must be impregnated with a protective composition, and then painted with thick or translucent paint.


Natural wood shade will not harmoniously complement all interiors, so the walls can be painted. Large selection painting methods allows you to create an exclusive coating. To do this, it is important to choose the right paint color. Don't forget about simple rules: light shades visually expand the space, while dark shades, on the contrary, make the room smaller.
- Warm and calm shades look great in the kitchen interior: yellow, orange, pink and peach.


- A honey-golden shade combined with a natural wood pattern looks great in the living room. The interior can be diluted with light shades or bright and catchy colors.
- For the office, you can choose natural wood colors. In this case, oak looks great, but the lighting in the room must be well thought out. Cool tones will also help you get into a working mood.


- In the bedroom it is better to use wood shades or light and neutral colors. Looks great too white when decorating the walls in the bedroom.
- You can use any colors in the nursery, but psychologists advise against bright and saturated tones - it is better to choose calm and moderate ones. bright shades. They will not only create a special playful mood, but will also help the child relax and get ready for sleep and rest.
- Painted gray and blue the lining will create a feeling of dampness and cold, so it is wiser to use such shades in sunny rooms.


The lining can be mounted in various ways.
- Vertical. Will allow you to visually raise the ceiling. This technique is especially good to use in combination with light shades.
- Horizontally. Helps visually lengthen the wall and create the effect of expanded space.
- Diagonally. It will create special dynamics in the interior and allow you to make a spectacular accent on the wall or ceiling.
- Alternating. Allows you to create special charm using a simple technique. For example, you can depict various shapes on the wall: a herringbone, steps and other combinations that the homeowner’s imagination can create.


Style
When choosing a coating for lining, it is important, first of all, to focus on the style and general idea of the design that needs to be created. Impregnations and varnishes are suitable if it is necessary to preserve the natural wood grain. The antique wood shade is perfect for country or Provence style.
Classical english style impossible to imagine without the use of wood. To recreate a unique and sophisticated style, you can use lining, which must be installed from the bottom to a third or middle of the wall, and the upper part can be decorated with wallpaper or paint.

The lining can harmoniously fit into a modern and fashionable high-tech style, but for this it is necessary to carry out work on covering the walls with paint with metal particles or mother-of-pearl.
Light shades of wood can be perfectly combined with an attractive eco style. Cleanliness and preservation of the natural pattern in combination with bright greenery look appropriate and harmonious both in a city apartment and in a country cottage.


For Scandinavian style you can also use clapboard, but in this case all boards must be painted white.
In some cases, it is appropriate to combine several colors when painting one wall. For example, bottom part can be covered dark shade, and the top one is light, or you can alternate two different colors to highlight horizontal or vertical stripes. It is worth taking care that paints do not merge at the border of different colors. To do this, you need to use masking tape and thin brushes - then you can turn a simple wall into a real art object.


How to paint?
You can paint the lining inside the house in any color. For this you can use any type of paint - in this case it all depends on the decorative requirements and characteristics of the room.
Below are step-by-step instructions for painting the lining with your own hands.
- Each board is checked and sorted. Uneven, cracked or bowed paneling is sent for processing, and parts unsuitable for finishing are used for color or varnish testing.
- After sorting, the boards are cleaned of dirt and sanded with a special machine. If you don’t have such a tool at hand, you can use improvised means: wooden block with sandpaper.
- The primer and protective agents are applied with a spray gun or roller.

- In a damp and unheated room, experts recommend using exclusively wood that has been treated on all sides so that the material does not lose its original appearance. After complete drying, you can move on to decorative finishing: coated with paint or varnish.
- To get the best effect in a room, designers strongly recommend processing each detail in turn. To do this, you should sand, paint and dry all the boards and only then proceed to installation.
- The coating must be applied with a brush or roller along the entire length of the central part of the lining. The paint is thoroughly ground and shaded until an even, uniform shade is obtained. To do this, you will need two brushes: medium thickness and narrow format. The painted surface must be completely dry, so after this the boards are set aside for a few minutes.


- After complete drying, you can additionally repeat the surface sanding step. Then one or more layers of paint are applied - it all depends on the effect you want to achieve. Paint applied in thin layers lasts longer than one thick layer, but the latter should be as thin as possible. Then the lining is sent back to dry.
- If you paint the finished surface, there will be untreated areas between the boards, so you won’t be able to paint the joints well. This finishing method is only permissible if the color is updated.
- Painting old lining is a labor-intensive process that requires proper preparation. If the paint has chipped off in some places on the walls, you need to get rid of it. To do this using construction hair dryer the surface of the wall should be heated and the top varnished or painted layer should be removed. After this, the lining must be sanded and primed again.


Over time, any protective coating loses its properties Therefore, periodically the boards must be re-impregnated with fire retardants and bactericidal agents, and the surface must also be additionally coated with various varnishes. Antiperen is used to protect wood from fire, the service life of the coating is up to 5 years, so during this period it is necessary to additionally treat the surface with the product.
During the initial application, experts advise additionally using a small part of the same wood as an example. The composition is applied to the surface in two layers using a brush or spray. After complete drying, the treated part of the board used for the sample must be set on fire - the surface should not burn or smolder, and after 30 seconds it should blacken and char. Bactericidal compounds will help avoid fungal infection and fight existing mold.


Painting lining is not a difficult task. If you have complete information about all the details of choosing paint and its application, the process will be as simple as possible.

When painting exterior wooden walls, you need to consider the type of finishing material. Lining, imitation timber, wooden siding are the same material. These finishing boards differ only in thickness and profile. The same paints are suitable for all these types of cladding, and any acceptable technique can be used when applying them.


If the wall is built from timber or rounded logs, a different approach to the choice of paint and the method of applying it is required. You need to know about this before deciding how and with what to paint the walls of a wooden house.
You should not be afraid that in 2-3 years you will need to renew or repaint the facade. If you know all the rules and secrets of the painting process, the facing layer will not lose its properties even after 10 years. Many manufacturers paint and varnish materials(LKM) provide a guarantee for a longer period.
Important points to know
Most homeowners who are not familiar with the nuances of choosing and applying paint complain that the very next year after painting, the facade loses its attractiveness. The finishing layer begins to peel and crack. All these troubles can be prevented.
But even among specialists, few know that in order to obtain excellent result we need to change the approach to painting wood. This job requires as much attention as painting a car. To obtain a durable cladding coating, you need to perform several steps:
- carefully prepare the tree;
- prime the surface;
- Apply as many layers of paint as recommended by the manufacturer.

Let us consider each of these processes in as much detail as possible.
How to properly prepare wood for staining
Drying the lining
Careful preparation of wood includes several stages. The first of them is high-quality drying of the finishing material. If the lining is damp, the paint will not last more than 1-2 years on it. Already next season, its peeling and fading will become noticeable. The owner may decide that the quality of the paint or the inept hands of the workers are to blame for this, but in fact the reason is improper preparation of the wood or ignoring this important stage.

The board must be dry before painting. The permissible degree of humidity is 15-20%. But it is not always possible to achieve such indicators, especially for those facades that are already lined. Craftsmen recommend using this method: build a canopy over the walls to protect them from rain, and dismantle it after 3-4 weeks. During this time, the wood will lose a sufficient amount of moisture and it will be possible to begin finishing work.
There is an opinion that the process of drying wood speeds up the application of a high-quality deep-penetrating antiseptic to it. These include Neomid 46 Bio.


Penetrating into the pores, the composition replaces moisture and the process of its evaporation accelerates. For these purposes, you can use any preservative that protects wood during the construction of a house. On average, these compounds act for 6-7 months, after which they spontaneously decompose into biologically safe substances.
How to check the moisture level of the lining
- Cut a piece of plastic film measuring 40/40 cm.
- Using tape, attach it to the lining so that there are no gaps.
- Leave for 24 hours.
- Assess the degree of humidity inside polyethylene film.
If the surface of the polyethylene is wet to the touch, it means the lining has not dried. Such wood cannot be painted.

Processing of lining
An important point in preparing for painting is sanding the boards. All materials of medium quality (grade B and lower) require this procedure. Often on such wood you can notice “fleecy” areas, uneven profiles, and height differences in the area of knots. All of the above is problem areas, without eliminating which, it is impossible to obtain a high-quality painted surface.
Easiest to process facing material before it is laid on the walls. In this case, you can use various tools: a milling cutter with a cutter of the appropriate profile, an angle grinder with an abrasive disc, a thickness planer. However, the use of a mechanical processing method does not eliminate the need for manual labor. All recesses and protrusions of the profile will have to be sanded using sandpaper.


If the lining is already fixed to the facade, a nylon abrasive brush and a sander are used to process the wood. The grinding process is not fast, but it will allow you not to think about finishing the facade for 8-10 years.

Prices for popular models of sanders
Sander
Wood priming
After the lining has a flat and smooth surface, the wood must be primed. You should not postpone this process for long. Therefore, it is recommended to decide in advance on the type of primer and purchase the required quantity. There is an important point in this matter: it is not recommended to choose the most inexpensive composition. It will not be able to provide high-quality adhesion and will not adequately protect the wood from moisture.
High-quality primer often costs more than paint. This situation is observed in different product lines of the Tikurilla company. A competent manufacturer knows that the most important part of the painting job is priming. It is its quality that determines the durability of the paintwork.

The following types of primers are suitable for external work:
- acrylic;
- based on acrylic and silicone;
- based on epoxy resins.
Regardless chemical composition primers, you need to choose those products whose containers indicate that they are intended for facade works. Another important property that you need to pay attention to is the degree of penetration of the solution deep into the wood. The primer should say so: “deep penetration”.

Valtti Pohjuste
It is not recommended to use alkyd compounds for facade work. They form a thin film on the surface of materials. It simultaneously protects the lining from pests and mold, and prevents moisture from escaping from the deep layers of wood. Therefore, the best choice is water-soluble primers, which include acrylic and (or) silicone.

When priming and painting the facade special attention given to the south side of the house. She is more exposed negative impact ultraviolet. Therefore, on the north side of the house, the paint fades less and cracks less often.
Prices for wood preservatives
Impregnation for wood
Choosing paint for a wooden facade
One mistake many homeowners make is not reading carefully, or not reading at all, what is written on the paint can. This information contains instructions and recommendations from the manufacturer, following which you can achieve the desired result. But before it comes to them, you need to decide on the type of paint. After this, you can begin to familiarize yourself with the nuances of its application.
It has been noticed that oil paints lose their color saturation the fastest. They become covered with cracks faster than others. The reason is the composition of these coatings and their viscosity. The latter property provides high covering ability, but does not guarantee the quality of the coating. Therefore, oil compositions are not often used for finishing facades.

The best choice for exterior work is quick-drying water-soluble acrylate paints. You can pay attention to the products of the Tikurilla company. This manufacturer has a wide range of paints and varnishes for facade work. Excellent reviews of Ultra and Pika Techo paints.

"Pica-Techo" acrylate paint

For regions with unstable climatic conditions, characterized by temperature changes and cold winters, silicone-based façade paints are suitable. These compositions successfully withstand low and high temperatures, have a high degree of moisture resistance, and at the same time remain vapor permeable. Silicone facade paint combines best properties acrylate and silicate compositions, forms a durable, uniform coating.

Prices for different types of construction paints
Construction paint
Characteristics of facade coatings
The lining can be painted with stains, tinting impregnations and oils. Wax or varnish is used as a finishing coat.


Methods for painting lining
Before choosing a painting method, you need to learn about those rules for performing work, without which it will not be possible to achieve high quality surface finishing. The main point is the timing of the work. The lining is painted no earlier than 3 days after the last rain. During this time, the wood will be able to dry completely.
The air temperature must be positive. The limits recommended by paint manufacturers are +5°С – +20°С. It is also important to consider the time of day. It is best to start coloring at 10-11 am. By this time, the lining will be completely dry from the morning dew.
Lining painting techniques
The easiest way is to paint the lining before installing it on the facade. In this case, you can get a uniform layer without smudges. The paint is applied with a brush, roller or spray gun. Since the boards are quite long, the work is carried out in a spacious room or outdoors. Either way, you'll need to do a little preparation.
If you decide to work indoors, you need to provide the possibility of high-quality ventilation. The floor, furniture and household items are covered with plastic film. This is especially important if you plan to use a spray gun. Don't forget about your protection. First of all, you will need cotton gloves. If the paint will be applied by spraying, wear safety glasses.
Painting lining with a paint brush
The process of applying paint is easiest if you use a quality paint brush. Best choice– semi-rigid bristles, with a fairly soft and even edge. The choice of tool also depends on the amount of work. Synthetic bristle brushes are more wear-resistant.

The coloring technique consists of several simple steps.
Step 1. Open the container with paint and mix the composition thoroughly using any convenient device. You can use a wooden strip of sufficient length.
Step 2. Dip the brush into the paint 1/3 of the bristle length.
Step 4. Lightly squeeze the bristles onto the edge of the jar.
Step 5. Lightly apply paint to the wood.

Step 6. Repeat the process until all the boards are painted.


Painting lining with a roller
Choose a narrow roller equipped with a fur coat with pile medium length. You will need a paint tray, which is otherwise called a “paint bath” or “construction ditch.”

Step 1. Open the container and mix the paint.
Step 2. Pour paint into a special tray.
Step 3. Immerse the roller in the paint to ½ the height of the roller.
Step 4. Roll the roller along the corrugated beveled part of the cuvette. Thus, the paint is evenly distributed over the coat and the excess is squeezed out. One set of paint should be enough to paint 1-1.5 m2 of lining.

step 5. Apply paint by pressing the roller against the wood with even force.

Step 6. Distribute the paint so that the surface is well painted and there are no smudges on it.
Step 7 Repeat the process.

The lining has a rather complex profile, so the edges of the boards will have to be painted with a brush.

Painting lining with a spray gun
An airless sprayer can be used to apply paint. This is the most successful way to carry out finishing work with an already installed facade. The spray method allows you to paint everything hard to reach places. But areas near window and doorways needs to be finished with a paint brush.
To apply paint, you can also use devices such as low-pressure paint sprayers. When working with these tools, you need to take into account that some of the drops will settle on objects located close to the workplace. This happens because the paint exits the device’s nozzle in a fan-shaped manner. Therefore, not all particles reach the surface of the facade.

Working with a spray gun is more convenient than using a brush and roller. In addition, the dyeing process will be much faster.
Prices for paint sprayers
Spray gun
Video - How to paint a wooden wall so that it lasts for 10-15 years?
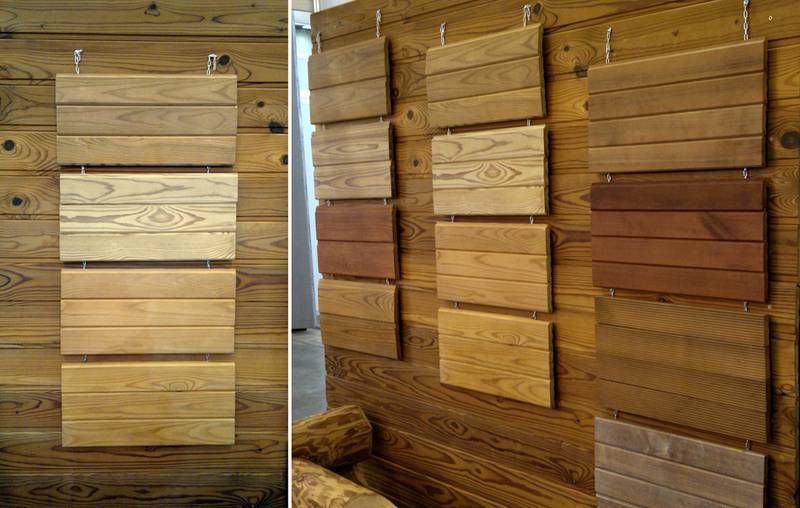
One of the most popular types of wooden finishing materials is lining. It has a different profile, due to which the surface has different type- from a smooth wall with small grooves to waves different sizes. Just wooden walls They do not fit into all interiors, so there is often a need to paint the lining indoors - at home or in the country.
How to treat lining inside a house
In general, many people believe that it is better not to treat the lining indoors with anything. Maybe so, but not in every climate and room it will retain its original appearance for a long time. If the level of ventilation is insufficient, the wood may turn blue; if it is exposed to the sun, it becomes dark gray.
Blue discoloration can only be combated with biological means - chlorine or active oxygen, and then definitely impregnated with protective compounds, and maybe even painted. It is a little easier with grayed wood: by removing the top layer by sanding you will again get beautiful color, but without UV protection it won’t last long either. That’s why they decide to paint the lining inside the house or cottage.
One more point: not everyone likes wood in the interior. It's just that sometimes people get tired of looking at her. I just want a smooth, colored surface. This also happens, and often. In this case, look for opaque paint. Select characteristic effects as desired.

The inside of the lining is painted with opaque paints also because wood in its natural color is not compatible with all styles. But sometimes you want high-tech, for example. In this case, paint with metal particles or mother-of-pearl (for example, Lignovit Platin) is suitable.
All compositions for protecting wood can be fairly roughly divided into six main groups:
- Protective compounds. Available for outdoor and interior works. Compositions for external use additionally include ultraviolet protection, which prevents or slows down the process of photoaging of wood - discoloration to gray. So if you need impregnation for the lining on the balcony, and it faces south or east, you need a composition for external work. Just note that some of them paint the surface pink or green is the result of a chemical reaction. Read the description carefully, because the resulting color can only be painted over with opaque paints or a very dark tint.

- Tinting compounds or stains. They do not paint over the texture of the wood, but give it some kind of shade. At the same time, a film is not created on the surface, the wood does not lose its properties - it remains vapor-permeable. Tinting compositions contain pigment and can be lightly or heavily pigmented. If you want to have a surface with a pronounced wood structure, take a slightly pigmented composition. You may need a lot of layers, but you can control the degree of “shading” of the wood.

- Lucky. Today, water-based varnishes or aqualacs are more popular for lining walls or ceilings. They can be matte, semi-matte or glossy. Many people have the opportunity to add color and change the color at the same time. Unlike traditional varnishes, water-based varnishes do not close pores - the film on the surface remains vapor-permeable, but protects against dirt absorption. Many manufacturers add UV filters and bactericidal components. Such paints and varnishes are good for balconies or in unheated rooms with periodic visits - in dachas and bathhouses.

The varnish can be glossy, matte or semi-matte, or it can give color - pigmented
- Paints. This group includes compositions that create a dense film on the surface, through which the structure of the wood is not visible. The group is extensive, with different properties and price range - from traditional oil to latex and acrylate enamel.
- Wood oils. Some are transparent and some have pigment. Unlike varnishes, they do not create a dense film on the surface, but are absorbed into the fibers. Good compounds act similarly varnish coating, protecting against abrasion and dirt absorption. Only oils do not have a bright glossy shine - a matte or slightly shiny surface, like silk. This is a great way to preserve wood. Using specific application techniques, pigmented wood oils can highlight the texture (see below).

- Wax-based compositions. There are three types of wax: solid, liquid and water. Before use, solid wax is heated to a liquid state; liquid and water (wax glaze) are ready for use. Wax protection is traditional and very effective, and new technologies make the process much easier. The disadvantage of wax is that it is quite difficult to apply evenly, but it fits well on a pre-primed surface.
This division is arbitrary: there are many mixed compounds that can be classified into at least two groups. So there are impregnations that can be tinted, and there are paints with protective properties. The difference is in the effectiveness of the protection. Impregnations primarily protect the wood, and imparting color is a secondary task. With paints it's the other way around. Their main task is to create a beautiful coating, and protection is a concomitant effect. If you immediately need good protection and high-quality coverage, take impregnation without tinting, and after drying, apply paint.
Another example of a mixed composition is oils with wax. These compositions combine the properties of both oils and wax, due to which the wood retains its appearance for a longer time.
The question of which group to give preference is up to everyone to decide for themselves. Different tools solve different problems, and it is important to choose the right properties that you need first.
How to properly paint the inside of the lining: technology
To paint lining in “dry” rooms inside the house, you can use any type of paint. Here you simply decide on the requirements for decorative appearance surfaces. If the lining is dry, it can not be impregnated with protective compounds, or you can choose paint/varnish/wax with appropriate additives. you can paint it only on one side, leaving back side unprocessed.

If the lining will be used in damp or unheated rooms, on a balcony, it must first be thoroughly impregnated with protective compounds on all sides, maybe twice. Only after the impregnation has dried can it be painted, varnished, or, in general, given decorative properties. Another point: when installing the lining on a wall or ceiling, it has to be cut into pieces. Places of cuts in wet areas it is also necessary to coat it with the composition. It is not necessary to wait until it dries, but it is necessary to process it.
There is one very important nuance, which many amateur decorators overlook. If you want to get professional-quality lining painting, you need to process each board separately: sand it, paint it, dry it, and only then assemble the surface from the already painted lining. That is, mount already fully processed boards on the wall or ceiling. Only with this approach will the surface of the lining have the same color from any point.

It’s difficult to paint the entire surface of a clapboard wall well
If you paint an already assembled surface, unpainted areas remain in the grooves and recesses, making it difficult to sand large areas. You definitely won't get a perfectly flat surface. The quality of finishing in this option is not above average. It is permissible to paint a finished surface if you are renewing the paint job. This must be done at different intervals, depending on the operating conditions and the properties of the paintwork material.
Correctly, the painting technology looks like this.

There can be many layers: it depends on the hiding power of the paint and on what effect you want to get. But in any case, one rule remains: there should be little composition on the brush. The exception is impregnation or primer. They are applied with a well-moistened brush, but only those without pigment. When applying pigmented protective compounds, the rules for paints apply - minimum required quantity The composition shades well.
Sometimes, even with careful rubbing of the paint, stains are clearly visible. This is not a bad paint, but the properties of wood: in some places the pores absorb better, in others worse. In order to achieve an even color in this case, the surface is first primed. You can use any wood primer or colorless matte varnish (can be water-based). After drying, the surface is sanded (yep, again) and then the required number of layers of paint are applied. Only in this case, after the first layer of paintwork, grinding is rarely required, and if necessary, then in some places, more often on a tenon or groove.
Watch the video to see how to evenly apply glaze, oil or wax.
If furniture quality painting is required, there are even more layers: first a stain is applied, then two layers of primer. After drying, the surface is sanded until the surface is completely matte, first with grain 280, then 320, after removing the dust, a finishing layer is applied - varnish. An example of such work is in the video.
Painting wood while maintaining texture
A pronounced wood pattern can be achieved using glaze, pigmented oil or wax. These compounds apply quite tightly, almost painting over the structure of the wood fibers. Any of the compositions described above can be applied with a brush or roller.
When applying paintwork materials, take very little, first applying them in fragments along the entire length of the lining. Then, using a brush or roller, the applied strokes are shaded over the entire surface. After leaving them to soak for 5-10 minutes, to reveal the texture, take a soft, lint-free cloth and remove most of the oil. As a result, the pattern appears much brighter than in its original state: a larger amount of pigmented product is retained in the grooves, and almost none remains on the protruding parts. The result is a pronounced texture. This technique is also called brushing or texturing the lining. In interiors, wood processed in this way looks very decorative: both on the walls and on the ceiling.
The process can be observed in the video. Three samples were painted: two with the same oil with pigment, one with colorless. 5 minutes after painting, one of the pigmented blanks is wiped to reveal the design. To preserve the wood after the pigment has dried (24 hours or more, read on the packaging), the lining is coated with two layers of colorless oil (glaze, wax). In areas of intensive use, you can also coat it with matte varnish.
How to paint lining like bleached oak
Often it is necessary to paint the wood white, but so that the veins are visible. They also say to create the effect of bleached oak. There are several ways:

It’s difficult to say which composition to choose - you need to try. It is advisable to paint the lining with several compositions and compare the results. The effect when using different products is slightly different, but it also greatly depends on the wood. The reviews are also very different - some whitened with tinting, others with oil. Soils are rarely used for these purposes, but mainly because not everyone knows their properties.
Secrets of decorative wood staining: techniques and tricks
City dwellers want to preserve the natural color of wood as much as possible. For those for whom wood in the house is a boring everyday thing, paint the interior lining in some kind of unusual color. Modern paintwork materials allow you to achieve different effects. For example, textured or brushed lining, but in two colors. This technique is often used.

Brushed lining in two colors - great choice for wall decoration
The trick is to apply two layers of different colors. The first layer is applied dark color, the second - light or brighter. After playing with colors and the order of their application, you can create your own version. Watch the video - how to get lining brushed in two colors.
Painting in two colors may not be the same. You can make the recesses a darker color, and only slightly tint the face (front part) or do everything exactly the opposite. The result is a striped wall made of clapboard - the effect of a slatted wall.
How to paint lining inside a house: ideas
Painting techniques and methods are great, but how? Just. There are quite a few interesting options. The designers' latest finds are a clapboard wall in a room with smooth walls. It looks creative and interesting. And most often such a wall is made using the brushing technique.

An interesting effect is achieved by combining fittings of different thicknesses - in the photo, thin ones are inserted between wide boards. Moreover, they are painted in different shades of the same color. The combination turns out interesting and fresh.

Lining is not only necessary flat board with small grooves on one side, which is also called eurolining. There are different profiles, including those with waves and troughs. From them you can collect interesting walls, the relief of which is emphasized by coloring.

You can assemble interesting reliefs from linings of different profiles. To make it look more interesting, highlight the reliefs or whiten them
As usual, in the interior, a lot depends on the light. Several non-standardly designed lamps - long translucent strips behind which lamps are hidden, installed in the middle of the ceiling - and the interior is completely transformed. This design can be used to decorate rooms for young people, creative rooms, etc.

You can play not only with light, but also with color: in the lighting area, paint the lining in a more light color, emphasizing this zone in this way.

If you have good drawing skills, you can paint the lining. Just don’t forget to then cover the entire painting with colorless oil or varnish to preserve it longer. This technique can be used when

Rigidly defined clapboard panels look great in the living room and hallway. In the same vein, you can decorate the wall in the dining area in the kitchen. Only its quality and coloring must be perfect.

The honey shade of the lining is repeated on the ceiling
Treatment for a rustic-style interior can be deliberately imperfect. These are rooms with a masculine character.

The rustic style will appeal to men. In this case, painting the lining using the brushing technique is the norm. Moreover, the colors are chosen dark
As if in contrast - light walls. The lining is whitewashed and the beams are painted dark. Despite traditional materials, used for centuries, the look of such a room is modern and stylish.

An excellent combination is light walls with the effect of bleached oak and dark massive beams. It's practically a win-win option.

Lining is also used in the decoration of bathrooms. Impregnation here needs to be given maximum attention, but if it is done at the proper level, impregnation is protected from moisture, then there should be no problems. And the interior, you see, is very interesting - warm colors wood combined with bright marble is a great move.

Lining is also used for. You just need to fill it horizontally - this way you can expand the small space. And light colors look better in such a small area, maybe with a dark edging.


Ceiling - lining, painted with light stain
Lining is quite often used in interior design. It is inexpensive, environmentally friendly, and has an attractive appearance. But from time to time it may be necessary to paint the lining in different colors. In what cases such a need arises and what materials are best suited for this, we will explain in this article.
Types of lining
Initially, this material was used to decorate the walls of carriages (hence the name). However, for quite a long time, lining has been used to decorate walls inside houses. Its advantages are widely known - environmental friendliness, aesthetics, accessibility, ease of installation.

Manufacturers offer the following types of lining:
- At quarter. This type does not have a tongue-and-groove fastening system, but has protrusions in the side parts. It allows you to lay the boards overlapping, which creates a rather interesting effect.
- With tongue and groove. This type of lining is usually used for finishing vertical surfaces. It resembles an ordinary tongue and groove board, but smaller in size. Office premises, reception areas are the scope of application of this type of lining.

- “Calm”, “Peasant Woman”, “Russian”, “Simple”– the most popular types of lining. Equipped locking system“tenon and groove”, compensation groove and a flat, perfectly smooth surface.
- Double sided type has a classic connection system presented on both sides.


- Eurolining. Reminds me edged board. Characteristic feature This type is of high quality processing on every side. The elements are connected to each other using the “groove-tenon” principle. Eurolining is most often made from coniferous trees. The enlarged connection point of this type (up to 8 millimeters) allows you to create a coating without visible seams. In addition, on the back side of the profile there is a special recess that serves as an air outlet. Thanks to this, condensation, mold and fungi do not appear on the panels.
- "American". It has the shape of an irregular rectangle. There is a groove along the widest part of it, which makes it possible to create an interesting decorative effect - the boards seem to be laid overlapping.


Each of these types of lining is good in its own way, each is popular. But even the most beautiful coating can get boring and make you want to, if not change it, then at least update it. For this, various coloring compounds, varnishes, impregnations, and so on are used. Wooden lining is often coated with such substances to extend its service life, emphasize or, on the contrary, hide the structure natural wood.

Paint selection
Can be used for painting lining various options coloring compounds. Of course, if the work will be carried out inside a living space, it is better to choose those compounds that do not have a strong odor.
The modern market offers a wide range of different paints:
- Oily. This is a recognized leader among all decorative coatings. Due to deep penetration into the surface, the result is reliable protection. This type of paint provides good coverage, which does not lose its attractiveness for a long time. Disadvantages include the presence of a sharp, specific odor and the drying time. This type of paint is best used outdoors, outside. It is not very suitable for interior decoration.
- Acrylic paints. They dry quickly, have no pungent odor, retain their original color for a long time, and are resistant to moisture. Well suited for interior work.
- Acrylic scuba tank. One of the best ways lining design. This is an environmentally friendly material that provides a strong and durable coating.
- Alkyd varnish. It takes a long time to dry and is highly flammable. But it is insensitive to moisture and temperature changes.
- Glaze. Emphasizes the natural structure of wood. If you add color to it, you can get a colored coating.
- Opaque enamel. Optimal for suburban buildings. Thanks to the formation of a dense layer, it provides good protection from mechanical stress, damage, and also hides existing defects.


Often the lining is covered with good old water-based paint. It is odorless, easy to apply, and dries quickly. Optimal for interior decoration. The lining covered with it acquires a pleasant white color, while the structure of the wood itself is not completely hidden.

To protect against moisture and mold, the lining is impregnated with oil. The surface treated in this way becomes matte, and the structure of the wood stands out more clearly.

Interesting samples can be obtained by coating with acrylic paint. The undeniable advantages of this material have allowed it to gain popularity among other decorative coatings. By itself, such paint retains its original color for quite a long time, but if you additionally treat the surface with varnish, its service life will increase.

When choosing the type of paint, you should pay attention not only to its cost. Much more important are its technical specifications– durability, color saturation, resistance to fading, moisture, temperature changes. The presence or absence of a pungent odor is important if work will be carried out indoors.

Paint for exterior use should be insensitive to climatic, weather conditions, provide sufficiently dense and reliable coverage. In this case, the “fragrance” of the paint is of secondary importance.

Color palette
The choice of color when painting lining is determined by the style of the interior, its color scheme, as well as the taste of the owners of the house.
Not everyone likes a light and smooth surface. Some people will want to add brightness to the interior, while others, on the contrary, will want to shade it with dark splashes. Some will emphasize the structure of natural wood, while others will decide to hide it completely. All this is a matter of taste.


Often when painting lining, white is used. Whitewashed wood, especially oak, creates a special atmosphere in the house. Light shades visually expand the space, “lift” it, add air and spaciousness. Therefore, rooms with a small area are most often decorated in light colors.

Combined with the structure of the wood, the effect is truly magnificent. Such a surface will fit into any style; it will harmonize with almost any environment and color. Translucent paint that does not hide, but emphasizes the wooden texture and gives a white tint to the material itself - good option in order to slightly refresh and update the interior without drastic changes.

To create a bright color accent, you can use acrylic or oil paints. They offer a fairly wide selection of shades - from discreet muted to flashy bright ones.

Another option for adding color to the lining is the use of tints. They can be added to water-based paint, glaze, and get a variety of shades of any degree of saturation. With proper mixing of several tones, you can get a rather interesting complex shade that will fit perfectly into your home. this interior. But in order not to spoil all the base paint (to which the colors will be added), it is better to pour a little into a separate container and try there.


In general, painted lining itself creates an interesting effect in the interior, especially when the structure of the wood remains clearly visible. It is not for nothing that such a solution is found more and more often in the most different designs, in different colors and in different styles.

Design
Many people perceive lining as an element country interior. However, it may be quite appropriate in city apartments. Classic or loft, Provence or rustic - properly designed lining will look harmonious in almost any style.


Painted in dark, even black color with preserved wood structure, it will be a worthy addition to the loft style, somewhat shading its industrialism and adding coziness to it. White lining will also look advantageous in such an interior.


Light-colored material will organically fit into classic interior with its sophistication and discreet chic.

As for Provence, the lining simply asks for itself in its elegant simplicity. Simply coated with varnish or stain light tone, painted white or lavender - it will be a wonderful addition to the interior.

photos
At the same time, it is not at all necessary to decorate all surfaces from floor to ceiling with clapboard, as in a country house. In a country house such a technique would be appropriate, but in a city apartment it is unlikely. Yes, and bringing this idea to life will be quite difficult.


Designers offer numerous wall decor ideas that will appeal to connoisseurs of a wide variety of styles.
With the help of lining you can create a spectacular antique interior. To do this, it can be covered with stain, simple or craquelure (“aging”, creating a cracked coating) varnish. With clapboard treated in this way, you can cover all or one wall in the room.


Highlighting one wall in a room is a now popular technique for zoning space. This method is especially good when finishing small spaces.

If we are talking about a bedroom, you can highlight the head of the bed and part of the ceiling above it, emphasizing the sleeping area. It is better to choose calm, relaxing shades that correspond to the character and purpose of the room.


In the office, you can create a work area in this way. For this purpose, lining in discreet tones that will not distract attention is suitable. Whether to choose a dark or light shade depends on the preferences of the owner of the office. The main thing is that it should not distract attention and have a relaxing effect. An office is not a bedroom, here it is important to get into a working mood, concentrate, and that’s all - including color design, should contribute to this.


The living room provides the greatest scope for imagination. Here you can implement almost any idea, the main thing is to comply general rules composition and ensure that the interior is harmonious and does not constitute “opposition” to the design of all other rooms. In decorating the living room you can use both bright and pastel colors, dark or light shades, emphasized or completely hidden wood structure, any finishing materials.

For a loft-style living room, for example, black-painted or bleached lining is well suited. The main shades of this style direction– namely black and white, the rest are present only as accents that dilute monochrome interior, adding zest to it. Therefore, when it comes to decorating the walls in a room, it is better to focus on these shades. If it is planned to assemble a screen, panel or some other structure from the lining, which is recognized to perform purely decorative functions and does not differ large sizes, you can also use bright colors.


Living room in classic style will require discreet colors. The natural texture of wood, emphasized by stain, varnish or bleach, works well.

A kitchen decorated with wood looks, of course, status and attractive. But the material itself in this case needs protection from external factors– humidity, elevated temperatures, possible exposure to chemicals and mechanical damage. The same goes for the bathroom. Here, especially close attention should be paid to protection from moisture.


To ensure that the lining lasts as long as possible, it is coated with special protective compounds.


Clapboard finishing is considered one of the most beautiful and convenient ways decoration of premises. It can be used both in the country and in a city apartment. However, over time, the wood darkens and looks worse. To save beautiful texture wood inside the house, you should think in advance about painting the lining.
We paint the paneling indoors - why do it?
Lining is a thin wooden board used for covering rooms inside and outside: doors, ceilings, walls. One of the main advantages is that the material is made of wood, since wood is classified as environmentally friendly building materials, easy to process and fairly cheap. Among other things, clapboard cladding allows you to create a special atmosphere and warm comfort in the house. You can also highlight such positive qualities of lining as:
- ease of installation and assembly,
- durability,
- visual smoothing of surface defects,
- increase in sound and thermal insulation.
As you can see, the material retains all the basic properties of wood. Including some problematic issues. For example, wood is susceptible to rotting even inside a house or apartment. However, it is very easy to avoid this if you paint the lining. Correct use and care will allow you to enjoy the appearance of beautifully laid boards for a very long time.
Thus, under no circumstances should this be neglected important point as protection wooden planks. A properly selected paint and varnish composition prevents negative consequences from contact with dust and moisture. In addition, mechanical damage and other defects will not be so noticeable. Another possible use of paints is to change the natural shade if you have become a little bored with it over time. Or, on the contrary, varnishing can help to intensively highlight the wood structure of the material and the texture of the design.
Despite the fact that lining is considered a fairly strong, reliable and durable material, direct exposure to sunlight can cause discoloration. Layer coloring matter or varnish will protect wooden panels from sunlight, preserving the natural color for many decades to come.
Indoor lining - how to choose the right paint
Paint for lining is currently available on construction market in great abundance. Each owner of an apartment or private house will be able to choose best option for yourself, based on the intended purpose of the mixture, its cost, as well as quality and manufacturer.

The main task of paints and varnishes is to protect against:
- Mechanical factors (pollution, scratches)
- Gribkov
- Insects
- Aggressive chemicals, fire
- Sunlight, liquid
Based on their purpose, there are two large groups protective equipment: varnishes and paints with decorative properties and compositions that perform exclusively protective functions. It is imperative to protect wood from destruction, insects, fungi, and bacteria, and if this is the only thing you want, then purchase colorless primers and impregnations. After they dry, there will be no trace left of the use of paint or varnish.
Important: several thin layers of paint last longer and better than one thick layer.
If you have different ideas How to diversify and decorate the interior of a room, you can safely use decorative solutions. They not only protect the wood from all of the above problems, but are also able to change the original shades of the lining. Due to the fact that the use of such compositions radically changes the interior of the apartment, you should choose very carefully and meticulously.
The range of decorative paints for wooden boards is very large, here are just some of the most popular:
- Acrylate paint. Ecologically safe material, distinctive feature which consists in a high drying rate even with low temperatures. When painting, it does not spread over the wall, and is also completely absent. unpleasant odors. However, the cost of the composition is quite high compared to other competitors.
- Oil paint. Relatively cheap paint, which is in great demand. Among its advantages are high level moisture resistance, durability. But the use of the mixture is associated with the appearance of specific odors, which leads to the need for constant ventilation of the rooms. The paint loses its external qualities after 7-8 years, so over time the coating needs to be renewed.
- Decorative glaze. An excellent option. If you haven’t decided how to paint the lining inside the house, you can safely opt for glaze. It is one of the best in terms of price-quality ratio, protects the boards from all kinds of problems, and also wonderfully emphasizes the texture of the pattern of the impregnated wood.
- Alkyd varnishes. Another very good option. The peculiarity of using varnish is that the surface must be completely dry before starting work. Otherwise, unpleasant effects such as peeling and gradual destruction of the paint layer will be observed.
- Acrylic scuba tanks. Durable and reliable mixtures that leave the wood structure visible. Subject to a processing process such as tinting. The only significant drawback is poor resistance to mechanical damage, due to which it is strictly not recommended to cover the panels on the floor.
- Stains. Specialists rarely use this composition, unlike ordinary people. The advantage is the price, but the paint can only be used on boards that do not contain any damage. This is due to the fact that stains only change the shade of the lining, but do not paint over the wooden surface.
- Opaque enamels. They are able to completely change and paint over the structure of the panels. To do this, you need to dry the lining and apply enamel in several layers, at least three. For this reason, it is necessary to purchase enamels in larger volumes than all other decorative compositions.

This is not the entire list of what can be used to paint the lining inside the house. When choosing, you should take into account your own capabilities and wishes. The choice of paint is carried out for each specific case separately. The type of wood that was used to produce the boards and the level of humidity in the room are important. Thus, paint for lining must be hypoallergenic if interior spaces are impregnated with it. Naturally, the cost of such a composition is somewhat higher, but you won’t have to overpay if you need a solution for exterior work.
We process the lining ourselves - step-by-step diagram
Having decided on the paint and varnish compositions, you can proceed directly to painting.
The whole process can be divided into four main stages:
- 1. Cleaning the wooden surface. Before painting the lining, it is necessary to prepare it, including bleaching and cleaning. For these purposes, hair or steel brushes are used to carefully clean the boards of dirt. To get rid of fungal growths and deep stains, you will need to purchase special bleaching products. Ultimately, the board should have a perfectly dry, smooth and clean surface.
- 2. Primer. The smallest pores of the wood must be filled with a primer so that the paint does not sag when drying and lays down evenly. You can prime the wood using a sprayer or a regular roller.
- 3. Surface impregnation. Antiseptic solutions allow you to avoid the appearance of fungi and mold, as well as prevent rotting of the boards. It is necessary to impregnate the lining on both sides, not sparing the solution. Afterwards, let the material dry, which will take about two days.
- 4. Painting. We will use paint brushes, a roller or a spray gun as tools. It is recommended to choose small brushes or rollers, up to 5 cm in length. In addition, the roller should have short pile. Movements during painting are continuous, along wood panel. The layers should be even and thin; there is no need to repeatedly apply over the same place. It is better to apply several layers, in which case the result will be much better. A new layer can be applied only after the previous one has dried.
After treatment, the lining will serve for a very long time, without changing its natural shade and without collapsing under the influence of external factors.