Garlic is a very useful and popular crop that every gardener grows. The process of obtaining a rich harvest and planting in open ground in the spring is quite simple, and even a beginner can cope with it, the main thing is to follow all the rules.
With the help of step-by-step instructions, planting and growing heads of garlic in the country will not be difficult in the Moscow region, in Belarus and even in Transbaikalia.
Garlic can be planted in both autumn and spring. The specific time frame will depend from the selected variety.
Experienced gardeners They know that such a crop can be represented by winter or spring varieties. These two species differ from each other not only in terms of planting, but also in many other characteristics. They can be planted and replanted in different times, the same applies to sowing seeds for seedlings.
To distinguish them from each other you need to know the main external characteristics of each type:
- winter garlic planted in autumn, it is larger, the lobules are covered with a hard shell. In the middle there is a thick and hard rod, around which the teeth are located;
- spring crops are placed in open ground early spring . Such heads are smaller in size, their skin is soft and resembles parchment. The teeth are small, their arrangement is chaotic.
Winter garlic is suitable for use in fresh and preservation, such varieties are stored for only 3-4 months. Spring has a less intense taste, but it can be used until the next harvest.
Specific planting dates will depend on the climatic conditions of the region:
- When carrying out autumn planting, it is worth remembering that by the time the first frosts appear at the beginning of winter, the tines should have time to form a powerful root system, this process takes on average 3-4 weeks. Based on this, all work should be carried out a month before the onset of frost, that is late September-early October;
- Spring planting is carried out immediately after the winter snow cover has melted and the garden soil has warmed up to +6 degrees. Depending on the specific region, this may be April or early May.
Advantages of autumn and spring planting of heads
When making a choice at what time to plant garlic, you need to think about the fact that not only the process of work, but also characteristics of the resulting crop how will it sprout and will it be necessary to replant summer period.

| Winter garlic | Spring garlic |
| The taste of spring garlic is less intense, and the heads and cloves are small in size compared to winter varieties | Winter garlic boasts large cloves that are easy to peel before cooking and a bold, spicy flavor. |
| Spring garlic takes a long time to ripen; the yield of varieties of this type remains low. | Winter garlic ripens a month earlier than spring garlic, so you can use fresh cloves already in the summer, and the yield of this type is much higher |
| Spring garlic can retain its freshness for up to 12 months | Winter garlic is stored for only 3-4 months |
| Spring planting guarantees the friendly emergence of seedlings and safe growth of plants | When carrying out autumn planting, it is worth considering that there is always a risk of earlier frosts or too much precipitation, which can destroy the plantings |
| When caring for spring garlic, you should take care of sufficient watering during the formation of teeth | Winter varieties are formed using ground moisture |
| Spring varieties of garlic are not afraid of common diseases and pests | Autumn varieties are the most defenseless against various ailments |
The choice of planting time and type of vegetable grown will depend on the purpose of cultivation. Experienced gardeners recommend planting in beds both winter and spring plants.

Cultivation technology and features of sowing seeds in the country
Each planting period has its own individual characteristics regarding the work. But there are also general rules that should be followed regardless of the time factor:
- Before planting a vegetable, it is necessary to calibrate, that is, remove heads that are too small and somewhat affected by diseases;
- The most common mistake that many gardeners make is planting winter in spring. In this case, you can get a harvest, but it will not be as tasty and large as with autumn planting;
- In order to get a guaranteed harvest you should purchase zoned varieties. It is also worth studying in advance all the characteristics, technology, how to sow and needs;
- Once every 3 years it is necessary to carry out variety rejuvenation, that is, instead of teeth, bulbs will be used as planting material, from which one-tooth ripen in the first season. The resulting harvest is used for planting next year. As a result of such work, garlic is renewed;
- In order to harvest a high-quality harvest, you must not miss the established deadlines. You can identify them by the arrow that should burst. Bulbs should also form;
- To obtain a richer harvest, you should pick off the garlic feathers in a timely manner.

The most important rule to follow when planting garlic is to adhere to the deadlines.
In the fall, you should not plant the cloves too early so that they do not germinate ahead of time, and in the spring you should not delay planting, because then the heads may not have time to ripen before the onset of cold weather.
Rules for planting garlic in open ground
In order for the cultivation to end in success, it is necessary to carry out the planting work correctly. It is also very important to properly care for plantings and carry out the necessary work in a timely manner.
Preparing seedling cloves
In order to get friendly shoots that will later bring good harvest you need to work hard and process correctly planting material :
- Well-dried garlic heads are separated into cloves without damaging the dry scales;
- Then carry out calibration, selecting large and healthy slices;
- Before spring planting, the teeth can be stimulated to produce roots more quickly; for this purpose, planting material wrapped in damp cloth and put it in the refrigerator for several days;
- Before planting the cloves in the ground, they need to be prepared.
There are three processing methods:
- The slices are soaked in warm water for 10-12 hours;
- Table salt, diluted in water (3 tablespoons per 5 liters), is also well suited for these purposes. This procedure is carried out for several minutes;
- Another way would be chemicals having a stimulating effect.
- The last important procedure will be disinfection. To do this, immerse the cloves in a solution of copper sulfate for 1-2 minutes (1 tablespoon per 10 liters of water).

A solution of potassium permanganate, the drug “Fitosporin-M” and an infusion of ash are also well suited for antimicrobial treatment. In this case, the processing will last 30 minutes.
Site selection and soil preparation
Garlic is quite capricious when it comes to choosing soil and planting sites. When preparing the site, you should remember all the preferences of this crop:
- the vegetable takes root best on loamy and chernozem soils with neutral acidity;
- there must be a place sunny and open;
- It is not recommended to plant garlic where onions, potatoes and tomatoes grew before it. Desirable predecessors are cabbage, legumes, zucchini and cucumbers.
At spring planting Soil preparation is carried out in the fall, and in the fall a month before the work. This procedure includes deep digging, loosening, and removal of weeds and stones.
In order to balance the composition of the soil, clay and sandy soil diluted with peat, and peat with loam.

In order to get a rich harvest, before planting the soil needs to be enrich. For one square meter The following fertilizers are applied to the soil:
- 1 bucket of humus or rotted manure;
- 1 bucket of compost;
- 1 cup dolomite flour;
- 1 tablespoon of superphosphate;
- 1 tablespoon of nitrophoska.
The final part will be disinfection of the plantings, during which the beds are watered copper sulfate or a solution of potassium permanganate. Experienced gardeners recommend covering the ridges with film until work is carried out.
Step-by-step instructions and what depth to plant
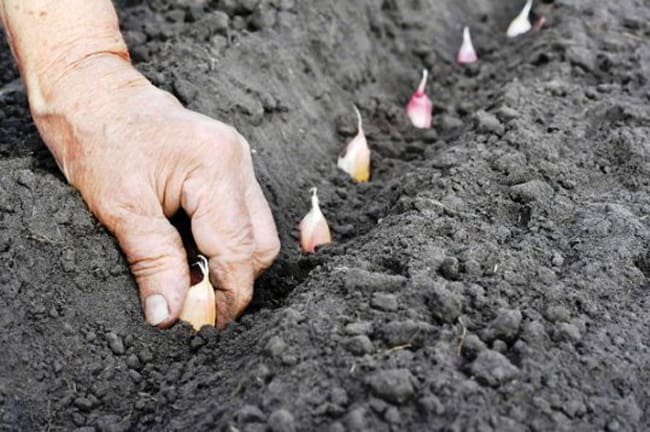
Vegetables are planted in rows, the distance between which should be equal to 20-25 centimeters. The distance between individual teeth will depend on their size, on average this figure is 10 centimeters.
The teeth are deepening strictly vertical. In spring, the planting depth will be 5-6 centimeters. In autumn, this figure should be increased to 10 centimeters. This is necessary in order to protect the planting material from freezing.
Care
Caring for garlic after planting will consist of: timely loosening and cleaning of the soil from weeds. Also, we must not forget about watering. During the growing season, the application of moisture should be plentiful.
Watering is reduced to a moderate amount when fruit formation begins, because with excess moisture, garlic can be susceptible to various diseases. IN rainy weather Watering should be reduced. The application of moisture is stopped 2 weeks before harvest.
In addition to watering, garlic needs regular feeding:
- 1 time every 10 days the soil is watered with a solution of phosphorus and potassium fertilizers;
- At the beginning of the growing season and after the head has formed, the plants are fertilized with mullein infusion or chicken manure. 1 kilogram of fertilizer is diluted in 10 liters of water and infused for several days. After fermentation is complete, 1 liter of fertilizing is diluted with 10 liters of water.
For additional protection against diseases and pests, preventive treatments with fungicides and insecticides are carried out in the spring.

How to replant garlic planted before winter in spring
It often happens that after autumn planting garlic, the gardener's plans change dramatically and the beds have to be transplanted to a new location. Many sources do not recommend this procedure, because it can damage the root system of plants and destroy them.
But if work is necessary, then the plantings are postponed along with a large earthen lump. In this case, losses will be minimal, but in any case a smaller harvest should be expected.
Garlic can be planted in both spring and autumn. The specific timing of the work will depend on the desired result. The key to successful work will be compliance with all the rules described above.
Garlic is a real hero of our garden, because it is not only tasty and healthy, but also repels pests from other inhabitants of the garden. The culture has gained popularity thanks to its vibrant taste qualities— it can be used for salads, various dishes, marinades, and as a spicy spice. And thanks to garlic, food always acquires a unique, luxurious taste. But in terms of useful properties For human body he is almost a record holder. Thanks to all these extremely positive properties, many summer residents grow this crop on their property. If you also want to properly plant spring garlic in the spring, then this article is for you!
Differences between spring and winter garlic
Distinguish spring garlic(it is planted exclusively in spring, harvest in the same year) and winter(planting is carried out in the fall, but is also possible in the spring). At first glance, it may seem that they are similar and not particularly different. In order to choose the right planting material in the spring, you should know what their differences are. Let's look at the main characteristic features crops that will help distinguish spring garlic from winter garlic:

Below is visual diagram showing how spring garlic differs from winter garlic:


Landing dates
So, winter has passed, when is it better to plant spring garlic in open ground? Define the right time quite simple. The soil temperature should remain stable at at least 5 degrees Celsius (in the top layer of the earth at a depth of 15 centimeters). That is approximately mid-April-early May.
IN different regions The timing of planting spring garlic may vary slightly:
- in the South ( Krasnodar region(Kuban), North Caucasus)- can be planted in early April;
- V Middle lane(including Moscow region)- late April-early May;
- in Siberia, the Urals, in Leningrad region - at the beginning of May.
Pay attention! The culture is quite frost-resistant, so there is no need to be afraid of returning spring frosts. Plant shoots can appear even at temperatures around +3°C
In addition, spring garlic can be planted according to the cycles of the moon. Thus, By lunar calendar 2019 it is better to plant in spring as follows:
- favorable days: in March - 10, 11, 12, 15, 16, 17, 23, 24, 25, 27, 28, 29, 30, in April - 2, 3, 4, 5, 6, 7, 8, 9, 11, 12, 13, 14, 15, 24, 25, 26, 27, 29, 30, in May - 1, 2, 3, 4, 12, 13, 14, 21, 22, 23.
- unfavorable days: in March - 6, 7, 21, in April - 5, 19, in May - 5, 19.

Step-by-step instructions for planting garlic in open ground
Probably, any gardener who has at least once encountered planting garlic will say that it is not difficult to do, especially when you know the scheme and technology of the process. Therefore, it will be useful for novice garlic growers to study before the event step by step instructions on spring planting of spring garlic in open ground.

Step one: choiceplaces and soils
In order to enjoy the harvest in the future, you need to choose a suitable place and soil for planting the cloves. The following descriptions of the most suitable place and soil for spring garlic will help you in choosing a site in your country house or garden for an ideal garden bed:
- Light loamy soil is ideal.
- The soil has neutral acidity - pH 6.5-7.
- The place is well lit by the sun, protected from cold winds and drafts.
- It is recommended to choose an elevated location.
- Moisture should not stagnate in the garden bed.
- You need to choose a place for a garden bed taking into account crop rotation. Favorable predecessors: cucumbers, cabbage, legumes, melons, green manure, but p suckers- tomatoes, potatoes, bulbous plants.

Step two: preparing the site
It is advisable to prepare the site before planting spring garlic prematurely, that is, in the fall. If you do not have this opportunity, then preparations must be made at least two to three weeks before the event.
If the soil on your site is acidic, then preliminary liming is necessary.

Step three: selection and preparation of cloves
As mentioned above, propagation of spring garlic is possible only by cloves. It is better to buy planting material, that is, cloves, from trusted sellers who will sell you exactly what you want. It is recommended to plant zoned varieties, which are ideal for growing in your region.

Preparing spring garlic cloves for spring planting should begin with sorting. First you need to delicately separate the onion. And then you need to choose the healthiest, largest cloves (they are located on the edge of the onion). But the small cloves that are closer to the center are better to simply eat. If the planting material has damage, signs of rotting, disease, or drying out, then they should be discarded.

Now we need to intensify the growth processes. It is necessary to wrap them with a damp cloth, then with a plastic bag, but so that air enters. In this state, they should be left for 7 days in a cool, dark place where the temperature is maintained at about 3 degrees Celsius (for example, in a refrigerator or basement). In this case, you need to regularly check the teeth and if the fabric dries out, it needs to be moistened. Manipulation will stimulate faster germination.
Immediately before the procedure, soak the cloves in warm water for 12 hours.. By the way, you can use not just water, but a solution growth stimulant(for example, Epin).
If you think that planting material is not very high quality, then for disinfection you can soak it in a solution of the drug “ Fundazol"for 20 minutes (the solution is made according to the instructions). Or if the quality of the cloves is normal, you can simply disinfect them in a weak pink solution potassium permanganate.
Video: preparing cloves.
Step four: direct landing
Having completed all the preparatory activities in the spring, you need to move on to the last and most important stage - planting in open ground. Step-by-step instructions will help you in this matter:
- You need to thoroughly loosen the soil in the garden bed and make grooves, the distance between them is 20 centimeters. If the soil is heavy, it is recommended to pour wood ash and sand into the grooves.
- You should water the planting furrows thoroughly and wait until the water is absorbed.
- Now you need to place the cloves bottom down. The distance between them is 5 centimeters. The planting depth for spring garlic is 2-3 centimeters (if planted too deep, the plant will grow more slowly).
- There is no need to press the planting material into the ground, just sprinkle it lightly with soil.
- And the final step of planting spring garlic is mulching.

Video: technology and rules for planting spring garlic cloves in spring.
Aftercare
Caring for the plant after planting in the spring is quite simple. In order to properly and fully care for spring garlic, it is enough to carry out simple measures:
- Immediately after planting, it is necessary to mulch the beds. The layer thickness is 10 centimeters. It is optimal to use sawdust, dry peat, wood shavings, and straw as mulching material. Mulching is very important element care for spring garlic after planting, because it prevents the growth of weeds and drying out of the soil, retains moisture in the soil, and prevents the plants from overheating on hot days and freezing on cold days.
Advice! If the weather is too rainy, then the mulch must be removed, otherwise chronic dampness will provoke the development of diseases.

- High-quality watering very important for normal growth and development of the plant root system. After planting, it is necessary to water for two months as the soil dries. But despite the moisture-loving nature of garlic, excessive moisture can cause rot, so maintain moderation. However, you cannot use cold water. It is advisable to water spring garlic in the morning or on a cloudy day, that is, when the sun is not yet very active. When the second half of summer begins, watering is reduced, and a couple of weeks before harvest it stops completely.

- After watering it is necessary loosen soil in the row, but not very deep, so as not to damage the roots.
- When weed we definitely need them eliminate. You need to weed in a timely manner so that weeds do not grow in the garden bed.
- Fertilizing is also indispensable for quality care of spring garlic. First feeding carried out after How will the plant sprout?, it is recommended to apply nitrogen fertilizers for the growth of green mass, for example, a solution urea(a tablespoon of substance per 10 liters of water). Second feeding carried out after the first in 2 weeks, it is recommended to add a solution of Nitroammophoska (50 grams of substance per 10 liters of water). Third feeding carried out during the formation of the bulb, that is, approximately at the end of June, can be fertilized Superphosphate(40 grams per ten liters of water).
Video: rules for caring for spring garlic after planting.
Spring garlic is harvested at the end of August or early autumn. You can determine the exact readiness of the plant by appearance— the castings turned yellow, began to dry out and lie down.
Pay attention! If planting in the spring was done correctly, and subsequent care after the procedure was carried out properly, then the first shoots will appear in approximately 7-14 days.
To understand how growing garlic in your garden is a useful and profitable activity, you need to try it at least once. And you will be pleasantly surprised. This is not to say that planting spring garlic in a dacha or private house plot will take a lot of your time and effort, everything is quite simple. But the result in the form of a delicious harvest will bring incomparable pleasure.
Few vegetables compare in popularity to garlic. It is a barrier against infections, an excellent culinary seasoning, and even protection against dark forces. He is not afraid not only of evil spirits, but also severe frosts, therefore it is grown in all latitudes. Moreover, this is one of the crops that can be planted in winter. Let's consider the benefits different ways planting, basic rules for choosing varieties and the main nuances of growing garlic in open ground.
Of the variety of varieties, two large categories can be distinguished - spring (those that are planted in the spring, usually in April) and winter (for planting in winter). The latter, in turn, is divided into shooting and non-shooting. The advantage of having no arrows seems obvious, however, this is not always the case.
Spring garlic
Advantages:
- It has greater shelf life and dries out less, so it is better to plant it with an eye to storage and harvesting.
- The shooter does not.
Flaws:
- It tends to gradually degenerate, lose productivity and accumulate infections, since it has to be propagated by teeth. Namely, they transmit signs of degeneration, disease and infection from generation to generation. It is possible to obtain a healthy gene pool from shoots, from aerial bulbs (bulbs). It takes two years to restore full-fledged bulbs; in the first year, only one-toothed seeds produce seeds.
- In terms of commercial indicators, the yield of this species is inferior to winter plantings.
- Gives large number teeth (usually they grow in two tiers), which means they are smaller in size.
Video review of growing spring garlic
Winter garlic
Advantages:
- More abundant harvest.
- Bulbs with large teeth.
- It germinates early, which means it ripens earlier.
- By the end of July, the bed is cleared and can be used for sowing other early ripening crops or planting so-called green manure grasses, which quickly grow green mass. They make an excellent natural fertilizer for incorporation into the soil in the fall.

Flaws:
- Low keeping quality. Preserve the harvest of winter crops even if all favorable conditions It will be possible until the beginning of next winter at the latest.
- Shoots together.
Features and rules of growing before winter
Planting is done about a month before expected frosts. By the time they arrive, the cloves should already be firmly rooted, but not yet produce visible shoots.
But it is difficult to predict the weather, and this vegetable is not afraid of light frosts, so often it still manages to sprout. In this case, they should be sprinkled sawdust, land or non-woven material, and they will overwinter painlessly. The following rules will help you plant garlic correctly in winter:
- When buying planting material, be sure to ask in which region it was grown. Only local harvest or specially released varieties will have good commercial characteristics. This especially applies to purchases on the Internet and in gardening markets.
- Select well-dried bulbs without signs of disease. To check, you need to clean one of them to choose from and check for stains, rot, yellowness, etc.
- Do not use heads with crooked cloves, the number of which exceeds 10-12 pieces in a given bulb. This indicates the degeneration of the variety and diseases that will be inherited.
- Prematurely sprouted cloves are not suitable for winter planting, they will sprout too quickly, not having time to take root, and will die at the first frost.
- If the head's outer scales are cracked or its teeth are falling apart, it means that it was overexposed in the ground and is not suitable for planting.
- The cloves should be separated immediately at the time of planting. Premature detachment of the root bed from the queen cell leads to loss of its viability.
- Use only the largest and most beautiful bulbs from last year's harvest for seeds.
No matter how beautiful Chinese garlic may seem, which is sold in abundance in supermarkets, it is not suitable for cultivation in cold mid-latitudes!
Site preparation and disembarkation
It is necessary to prepare the soil 3-4 weeks before the intended sowing. The bed needs to be dug up with a shovel, filled with organic and mineral fertilizers(potassium and phosphorus content is required), water and let the soil “settle.”

At increased acidity soil, vegetable ash or dolomite flour should be additionally added to it.
Garlic (especially winter garlic) loves high places; swampy conditions are worse for it than any frost. Therefore, the beds need to be made high so that they do not experience flooding.
A distance of 20-25 cm should be left between the rows; teeth should be planted in them after about 10-15 cm, but with an eye to their size. The larger they are, the greater the distance required between the roots. Since they cannot all be the same, as in selection, it is better to calibrate them in advance by size. The optimal depth is 6-7 cm. It is not recommended to germinate this crop in advance due to the fragility of the roots. Damaged roots lead to disease and stunted growth.
Crop rotation
For a good garlic harvest and minimizing damage from diseases and pests, it is important to choose the right neighbors and predecessors in the garden. Crops such as potatoes, tomatoes, peppers, eggplants, herbs and leafy greens. Currant bushes protect well from pests. Berries feel great next to them garden strawberries, as well as bulbous flowers. But proximity to legumes is contraindicated for both garlic and the legumes themselves. Plant them as far apart as possible.

It is important to correctly resolve the issue with predecessors. Radishes, beets, and turnips are absolutely not suitable for this. Surprisingly, some crops that are perfect for neighborhoods are absolutely not suitable as predecessors. These are bulbs, celery, some herbs (basil, cilantro, lemon balm, mint). It is best to plant garlic after last year's plantings of cabbage, zucchini, squash, tomatoes, and potatoes.
Alternative planting method
If there is not enough space for classic version, you can use "tricky" two-tier method. The first tier is laid to a depth of 12 cm, after which it is half covered with earth and the second tier is planted above it, at the usual depth. The lower “floor” feels good and grows no worse than the upper one, whose roots do not reach it and therefore do not interfere. Moreover, it is guaranteed to survive in very harsh winters. You need to dig up a two-story crop very carefully.
When using your own seeds, after a few years it is better to completely replace it with one grown from seeds to avoid degeneration and inheritance of diseases.
Top dressing
As soon as active growth of shoots begins, you should fertilize with mullein, vermicompost or diluted chicken droppings. It is good to sprinkle ash or spread rotted manure thinly between the rows to repel pests.

After the appearance of the fourth leaf, urea is fertilized, and as soon as the beginning of the formation of the bulb becomes visible, superphosphate is added. After this, no more fertilizing is done, pull vitality the plant will be made of greenery.
An old grandfather’s recipe for a rich harvest: when planting a clove in the ground, pour 1 tbsp into each hole. stove soot or ash.
Determining the need for fertilizer application by appearance
Drying of the tops
The slow formation of shoots and their drying out indicates a general deficiency nutrients in the soil. Organomineral fertilizing is required, consisting of an equal amount (2 tablespoons per bucket warm water) urea and chicken, duck, turkey and pigeon droppings. If you don’t have any of them, you can replace them with others in the same proportions. Watering calculation: 3-4 liters per square meter. m. The procedure is repeated after 2 weeks.

Yellowing of the tops
If a lack of moisture is ruled out, the cause may be a lack of nitrogen. Add 1 tbsp to 7 liters of boiling water. ammonium nitrate, stir well, cool and use once a week for watering.
Faded color of the tops, decreased color intensity
There is not enough potassium fertilizer. Feeding with calcium chloride or potassium nitrate can alternatively be replaced with organic plant ash. Spread a thin layer after a good rain or heavy watering.
Watering
It is imperative to water this crop in the absence of regular rainfall. The phase of intensive growth and formation of the underground part (the first half of the growing season) is especially important.

Diseases and pests
Unfortunately, garlic is susceptible to many potential diseases and pests, of which there are about a hundred. Let's consider only the most common and most harmful of them.
Pests
Stem nematode
It can easily destroy the entire standing crop. The nematode does not tolerate table salt; salt is added to water for irrigation and soaking. seed material before disembarking.
Root mite
It affects during storage and, being undetected, is introduced into the soil with seeds. Turns the pulp of teeth into brown dust. Requires careful control over the quality of seed material.
Garlic four-legged mite
It not only destroys crops, but is also a carrier of infections. Since mites are not insects, most insecticides are ineffective against them. It is necessary to use insectoacaricidal or acaricidal preparations. The acidity of the soil should also be reduced.
Onion fly
Afraid of tobacco dust, ash and shag, as well as red and black hot pepper.

Diseases
Rust
Black mold
Inhibits plants, causes rotting and death. Chemical methods there is no struggle, correct crop rotation, cultivation, loosening are necessary.
Fusarium
It mainly affects winter plantings. It is also a fungal disease, which can only be gotten rid of at the stage of working with the seeds. Signs of infection are pearly yellow coloring of the teeth, brownish sores or stripes on them.

At correct landing and minimal care, this crop requires almost no attention. But it is necessary to provide it with light, space and moisture, otherwise the marketable indicators of the harvest will significantly decrease. It is best to cultivate both types of garlic in the garden at once - spring and winter. The winter one is good for summer preparations and pickling, and the spring one is good for storage until the next harvest.
Pythagoras also called garlic the king of all seasonings, because it is a unique representative of the Onion class: it contains many microelements that have an incredible effect on the body. From this article you will learn how to plant garlic in autumn and spring, about methods of propagation, seed preparation, and also how to reap a rich harvest.
Rules for planting garlic
Regardless of whether you plant garlic in autumn or spring, you must follow several rules, because this is the key to a healthy harvest:
- for planting you need to choose an open one sunlight plot;
- observe crop rotation;
- The bed must be fertilized in advance.
The majority of gardeners prefer to plant garlic before winter, but experts recommend doing this in the spring, since with the onset of frost the root system does not have time to gain strength. As a result, in spring the garlic is too weak. Garlic should be planted in open ground in the spring as soon as the snow melts. If you delay for several days, you will not get the expected result.
Crop rotation rules
All agronomists insist that you cannot plant one plant in one place every year, crop rotation is the key bountiful harvest. It is not recommended to sow garlic in a place where the following plants grew:
- onions, since they require the same substances as garlic to grow. In addition, both plants may have the same diseases and pests;
- Sevk is not recommended A garlic in place of carrots, because they deplete the soil;
- also potatoes, cabbage, beans, peas and beets squeeze out from the soil the substances required for the growth of garlic, so that the harvest will be minimal.

- all grain crops with long roots, they are an excellent green manure, with the exception of oats and barley;
- You will also get a good harvest if you plant garlic where zucchini, bush berries and forage grasses grow.
Correct crop rotation in combination with fertilizer and proper care will bring you the expected result.
Soil preparation
Garlic grows best in soils with high level clay content, they have properties that have a beneficial effect on the growing season:
- do not retain liquid, but do not dry out too quickly;
- the porous structure allows air to pass through to the root system.

If the soil is suitable, then all that remains is to dig up, loosen and plant the garlic. But not everyone is lucky enough to have suitable soil: then many gardeners buy a special soil mixture with vermicompost and make bulk beds. Due to the fact that garlic has a short root system, it grows well in artificially created conditions.
Preparing garlic for planting
Planting winter garlic consists of several stages. First you should prepare the planting material, the procedure will be as follows:
- carry out a superficial inspection for the presence of damage, mold, without disassembling the head into teeth;
- place the selected material in a place where a stable temperature of +3-4 degrees Celsius is maintained (a refrigerator is perfect);
- leave the heads for 3-4 weeks, this is required so that it does not begin to grow prematurely;
- the day before planting, disassemble the heads into teeth, select only healthy ones (those with the slightest signs of mold or mildew should be thrown away to eliminate the possibility of infecting the rest);
- the selected planting base should be soaked for a day in a solution of potassium permanganate, then placed in salt water for a few minutes (1 tablespoon of salt per 3 liters of water). Also, some gardeners prefer to soak the teeth in a 1% solution of copper sulfate for 12 hours.

You don’t have to do these steps by planting the cloves in the ground right away, but it’s better to play it safe in order to be sure to get a bountiful harvest.
What time is sowing carried out?
Planting garlic in the fall before winter requires compliance with deadlines, otherwise you will not get the expected result. The crop growing on the site should be removed by the end of July. The winter variety is planted 30-40 days before the onset of frost; during this period it will be able to develop the root system, but not start the growth of the green part. The best time for planting is considered to be from September 20 to mid-October. If you plan to grow from bulbs, then planting can be done in April. According to the lunar calendar, which guides many gardeners, best time for boarding it is 4, 12-15 September and 11-13 October, if you are late, then 11 and 16 November are allowed.
How to plant garlic cloves for the winter
Make indentations in the area developed in advance; the furrows should be 15-20 cm deep, 25 cm apart. The bottom must be covered with sand, the layer should not exceed 3 cm, in order to eliminate rotting upon contact with damp soil. Large tines should be placed at a distance of about 15 cm from each other, those that are smaller in size, about 8-10 cm. After sowing, the soil must be mulched; for this purpose, the garden area is covered with a two-centimeter layer of peat or a mixture of soil and wood sawdust. If snow does not fall, but there is frost, then the bed should be covered with polyethylene or roofing felt, and opened when snow falls.
Planting garlic in autumn bulbs
If you plant garlic in bulbs, then the distance between the depressions should not exceed 10 cm and the depth 3 cm. The seeds should be placed at a distance of 2 cm from each other. Having carried out the work in April, by autumn you will receive the so-called “single-toothed plants”, which will be full-fledged planting material in the fall. Before planting, single-cloth bulbs need to be dug up and dried, and then planted in a new place, and next year you will get the expected harvest.
Caring for winter garlic
If you mulch the soil correctly, then over the winter the garlic will have time to develop a full-fledged root system, and caring for the plant will not be difficult. With the first rays of spring sun, remove a 2cm ball of mulch to allow the green part of the plant to shine through. When the garlic begins to break through the first arrows with seeds, break them off before they reach 15 cm, otherwise the bulbs will be too small. In the process of growth:
- With the appearance of the first green leaves, it is necessary to fertilize with substances containing nitrogen. This can be either artificial fertilizer Urea or organic fertilizers;
- The next feeding is carried out at the end of June - beginning of July; for this, half a kilogram of wood ash must be dissolved in 10 liters of water.
During the growth process, it is necessary to remove weeds, loosen the soil and water if the summer turns out to be with little natural precipitation.
When to plant spring varieties of garlic
Planting garlic in spring is possible only with cloves, after the soil has warmed to 5 degrees Celsius. Already at 8-10 degrees the leaves begin to grow. If garlic is planted at more high temperature, then the yield will be low, since the bulb will not have time to form. If you follow the rules, growing wild garlic is not a hassle.
How to plant garlic in spring
About a month before planting, you need to select the heads and place them in the refrigerator or bury them in the snow. 12 hours before planting, the heads must be disassembled into teeth; anything with suspected mold or mildew must be discarded. Next, the seeds are processed. There are three ways to prevent mold growth:
- soaking in a 1% solution of potassium permanganate or copper sulfate;
- for 8-10 hours, warming up the teeth at a temperature of 40-42 degrees Celsius;
- Soaking in ash: dissolve 400 grams of wood ash in 2 liters of water, and soak the garlic in the resulting mixture.

To speed up the germination process, you can wrap the garlic cloves in a damp cloth for 2-4 days and wrap them in plastic wrap.
Every 25 cm you need to make furrows 4 cm deep. Place the tines at a distance of 10 cm from each other, but they should not be pressed in, as this may adversely affect the development of the root system.
Caring for spring garlic
The green part of garlic begins to appear in the light at a temperature of +3-5 degrees Celsius. The essence of care is watering, getting rid of weeds, loosening and fertilizing. It is recommended to mulch the area with peat, humus or compost; the layer should be about 3 cm thick.
Maintenance also includes regular watering.
At the initial stage of the growing season, moisturizing should be done abundantly: if you notice that the tips are beginning to turn yellow, this indicates insufficient or infrequent saturation with water.

In the second stage of the growing season, you need to be careful with watering, because too much moisture can lead to rot or mold development. The day after rain or watering, loosen the soil to allow air penetration.
Pest protection
- leaves begin to turn yellow and dry out;
- spots of a grayish tint appear on the green parts;
- the roots die, and a coating that is uncharacteristic of a healthy plant appears on the bulbs and between the teeth.

To prevent the development of mold, garlic should be treated with preparations such as Alirin-B.

Growing garlic in open ground is commonplace for gardeners. This unpretentious vegetable crop in demand among different nations world, successfully used in cooking and medicine. Garlic is rich in vitamins, microelements, essential oils, which determine its specific aroma.
Varieties of garlic in open ground
Growing methods and planting dates allow us to divide garlic varieties into two groups -
- winter crops;
- spring
Winter varieties They are planted a month before the onset of cold weather, have large heads, short shelf life, and ripen early. The most popular winter varieties are:
- Jagged tooth. Large heads, rich harvest.
- Alcor. Medium-sized bulbs with pink-violet scales.
- Lyubasha. Tall tops and large flattened bulbs.
- Hermann. Long shelf life, medium heads.
- Doctor. It tolerates transportation well, does not shoot, the heads include up to 16 cloves.

Spring varieties distinguished by the absence of arrows, planting dates, head size and storage duration. Spring garlic is planted in the spring, in early April, and harvested later. Compared to winter varieties, spring varieties have small heads that can be stored all winter and spring. The following spring varieties of garlic are popular among gardeners:
- Moscow. It differs favorably from its fellows with its large white heads.
- Gulliver. It has dense, flattened heads that can be stored for about 8 months.
- Victorio. Medium-sized, round, white heads consist of yellowish teeth. The variety is resistant to diseases and pests.
Planting garlic in open ground
Growing garlic from seeds is impossible, since the vegetable reproduces exclusively vegetative way– teeth or airy bulbs. The latter are heads with small teeth that grow on the frog. Both tines and bulbs can be planting material, which determines the preparation, planting time and growing cycle. The first harvest of bulbs are single-pronged heads intended for subsequent planting.
How to plant garlic in open ground?
Proper cultivation of garlic involves preliminary preparation and compliance with technology. The primary task of a gardener is choosing a site. For garlic it is preferable:
- sunny area;
- fertile loamy soil, rich in organic matter;
- It is better to grow a vegetable in a garden bed where legumes, potatoes, and cabbage grew;
- Strawberries, strawberries, currants, and gooseberries are excellent neighbors for garlic.
Preparatory work on the site should be carried out in advance:
- in the fall it needs to be dug up and;
- in spring (for spring varieties), 2 weeks before planting, the bed must be dug up again and fertilizers must be added - humus, superphosphate and potassium salt;
- acidic soil must be neutralized (with lime, dolomite flour).
Growing garlic in open ground will give decent results if the planting material is of high quality and prepared:
- the best heads, without signs of infection, are selected for planting;
- the teeth are separated immediately before planting, and then the top husk is removed;
- To prevent fungal diseases, the cloves are soaked in a solution of “Fitosporin” or potassium permanganate – your choice.
When to plant garlic in open ground?
The time for planting garlic is determined by the variety:
- You need to have time to plant winter garlic a month before the onset of cold weather. During this period, the teeth will take root, and the green mass will not have time to grow.
- Spring garlic is planted in open ground in early spring (you don’t have to wait for the soil to fully warm up to carry out the work).
- Aerial bulbs of winter varieties are planted, like tines.
Growing garlic in the country - planting scheme
The technology for growing garlic involves standard scheme plantings for all varieties:
- row spacing - 20-25 cm;
- the teeth are located at a distance of 8-10 cm;
- the planting depth of each clove is 5 cm;
- after planting, the bed is leveled and mulched;
- when planting for the winter, the bed is covered with branches or fallen leaves.

Caring for garlic in open ground
Growing and caring for garlic in open ground comes down to timely fertilizing, loosening the soil and regular watering. You can begin to loosen the soil between the rows after 2-3 leaves appear, then repeat the procedure after each watering. In the spring, vegetable crops require an abundance of moisture, otherwise you should not count on a rich harvest. Garlic also needs fertilizing - nitrogen in the initial phase, and phosphorus-potassium during the ripening period.
How to properly water garlic in open ground?
Lack of moisture is detrimental to garlic; under such conditions, the heads form very poorly and stop growing altogether. Therefore, the question of how to water garlic in open ground requires detailed consideration. In the spring, when the tines begin to sprout the first shoots, the plants can already be watered. In the absence of rain, you need to moisten the soil abundantly once a week (at the rate of 10 liters per day). In the summer, as the vegetable ripens, watering is reduced and stopped altogether 14 days before harvesting.
Fertilizing garlic in open ground
Growing garlic involves fertilizing. The first application of fertilizers (humus) falls on the phase of 2-3 leaves. A little later, the foliage is sprayed with a solution (at the rate of 1 tbsp per 10 liters of water). Two weeks later, a solution of nitrophoska is added (2 tablespoons per 10 liters of water). In summer, fertilizing nitrogen fertilizers should be stopped - in June the plant will respond well to watering with a superphosphate solution (2 tablespoons per 10 liters of water).
