The Earth for Us is a natural wealth that fed our grandfathers and parents. Today, only a small percentage of people manage to interact with it directly - coming to their dachas a couple of tens of kilometers away, living in rural settlements or your own private house within the city limits. All these options often converge on one thing - cultivating work, removing weeds, planting cultivated plants and/or... Sometimes, all these things are carried out on the “weekend”, after working days. But, you also need to relax, go out onto the summer terrace or just stand on the edge of the garden and contemplate how you were able to correctly plan the garden on your site.
Of course, while there are endless expanses of snow in front of you, you won’t really “plan”, but you have a warm blanket, a cozy chair, you’ve prepared yourself delicious tea and just now, you can begin to decide from a theoretical point of view how you want to plan your garden.
If you decide, you can give each square meter of land such a look that cultivated plants will produce up to 15%-20% more yield, the flowers will be slimmer, and the eye will only be happy
Based on this, we offer you the following points, which We will reveal during our “journey” of planning a “workspace”:
- We decide on a planting plan;
- We form the correct dimensions and position of the beds;
- Alternation of crops - what is it and what is it eaten with;
- Combined landing;
- Crop rotation and many other “hot” issues and their solutions.
 Planning beds
 Soil in the garden
We are sure that you are an experienced person in terms of annual selection crops grown on your plot, you know that in order to plan them you need to know which soil in the garden is more suitable for a particular variety or variety. And if earlier this was done “by eye”, now it is necessary to correctly determine the soil composition, which means it is imperative to know it acidity (pH).
This is quite simple to do - take samples taken from the garden to a special laboratory. It is imperative, for a more accurate composition, to take several samples from different parts of it. If you don’t want to wait a long time, pay, or are just interested in Is it possible to do this test at home?, we answer – maybe not so accurate, but it’s possible. To do this, let’s take the same “samples” and mix them thoroughly to get, literally homogeneous mass and pour some of it into a jar or other container. Next, pour a little vinegar and see the result. There will be 2 of them, and each will indicate its own designation:
- Bubbles appear on the soil sample upon contact with vinegar, which will mean neutral pH;
- The vinegar will be absorbed into the ground without any visible reaction, which will determine acidic pH soil.
Let’s say right away that this is not the most accurate analysis, but it allows us to quickly and clearly illuminate this important issue.
 Planning rules or how to plan a vegetable garden
In addition to the composition of the soil, plan the site The correct arrangement of those several beds that you are already “sorting out” in your imagination will help. Here are a few rules to help you with this:
- Most best option The location of the garden is flat terrain. In cases where the plot is located on a slope, choose the southern or southeastern part;
- Be sure to resolve the issue with . Innovation or automation is not important here – it’s your choice. Both large and small gardens love the availability of water, which will be more convenient for you;
- Determining the soil. Chernozem is best suited for planning a vegetable garden and getting a rich harvest. But if heavy clay predominates in the soil, you will have to refine it and bring peat, sand, or black soil itself to the site;
- If you have not yet decided how to make beds correctly and where to start, start by planning the area at a distance from the trees. They will not create a shadow, and at any time the soil will be warmed by the sun's rays.
- From south to north beds are located if the land you own is in a lowland. Often, the soil is constantly damp, which means it needs to be warmed by the sun;
- From west to east, beds are planned in case of dry soil. The row spacing will be under the shade of the plants, which will retain moisture;
- When the ground slopes, it is better to divide the beds crosswise;
- South side suitable for planning a vegetable garden, and the northern– garden, if the area is not initially level.
 How to plan a vegetable garden
 Creating a planting plan
We agree that planning a vegetable garden is painstaking work that will take a single day, but without it you will not produce rich harvests, and this place will not become a vacation for you.
The first thing we start with is drawing a plan of “possessions” on paper
The drawing should contain the most complete information: shape and dimensions, information about the acidity of the soil, its orientation. Next, divide the site into zones - garden, vegetable garden, residential and utility zones. It will be great if you observe and note the amount of shadow from buildings and trees. Now, in order to plan the garden more clearly, we make a “model” of it. To do this, cut out strips of paper and write the name of the plants you will plant, as well as important devices such as watering centers. Place them, play around and you will find them the right combination. For those who believe that these actions “can be omitted,” let’s say that it is better to prepare on paper than to find right places in the garden itself in the spring. When all the forms and places are determined, you can think about the varieties and varieties of crops that are needed in the garden.
Correct beds
If proper beds are absent in the garden, then there will be no rest - everything will be painstaking work. Therefore, we will pay attention to the beds in order to properly plan the garden.
- Lower or raise
There are several positions of the beds: deepened, raised, flush with ground level. The level is determined by the availability of watering every day, natural conditions. For example, if you cannot water your beds every day, then it is better to deepen them, and vice versa.
- Dimensions
The forms can be completely different, the most important thing is easy access. If the length can be any, then the width for easy access should not be more than 1 meter. Optimal width– from 60 cm. Size design – according to your wishes (brick, slate, etc. or not).
- Crop rotation of your crops
This is one of the critical issues, which must be solved not only to plan the garden, but also to get a rich harvest. The turnaround time for “returning to your previous place” is about 4 years. Therefore, we recommend dividing the entire area into 4 sections, and observing all the necessary sequences, according to the crop rotation tables.
- Combined planting of crops
Here, in order to properly plan a site, it is worth knowing which crops will not be able to live side by side, and which will even help grow, forming a “community”. For example, beans and beans are known among agronomists as the “Three Sisters” because their growth rates are perfectly suited to each other. But it’s worth knowing that not all plants are so “friendly.” Dill and knowledgeable person will never sit next to you. The same applies to beans and... In order to understand exactly which cultures help and which ones “cheat” each other, see the TABLE:
Culture compatibility table
 Culture compatibility table
 Interesting tip: garlic can not only help a person strengthen the immune system, but also allow him to take care of “ immune system» plants. This means they will get sick much less. To do this, make a healthy infusion according to the recipe: chop 5 garlic cloves and pour boiling water (1 liter) over them, then close the lid and let it steep for about 20 minutes. Immediately after this, you can water indoor and garden plants with this infusion to prevent any diseases.
Planning and planting a vegetable garden of 6 acres
Planning a large-area vegetable garden is quite simple, due to its good dimensions. But on 6 acres you can’t really roam around. But this is not a problem, especially if you take into account several nuances:
- Garage position;
Do not build a garage in the back of the dacha (house), because you will need to allocate a road (access) for the car.
- A south-facing garden will provide shade for most of the day;
- It is better to install the grill on the windward side;
- The non-standard shape of the flower beds will not only allow you to plan your garden, but will also visually expand it;
- A mini-garden located in the area of the barbecue or gazebo will decorate the perimeter and save space;
To do this, a block is knocked together from boards, soil is poured in and flowers or crops are planted. The bed can be fenced with a fence to limit the beds.
- Drainage systems in lowlands are simply irreplaceable;
If your site is located on a slope, then bottom part will always contain excess moisture. Exactly drainage systems, disguised in special terraces, will visually and actually make using the site more convenient.
These tips will serve as a good lesson both in planning a simple small garden and large plots.
So, by adhering to the above measures, you will be able to create a proper vegetable garden right from a piece of paper this spring, which will bear fruit to your delight
We wish you to rest on your personal plot and not to believe people who say that work at the dacha turns into torture. Turn your site into a fairy tale right now.
A garden and vegetable garden are integral attributes of any suburban area. You don't have to be to break them experienced gardener– it is enough to have minimal knowledge about the issue and, of course, good instructions.
Let's start with the fact that making a garden from scratch is much more difficult, because it will grow not for a year, but for several decades, so you have to take many points into account. Something may be planted in the wrong place, and years later these mistakes will make themselves felt. For example, a common mistake made by novice gardeners is to have the root collar of seedlings too deep.

The process is quite labor-intensive and consists of several important stages. Let's get acquainted with the features of each of them.
Stage one. Selecting a site
Great attention is paid to the selection of a suitable site - the relief, soil type, and depth are assessed groundwater, degree of wind protection and other important conditions. Thanks to agrochemical analyses, it is possible to determine the level of soil acidity and the concentration of nutrients, which will later help with watering, fertilizing, and liming. Determining the depth of groundwater will allow us to determine measures to minimize it. negative impact. In short, planting a garden should be done only after preliminary preparation, and gardeners are required to know about some aspects of land assessment.

Pay attention! A number of additional measures will help make even land unsuitable for trees suitable (for example, drainage).
Relief
Gardens grow best on slopes with a steepness of no more than 8 degrees. The direction of the slope is also important - it should be southern, which means warm and well-lit. You should not plant a garden in a depression, because water accumulates there and cold air stagnates.

But most of the terrain suburban areas flat, without depressions or slopes, so there is no choice.
Soil
Fruit trees, as is known, have quite powerful root system, which goes deep vertically and spreads widely to the sides. This means that nutrient medium required in large quantities. It is for this reason horticultural crops They develop better on rich soil that contains the required supply of elements and is sufficiently (but not too) moistened. Swampy, rocky, heavily podzolized and clayey terrain is completely unsuitable in this case.

As for the subsoil, it must be moisture- and breathable.
- Apple trees require black soil, sandy loam or turf soil. It is important that the soil is loose and wet, however, apple trees cannot tolerate excess moisture.
- Plums need moisture and rich nutrients loamy soil. They cannot tolerate moisture deficiency and dry air.
- It is better to plant cherries not too steep slopes with sandy loam soil.
- Pears will grow best in light loamy soil.

Groundwater
Area with high level the passage of groundwater is dangerous for garden trees, because plants do not live long in such places. The roots, reaching the water, die due to oxygen deficiency, then the ends of the branches in the crown dry out, and later the twigs. Plants grow very slowly and soon die.

If you plan to plant apple trees, then groundwater should be no closer than 2 m. For stone fruit varieties (cherries, cherries, apricots), which have deep roots, this figure is 1.5 m. Finally, for planting berry trees, the depth groundwater may be even less.
About the satellites of fruit trees
Some forest trees grow in the same conditions as fruit trees. It has been proven that if oak, linden or maple grows well on the site or next to it, then fruit crops will develop quite successfully. But alder and horsetails indicate that the area is swampy, which means it needs to be previously cultivated. Thanks to all these signs, you can find out whether the land is suitable for a garden.

Wind protection
Many gardeners know that wind has a harmful effect on the garden. IN winter time it blows snow off the ground, increasing the risk of root system freezing. Large snowdrifts around the perimeter destroy the crowns. As for hot summer winds, they dry out the soil and prevent normal pollination by insects. Young plantings are swayed by the wind, which is why the roots of the seedlings take root more slowly. Finally, with a strong gusty wind, not only leaves are torn off and branches are broken, but the trees themselves fall.

Strong winds pose a particular danger in harvest years, when in just a day most of the fruit can fall to the ground. To avoid all this, wind protection is required - an excellent way to preserve the harvest and protect the plants from damage. For protective plantings, it is best to use fast-growing trees and shrubs, but they will be effective only several years after planting. Therefore, wind protection should be taken care of at least two to three years before planting the garden. Also, outbuildings, natural hills and forest nearby can play the role of wind protection.

The most suitable tree species for wind protection are oak, poplar, birch, and linden. If shrubs are used, then it is better to give preference to yellow acacia, rowan, hazel and rose hips.
Pay attention! There are clear distances at which protective trees and bushes should be placed. For trees this is about 1-1.2 m (within a row) and 1.5-2 m (between rows), for shrubs - 0.5-0.7 m and 0.7-1 m, respectively.
Stage two. Site layout
The land should be used rationally, and there should be no room left for weeds and various pests. In other words, the area should be densely planted. Fruit crops need light, and their roots need soil nutrition. Moreover, with proper placement, the garden itself will be more attractive.
Before you start, you need to plan everything. As a rule, gardeners use the same placement schemes, which may differ depending on the topography, climate and preferences of the gardeners themselves. One such scheme is shown below.

Out of eight to ten apple trees, five should be winter variety, two - summer and two more - autumn. It also provides for the creation of a gazebo and recreation area, and planting of flower crops.
Pay attention! Pears and apple trees should be planted 5-6x4 m apart, while plums and cherries should be about 3x2.5 m apart. You can plant low-growing representatives of the same varieties between the rows of tall crops.
These low-growing plants are less durable; their fruiting will end by the age of twenty. At the same time, the crowns will reach full development, they will become too crowded, and you can get rid of the trees.
Stage three. Choosing a landing date
It is better to plant a garden in the central regions early spring, i.e. until the buds swell (this is especially important for cherries). In the South, gardens are usually planted in the fall. What is also important is that in the spring, planting should be carried out before the seedlings begin to grow, and in the fall - during leaf fall.

We also note that before digging up seedlings, it is necessary to remove the leaves. The fact is that the leaves evaporate the moisture entering the plant, and if they are not removed, the likelihood of successful survival will decrease. The leaves are removed carefully, taking care not to damage the buds.
Stage four. Soil preparation
To obtain a good harvest, a deep arable layer of soil is required. Typically, root systems fruit crops They go into the ground to a depth of 0.8 m, which means that treatment and fertilization need to be carried out for the same amount. To do this, it is more advisable to use a small planting plow.

Stage five. Selection of seedlings
They need to be purchased from a nursery that is located in the same region as the future garden, otherwise there will be a risk that the plants will not take root. The roots should be branched, long (more than 30 cm), not frostbitten, and white when cut. High-quality seedlings have straight trunks, smooth bark and no visible defects. Finally, the crown should consist of at least three to four well-developed branches, which are directed in different directions, and necessarily with a guide (i.e., a leading shoot).

Gardeners have different opinions about the age at which trees should be planted. Some plant mature plants (eight- or nine-year-old), which quickly bear fruit, but are quite expensive, and they are quite difficult to plant. Others buy two- and three-year-olds, which are somewhat behind in terms of fruiting, but are cheaper.

Stage six. Preparation of seedlings
The procedure consists of two simple steps. Let's look at them.
Step 1. Roots
The largest roots are trimmed so that the cut area “looks” at the bottom of the hole. To do this, you need to use a garden knife (not pruning shears, as it crushes the wood and does not give an even cut). If the seedlings were received in the fall, but will be planted in the spring, then after pruning they are immersed in clay mortar and bury it in the ground for a while (this will prevent drying).

Step 2. Crown
The length of the roots of dug up seedlings does not exceed 35-40 cm, while most of them (the roots), which is about 70%, remain in the ground. But the above-ground part remains the same, which is why the trimmed root system can no longer “feed” it properly. Therefore, branches in the crown should be cut to approximately a third of their length.

Pay attention! It is more convenient to trim branches after planting - this way a person can not only see their placement relative to each other, but also do the work with both hands.
Stage six. Digging planting holes
During the first two years after planting, the roots are located within the planting hole, which means they use moisture and nutrients from there. Therefore, at first, young plants should be provided best conditions for development.

The diameter and shape of the planting holes can be different, but in order to ensure uniform and proper development of roots, it is advisable to make round holes that taper downwards.
Pay attention! There is an opinion that on clay soils the bottom of the pit should be covered with a sand “cushion”, and on sandy soils – with clay. This is supposedly necessary for water retention. In reality, everything is not like that.
Holes for spring planting should be prepared in the fall, while for autumn planting - about a month in advance. Moreover, in the first case, before frost, the holes should be filled with fertilized soil, but not compacted.
Stage seven. Landing
Let’s immediately make a reservation that you should not fill up the root collars - when the soil settles, they should be flush with its surface. In principle, planting is the most important stage; the yield, survival rate and life expectancy of trees depends on it. The mistakes made here are quite difficult, and sometimes even impossible, to eliminate in the future.

The most common mistake is deep planting, which can only be discovered after several years. It is difficult to raise a deeply planted tree, and a novice gardener will definitely not be able to cope with this; moreover, he may even destroy the plant.
Pay attention! If the groundwater is too close to the surface, then plants cannot be planted in holes - instead, mounds of soil are created. To do this, the planting sites are first dug up, then mounds of fertilized soil are poured onto them (width - 100 cm, height - 45-50 cm). Seedlings are planted on such mounds and tied to wooden pegs.

A few words about the landing board
When the planting sites are marked and the stakes are ready, you can proceed directly to digging. To avoid violation of straightness, a stake must be driven in the center of each hole.

It’s not easy to do this by eye, so you can resort to one simple adaptation- the so-called landing board. To make it, a board with approximate dimensions of 200x15x2 cm is used. A triangular cutout is made in the middle of one side of this board. Similar cuts are made along the edges, 75 cm from the center, as shown in the images.
Such a board will allow you to install pegs to which the seedlings will be tied, exactly in the center of the holes. Next, the plants are tied to pegs as shown below.

After planting, the trees need to be looked after, fertilized and watered, but here everything depends on the specific tree species.

Video - Features of caring for fruit trees
Creating a vegetable garden on the site
Ideally, a vegetable garden should consist of beds located on sunny place and protected from the wind by those planted from the north fruit trees, as well as comfortable wide paths. Making a vegetable garden from scratch is not as difficult as a garden, but you can still encounter certain difficulties. You should start with preliminary preparation.

Stage one. Selecting a location
The space for the garden must be appropriate certain requirements, let's get acquainted with them.
- The vegetable garden should be located in a sunny place. It is important that the plants are exposed to the sun for at least six hours a day.
- Also, in the selected location there should not be strong winds or, as an option, the wind protection described above will be installed.
- The beds must be located at least ten meters from trees and buildings.
- Finally, the selected area should be level and located on a hill.
Pay attention! If the garden slopes towards the south, the harvest will be early, while on the northern slope the fruits will ripen later than usual. The western and eastern slopes are also suitable for a vegetable garden.
It is not worth making beds in lowlands, as water will accumulate there. If there is no other way out, then you should take care of a system of drainage grooves, and make the beds themselves no lower than 20 cm.


As for lighting, it is not easy to regulate. The only way is to get rid of objects shading the garden (with the exception of the north side). That is, there is no need to plant trees. But if they serve as protection from the wind, then it is necessary to at least thin out the crowns so that they do not cast a thick shadow.

Stage two. Planning
In most cases, it comes to the garden only after everything else is ready. All that remains is a piece of land on which the beds need to be laid out.
You should start by making a plan. What should be included in it? First of all, you need to indicate the number of beds, and also decide on their shape. It is advisable to make the beds square or rectangular shape, but if desired, the garden can be divided into sectors. You also need to raise them slightly (by about 15-20 cm, although the height can be greater) so that when processing plants you do not put too much strain on your back. The width of the beds is usually about 80 cm.

In addition, the plan should provide space for paths (for this, the distance between the beds should be at least 40 cm), as well as small areas for water containers and equipment. Such tanks, by the way, are needed when planting crops that like warm watering. Most of the costs here are for the arrangement of paths.

Pay attention! You should not use roofing material or slate when demarcating - these materials are released into the soil harmful substances, due to which the crop can be hazardous to health.
Still need space for compost heap, where plant and organic waste will be stored. After two years, this waste will rot and serve as good fertilizer.
Stage three. Registration
If there is a lawn on the site of future beds, then the selected area needs to be cultivated. There may be several options, but the most effective (and at the same time expensive) involves cutting off the top layer of turf (no more than 3 cm) and then evenly scattering a mixture consisting of sand, peat and manure. Then the area is dug up and beds are created. Another option is to dig up the soil so that the top layer goes to a depth of about 15 centimeters, and grow potatoes on it in the first year.
The procedure for designing the beds itself is as follows.
Step 1. First, according to the drawn up plan, pegs are driven in around the perimeter of the garden, between which a rope is stretched.
Step 2. Then the soil is prepared using one of the methods described above.
Pay attention! The location of the crops must be changed annually, otherwise the harvest will become worse over time, and the soil will become unsuitable for cultivation.
Step 3. The soil is loosened. It needs to be made soft and airy so that the plants sprout easily.

Step 4. The boundaries of the beds are indicated. This can be done using the same pegs and rope or planted around the perimeter perennials.

Step 5. At the end, paths are formed. They can be covered with gravel or laid with tiles (in the second case, the earth is compacted and covered with a layer of sand, after which laying is carried out).

Stage four. Planting
After creating the beds and paths, you can begin planting plants. To avoid any problems in the future, you need to follow the compatibility rules given in the image below.

That's all. As it turned out, if you do everything correctly, then it is quite possible to equip your house, garden and vegetable garden with your own hands. Even more useful information can be found in the video below.
Video - Planning a vegetable garden and laying out beds

Particular attention should be paid to planning the garden for planting vegetables; you should not think that this stage is not important, that you can simply stick a seed or seedling in and the earth itself will give birth. In our latitudes, this is unfortunately not the case...

Separately, it is worth noting that even vegetable beds can be like flower beds, no worse, and sometimes even better. In this case, your vegetable garden will become your flower garden at the same time, care will pay off handsomely, you will see that even vegetables can respond to care and care, just like flowers. Therefore, bringing love to the plot will undoubtedly be reflected in the harvest!

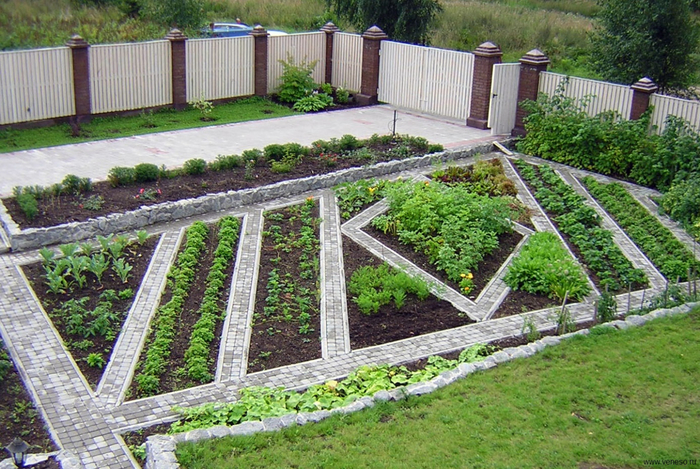
What should vegetable beds look like when planning a garden?
The first and most important rule is that the beds must be well lit, level and dry! That is, the sun should always fall on your bed, the bed should be raised, and, of course, level.


An example of a garden plan for planting
Please note that this diagram is presented as an example, first of all, as an idea from which you can build on in the future. I recommend paying attention to space optimization - the structure of the beds is made taking into account ease of placement vegetable crops.

The most common vegetables in the Middle Zone
In the list I presented the most popular crops among our gardeners. Of course, it doesn’t make sense to plant everything; it’s better to select some of them.
Root vegetables — radish, radish, parsley, carrots, beets, celery.
Fruit — eggplants, peppers, cucumbers, tomatoes, corn, peas, beans, pumpkin.
Tuberous — potato.
Brassicas — cauliflower, Brussels sprouts, cabbage sprouts, Savoy sprouts, kohlrabi.
Onion — onions, garlic, leeks.
Perennials — horseradish, rhubarb, asparagus.
Spicy-tasting — watercress, sage, marjoram, caraway seeds, dill, thyme.
An example of a small vegetable garden layout

The diagram suggests the optimal combination of vegetables; this bed can be used as the basis for a future vegetable garden.
Original garden layout

A fairly ergonomic example of organizing beds; you can reach all the plants and provide the necessary care.

Classic raised beds - islands

It is also a fairly common option for beds, which has a number of advantages over simple bulk beds without sides. Please note that in any case, it is recommended to install a fine mesh net at the bottom of each box to prevent moles from damaging the crop.
Vegetable yield per square meter

I also consider it necessary to voice the concept of vegetable yield per square meter - this indicator is important for calculating the required types of plantings. The numbers reflect the ideal size of a hypothetical harvest.
For example, subject to all agrotechnical rules, on one square meter you can grow 30 kg of cucumbers, 5 kg of tomatoes, 6 kg of potatoes, 4 kg of root vegetables (carrots, beets, etc.), 2 kg of radishes, radishes and onions, 2.5 kg of peppers, eggplants, pumpkins, zucchini, 2-3 kg of peas and beans, 1.5 kg of lettuce and dill. The figures, I repeat, are approximate, close to ideal, but we need them to plan the size of the sown areas.

Divide the entire garden into parts
Divide the space into several parts, up to 5. Depending on the desired number and type of cultivated items. Change the location of planting one vegetable or another every year and maintain crop rotation. Take into account the recommendations on what is best to plant. More details in the table:

There are vegetables that need and do not need organic matter; some fill the soil with nitrogen themselves, while others take nitrogen from the soil. Plant vegetables in the same place every 4 years.

Table of distances between plants
It should also be noted that it is necessary to maintain distances between vegetables when planting. This is an important criterion for the full development of the plant and its future harvest.

Vegetable compatibility table
You can use beds effectively only if you combine plantings, mixing different compatible plants. It turns out significant savings spaces, all details in the table:

Video on garden planning and vegetable crop rotation
For more information about crop rotation of vegetable crops, watch the video clip from the editor-in-chief of the Sadovod newspaper, Yuri Bushuev. The material is very useful for all gardeners!
Preface
In the struggle for the harvest, the owner’s diligence land plot- the most important factor, but not the only one. In order for the season to be as productive as possible, reasonable garden planning and soil preparation are required. What rules are used to guide this?
Garden and vegetable garden planning: purpose and first steps
When planning an estate, the following goals are pursued:
- arrange the house, garden and vegetable garden so that the latter is in the shade as little as possible;
- avoid the proximity of incompatible plants;
- place all objects in accordance with the standards in relation to the red line, neighboring areas and water sources;
- use all available space with maximum effect.
The site plan is drawn on paper. A convenient scale is 1:100. The drawing will turn out to be large, so you should prepare a sheet of whatman paper.
Everything is put on the drawing required dimensions, the planned objects are indicated - flower beds, gardens, paths, buildings, etc.
Objects already existing on the site are drawn, and new ones are cut out from another sheet of paper. By arranging them differently on the plan, it will be possible to consider several arrangement options.
If there is no house or outbuildings on the estate yet, planning begins with them. The following distribution of territory is considered optimal:
- house and adjacent residential area: 20%;
- outbuildings: no more than 15%;
- garden and vegetable garden: at least 65%.
When placing the house and outbuildings, take into account the following:
- Areas near the road are preferable - it is easy to get here. The house is located closer to the street so that it is visible, the outbuildings are behind it, in the depths of the site.
- A front garden with ornamental plants or berry bushes is laid out in front of the house.
- It is advisable that the buildings are located on the north side of the site, without shading the garden.
When planning, it is necessary to maintain the distances specified by the standards:
- from the house to the red line - 5 m, to the fence of the neighboring plot - 3 m;
- from the windows of the house to household objects on the neighboring site - 6 m;
- minimum distances between buildings (for fire safety reasons): stone - 6 m, wooden - 15 m, mixed - 10 m;
- from the fence to the animal shed - 4 m;
- from the fence to other outbuildings - 1 m.
The playground is located so that it is clearly visible.
The playground for children should be clearly visible from the windows of the house
- no shadow from the trees fell on the garden;
- the garden protected the vegetable garden from the prevailing wind.
The finished drawing of the site allows you to approximately determine the volume and cost of soil preparation work.
Removing stumps and bushes
In a residential area, a stump can be left as decorative element or decorate it in the form of a table, chair or element of a children's playground.
a little imagination - the stump turns into a funny decoration of the site
In other cases, the stumps are uprooted. They do this in different ways:
- Manually. The stump is dug up, exposing the upper roots, then they are cut off with an ax or shovel. Next, the stump is rotated around a vertical axis until the central root breaks. This method requires significant physical strength. It’s easier to uproot stumps with a winch. The process also begins with digging and cutting the roots, then the stump is hooked and pulled out, simultaneously cutting off the roots showing from the ground.
- With the help of technology. This method is used when there are several stumps. Along with traditional equipment - excavators, bulldozers, tractors - special stump crushing machines are used. The work of the latter is expensive, but they do not spoil the landscape.
- Chemical reagents.
The wood of a stump is corroded by the following substances:
- “Roundup” product: some time after treatment, the remains of the stump are easily uprooted;
- urea: pour into drilled holes, fill with water and wrap the stump with polyethylene;
- sodium or potassium nitrate: used in the same way, it corrodes even deep roots.
The effect of saltpeter extends to other plants within a radius of 0.5 - 1 m, so before using it, the most valuable of them should be replanted.
Shrubs in small quantities are uprooted with a shovel and a pick, having previously dug up. In large areas they are removed mechanically in three stages:
- cut with a gasoline rotary brush cutter;
- the roots are milled using a stump crusher;
- roots are removed using a tractor with a special plow, or less often with an excavator.
Chemicals used to kill bushes are called arboricides. These include the same “Roundup”, as well as “Tornado”, “Octopus”, “Fighter” and others. Most of them are based on the herbicide Glyphosate.
Drainage device
Often required in low-lying areas that are heavily flooded during rain. Some literally turn into a swamp and then dry out for a long time.
If there is a slight water cut, proceed as follows:
- on the border of the site at its lowest point, they dig a well 2.5–3 m deep;
- several trenches 1 m deep are dug on the site, directed from the upper zones to the well (the slope is 3–4 cm/m);
- fill the trenches halfway with crushed stone or pebbles (suitable construction waste and uprooted stumps) and cover the top with geotextiles;
- lay fertile soil on top of the geotextile.
The trenches can be filled with stones and completely, laid on top of sand or boardwalk paving slabs- these will be garden paths.
In case of severe watering, a complete drainage system is installed:

On areas without slope drainage well turns out to be especially deep. Then its walls are strengthened with supports and concreted. As the water is filled, the wells are pumped out with a pump.
Ground leveling
It is extremely inconvenient to work in an area riddled with uneven areas and you have to waste a lot of water for irrigation. Therefore, it is advisable to level the soil. In the simplest case, when the height difference is small, the area is cultivated, then leveled with a board or ladder, which is pulled by a rope.
If the terrain is very pronounced, they resort to removing soil from the hills and adding it to the depressions.
If the site has complex terrain, it will not be possible to level it without special equipment
Do it more correct in the fall: the soil will compact over the winter and in the spring it will be clear where improvement is required. Alignment is carried out in three stages:
- Mark the area. It is necessary to drive pegs into the ground at certain intervals and pull a cord between them - strictly horizontally and at the same height. To do this, marks are first made on the pegs using a water level (a transparent polymer tube filled with water).
- Using the cord as a guide, they determine the hills and depressions, then transfer the soil. For large volumes, technology is used.
- After waiting for the soil to settle (it will take a couple of weeks), trim the area with a rake.
The transferred soil easily erodes: in the absence of forest protection, the area must be closed with a fence.
Terracing
In areas with a slope of 15 degrees, horizontal steps - terraces - are formed. They are built from top to bottom, each time using the cut soil as the basis for the underlying step.
Each terrace is supported by a wall, which is called a retaining wall. A retaining wall is a critical element: if its strength is insufficient, the soil may collapse with serious consequences. Therefore, construction should be carried out by an experienced specialist. The walls are built from stones and bricks, logs and even steel sheets on supports. A foundation is required.
After the steps are formed, reinforced concrete retaining walls are constructed
The maximum permissible height for a terrace is 1.5 m. The lower the height, the less durable and, accordingly, expensive retaining walls will be needed.
To climb from one terrace to another, stairs are arranged. The condition for choosing materials and design for them is harmonious combination With appearance retaining wall. For safety reasons, stairs are equipped with handrails.
Installing terraces on a slope is a costly undertaking, but such a site looks impressive and is illuminated better than a flat site (if located on a southern slope).
Removing turf
If the site is used for planting cultivated plants for the first time, it is advisable to turn the existing turf (top layer of soil with grass) into a valuable fertilizer. They do it like this:
- in the spring, the turf is cut with a shovel into pieces 10 cm thick and measuring 20x40 cm;
- inverted (roots up) the turf is stacked in stacks with a maximum width and height of 1.2 m, sprinkling each layer with lime;
- During the summer, the stacks are watered with liquid manure or at least water, and loosened 2-3 times.
Next year sod land used as fertilizer. If there is excess clay, it is diluted with sand.
If there are molehills, it is recommended to prepare turf soil from them - here it has high breathability and does not contain harmful insects.
The turf is cut into squares using a bayonet shovel, carefully removed and stacked upside down.
Organization of watering
For irrigation, a water pipeline is laid to the site. For year-round use (homesteads with permanent habitation), pipes are laid in trenches below the freezing depth. If they are polypropylene (PP), they must have a special reinforced design. You can recognize such pipes by orange color. For seasonal use, pipes are laid on the surface. There is also a special UV-resistant PP for this purpose. It is distinguished by its black color.
In areas where vehicles pass, pipes are laid on the surface in trays with durable covers that protect them from damage.
If there is no connection to a centralized water supply, when planning a garden, arrange autonomous system water supply using a natural reservoir, well or borehole as a source. Used to supply water pumping station. Unlike a household one, it should be equipped not with a pressure switch, but with a flow sensor. When the tap is opened, the pump turns on automatically and runs indefinitely until the user turns off the water.
Water from a well or borehole should be checked for salt concentration: if there is an excess of salts, do not use water for irrigation - it causes salinization of the soil (hardens like stone).
Modern watering systems provide fully autonomous operation: soil moisture is analyzed by a sensor and, based on its signal, the equipment is turned on when necessary.
Soil preparation
The soil on the site is tested for acidity. The exact pH will be determined by analysis in a special laboratory, where several samples should be taken with different zones plot. It can be approximately determined at home by pouring vinegar into a portion of the soil. Test results:
- bubbles are visible on the wetted surface of the sample - the soil is neutral;
- the sample absorbs vinegar without any manifestations - sour.
Soil pH is also determined by the vegetation growing on it:
- alkaline: coltsfoot, clover (white or ordinary), nettle, etc.;
- neutral: horsetail, mint, buttercup, etc.;
- sour: heather, plantain, sedge, ivan-da-marya, etc.
Reduce acidity (deoxidation) by adding compost, manure humus and wood ash to the soil. For the same purpose, dolomite flour and fluff lime are added, but this should be done in the fall.
Increase acidity by adding fresh sawdust and peat.
If the soil is not fertile, as evidenced by sparse vegetation, black soil or at least peat is brought to the site.
Garden planning
At the stage of planning a garden on a personal plot, the owner makes a list of all the trees and shrubs that he intends to plant. The number of seedlings is determined based on the available area, while the space for each of them is allocated taking into account the size of the adult tree. Medium-sized plants require 2–3 m2, the largest ones require 4 m2.
A simple plan for laying out an orchard will significantly speed up the work on its implementation.
The compilation of the list and selection of location is carried out taking into account the characteristics of the crops:
- The pear is the tallest fruit tree, so it can be planted in a shaded place, for example, behind a bathhouse. In a few years the tree will rise higher than her.
- Cherries prefer acidic soil.
- A suitable place for plum trees is one where the prevailing winds blow away the snow. Under snowdrifts higher than 40 cm, this tree succumbs.
- For pear and apple trees, choose a place with a low groundwater level - 2 m or more. Otherwise, they will live no more than 10 years.
- For stone fruit crops, the minimum permissible groundwater depth is 1.5 m.
When choosing crops, the climate of the region is also taken into account. In the southern regions (Crimea, Astrakhan, Rostov regions, etc.) any perennial plants grow. Only a few, more prone to cool climates, grow poorly in hot conditions:
- blueberry;
- blueberry;
- coniferous trees.
The following are considered traditional for such latitudes:
- peach;
- quince;
- apricot;
- cherries;
- almond; walnut;
- grape.
You can also grow exotic plants, for example, mulberry, the berries of which are very tasty. Fruit trees are complemented by any berry bushes - gooseberries, raspberries, blackberries, red and black currant, chokeberry.
IN middle lane(Bryansk, Tula, Voronezh regions, etc.) and the northern part (Altai, Buryatia, part of Karelia, etc.) when selecting crops, the so-called winter hardiness is taken into account - the ability to tolerate low temperatures. The following varieties are planted here (the maximum permissible sub-zero temperature is indicated in brackets):
- Honey pear (-30 0 C): late variety.
- Decor pear (-25 0 C): fruits ripen in September.
- White-red columnar pear (-30 0 C): early variety.
- Apricot Prince March (-30 0 C).
- Red and black columnar cherries (-30 0 C).
- Queen Mary cherry (-30 0 C): gives a good harvest, growing even in the shade.
- Arbat apple tree (-30 0 C): the fruits ripen in early autumn.
- Early grape varieties: Arcadia, Arch, Souvenir (-30 0 C).
There are two ways to plan a garden:

When planting regularly, the following distance is maintained between seedlings:
- dwarf varieties: between trees in a row - 2 m, between rows - 3 m;
- semi-dwarf: 3 m and 4 m, respectively;
- Large varieties: 4 m and 5 m, respectively.
To prevent fruit trees from casting a shadow on the garden, they are planted on the north side of the site. At the same time, the tallest ones, such as apple, pear, and walnut trees, are planted on the northwestern side, and the shortest ones, such as cherries, apricots and plums, are planted on the northeastern side. The fact is that photosynthesis occurs most intensively in the first half of the day. In addition, 12% more light falls on the surface of the earth at this time compared to the afternoon period, since the atmosphere is more transparent in the morning. Consequently, with such tree planting at the very favorable time Low days will not be obscured by high ones.
Trees are planted in spring or autumn. The choice of planting time depends on the variety: some take root better in autumn period, others - in the spring. In the middle zone and northern regions, only the most winter-hardy varieties, since young seedlings are quite vulnerable to frost.
The diameter and depth of the hole depend on the type of soil:
- fertile soil: 0.5x0.5 m;
- infertile: 1x1 m.
For spring planting pits are prepared in the fall: this is due to the fact that as much as possible is required early boarding- until the buds bloom.
If possible, berry bushes are planted between the vegetable garden and fruit trees. The timing of planting depends on the form in which the seedling was purchased:
- Container (planted in a small container). Planted in spring or autumn depending on the variety.
- With bare root system. Planted only in autumn.
The planting scheme for berry bushes includes the following stages:
- Holes are made in the ground. Their depth when planting seedlings in containers is 1.5 times the height of the container. In the case of a bare root system, they are guided by a mark indicating how deep the seedling was during cultivation. The pit is also made 1.5 times deeper.
- Immediately before planting (an hour and a half), the seedlings are prepared: in containers - watered abundantly, with bare roots - placed in containers with water.
- The bottom of the hole is covered with humus and dug up with a pitchfork. The soil extracted during the formation of the hole (it is also used for backfilling) is also mixed with humus.
- Having straightened the roots of the seedling so that they grow in all directions, it is lowered into the hole and sprinkled with a mixture of earth and humus. Then the earth is slightly compacted.
- The next shrub is planted at a distance of 70–80 cm.
Video: when is the best time to plant seedlings of fruit and berry trees?
Vegetable garden layout
Most vegetables grow safely in different climatic zones. But you need to choose zoned varieties. Otherwise, the plants may wither from the heat or stop growing due to the cold. A short summer or lack of moisture will not allow you to harvest heat-loving varieties. In regions with such climatic conditions It is advisable to construct greenhouses and greenhouses.
When planning a range of crops, preference should be given to plants that require the same conditions for growth: this makes it easier to care for the city.
Productivity depends on where and how the greenhouse is installed. The most successful location is considered:
- On higher ground, where it is drier.
- In a well-lit place, not shaded by buildings or trees.
- In the east-west direction (latitudinal).
This arrangement has the following advantages:
- the beds are illuminated evenly;
- The sun's rays fall on the wall of the structure almost perpendicularly, therefore the reflection coefficient is very small.
Installing a greenhouse in the north-south direction (meridian), in which a significant portion of the light is reflected and the beds are illuminated unevenly (the north side is worse), is acceptable only for greenhouses used exclusively in summer and south of the 60th latitude. In such conditions, the sun rises high and the disadvantages of the meridian location appear minimally.
It is correct to position the greenhouse from north to south - in this case it will be illuminated by the sun throughout the daylight hours
Vegetable beds are located in places not shaded by trees during the day. Orientation to the cardinal points depends on the water content of the area:
- in damp, low-lying areas: the beds are formed in the direction from south to north so that the row spacing is warmed by the sun;
- in dry areas: choose the direction “west - east” so that the row spacing remains in the shade and retains moisture longer.
According to the height of the beds, they are divided into:
- in-depth: used when it is not possible to frequently water the garden;
- at ground level: standard option, for normal conditions;
- raised (soil is poured into wooden frames): do not require soil preparation on the site, they are quickly warmed up by the sun (relevant for northern regions).
In addition to horizontal ones, vertical beds are also arranged: this arrangement of plants helps to significantly save space in small areas
Crop rotation
Plants differ in chemical composition, accordingly, each of them extracts its own set of microelements from the soil. Rational use of soil consists of alternating various types plants in order to extract microelements evenly and give them the opportunity to recover. If you plant the same type of plant on a plot year after year, the soil will become depleted. In addition, pathogenic microorganisms characteristic of this plant develop in it.
The crop rotation cycle is 4 years. That is, each crop is replanted in a certain area only after 3 years. Based on this, the plot is divided into 4 parts, crops of 4 types are planted on them and then they are alternated according to the table.
Table 1: Crop rotation of garden crops traditionally grown in the garden
Plant compatibility
Some plants planted nearby inhibit each other, others do not have any mutual effect or even contribute to the development of the neighbor. So, when beans and peppers or carrots and dill are adjacent high yield can't wait. Corn, pumpkin and beans, on the other hand, go well together. Full information on crop compatibility is displayed in the table.
Table 2: plant compatibility
Video: mixed plantings
Growing plants in a limited area
Plot small size requires a special approach so that all areas are used with maximum effect. Here's what to do in such conditions:
- The garage is located right next to the road, so as not to dedicate useful space to the entrance to it.
- Berry bushes are planted around the perimeter of the site. When planting trees at the edge, you would still have to step back from the property line so that the branches do not block the street, and then the outermost strip would be unoccupied. It’s not scary if some of the bushes end up in shady place- lack of sun has almost no effect on their growth and productivity.
- Instead of ordinary fruit trees, columnar ones are planted. In such plants, the branches are directed upward, which allows them to be planted at a distance of 0.7 - 0.8 m from each other. On a plot of 5 sq. m can accommodate up to 15 columnar trees.
- Plants that can grow in partial shade are planted among the trees. In the southern regions, even pumpkins, watermelons, zucchini and cucumbers can produce a good harvest under such conditions. In the central and northern regions there are only salads and greens. Thus, rhubarb, lettuce, sorrel, parsley, cilantro, spinach, Odessa curlew, watercress and others grow well in shaded areas. Wild garlic, which grows naturally under the trees, is a rich source of vitamins. Borage and garlic are also unpretentious to lighting conditions. You can also plant beets: the root vegetables will be smaller, but more tender and easier to prepare.
Among the berry bushes that are not afraid of shade are fragrant raspberries, blue honeysuckle, chokeberry, viburnum, and serviceberry.
Before spraying fruit trees, the greenery planted between them must be covered with polyethylene.
How to decorate your garden plot
In addition to performing a purely utilitarian function - growing crops - a garden plot can become a beautiful natural corner. Residents have the greatest ability to decorate their gardens southern regions. The following ornamental plants are traditionally grown here:

In the middle zone, gardens are decorated with plants:
- Conifers: berry yew(form hedges), elfin cypress and juniper species.
- Perennial flowers: hostas, callas, bergenia, heuchera.
- Flowering shrubs: lilac, honeysuckle, weigella, paniculata hydrangea, rhododendron, garden jasmine, solar forsythia.
- Plants for vertical gardening(form a green wall): campsis, clematis, virgin grapes. The latter, having high winter hardiness, does not require shelter in cold weather.
In northern latitudes, two methods are used to improve the garden:
- Local plants are planted - dwarf birch trees, growing in this region berry bushes, raspberry trees, coniferous crops.
- Ornamental plants are planted in containers and hidden in greenhouses for the winter, winter gardens or basements. In this case, the choice of crops is not limited, as long as the plants have small roots.
Terraced areas on slopes have great artistic potential. Besides ornamental plants they are decorated with waterfalls made of natural stone retaining walls, beautiful platforms and stairs.
Video: the best ideas and crafts for your own garden
Only a properly organized plot will bring a good harvest. As you can see, before mastering it, you have to answer a number of questions. By following our advice, the reader will be able to get the maximum benefit from his possessions.
Happy owners of their own land plots, be it a dacha or a private house, almost immediately face the problem of proper zoning of the territory. Now there are a lot of landscape design specialists, but our people are closer to planning a garden with their own hands. The house, garden and vegetable garden are their own, and here it is important to initially take into account all the nuances, because remodeling it will be problematic or even impossible.
Common types of planning
Advice: in the vast majority of cases, when designing a standard garden with your own hands, experts adhere to the proportions according to which residential buildings account for 10% of the territory, 15% is taken by the recreation area and outbuildings, 75% is given to plants.
Despite the apparent diversity, the planning of a garden plot can be done in four main ways.

- The most common is the rectilinear or parallel-perpendicular option. They choose it not because it has any special beauty, but rather because it is easier. Plus, this arrangement is subconsciously associated with order.
Important: parallel-perpendicular forms, in plan landscape design, create the effect of reducing space.
Therefore, planning can be carried out in this way garden plot 10 acres or more.

- The direct opposite would be the circular arrangement option. Let's say right away that this is enough specific method, and it requires some knowledge of landscape design. An orchard and flower beds can be included in this way, but with a vegetable garden it will be more difficult.
- The diagonal arrangement can to some extent be called universal. Thus, it can be done as a layout for a garden plot of 15 acres or more. So is the arrangement on the standard six hundred square meters. The diagonal orientation creates visual volume and at the same time makes it possible to easily arrange the location of various zones on the site with your own hands.
- The fourth option can safely be called creative. There are no specific laws here; as a rule, it is a symbiosis of several types described above. Most often it is used in areas with incorrect configuration and broken perimeter lines.

Advice: before starting to implement your project, you must draw it on paper.
If you have purchased a ready-made site that already has some buildings and plantings that you do not plan to remove, you should mark them first and then proceed from the resulting picture.
Laws of rational distribution
Of course, it is much easier to plan the location of buildings, a garden and a vegetable garden on 10 acres; this is the very critical square area on which such landscape delights as an open pond or a separate children's playground will look appropriate. But owners of smaller plots should not be upset either; with the right approach, you can make a masterpiece out of any territory.

In any project, the house is the main object, attention is paid to it first, so you should start with it. The approach here can be twofold, depending on the overall focus.
If the site is being developed with the aim of growing a good harvest and in the future it should be overgrown with fruit trees and a rich vegetable garden, then it is better to locate the buildings on the outskirts. Moreover, from the north or north-west side, so as not to block the sun from the plants.
In an area intended exclusively for recreation, with lawns and flower beds, it is more reasonable to locate housing in the center or closer to the front part. In both cases, it is recommended to hide outbuildings in the depths of the territory; if this is not possible, then they should be decorated with shrubs or vineyards.

It is better to place a recreation area with a barbecue and appropriate furniture closer to the house; in small areas it is appropriate to make a covered terrace adjacent to the house; in large areas it is possible to arrange a gazebo. This will make it more convenient to establish the necessary communications. But, undoubtedly, such a zone should be hidden from prying eyes.
If you would like to receive regularly good harvests and admire the beauty of your flower beds all season long, then all green spaces should receive as much sunlight. The layout scheme is also of great importance. orchard and gardening with your own hands, because the price of improper planting is the lack of harvest.
Arrangement of an orchard
Let's assume that all the pains of creativity associated with arranging different zones at your dacha or in a private household are already behind you and the time has come to purchase seedlings. The most common mistake young owners make is the desire to plant more and more of everything.
But do not forget that fertile land is not dimensionless and no more than 7 tall, fruit-bearing trees can fit on one hundred square meters.

Low or flat fit can accommodate up to 15 healthy trees and there will still be room for a small vineyard and shrubs. In this case, it is much better to plant less than to invest money in high-quality seedlings, the price of which can be rather high, and after a couple of seasons to uproot the trees, because they develop poorly and interfere with the growth of neighboring plantings.
Review your list.
Think about whether you really need all the plants you plan to plant.
- Sea buckthorn is certainly useful, but after the first harvest, interest in it drops sharply. Intensive growth, thorns and problematic harvesting will quickly discourage the desire to grow it; it’s easier to buy 1 – 2 jars on the market.
- Cultivated low-growing walnuts are rare; in 80% of cases they will sell you regular ones. Its crown will cover a large area, and its roots can tear out a light strip foundation. It is appropriate in large areas or next to a permanent cottage, creating shade over the barbecue area.
- Hazelnuts will take a quarter of a hundred square meters and will produce a lot of shoots.
- One viburnum is enough; it is better to plant it on the outskirts, near the fence. The plant is unpretentious and tolerates shade well.
- Chokeberry or chokeberry, not for everyone. The fruits are good for blood pressure, but this plant loves the sun.

Any plant reaches for the light, and until it reaches its goal, it will not bear fruit normally. Therefore, by planting a seedling in a deliberately shaded area, you thereby doom yourself to a lack of harvest, and the plant to eternal struggle. In this case, even the best grafted seedlings will not save you.

The size of the shadow is approximately half the height of the tree. An area where there is no sun for half a day or more is considered shaded. But don’t worry, you can place paths, design elements or flower beds in these places.
Important: trees planted near high walls, they will “shy away” from them, they will need to be molded.
The only exception is the southern direction.
If the goal is big harvest then it is better to form trees with a height of no more than 2 m, in some cases the height can reach up to 4 m. A comfortable distance between trunks should be twice the height of the tree, in other words, there should be at least 4 m between two-meter plants.

Try to place tree lines, vineyard trellises and rows of bushes from north to south. So you get additional opportunity landings between rows tall plants There are also low-growing crops; there will be enough sun for everyone.
A few words about the garden
Ease of movement in the garden is important. Comfortable size The paths should be at least 40 cm wide. They should be convenient not only to walk on, but also to deliver fertilizers or harvest crops.
Based on many years of experience, we can safely say that the parallel-perpendicular arrangement of tracks is inconvenient in this case. You will constantly trip over right angles and curse sharp turns.

The law works in vegetable beds: the shorter the path, the better. Therefore, feel free to combine diagonals, semicircles or any other configurations that are convenient for you.
The width of the beds may vary, but nice garden bed should be raised to a height of about 20 - 30 cm and edged with a border. The internal space is completely filled with fertile, fertilized soil.
Cabbage, root vegetables and some bush legumes like beds at least 1 meter wide. Beds for climbing beans, tall spreading tomatoes, cucumbers or melons can be made 60 cm each.
The mutual love or dislike of cultures should also be taken into account.
- It is recommended to plant rhubarb, sorrel, perennial onions and horseradish separately from the general planting.
- A variety of greens, such as dill, parsley, spinach, rucala and other salad greens, will find their place between the main beds.
- Cabbage does not tolerate proximity to tomatoes, strawberries, onions or potatoes. Onions have a negative attitude towards legumes or turnips. Cucumbers do not need to be combined with tomatoes, rhubarb or carrots.
- If we talk about a favorable combination, then legumes, corn and sorrel get along well with zucchini. Tomatoes love to grow next to parsley, beans, carrots or onions.
Important: do not forget about crop rotation.
Related plants should not be planted in one place for more than 3 years, after which redevelopment should be carried out.
Otherwise, land depletion may occur.

The video in this article reveals some of the secrets of landscape design and DIY garden planning.
Conclusion

The layout of a garden and vegetable garden on 15 acres belongs to the category of layout of large areas. Unlike the miniature 6 acres, there is already room for creative thought to run wild. But we do not advise you to neglect the above recommendations; correcting errors may take a lot of time.