Eighteen years ago I was young, ardent, quick to think, and handsome. But I didn't have internet. At all. But there was a wild desire to decorate the yard, to make it somehow unusual. But as? The year is 1999, parents are having difficulty recovering from the default and there is practically no money. I did not think for a long time, and decorated the yard with ... wattle.
Did I mention that I didn't have internet? I will say more - in the village library there was no literature on weaving. Only fragmentary information from newspapers and magazines, but in my head - memories of how grandfather made wicker baskets. No wonder I broke a lot of brushwood before I could weave the first section. But I could! And now I will share my experience. I will tell you how to make wattle in the country, how to pick up and prepare a vine, how to extend the life of the fence.
Types of wicker fences - which option to choose?
In Ukraine and the southern regions of Russia, these types of fences are called tyn, in the rest of the territory - wattle. This is a section consisting of branches almost always intersecting at right angles. This design gives the fence stability, makes it strong.
Ideally, even external fences can be weaved from the vine. Do not believe those authors who say that the fence will not protect against intruders. Apparently, these writers have never stormed a two-meter wattle fence made of twigs, 3-4 cm thick. But I had a chance to climb and I will say that it is more difficult than jumping over any modern fence.
But in order to make a strong fence, you need to choose the right design - there are three of them:
- Horizontal braid. Stakes are buried or clogged, which are braided horizontally with a vine.
- vertical fence. Transverse poles are tied to the buried posts, around which weaving is performed in the vertical direction.
- Oblique wattle. The vine is located diagonally, braided around the pillars and crossbeams.
Which option for a beginner? A horizontal wicker fence can be used as a fence around the perimeter of a summer house or as separate decorative elements, it can be used to mark the borders of flower beds and flower beds.
The vertical wattle fence is suitable for fences with a height of 1-1.5 meters. It needs a more flexible vine, and it is a little harder to weave it.
It is unrealistic to make an oblique wattle fence on your own, without experience. You will have to watch the corners, pay attention to the tightness of the vines to each other. And you can’t build a solid fence from it, you can only build decorative garden partitions.
I will talk about how to make a horizontal wattle fence at my dacha. It is easier to build, and the scope is limited only by your imagination.
Choosing and preparing a vine
I filled a lot of cones while I was picking up material for a decorative fence. I found out that hazel (hazelnut) branches are brittle and difficult to work with. I learned that cherry growth rarely reaches the desired height, you will have to build up all the time. What is better to make tyn?
It's really hard to give an exact answer. Even the same species of willow, whose branches are traditionally used for weaving, in different regions may have different properties. We don't have to strive for perfection, as in weaving baskets or furniture - fences have always had a certain roughness. You can use maple, birch, willow. Well, if a bush or a tree grows near water, then the branches are more flexible.
To understand whether the lozina is suitable for your purposes or not, proceed as follows.
- Inspect the branch from the butt (bottom) to the top. There should not be particularly strong bends - a novice craftsman will not always be able to “curb” them.
- Take a branch with two hands, with a distance between them of about 40-50 cm and bend. Doesn't break, doesn't crack? So the vine is suitable for fencing.
- Cut off a branch for testing and look at the core. If it is dark, then the wattle fence will collapse in 2-3 years. A good material has a light core.
What thickness of the vine do we need? Depends on goals. If you need to make a fence around a flower bed, no more than half a meter high, look for branches up to 1 cm thick. For higher fences, a 2-3 cm thick vine is suitable.
When to harvest the vine? Best in winter. At this time of the year, the shrubs are dormant, the sap does not move, so the branches do not break as much and bend better. If going to the forest in winter is not an option, you can harvest material for weaving in August. At this time of the year, it is usually hot, the movement of juice slows down. In August, too, is not fate? Well, it happens. Then I advise you to cut the branches on any hot day. It's better than nothing at all.
How to process a vine for a fence
Breathe a sigh of relief - you do not need to follow a specific technique for preparing the vine for weaving the fence. Those who are engaged in the manufacture of interior items, the vine is boiled and dried in a special way. We can do without it.
The main dilemma is to remove the bark or not? It serves as an additional protection against moisture, but after a year it darkens and the wattle fence turns into an awkward monster. It is for this reason that I removed the bark (did barking), then dried the rods under a canopy. To give them flexibility - soaked in water a day before use.
Yes, the peeled lozina will also darken over time. But there is a trick here - the twig can be treated with a special solution that will change color and prevent it from darkening over time. What tools can be used?
- Hydrogen peroxide - gives a beautiful white color.
- A solution of potassium permanganate - depending on the concentration, will color the surface dark red or burgundy, almost Brown color.
- Infusion of onion peel - depending on the concentration gives a yellow, orange or brown color.
- A solution of ferrous sulfate - gives a dark gray color.
- Soda solution (2 packs per bucket) - if you boil the vine of some types of willow in this remedy, you will get a jet black color.
And you can also open the finished fence with drying oil or stain. As for varnish, I have never seen it stay on street weaving for a long time. Maybe you saw? Tell us about it in the comments.

The vine is ready, you can start weaving. There are two types of fences - stationary and portable. The first one cannot be transferred, the second one can be removed for the winter or moved to another place if you are tired. In each case, the weaving technique does not change, but there are special requirements for the base.
Weave a stationary wattle fence with our own hands
If everything is done wisely, the wattle fence can stand for up to 10 years and not scare you with its appearance. Rely on the Russian "maybe" - in 5 years you will take an ax and remove everything that you piled up. That is life.
To make it easier for you - ladies step by step instructions with detailed explanations.
The first step - preparing the pillars
If you plan to use metal pipes or larch poles, you do not need to prepare anything. Unless the pipes are painted under a tree. And the larch will stand up to all of us, because it practically does not rot.
If you use other types of wood for posts, protect them from rotting. How to do this is up to you. You can burn the ends, process with bitumen, or go to the store and buy some kind of processing compound.
It is desirable to remove the bark. Hard-working bark beetles and other insects start up under it, which will turn the base of the wicker fence into dust. And they will do it in 3-4 years.
When deciding on the length of the column, consider the height of the future rod fence. I believe that for fences up to 1 meter high, you need to make a margin of 30-40 cm (if the height of the fence is a meter, the length of the column is 1.4 m). If you want to make a fence more than a meter high, then add 1/3 of the desired height to the value you choose.
- fence height 2 meters;
- 1/3 of two meters - approximately 60 cm;
- the total length of the pillars is 2.6 m.
This is the stock that will "go" into the ground.
As for the diameter of the columns - it depends on the purpose of the fence. If you do decorative fence around the flower bed - enough pegs, 3-4 cm thick. For capital fences, I recommend installing poles with a diameter of 7-10 cm.
On a note. Hazel, alder, willow and willow are not suitable for poles. They will rot in a couple of years even after proper processing. It is better to use hard rocks.
The second step - install the poles
When I read advice in which someone says that it is enough to hammer stakes into the ground, I want to do this to the adviser. Only in the head. Yes, for fences up to 0.5 m high, pegs can be hammered in, there will be no harm. In other cases, bury the pillars, and then cover them with a layer of earth and a layer of stones.
How I did it:
- Dig a hole of the right size.
- He erected a pillar, surrounded it with stones.
- He leveled, then rammed the cobblestones.
- Then he poured a layer of earth, 10-15 cm thick, and rammed it.
- Again a layer of stones, again tamping.
This is how the puff “pie” turned out in each hole. If you bury the posts in the same way, the wattle fence will not fall down by any wind, it will be possible to dance on it.
By the way, recently I had to remove several poles that had stood for 18 years. The time has come for them to rot. So, I scolded myself, because it was not easy to pull them out, and rocking them did nothing at all. Try to dig it yourself, the result will please.
At what distance from each other to bury the posts for the wattle fence depends on the thickness of the rods. So, if you use branches up to 1 cm thick, then a distance of 50 cm is enough. For thicker branches, you can increase the interval, up to a meter.
Remember: the distance between the posts affects the durability of the fence. The smaller it is, the stronger the braid. But, if you overdo it and make too small a distance, you can break the entire vine and not build anything worthwhile.
Step three - start weaving
I recommend starting the first row at a height of 10-15 cm from the ground. This will prevent the bottom rods from rotting. Starting weaving, leave 10-15 cm of the rod outside the first pillar. This is necessary so that your structure does not fall apart during operation.

As for the weaving technique, it is better for beginners to use the “eight”. With this approach, each column is braided with rods on both sides. The weaving pattern is shown in the figure.
As you work, follow the five rules.
First rule
Start weaving wattle with thicker rods - they will last longer than thinner ones (they will not rot so soon). And yet, a thick vine presses on the pillars more than a thin one.
If you start weaving a fence with thin branches and finish with thick ones, most likely the upper part will go in waves.
On a note. This property of the material can be used if, during the weaving process, you notice that the post has deviated from the desired level. Just weave in a couple of thick branches.
Second rule
Each new row is tightly attached to the bottom. Then it will be difficult to do. The force with which the branches are pressed against the posts increases with each row. If you made a gap from below, and noticed it after 5-6 rows, then most likely you will have to disassemble the entire wattle fence.
Third rule
Alternate the location of the butt (the widest part of the rod). Let's say you started a row and the butt is on your right. In the next row, the butt should be on the left. The vine has a conical shape, if you do not follow this rule, you will very soon begin to skew horizontally.
Fourth rule
With each row, change the direction of the "eight". Let's say you have the lower vine first bending around the trunk on the left, the upper one on the right. This is the first row. In the second row, the lower rod should go around the column on the right, the upper one on the left. Why is this needed? Branches, due to natural bends, exert strong pressure on the pole. Alternating the location of the figure eight allows you to balance the impact and the pillar will not squint.
Fifth Rule
Unfortunately, it is impossible to find a vine of the right length to last the entire row. Very often it ends, but the series must continue. In this case, extension will help.
How to make it? Leave alone the ended branch (in the sense - do not cut it). Take a new vine, start it 3-4 flights before the place where you ended the previous one and continue to weave, observing the "eight" technique.
Why exactly 3-4 spans? If you retreat more, there will be an unnecessary overrun. If less, then there will be no necessary fortress. Such a vine can be easily pulled out by hand.
Step four - cut the wattle
After weaving the fence in the country house is over, cut off the extra branches. You can use a chainsaw or its electric equivalent, but I recommend using either a hacksaw.
Step back from the extreme pillars 5-10 cm and remove excess branches along one vertical line. If you did everything right, the twigs will be pressed against the poles or slightly disperse to the sides. This is fine. In extreme cases, they can be pulled together with dry bark or wire. Although this will spoil the whole view.
Making a portable wattle fence
If you need to enclose a flower bed with a low wicker fence, or put a similar structure along the paths, it is advisable to make a portable fence. The principle and rules of weaving are the same as in the previous case.
To fix the pegs - make a bed, as master Alexander Kryzhanovsky advises (he is in the video). It consists of two parts. The first is fixed wooden beam. The second is a thin wooden plank, the thinner the better. Drill holes in it, the diameter of which is equal to the diameter of the screws (they will tighten the frame).
I found this method on the Internet. I share with you videos from which you will more clearly understand how to make a low wicker fence.
On the Internet you can find a lot of tips on decorating the finished tyne. The most harmful is planting along the fence climbing plants. Why do I think so? For three reasons.
- Due to the green mass, the wattle rods will not be ventilated, this will lead to premature decay.
- Homemade tyn already decorates the cottage, why hide it behind plants? It’s better then to pull the chain-link mesh at all and not rack your brains.
If you really want to somehow decorate the fence - use antique items or their imitation. The wheel from the cart and earthenware jugs look great against the background of the wattle fence. And from plants - a sunflower growing nearby looks harmonious.
And do not believe those who say that a wicker fence looks beautiful only in that country house where everything is done antique. I saw how such designs are combined with modern finishing materials. The main thing is to show imagination.
How to make wattle in the country, without a nail and negative emotions
Making willow fences with your own hands is not so difficult if you properly prepare the material and study the technology. Wicker fences are of two types: living and non-living. The first ones are used as protection from prying eyes, as well as for decorative purposes, the second ones are used to decorate a flower garden or garden beds in a rustic style, to fence a garden or summer cottage.
Wicker willow fence fits perfectly into any facade.
Preparation of willow twigs
Before starting work, it is necessary to prepare willow twigs. It is best to cut the vine at a time when sap flow is suspended (from autumn to early spring). Such material is much better stored and processed. If you plan to make a wicker fence in the summer, then it is not necessary to prepare the material in advance, you can use a freshly cut vine that has been properly processed. For hedges, willow is harvested during the suspension of sap flow. The rods are cut at an angle, put them in buckets of water. The temperature in the room should not be too high, otherwise the willow will germinate ahead of time.

Options for simple weaving of a willow fence: a - weaving scheme, b - through one rack, c - through one rack into four rods, d - through two racks, e, f - options for combining techniques.
When harvesting material, a bush with good upright shoots is chosen, the age of which does not exceed 2 years. Such rods have the proper thickness and good flexibility. The vine is cut with a pruner or a special sickle-shaped knife at an angle. After cutting the rod, make sure that its core is not loose, and its diameter is at least 1.5 and not more than 4 cm. The cut should not have a brownish tint. The rods need to be cleared of leaves. Branches for the base of the fence are immediately harvested, their thickness should exceed 4 cm in diameter.
The vine, collected in the spring and summer, must be immediately cleaned of bark. For this purpose, a special device is used called a "pinch", which allows you to process a large number of rods in a short period. If desired, the pinch can be made independently. They take a thick branch, split it in the middle, wrap the split with tape or twine. The vine is cleaned by pulling it through the pinch. The willow is laid out in a sunny area to dry, while it is important that the rods do not touch each other, otherwise they may rot.
The vine, harvested from late autumn to early spring, must be boiled in boiling water for 4-5 minutes, then dried in a warm place where there is no dampness. Rods treated in this way can be stored for quite a long time, while it is important that the temperature in the room does not drop below 0 ° C, otherwise the material may rot. Before starting work, it is necessary to steam the vine in a water bath or soak it in a container of water. This procedure will help to give the material proper flexibility and plasticity.
How to make wattle from willow twigs?
You will need:

- secateurs;
- mallet;
- vine;
- branches for the base;
- hammer and nails;
- pegs and rope;
- wire.
Making a wicker fence is not so difficult. The first step is to mark the future fence with pegs and rope. Then you need to drive thick even branches into the ground, which will serve as the basis of the structure. In order for the fence not to warp, it is strengthened with the help of transverse slats, which are driven in horizontally at a distance of 30 cm. As weaving progresses, auxiliary slats are removed, but if the fence of branches is long enough, then it is better to leave the crossbars. In order to make it easier to drive the support into the ground, it is necessary to sharpen in the form of a wedge at the end of each stake. Important: the bottom of the supporting branches must be treated with liquid roofing material or burned, which will prevent rotting. Stakes are driven in to a depth of 35 to 50 cm (depending on the height of the fence).
The distance between the supporting stakes should be at least 30 and not more than 50 cm. The thicker the vine for weaving, the wider the step between the main stakes.

When weaving, it is necessary to allow the willow to bend freely, it should not spring, which can happen if the bases are too close. The tip of the first rod is nailed to the base, then the vine passes behind the second stake, goes outside, goes around the 3rd stake in front, the 4th base in the back, etc. When weaving, it is very important to connect the rods imperceptibly. This can be done in several ways, for example, to connect the vine in the cut area with wire or tape. If the willow is thin and flexible, then the rods are intertwined, and the ends are turned inside out, then carefully trimmed.
Each subsequent row is performed in a mirror image: those stakes that were skipped in the previous row go around. Masters use almost the same techniques as in the manufacture of ordinary baskets. During weaving, the vine is compacted with a mallet, otherwise the fence will look sloppy. Weaving from 2-3 rods at the same time looks very impressive. In this case, the technology is the same: the base is woven into checkerboard pattern. In this case, it is necessary to ensure that the rods are not intertwined, but run parallel to each other throughout the weaving.
You will need:
- branches for the base;
- vine;
- adhesive tape (wire, rope);
- secateurs;
- nails, hammer.

With the help of a willow hedge, you can perform zoning of the site or protect flower beds from garden plantings.
A vine hedge looks very impressive. In addition, this design is an excellent protective structure, which is important. For the manufacture of a living fence, it is necessary to make markings, then drive in the stakes of the base at a distance of 1-1.5 m from each other. The diameter of the branches for the base should be 4-5 cm. The stakes are driven in to a depth of 35-50 cm (the higher the fence, the deeper the base should go into the ground).
The structure is fastened with horizontal strips from below and from above. Intermediate cross bars are nailed depending on what type of weaving will be chosen. So, with a vertical arrangement of rods, transverse strips are nailed to a height of 25-35 cm from each other. If you want to make a hedge in the form of a grid, then horizontal supports are placed at a distance equal to the height of the cells of the future wattle fence (from 35 to 50 cm). Many craftsmen get by with only the upper and lower cross bars, but if you have no experience, then it is better to use an additional mount, and after the fence is ready, you can remove the horizontal bars.
Willow rods are stuck into the ground to a depth of 15 to 20 cm, the distance between them should be 20-30 cm. For a vertical fence, the vine is stuck evenly, for mesh weaving - at an angle. In those places where the willow rods come into contact with the cross bar or intersect with each other, they are fastened with a rope, adhesive tape or wire. With mesh weaving, it is necessary to cut the bark at the junction of the rods and carefully wrap the vine with tape - then the willow will grow together in this place, forming nice shape in the form of a lattice.
It is important to remember that the vine will thicken as it grows, so the wire tie should not be made too tight. As the vine grows, it is freed from fastening, adjusted with a pruner. If a rod does not take root, then it is replaced with a new one. In order for the willow to take root well, it is necessary to add river sand or other baking powder to the soil, water the planted rods in time, preventing the earth from drying out for a long time. Best time for planting a hedge - this is early spring, when there are no leaves on the willow and sap flow is just beginning.
Decorating and protecting a wicker fence
In order for the wicker fence to last as long as possible, it is necessary to treat the wood with a special antiseptic agent against decay and insect damage. Willow itself contains tannins that protect the tree from pests, but when high humidity wood can become moldy, so it is advisable to treat it with an antiseptic. Modern industry offers varnishes with various additives that not only ennoble wood, but also increase its service life.
To give the fence the desired shade, stain, acrylic facade paint, colored varnishes are used. You can bleach wattle with hydrogen peroxide. It is equally important to supplement tyn decorative elements, for example, hang clay jars on stakes, plant sunflowers along the fence, put winding morning glory, hops or girlish grapes on the wattle fence. special charm garden sculptures placed along the wattle fence will be added. Everyone can make a willow fence with their own hands, for this you only need desire and malleable natural material.
A wicker fence is a stylish fence made of branches or rods intertwined with each other, which is selected for fencing personal plot or one of his constituent parts. It has a decent appearance, looks great against the background of the usual rural landscape, but at the same time it is more of a landscape design than reliable protection dwellings.
Wattle has long been considered a symbol of comfort and measured rural life. The technology of weaving such a fence has been preserved since ancient times. To perform this design, you can use all kinds of improvised materials, but the most popular are the branches of different trees.

Peculiarities
Wicker type fences differ from each other in different parameters: in height, in the difference in weaving methods and in external design.
Wicker fences in height are of 3 types:
- High (from 2 meters and above) can become quite quality protection. Such a fence will look decent if the pillars in it are made of stone, and a wicker product is placed between these pillars.
- low products. Their height will not exceed 0.5-0.7 m. They are more suitable for decorating flower beds, they are used as elements stylish design landscape.
- Wicker fences a meter high are used to separate the recreation area from the rest of the suburban area.


According to the methods of weaving, the fences are divided into:
- Horizontal- the most common type, the easiest to perform. These wattle fences will serve you much more than their vertical counterparts.
- vertical making fences with your own hands in weaving is very problematic if you have no experience, but those who know how to do it masterfully create amazing masterpieces, decorating a new fence with intricate patterns.


Wicker fences can also differ in how they are created and used:
- A wicker fence with a height of less than 0.7 m is already installed on a prepared base, most often a metal base is used to increase the service life of the product.
- Flat wattle is best installed in sections, the length of only one such section can be up to 2 meters. This weaving method is the easiest to repair than all the others, and if necessary, one of the parts can be completely replaced without difficulty.
- Decorative fences installed in the form of a circle are most often used to decorate flower beds and flower beds.
- A wicker-type fence is, first of all, pillars that are dug into the ground, branches or twigs of a vine are woven around them. To increase the durability of the product or create unusual and interesting patterns, special durable poles are installed between the racks.


A fence of this type will fully satisfy the owners with all aesthetic aspects. It will give any site a special rural charm. In terms of strength, such a braided line will by itself give way to a stone fence, but it will decorate your site.
For the weaving procedure itself, you will need long and thin rods that will create the plane of the hedge, and slightly thicker stakes - the rods will hold on to them. You can choose the vine of any plants that are suitable certain requirements. Willow twigs and bamboo often grow a "living" fence. In addition to twigs, you can pick up other materials - boards, pickets (thin and flexible).

Pros and cons
The wicker fence has the following main advantages:
- Interesting view. Weaving helps turn the fence into a real decoration for the entire site. High or low products with different types plexuses become a stylish addition to the design of any personal plot.
- A wicker fence is completely safe, since no life-threatening substances are used in its creation.
- Low price. If you make a fence on your own from a tree from your site, then you can spend nothing at all. But if you buy already made fences, their cost will fluctuate depending on the amount of material, the height of the structure itself and the type of weaving chosen.
- Ease of installation. You can decorate the yard with wattle without specialists.


However, have this product and some cons:
- Short service life, as such a product is afraid of gusts of wind and any precipitation.
- If you want to put a wattle fence on the site, then it is worth remembering that it will only perform a design function and will not save you from unexpected visitors.
- Complicated repairs. When at least one of the elements breaks in such a fence, then you will have to redo the entire fence or an entire section.

Before choosing a wicker fence, remember all its positive and negative qualities, specify the duration of its service and all the features repair work, duration of installation and environmental aspects.
Types of weaving
Before you start weaving from rods or branches, you need to choose the method by which you will create a new fence. Most commonly used options:
- Vertical type will require the presence of strong horizontal sticks between the supports. They will be fixed in increments of 20-30 cm. The rods are woven between them, starting from the bottom and to the top. The length of the branches in this case should be 15-20 cm less than the height of the fence itself. Vertical weaving is often done from boards - then a beautiful wooden fence is obtained. You just need to take the boards, use them to perform vertical weaving, and use the support to align the ends. The support is usually installed at the top of the fence. To give a beautiful effect, the same support is made at the bottom of the fence.

- horizontal weaving everyone calls it classic. The rods are intertwined with the "8th" or the sign of "infinity". That is, each new blank is a natural continuation of the one ahead. The length of the blanks in this case will be at least 2 m. The supports are installed in increments of 25-30 cm so that the branches are easy to bend. If you have a lot of small rods, gather them all together in bundles and weave them all at once. One of the varieties of such weaving is the oblique method, which is done diagonally, which looks very beautiful.

A horizontal wattle fence can also be built using shields. First, the shields themselves are made, the required number of supports is made in each of them, and the blanks themselves are neatly woven between them. Shields with each other are fixed with nails, self-tapping screws.
The shield braid is also constructed from boards, only the spans between the supports will be larger.

Manufacturing materials
Wicker fences can be built from those materials that have a special flexibility. The most unreliable of them are cattail, reeds. They are unlikely to last more than 4 years, as they dry out, and after that the fences from them quickly lose their appearance and collapse. More often, vine and willow are used to obtain wattle, and today this kind of fence made of small boards is especially in demand, as they look stylish and are very durable. Companies that produce wicker products offer universal PVC fences, and although this is not a natural material, it is very durable and will last for many years.

Willow
The branches of this tree are strong and flexible, so baskets and fences are often woven from them. Before you start weaving, the rods should be steamed well so that they are even more bendable.
You can make fences from willow twigs by any method. The vertical version looks best with them. First, support structures are placed horizontally, then willow branches are woven vertically, burying their ends in the ground. A little later, willow twigs will be accepted, turn green and create the effect of a natural design of the fence.

In order for the willow braid to last for a long time, the tree must be treated with a special compound, and where the fence is installed, dig a trench for drainage and pour sand instead of soil.
Vine
A vine is a very bending and rather long branches of trees and various shrubs that are chosen for building a fence and even building houses from them. Wattle wattle is aesthetic, natural and beautiful.
In order for the fence to come out strong and last longer, the following requirements must be met:
- To facilitate the work with the rods and give them flexibility, they are soaked in hot water or left in a well-heated bath for a couple of hours. After that, you should immediately start weaving, because after the material dries, it will lose its flexibility, but it will perfectly hold any shape.
- For a low decorative fence, you need to pick up branches no more than 2 cm thick, for tall wooden wicker fences - from 2 to 3 cm.
- First, you should carefully remove the entire bark from the vine, apply a disinfectant, potassium permanganate, stain and varnish.


The vine is chosen to decorate decorative fences that will complement the design of a personal plot, divide it into different zones or decorate yard flower beds.
Boards
A wicker board fence will carry both a decorative and protective load due to its reliability and ability to protect against uninvited guests on the site.
Selected for production unedged board, planed boards and poles (they can be made of metal, wood or concrete). The fence will stand with the help of the tension of the "woven" boards, but nails can be used for additional fastening.
A small hole underneath finished product, often laid with ordinary bricks or stones of different sizes.


Wicker elements made of wood in a brick fence are very popular. If you want to weave a fence from boards yourself, then be sure to look for an assistant, since it is very difficult to build this building alone.
A popular type of such a fence is the Austrian braid. For its construction, a pine tree is chosen - inexpensive material characterized by a long service life. Such a structure must be coated with an antifungal substance.
Fence supports are made of wooden beams or metal profiled pipes. They are fixed at an equal distance, for style they can be painted in any color or decorated with boards.


PVC
Most often, a wicker fence is associated among the inhabitants with natural materials, but today it is also produced from PVC, which has a number of positive features:
- Long service life. This is the main pvc difference from other materials. For all the time of operation, the fence will not lose its stylish look.
- Mobility. Anyone can make and install a plastic wattle fence. The design is lightweight and easy to transport.
- Ease of use. PVC fences will not fade in the sun, will not be afraid of heat, cold and high humidity. In order for the fence to maintain a decent appearance for a long time, it is necessary to cover it with a special composition from time to time. Metal components are constantly treated with a special tool.
- Rich model selection. Fences can be selected in all sorts of colors, which will perfectly complement the design of your personal plot. It is also important to initially choose the right PVC fence parameters.
- Acceptable price. Due to the ease of production, PVC fences have an acceptable and affordable price.


What to choose?
You have a great opportunity to first choose what material to make your new wicker fence from. In addition to those already mentioned, you can opt for hazel - this is a type of twig that is collected only in early spring, before the first buds appear on the branches, it is then that young shoots have special flexibility. Hazel in terms of service life is not inferior to willows.

Also, you should pay attention to artificial rattan, which has many advantages: it looks natural, external characteristics will not yield to natural samples, and thanks to him, natural resources are preserved. Rattan will not respond to climate change and therefore can stand for decades without requiring repair costs. Natural rattan quickly grows into the ground, which artificial does not. Synthetic rattan costs much less than natural rattan.


Alpine vine is very popular today due to its neat appearance, so you can always combine it with other types of weaves to make your fence even more exclusive.
By the way, all kinds of weaving can be used not only for fences, but also in flower beds. A flower bed with a wicker base in the form of a fence will not require extra costs and will look great both in the country house and in the garden of a house in the city.


decoration
Wicker fences can be very successfully decorated with a number of secondary elements to make the decor of the site unique.
Chess is when the vine is taken in a bundle and woven horizontally. The result is an original product.

Diagonal checkerboard - for this kind of weaving, horizontal poles are attached to the supports. Branches a little more than 5 cm thick in increments of up to 15 cm are fixed to the topmost pole with one nail. The rods unfold along the diagonal of the fence and are fixed at the bottom of the horizontals. Between them, directing to the opposite diagonal, other branches are woven.
Today, a do-it-yourself wattle fence serves more decorative ornament on the site, although wickerwork from boards or overgrown hedge create a reliable barrier to the penetration of intruders into the territory.
Simplicity and natural beauty rustic style are becoming more and more popular every day country houses and household plots. And more and more often, a variety of wattle fences, tyny, hedges or wickerwork are used to protect the territory or decorate the site. In ancient times, a fence woven from thin rods or branches was the most common type of fence.
Varieties of wicker fences, what to make and how to install a wattle fence?
Making a wicker fence with your own hands is easy and not expensive. Traditionally, wattle is constructed from improvised materials: flexible tree branches or thin rods and stakes. Most often, the wattle fence is installed on the site to delimit the space in order to protect the flower bed or beds from animals or create a secluded place to relax. Having decided to do fence weaving for the first time, making a low border for a flower garden will become good master class before making a tyn with a complex pattern.
Types of wattle
Quite conventionally, wicker fences are divided into groups according to different criteria.

Preparation of material for wattle
For a wicker structure, it is necessary to prepare two types of material.

Wattle in the country


Having properly prepared the rods, you can make wattle from hazel, cherry, apple, willow, aspen or birch. Branches should be cut in early spring or late summer, when sap flow is slowed down in plants. Freshly cut vines remain flexible for a week. It is better to remove the bark from the branches with wire cutters, a pincer or makeshift device from a thick branch with a cleft. Elasticity to dry branches is given by weekly soaking, steaming or hot water. If desired, you can enhance the brown color of the rods by adding a little potassium permanganate to the water, and bleach with hydrogen peroxide. Vitriol will give a grayish tint to the wood. Reed stalks turn golden when dried in the sun, and after drying in the shade, they retain a pale green color.
The low decorative fence made of thick branches looks original. You can make a rare fence out of them only immediately, until they dry.
The formation of a drainage cushion of sand in the pits for the installation of wooden supports and along the entire length of the wattle fence will prevent wood decay. Through the sand, water will seep faster into the lower layers of the soil and will not have a devastating effect on the wooden fence.
Wicker boards
 A more durable wicker fence will be the "Austrian" wicker board. High resin content and affordable, more commonly used pine board 20–25 mm thick and up to 10 cm wide. For the manufacture of pillars for this fence, a wooden beam or more durable and strong supports made of profiled pipes, sheathed with a board, are used. The length of the span between the supports from 2 to 3 meters is determined by the flexibility of the board. 3-5 intermediate bars are installed between the pillars.
The plinth and fence posts can be laid out of stone or brick, and between them install finished sections of horizontal or vertical wicker. Impregnation with an antiseptic agent and varnishing will extend the service life of the wicker structure. Stain can be given wooden fence any colour. It is important to know that if weaving from a raw board, then after drying, gaps of 5–10 millimeters are formed.
How to make wattle with your own hands?

Artificial sunflowers and put on pegs will add national color to the wicker fence clay pots. Gardeners will be pleased with the flower beds, fenced with an elegant vine of thin vines and flower beds-baskets woven with their own hands. Having mastered chess weaving, you can decorate your suburban area with an exclusive gazebo or an original canopy over a bench.
Living wattle
An unpretentious willow with easy care can become a beautiful hedge.
Thin twigs cut in early spring, after standing in the water for about a month, will give roots. And already in early May they can be planted in the ground. For a living weave, willow cuttings are planted at an angle, weaving them into a mesh network. The growing branches are woven into the hedge or carefully cut with secateurs. A cheerful green wattle fence will organically complement the rustic exterior of a country house.
There are many types of fences from the most various materials. But recently, more and more often you can see a beautiful, eye-catching fence made of intertwined vines - Ukrainian tyn. Such a fence decorates areas near cafes and restaurants, divides zones into garden plot or just enclose flower beds. Tyn can be made with your own hands from a variety of materials.
It looks like a classic fence tyn
Colorful and fashionable wicker fence
Vine is called elastic, long rods from any plant material. It is harvested in early spring before the juice begins to move in the stems or in autumn, from early September until frost.
Properly prepared material is the key to a beautiful and high-quality fence
Most often, long annual branches of willow, hazel or willow shrubs are used. The best time to go to harvest material is an early sunny morning. cut the vine sharp knife obliquely, trying to make the cuts smooth and even. When cutting off the branches of a shrub, they tend to leave 3-4 leaves from the ground. So, the bush will recover faster. 
After clearing the branches of leaves, it is desirable to give them a neater appearance by removing the bark. This is done with a simple tool in the form of a split cone, which is better known as a pinch.
It can be made by hand by splitting a hardwood stake from one end. The unsplit end is strengthened by tying it with a strong rope or wire. The rod is inserted between two chips and stretched from edge to edge. The bark from a fresh vine is easily removed, but if it has lain down a little, then it is better to put it in water for a while.

Wicker fence tyn using logs for poles
If the branches have been stored for a long time and managed to dry out, it is best to steam them or soak them for a week in a large container of water. It is very important that the material is completely covered.
When the vine is ready for weaving, it is sorted by stem thickness.
Thicker rods are used at the base of the fence and at the very top. The thinner rods are woven closer to the middle. This trick allows you to build a stronger and more durable wicker fence.
Do I need a foundation for a wicker fence
The place where it is planned to put a tyn in the future must be prepared in advance.

An example of a tyn fence with a foundation
Typically, such a fence does not need, but more expensive options do not exclude stone or brick bases. Such fences are more often installed in public places, for example, in open areas of restaurants or cafes, enclosing their territory and creating a unique comfort. They look quite respectable, but they are much more expensive.
It is best to make a pillow of sand and gravel throughout the entire length for better drainage. This, of course, significantly slows down the construction process and increases the cost, but the wattle fence will not get wet in the water during rains. Hence, it will last longer.
The technology of such construction is very simple:
If you simplify the task of erecting a wicker fence with your own hands, you can simply level the site (in order to avoid stagnation of rain or melt water) and drive the bases into the ground to a depth of 30 cm. You must treat with drying oil, resin or any other means that protects them from decay .
Weaving a fence from a vine
Probably, everyone has seen a finished wicker fence at least once in their life, so they have an idea of its essence.
An example of a wicker fence made of vines
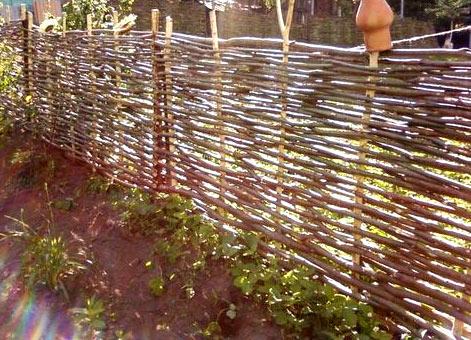
Weaving begins from below, using thicker rods for this. The first rod is firmly fixed in front of the initial base with a hand from the butt side and carefully wound behind the second, and so on, in strict observance of the order.
The rod must end with back side next stake. With the next rod, on the contrary, weaving behind the stake begins and the next stake is wrapped around from the front side. And in the same way - to the end of the fence.  It is not difficult to make such a decorative fence, the main thing is to have patience and know some tricks:
- Each rod must begin to be twisted from the butt, thicker side;
- You can not leave the end of the vine in the middle between the stakes, this will make the fence look untidy;
- It is necessary to regularly compact each row of weaving with a wooden mallet for greater strength and a beautiful look.
When the weave reaches the top edge, the top of the protruding stakes can be cut off or, if desired, left as is. Then you can place various decorations on them in the form of clay pots or a hanging flower pot with a climbing plant.
Interesting options for wicker fences
In order to, you can use other, alternative, material options. Some of them can stand for only a few years, while others are very durable.
Reed weaving
For such a tyne, long bundles of reeds up to five centimeters thick are used. You can make this decorative fence with your own hands using the same technique as. If the reed was dried under the influence sun rays, you will succeed golden color. Light green reeds can be obtained by drying them in the shade of a canopy.
PVC weaving
Now you can. Such fences are sold in a ready-made set, their price is quite high, but they will stand for a very long time. PVC material is not afraid of sudden changes in temperature, does not fade in the bright summer sun, and it is easy to install it yourself.

It looks like a woven PVC fence
If the tyn is made not so much for a decorative purpose as for performing protective functions, you can build it from veneer or thin boards. Such a fence belongs to opaque types.
In addition to decorative functions, it will also reliably protect the site from the prying eyes of strangers.
The bases for this type of fencing should be stronger, and it is installed at a distance of 1.5 meters or more, but not more than two meters.