Pepper is a rather capricious and demanding crop. However, most gardeners and gardeners have adapted to its requirements regarding soil, watering, heat, and successfully grow it on their personal plots. The reference books give many recommendations on how to how to prepare the soil for peppers, including for seedlings. Let's take notes on the information.
Soil for pepper seedlings
Pepper is a heat-loving plant, so it is recommended to grow it only as seedlings. Since pepper does not tolerate picking, it is recommended to immediately sow the seeds in separate pots (preferably peat). The diameter of the pots is no more than 10 cm.
Soil for seedlings must consist of the following components:
- Garden soil,
— Humus, which saturates the soil with minerals, increasing its fertility.
— River sand, which is a good leavening agent, and earth.
The components are mixed in a ratio of 1: 2: 1 and ash is added here (for every kilogram of substrate - 1 tablespoon). You can add peat - it provides the soil with the necessary looseness and moisture.
The substrate should be uniform and fine, for which it should be sifted. Must be carried out disinfection measures:
- The most in a simple way disinfection is to water the soil with potassium permanganate. After the soil has been watered generously, wait until it dries and only then can you plant the seeds.
- More complex methods include calcination - treating the soil with high temperatures (on average up to 80 degrees). This can be done by placing the soil in a preheated oven or microwave.
- Steaming - you need to steam the soil in a water bath for several hours with the lid tightly closed. This procedure should be performed a month before using the soil. Then the soil microflora will have time to recover by the time of sowing.
- Fungicides are also used; they must be dissolved in water and watered abundantly on the soil, thereby destroying different kinds fungi that may be in the ground.
- And in order to improve the quality of the substrate and saturate the soil with air, it is recommended to add natural soil loosening agents - perlite or vermiculite - these are processed small minerals.
It's simple! For sowing, you can also use a special soil mixture, making it easier for you to carefully preparing soil for pepper seedlings. This soil is sold in garden stores and has a fairly reasonable price.
Pepper seedlings can be grown in greenhouses or at home on a balcony or windowsill. Plant the seeds to a depth of 1.5 cm.
Pepper is a plant very sensitive to lack of moisture, so its seedlings should be watered abundantly, but in moderation. If you overwater the seedlings, a fungus may develop in them and the plant will die. Should be watered warm water, since cold weather can also cause plants to die or get blackleg.
Soil for planting in greenhouses and open ground
Peppers prefer a warm microclimate, which is why they are most often planted to greenhouses, providing suitable air temperature.
in autumn soil for peppers dig up and saturate with organic fertilizers, for example, compost or manure. Dose of organic fertilizers: 5-6 kg per 1 m2. Over the winter, the fertilizers will rot, the beds will become warm and quite fertile. And this is the ideal soil for growing peppers in a greenhouse.
In the spring, before planting seedlings, the soil is dug up again and fertilized. Now potassium and phosphorus fertilizers are being applied. Dose: 40 g per 1m2. Nitrogen fertilizers are also necessary, their dosage is 30 g per 1 m2. You can prepare fertilizers yourself. To do this, you will need humus (but not fresh manure), a glass of wood ash, a glass of double superphosphate and 25 g of nitrate. This composition is used for 1 square meter area.
Before planting seedlings, the soil is thoroughly loosened to a depth of about 15 cm, holes are made into which one and a half to two liters of water are poured. Then the pepper is planted there along with the lump of earth in which it grew. The lower leaves should be at soil level. After planting, the plant is compacted by hand and covered with mulch (peat, humus), which prevents the evaporation of moisture from the soil.
Before planting, it is advisable to preheat the air in the greenhouse. The soil temperature must be at least 15 degrees, otherwise the peppers begin to get sick and lose their ability to absorb nutrients. The optimal soil temperature for peppers is 25 degrees.
Greenhouses must be thoroughly ventilated, especially after watering, and do not forget to loosen the soil to a depth of 10 to 3 cm (it is gradually reduced as the plants grow).
2-3 days after planting in a permanent place, it is useful to hill up the seedlings with damp soil, the height of the mound is approximately 3-4 cm. Hilling up will help the young plant to take root better.
Soil for planting pepper in open ground prepared in the same way as for greenhouses. In addition, you should select correct area for landing. Pepper is afraid of drafts and loves light and warmth. Therefore, the area should be bright and protected from drafts.
At the end of May, when the soil warms up well, the seedlings can be planted in a permanent place. Now she is no longer afraid of illness.
If you use the advice of experts and take care of this extremely healthy vegetable, then a good harvest will not keep you waiting!
It’s the very beginning of autumn, and the entire crop hasn’t even been harvested from the plot yet. But you may not believe that in order to ensure next season’s harvest, it’s time to start preparing the vacated soil for future beds. And this is not a joke at all: this soil needs to be prepared not anyhow, but correctly, so as not to be disappointed in next year’s harvest. How to prepare beds, how to properly dig and apply fertilizers for the most common vegetable crops already now, we will tell you today.
Autumn preparation beds in the garden. © Charles Dowding
It is clear that the formation of above-ground mass, the formation of crops that we harvest, consume or store, leads to the removal of a variety of elements from the soil. First of all, these are the well-known nitrogen, phosphorus and potassium. So, immediately after harvesting and when preparing the bed for the new season, it is advisable to compensate for the deficiency of these elements in the soil, although it is not visible to the naked eye.
The autumn period is almost an ideal period for applying various types of fertilizers, which winter time“will reach” the soil, and the plants sown or planted in the beds we have made will begin to consume them in an accessible form, and not wait until they turn into such, wasting precious time on their development and forcing us to wait longer for the harvest.
For example, organic matter and various minerals: in fact, any vegetable crops perceive and react to them purely positively. However, in order for the root system to accept this or that element, it must already be in an accessible, dissolved form, and this takes time. Winter is just such a time.
Of course, when choosing fertilizers, you need to take into account a number of factors - this is the biology of the crop that will grow in this place in the future, and the type of soil (heavy, sandy soil, black soil, and so on) and even weather conditions in this moment time, determining, among other things, the condition of the soil.
So, enough reasoning, let’s move on directly to the rules for preparing beds in autumn period for the next season.
Why prepare the beds in advance?
This question is often asked: after all, there is spring, when you can have time to prepare the beds, sow seeds, and plant seedlings. Yes, absolutely true, but, firstly, not all fertilizers will have time to transform into a form accessible to plants, as we said above, and secondly, spring is such a fleeting period that in fact you may simply not have time to do everything, how necessary. Remember the Russian proverb in the words of a peasant peasant: “If my hat falls in the spring, I won’t pick it up” (that is, I’m so busy).
On top of that, if we prepare the beds for winter in the fall, think for yourself how much we will ease the spring worries: all that will need to be done is to loosen the ready-made beds, make holes for planting seedlings or furrows to sow seeds, and begin to carry out the usual procedures related to shoots or seedlings, without rushing or being late.
In what order should the beds be prepared?
The first step is to clear the areas of future beds from weeds and plant residues and burn them outside the site, although if they are without signs of disease, then it is quite possible to put them in compost heap, and then add chalk or lime as a fertilizer when digging the soil and, if necessary, add chalk or lime along with fertilizers to normalize the pH.
You need to clear weeds as thoroughly as possible, everything creeping weeds, wheatgrass with parts of its root system and dandelions just need to be excluded (uprooted) from the garden by all possible ways, they shouldn’t be there, no matter how much effort you spend on it.
When the soil is free of weeds and plant residues, that is, in its pure form, it can be enriched with the elements necessary for each plant - nitrogen, phosphorus and potassium. Since nothing will grow in these beds this season, you can add urea (20-25 g per square meter), superphosphate (18-20 g per square meter) and potassium chloride (15-20 g per square meter). ). In this case, there is no need to be afraid of potassium chloride, since by spring the chlorine will be neutralized and will be safe for plants. In addition, it is advisable to add well-rotted manure at 5-6 kg per square meter, or humus (3-4 kg per square meter) and wood ash (stove or soot) at 250-300 g per square meter of soil.
If the soils of your site are heavy and clayey, then you need to add river sand in a bucket per square meter, preferably mixed with compost in the same amount, this will increase the looseness of the soil and enhance its fertility.
Sandy soils do not retain moisture and nutrients well; here it is necessary to add a bucket of clay per square meter, as well as well-rotted compost (5-6 kg per square meter), leaf humus (3-4 kg per square meter) and sawdust(bucket per square meter). Be careful about sawdust - they can acidify the soil, so you need to use as gray as possible, that is, almost rotted sawdust.
Soils are acidic, where the acid-base balance (pH) is below 6.0, it is necessary to lime or chalk. If the acidity is below 4.5, then lime should be used at 200-250 g per square meter, if the acidity is from 5.5 to 4.6, then chalk: add 250-300 g of chalk per square meter.
Naturally, fertilizers, chalk, and lime - all this is added during the autumn when preparing the bed for digging, by initially spreading it over the surface and then covering it by digging with a full shovel.
How to dig up beds?
Usually there are two main options for digging the soil - a non-mouldboard method and a moldboard method. Let's start with the dumpless method of digging. With the dumpless method of digging, they try to do so that most of the earthen lump does not break or turn over. The purpose of such digging of the soil is to maximize the preservation of the beneficial microflora of both the lower and upper layers of the soil. Clods of earth also do not break up.
With the dump digging method, lumps of soil are turned over and broken. Typically, the second option is often used when preparing beds in the fall. In this way, we embed fertilizers deep into the soil, and with them chalk or lime, if necessary, and literally pull the overwintering stages of pests and diseases to the surface.
At the same time, it is undesirable to break up clods of soil, because in this case the soil will freeze to a great depth, becoming maximally disinfected. But if you decide to prepare a full-fledged bed with clearly defined edges and in the spring do not worry about breaking up the clods, then it is better to finish the digging job: break up the clods, level the bed and make, by pouring layers of soil on top of each other when digging, the bed is a couple of centimeters higher soil level, so that eventually the soil on it warms up faster than on the rest of the site.
 Preparing beds in the fall. © lasercuttingmachine
Preparing beds for certain crops
So, we talked about how to prepare the bed as a whole. There is nothing complicated about this: we clear the area, add fertilizer for digging, try to dig up the bed with an increase in the soil level, thus outlining the edges of the future bed, but this is in general. It seems to us that we also need to talk about how to correctly prepare a bed for the main crops, which certainly exist in every garden; beds for them can also be prepared in the fall.
Beet beds
So, in order for red beets to grow beautifully, you need to choose the most illuminated area where the soil is light and well-drained. Ideally, of course, the bed for beets should be prepared in the fall on sandy loam and loam with neutral acidity. On heavy soils, clayey, for example, beets will grow poorly even with sufficient nutrition. You should also avoid places where melt water, irrigation water, rain water, and, of course, acidified soils accumulate for a long time.
The best predecessors for table beets are crops that leave the site early - cucumbers, zucchini, early potatoes, early varieties sweet peppers and eggplant and, again, early tomatoes. You should not sow beets after spinach, rapeseed, carrots, chard and cabbage.
In the fall, when preparing the soil for beets, it is advisable to add organic fertilizers, for example, compost or humus in the amount of half a bucket per square meter of the future bed. As for mineral fertilizers, it is quite possible to add potassium chloride in the amount of 12-14 g per square meter, as well as ammonium nitrate and superphosphate in the amount of 22-25 g per square meter.
Next, prepare a bed for pumpkins and zucchini.
You need to know that these crops are generally unpretentious and simply respond wonderfully to various fertilizers contained in the soil. You can apply manure under them, but well-rotted manure in an amount of 3–4 kg per square meter of bed, no more, of course, for digging.
As for the choice of location, the soil must be neutral, therefore, if acid predominates, then chalk or lime must also be added before digging.
The best predecessors for pumpkin and zucchini are considered to be: potatoes, onions, cabbage, root vegetables and legumes, but cucumbers, zucchini and squash are considered the worst.
Pay special attention to the soil, so if the soil is clayey, then, as with the general preparation of the bed, under the pumpkin and zucchini you need to add half a bucket of humus and a bucket of river sand per square meter for digging. As for mineral fertilizers, 10-15 g of superphosphate, 250 g of ash and 15 g of potassium sulfate are enough.
On sandy soils on which you decide to grow zucchini and pumpkin, add a bucket of clay and half a bucket of humus per square meter.
Beds for dill and other greens
To get a good harvest of dill and other greens, you must first deal with the predecessors. Good predecessors for green crops are: cabbage, tomatoes and onions, and bad ones are parsnips, celery and carrots.
Next, try in the fall to choose the most well-lit bed, and, therefore, the one that warms up as much as possible. Ideally, the soil should be made as fertile as possible and try to keep snow on it by covering it with spruce branches. Don’t forget to pay attention to the acidity of the future bed; green crops grow poorly on acidic soil, so lime and chalk for digging, provided increased acidity, are necessary.
For green crops, preparing a bed in the fall is not difficult; the digging depth should not be very large, only 22-23 cm. Be sure to add 2-3 kg of well-rotted manure per square meter and 15-20 g of ammonium nitrate, 8-10 g of potassium sulfate and 10-12 g of superphosphate for the same area. In the spring, all that remains is to loosen the finished bed, make grooves for sowing, be sure to water them (2-3 liters of water per meter) and lightly compact them before sowing to prevent the seeds from sinking (a couple of centimeters deep is enough).
Preparing beds for tomatoes
Tomatoes - their best predecessors are: beets, cucumbers, onions, beans, carrots, various greens, peas, corn and zucchini, and their worst predecessors are potatoes, late cabbage, pepper and eggplant.
That's sorted out, now let's find a site for tomatoes before it gets cold. The best will be fertile soil, it is enough to dig it up, and if it is acidic, then lime it (150-200 g per square meter), but with fertilizers, in particular superphosphate, which tomatoes adore, you can take your time and simply sprinkle it over the surface of the soil without digging. By the way, tomatoes react very jealously to the level of acidity and the dose that we indicated may not have an effect on different types soil For example, if you have sandstone or loam on your site, then it is better to add 250 g of lime for digging, and if there are medium and heavy loams, then 350 g of lime and also for digging.
Too much raised beds don’t do it for tomatoes, don’t forget that they themselves tall plants, so 22-23 cm is quite enough and about a meter wide, no more is needed either.
 Autumn soil preparation in the garden. © Vesna Maric
 Beds for cucumbers
Well, cucumbers, because you are unlikely to find a plot where cucumbers do not grow, but only tomatoes or cabbage. The best predecessors for cucumbers are: tomatoes, eggplants, potatoes, onions, legumes, spinach, rhubarb, early and cauliflower, beets, carrots and greens, but the worst are considered to be: cucumbers, zucchini, pumpkin, squash, melon and watermelon.
Ideally, in the fall, the bed should be made so that it is light, preferably loamy or sandy loam. If the only soil you have is clayey and heavy, add a bucket of river sand per square meter for digging. By the way, cucumbers grow well in slightly acidic soil, so if this is the case for you, then there is no need to worry.
The beds for cucumbers must be dug up with a shovel full and 5-6 kg of well-rotted manure added.
Subtleties of fertilizing warm beds in the autumn
In the autumn, you can build a warm bed, first you need to knock down a box from boards, usually a meter wide and two meters long, lay a drainage layer at the base, this can be, in fact, any large debris, for example, various branches, pieces of boards, stumps , plant tops. You can sprinkle all this with river sand, sawdust, wood chips, weeds, peelings from potatoes and other vegetables, lay leaf litter, humus and scatter wood ash on top. Of course, the layer should be such that fertile garden soil (20-30 cm) fits on top, in which vegetable crops will grow next season.
A few words about mulching
Questions arise whether it is necessary to mulch the beds prepared in the fall, the answer will be positive. In principle, mulch, if it is made from natural components (the same leaf litter pressed down with spruce branches), then it will not in any way affect the vital processes of beneficial microorganisms in the bed you have built. Therefore, in the spring, after removing the mulch, the bed will look even fresher. The main thing is to remove the mulch early so that the soil warms up faster.
Peppers and tomatoes are crops that are extremely responsive to fertilizer application. If you want your plants to please you with an excellent harvest, then from the first days of planting seedlings you need to make sure that the soil contains all the necessary microelements for its growth and development. And since they will absorb them quickly and quite diligently, fertilizers for peppers will have to be applied regularly as the seedlings grow.
Main difficulties
When talking with gardeners, you often hear that they stop growing peppers on their plot. This is due to some of the difficulties posed by growing a heat-loving crop in our climatic conditions. Few people know what it is perennial shrub, however, in our country it is cultivated exclusively as annual plant. Its fruits are loved by everyone; they are used to prepare salads, first and second courses, and are sources of vitamins and minerals.
Is it so difficult to grow them in Russia? Let's just say that this is possible, subject to a number of rules. We don't take into account southern regions countries. This crop has a long growing season, which means that in many regions of the country, planting seedlings begins in February. This gives the plant a chance to bloom and grow fruit in a short, hot period. In addition, timely weeding, watering, and loosening are very important factors. Do not forget to apply fertilizer to the soil on time. For pepper, this is one of the foundations of normal life.
We grow seedlings
To get a good harvest, you need to sow the seeds in the ground at the end of January - beginning of February. To do this, you need to prepare the boxes in advance, fill them with soil, and water them. In a couple of days you can start planting the seeds. The composition of the soil is the same as that which will be used for subsequent cultivation in open ground, greenhouses or greenhouses. You will need two parts of soil, one peat and one humus. Everything is thoroughly mixed. If you take garden soil, do not forget to disinfect it using potassium permanganate or exposure to high temperatures.

First feeding
Fertilizer for pepper is a source of life and health. Only in soil rich in nutrients will seedlings grow strong and healthy. This means that it will easily tolerate transplantation into open ground and take root without any problems. As soon as the seedlings have their first true leaves, it is necessary to fertilize them. The second stage is two weeks after the pick. The seedlings are fed for the last time 10 days before planting in the ground. Further, all activities will be carried out at the main place of residence.
Best cast
The ideal fertilizer for peppers during the first weeks of seedling life is complex, nutritious mixtures in which nitrogen content predominates. If you have nowhere to buy it, you can prepare it yourself. There is nothing complicated about it. It is enough to dissolve 1.5 g of potassium salt and 0.5 g of urea, as well as 4 g of superphosphate in one liter of water. This is a starting composition that will enable plants to quickly gain strength and begin to grow. Fertilizing pepper seedlings is done by watering pre-moistened soil with a nutrient composition.
As soon as the plants produce their second and third leaves, it is time to pick. It is best if these are immediately cups designed for individual fit. For example, peat.
Immediately after this, another feeding of pepper seedlings follows. It is best to use urea for this. To do this, dissolve one tablespoon of the substance in 10 liters clean water. The third time, immediately before planting in the ground, preparations containing nitrogen and phosphorus are used. Potassium content is acceptable in small quantities.

Optimal dosage is the key to success
Fertilizers for the growth of pepper seedlings must be supplied to the soil regularly, this is an essential guarantee good growth and the future harvest. Young peppers are the most unpredictable of all. garden plants. They can grow and develop normally, and suddenly, in an instant, they begin to dry out. Experienced gardeners say that this is precisely the result of a lack of nutrition. If you urgently apply fertilizer, the situation can still be saved.
It is useful to know what functions a particular substance has. Nitrogen is extremely necessary for increasing the green mass of the stem, phosphorus - for a powerful root system. But seedlings hardly use potassium; it will be needed much later. But determining the quantity is a little more difficult. Based on practical experience, we can say the following. As long as the plants are developing well, have thick stems and well-developed leaves, you don’t have to bother with fertilizing. And as soon as a slowdown in growth is diagnosed, you can correct this situation with a new portion.
We stopped at this point because an inexperienced gardener may decide that granular compost, vermicompost and other “delights”, which are now freely sold in country stores, can be sprinkled under the roots in unlimited quantities. It is unlikely that the plants will die from this, this is a fact, but they will begin to “fatten”. That is, you will get a huge bush with lush leaves that will refuse to bloom and produce a harvest. All its energy will go to the formation of green mass. But if you completely overfeed, the leaves will lose their beauty, begin to curl and become fragile.
The main differences between feeding seedlings
Fertilizer for bell peppers must be applied correctly. If in the ground you can simply water the soil, and only then use a watering can to pass the nutrient solution, then in the boxes you will have to change tactics. Here you moisten the soil in the evening and apply fertilizing in the morning. Otherwise, there is a risk of flooding the root system. There are two types of fertilizer application tactics. In the first case, nutrients are applied to the root, and in the second, they are sprayed along green leaves. In the case of seedlings, the first option is suitable, since food must reach both the roots and leaves.
The first nutritional cocktail is prepared in approximately the following proportions: 1 g of urea, 8 g of superphosphate, 3 g of potassium sulfate. This mixture must be dissolved in two liters of water. There is one more trick. Before applying fertilizer for bell peppers, it is recommended to sprinkle the soil in pots with ash. Subsequently, the concentration is doubled. The frequency of application is two weeks.
Choosing a bed
It's best to plan spring planting in advance, and for this you need to know what conditions pepper likes. Growing and caring for them in open ground is a little easier than in pots. The main thing a southern guest needs is warm soil with a high humus content. It is best if the composition is sandy or loamy. That is, moderately loose. Necessarily good hydration Therefore, in soils that are too light, it is necessary to add peat, turf and leaf humus. It is best if legumes grew in the selected area last year. But a tomato bed doesn’t fit well, because they only have pests.
The soil for planting peppers is prepared in advance. In the fall, organic matter should be added to the selected bed. For example, rotted manure. This optimal choice every gardener. It should be applied in an amount of 3-4 kg per square meter. Another option would be straw with added nitrogen components. These are the best fertilizer options for any type of soil.
Fertilizing in the ground
It's time to transplant our young peppers into the garden. Growing and care will be largely determined weather conditions. If the weather is hot and sunny, then all you have to do is add the necessary nutrients and also carry out regular watering. If it’s cool outside, you’ll have to organize additional protection in the form of a greenhouse or greenhouse. But more on that a little later.
The first feeding will be required two weeks after the young peppers move into open ground. The following solution is used for this purpose. For 10 liters you need to take two teaspoons of urea and the same amount of superphosphate. For each bush you will need to add approximately one liter of solution.

Mass flowering period
This important point, since right now yours is being laid future harvest. The formed ovary will now grow and turn into healthy vegetables. To prevent flowering from going to waste, it is very important to add potassium fertilizers. For peppers, this will be their first application since planting. To prepare a nutrient solution you will need a teaspoon of potassium sulfate, a similar amount of urea and two tablespoons of superphosphate. The dosage is similar to the first feeding.
Fruit formation
When flowering is over, a small ovary appears on the bushes. Each of these seeds can grow into a huge juicy and tasty pepper. For more intensive growth and development, a third feeding is performed. To do this, for 10 liters of water you need to take two teaspoons of superphosphate and potassium salt. If fruit growth is intensive, then this can be limited. But sometimes the gardener notices that, despite all efforts, the ovary continues to hang on the bushes without changes, or the plant itself has stopped growing. If nothing is done, you may be left at the end of the season with tiny green fruits that are only suitable for winter harvesting. Great solution will be a urea solution. You will need 30 g per bucket of water. It is best to do this in the evenings, for 5-7 days.
Fertilizing schedule in closed ground
Growing plants in a greenhouse has its own specifics. Here's another one temperature regime, which means the growth of peppers will be more intense. Respectively, nutrients it will take a lot more. At the same time, do not forget that organic substances contribute to the productive formation of the crop, and mineral substances are necessary for the proper growth of the plant. The ideal fertilizer for peppers when planting is an aqueous solution of bird droppings. The concentration should be weak, maximum 1:15. You can also use mullein, here the proportions can be 1:10. These mixtures contain a full range of useful substances that promote the growth and development of agricultural crops. If the soil of the greenhouse has been well manured since the fall, then you can replace organic matter with potassium sulfate with superphosphate.
Mineral fertilizers for peppers in a greenhouse become very important about two weeks after flowering. Now comes the time for active formation and growth of fruits. Best choice will become organic with the addition of mineral fertilizers. By the way, picking the first fruits does not mean that caring for plants can be stopped. The third feeding is carried out just at this time. The composition can be changed slightly. In some cases, gardeners believe that best fertilizer for peppers - this is the composition indicated above. Further fertilizing is only necessary if the soil is very poor. A mixture of superphosphate and mineral fertilizers is best suited here.

Folk remedies
If you are against the use of chemicals, and there is no way to get rotted manure, then you can use other folk remedies. To do this, one tablespoon of wood ash must be dissolved in two liters hot water. Stir and leave to brew for a day. Now all that remains is to strain and use as intended. Ash as a fertilizer for peppers is a source of essential minerals.
You can also use eggshells for feeding. To do this, take the shells of two or three eggs, wash and dry. Now grind it thoroughly, pour it into a three-liter jar of water and let it brew for three days, stirring occasionally. During this time, the water will be enriched with magnesium and iron, calcium and potassium. This infusion can be used as a top dressing, diluted one to three.
Another great recipe is onion peel tincture. It not only saturates the soil with microelements, but also disinfects it, which is especially useful for young plants. It is very easy to prepare; for this you need to take 20 g of husk per 5 liters of water and leave for five days. If you love coffee, try not to throw away the grounds for a year. It is dried and collected, and then applied to the soil. This way it is saturated with nitrogen and oxygen, which is very beneficial for plants. In addition, gardeners recommend storing dry banana skins. When crushed and added to soil, they are also an excellent source of potassium and other nutrients.

Ready-made nutrient complexes
It is difficult to say which option is optimal. Some people prefer to grow their plants exclusively on natural fertilizers, such as mullein or bird droppings. Others, from early spring, stock up on industrial solutions, powders and tablets, which simply need to be diluted in water and applied to the soil. Complex fertilizer for seedlings of tomatoes and peppers can be purchased in liquid form or in granules. Trade marks may have different names, but the essence does not change. Check out the ingredients. If it contains nitrogen, phosphorus and potassium, then this is exactly the mineral complex you need. For pepper percentage should be N:P:K % 12.5:17.5:25. When fertilizer in an amount of 20-30 g per 1 square meter is evenly scattered over the surface of the earth, and then dug up.
The second stage opens during the growing season. Now the plants are additionally fed with a half dose. That is, 10 g per square meter is already used. Apply the product to moist soil and distribute it evenly around, embedding it into the soil. In addition, fertilizer is applied in the form of a solution. To do this, you need to take 10 g of powder for seedlings and 20 g for adult plants. A small amount of insoluble residue is acceptable. For seedlings, it is recommended to alternate feeding with one watering with plain water. For adult plants, it is permissible to use it with every watering.
Instead of a conclusion
Pepper is a rather capricious crop, so in order to get a good harvest, the gardener must provide all the conditions for it. The southern plant loves hot weather and abundant watering, as well as nutritious soil. If the first two factors strongly depend on the climatic conditions of the region, then the third depends entirely on you. The choice of fertilizers depends on the preferences of the gardener himself. You can ask your neighbor - a farmer - for humus, supplement it with wood ash and forest humus, and you will get excellent nutrition for your plants. Or you can simply buy a special solution or granules in the store, which will be enough for the whole season.
And finally, advice experienced gardeners. After harvesting, sow the bed where you plan to plant peppers next season with regular barley. As soon as the first greenery appears, mow it with a sickle and leave it on the ground. This will enrich the soil with nodule bacteria and make it healthier.
Planting pepper in open ground is the most important step towards a rich harvest of this crop. Mistakes made by a beginner at this stage can ruin all efforts to grow high-quality seedlings. In the article I detail and in simple words I’ll tell you how to plant peppers in open ground with minimal effort on your part and as comfortable as possible for the plants themselves.
Preparing pepper seedlings for planting in open ground

When grown on a windowsill, pepper plants need additional lighting.
About a week before the planned planting, pepper seedlings begin to be “walked”, taking the plants to Fresh air. At first, walks should be short, 15-20 minutes, but each time their duration increases by 50%. At a temperature not lower than +14...15 degrees, the plants will harden well and will better tolerate transplanting to an open garden bed.
How to choose a place for pepper

If there is no space in the garden, then peppers can also be grown in bags filled with nutritious soil.
The pepper bed is placed in an area with moderately fertile, light soil with a neutral or slightly acidic reaction. This culture does not grow well in places with close groundwater- then it’s better to give her a high, warm bed. Read about how to build such a bed.
Pepper just hates shadows. Therefore, plants must be exposed to the sun all day, otherwise their development will slow down and the harvest will be very meager.
Another important condition when choosing a site for this crop is that it must be reliably protected from the wind.
To do this, at some distance from the garden bed, you can make a partition or arrange a fence from any available materials. Alternatively, around the plantings, at a distance of 70-100 centimeters, you can place 1-2 rows of bush plants - beans, corn, sunflower, Jerusalem artichoke, chard. Plants are a must sown or planted seedlings in advance, 2-3 weeks before planting the pepper itself. If you plan to keep the bed covered with film all season, then you do not need to build any additional protective barriers.
Legumes, onions, beans, pumpkin, squash, zucchini, root vegetables and cabbage- here is the list the most successful predecessors for pepper. I do not recommend planting peppers after any nightshades, for example, potatoes, tomatoes, eggplants, or after any types of peppers. You need to wait at least 3-4 years before placing pepper in such a place.
Preparing a bed for peppers

It is better to remove the first (crown) flower of a pepper seedling. This will significantly increase the branching of the bush and yield.
Any soil can be improved and made suitable for planting peppers by adding various organic materials:
- in the case of medium loamy soil- this is peat and well-decomposed manure, one bucket per square meter of bed, as well as half a bucket of old sawdust per square meter;
- in the case of clayey, heavy soil- this is peat or well-decomposed manure at the rate of a bucket per square meter plus coarse sand (or semi-rotted sawdust) at the rate of 1 bucket per square meter;
- in the case of peat soil- this is humus and turf (or clay) soil, one bucket of each type of soil per square meter;
- in case of sandy soil- these are 2 buckets of humus (garden compost), 2 buckets of peat and clay soil and 1 bucket of rotten sawdust;
- in all cases, it is recommended to add one tablespoon of superphosphate and potassium sulfate into the soil (this is done in the fall), as well as one teaspoon of urea or nitroammophoska (in the spring) per square meter of bed; for convenience, the “mineral water” is mixed with organic matter;
- if you don't use it at all mineral fertilizers on the site, then simply add wood ash to the soil at a rate of 1 cup per square meter of bed (this is best done in the spring)
To determine the mechanical composition of the soil in your area, perform a simple test. You will find its description in.
When preparing the soil for this crop, consider the following:
- It is advisable to fertilize the soil for peppers in the fall, but it is permissible to postpone this work until spring;
- if you have light loam on your site, then you only need to fill the soil in the pepper bed with compost or humus at the rate of 1 bucket per square meter of its area;
- the bed for this crop cannot be filled with fresh manure, otherwise the plants will produce a lot of greenery, but few fruits.
Planting peppers in the garden

Spring soil preparation for planting peppers is in full swing)
IN middle lane In Russia, peppers are planted in open ground no earlier than the last ten days of May, and if the spring is prolonged, it is better to postpone this work to the beginning of summer.
By the time of planting, pepper seedlings should have 7-9 well-developed leaves, as well as short, strong internodes and several formed flowers. Early ripening varieties can be planted even with an ovary.
On the eve of planting in a permanent place, hardened pepper bushes are watered abundantly so that they do not become lethargic. Otherwise, they will be stunted and will lose their first buds.
Planting sweet peppers in open ground is carried out in 9 simple steps:
- Carefully prepare the soil in the garden bed loosen And level out. When growing pepper in two rows, its width should be 90-100 meters, and when planting in three rows, the width of the bed is increased to 120 centimeters. It is also highly desirable that the bed be extended in the direction from north to south.
- A distance of 50 to 60 centimeters is left between the rows, and 40-45 centimeters between individual planting holes. It is better to place the pits in checkerboard pattern. More dense planting pattern 20-25 x 50 centimeters leads to a decrease in fruit size, but increases their number.
- The holes are filled with 200-300 grams of vermicompost (humus, compost), add 1 tablespoon of ash and the same amount of crushed eggshells, and also pour in 1-2 liters of a light pink solution of potassium permanganate.
- Arcs are installed over the bed, and to prevent the film from sagging, twine is pulled between the arcs on both sides.
- Seedlings are planted in the afternoon or in cloudy weather at any time of the day.
- Pepper bushes are planted at the same level at which they grew in pots (permissible depth is no more than two centimeters). In this case, tall varieties are placed in the central row, and low-growing and dwarf varieties are placed along the edge of the bed.
- When planting, pegs 50-60 centimeters high are attached to each plant for further garter. After this, the roots of the plants are covered and pressed with hands around the stems for better contact with the soil.
- The soil in the bed with planted seedlings is mulched with peat or dry soil. This is an optional, but highly desirable technique.
- Throw a film over the arcs. If the weather is cool, then the plantings are additionally insulated with lutrasil or any other non-woven material.
You can reduce the need for watering, weeding and loosening by planting pepper seedlings directly into black film or non-woven covering material. To do this, the soil in the garden bed is fertilized, moistened, mulched with peat and covered with film or non-woven fabric. Pepper plants are planted according to a pattern of 40-45 x 50-60 centimeters in cross-shaped holes made in the selected material.
Caring for peppers after planting in the ground

This pepper clearly doesn't want to be eaten))).
Peppers are slow to take root in a new location, so the plants need help to acclimatize. To do this, for the first one and a half to two weeks they are watered every 2-3 days under the root, using 1-2 liters per plant.
During dry and hot periods, watering is carried out on a daily basis.. During this period, the soil between the rows must be loosened, but with great care, to a depth of no more than 3-5 centimeters. This allows you to avoid any damage to the roots of the plants until they finally take root.
As long as the temperature at night does not exceed +16 degrees, the peppers should be under film cover. In the daytime, if the air under the film warms up above +28 degrees, it is opened slightly or even completely removed.
But if, according to the forecast, return frosts are expected - this sometimes happens in early June - the soil in the bed with planted seedlings needs to be shed with water at a temperature of +35-38 degrees. Then, in addition to the film, throw a thick non-woven fabric on top and your plants will be reliably protected from the cold.
One of the most common problems that a novice gardener faces when growing peppers is when the plants begin to shed their ovaries en masse. The main reason for such trouble is faults in maintenance and weather surprises, which are especially dangerous on open garden bed. To more fully understand what exactly caused the ovary to fall off in your situation, I suggest reading.
We made a short video for you in which we shared our experience of growing pepper seedlings and planting them in open ground.
Growing sweet peppers (bell peppers). Preparing the soil for the site. Sowing seeds for seedlings. Transplantation into open ground. Care
How to plant and grow Bell pepper. How to prepare the soil. How to sow seeds. When to plant seedlings in open ground. How to care for planting (10+)
Pepper agricultural technology - Preparation. Sowing. Seedling. Care
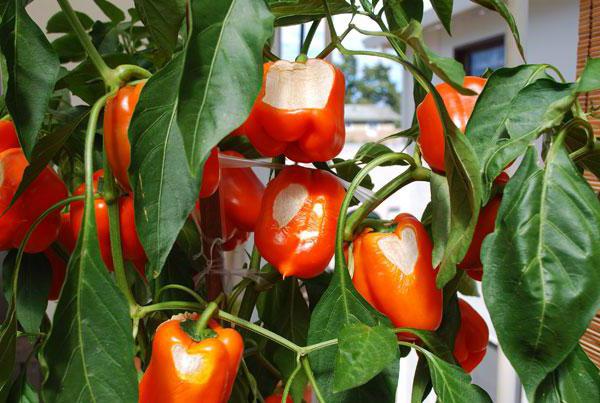
In order for the pepper harvest to be good, you need to work very fruitfully. This vegetable came to us from southern countries, so it is considered a short-day plant. If daylight hours are reduced by less than 12 hours, then the pepper automatically receives a signal that it needs to move on to the fruiting phase. Peppers were first cultivated in Central America. Next came Spain, Türkiye and Iran, and only in the 15th century did the “Mexican guest” reach Europe. Today there are more than 2,000 varieties of pepper. But bell pepper- this is not only a bright palette of colors, but also a rich storehouse of vitamins. Not every vegetable can boast of such a set.
Preparing a site for planting pepper
In general, pepper loves high temperatures and normal air humidity. It is better to choose a site that is sunny and maximally protected from the winds. The best option- south side of the house. If there is no natural protection from the wind, you can build an artificial lash from twigs or other available material. Most suitable option The predecessors of pepper are cucumber, cabbage, representatives of the legume family and table root vegetables, such as beets or carrots.
You should not plant peppers in the place where potatoes or tomatoes previously grew, since young seedlings can automatically receive a whole “bouquet” of diseases of their predecessors through the soil.
Soil for peppers must have at least three qualities: fertility, high drainage and good moisture retention. Site preparation begins in the fall, when the remains of the previous plant are carefully removed and then the soil is dug up. Before digging, the soil is fertilized with a mixture of superphosphate (30-50 g), wood ash (50-80 g) and rotted manure or humus (5-10 kg). All figures are given per 1 square meter. Remember, fresh manure - worst enemy pepper Pepper does not need organic additives either. This is due to the sensitivity of the plant to dissolved nitrogen in the soil, and if there is a lot of it, then the plant directs all its forces to the development of leaves, and accordingly there is a threat to the preservation of the ovary and the ripening of the fruit as a whole.
After applying fertilizer, the area is dug up deeply, and in the spring it is loosened and fertilized with phosphorus and potassium fertilizers. It is enough to apply about 30 grams of each fertilizer per 1 square meter. Immediately before planting, lightly dig up the soil and level the surface well.
Growing seedlings
You should start working with seeds in mid-February, so that in May, when the need arises to transplant the seedlings into open ground, the plants will be 90-100 days old. It is better to sow the seeds immediately into peat bags with a diameter of 8-10 cm. This measure is necessary because pepper does not tolerate the picking process well. Large pots should also not be taken, since the root system of the plant at this time is very small.

The soil mixture for planting is taken as follows: 2 parts humus, 1 part sand and 1 part soil. Afterwards, you need to add table ash - 1 tbsp per 1 kg. spoon. In order for the seeds in peat bags to germinate, additional preparation is necessary. To do this, the seeds are kept for 5 hours in water whose temperature is about 50 degrees Celsius. For the next 2-3 days they are kept in damp cotton cloth. This period is sufficient for the seeds to hatch. This preparation allows the first shoots to appear within a day after sowing in peat bags. After placing the seeds in the ground, the crops are well watered and covered with film or glass. Before the emergence of seedlings, it is important to provide warmth in the room (up to 22 degrees Celsius), but as for lighting, the crops can be left for this time even in the dark.
As soon as the seedlings appear, we transfer the seedlings to a warmer place (the temperature during the day should be 26-28 degrees, at night about 10-15). Don't get carried away frequent watering seedlings, since excess moisture can cause a disease such as black leg. Watering should be done with water whose temperature is about 30 degrees Celsius. Do not forget about air humidity, and also periodically spray the plants, and ventilate the rooms where the seedlings are located, but do not allow drafts. In February there are still very few sunny days, so it is advisable to spend additional artificial lighting during this period from 7 am to 9 pm.
Transplanting pepper seedlings into open ground
Pepper does not tolerate even slight frost, so seedlings should be planted either in two stages, or when the threat of frost has passed, for example in last days May. Before planting, the plant should gradually begin to harden off. To do this, the seedlings should be taken outside every day, each time increasing the time spent in the open air. If the temperature is below 13 degrees Celsius, then the seedlings should not be removed. This temperature can only negatively affect a young plant. Five days before planting, the soil should be disinfected.
For this, a solution is prepared from copper sulfate(1 tbsp per bucket of water), which we then water the prepared area with. In a greenhouse made of film, but not heated, seedlings can be planted in the first ten days of April. The planting pattern is 60 -70 by 20-30 cm. Before transplanting, the seedlings are well watered. On a hot day, it is better to plant seedlings in the afternoon, and on a cloudy day, in the morning. Each hole is watered with warm water at the rate of 1-2 liters per hole. Next, we take the seedlings out of the pots and plant them a little deeper than they grew before. This approach makes it possible to educate adventitious roots on the main stem.
Low growing varieties with early When maturing, they are planted in a row every 15 cm or 30-40 cm, but two plants per hole. After planting in the ground between the rows, they are immediately loosened.
Pepper is susceptible to cross-pollination, so if you plan to plant several varieties at once, try to plant them at the farthest possible distance from each other or fence them by planting corn or sunflowers.

It is not advisable to plant peppers by directly planting seeds in the ground, even in warm countries, because you still have to wait until the soil warms up, and this, accordingly, leads to a delay in the ripening of fruits in general.
How to properly care for peppers
For successful development and good harvest it's important to organize proper watering, timely loosening and high-quality fertilizing of crops.
Water is one of the most important components of successful plant survival after transplantation. Therefore, during the first week you need to water every two days, using 1-2 liters of water per bush. If the weather is very hot, you can water every day. A week later they inspect the bed, and instead dead plants reserve seedling bushes are planted. At the same time, watering is reduced in the future. On hot days, watering is carried out in the morning and evening hours, and during harvesting, watering is reduced to once every 5-6 days.
For peppers, the soil must always be loose, since the formation of a soil crust has a detrimental effect on the nutrition of the plant. Loosening allows the roots to receive more air and also stimulates the work of microorganisms in the soil. Therefore, after watering and rain, the soil must be loosened, except for the first two weeks. During this period, the plant grows slowly, since the main emphasis is on strengthening the root system. After this period, after watering, loosening is carried out, and quite deep.
Early ripening varieties of pepper should be loosened 3-4 times, and for varieties more late dates ripening - 2-3 times. Between the rows you should loosen more often, but carefully so as not to damage the stem and roots. The plant should be earthed up during the active flowering phase.