How nice it is to collect the first harvests of greens or radishes from the garden. And it’s even nicer when this happens in early spring. And in order for this to be real, it is necessary to build a greenhouse. A greenhouse made of wood, even not a big one, is great solution for the garden and vegetable garden, which will allow you to harvest crops in large quantities earlier. And don’t think that a greenhouse is complex design, which must be built by professionals using complex drawings and using special tools. No.
Greenhouses made of wooden beams
First you need to understand what types of greenhouses there are, what materials are used to build them and what tools are needed. There are several types of greenhouses, differing in shape and purpose. The two main types are winter and summer. Once you decide on the seasonality, we begin selecting materials for the frame.
You can use metal, wood, polypropylene and even brick. Afterwards, we decide what the greenhouse will be covered with. It can be glass, polycarbonate or simple polyethylene. In this article we will consider the option of building a greenhouse from wooden beam 50x50 and polycarbonate.

Wood is a malleable material that correct processing will last a very long time, and if something happens, unlike welded metal elements, will easily undergo design changes. Having decided on the material, we will need detailed diagram our future greenhouse. There are many of them.
From the tool we will need:
- Hammer and nails;
- Hacksaw;
- Plane;
- Screwdriver and screws;
- Roulette;
- Construction level (or you can rely on your eye).
Greenhouses can be gable, lean-to, flat roof, hangar or dome. And we will look at the simplest, gable model, which, with due diligence, can be erected in one day. Single-pitch models are most often used in the form of extensions to a wall, a permanent structure, i.e. one of their sides is closely adjacent to a house or barn and is most often used to build winter versions of greenhouses, since it is easier to install a heating system in them.
Which timber to use for a greenhouse
Wood is inferior in durability to metal, but with proper processing it can last 5-7 years without any repairs, which is a good indicator if you compare the price and ease of production. No need to look for wood of any exotic or valuable species wood, their service life is almost equal, so simple pine will do, and it’s easier to find bars made from it in construction stores and carpentry shops. When we have decided on the type of wood, we can, based on the planned dimensions, purchase timber for the construction of the greenhouse.

To build the frame, a beam with a section of 50x50 will be sufficient. It is advisable to choose dry wood, without knots, bends or signs of rot.
The smoother and “cleaner” the timber is, the easier it is to work with. We will also need material for laying the base. This should be a beam with a cross-section twice as large as ours. Those. 100x100. There should be enough bars for installation bottom trim our greenhouse, i.e. The length size must correspond to its perimeter. If the greenhouse has rectangular shape, you need to make sure that the long edge of the rectangle does not sag under its own weight. It may be better to install posts perpendicular to the base so that they add strength to the structure. Also, to calculate the amount of material, you need to take into account the windows and door.
So, the timber criteria that we need to pay attention to:
- Dryness;
- Evenness;
- No external defects;
- No knots;
- Section;
- No damage to the wood structure (rotting, voids, deep darkening).
Windows are one of the important parts of the greenhouse, since it is necessary to ventilate it with fresh air, and one open door will not be enough, and the resulting moisture will have a bad effect on both the plants and the condition of the greenhouse.
What you need to build a greenhouse from timber with your own hands
When everything necessary has been purchased and is ready for assembly, we begin preparing the site for installing our structure. First you need to level an area slightly larger than the greenhouse itself. Mark out the future building and prepare the foundation.

For this, four holes in the corners are enough, or more if the heifer is long, around the perimeter, 50-70 cm deep, with bricks laid and filled with cement.
This foundation in the future can serve for the construction of an outbuilding or a more massive frame. You can, of course, fill in strip foundation, but this is more labor-intensive, and if a decision is made to move the greenhouse, the strip foundation is more difficult to dismantle. While the foundation hardens, we begin to prepare parts for the frame. We cut the timber according to our dimensions and cover it with an antiseptic, paint or drying oil, which will protect our structure from fungus and rot that inevitably arise when exposed to environment.
What else may be useful for assembling a greenhouse with your own hands:
- Mounting corner;
- Hinges for windows and doors;
- Dowel nails;
- Hammer with drill.
You can make a greenhouse without a foundation, but in this case you will have to take care of securing it to the ground, since strong winds can move the greenhouse from its place and damage the plants that are inside. If you decide to do it without a foundation, then skip the pouring step and immediately proceed to assembling the frame and installing the timber, but do not forget to thoroughly saturate the base with an antiseptic.
Making a greenhouse from timber with your own hands: detailed diagram
Now that the foundation is ready and all the parts are cut, you can begin the final stage of construction. First, let's install the corners by attaching them to dowel nails or anchor bolts to the foundation. To these corners, you can attach a thick beam, which will serve as the bottom frame and will be load-bearing in our structure. After this, you can begin assembling the frame using a simple fastening - building corners.

We also install doors and windows that can be sheathed with the same polycarbonate. After the top frame has been installed, we begin to attach the rafters for the roof.
It is advisable to install the roof slope at an angle of 45 degrees, so that it turns out steep and does not require close monitoring of the amount of snow in winter. As soon as you have finished building the frame and installing the rafters, the simplest thing begins - covering the greenhouse with polycarbonate. The material is very easy to install and has a huge number of advantages compared to polyethylene, since it is durable and will not tear from accidental mechanical impact.
Cutting polycarbonate into plates the right size, we fasten it with special fasteners or self-tapping screws through the sealing gasket to avoid pushing through the material with the self-tapping screw. This role can be played by simple rubber or thin plywood.
In short, the build process looks like this:
- Installation of supporting beam;
- Frame assembly;
- Installation of doors and windows;
- Polycarbonate sheathing.
DIY timber greenhouse (video)
As it became clear, building a greenhouse with your own hands is not a difficult task, and anyone can do it. The main thing is to draw up a project, think about the drawings and creatively approach the solution to this problem. And do not forget about safety precautions when working with the tool.
Range ready-made solutions for closed ground it is represented mainly by products made of plastic or metal supports. Those who want to install a wooden structure on their site will have to make an effort and make a greenhouse with their own hands from wood or lumber. It is necessary to determine the optimal model, draw up a drawing, prepare materials and select the location of the building. Further construction technology depends on the type of foundation used and design features greenhouse
Advantages and disadvantages of timber frame greenhouses
Before building a wooden greenhouse made of polycarbonate or film-coated, it is necessary to evaluate the positive and negative characteristics of a wooden frame. In addition, you should decide in advance on the shape of the future structure, taking into account the dimensions of the site and the purpose of the building.
Greenhouse made of wood, "house" type
Types of wooden greenhouses
The variety of wooden greenhouses is classified according to three criteria:
- form;
- covering material;
- deepening into the ground.
Based on the configuration of the walls and roof, they distinguish the following types greenhouses
Gable. Buildings with straight sides resemble a house. The design is popular due to its versatility and practicality. Plus - the snow does not linger and does not create a load on the frame. The downside of the “house” is large heat losses through the north side.
A variation of the gable model is “Dutch” with inclined walls. This solution expands the area for planting crops.
Tent. Build round greenhouse made of wood is difficult due to the large number of parts and joining angles. Externally, the greenhouse looks impressive. The downside is that to rationally use the space you will have to create shaped beds or make shelving. Plus - good lighting throughout the day.

Tent shape made of wooden slats
Tunnel. Traditional modification of arched arches. Advantages of a semicircular vault:
- versatility - suitable for low-growing and tall crops;
- ease of maintenance;
- ease of shelter due to the absence of corners;
- uniform light distribution;

Spacious arched greenhouse made of wood
The main disadvantage is complexity self-assembly.
Single-pitch. One side of the greenhouse is the wall of a permanent building. Pros: compactness, accessibility and the ability to supply heat from the house. Cons: limited area and lighting.
Cover options for a modern wooden greenhouse made of wood:
- film – low price, rapid wear, condensation formation;
- glass – high thermal insulation and light transmittance, resistance to high temperatures, complexity of installation and fragility;
- polycarbonate – strength, durability, flexibility, ease of installation.

Lean greenhouse near the wall of the house
A wooden polycarbonate greenhouse protects plants from UV rays.
The previously discussed modifications are of the ground type. Recessed buildings are winter thermos greenhouses that go 2-3 m underground. The main advantage is maintaining an optimal microclimate and saving heat.

Wooden greenhouse-thermos
What to consider when building a greenhouse
Despite the emergence of new materials, the demand for wood does not fall. Arguments in favor of a wooden greenhouse:
- availability of lumber;
- environmental friendliness - regardless of operating conditions, wood does not emit toxic or toxic fumes;
- ease of processing - no expensive equipment is required for assembly;
- sufficient margin of safety - untreated wood will last about 5 years, and a protected and well-maintained wooden frame will last more than 10 years.

Flower greenhouse made of wood and glass
However, we should not forget about the disadvantages of using wood to build a greenhouse:
- susceptibility to rotting;
- ease of ignition;
- difficulty in dismantling and moving to a new location;
- the appearance of shadows from wide beams and wooden beams.
To minimize the shortcomings of the building, it is necessary to competently approach the choice and pre-treatment wood.
Preparing for the construction of a wooden greenhouse
Initially, you should decide on a location, prepare lumber, develop a construction diagram and lay the foundation. The proposed drawings with photos will help you design and make a permanent structure from boards or timber.
Choosing a location for a greenhouse on the site
Before you build a greenhouse out of wood with your own hands, you need to choose the optimal location for the greenhouse. The ease of use, the possibility of supplying communications, the speed of ripening and the abundance of fruiting of vegetable, fruit or flower plantings depend on this.
A number of factors are taken into account:
- landscape of the area;
- soil characteristics;
- orientation to the cardinal points;
- proximity of communications.
Landscape characteristics. Experienced gardeners It is recommended to place the greenhouse:
- Closer to home. Newcomers try to move the greenhouse away so that it does not become an obstacle and take up space in the middle of the site. However, over time it becomes clear that maintenance is complicated, and the supply of communications is difficult due to the large distance from the house.
- On a flat base. If you have to install the greenhouse on a slope, then the surface will have to be leveled and soil will have to be poured into the recesses.

Flat area for building a greenhouse
Soil composition. Wooden structures should not be placed on swampy or sandy soils– accumulating moisture will cause rapid deformation and rotting. Clay soil should be compacted with gravel, and a fertile layer of black soil should be poured on top.
Side orientation. Sufficient illumination of a wooden greenhouse is given priority. Optimal locations:
- east-west direction - for large farmland;
- north-south or east-west orientation - suitable for small buildings.

The main landmarks are the cardinal directions
Wind direction. The factor largely determines the heat loss inside the greenhouse. Cold gusts of wind increase heating costs in winter. It is necessary to study the wind rose diagram of the area and choose the calmest place.
Ways to reduce wind load:
- erection of a fence (up to 1.5 m high);
- attaching a wooden structure to the wall of a house.
Availability of communications. You need to think in advance about how to install electrical wiring and ensure the functioning of the water supply and heating systems.
Choosing wood for the frame
The optimal material for the construction of wooden greenhouses is larch. The structure of wood is characterized by high density, which determines its main qualities: strength and resistance to rotting. Over time, the material “hardens” rather than softening.
In addition to larch, pine and spruce are suitable types of coniferous wood for building a greenhouse. Pine timber Quite lightweight, resistant to moisture, commercially available and inexpensive. However, its mechanical strength is inferior to larch, so the supporting beams and frames must be more massive.

Glued laminated larch beams - durable wood for construction
Spruce logs do not contain enough resins, so without proper antiseptic treatment putrefactive processes will quickly begin in the tree. Deciduous wood you can use: oak, teak, hornbeam and beech. The wood is very dense, so its processing is complicated and requires the use of carpentry machines.

Treated dried oak timber
To build a greenhouse from boards with your own hands, blanks for frames with a cross section of 50*50 are suitable if the width of the structure does not exceed 3 m. Spacious models up to 6 m are built from beams 80*80 mm or logs with a diameter of 70 mm.
Types of designs and drawings
The greenhouse design must show the main dimensions, places of fastening of elements and general scheme assemblies. When building a wooden greenhouse with your own hands, it is better to choose a gable or wall-mounted model - they are easier to implement.
The nuances of choosing the size of a building:
- Standard width– 2.5 m. Two parallel beds of 90 cm each are set up, and free space is allocated to the path.
- In a 3.8-4.3 m greenhouse, it will be possible to organize three ridges and two passages.
- The length of a wooden greenhouse is limited by the size of the plot.
- The height of the building above the passage is from 2 m, near the walls – 1.3-1.5 m (depending on the type of plants).
Possible solutions for a wooden frame.
Option 1. Standard gable model: width – 3 m, length – 4 m. Base – strip foundation made of brick.

Drawing of a gable model made of wood
Option 2. A greenhouse made of wood with a house with a plywood wedge for installing a transom.

Design with a transom according to the "Mitlider" type
Option 3. Recessed “thermos” with wooden frame. The width of the greenhouse is 2.85, the elevation above the ground is 130 cm, taking into account the height of the foundation.

Underground greenhouse-thermos
Option 4. Sloping lean-to with water heating from the house. The slope angle is 13°.

Wall-mounted model with heating
Option 5. Scheme for assembling and placing a film shelter on a wooden arched greenhouse. The width of the structure is up to 3 m, height – 2.2 m.

Assembly arched greenhouse made of wood and film
Wooden greenhouse foundation
It is unacceptable to install a wooden frame on the ground - the lower elements will quickly deteriorate due to dampness. Therefore, even for small and light wooden greenhouses, the construction of a foundation is mandatory. There are two options: columnar and strip base.
Columnar is erected from pipes filled with concrete, pieces of piles, bricks or reinforced concrete blocks. The pillars are installed at a distance of 1-1.2 m, and a timber frame is laid on them. For frame structures without strapping, a fundamental pillar is mounted under each vertical post.

Columnar brick foundation
Technology for laying strip foundations:
- Prepare the site: clear of debris, level.
- Apply markings according to the dimensions of the greenhouse. Determine the boundaries of the foundation - the width of the tape is 30-35 cm.
- Dig a trench 30 cm deep and fill the bottom with sand (10 cm).
- Install formwork from boards 2 cm thick, height 25 cm above ground level. Connect the side elements with ties and secure with jibs.
- Mark the fill line using a water level.
- Install a reinforcing belt made of rods with a diameter of 5-6 mm, the grid spacing is 20 cm.
- Fill the trench with concrete, leveling the surface according to the markings.

Prepared formwork from boards
Leave the foundation for 2-3 weeks; in hot weather, the concrete must be wetted periodically to prevent cracks from appearing. After removing the formwork, waterproof the strip base bitumen mastic or roofing felt.
Making a greenhouse with your own hands
Various types of structures can be erected on a prepared strip foundation wooden structures: greenhouses under film or modern polycarbonate shelter. To simplify the task and allow for transfer, a columnar base made of timber or blocks is used.
Wooden frame for film
Brick racks will serve as the foundation, followed by timber lining. All work can be divided into several stages.

Wooden frame for film
Stage 1. Fixing the supporting beam. Before building a wooden greenhouse with your own hands, the prepared lumber must be treated with an antiseptic compound, for example, Biosept. A solid beam with a cross-section of 10*10 cm is used as the basis of the frame. It is not advisable to use pieces of wood for strapping - this reduces the stability of the future building.
Stage 2. Manufacturing of side walls. Cut out wooden elements according to the diagram: length – 5.4 m, height of racks – 1.5 m, number of crossbars on one side – 9 pcs. Join the parts into a single sheet using grooves.

Wall panel assembly diagram
Connect the walls with rafters, doors and ceiling joists using self-tapping screws and metal corners.
Stage 3. Construction of the rafter system. The length of the rafters for the proposed greenhouse will be 1.27 m; for tall people, the value can be increased to 1.35 cm. The calculation is made in accordance with the size of the film covering 6 * 6 m.
Under the given conditions, the sum of two side posts and two rafter legs will be about 5.8 m, which means that it will be possible to do without waste and film residues.
A rafter pair is assembled from two racks, a wooden corner and a crossbar. The number of rafters is equal to the number of side posts - 9 pcs.

Assembling the rafter pair
Stage 4. Installation of the roof and door. Assembly order:
- Install rafter pairs.
- Attach the roof ridge and wind boards - the elements are made from solid wooden beams.
- Prepare the door frame and window frame.
Stage 5. Sheathing the frame. Stretch the film and distribute it over the frame mesh. To prevent the material from “sailing” in the wind, the film should be secured with wooden slats, packing tape or pieces of old linoleum - the clips are secured with staples or small nails.

Upholstery wooden frame film
Greenhouse made of wood under polycarbonate
A more complex option is an insulated greenhouse made of polycarbonate and wood, built with your own hands. Base – tape concrete foundation, dimensions – 3.6 * 3.3 m, height above the aisle – 2.5 m.

Insulated polycarbonate building
Necessary materials:
- board – 100*50 mm;
- metal corner;
- polycarbonate;
- wall corrugated sheeting;
- plywood – thickness 12 mm;
- metal ridge;
- silicone sealant, wood antiseptic;
- door furniture.
Step 1. Laying the strip base (the technology is given above).
Step 2. Assembling the side, front and rear front walls. The side panel consists of 7 racks (850 mm) and parallel strapping of 3.590 m each. The elements are fastened with self-tapping screws.

Schematic design of the side
The rear wall includes 6 supports (850 mm), two trims - 3.1 m.

Drawing back wall
Assemble the front side according to the sketch.

Front side design
Install all walls on the foundation, securing with anchor bolts. Fasten the parts together with metal corners and self-tapping screws.
Step 3. Installation of roof gables. Work progress:
- According to the drawing, cut out the details of the front and rear gables.
- Place the workpieces on a flat surface and fasten them with screws through mounting plates.
- Check the structure for strength and install it one by one on the erected frame.

Sketch of the front and rear gable
Step 4. Assembling the roof is performed in the following sequence:
- Installation of a wooden ridge beam 3,490 m long.
- Preparation of the lower and upper rafters.
- Connecting rafter elements to each other using plywood overlays.

Assembling the rafter system
Cover the wooden frame with paint and protective impregnation.
Step 5. Insulation and sheathing. Sew up the vertical sides of the greenhouse with corrugated sheets and insulate them from the inside thermal insulation material(foam or mineral wool).
Cover the upper part of the frame with wave or cellular polycarbonate. To fix the first option, figured wooden slats are used, the second is attached directly to the frame.

Sheathing with corrugated sheets and polycarbonate coating
Portable greenhouse on foundation blocks
To be able to transfer a wooden greenhouse, two conditions must be met:
- the most lightweight frame;
- arrangement of a “collapsible” foundation with fastening mortgages.

Option for a portable greenhouse made of wood
The foundation blocks will serve as such a base, on which a frame made of 150*150 mm wooden blocks will be mounted.
Construction technology:
- Dig a ditch 60 cm deep.
- Place a cushion in the trench from sand and gravel mixture.
- Lay down concrete blocks along the perimeter of the structure, install mortgages and fill with concrete.
- Prepare the strapping elements - treat the wood with a persistent antiseptic, cover the outer surface with bitumen and bottom part timber.
- Secure the harness frame to the mounting screws.
- Build a wooden frame and fix it to the base beam.
- Install jibs in the corners of the greenhouse. Coat all wooden parts with antiseptic.
- Make a template rafter and cut the rest according to its pattern.
- Assemble and install trusses and mount the ridge.
- Cover the frame of the greenhouse with film or polycarbonate sheets.

An example of using embeds in fundamental blocks
Wooden greenhouse made from window frames
A popular frame option for wooden greenhouses is old window frames. The performer is required to lay a solid foundation and securely fasten the improvised “skeleton” of the greenhouse.

Scheme of strapping and installation of frames
Algorithm of actions:
- Prepare materials. Remove the fittings, remove the old layer of paint, dismantle the glass temporarily so as not to damage them during the installation process. Cover gaps and cracks with silicone sealant.
- Install a timber frame on the foundation and treat it with bitumen.
- Erect vertical posts from wooden beams 150*150 mm in the corners.
- The beams are additionally secured with lower and upper trim.
- Sequentially install the window frames, fixing them to the trim elements with self-tapping screws.
- Foam all gaps between transoms.
- For additional fixation with inside Nail the frames with supporting vertical bars.
- Erect a rafter system and cover the roof with film.
The step-by-step technology for assembling a greenhouse with your own hands is shown in the photo.

Fixation window frames and installation of rafters
Video: building a greenhouse with a wooden frame
Videos clearly demonstrate the progress of construction work different types wooden greenhouses.
Video: Building a greenhouse with your own hands from wood and polyethylene
Video: Construction of a country greenhouse from window blocks
Video: Nuances of assembling a wooden frame, mounting the frame on a strip base
A homemade greenhouse made of wood is an excellent option for a novice summer resident. The construction of a simple gable or single-pitch model does not cause any difficulties. The main thing is to choose the right wood, process wooden blanks, build a foundation and adhere to assembly technology.
Many summer residents turn to building a greenhouse to grow natural vegetables and berries. Such construction is made from different materials. The most common options are metal profiles and timber. We will talk about the latter in more detail today.
Peculiarities
Today you won’t surprise anyone with a greenhouse on a summer cottage. Such buildings can be purchased ready-made or built with your own hands. In this case, it is permissible to use various materials. This applies to both the frame base of the building and the covering material that complements it.
Some of the most sought after and popular today are those made from wooden beams. They can also be easily made with your own hands, following simple technology.


The sizes of such constructions also vary. For example, options made of timber, the dimensions of which do not exceed 50x50 mm, are erected in the shortest possible time. Plus, it doesn't take too much effort.
Wood itself is a fairly pliable and obedient material that can be easily processed if necessary. That is why not only standard, but also more original structures with various kinds of decorative elements are often made from timber.

It is very important to keep in mind that wood will only last a long time if it is properly treated and proper care. Structures made from wooden blocks will need to be impregnated with a special antiseptic composition.


According to experts, most of all for the construction of timber greenhouses these are suitable tree species like spruce, pine and larch. Highly efficient and attractive buildings are obtained from such raw materials. Construction of a structure made of spruce will cost the least. Larch is quite expensive, but it is good because it is slightly susceptible to rotting, so it lasts longer and is more wear-resistant.


Greenhouses made of timber should be installed on strong foundations. In this case, the structure will be more stable and well secured. In addition, in such conditions, a wooden greenhouse will not need regular major renovation– it will not warp on the foundation.

As for the covering material for a timber greenhouse, here you can also turn to different products. It will be possible to select and install it only after the construction of the frame base is completed.
Kinds
Greenhouses made of timber come in different varieties – the choice is huge. Of course, the most popular and frequently encountered are gable and single-pitch structures, as well as structures that have a simple flat roof. A dome or hangar-type greenhouse will look more interesting on the site.


The simplest model in appearance and in terms of construction is rightfully recognized as the lean-to model, installed directly to the wall of a house or other outbuilding. Often such structures are combined with a barn or installed as separate design. Thanks to such a solution, you can get a very convenient and functional structure that will be extremely useful.

Size and shape
Greenhouses of various sizes can be made from timber. It can be either a very small or a spacious building for a large number of different plantings.
To place a couple of beds in a greenhouse and place a small path between them, you should design a structure with a width of 2.4–3 m.
The building length parameter depends on the area summer cottage and the planned number of landings. The optimal length is 5 and 6 m. In such conditions, it will be possible to grow plants for a family of 4–6 people. Since tomatoes and cucumbers require different levels humidity, as well as temperature regime, then you will need to organize a separate greenhouse for each crop.

In most cases, greenhouses are made trapezoidal and equipped with gable roofs. Moreover, their height should be at least 1.8–2 m.
Tools and materials
As mentioned above, it is quite possible to build a greenhouse from timber yourself. Carrying out such work is easy and does not take up too much free time, since wood is an easy-to-build material that can be processed without problems if necessary. However, you should begin the actual construction of a wooden greenhouse only after purchasing all necessary tools and materials.
As for the tools, here you will need:
- nails and hammer;
- plane;
- hacksaw;
- roulette;
- construction level (it is advisable to buy a laser or bubble tool);
- perforated corner for fastening;
- screwdriver and screws.


Before starting construction work, it is necessary to select suitable timber. It is very important to ensure that it is completely dry.. In addition, it should not have serious defects– knots, chips, cracks (especially deep ones), as well as traces of rotting. Pay attention to the cross-section of the wooden beam. Make sure that the wood has not been attacked by harmful insects. In addition, the bars should not have voids.

How to build with your own hands?
If you stocked up on everything necessary materials and tools, you can proceed to the actual construction of a wooden greenhouse. In order for this construction to last as long as possible and not require frequent repairs, it should be placed on a foundation. In most situations, strip or columnar foundations are prepared for greenhouses.
A design with a tape base will be more expensive. It is recommended to use it if you plan to install a large greenhouse on your site, which will contain many beds.

Base or foundation
For a small or medium-sized greenhouse, a columnar base will be sufficient. To build it, you will need sand, cement, crushed stone and wooden boards. When carrying out such installation work, it is imperative to use a building level.
With the foundation, the structure will be located on one territory specially designated for it. Column foundations are cheaper. It is usually made using concrete, blocks, bricks and rubble concrete.


When carrying out such installation work, the usual formwork is replaced with metal or asbestos-cement pipes.
If we are talking about installing a medium-sized greenhouse, then it is permissible to use standard concrete pillars, which are usually used when installing fences.
These parts must be thoroughly dug into the ground that has been cleared in advance. This must be done in such a way that the pillars stand securely and firmly. After that, they are cut with a grinder using a level.


When installing the foundation, it is necessary to maintain maximum accuracy of all values. The horizontal plane must be perfectly flat. Please note that it will be much more difficult to construct a frame on a poor-quality foundation.
When the foundation is ready, you will need to prepare all the components that will be useful for further assembly of the frame. The bars need to be cut in accordance with the size of the future building. To protect the material from possible destruction, it is treated with antiseptic substances and coated with drying oil.

Frame
Having cut all the required parts, you can move on to the next step - constructing the frame base. You will need to secure the corners of the fasteners using dowel nails. Instead, it is permissible to use anchor bolts, which will also do their main task perfectly. Next, you need to attach a dimensional block to them, which will play the role of the lower trim, which is load-bearing element one-piece design.
In the process of preparing the frame, special construction angles are used, with the help of which the parts are easily attached to each other.

Then you will need to install window and door designs. Their installation will not take much time, but you will need to apply cladding. For example, it could be film, glass or polycarbonate sheets. Having arranged the top trim, you should attach the rafters for the roof.
Experts advise making the slope at a certain angle (for example, 45 degrees). Too much steep slope should not be present on the roof, because moisture and snow will accumulate on it.

Sheathing
The final stage of work will be the installation of greenhouse cladding. As stated earlier, for this you can use different materials, but lately people are most often turning to polycarbonate. He's pretty durable material and is not afraid of mechanical influences from the outside. In addition, polycarbonate sheets are easy and quick to install. It is quite possible to carry out such work without assistants.
Polycarbonate is cut into plates suitable sizes(these parameters are usually indicated in the project diagram and drawing). As a rule, sheets of this material are attached using a special sealing gasket. This detail will not allow the material to be damaged. These processes take very little time. The main thing is to prepare everything in advance for installation work.

Finishing work
Properly made greenhouses made of timber can decorate the existing area. Often such structures attract a lot of attention, as they have an aesthetic and neat design.
Many owners cover these structures with various paint coatings that have a variety of shades - choice ideal option depends on the preferences of the owners and the environment landscape design. Experts recommend using a water-dispersion emulsion. This coating will last a long time and will look attractive.
A variety of facade paints used in the decoration of wooden greenhouses are very popular today. Such coatings should be applied only if the temperature outside the window is not lower than +3 degrees. Under such conditions, the paint will dry completely in about 2 days, and then crystallize over the course of 3 days.


Of course, not all gardeners turn to painting a wooden greenhouse. According to many users, this process is absolutely unnecessary - this will not make the building more functional, and its decorative properties are not important to everyone.
At self-production For greenhouses made of timber, it is permissible to use cladding not only of polycarbonate, but also of glass. It could be simple glass. Some users use film instead of this material, but it will not last long - it will only last for one season.

All connection points wooden parts must be treated with antiseptic agents. Make sure that chemicals do not get into the ground, because such work must be carried out right at the site where the structure is assembled. It is advisable to use a bedding made of a special protective film.

In progress self-construction greenhouses made of timber, it is necessary to make notes on all beams and slats of the future structure. Thanks to such marks, you can quickly disassemble the greenhouse for a period winter storage. It can also be easily collected in the spring.
Before preparing the foundation for a future timber structure, you should carefully prepare the allocated area. It is necessary to remove absolutely all garbage, remove all weeds. Often the small topsoil layer is completely removed, and installation of the foundation begins only after this.

If you decide to decorate a wooden greenhouse with a special film, you need to start installing it from the top point. For this purpose, the required number of sheets is attached to the ridge strip in accordance with the width of the greenhouse itself. They are secured with thin slats and small nails.
Before you start building a greenhouse made of wood, you need to draw up detailed plan and a drawing indicating all dimensions and other parameters of the future building. Based on the developed diagrams, it will be much easier to make a house for planting with your own hands.

The bars must not only be well processed and clean, but also smooth. Not recommended for use in construction work parts with uneven and curved surfaces.
Many summer residents and villagers purchase ready-made greenhouses produced by factories and cooperatives. Their wide variety allows you to choose the design of the desired parameters. But if a greenhouse is made from timber with your own hands, then the owners feel proud of the work, and the greenhouse comes out with exactly the configuration that is needed in a particular case. This building is much cheaper than the purchased one.
- it is easily accessible, that is, it can be purchased everywhere, and its cost is low;
- no need to look high quality material;
- the wood must be properly dried and free from defects;
- no special skills are needed to assemble the frame;
- the material is non-toxic and environmentally friendly;
- The design is durable and its service life is at least 5 years.
- to protect the frame from rotting it is necessary to treat it with a special compound;
- if it is necessary to move the structure or dismantle it, this will not be easy to do;
- the tree is negatively affected by the environment (bad weather, microorganisms, moisture, insects, etc.);
- Compared to metal ones, such structures are easily flammable.
- illumination is one of the main conditions for increasing productivity;
- the terrain of the site - it is better to build the building on a hill;
- protection from gusts of wind - installation is carried out near the fence;
- distance to the water source (if there is no centralized watering system);
- soil composition.
- 1. For the base of the greenhouse, the soil is drilled and posts are prepared, into which the pins are then inserted. The depth of the wells should be 0.6 m. The columns are filled with concrete.
- 2. On the completed foundation, a frame of 10 x 10 cm beams is assembled (it is better to use larch for these purposes). Holes are drilled in the harness, placed on the studs protruding from the columns and tightened with a nut and washer.
- 3. A frame is erected and sheathed with polycarbonate.
- 4. Make a gable roof and cover it with the same material.
- 1. Install the frame. The distance between the posts should be 72 cm. Soak everything with the Senezh-Bio mixture.
- 2. In the upper part of the building, vents are installed (operate according to the drawing). For example, in the greenhouse in the drawing there are 4 windows with an area of 16 m². They are equipped with an automatic system to open them.
- 3. Fix polycarbonate so that there are no gaps.
- 4. Turn on the water supply. To do this, place a large capacity container and make pipe routing for drip irrigation beds.
- 5. Install doors and windows.
- 1. Drive the strapping bars into the ground, checking the correct installation using a level. They are secured using self-tapping screws. Docking is done in half a tree.
- 2. Joints are reinforced metal plates. Along the perimeter, the lower trim is sewn up with galvanized steel and buried in the ground.
- 3. Polycarbonate is secured with self-tapping screws and washers. Rubber products are used for the roof. In other cases, self-tapping screws with press washers are used.
- 4. The end of the polycarbonate is closed plastic corner. The sheets are laid overlapping, treating them along the edges with sealant.
- 5. The lower trim is treated with an antiseptic in two layers. After drying it is painted.
- 1. Dig a ditch 60 cm deep, pour ASG into it, and compact it. Three concrete blocks are laid on each side.
- 2. Two beams are treated with an antiseptic, and after it dries, their upper and lower sides are coated with bitumen.
- 3. Install the frame and treat it with an antiseptic.
- 4. 1 m long braces are fixed in the corners of the greenhouse.
- 5. The rafter is made and all measurements are taken from it.
- 6. Cut out the racks and install them in the right places.
- 7. After the roof is erected, its ends are painted.
- 8. The entire structure is covered with polycarbonate with a thickness of 4 to 8 mm.
- 9. Blocks are installed outside along the perimeter, and EPS is used inside the structure. This will keep the greenhouse warm.
Show all
Positive and negative characteristics
Before starting the construction of a greenhouse, everything is carefully thought out. Measure the area and choose the location of the structure. They draw a sketch and make drawings that indicate the exact dimensions of the building. This is necessary to calculate the amount of material.
A greenhouse can be made from PVC pipes, polycarbonate, window frames, boards, beams, etc. But most often wooden beams are chosen for these works.
For a greenhouse with a frame, this material has a number of advantages:
It is worth noting that wood, in addition to its positive characteristics, also has some disadvantages. Among the “disadvantages” of greenhouses made from timber are:
How to choose the right place?
In addition to the shape, material and dimensions, one of the important points in building a greenhouse is its location. After all, ease of use, ripening of vegetables, fruits and other plantings largely depend on this.
There are some factors to consider when choosing a greenhouse location:
Most often, the greenhouse is located away from tall buildings or trees. Natural light should constantly fall on the greenhouse during the day. Since it is difficult to install a structure on a hilly surface, a flat area is chosen for the greenhouse or a hilly one is leveled. If a greenhouse made of wood is unstable, then with a slight wind it can become deformed or collapse.
Installing such a structure is not always possible. If the area is swampy, then you cannot build a greenhouse on it, because moisture accumulates in the lowlands. If the soil on the site is sandy, then it is necessary to build a foundation for the construction. It is best to place the greenhouse on a flat hill.
It shouldn’t be cool inside the greenhouse, and to prevent the cold from penetrating inside, install a fence around it or plant low bush. Heat loss is reduced by some reinforcement of the roof. If the body is covered with glass or film, then an additional layer of the same material is used.

Configuration and dimensions
First, determine these parameters, as you should not overdo it. After all, each variety of vegetables requires absolutely different conditions. For example, tomatoes and cucumbers cannot be grown in the same building, since the latter require high humidity, but tomatoes cannot tolerate it. Therefore, two are often built for them different designs, which will be more useful than one big one.
The optimal size of such a structure is considered to be 3 x 6 meters. You can build a structure with other dimensions, for example, 6 x 20 or 5 x 4, it all depends on the size of the site itself and the requests of the owners. These dimensions are relevant if the greenhouse has a rectangular shape.
Many summer residents do not want to have a standard-shaped greenhouse. Therefore, the owners of the site have different configurations of their structures. If this is a geodome, then its dimensions are determined by measuring the diameter of the structure. To make it convenient to work in a greenhouse, its height should be 2.5 meters. A taller structure will not retain heat and is unstable. If they want to make a gable roof, then the height of the greenhouse should not be more than 2 meters.
Greenhouse in the shape of a geodome or semicircle
Typical configurations include semicircular and arched. They are practical and are not affected by gusts of wind. Snow does not accumulate on the roof, and the design is pleasing to the eye. This shape can be easily made from aluminum or plastic arches, but not from wooden beams.
Arched design

Roof types
Most often, buildings have a single or double slope roof. The first type of roof is used when the greenhouse is located near the house or adjacent to its wall. In other cases, the second type is used.
In areas with little snow, when the site is located far from the central water supply, structures with horizontal roofs are used. As such, a perforated film with holes through which rain penetrates is attached to the frame. This is how watering is done. But most often a flat roof is not used for greenhouses.
In a greenhouse with pitched roof It is convenient to grow plants near the walls of the structure, and make maximum use of the internal space. Various precipitation does not linger on the roof. Such designs can even be made in the form of a polyhedron.
Step-by-step construction instructions
For a standard greenhouse with a gable roof, first level the soil under the structure. Mark the base and lay bricks around the perimeter. If they want a stronger foundation, then it is filled with concrete mortar.
A box is assembled from timber and installed. Door panels, walls and roofs are assembled from the same material. The greenhouse is sheathed with polycarbonate, film or glass. All this work is done in calm weather. At the beginning of the winter season, the film is removed, as it cracks in the cold.
If they are building an arched greenhouse, then the foundation for it is made thoroughly. For year-round construction, the brick base is poured with concrete. The arch elements for the structure are made from fresh wood, as they are more flexible. The frame is erected and the covering is installed.
Before building any structure, they purchase high-quality material, the necessary tools and select the type of frame. The drawing and detailed diagram of a wooden greenhouse are so simple that anyone can draw them up. Therefore, construction is similar to Lego.
Drawing of a standard wooden greenhouse
Several construction options
To build a standard greenhouse measuring 6 x 4 meters, any type of foundation is suitable. The most commonly used base is a columnar type.
The construction process consists of the following steps:
Standard greenhouse
Greenhouse according to Mittlider
This design has dimensions of 6 x 8 m. Using this technology, this design has a gable roof, under the ridge of which there are vents.
Greenhouse drawing according to Mittlider
The materials used are boards 0.5 x 10 m (2 cubes), bars 30 x 50 and 50 x 70 cm. For the construction itself, a monolithic strip foundation is first poured, using 4 x 8 mm reinforcement. The width of the base ranges from 20 to 35 cm. The outside of the foundation is impregnated with Penetron so that it does not crumble. Subsequently it is covered with stone.
Greenhouse according to Mittlider. Appearance
Greenhouse made of wood under polycarbonate
For its frame, a beam measuring 45 x 45 mm is used. The structure is 8 m long and 2.7 m wide. 8 windows and 2 doors are installed in the structure. The distance between the posts is 1 m, and the truss rests on two of them.
Used for strapping metal corner dimensions 45 x 45 or 50 x 50 mm. To obtain the base, make a 12 cm incision with a grinder, bend it at an angle of 90° and obtain the base. It is on this that the harness is attached. Paint the corner with an anti-corrosion compound.
Construction under film
This design is not heavy. For it, piles are made from aluminum corners 5 x 5 cm, up to 90 cm long. They are coated with a primer and driven into the soil. Their alignment is carried out with a laser level and the assembly of the base begins.
To install the rafter structure, beams 3 x 3 cm are required. They are sheathed with 8 mm plywood, which is connected with glue and self-tapping screws.
The frame is painted, but before that the wood is treated with an antiseptic. Assemble frames for windows and doors. The entire structure is covered with film. Cables are pulled inside the structure to secure the plants. Install a watering system. If the area is quite cold, then a second layer of film is tensioned inside the structure, which is stapled to the frame.
Wooden frame for greenhouse
Portable structure
Any small wooden greenhouse is lightweight, so its location can be changed if necessary. This design has a foundation that can be easily disassembled. For example, beams measuring 5 x 5 cm are used as the base of such a greenhouse.
Such a foundation is not poured with concrete. To build such a greenhouse, the following steps are performed:
Small portable greenhouse
From such building material, like a tree, you can build a greenhouse not only in the form of a “house” or arch, but also a beautiful “pyramid” and dome. The owner of the plot makes the choice of design based on the size of his plot, the amount of materials and his own taste. The greenhouse will delight you for a long time good harvest not only the owner, but also his guests.
Building a greenhouse yourself is an exciting process. Firstly, you just want to admire your own creation, and secondly, the structure turns out exactly as you saw in your imagination. And most importantly, a homemade greenhouse is cheaper than a factory-produced one.
Construction and functionality of a wooden greenhouse
The greenhouse structure is frame and constructed from beams. The connection of the purlins is provided by the upper and lower racks. The upper part of the frame consists of rafter legs.
The structure is made up of many beams fixed at the same distance from each other
A door frame is inserted into one end side of the greenhouse. It, the walls and roof of the structure are covered with film, glass or polycarbonate.
Plastic film is often stretched over the wooden frame of the greenhouse.
Greenhouse as a structure with wooden frame, finished with some transparent but durable material, performs certain tasks:
- collects what comes from outside thermal radiation and holds it, creating the necessary conditions for rapid plant growth;
- protects vegetables from negative environmental influences: strong wind, snow, pests and animals that can break plant stems.
Drawings and diagrams of wooden buildings of various configurations
The greenhouse can be a lean-to greenhouse, attached to a building, or free-standing on the site.
Design with pitched roof assembled from longitudinal, vertical and transverse wooden elements
Another option for a greenhouse is to build with gable roof, inclined more than 30 degrees.
The height of the structure excluding the roof is 1.5 meters
No less popular arched design for growing plants. The difference between this building is the vaulted ceiling, which makes the greenhouse beautiful and very warm.
To create a greenhouse frame, you can use bars with a cross section of 30×40 mm in combination with arcs
The weight of the wooden structure is significant, so it requires installation on a solid foundation. But some people do without it, using boards or pins as anchors.
The ends of the racks of the structure can be wrapped in polyethylene, immersed in the ground and covered with crushed stone, which will ensure their reliable fixation without the use of a foundation
However, the foundation is important for any structure large sizes. A greenhouse that is placed on a slope requires a particularly reliable foundation. The structure for growing plants is usually fixed on a strip brick or columnar foundation.
A columnar foundation will provide reliable fastening of the structure, although, unlike a strip foundation, it is constructed from a small amount of materials
But most often, in order to spend a minimum of finances and at the same time secure the greenhouse well in its place, they use a base made of thick beams.
Crushed stone must be poured under the base of the beams and a waterproofing sheet must be placed
When drawing up a drawing, you need to understand that the functionality of the greenhouse depends on its dimensions. Optimal sizes buildings are 3 meters wide and 6 meters long.
The greenhouse should be such that there is enough space for both plants and people
The height of the structure is always determined by the height of the person. To make it convenient for the gardener to care for plants, there must be at least 2.5 meters of free space from the surface of the ground to the highest point of the roof. For a gable building, the height of the walls is usually 2 meters.
There is no point in making the greenhouse too high. It will sway from side to side and will not be able to warm up to the desired temperature.
Subtleties of choosing material for greenhouse construction
In order to build a good, reliable greenhouse, you need to choose high-quality material. It must be durable, lightweight and resistant to external influences.
Material for wooden frame
The reliable wooden frame of the greenhouse is the key to its long service life. Therefore, it is better to build the frame from larch - a type of wood that does not rot for a long time and is characterized by high strength.
In addition to larch, beams made from spruce and pine are suitable for building a greenhouse, but they are less durable. This means that lumber from non-deciduous trees should be thicker.
The beams for the construction of the greenhouse are selected carefully, eliminating defects
The frame of the greenhouse should be created from boards or beams with the following characteristics:
- humidity no more than 20%;
- ideal appearance(without rot and traces of damage to wood by bark beetles);
- smooth surface (chips, cracks and knots are signs of defective material).
The dimensions of the beams from which the structure of the building will be assembled depend on the weight of the covering material. In most cases, the wooden frame of the greenhouse is covered with polyethylene film with a thickness of 100 to 200 microns, glass with a density of 5 to 10 mm, and four-millimeter polycarbonate.
Gardeners are more accustomed to covering the greenhouse frame with film rather than glass or polycarbonate.
Covering material
The choice of covering material for the greenhouse plays a very important role. After all, it lies on it main function greenhouses: maintain heat, which will ensure rapid growth of plants. There are three main covering materials.
- Film. The material is light and therefore does not put pressure on the wood. This means that you can safely use medium-sized construction raw materials, for example, 5x5 cm beams, as the posts and rafters of the structure. But the base of the greenhouse should be made of lumber with parameters of 5x10 cm, because it will have to experience significant loads.
A relatively thin beam can hold the film
- Glass. This covering material needs reliable support. It is more expedient to make the frame racks of a glass greenhouse from beams with a thickness of at least 7 cm and a width of 7 to 9 cm. And the rafter system is better to construct from lumber with parameters of 4.5 × 9 cm.
A thin beam will not withstand the pressure of glass, so to build the backbone of a glass greenhouse, use material at least 7 cm thick
- Polycarbonate. A greenhouse, which is decided to be covered with polycarbonate sheets, requires the construction of a skeleton from materials with different cross-sections. For the ridge of the roof and the base of the structure, beams measuring 5x10 cm are suitable. door frame and the racks are supposed to be made of wooden elements with a section of 5x5 cm, and the door leaf and window frames are made of timber with parameters of 5x4 cm. And the tasks of the stiffening ribs of a polycarbonate greenhouse are well fulfilled by boards measuring 40x180 mm.
In a polycarbonate greenhouse, it is customary to make only the base of the structure super-strong
Preparation for construction
We will build a classic greenhouse with a wooden frame made of beams. Glass was chosen as the covering material.
Necessary materials
To build a greenhouse you need to purchase the following materials:
- crushed stone;
- roofing felt;
Roofing felt - material for waterproofing structures
- 4 beams 9 cm thick, 9 cm wide and 4.2 m long;
- 4 beams 9 cm thick, 9 cm wide and 3 m long;
- 12 beams 9 cm thick, 9 cm wide and 3.6 m long;
- 38 beams 9 cm thick, 9 cm wide and 1.8 m long;
- 2 carriages (half beams) with a section of 4.5x9 cm and a length of 3 m;
- 4 carriages with a section of 4.5x9 cm and a length of 4.2 m;
- 24 carriages with a section of 4.5x9 cm and a length of 2.4 m;
- 28 carriages with a section of 4.5x9 cm and a length of 1.8 m;
- 34 carriages with a section of 4.5x9 cm and a length of 1.2 m;
- 102 carriages with a section of 4.5x9 cm and a length of 90 cm;
- 8 sheets of plywood measuring 12x1220x2440 mm;
- 34 m² of glass 10 mm thick (18 m² of material will go on the walls, and 16 m² on the roof);
- antiseptic composition for wood processing;
- steel cornice;
- 3 pairs of door hinges;
- door handles and locks;
- sealant;
- glazing beads
The function of the beads is to ensure reliable fastening of the glass to the sealant
Tools
Work on the construction of a greenhouse involves the use of tools and fasteners such as:

Phased construction of a wooden greenhouse
A greenhouse with a wooden frame trimmed with glass is built step by step:
- The perimeter of the building is marked on the site. To do this, use pegs and fishing line.
It is recommended to mark the perimeter of the greenhouse using pegs
- They dig a trench 1 meter deep and 50 cm wide. The bottom is covered with crushed stone, which is carefully pressed. Roofing felt is placed on compacted stones, and on it is a foundation made of 4 thick beams 4.2 and 3 meters long. Wooden base coated with an antiseptic.
The base of the greenhouse is laid on compacted crushed stone
- Wall posts are placed on the foundation, that is, beams with a cross section of 9x9 cm. For a while, these wooden elements are supported with boards. How level the racks are is checked with a level and a piece of cord.
First they install the racks, and then move on to installing the top trim
- At the top, the racks are fastened to each other with strapping, the beams of which are connected using the “half-tree” method. The purlins on the side of the structure are marked for the installation of rafters. At the marked points, inclined nests are hollowed out.
At one end of the beam a cut is made to half its thickness, on the other beam the same cut is made, but on the other side of the end
- The gables of the roof frame are assembled. The stands for them are constructed from thick boards. The wooden element that will become the ridge is placed under the rafter legs in pre-created grooves. The flatness of the finished slope is assessed using a cord. The rafter legs are treated with an antiseptic compound.
The pediments located at the edge of the structure are assembled first.
- Greenhouse frames are made from beams measuring 4.5x9 cm. It is important to connect the parts to each other at the same angle. Grooves are created in the manufactured frame. Boards are inserted into them - elements of the canvas.
- They make upper frames intended for installing glass. Only well-dried boards are used as panels.
- Starting from the ends of the frame, onto the nails for finishing Attach panels previously assembled from boards. Later, the same task is performed on the sides of the greenhouse. At the same time, do not forget that the width of the side panels is greater than that of the end panels. Sheathing slabs are placed between the racks and covered with an antiseptic.
The end panels are assembled first, and then the wide side panels.
- Simple door frames are inserted into two openings located at the ends of the structure. The door is completely glazed. The handle is attached to an additional wooden element.
- A small cross-section strip, called a glazing bead, is attached to the pediment parts. The element is covered with sealant, and already cut glass is placed in the formed grooves. They are secured from the outside using thin nails.
Glass is inserted using sealant and glazing beads
- The roof of the greenhouse is glazed in the same way as the walls. As a support, use a rail nailed to the sides of the rafters in a special way: indented from the top edge by the thickness glass blank and glazing bead. The glass is inserted using sealant and fixed with glazing beads and nails on a thin leg.
- Having glazed the roof, a wind board is nailed to the end parts of the rafter legs.
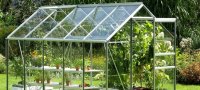
The greenhouse is only half glazed, which makes it original and durable
Video: do-it-yourself timber greenhouse
Features of greenhouse finishing
If you want to make the greenhouse beautiful, then it is recommended to treat its wooden elements on the outside with breathable facade paint. We are talking about a water-dispersed color emulsion.
Paint can be applied at temperatures above three degrees Celsius. Only in such conditions does the coloring composition dry within two days, and then for three days crystallizes.
However, many gardeners say that there is no particular need for paint. It will not improve the functionality of the greenhouse, but will only give the building an attractive appearance.
As a result of special processing, the wood is covered with a protective film
When you want to achieve both attractiveness and durability of the greenhouse frame, you should use wood impregnation. This product has a pleasant color, protects the wood from damage by bacteria and insures it against rotting.
It is recommended to treat wooden elements both outside and inside the greenhouse with impregnation. In order for the product to be useful, it must be applied to the surface in 2 or 3 layers, which depends on the financial capabilities of the owner of the building.
Photo gallery: greenhouses with wooden frames
 The Mitlider greenhouse stands out from the rest due to its unusual roof design
  Warm air in a tent structure it accumulates under the roof and is removed thanks to windows, which provides better ventilation for plants
  The arched greenhouse according to Mitlider provides inflow into the structure fresh air
  An arched greenhouse with a wooden frame is often covered with polycarbonate
  A wooden greenhouse can be built from old wooden window frames
  If possible, you can attach a greenhouse to one of the walls of a heated house - this will provide additional heat inside the structure
  One way to deal with negative impacts external environment on the greenhouse - painting the frame paint and varnish material, which will restrain the destruction of the structure
  It is difficult to build a round greenhouse made of wood due to the large number of parts and joining angles, but from the outside the greenhouse looks very impressive
There is absolutely nothing stopping the dacha owner from building a greenhouse of the desired configuration based on wood. This material can be combined with any covering materials. To make a greenhouse out of it, you just need to thoroughly study the instructions.