If you have a dacha, that means you have a vegetable garden, and the most important thing for a vegetable garden is fertilizer. Not everyone likes to use mineral complexes as a supplement. Many people prefer organic matter like humus and compost, which they can prepare themselves. In this case, composters for the garden will be excellent helpers for the gardener - special containers of different sizes in which it is convenient to prepare and store natural fertilizer.
It is a mistake to assume that these two terms have the same meaning. What they have in common is only the essence of obtaining fertilizer, namely the process of decay. The difference lies in the components used, which will lay the basis for feeding and its vitamin and mineral composition.
Humus
This is decomposed manure - cow, horse, rabbit and any other, depending on the household living on the site. The entire process of debate or decomposition takes from 2 to 5 years. The finished humus should have a pleasant, fresh aroma, like soil in a forest. To improve the quality of the fertilizer, manure is mixed with soil, sawdust, straw, adding water if necessary to prevent drying out.
The presence of a heavy ammonia smell indicates that the humus ripening process is not yet complete.
From time immemorial, almost all crops in Rus' were fertilized with manure. It is excellent for sandy loams, retaining moisture in them. Clay soils it makes it more loose and aerated. Ready-made humus is the same humus that is a fertile component of any soil.
Compost
Not all summer residents have the opportunity to fertilize their plots with humus. In this case, compost will come to the rescue; you can make it yourself using a pit or a special container - a composter.

To prepare it, they take vegetation and everything that can rot. Grass, sawdust, wood chips, small twigs, leftover tops, peelings, tea bags, ash and whatever is on hand are great. Some gardeners add a little manure or chicken manure– this significantly improves the quality of the finished fertilizer.
It is not recommended to put fungal and disease-affected vegetation, dog, cat and human feces, fish, bones, meat and dairy products into the compost heap. Violation of the rules for preparing compost can lead to a deterioration in its quality and the development of harmful microorganisms.
Compost matures completely in about two years. But the market today offers various composting accelerators, as a result of which the entire process can take no more than one season. The finished fertilizer, along with humus, improves the structure and properties of the soil, thereby increasing productivity.
What conditions are necessary for composting?
The simplicity of preparing compost only seems at first glance. In reality, proper composting conditions are necessary for the fermentation process to proceed correctly. The main factors that naturally influence the course of this process are:
What is a composter and what is it for?
To prepare compost, a hole is traditionally dug. However, its use is not very convenient, especially when you own only 4-6 acres. The small area of the site, the smell emanating from the pit, and the inconvenience of mixing the compost heap force one to look for an alternative.

A composter is a container of a given volume, the special device of which provides for the creation favorable conditions for making compost.

Each design must have:
- a lid where the material for composting is placed;
- holes for air intake;
- holes at the bottom to remove accumulated liquid.
Additional features may vary by model.
You can make a composter yourself using scrap materials - this is a good saving cash. The advantage of purchased models is durability and beautiful appearance, allowing you to place boxes anywhere.
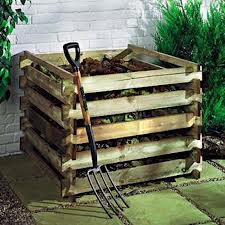
Composters are made from different materials, for example, made of wood. In such products, the contents are well saturated with oxygen; as a result, the fertilizer is crumbly, but sometimes a little dry. Metal containers retain moisture excellently, so the finished compost is moist and denser. There are also composters made from resistant plastic. low temperatures and ultraviolet.

What are the advantages of using a composter?
A composter is for a summer resident what a food processor is for a housewife. This is a convenient thing that will help save time, effort and money. Composters, especially closed ones, have many advantages, the most significant of which are:

Modern composters have excellent performance and aesthetic characteristics, so they can be installed without harming the design of the site. In addition, manufacturers began to produce landscape devices in the form of a small mound, decorative stone or other natural elements. Such models will not only perform their functions, but will also decorate the place.
Types of composters
According to the type of their functioning, composting devices are divided into:
- Open composters, which are used during the warm season. This is the most economical option. It is easy to assemble and convenient to use in large areas where there is a lot of organic material.
The disadvantage of this type of design is the distribution unpleasant odor and the possibility of overgrown vegetation. In addition, the fermentation period increases.
- Closed composters more convenient to use. They are small, their volume ranges from 200 to 1000 liters. These composters can be left outside all year round, and if necessary it is easy to hide in the garden. Moreover, chemical reactions inside proceed faster, which means the fertilizer will be ready earlier.
The only disadvantage of closed composters is the price. It is significantly higher than that of open type composters.
Models
Among the variety of industrial composters, the following three models are distinguished, which differ in their design features:


How to choose a composter?
Choosing a composter starts with its capacity. For small areas (up to 6 acres) or for the disposal of food waste, a design with a volume of 200-300 liters is suitable. For a larger area, a larger capacity will be required - up to 1000  l. Sometimes summer residents purchase two or three composters at once and put organic matter into them one by one, thereby providing themselves with a continuous supply of organic fertilizer.
When choosing a composting device, we focus on its structural details. For example, it is important to pay attention to the presence of a bottom mesh that protects the contents of the container from rodents. If it is not included in the kit, you should worry about purchasing additional items in a timely manner. Yes, and it won’t hurt to immediately decide whether it will be a summer composter or whether all-season placement of organic matter is planned.
Before purchasing a box, you need to pay attention to the entrance and exit hatches. They should be wide enough to make it convenient to lay armfuls of grass and rake out fertilizer shovel. Having a large loading hatch will make it easier to stir the pile to increase oxygen access. An alternative to the unloading hatch can be a pull-out tray with ready-made fertilizer from the lower layers.
Hatch fastenings are a fly in the ointment for many models. During operation, it is discovered that the doors dangle and tend to fly off due to the wind. Therefore, before purchasing, you need to check how they rotate and how tightly they fit when closed.
The mobility of the composter is important, especially if it is stored for winter or regularly moved. If you plan to compost throughout the winter, a thermal composter with a thermostat, thermal insulation and peat included will be indispensable. For lovers of California worms, a vermicoposter is suitable.
The best manufacturers
Kekilla Global (Finland)
Perhaps the first place can be assigned to the Finnish manufacturer Kekilla. Their composters have excellent resistance to severe frosts, and are therefore considered universal. The most popular Globe model does not have any heavy or small parts. The design is rounded, easy to use, safe for children.
Due to the high composting speed, the device has a volume of 310 liters. the amount of finished fertilizer per season is comparable to 600 liters. In addition, the volume can be artificially increased by adding a pair of 160-liter rings, which are purchased separately.

The compost is reliably isolated from environment, and after ripening it is easily removed with a shovel. To do this, simply remove the lid and body, opening access to the contents. Finnish flag key on composter - sign highest quality products made from our own raw materials.
An analogue of the Finnish composter is the Russian Meridian, which has been on the market for 5 years. It has the same characteristics as its Finnish “brother”, but on the outside it has a pattern in the form of parallels and meridians. It has a favorable price.
Graf Thermo King(Germany)
Another thermocomposter model that has proven itself in practice. Its body is made of UV-resistant plastic, the foam structure of which perfectly maintains the optimal temperature inside the box. There is support for selecting summer and winter operating modes.

The lid consists of two wings and is securely fixed. Doesn't open even in strong winds. Loading of material, accordingly, is carried out from both sides, just like extracting the finished compost. The design of the device is beautiful, ergonomic, and easily fits into the landscape.
Volnusha (Russia)
 This is a cone-shaped container, the body of which has a wavy shape (hence the name). Made from frost- and heat-resistant propylene of increased rigidity, which, due to its shape, perfectly distributes the compost mass. At the same time, it does not oxidize and does not enter into a chemical reaction with other substances.
The volume of Volnushi is 1000 liters, ideal for six acres. It has no bottom, so excess moisture will go into the ground. However, it is required additional purchase bottom mesh to protect against rodents.
The case has ventilation holes and four holes for compost extraction. Easily disassembled and transported in the trunk of a car. The disadvantage is that the lid opens in strong winds.
Operating rules
- Do not overload the container - the finished fertilizer should be loose and slightly damp. The material should be immersed in it no higher than the maximum mark.
- It is recommended to install the composter on the ground or grass, but not on wood or concrete base. This is necessary to ensure access for worms inside the structure and to remove excess moisture.
- The best place to install a composter is a shaded and wind-protected area away from open fire.
- The bottom of the composter must be protected metal mesh from the penetration of mice.
- When cold weather sets in, the device must be switched to winter mode or wrapped in film to maintain the internal temperature.
- Regularly 1-2 times a month you need to stir the compost heap to improve chemical reactions. In this case, it is better not to touch the lower, ripened layer.
DIY composter
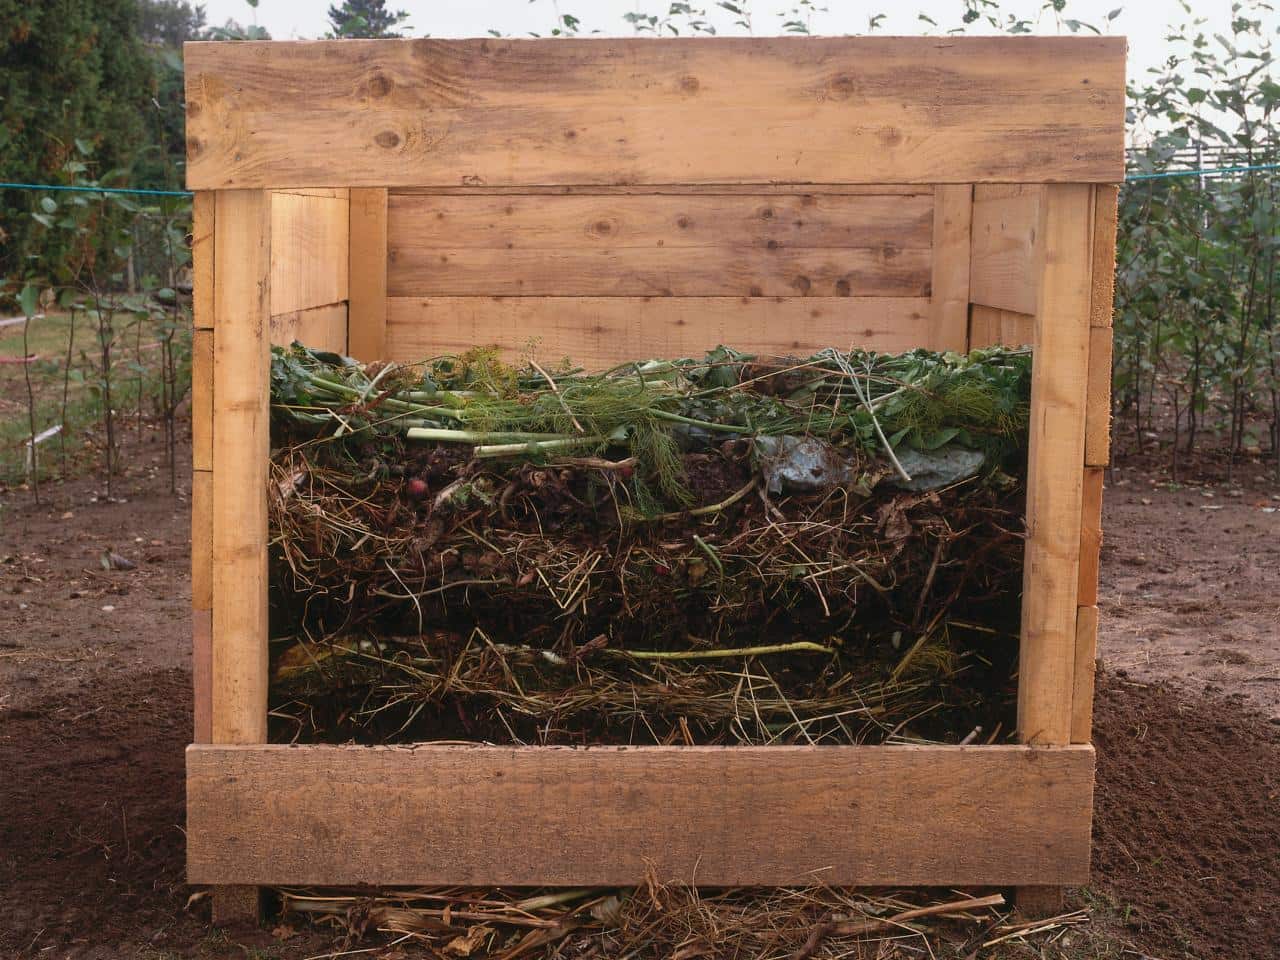
The composter can be made from scrap materials - boards, old furniture, construction remains. Most often, wooden containers are made, since working with wood makes it easy to comply with all necessary conditions. Furniture is not good in this regard; it usually only lasts for one season.
For convenience, you can prepare a drawing of the box. It will be easier to navigate during the work process, as well as calculate the amount of material needed. The optimal size of the composter is 1 m 3, that is, 1 m × 1 m × 1 m.
To work, you will need a 5-centimeter beam and boards 2.5 cm thick. All material will need to be treated in advance with an anti-rotting agent, which will prevent the body from participating in fermentation.
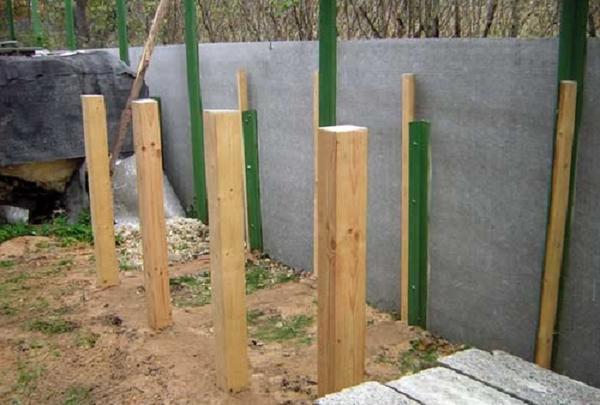
First, posts are made from timber, which are dug into the ground and, if desired, fixed with cement mortar.
Next they collect side walls, then the back and front. A 1-2 cm gap is left between the boards for oxygen access. A small gap is also necessary from the surface of the earth. For convenience, the front wall can be shortened a little, then the hinged door will lie at a slight angle. The side door will make it much easier to remove the finished compost.
Two- and three-section composters are made using the same principle. While the debate process is going on in one section, plant material is being laid in another. You can make the side walls of the device not from boards, but from fine-mesh stainless mesh, enclosed in wooden frames. The frames are attached to lumber posts, creating a perfectly aerated container.

There are many options for making composters. Here you can truly show your imagination and skills. It is only important to follow the basic operating principles of the device, which are responsible for the quality of the finished fertilizer.
Video instructions for building a composter
To ripen and store organic fertilizer, special containers are used - composters. A compost container can be purchased ready-made from plastic with a sealed lid. Such structures are more suitable for anaerobic fermentation.
But for the aerobic method, it is better to make a compost bin with your own hands. It is more convenient to mix the components so that they do not turn sour, and you can regulate the access of oxygen. Based on the amount of organic matter, compost containers are made suitable size- two or three chamber.
The options for making a compost bin with your own hands are varied both in material and shape. There is always something to use on the farm - boards, slate, plastic panels, metal barrels, brick or concrete.
Types of compost bins
There are two fundamentally different ways compost preparation – aerobic and anaerobic. In the first case, it is necessary to ensure a constant flow of air to the waste so that bacteria can function and multiply. Aerobes need oxygen to live.
The second option is to arrange cesspool, seal it and allow anaerobic microorganisms to process organic matter. Such bacteria do not need oxygen; on the contrary, they die in its presence. This method preserves more nutrients and eliminates odor, which is also important if you have neighbors nearby who do not have a compost bin.

In turn, compost bins for aerobic processing differ in design. The most convenient option is in the form of a prism. By attaching a handle to the side, you can easily turn the contents over and control air access. The composter is in a suspended state; it is possible to close it completely and turn it over several times.
The most common option is to make a compost bin with your own hands and install it on a level area. In this design, you will have to turn over the waste manually - with a pitchfork or shovel. The compost container can be made to any size. You can divide it into several sections to lay organic matter one by one.

While in one the fertilizer is ripening, in the second it is already on its way, in the third it is ready. It is advisable to make such a garden composter with your own hands if there are animals and birds on the farm, as well as a large plot that requires constant updating.
How to make a composter with your own hands
There are options for making compost bins with your own hands with drawings. But this does not play a special role. You only need to remember three sizes:
- width – no more than 1.5 m;
- depth – 1 m;
- Any length.
With this ratio of values, the process goes faster and the fertilizer is of higher quality. The fact is that air penetrates heavier into the depth of the mixture if it is large. If you make a wide and deep pile, you will have to think about an electric mixer with a hydraulic drive in order to turn it on periodically and mix the mass.
Slate
Slate is well suited for fencing a pile. This is a dense material. Unfortunately, it can be damaged by impact, but it is also easy to replace. How to make your own compost bin from slate:
- It is necessary to mark straight lines according to the size of the composter and stretch the rope as a guide.
- Dig holes in the corners with a drill and dig in logs - these will be corner support pillars.
- Nail slats or boards between them so that the slate can be secured.
- Using a drill and screws, attach the slate to the boards, placing it under the nails soft material– leather or dermantine.
- It is advisable to fill the bottom with concrete.

The front part of the collar is made lower to make it convenient to work with a fork. Another option is a door if you want to tinker with awnings.
Tree
Wood is the most popular option for making compost bins. Both simple boards and thick branches cut from a tree are used. The disadvantage of wood is its susceptibility to rotting processes that occur inside the composter. After a few years, a new collar may be needed. Wood cannot be treated with chemicals, as microorganisms may die.
Pallets purchased at the nearest store or supermarket are popular. These are even structures, so they can only be connected to each other with long nails.
Video: Solid DIY compost bin
How to make your own compost bin from pallets:
- Calculate the required number of blanks. For example - one for the end sides, two for the length, two for the roof. Only 8 pieces. If the planned length is longer, then more spare parts will be needed.
- Make markings on the ground, choosing in advance a place for the composter from pallets.
- Use a hammer and long nails to connect the pallets. It is better to make a roof with awnings so that the storage can be closed when it rains.
Some people prefer to make containers with an open bottom, explaining that earthworms should penetrate the pile. With this method, a maximum of 10 individuals will be taken into the container. This is not enough.
To get results quickly, it is better to purchase red Californian worms, whose reproduction rate is 500 times higher than domestic eukaryotes. This is a specially created type for industrial production fertilizers They process organic matter quickly and in 2 weeks you can get a completely finished fertilizer.
If you use only bacteria, then during decomposition the liquid will flow down and be absorbed into the ground, and with it nutrients that could be preserved. To do this, the floor in the composter is concreted, and a layer of peat, straw or soil is placed on the bottom.
Plastic
Plastic waste has also been successfully used to contain the maturing waste mixture. Disadvantages of plastic:
- in the cold it is more fragile;
- emits in hot weather harmful substances, if it is not intended for food products.
Pros - easy to install and quite durable at average temperatures. It’s better to use regular panels rather than panels plastic barrel liters per 300 - 400. Holes are drilled in the walls and bottom to allow air to penetrate. This design can be moved to another place; lids are sold with the barrels, which will protect the compost from rain.

Alternatively, use a plastic mesh attached to wooden frame: both oxygen enters and components do not fall out through the cracks.
If you have an old plastic or acrylic bathtub on your household, you can also use it to make a compost box with your own hands. You will have to cover it with a thick film or tarpaulin laid on boards.
Composting Bin Requirements
The requirements are primarily for aeration if aerobic bacteria are used. The width between the boards should be at least 2 - 3 cm.
It is not recommended to install a composter with an open bottom near a drinking well. It is carried at least 15 m away. You cannot set up a waste storage facility near your home - when manure and waste decompose, harmful and dangerous substances are released - methane, carbon dioxide, hydrogen sulfide.
DIY garden composter diagram should be universal:
- storage of ready-made substrates is provided;
- unloading fertilizer from below, because it ripens faster in the lower part;
- possibility of transfer to another place.
If you don’t skimp on materials, the collar will last for many years.
Tools for work
In order to reliably and correctly make a compost bin with your own hands, you may need the following tools:
- drill or screwdriver;
- nails or dowels;
- hammer;
- tape measure for measurements;
- a mixer if you plan to fill the bottom with concrete and a container for diluting the concrete mixture.
Any site owner has such a set, but if you buy a special container, you won’t need tools - plastic models are simply installed on the ground without any preparatory steps.
Video: Basic rules for good compost
Building a box for manure and humus with your own hands
You can not only compost vegetable waste, but also cattle manure and bird droppings. These are nitrogen-containing substances and the primary task is to preserve them. You need to know how to properly make a box for manure or humus.
For information: in rotted manure the nutrient content is reduced by 50%. That is, such manure is no longer used as fertilizer. It is only suitable for adding to the soil to restore the soil and feed bacteria
Manure is stored in two ways - cold and hot. In the first case, bedding manure is folded tightly into a pile and compacted so that less air gets inside.
Such a pile will not burn and the beneficial nutritional components will last longer. The box for the cold composting method is made airtight - the boards are nailed close to each other. The lid is also made airtight. After laying the manure, you will need to cover it with grass, soil or straw.
The hot method of storing manure requires oxygen, so the boards are placed wider. After ripening and overheating, excess liquid evaporates, the substance loses its original volume and weight.
To save leftovers nutrients, humus is covered from rain and other precipitation. It is not recommended to bring manure to its extreme state, because then you will have to add mineral fertilizers to provide nutrition to the plants.

Everyone knows the truth - plants develop best and bear fruit on fertile soil. But where can you get it if plants are planted on the site from year to year that absorb useful substances from the ground. To nourish the soil, many chemicals. But don’t forget that this is chemistry, and everything you put into the soil will end up in the crop. But there is an alternative - make your own compost.
What is compost and how to make it yourself
“What is compost and how to make it?” - this is a question that novice summer residents often ask. Compost is an organic fertilizer obtained by decomposing various raw materials of plant or animal origin.
You can make your own compost at summer cottage.There are two options for making natural fertilizers for the garden.
- Compost heap. This is the most common option for producing compost; it is also cheap and simple. You will need to make the frame in such a way that air and moisture can get inside. The best material wire mesh will be used for manufacturing. Preparation of compost from the beginning of laying to full maturation takes from six months to 9 months.
Compost pile at home
- In a special box for receiving organic fertilizers. You can buy it in the Sad-Ogorod store departments. This device is protected from insects getting inside. Inside the box there is a drum that turns the substance. In addition, in the middle of the container there is a hose for moistening the waste.
Methods for making compost?
Experienced gardeners recommend preparing organic matter with your own hands. The options that provide the most effective results are a compost heap or compost bin. In these cases, waste decomposition and rotting occur best, because inside the layers the temperature and humidity are practically unchanged. The ripening time of organic matter directly depends on the volume of filling: the most filled pits and the largest ones become ready for use more quickly.
The most acceptable are compost heaps with the following parameters:
- width – 1.5 m;
- length – 2 m;
- depth - about a meter.
You can double the size and make two compartments: one for storing finished compost, the second for laying new one.
It is also possible to place a compost heap directly on the ground. It will also be well ventilated in natural conditions. Excessive moisture should be avoided. When putting waste into a pile, don’t get carried away; the optimal sizes for it are:
- base perimeter – 1x1 m;
- in height – 1 m 20 cm.

Compost bin
Necessary components for a normal composting process:
- oxygen;
- water;
- nitrogen.
In the presence of these factors, beneficial bacteria begin to act and participate in the decomposition process, and thus compost is prepared.
How to start preparing compost?
Before you start composting, you need to prepare a shallow hole (the depth is approximately equal to the bayonet of a shovel). The lowest layer in the pit should be small twigs, cut from fruit bushes or trees. This layer acts as drainage, allowing excess liquid to flow down.
If you already have ready-made compost, then a small part of it should be placed on the branches. This will speed up the decomposition process; beneficial bacteria from the finished humus will enter new layers. For all subsequent layers, food plant waste or grass, leaves from the site are used. They are evenly distributed on the surface, trying to compact them, and watered with water. Sprinkle earth on top.
To prevent the pile from falling apart and being blown away by the wind, it is worth surrounding it with a fence made of boards or wire mesh with large cells. The top is covered with a special covering material (spunbond); in extreme cases, straw is used. So you have a finished composter with your own hands.

Making compost for the garden
What components does compost consist of?
Compost is natural nutrient, which helps restore the structure of the soil and increase its fertility. But first you need to know how to properly prepare compost. T It is necessary to create certain conditions for composting to proceed normally:
- Creating an optimal moist environment inside the compost heap. It should approach readings from 45 to 70%. But if it is not possible to measure humidity readings, then this is done “by eye” - the normal moisture of a substance resembles a wrung out sponge. The temperature indicator is also important - within 28–35 degrees. Waste that is too dry will not decompose, and waste that is too wet will begin to rot. For hot and dry conditions weather conditions compost needs watering. If it rains constantly, then you should definitely turn over the contents of the pit. Overheating of the substrate more than 60 degrees is unacceptable, because with this temperature conditions All beneficial bacteria die.
- A prerequisite is oxygen access to all layers of the compost heap. To do this, it needs to be shoveled constantly (about 2 times a month), with the lower layers lifted up, and the side layers moved to the center.
- Availability in compost pit bacteria, earthworms will have a positive effect on the process of composting biomaterials. They participate in the decomposition of waste.
Observing all the conditions, you can prepare compost at your dacha with your own hands quickly and easily.
What ingredients can you use to make compost?
We have learned how to make compost, now we need to figure out what ingredients are suitable for this. Symbolically, all components can be classified into two varieties:
Components with increased level nitrogen, otherwise they are called green mass. These include:
- cultivated herbs;
- massive parts of vegetable and fruit plants;

Making compost from greens
- food waste of plant origin;
- bird droppings, pet manure.
A do-it-yourself compost bin is necessary for everyone who cultivates the soil or grows vegetables or fruits.
You can make such a box with your own hands in a day using one of the well-known technologies and solve the problem of storing waste, at the same time turning it into nutrient medium for plants.
But before a pile of trash becomes compost, there's one step that needs to be taken: keeping it in a compost bin.
Where to start?
Construction begins with a drawing. Some summer residents will be quite satisfied with a simple one.
But others don’t want to spoil the landscape with an indecent pile of garbage in a secluded corner and put just a container: a garbage container, metal barrel- just to get the result. The design options are truly numerous.

But even with such a simple task as making your own compost bin, you can use your taste and create something that deserves its place in your backyard.
Any compost bin requires the following:
- compost needs air to mature;
- there must be a lid so that the rain does not wash away all the most useful things into the ground;
- must be quick access to the lower layers of compost;
- must have a reliable bottom that will not rot (for example, a slate bottom);
- Wood should be used whenever possible;
- The compost matures quite quickly, so the box should be wide.

A compost container can be made from various materials:
- boxes of vegetables and fruits;
- plastic/metal barrels;
- plank boxes;
- wooden pallets.
Before you set up a place for compost, you need to understand the characteristics of the compost that you want to prepare.
Let's not take into account organic matter and other ingredients now, but let's pay attention to 4 factors that ultimately make up the correct, working compost: bacteria, moisture, air and time.
In order to combine all this in a box, the design in any situation and any material must have holes for ventilation (you can equip both the bottom and the walls or lid of the box with holes)!
If we consider options made from lumber or pallets, then first of all, the bottom of the container and the walls need to be properly dried in the sun and then seasoned with an antiseptic and hydrophobic impregnation so that the box lasts as long as possible.
To build a reliable box with your own hands, you need to take into account that its contents can be completely different.
So it is necessary to install a lid - both to protect the contents and to provide a more aesthetically pleasing appearance in the surroundings of the dacha.
In spring and summer, at the peak of compost preparation, it will also protect the contents from high temperatures and maintain optimal humidity inside.
The construction of the box is only required to maintain optimal conditions“ripening” the fertilizer without your constant participation.
We have already dealt with the requirements of the composting technology itself, but in terms of manufacturing the design of the box itself, there are some nuances.
The whole thing is simple, but it’s better to make a box with your own hands once and for a long time.
Let's look at the design using an unedged board as an example:
- Each box must have four support posts and form simple design- box.
- The supports are dug into the ground and serve only as support for the entire structure;
- Bury the support so that the final height of the box is about 1.2 m (up to the height of the abdomen);
- The device should have dimensions of 1x1 m (exactly a cubic meter). There is simply no point in doing less;
- During construction, gaps are allowed (when filling boards with a gap);
- If you are building a dense structure “for centuries”, then at the end you will need to drill a lot of holes;
- The bottom of the box should be made of non-rotting material (for example, slate);
- At the bottom you need to build a door for quick unloading of the finished compost;
- Do not bury the container into the ground or allow the compost to come into contact with the soil;
- The bottom is a must! Otherwise, all the work goes in vain;
- Place the box out of direct sunlight.
The most suitable design is the usual one wooden box, tightly knocked together, with many holes, which has a door at the bottom.
It is advisable to make the door the width of the box, so that you can rake off the bottom layer at once and then add a new one on top. Important quality compost – its homogeneity and density.
When you open the door, it won’t fall out like things from a crowded closet.

Until we move on to consider practical example DIY making, a small technological find!
Remember drawer cabinets, tables. The same principle can be used: when the compost has matured, you press on such a box and it pushes a whole layer at a time into the side hole.
This kind of “feint,” if I may say so, can be performed in two versions:
- The press will always be outside. Consists of a longitudinal board/sheet of metal with convenient fastening; guides are not needed. But the downside of the design is that the handle will stick out from the outside;
- You put the drawer inside, but there will also be a pull-out sheet of plywood above it, with holes in it. The bottom layer has ripened - we pushed in the top partition - pulled out the bottom drawer - pushed the partition in - added a layer on top - opened the partition and waited for the next bottom layer to ripen.
Step-by-step manufacturing instructions
Now is the time to take a practical look at the entire production process. We will consider not a device of Finnish, but conventional, Russian technology.
We will make a box and a volumetric cylinder from garden netting for the dacha.
Box, instructions
The drawing requires 4 bars 10 by 10 cm and 1 meter long. These will be the supporting corners of the box. We prepare 16 boards 5 by 15 cm, 1 meter long.
The boards will become the walls of the box (if the dimensions are larger, you will find out the quantity during the assembly process).
If you use 12 boards of the specified size, you will leave gaps of the same width for ventilation.
If possible, purchase one uniform piece of wood with an area of 1 square meter, or make it yourself by knocking down several thick boards and strengthening them across with two or three boards.
We nail one 5x15 cm board to two 10x10 cm boards: place the two boards parallel and nail the 5x15 cm board with its ends to the parallel boards, so that the edges of the board are flush with the edges of the parallel boards.

At the end of knocking all the 5x15 cm boards onto two load-bearing, parallel 10x10 cm beams, we will get two beams with 4 perpendicular boards. Thus we received ¼ of our future box. The structure will consist of four pallets.
Do the second wall in the same sequence, similar to the first one.
Place the two walls vertically, parallel to each other, and connect the two walls to form the back wall using 4 more 5x15 cm boards.
Following the same pattern, nail the remaining 4 5x15 cm boards. Remember to offset the nails so that they do not collide in the wood. The bottom of the box is made of plywood/slate.

Place the lid we made in the second step above. The box is ready!
Collect 3 of these boxes and you will have enough compost for a whole season of work.
DIY mesh cylinder, instructions
Take a mesh 1 meter wide, and select the length based on the fact that when it is bent into a pipe, the optimal volume should be formed. The longer, the larger the volume of the final cylinder.
Prepare 4 bars 1.3 meters long, in a profile of 10 by 10 cm. They will become supports. 30 centimeters of length will be dug into the ground for stability.

Attach one edge of the mesh to the block, leaving 30 cm free. You can fasten it with a construction stapler or nails, bending the cap into the board.
Place the bars under the mesh and at the final bend - they should be outside the structure, but not inside!
Roll out the mesh until it is a perfect circle and the ends of the mesh touch each other.
Connect the junction of the ends of the mesh with a stapler or nails to a block. The bars must be parallel after fastening.

Place the resulting cylinder on the ground and attach the remaining 2 bars also in parallel.
The finished structure must be placed on a wooden stand, but not on the ground! Otherwise, the finished compost will begin to fertilize the soil directly under the structure itself.
Compost laying, maturing
Now that our box/cylinder is ready, we can start preparing the fertilizer:
- Lay down about 20 cm of a layer of brown material (hay, branches, shredded cardboard, leaves, sawdust, bark) for ventilation and drainage;
- Now add alternating brown material with green - tops, grass clippings, lawn clippings, kitchen waste, weeds;
- You can add cow dung, a little garden soil and a handful of earthworms;
- Do not compact the contents - they must breathe. Over time, the pile will compact under its own weight and you will add another layer;
- Water and shovel the compost regularly. Avoid stagnant water and ammonia odor. The latter indicates that there is too much green material and you need to add brown.
After 2-3 months, the compost will have an earthy smell and will be ready for use.
But not all ingredients are good for compost!
The problem of waste recycling is increasingly relevant in modern world. According to statistics, the bulk of them are organic. Despite the scale of the problem, everyone is able to contribute to its solution and, at the same time, receive real benefits. Any dacha owner can turn waste into excellent fertilizer and minimum cost funds. An excellent option would be to make a composter yourself using Finnish technology. Let's look at all the intricacies of this matter in more detail.
A garden composter is a design that cannot be made special effort, but it is imperative to follow the manufacturing technology and adhere to the scheme. There are several very important points For proper organization processes, including the mandatory access of oxygen to organic matter, maintaining humidity at about 55% and the presence of organic substances containing nitrogen, because it is critically necessary for bacteria that process waste. The content of the material itself stored in the container can be very diverse and include food waste, leaves, grass, manure and others.
The box itself should have a volume of 1-3 m with the same height, width and length. Essentially, a capacity is a cube. The entire structure must be removed at least 12 meters from buildings and 8 meters from water sources. It is also very important that it is located in a place where it cannot be flooded during rain.
Required materials
The most the best solution in this matter there will be a tree. Of course, slate is sometimes used, but it cannot provide suitable quality and reliability, so we will focus on the first option. Among possible options diagrams of a garden composter for a summer house, a three-section box is perfect. The list of everything you need to get started can be presented as follows: 
- Sturdy board for the base. It should be dense enough to support the mass of compost.
- Wooden boards with dimensions 10 * 3 * 100 cm in the amount of 45 pieces (it is better to take 50 pieces as a reserve in case of damage) and 10 * 3 * 300 cm - 25 units. This is enough to do everything without worrying about running out of material.
- There are 8 pieces of timber, having the following characteristics: width - 5 cm, thickness - 5 cm, length - 100 cm.
- An antiseptic product intended for wood. In this case, you should make a choice based on parameters such as quality and environmental friendliness, which are critical for the dacha.
- To properly fasten the structure, you will need 12 overhead-type window hinges and screws.
- Oil paint. A garden composter, like any other object, should fit beautifully into the exterior.
Video “How to make compost with your own hands”
In this view you can see how to make compost with your own hands and what it looks like when finished.
Features of Finnish technology
In this case, the process of “ripening” differs from that in a regular pit. There are several important points that must be taken into account. Firstly, filling the compartments must begin from the first. During the extraction of compost mass, it is filled from the neighboring one, accordingly, the cycle becomes continuous. Secondly, all material in the first compartment should be stirred regularly for uniform “ripening”.

For those who are going to use weeds as one of the ingredients (and they, unfortunately, are not uncommon in the country), let us clarify that it is better to place them in the middle, because high temperature during decomposition, it will not allow their seeds to remain capable of germinating.
Finally, don't forget to give good watering in hot and dry weather to maintain the required level humidity. If all the necessary conditions are met, you can count not only on a place for proper disposal of organic waste, but also on receiving fertilizer that will significantly increase the yield in your garden plot.
How to arrange a three-section box
Now that we've got everything covered necessary materials and got acquainted with the features of Finnish technology, let's figure out what needs to be done to assemble the structure itself. It is required to carry out the following steps step by step:
- Process wooden boards antiseptic, following the instructions in the instructions.
- Next, we begin assembling the side walls. For all four we use screws as fastenings.
- The walls made in the previous step need to be sheathed with boards, two of them closely, and the rest with a gap of 10 mm.
- Secure those boards that are prepared for the back side. In this case, you need to leave a 10mm gap.
- The next step is to make the bottom. During the fastening process, you will also need to leave a gap of up to 10 mm.
- Afterwards, we sheathe it in front of the board and leave 20 cm below where the doors will be placed.
- We install the roof. This must be done taking into account the fact that on one side there will be several hatches for introducing organic waste.
- At the finish, we attach the lower doors and hatches, which completes the process of assembling the garden composter.
