Summer and autumn delight gardeners with abundant harvests. Unfortunately, it is impossible to store the crop at home for a long time. To process it, you need a juicer. You can buy it, or you can make it yourself from your used washing machine. To do this, you need to have the skills of plumbing and welding.
The principle of operation of the juicer
The way the juicer works is very simple: it breaks the integrity of apples, grapes, apricots, etc., dividing them into a liquid fraction - juice and dehydrated fiber - cake. The main components of the juicer are as follows:
- A bunker into which fruits or berries are loaded
- A crusher that destroys the peel and structure of the fruit. Rotating knives or a drum grater are used.
- Juice extractor. It can be a press or centrifugal force that occurs in a rotating drum.
- The filter separating the liquid fraction and cake.
- Stand for bottles or containers for collecting juice
The simplest juicer is construction mixer clamped in the chuck of a high-speed drill.
Materials and tools
More difficult to manufacture, but also giving better products, the design of a do-it-yourself juicer is built on the basis of a front-loading washer that has served its purpose.
At the first stage, you need to remove the nodes that are no longer useful:
- pump;
- water heating system;
- control system;
- pipelines and valves for water supply and drain;
- back wall and bottom.
General view of the device
From the materials you will need:
- Two springs for cushioning the drum. They are designed to balance the increased horizontal centrifugal force, since the device will be operated with the hatch up.
- two stripes metal mesh 300*60 mm.
- Juice storage container.
- Drain pipe.
- Plugs.
- Fasteners.
Of the tools needed:
- high-speed screwdriver or drill;
- Angle Grinder;
- welding machine;
- set of hand tools.
You will also need a workbench with a vise.
Washing machine juicer
For dismantling, the machine must be placed on the back wall and secured. On the frame should remain:
- loading hatch;
- sealing cuff;
- drum;
- electric motor and drive.
- remove the belt rotating the drum from the pulleys;

Removing the pulley
- remove shock-absorbing springs and other parts that interfere with the removal of the tank;
- remove the sealing collar;

Removing the cuff
- remove the drum and tank;
Removing the drum and tank
- clean them from dirt, rinse with vinegar.
Also remove from the tank. heating elements, sensors and other equipment and plug the remaining openings with rubber plugs.
Now comes the stage of finalizing parts and assemblies:
- Assemble the tank and fix it in place.
- Install sealing collar.
- Weld holes in the drum.
- Remove the ribs inside the drum. Fasteners do not need to be removed.
- Drill 100-200 holes in it with a diameter of 1 - 1.5 mm.
- Inside the drum, fasten the mesh strips between the rib attachment points with self-tapping screws.
- Attach shock absorber springs.
- Connect the electric motor to the network through the switch. Engine power should be at least 1-1.5 kilowatts.
- Finally fix the device on a horizontal base with the hatch up.
A test run should be carried out without downloading. The drum during rotation should not touch the walls of the tank. If everything is in order, you need to substitute a container for juice to the drain pipe.
The fruits placed in the drum will break into a pulp, hitting the nets, rib attachments and each other. Centrifugal force will squeeze the juice through the holes into the tank, from where it will drain into the storage tank.
How to make a loading hopper and a pusher
For dosed loading of fruits, you will need to make a bunker. It can be made from a piece of plastic pipe with a diameter of 100 mm. It is fixed obliquely so that the fruits roll onto the edge of the grater. The hopper is attached to the body of the device with aluminum or steel corners bolted

Pipe for the manufacture of the bunker
The pusher can be made from a birch cutting for a shovel. A circle of plywood with a diameter of 5 mm less than the diameter of the pipe is attached to the lower edge. A transverse limiter is installed on the top.
Grain grinder from a washing machine
Grain crusher industrial production is not cheap. If the home master has the skills of plumbing, electrical and welding work, and in the pantry there is a failed washing machine of an activator type - it is quite possible to convert it into a grain crusher, or, as they say, a grain mill.

Grain grinder from a washing machine
Required materials, tools and construction
For the manufacture of a grain crusher you will need
- washing machine Oka - 1 pc.;
- knives for crushing grain -3 pcs.;
- lattice with a cell of 2-3 mm;
- tin and rubber for gaskets;
- sleeve;
- flange.
- line segment plastic pipe diameter 100-150 mm
Of the tools and equipment you will need:
- drill or high-speed screwdriver;
- a set of manual metalwork tools;
- angle grinder, or grinder.
The changes made to the design of the machine come down to replacing the activator with flat knives with curved ends. The grain is poured into the hopper (2), which is the tank of the washing machine. Rotating, the knives (4) crush the grain and throw it onto the calibration grate (7). Grain particles smaller than the grid cell pass through it and fall into the funnel (8) and further into the storage tank. Particles that have not passed through the grate are returned to the knives by the flow of grain and crushed again.

Grain crusher device
During preparation, you will need to remove the plastic cover of the activator. The knives are made of a steel strip 3-4 mm thick, their ends must be bent in opposite directions so that they do not touch the walls of the tank. The hole for mounting on the shaft must be drilled exactly in the middle of the strip, otherwise it will be poorly balanced and cause vibrations during rotation. The flange on one side of the side is put on the pulley, on the other side it has a threaded stud for attaching knives. A rubber gasket and a square tin patch should also be prepared to prevent grain from entering the drive.
Device Assembly

Grain Crusher - Top View
Assembly begins with mounting the chopper blades on the flange. Next, the sleeve, passing through the gaskets, is attached to the pulley. The patch should be attached to the tank body in such a way that the knives do not touch it during rotation.
The next stage is the device of a funnel for collecting and removing crushed grain. The drain located at the very bottom of the tank will not be converted. The sequence of operations is as follows:
- With a chisel or grinder, bring the drain hole to a diameter of 120-150 mm.
- Insert a piece of pipe into the hole and secure it.
- Move the pipe to the side and direct it into a storage container.
The next step is to install the grate-separator. For this you need:
- Mark the installation line on the bottom of the tank so that it is 1-2 cm away from the blade rotation zone.
- Cut the grid from the mesh so that it is placed perpendicular to the bottom of the tank and fits snugly to both the bottom and the side walls.
- Fix the grate with self-tapping screws to the surface of the tank. For reliability, you can use clamping strips from thin strips cut from a sheet of metal.
- Slots should be smeared with a composition of the type " cold welding or silicone sealant.
Before a test run, the device must be securely fastened to prevent it from tipping over or falling. A trial run is carried out without grain. During this process, you need to make sure that
- knives do not touch the bottom of the tank and the sealing gasket;
- the knives are well fixed on the sleeve, and the sleeve is on the flange;
- there is no runout of knives due to imbalance.
If a runout is detected, balancing is carried out by balancing the knife along the line of the hole. Small holes are drilled in the lowered part until the parts are balanced.
After a successful test run, make sure that there is a storage capacity. Then you can pour about 5-7 liters of grain into the tank, close the tank with a lid and turn on the machine at maximum speed. To reduce dust, a blanket can be thrown over the lid.
The new life of the washing machine as a grain grinder has begun. Bon appetit to your pets.
Other ways to make juicers
If skills home master they don’t allow you to make a juicer from a washing machine, or you just don’t have such a machine at hand, you can process the crop in another way.
For grinding fruits, a construction mixer is suitable, which mixes mortars or paint. Several holes are drilled in its lower part, bolts protruding by 10-15 mm are screwed into them. The fruits are crushed in a bucket, then the mass is placed in a woven bag and placed in a press.

Grinding apples with a mixer
For the manufacture of the press, a large non-enamelled pan is suitable. Drill holes in the bottom of the pan at the same frequency as in the colander.
Pot juicer
The bag is placed in a modified pan and placed under oppression. Apple or pear juice flows out through the holes, the pulp remains in the bag. Instead of oppression, you can use a hydraulic jack.

Using a juicer
This method provides a lower productivity and depth of processing of raw materials than the manufacture of a full-fledged home-made juicer used for processing apples.
Every fresh fruit juice lover wants to have their own juicer, but not everyone has the opportunity to buy one. A juicer is a very useful and necessary device. During its use, after processing useful fruits, we get a large amount beneficial vitamins and micronutrients.
But you can not even buy it, but make it at home. Moreover, it will turn out much more juice in a home juicer than if you made it on a purchased machine. It is enough to show your imagination, find unnecessary things, sometimes they can come in handy and do it yourself with your own hands.
A juicer made by you will be much stronger and last much longer. Many did not even think that a juicer is actually very easy to make from improvised means.
And your juice will turn out even better and will cost much less than store-bought.
Preparatory work
The hardest thing is to make a mixer. Many people face this problem. It's simple: buy a mixer and put on conventional drill. Next, you need a large iron bucket.
On the sides you need to make a lot of holes so that the juice can flow out. Under it you need to put a basin, which will gradually fill with juice. After you have crushed certain fruits with a mixer, you will need very heavy material. It could be a huge round wooden block 6-7 centimeters, a bag with some object, preferably something large and hard.
After all, this item will have to crush the crushed fruit very hard. After that, fruit juice will pour out of the holes you made in the bucket. It can be drained into a large jar or into a mug and enjoy the fresh product.
Making a juicer with your own hands
An example of a do-it-yourself juicer is shown in this video. Recommended for viewing!
There is another way, but it takes longer. The base of this design is cut out of a thick wooden block. We make a small hole in it, maybe a couple of holes. Juice will flow out of them.
Next, attach to wooden base two little stands, it is possible from any improvised material, even wooden, even metal. After that, we place a crossbar with a large nut between the racks, and a movable screw will be attached to it.
It is necessary to attach it so that it does not cling to anything, otherwise the whole process will stall. If the movable screw is larger and thicker, it will work better.
Also, the length of the screw should be large, not small. If you certainly want a lot of servings of juice and you can say that the main part of the juicer is ready. It remains to take a large pot, a large basin, where the juice from fresh berries will flow.

An example of a do-it-yourself juicer
We place fruits in a wooden block and turn the movable screw by the handle. He will rest against the bar, thereby crushing the berries. Through the cut holes in the bar, the juice will flow out. True, the second method is better to use for small berries.
You can put raspberries, strawberries, strawberries there, although if you finely chop the apples and remove the seeds, then this method is also suitable. If you decide to make juice from cherries, then it is better to get the seeds in advance, they can interfere with the cooking process a little. Or slip out of the bar and fall into the container along with the squeezed juice.
For the manufacture of apple juice, you can use the first option, of course, many apples will not fit there. But if you have time and an old automatic machine, then you can still come up with interesting option. And in such a juicer, a whole bucket of apples is converted into fresh juice in 10 minutes.
You will need a drum washing machine, drum mount and casing. Get in modern times such things are quite simple, since the models are updated quickly. It is necessary to wash everything very well and clean it of scale and powder.
Throw out all other unnecessary parts from the casing, temperature sensor, etc.
We examine the holes in the drum and carefully seal them. Anything, but a thin rubber band is better. Leave only one hole, as juice will drain from there.
We clamp a thin elastic band with stainless steel plates on bolts. It is better to take nuts and bolts made of stainless steel. Next, for a large hole, you need to find a suitable tube diameter. It will be needed in order to load apples into the drum.

Another example of an apple juicer
The tube is attached to the drum from four sides. The bolts must be fastened from the inside of the casing. Further chopping of apples will depend on this. Then we make a grater. The grater is made on a stainless steel machine. Cut out a circle 3 mm thick and 230 mm long.
Then again we cut out the second circle from stainless steel, only 0.6 mm thick, and the diameter is still the same. The second circle will be the spacer for the grater. It is placed at the bottom of the drum and fastened with screws. Thus, it does not allow the grater to bend.
The grater itself is attached to it and secured with five screws. Next, drill holes around the entire diameter. All over the circle we make ten millimeter markings around the entire circle, there we will have to stuff sharp teeth.
The grater should be in the center of the drum. Therefore, we mark everything accurately. In this video, you will be shown how you can make the most common press for getting juice from fruits and berries.
It remains now to make a pusher for apples. We cut out a small circle with a diameter of 80 mm, you can take plywood. And a thick stick from under the shovel. Install a small limiter so that the pusher does not fall into the grater.
And finally, the engine, preferably with a power of 1.1 kW, it will succumb to only 1500 revolutions. The final touch, to the hole at the bottom of the drum, which we left, we extend a small hose. Juice will run down it.
You also need to take a pan so that the juice is collected there. Before throwing apples, they must be washed, the rotten ones taken away, the bones removed, and then 3-4 apples are thrown into the resulting juicer.
Of course, this option is quite heavy, but more convenient. In just half an hour, you can recycle several buckets. But then there will be a large supply of apple juice.
When creating this juicer, observe safety precautions. Do not plug the device into the outlet until it is completed to the end. Also make sure that you have assembled all the parts correctly and that the mains voltage is appropriate for your application.
. Features of this type, the principle of operation, as well as other useful information, you can find on our website.
How to make a simple do-it-yourself car antenna is described in detail in this. We advise you to read and listen to the advice!
If you do not know how to repair a Termex water heater, you will find all the information you need.
You can process not only fruits, but sometimes vegetables as well. But not all fruits will do. Before immersing the fruits in the juicer you made, they need to be sorted out.
If they are dirty, then they should be washed, if rotten, then it is better to throw them away. Even if they have not completely deteriorated yet, but there are already small dents and stains, it is better not to put such a fruit anyway. Otherwise, you will get not juice, but porridge, and not very pleasant in taste.
It is also strongly not recommended to load fruits with seeds. They will interfere with the squeezing process and worsen the taste properties, giving bitterness. Your juicer, unlike the purchased one, will certainly not break, but it will not be very pleasant to drink juice with bones.
If you want the juicer you made with your own hands to serve for a long time, then you should fulfill these requirements. To extend the life of a homemade unit, care should be taken seriously.
Each part must be thoroughly washed, especially if you have an automatic juicer from the machine drum. After washing all the parts, let them dry well.
And put it away for storage in a place convenient for you, until the next use.
Your self-made juicer will last much longer than a store-bought one.
Do-it-yourself apple juicer: instructions and video
The quality of store juices often causes justified criticism. In society, it has long been believed that the safest drink from vegetables or fruits is squeezed out "with your own hands."
A necessary device for this simple procedure is a juicer. There is no shortage of inexpensive urban juicers.
Most often these are small Appliances who will not always be able to process a bountiful harvest from the site.
More powerful machines are expensive and inaccessible. The way out in such a situation can be a do-it-yourself juicer for apples or other fruits.
Operating principle
To figure out how to make a juicer and start implementing own project you need to understand how it works. Juicing involves chopping fruits or vegetables and actually pressing them.
Depending on the design of the device, the processes can be performed sequentially or simultaneously. In centrifugal models, grinding with a centrifuge first follows, then the press comes into play. Screw machines extract juice during processing.
Structural elements
Regardless of the choice of screw or centrifugal design to assemble a homemade juicer you will need:
- crushing and pressing device;
- bunker for laying;
- container for collecting pomace.
Further constructive complexity depends on technical capabilities.
Screw versions with simultaneous grinding and squeezing are more expensive and will require more time to manufacture.
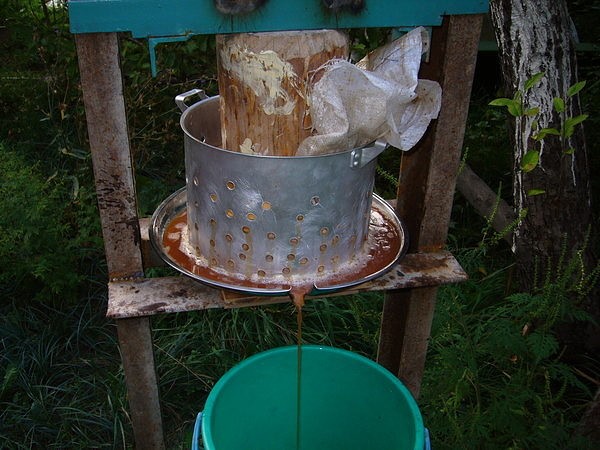
Hand press
The easiest way to get a device for squeezing juice is to use grandfather's experience. In ancient times, an ordinary wooden trough and a cut (a special knife for chopping hard fruits and vegetables) were used to grind pre-peeled apples.
The pulp prepared in this way, packed in canvas (gauze), was reloaded into a wooden tub under the press. To drain the juice into a specially prepared container, a hole was made in the lower part of the tub. Any heavy object could be used as a press, for example, a couple of boulders.
Press
When possible, a screw press was used, consisting of:
- support frame made of wood or metal;
- screw with handle for tightening;
- round support board with a diameter according to the internal dimensions of the container.
The possibility of using a welded machine will allow you to assemble a press from metal. Alternatively, you can use:
- two pipes;
- a U-shaped profile is welded on top;
- a hole is made in the profile and a threaded head is welded to install the screw;
- on the bottom of the screw should be provided with a stop for wringing;
- top rotation handle;
- from below, a pair of clamps are welded to the pipes for mounting on a support board;
- instead of clamps, a supporting structure made of a metal profile can be used.
This option will not be too time consuming and necessary funds. The performance of the device depends on the volume of the tub.
Centrifugal juicer from washing machine elements
A popular automated option is centrifugal-type juicers from a washing machine. For their manufacture, the following are extracted from the donor device:
- drum (centrifuge);
- casing (tank), checked for defects;
- fasteners;
- ball bearings.
All dismantled parts must be cleaned of powder residues, rust, scale. All openings in the tank must be welded or closed with rubber stoppers. Of all the holes, only one should remain for draining the spin. A useful element of the tank will be a filter mesh, which is mounted above the drain outlet.
Making a grater
The standard centrifuge cannot be used as a grater and needs to be modified. Standard holes that are used to drain water during the wringer will not cope with grinding. You can solve the problem in several ways. Among them:
- make a steel lining from stainless steel, drill holes and fill teeth, fix it inside the centrifuge;
- install a grid on the walls of the centrifuge, which will serve as a chopper;
- ream the regular holes of the drum and fill the notches with the sharp part inward with the direction against its movement.
Installation in an enclosure
The drum with a grater is mounted in the tank. For this purpose, fasteners and ball bearings from the washing unit are used. Mounting is carried out depending on the characteristics of the donor machine.
The assembled structure is placed in a vertical case, which is closed with a removable lid with latches or a wing-type fastening.
From above, a hopper is inserted into the opening of the lid, where vegetables or fruits are placed for chopping.
Engine
The drive of the device is borrowed from the same washing machine. It can be located outside or inside the case. Its speed must be coordinated with the required speed of rotation of the centrifuge by a system of pulleys of the appropriate diameter.
screw device
A more time-consuming option, in terms of manufacturing, is a screw juicer. In this case, most of the parts of the unit are performed independently:
- stainless steel body;
- a screw press placed inside the housing;
- bunker;
- a tray for receiving juice from which it flows into a container;
- engine at 1.5 thousand revolutions.
The assembled structure is mounted on a stand made of a metal frame with an engine fixed in it. The belt drive transfers the rotation from the motor to the auger pulley.
The options listed are not detailed description making a homemade juicer. These are general ideas on the basis of which you can develop your project based on the available opportunities.
A homemade juicer with high performance will be useful for gardeners and gardeners who have to solve the problem of processing a large amount of fruits or vegetables during the season. For domestic needs, a factory-made household juicer is quite enough, which will provide its owners with several servings of freshly squeezed juice.
Source: http://TehnoPomosh.com/dlya-kuhni/sokovyzhimalki/dlya-yablok-svoimi-rukami.html
How to make a juicer with your own hands
A do-it-yourself high-performance juicer is useful for gardeners who have to process large volumes of fruits and berries during harvest. AT living conditions factory devices are used to ensure the need for small portions of freshly squeezed drink.
Device types
Before you make a juicer with your own hands according to your own drawing, you need to study the principle of operation of the device. Depending on the design possibilities, the squeezing processes can be carried out in a certain sequence of work stages or simultaneously.
Centrifugal juicers process fruits to a pulp state. They work according to a scheme in which, after grinding with a centrifuge, pressing is carried out using a press. A screw juicer allows you to extract juice from fruits during processing.
Selection necessary elements designs are carried out depending on the type of device for squeezing juice. To simplify the processing process, the fruit is crushed, for example, using a manual beet cutter. Complex designs involve the use of a mechanical drive for grinding.
Screw devices by design and appearance are close relatives of the home meat grinder. With their help, you can simultaneously grind and squeeze the juice, they require more time to manufacture.
Mechanical press for apples
To prepare homemade fruit drinks, household appliances are often used that can handle a small volume. For recycling bountiful harvest the way out of the situation is a homemade juicer for apples and other fruits.
A simple old-fashioned method for extracting juice from fruits involves the stage of grinding and squeezing liquid from the formed mass. The apples, peeled from the core and spoiled parts, were poured into a wooden trough. With the help of a special knife for chopping, the fruits were processed into a homogeneous mass.
The prepared slurry was packed in gauze and placed under pressure in a wooden tub. In order to collect apple juice in a container, a hole was provided in the design to drain the liquid in the lower part of the device. The role of the press could be performed by heavy objects (stones).
The screw version of the press was equipped with:
- the frame on which the device is mounted;
- screw with a fixed or removable handle;
- a support board, round in shape, corresponding to the diameter of the inside of the container.
How to create a screw press for apples of high productivity can be seen in the video. Do-it-yourself apple juicer is assembled from prepared parts.
To create a structure, you need to prepare 2 pipes, on which a metal profile is fixed from above by welding. A hole is made in the upper part of the profile, into which a threaded head is inserted.
At the bottom of the screw, the design provides an emphasis for wringing. A rotation handle is fixed at the top, and clamps or a support structure for fastening are permanently welded from below. The technical capabilities of the press depend on the volume of the tub, in which the crushed raw materials are placed for pressing.
During operation, such a device is labor-intensive due to the performance of a significant part of the manual work.
hydraulic device
You can reduce labor costs for making juice using a jack design. For its manufacture you will need:
- rolled metal (corner, channel);
- perforated basket;
- board;
- screws for fastening;
- short log.
The component parts of the frame are measured and welded into the structure. Holes are drilled in the pan.
Chopped apples are placed in a container. A wooden circle, cut from a board, is installed on top, equal to the diameter of the perforated basket. A piece of wood is placed on top. The hydraulic juicer is driven by a jack.
Automated construction
The juicer from the washing machine is considered a popular option for squeezing juice. For the manufacture of the device, the following parts are used:
- centrifuge;
- ball bearings;
- attachment points.
All composite structures must be cleaned of powder residues and scale before use. All openings in the tank are closed with rubber stoppers, leaving only one for draining the juice. Above the drain outlet, it is useful to install a grid to filter the juice.
For grinding fruits, a regular centrifuge requires additional refinement. You can solve the problem with the help of a steel lining, in which holes are drilled and teeth are stuffed.
The stack installed on the walls of the centrifuge can grind raw materials. Training working surface drum provides for an increase in regular holes and the installation of notches with a sharp part inward with a direction opposite to the rotation of the drum.
The made grater is mounted in the tank using ball bearings and fasteners. The design is located in a vertical case, the lid of which is closed with latches. A bin for receiving fruit is placed in the upper part of the hole.
During operation of the device, the main thing is to ensure stability from vibration. It is recommended to fix the body on a rigid base, and provide a limiter for the hopper. The engine of the device is borrowed from the washing machine. It can be mounted inside and outside the structure.
A screw juicer is a more labor intensive option. Most of the parts are custom made. These include:
- frame;
- screw;
- tray for receiving juice;
- bunker;
- engine.
The design is assembled and mounted on a stand made of a metal frame with an installed engine. The rotation of the auger is provided by a belt drive from the motor to the pulley.
Grape processing
Before the advent of devices for making juice, it was used manual labor. Along with the technology of winemaking from ancient times came the tradition of crushing grapes with your feet.
At home, for small crops, a grape juicer is used. Special presses help to process a significant amount of fruit.
There are presses various designs. They can be equipped with an automatic or mechanical drive, set in motion with a screw or a jack. The operation of the devices consists in loading grapes into a container that looks like a barrel.
Under the action of a force that moves in a downward direction, the grapes are crushed. The resulting juice flows out through the holes.
A do-it-yourself grape crusher works on the same principle as a washing machine. Therefore, in the manufacture improvised designs parts of old machines are used for processing berries.
Source: https://prosoki.ru/sokovyzhimalki/sokovyzhimalka-svoimi-rukami.html
How to make an apple press with your own hands
Apple trees periodically give amateur gardeners such a large-scale harvest that the excess fruit has nowhere to go. In addition to jam and compotes, there is another option for processing fruits - juice.
But many do not associate with this type of blanks due to the high labor intensity of the process. Ordinary household juicers simply cannot cope with a large amount of raw materials, and not everyone is ready to buy a professional device for the season.
But there is a great option - to quickly and efficiently squeeze juice from apples on a do-it-yourself press.
To make a standard press yourself does not require special skills and drawings. Anyone can measure, saw off a rail, hammer a nail or screw a nut if desired. It is not necessary to own a welding machine, any design can be reproduced in a wooden version with common garden tools .
Homemade wooden apple press
To make a home press from tools, you will need a hacksaw for wood and metal (or a grinder), a welding machine, screwdrivers, pliers, a hammer. As for the materials, the following are mainly used:
- metal channel;
- wooden bars, slats, boards;
- self-tapping screws, bolts and nuts;
- tank or barrel, stainless steel sheet;
- bench screw and nut, valve, threaded rod or jack - depending on the chosen design;
- durable fabric with good drainage properties for bags for apples: coarse calico, cotton, jute burlap, linen.
It is better to make wooden elements from oak, birch or beech, since materials from biologically active tree species (spruce, pine) can change the taste of juice. Under no circumstances should drainage grates be made from chipboard: fine dust impregnated with phenol-formaldehyde glue will get into the product.
The main thing in the press is a solid foundation and a working mechanism.
The principle of operation of the device:
- layer by layer through the drainage gratings the prepared raw material is placed for pressing(chopped apples) in cloth bags;
- by means of a mechanism oppression descends from above and squeezes juice.
A good press squeezes out 65-70% of the juice, leaving an almost dry pulp. It is quite possible to make one with your own hands.
The designs of a homemade press differ according to the principle of operation of the main mechanism:
- Screw.
- Based on the jack: mechanical and hydraulic.
- Combined.
Screw (worm) pressScheme of a screw pressScheme of a mechanical pressHydraulic pressScheme of a hydraulic pressCombination press
In the bulk of structures, the pressure is from above, but in combined version compression goes in two directions: using a screw mechanism on top and a hydraulic jack on the bottom.
Juice press consists of the following parts:
- sustainable bed;
- square or cylindrical frame, inside which sacks of chopped apples are stacked;
- wooden lattices, with which the bags are shifted so that they do not spread;
- piston-gne t, directly exerting pressure on the cake;
- thrust bearing for a jack;
- working mechanism: screw with handle, mechanical or hydraulic jack;
- bowl-tray.
The main body can be:
- single perforated: juice through the holes will flow down the walls and through the bottom into the pan;
Screw press for apples with a single perforated body
- double: a solid casing with a slightly larger diameter is put on a perforated metal cylinder;
- in the form of a solid metal body with one drain hole at the bottom;
- assembled from wooden slats connected by hoops, − barrel. The walls at the same time perform the functions of a drainage grate.
Screw press for apples with a body made of wooden slats
Corps may not exist at all.- just a pyramid of wooden lattice frames in a tray with a mouth at the bottom, under which a container for juice is substituted.
Hydraulic Frame Press
This design is easy and quick to install. For the bottom plate, you can take a piece of countertop, for example.
The screw (worm) mechanism in the press is implemented in the form of a large screw (threaded axle) with a nut or a mechanical jack. Last option much easier - you can buy it in a spare parts store or get it out of the trunk of a car, you don’t need to look for anything, adjust, grind and weld.
Structures based on a hydraulic jack are much more productive(force from 1t) than mechanical ones, and require a minimum of labor costs on the part of a person. Bottle hydraulic jacks make it possible to squeeze juice quickly and in large volumes. They fit comfortably into any design.
Bottle hydraulic jack
You can design a press with a removable mechanism, then you don’t have to specially buy a jack, but you can use the attendant in the trunk. After all, the harvest of apples is not good every year.
The press needs a stable strong support - a bed. The simplest is to assemble it from wooden blocks with screws. For the manufacture of a metal bed, you will need a welding machine and a channel.
The dimensions of the frame depend on the diameter of the working body or the parameters of the drainage gratings. Therefore, if a hull structure is planned, then you need to prepare the container in advance.
The simplest frame press with a worm mechanism
Welded stable construction. A hole for the screw nut is cut in the center of the upper channel (you can use an old bench or order from turners). The nut is welded into the frame.
Frame press frame from channel
Then assembled wooden drainage grate, which is two layers of slats stuffed perpendicular to each other.
The thickness of the rails is not less than 20 mm. It is also necessary to install a stand from the bars.
A retainer for the pressing part of the screw is attached to the top board - any suitable in shape metal detail(can be put on epoxy glue).
Wooden drain grate for apple press
The tray is made from stainless steel sheet., in front of the spout-drain is bent. It remains to substitute a pan or other container. The result is a press.
Homemade screw frame press
The bed for a hydraulic press is assembled according to the same principle as for a screw press. As a case, it is easiest to take a ready-made metal or wooden barrel. A hole is cut out at the very bottom and equipped with a drain spout.
If the wooden barrel is not completely airtight - even good. The juice will merge in several directions at once, in the end it will still end up in the pan. It is better to put on a plastic casing with a larger diameter on top of such a design so that there is no splashing.
You can make a wooden case yourself:
- It will take: several planks of equal size (parquet can be used), two strips of stainless steel and self-tapping screws with an anti-corrosion coating.
- Boards from above and below are screwed with self-tapping screws to stripes at a distance of approximately 10 mm.
- Strips with boards are bent in the form of a circle, the ends of the strips are fastened with bolts.
- A plastic bowl of a suitable diameter can be used as a pallet with a drain for juice cut out at the bottom.
Press for apples with a body of wooden slatsStrips with boards of the body of the press are bent into a circle
Another important element is the jack stop.. It is usually made of wood: you need to knock down the slats and cut out a circle slightly smaller than the diameter of the working body from the resulting canvas. You can use a grinder to cut a support out of a stainless steel sheet.
Jack stop
Drainage pads are made in the same way as in the description for the screw press, but they are given a round shape.
As a result, the design should be something like in the photo.
Corpus Hydraulic Press for apples
The principle of pressing apple juice simple - the finer the raw material is chopped, the more product will be the output.
It is best to use a special chopper (crusher), since it is theoretically possible to finely chop several buckets of apples by hand, but in fact it is difficult to implement.
An electric meat grinder for large volumes is also not an option: it roars, howls, heats up, and as a result, it may burn out. A suitable crusher can also be made independently.
The simplest design of a homemade crusher
From moisture resistant plywood or sheet stainless steel, a deep bunker is mounted slightly on the cone. Two bars are attached to it for stability from below.
AT lower part a wooden roller (preferably made of beech) with self-tapping screws wound in a spiral cuts into the container. As a drum, you can use an ordinary kitchen rolling pin.
The axis of rotation of the roller goes out, a drill is inserted into it and the process begins.
Metal hopper Wooden roller at the bottom of the hopper
Some simply crush apples in a bucket with a construction mixer.
After the raw material is prepared, it laid out in cloth bags or wrapped in pieces of fabric according to the principle of an envelope.
When the push-up process is completed, the pulp is taken out, the next batch is loaded.
The remaining cake after quality pressure is usually delivered dry and pressed into "tablets" (photo 16).
Cake of apples after the press
The pomace is best disposed of in compost heap. Worms reproduce very well on such material, creating valuable fertilizer for the garden.
The resulting juice can not only be drunk fresh, but also prepared for the winter:
- pasteurized rolled juice;
- apple wine several types;
- apple cider.
Apples are a very valuable product for health. It is extremely imprudent and wasteful to bury and give the neighboring pigs the surplus of the crop. Having built a couple of simple devices, you can quickly and easily process all the fruits. And in winter it will be so nice to get healthy and tasty amber drinks from the cellar or refrigerator!
Source: http://profermu.com/sad/derevia/yabloki/press.html
How to make a juicer from a washing machine
A juicer from an end-of-life washing machine is not such a new idea.
Back in the late 80s, handicraftsmen published their drawings of productive juicers in popular technical magazines, which were made from Soviet machines "Riga", "Oka" or "Vyatka".
We decided to continue the good tradition and offer our ideas on the use of a modern washing machine, namely, the manufacture of a juicer from its parts with minimal alterations.
Why make a juicer?
The question is really good, why spend a lot of time reworking a used washing machine to turn it into a juicer, when you can buy a powerful machine in a store quite freely for relatively little money? The answer to this question lies in human nature.
Some make such things for fun, so that they stand in their garage or in the country and you can show off your ingenuity and "golden hands" to your friends.
And some make such things with their own hands simply because they like the process of working with hardware and electrics. So a homemade concrete mixer is born from a washing machine, emery and God knows what else.
Whatever your motivation, the goal is worthy, and we will try to help realize it.
What materials will be required and how to prepare them?
To make a do-it-yourself juicer from a front-loading machine, we need a used washing machine and a few more spare parts on top. Excess from the body of the washing machine, we remove immediately.
The pump, pressure switch, filling valve, drain filter, block and control panel are all extra parts, we don’t need them. It will also be possible to remove the bottom and back wall of the washing machine.
In addition to all this, we need two additional damping springs to compensate for the horizontal centrifugal force.
We also need to acquire two thin strips of metal mesh 30 cm long and 6 cm wide, a large number of 3 mm bolts and nuts, a juice container, a new drain pipe and plugs made of tin and rubber. From the tools we need:
- drill;
- Bulgarian;
- welding;
- screwdrivers;
- different wrenches;
- thin awl or drill;
- pliers;
- a hammer;
- metal scissors.
The idea is as follows, we put the washing machine “on its back”, substitute the bars in the corners and fix them so that the juicer does not come off them during operation.
We leave the hatch, cuff, drum, engine and drive mechanism in place, we remove the rest. The engine will have to be connected separately, since we also removed the control unit.
- Remove the drive belt from the pulley.
- We unscrew the shock absorbers and all other elements that prevent the removal of the tank.
- We remove the cuff of the hatch (for this you need to loosen the clamp).
- We take out the tank along with the drum.
- If the tank is collapsible, we spin it, if it is not collapsible, we cut it along the seam with a grinder.
- The drive mechanism can not be disassembled and the drum can not be pulled out, our task is to clean the bottom of the tank from debris and dirt, as well as clean outer walls drum from the same dirt. After mechanical cleaning, it is better to additionally treat the bottom and walls of the tank, as well as the drum with vinegar.
- The tank has been cleaned, there should be no debris left in it, no extra parts such as a heating element, thermistor and other sensors. All excess holes must be sealed with tin and rubber patches. We will leave only the drain hole, to which you will need to screw a new drain pipe.
- We weld all the holes of the drum by welding, they are not suitable - they are too large. We remove the rib cutters, and leave the mounts for them, they will help to chop vegetables and fruits.
- We make hundreds of small holes with a diameter of 1 mm in the walls of the drum along the entire perimeter.
- We collect the tank back. If it was non-separable, then you will have to drill 15-20 holes across the seam in a circle, coat the seam with sealant, and then tighten the two parts of the tank with bolts.
- We install the tank together with the shock absorbers and the cuff of the hatch in place - the preparation is completed.
Assembling the structure
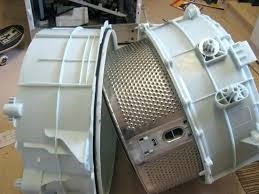
After high-quality preparation of parts, which was carried out by hand, it costs nothing to assemble the finished device. To begin with, we will finalize the drum of the washing machine so that it turns into a full-fledged juicer.
- We take pre-prepared strips of metal mesh and insert them around the drum between the fasteners of the rib breaker and onto the back wall.
- We attract them for strength with screws to the wall of the drum. The grid will play the role of a grater for vegetables.
- In addition, the fastening of the rib breaker will help break the vegetables in the drum, it must be unbent and the edges sharpened. Here is the ready fruit receptacle.
Now we need to improve the design so that the device lasts as long as possible.
We fasten additional springs to the tank and the wall of the washing machine in order to dampen the vibration of the tank from the horizontal centrifugal force.
This is necessary, since we will operate the juicer with the hatch to the top. Now you need to "give life" to the drive mechanism that rotates the drum, namely, connect the engine to the mains. See the video below for how to do this.
We put our do-it-yourself juicer with the hatch up and conduct a test run. The drum should rotate freely at full speed without knocking or other extraneous sounds.
It is also important that the juicer stands securely on wooden supports and does not collapse while working with a full fruit receptacle.
We substitute a container for juice under the drain pipe, open the hatch, pour the fruits into the fruit receptacle and start the juicer.
What will happen to the fruits? Rotating at a speed of 800-1000 revolutions per minute, the fruit receptacle, which is also a drum, breaks the fruits into porridge.
Porridge is kneaded in the fruit receptacle, and the juice, together with part of the pulp, is squeezed out through the holes in the side and back wall drum and settles in the tank.
How many vegetables and fruits can be placed in the drum optimally so that they are processed efficiently? The answer is simple - the denser the fruits, the less they need to be poured into the fruit receptacle.
For example, hard apples are poured into half a drum, that is, until they fill the fruit receptacle to half.
Carrots are very hard, so you need to fill them in a quarter of the fruit receptacle, but berries like currants or cherries can be filled in ¾ of the fruit receptacle - in general, the principle is clear.
In conclusion, we note that, as you can see, making a do-it-yourself juicer from an automatic front-loading machine is not too difficult. The washing machine undergoes minimal alteration, you just have to make some adjustments to the design and you can start processing tens of kilograms of fruits from the garden.
For lovers of apple juice from apples and berries, I can offer a homemade juicer that is easy to manufacture and does not require significant investments. It is made from an old washing machine.
Factory juicers are characterized by low productivity and poor reliability, since they contain many plastic components and parts. On my own homemade bucket of apples processed in 7 - 10 minutes.
For its manufacture, we need from the washing machine mainly a drum and its casing, an apple press. They can be taken from any used washing machine with horizontal loading. Getting such a car in our time is not a problem, since models change every 2-3 years.
Juicer from the washing machine progress of work
We do a complete disassembly of the old car. We leave the drum, drum casing, drum mounting bracket with bearings. Balancers, temperature sensors, heating elements and other unnecessary parts are unscrewed and removed from the casing.We carry out a thorough cleaning of all parts from powder and scale. Fine sandpaper polish all surfaces to a shine. Let's inspect the existing holes. We need to leave only one hole in the drum casing, at the bottom - for the juice to drain. All other holes are sealed with an overlay made of thin rubber, clamping it with stainless steel plates on bolts. If possible, all bolts and nuts are better to take brass or stainless steel. In my case, a tube with a corrugated hose from a siphon for a kitchen sink came up in diameter to a large hole.
We make a grater and a gasket for a grater. From a "stainless steel" 2 mm thick, we cut out a circle with a diameter of 220 mm with a grinder or on a machine - for a grater. From the same steel with a thickness of 0.5 mm, we cut out a second circle with a diameter of 220 mm with metal scissors: this will be a gasket. It is needed to ensure rigidity so that the grater does not bend. The gasket is attached through three brass racks to the bottom of the drum, and the grater is attached to it with five M5 screws. We cut the thread directly into the gasket.
The grater is made in the following way. Having drilled holes with a diameter of 5 mm, we make markings in increments of 10 mm along the entire diameter. We divide the circle into 14-20 sectors. We fasten the workpiece with screws to plywood 10 - 16 mm thick in holes with a diameter of 5 mm. According to the marking with a punch with a round or square working profile, we fill the cutting teeth. Screws and gasket prevent the grater from bending and moving. Marking and drilling of all parts should be done as accurately as possible so that the grater is exactly in the center of the drum.
Do-it-yourself apple juicer drawings


There are holes in the drum with a diameter of 3-4 mm, so we are finalizing it. As a rule, inside the drum has three stiffeners. We take a fine mesh made of "stainless steel" with a cell of 1x1 mm, we make three blanks according to the size of the drum sections (if there are no stiffeners, then we make the mesh in one piece). In the upper part of the grid, we add 10 mm each for a bend performed under the ruler, tapping with a hammer - the edges we have turned out to be smooth and safety. Using an awl and a gun with blind rivets, we fix the mesh inside the drum. The number of rivets is arbitrary so that the mesh fits snugly against the surface of the drum and does not move away during rotation.
From a piece of polyethylene pipe with an inner diameter of 100 mm and a wall thickness of 5 - 6 mm, we make a hopper for loading apples. To fix the pipe, we need four aluminum alloy corners. We fix the pipe with an offset from the center so that its edge is on the edge of the grater.
The pipe with corners is attached to the drum casing with 4 Mb bolts, and the bolts must be inserted from the inside of the casing before assembly and clamped with nuts from the outside. With the help of washers under the corners, we adjust the gap between the pipe and the grater: it depends on what degree of chopping of apples will be. From above, the corners are fastened with lambs for quick disassembly and assembly.
From a birch handle for a shovel we make a pusher for apples. On its end we attach a circle of plywood with a diameter of 90 mm, in the upper part we put a limiter so that the pusher cannot go down to the grater.
After we prepare all the details, we assemble the drum with a casing and a bracket. Check bearings and seals and replace if necessary. The pulley will have to be altered to fit its dimensions and the V-belt.
I took the engine with a power of 1.1 kW at 3000 rpm. On the drum with belt drive 1500 rpm is applied. More dangerous due to vibration, and less - it will be bad for the juice to drain during the extraction.

We will weld the base frame from the corner or adapt some ready-made one. We fasten the bracket with the drum casing to it through rubber anti-vibration washers. We cut out a cover from thick polyethylene or rubber - a circle along the diameter of the drum casing with a hole for the apple loading pipe. The cover is necessary not only to protect against the ejection of splashes of juice: it will also protect against a rotating drum.
All fasteners must be securely clamped, and the electrical part must be assembled with good insulation to prevent damage. electric shock. Before assembling the parts of the container, thoroughly wash with dishwashing detergent and rinse. All components must be made of environmentally friendly materials, not corrode and not emit harmful substances into the juice.
DIY juicer video
After assembly and commissioning, we make a trial run. An empty drum should rotate without beating and extraneous noise. We cook apples, wash them thoroughly, select rotten and wormy ones. good apples may not be cut. The core and bones are not a hindrance to our juicer. We substitute a bucket under the drain tube. We throw apples 1 - 2 pcs. into the bunker and press the pusher to the grater. With a uniform cast, about a bucket of apples is crushed until the vibration starts. Centrifugal force presses the cake around the circumference of the grid evenly. If a slight vibration starts, we stop the casting and let it work for spinning until the juice stops flowing from the tube.
Turn off the engine and wait for a complete stop. With a plastic plate or a children's shovel for a sandbox, we clean the cake from the mesh of the drum.
After finishing work, thoroughly rinse the mesh and all parts with a strong jet of water.
For long-term storage we separate the drum casing from the bracket, remove the mesh for more thorough cleaning and washing.
Dried cake is a good vitamin supplement for chickens and goats in winter.
E. YABLONSKY, Bobruisk, Belarus
One of the most simple ways harvest processing - juicing. A do-it-yourself apple juicer can become great solution, since most of these devices are either expensive or have low performance and short-lived.
There are several ways to make a centrifugal juicer from a washing machine. One of them will require a drum, its mount and casing from.
The design of a homemade juicer from a washing machine: 1 - washing machine tank; 2 - centrifuge; 3 - mesh insert; 4 - fruit bin; 5 - grater; 6 - bushing-axis; 7 - guide pipe; 8 - engine; 9 - car tire.
First, they are cleaned of traces of powder and scale, and then polished to a shine with fine sandpaper. All openings in the drum casing, except for the bottom one, are closed with a thin rubber gasket and stainless steel plates using nuts and bolts.
From a sheet of stainless steel, 2-3 mm thick, a circle with a radius of 110-115 mm is cut out for a grater. For the lining, we make another circle of the same diameter and from the same material, but already 0.5-0.6 mm thick. Lining provides rigidity. It is fastened with three brass posts exactly in the middle of the bottom of the drum. The grater is mounted on the pad with five M5 screws.
Through two circles, many holes are drilled, with a radius of 2.5 mm, centimeter markings are made along the diameter, dividing it into 14-20 sections. Cutting teeth are stuffed on it with a punch.
The loading tube for apples, corresponding to the diameter of the large hole, is attached to the drum on four sides with aluminum corner bolts. You can use a pipe with a corrugated hose or a polyethylene pipe with walls 5-6 mm thick. The MB bolts are inserted from the inside of the casing at the beginning of the process and are clamped with nuts from the outside. The distance between the pipe and the grater determines degree of grinding apples. From above, the corners are fixed with lambs.
From a stainless steel mesh with a cell of 1 × 1 mm, workpieces are made with dimensions of a drum section (with a margin of one centimeter for bending) according to the number of stiffeners. We bend the mesh so that the edges become smooth and safe. With a rivet gun and an awl, we tightly attach the mesh to the drum.

For a pusher, a plywood circle with a diameter of 0.8-0.9 cm is attached to the end of a thick handle from a shovel. A limiter is installed to prevent contact between the pusher and the grater.
The pulley is altered to the required dimensions and a V-belt. The base frame is welded from a corner. A 1.1 kW motor at 3000 rpm is ideal.
A polyethylene or rubber circle is cut out with a diameter like that of a casing and a hole corresponding to the diameter of the pipe for loading apples. Such a cover protects against splashes and closes the moving drum. A hose is pulled to the lower opening of the drum for the outgoing juice, under which a pan is placed.
All elements are firmly clamped, the motor and wires are insulated, the mains voltage is taken into account. The parts of the container are thoroughly washed.
During the test run, the empty drum of a properly assembled homemade apple juicer should not beat and make foreign noise.
Apples are laid in it 2-3 pieces. The pusher pushes them close to the grater. The centrifugal force distributes the cake over the grid. If the device starts to vibrate, then, without adding apples, we wait until the juice stops flowing. If you lay the product systematically and constantly, a bucket of apples will be processed before vibration (in 7-10 minutes).
After turning off the engine with a plastic spatula, remove the cake from the grid. Then wash and dry all parts. The apparatus is stored disassembled.
From an activator type machine
It can also be made from an activator-type washing machine. The activator and shaft are removed from the bottom of the tank, a shaft of the required diameter is installed. Three knives are installed on the shaft thread with nuts at an angle of 60 degrees. The drain hole is closed. A stainless steel mesh with a cell of approximately 1.5 mm is placed on the wall of the centrifuge with an overlap of 40-50 mm. A complete rubber cover, plugged with a cork, is placed at the bottom. Everything is washed with baking soda. The timer relays turn off or jam its toggle switch.
Several apples are lowered into the tank on moving knives. The fruits are crushed for 20-30 minutes. Move into the centrifuge at a time no more than 3 liters the resulting puree so that it does not spill out. After 2-3 minutes, the mesh with waste is removed.
The assembled apparatus prepares 10-12 liters of juice with pulp per hour, works with juicy fruits. To remove the sediment, the juice is settled, and then passed through gauze.
If there is no electricity, it is better to do a homemade juicer. Apples for her are cut in half, the core and rotten areas are removed. A long straight trough made of pine or spruce boards is filled with prepared apples, which are then pounded with a rectangular spatula with a sharp blade of the width corresponding to the trough.

In a rectangular tank, pan, barrel or wooden compartment lined with polyethylene, a hole is cut to drain the juice. Inside put gauze with apple pulp, laid out with boards. A piston cover is placed on top, and a press of one of two designs rests on it:
- worm mechanism;
- jack.
The screw is tightened smoothly, watching the juice drain. Upon completion of the process, the screw is unscrewed upwards, the cake is removed from the gauze.
Apples for the described manual juicer can also be chopped with a mixer mounted on a drill, this will speed up the process. And as a tank, you can use a large plastic bottle.
After watching a video on how to make a juicer, do not forget about preparing raw materials for pressing. Apples are washed and rotten places are cut off. Product for juicers from washing machines does not need to be cut and cleaned, but should be remove bones. The resulting dry cake is added to animal feed in winter and used as fertilizer.
Osiliv independent production juicers, you can easily manage the factory model.