Exposure to ultraviolet rays and precipitation negatively affects the condition and performance properties of the front door. A canopy over the entrance will refresh the design and become a reliable preventive measure against the vagaries of the climate.
Purpose
The absence of a canopy over the entrance causes a feeling of incompleteness in the appearance of the facade of the house. In addition to aesthetic appeal, the canopy over front door in a private house allows you to achieve complete protection from direct sunlight in the summer, water flows in rainy weather and snow in the cold season.
Types of canopies
- Modular canopies, characterized by the presence of canopies on the sides and several constituent elements. This option is very easy to install.
- The most attractive in terms of longevity is a monolithic canopy over the porch. It is usually a component general design Houses.
- The forged model adds sophistication and charm to the structure. This canopy is in perfect harmony with the Gothic style.
- Compact and easy to install hanging products. The optimal solution for arranging a backyard on a summer cottage;
- Entrance with supports, supported by special columns.
There are no restrictions on the choice of source materials. The only condition is harmonious combination with the overall design concept of the building and site area.
Selecting a visor
Another important nuance– choice of form. Most often, the choice is made in one of these popular options:
- Single-pitch with a frame attached to façade wall.
- Gable models covering the porch on both sides.
- Tents covering the entire entrance area.
- Original arches elegantly envelop all sides and the top of the structure.
All canopies over the door are divided according to the method of fastening into supporting and hanging. The former are mounted on special vertical elements, and the latter are attached to the wall surface with brackets.
Materials
You should carefully approach the creation of a sketch that will take into account all the points related to the climate in your region of residence and the characteristics of the selected components. IN middle lane our country are usually used wooden structures, easy to decorate. It is convenient to decorate such samples on the pediments with original carvings.
Wooden awnings
A canopy over a wooden porch begins with the creation of rafters, which are made from a pair of beams. The dimensions of the overlap determine the angle of attachment of these elements - 60 or 45 degrees.
Next, we move on to the stage of assembling a standard gable canopy. For this purpose, an installation method is used with a system of spacers, two beams and a ridge. The finished structure is attached to predetermined sections of the wall using brackets.
We rigidly fix a pair of vertical beams on the facade wall on the sides of the structure as additional supporting elements. Before final fastening, the horizontal position of the porch canopy and the verticality of the supports are carefully checked. All these actions are intended for the suspended version.
When using separate supports, brackets will not be needed. In this case, metal or wooden poles. Before installation begins, sand and crushed stone are poured into the recesses and poured cement mortar to the height of the area covered in the ground. At the top, the supports are connected to the supporting beams, on which the rafters are already located.
How to make a canopy over the front door with the optimal number of rafter elements? For the version with wood, one pair is enough. And the rigidity can be increased by using additional crossbars.
It is necessary to provide for the installation of wind strips and hooks for gutters.
With brickwork
This option is used exclusively in the presence of columns. Inner frame is made from the above components, and the cladding consists of plastic or siding. Masonry elements will perfectly complement the interior with bright touches.
Metal
The steel canopy over the porch is framed with forged additions and has the following advantages:
- high degree of resistance to mechanical stress and long service life;
- weight parameters allow the use of a suspended option;
- compactness and functional diversity.
Types of roofing
Wide selection of modern and traditional materials will help you choose the most suitable option for your property. It is recommended to use a roof identical to that of the building. Let's consider the main advantages of materials for covering the canopy over the porch and possible disadvantages.
Corrugated sheeting and metal tiles
The advantages of this choice:
- relatively low cost;
- low specific gravity;
- good resistance to moderate loads and fading;
- flammability resistance;
- immunity to biological damage;
- a wide range of shades and external shapes.
To decide how to make a canopy over a door with your own hands using metal tiles, you need to remember the disadvantages of this material:
- the manufacture of non-standard structures leads to the generation of a significant amount of waste;
- increased noise level during precipitation.
Roof tiles
Obvious advantages:
- operational period – up to 50 years;
- guarantee of environmental cleanliness;
- immunity to various external factors;
- good maintainability parameters, allowing, if necessary, the replacement of one element rather than the entire roof;
- ideal noise absorption;
- aesthetics.
The disadvantages of canopies over the door with tiles include:
- high price;
- due to the heavy weight, support elements are required;
- quite a complicated installation procedure.
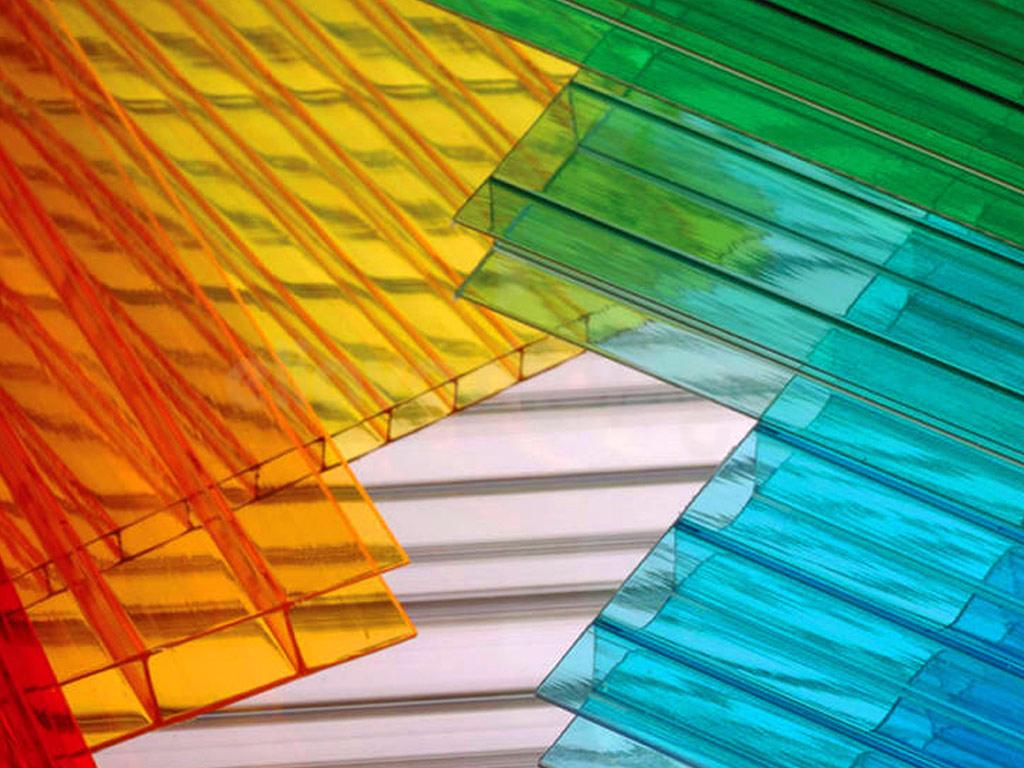
Polycarbonate
The material that is pleasant to work with is different:
- exceptional lightness;
- ease of processing and installation;
- good impact strength and strength;
- ability to transmit light unhindered.
A canopy in front of the entrance to a polycarbonate house has its disadvantages:
- susceptibility to combustion;
- low maintainability;
- any damage and dirt are clearly visible on the surface;
- the cost is high compared to other types.
Design
The main components of a properly made canopy over the porch:
- External covering – roofing made from any source material.
- Door columns, lugs and brackets as fastenings.
- The presence of a frame connecting these components into a single structure.
Installation features
Information about safety and reliability requirements and following a few basic rules will help you decide how to make a canopy over the door:
- protrusion of roof dimensions by 300 mm on the sides and front;
- not less than 20° – roof slope above the entrance door;
- the lower part of the door hinge is on minimum distance from the ground 2200 mm;
- dimensions no less than 1x2 m.
6 steps for correct installation
How to make a canopy over the front door with your own hands? It is necessary to follow a certain sequence:
- Add 60 cm to the measured width of the porch. A sketch is drawn up and the length of the slope is determined taking into account the selected slope.
- Struts and wall beams are manufactured, as well as rafters identical to the parameters of the slope. Wooden elements connected with self-tapping screws or bolted connections.
- The frame is fixed with special fasteners.
- Lathing is laid on the rafter part of the canopy above the front door in a private house. For soft components and similar materials a continuous layer is required, and for large sheet format elements - from 20 to 40 cm.
- According to the supplier's instructions, the covering is attached to the rafters.
- A drainage eaves strip should be attached at the bottom of the slope, and an abutment strip should be attached to the wall along the line of the upper part.
An entrance canopy over the porch will be the best choice for protecting the door of the house and a real decoration of the facade.
A canopy or canopy over the door is not necessary architectural detail, but can change the exterior of the facade of any building. In addition to aesthetic functions, the canopy is designed to protect the entrance group from unfavorable external factors. You can build a simple structure with your own hands; it is important to choose the right material and model of canopy for your home.
The shapes and designs of lightweight structures that protect the porch of a private house, office building or store from precipitation are varied. The simplest canopy can be created from a single sheet of metal profile or polycarbonate, or it can cover a large area above the terrace.
Depending on the size and functions, we can distinguish:
- pergolas that protect only from the sun;
- ramadas and patios - long narrow galleries along the wall of the house;
- small visors;
- awnings on supports.
The general principle of constructing all these structures is the same: the canopy above the door is fixed on one side to the wall of the house, and its free part rests on the posts. Depending on the dimensions of the canopy, there are 2 options for installing supports:
- free-standing pillars;
- jibs fixed to the wall.
The role of the latter is often played by decorative elements made of metal or carved wooden brackets. In such cases, the decorative nature of the supports is combined with their functionality.
By design load-bearing frame there are several different options:
- single-pitch canopies, consisting of a straight or curved roofing panel inclined in the same direction;
- gable, which have 2 planes that meet at the highest point of the structure;
- arched, resting on arched rafters;
- hipped - semicircular or polygonal, in which the rafters are connected in the center;
- shaped, consisting of several slopes of different heights.

Types of material
The owner chooses the frame and roof from which the canopy over the door will be assembled according to his taste. The choice is based on ease of processing when self-production, availability of the purchased product at a price or quality of the product. In any case, when choosing, you need to take into account compatibility appearance standard product with the general style of the house facade.
Tree
Wood is best suited for making your own visor. The material is easy to process, durable and lightweight. The disadvantage of wood is its susceptibility to rot. This requires additional costs for protecting parts of the structure and treating the wood with antifungal and antiseptic drugs.

Wooden awnings harmoniously combines with any type of facade cladding. The practical material allows you to design the design in a discreet or decorative style. Most often, canopies over the door, made of wood, are installed on log houses made of timber or rounded logs, complemented by carved supports and balusters of the railings on the porch.
Metal tiles
A type of steel sheet material - metal tiles - is a profiled sheet that imitates a tiled pattern. In a private house, covered metal profile, there are always remnants of this roofing material.

It is best to cover the canopy above the front door with the same metal tiles as the building itself. Corrugated steel sheet, coated with a protective polymer composition and painted in bright colors, serves as a good roof for a light canopy over the porch, and the matching of the roof of a large house and the canopy creates harmonious composition decorating the facade of the house.
Corrugated sheet
Unlike metal tiles, corrugated sheets have large sizes. Different brands of this profile have greater or less strength. Before purchasing corrugated sheets specifically for making a canopy, you need to pay attention to the recommended loads. If such material is available, the canopy over the door can be made from a single sheet, which reduces the time spent on work.

When making a frame for a metal roof, the lathing is performed in small increments (about 30 cm). This gives the thin sheet the ability to withstand pressure and withstand snow loads.
Metal
The support for mounting the visor can be made not only from wood, but also from metal. Most often, a square-section corrugated pipe is used. Based on it, you can make simple brackets or elegant door canopies assembled from bent parts. A metal support is well suited for a plastic roof: thin parts let in a lot of light and the canopy will be airy and light.

Metal products are susceptible to corrosion. When choosing a professional pipe or rod for assembling a canopy with your own hands, you should immediately take care of the paint.
Polycarbonate
Beautiful transparent roofing material It is highly durable and can withstand external factors. It does not rot or corrode and does not require additional processing. The standard sheet area allows you to avoid cutting and joining parts. For a small visor, use 1 whole sheet.
Cellular and monolithic polycarbonate bends well. This property is used to make an arched or hipped canopy over the front door. At correct installation such a canopy is practically not covered with snow: it rolls down a smooth inclined surface. But the angle of inclination must be greater than 20°.
Forged visor
Wrought iron support structures are the most decorative. Their popularity never ends; they are always in fashion. Forged product made a good master, is not cheap and is a work of art.

Budget option— welded brackets made of bent rod or corrugated pipe ( cold forging). Despite the simplified metal processing technology, they can be as beautiful as hand-forged ones. Subject to availability special equipment and welding skills, you can make a cold forged visor yourself.
Product Features
To make the canopy over the front door not only beautiful, but also durable, you need to take into account that the snow cap that accumulates during the winter puts pressure on the small structure. Closer to spring, large icicles may fall from the roof onto the canopy. In summer, the roof plane is affected by strong winds and showers. All these loads are transferred from the roof to the frame support.
The attachment of the visor must be thought out so that it does not fall when exposed to weather factors, and it must be implemented best option installation of supports. This can be done like this:
- Lightweight and durable design - with front supports. Posts can only be installed at the corners of the rectangle that are not fixed to the wall, but more supports can be made. It depends on the size of the visor and its outline. Front supports are installed if the roof area does not exceed 4 m².
- The most reliable and massive is the 4-post design. In this option, the supports are placed not only under the front side, but also near the wall. Additional supports allow the canopy to withstand heavy loads.
- The canopy is supported on brackets by supports in the form of a triangle. The racks under the front extension of the visor rest on the wall 30-50 cm below the horizontal beam. This is the most fragile, but often used design. The area of such a canopy cannot be made too large: the maximum dimensions are about 2 m².

When choosing options for mounting on vertical poles, you should not forget about the reliability of the support. Vertical structures must be firmly fixed. They can be integral with the porch fencing. If it is missing, then it is recommended to dig the columns into the ground to a depth of at least 50 cm. For the supports of a large canopy, fill columnar foundation, in which vertical posts are fixed.
Pros and cons of using
Having installed a canopy over the porch, the owner of the house may discover that the design has not only advantages. A canopy that is too large and installed close to the window near the door shades the hallway. To prevent this from happening, you need to correctly calculate the height of the structure. It should not be lower than 50 cm above upper limit windows, if it is located next to the door, and do not protrude further than 70 cm from the wall.

If you need a large canopy, you should also take into account the fact that these structures shade part of the local area. You need to start constructing a large structure after carefully choosing a location and determining the amount of insolation behind it. This is especially important to consider if the shadow falls on the property of your neighbors in the country.
Otherwise, the owner receives only benefits from using a canopy or canopy:
- the ability to leave the house and close the door without getting wet in the rain;
- avoid falling on an icy porch area;
- use the covered porch as a low balcony;
- under large canopies you can relax in the heat and pouring rain;
- a beautiful canopy will add completeness and chic to the facade if it is made with high quality and matches the style of the building;
- Light roofing plays an important role in protecting the porch materials from precipitation.
How to make a canopy over a door?
The canopy on the door can be made in the form of a simple lean-to structure:
- 2 parallel beams are strengthened on the wall of the house for support. The distance from top to bottom depends on the desire to make the slope larger or smaller.
- For a canopy with front supports, install posts and dig them into the ground. The pillars are connected with a horizontal beam.
- Between the top of the post and the beams, a horizontal frame (for rigidity) and inclined rafters (to support the roof) are placed; the distance between the rafters is 50-70 cm. The sheathing is attached to the rafters.
- The roof is secured with self-tapping screws and press washers.
To install a canopy over the door with your own hands with fastening to the jibs, you first need to knock down 2 right-angled triangles from wood or weld from metal. These brackets will hold the entire canopy, so they need to be strong. Attach the supports to the wall on required distance from each other, which will determine the dimensions of the structure.
To support the rafters, you need to attach an additional beam to the wall. Device rafter system carry out as above.

For a gable or arched structure, 2-3 semicircular or A-shaped roof trusses are made. They must be connected at the bottom, at the free ends, and at the highest points. For connection, a pipe or block is used, the length of which is determined by the extension of the canopy from the wall. Make supports for the roof frame on poles or brackets, as indicated above. Install roofing material according to general principles.

When assembling a canopy over the front door with your own hands, you often encounter difficulties with choosing the material and carrying out the work. Some useful tips will help you do everything right:
- The most reliable fastening used to install brackets is anchors. Metal spacers are suitable for concrete and brick wall, chemical - for aerated concrete. The canopy is attached to a wooden wall with nails no less than 15 cm thick.
- If soft tiles are used for the roof of a door canopy, the sheathing should be solid, made of boards 2 cm thick. For metal profiles or polycarbonate, a distance of about 50 cm between its elements is acceptable, since these materials do not bend even under the weight of snow. On arched roofs limited to trusses and connecting bars.
- When installing polycarbonate, the roof must have technological gaps between individual parts (4-5 mm). To protect against the penetration of precipitation, they are covered with a special profile. edges cellular polycarbonate need to be protected with edge elements. The film should be removed from the sheets only after installation.
When making a forged frame yourself, you need to draw a template in the form of a right triangle on the brackets. Decorative elements placed so that the axis of the load on the jib passes through maximum quantity interconnected parts. To support it on the wall, it is better to make a corner from a corrugated pipe, onto which to weld the pattern elements.
Immediately after the input has been installed door block, experts advise making sure to make a canopy over the door. This is the simplest and most reliable option to protect door leaf from rain and solar ultraviolet radiation, to avoid the threshold getting wet and the door freezing in frosty weather.
Types of canopies over the front door
A huge number of all possible options and schemes for using protective canopies, canopy arches, roof overhangs to protect the entrance to the house have been invented and built. A properly designed canopy over the door, photo, regardless of its size and shape, should, first of all, effectively protect owners who are unlucky enough to go outside in heavy rain without an umbrella.

Therefore, special requirements are placed on the protective structure:

Therefore, for small frame and wooden buildings, canopies are placed over the wooden entrance door. A lightweight frame made of aspen or ash can withstand the wind no worse than a metal frame, while securing such a canopy over the door to wooden wall much simpler than steel and, especially, forged.

Advice! The roof of a protective canopy is best made from transparent material, glass, polycarbonate or corrugated PVC slate.

This will allow the sun's rays to penetrate through the transparent roof and effectively dry the door leaf, walls, and most importantly, prevent the accumulation of ice and snow on the steps. It seems like nonsense, but you shouldn’t skimp on safety.
Forged visor over the door
Very heavy, the most durable and the most beautiful type of protective canopy. The visor is made of forged rod 8-10 mm thick. It makes no sense to use thicker metal, since the weight of the structure can reach 100 kg or more. Thin metal for load-bearing structure Rarely used, exclusively for decorative purposes. Forged canopies over the door, photo, are usually installed on brick and stone walls.

For your information! Those wishing to install heavy products on wooden houses on a weak wall, you have to use metal door frames, otherwise the pressure and load from the forged canopies on the door and door eventually leads to deformation of the entrance, and the hinges and locks begin to jam.
There are two most important advantages to using wrought iron canopies over the front door:
- Huge service life. High-quality forged metal can stand on a porch group for 30-40 years, which is practically unattainable for wooden and metal structures;
- Forged products, especially in combination with steel door leaf, look extremely stylish and original. Against the background of openwork forged decor, wood carvings or an applied plastic body kit look rather inconspicuous. Forged canopies today are considered status items, like granite facing steps, cast iron railings or oak entrance blocks with a copper surround.
The disadvantages of forged metal construction include the high cost and complexity of connecting individual parts into a single frame. Typically, the production of forged visors is ordered to specialized workshops or blacksmith artels.
Metal canopy over the door
A protective canopy that is lighter and easier to make with your own hands can be assembled based on a frame made of a square pipe and metal strip. A steel canopy to protect the entrance block is twice as light, and most importantly, most of the design parts can be made in a garage or country house.

The use of a steel strip allows you to copy forged curls and patterns, and after covering with black varnish, the tubular structure becomes similar to forged patterns.
The tubular steel structure can be used without any restrictions for entrance group any building, regardless of the material and method of construction. Therefore, welded products with a plastic body kit make up approximately ¾ of all models of canopies and protective structures for porches and terraces of a house.

Wooden canopy over the door
For a summer residence or country house Most often, simple hanging structures made of pine or spruce are used. Despite its simple design, a wooden canopy can be very beautiful and durable.

Lightweight wooden frame has high rigidity, so the dimensions of the canopy are limited only by common sense and the dimensions of the front door. Unlike steel and forged products, a wooden canopy requires constant care and periodic repairs. Every season the owners have to update paint coating, check the reliability of the fastening on the wall.

If you make a protection from wood with your own hands, then its construction will cost about three times less than steel and five times less than forged ones. But using wood also has its downsides:
- A wooden structure ages quickly, especially if it gets on the frame parts. large number sunlight and moisture. Over the course of 10-15 years of operation, the canopy over the wooden entrance door will have to be repaired several times, aligned and replaced with dried out and cracked parts;
- A canopy, even made from the best and most durable wood, is subject to swelling and “dry” shrinkage. As a result, the material may become deformed.
No protective varnishes or paints can stop the process of moisture absorption. The only way to prevent “wet” deformation of the canopy is to choose a design with good ventilation of the under-roof space. Usually they try to hang wooden canopies higher above the door. This makes it possible to reliably protect the door from rain and at the same time ensures good ventilation of the wood from condensing moisture.
Canopy over the door made of polycarbonate
The use of transparent plastic as a roof covering has long become the norm or an unrecognized standard for arranging canopy structures. Canopies of any design and type can be covered with polycarbonate. The choice of brand of polycarbonate sheet depends on the chosen roofing design.
For arched or dome canopies, honeycomb grades of polycarbonate are used, while for single-pitched canopies flat roofs and canopies, monolithic plastic is usually chosen.

Polycarbonate roofs are well tolerated sun rays, heat and low temperatures. The only disadvantage of polycarbonate is its strong thermal expansion. Therefore, “waves” from the swollen coating often appear on a canopy covered with a polycarbonate sheet. As a result, the canopy loses its original appearance and may even flap under gusts of wind.
Polycarbonate can be called the best option for an entrance door of any design. The flow of light and heat penetrating through the transparent covering of the canopy roof is too weak to negatively affect the paintwork of the front door, but it is enough to dry the canvas from moisture.
Dimensions of the canopy over the entrance door
Before you try to make a protective canopy with your own hands, you need to choose the most suitable roof dimensions. First of all, you need to decide on the roof configuration.
For classical gable roof The slope of each slope is taken to be within 40-45 o, respectively, the height at the ridge is equal to 70 cm, and the distance between the support beams is taken to be 140 cm.
In this case, the length of each of the canopy slopes is within the range of 110-115 cm. If we take the height and width of the entrance doors to be 200 cm and 80 cm, respectively, then the upper ridge strip will be mounted at a height of 260-270 cm above the level of the porch area. There remains a distance of 30-35 cm between the vertical slopes of the doorway and the conventional lines for installing the support beams on the struts. This is more than enough to effectively drain water from the canopy roof and not flood the porch area with puddles.
The easiest way to build a protective structure is from wooden beams, boards, lining and thin cellular polycarbonate. In almost any home there is a minimum of carpentry tools, and the material for the frame can be bought at any construction supermarket or roofing salon. A pine beam with a section of 50x50 mm and a lining of 70 mm are suitable.
How to make a canopy over a door with your own hands from wood
One of the protective design options is shown in the diagram below.
In order to make a canopy over the front door with your own hands, photo, you will need timber and lining, metal plates, self-tapping screws and carpentry mounting bolts.

It is necessary to make four sets of parts:
- A pair of horizontal support beams with vertical struts;
- Two pairs of rafters connected in a V-shaped structure using carpentry bolts;
- Horizontal cross members connecting support beams.
First, one of the horizontal crossbars is installed on the walls, then support bars with struts are attached, which then need to be closed with a second cross beam. Of course, you will first need to mark the height of the canopy above the entrance to the house.

The next step in assembling the canopy is to install and secure two pairs of rafters. They are assembled using hex head carpentry bolts.
Important! The lowest point of the overhangs should be below or at the level of the top edge of the door.
Next, you need to install two spacer crossbars, and you can assemble the sheathing from the lining. The roof is chosen depending on the design of the door; you can lay red metal tiles or limit yourself to a covering made of rolled material.
How to make a canopy over the front door with your own hands from polycarbonate
For transparent structures, the classic gable scheme is not suitable. If you need to make a protective canopy over a door with a transparent roof, then the frame will have to be ordered from forged metal.


One of the most good decisions for wooden canopies is shown in the photo below. This option looks great above the door against the background light walls buildings.

The principle of building hinged protection is similar to the previous option, but instead of wooden sheathing of slopes, it is necessary to build a roof from wooden arches. The blanks are cut out of the board - fifty according to a template, sanded and varnished.
To install the parts of the canopy over the door, we use screws and glue. Lastly, a sheet of monolithic polycarbonate, 8 mm thick, is laid.
How to install a canopy over the front door in a private house
The installation method depends on the material and design of the building walls. The simplest option for installing a canopy over the front door with your own hands is shown in the photo.

The entire structure is attached to the walls on both sides of the door using vertical strips and dowels. It is clear that this method Suitable for brick, cinder block or concrete walls.
For frame buildings lined with siding and insulation, the installation of a canopy over the door is carried out according to the diagram below.

Part of the cladding at the installation sites is cut out to the supporting frame of the building sheathing. If the building is built of brick or concrete, then you will have to cut out a small segment in the insulation in order to rest the heel of the strut and the horizontal cross member directly on the load-bearing part of the wall.
Important! When attaching the frame, you cannot rest the struts on the insulation, cladding, and, especially, on the door block of the entrance to the house.
After installing the canopy, you will need to seal the gaps with foam and mounting sealant.
Samples of canopies over entrance doors
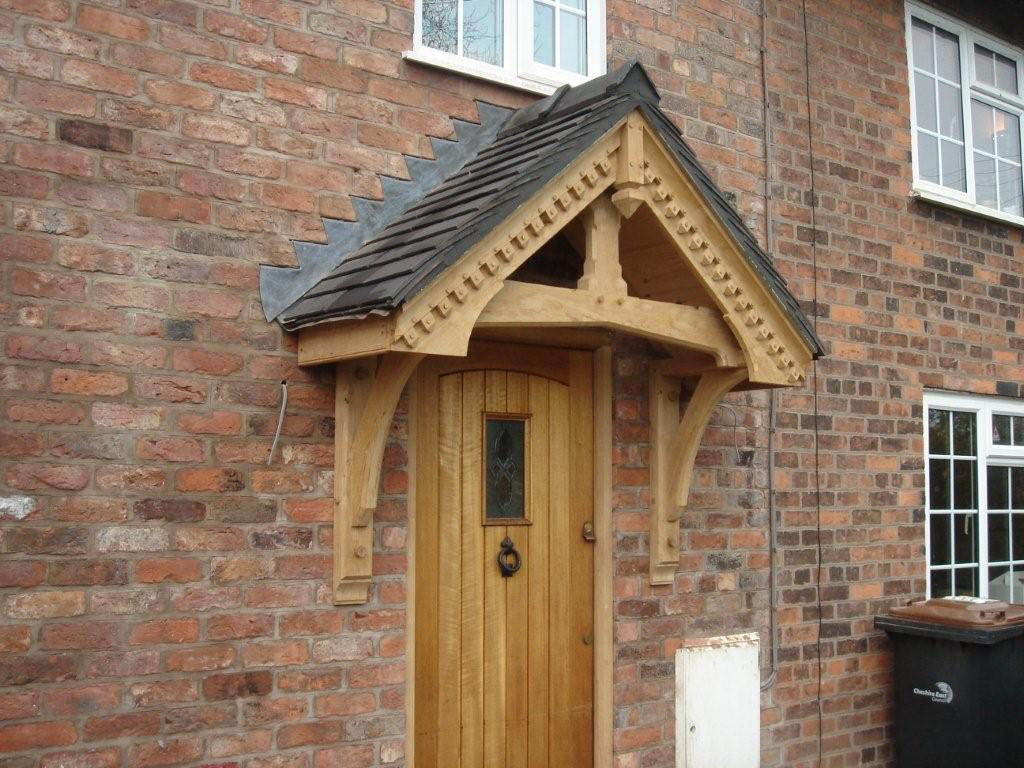
The most common form of protective visor is considered to be a gable scheme. All the most important advantages are concentrated in it modern types roofs:
- High resistance to strong gusts of wind;
- Strength;
- Great looks.
A gable canopy can be installed on the walls, even if the front door is designed without a porch group.

The second most common design is the one-pitch canopy design, as in the photo.

The obvious advantages of such a scheme include unusual way arrangement of the slope. The curved surface of the canopy is made of a thin wooden strip laid in steps on the supporting profiles of the slope. The advantage of this scheme is ease of installation; the canopy roof is attached above the door using two intermediate horizontal panels.
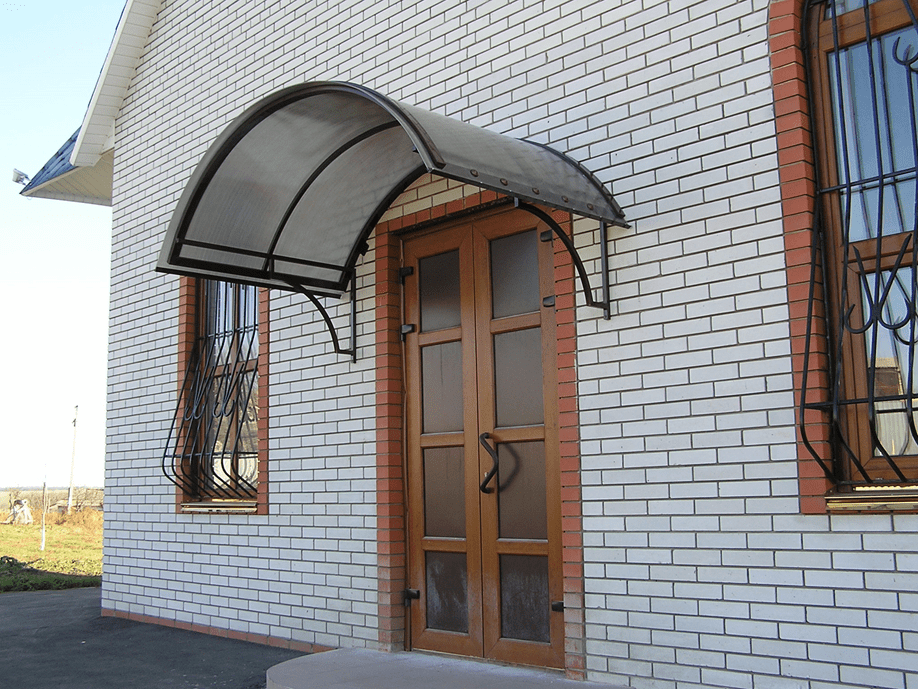
Most of the steel canopies are made according to an arched design from a square pipe with a cross-section of 20 mm. Thanks to the use of transparent cellular polycarbonate, the space under the roof always remains well lit, so both the door and the walls do not appear dark, as is the case under a metal roof.

Forged metal visors look even more elegant and laconic. Typically, such a canopy is made large enough and rises to the maximum height above the front door, so the structure does not “press”, does not obscure the entrance and does not block air movement.

Using transparent molded polycarbonate, you can achieve a unique effect when the canopy over the front door simply visually disappears from view.

Two small horizontal supporting posts made of metal are practically invisible against the background of a brick wall, and the absolutely transparent plastic roofing can only be seen when approaching the door of the house.

This protection option will be especially appropriate if the owners do not want to spoil the facade of an old building with modern structures.
Conclusion
In order to build a canopy over the door at the entrance to a house or any other room, you need to choose the right roof design and method of attaching the canopy to the wall. In order for the protective structure to withstand loads and wind blows, and at the same time look quite stylish, it is best to use a forged frame and transparent polycarbonate. For a small dacha or cottage, the hinged part above the door can be assembled from wood and cellular polycarbonate.
The front door is constantly exposed to precipitation. The construction of a canopy or canopy will help protect against this destructive effect and give the house a complete aesthetic appearance. There is a wide variety of modifications and materials from which this architectural element can be constructed. Before making canopies and awnings with your own hands, you need to choose a design that will not only decorate the house, but will also serve well for a long time.
Requirements for visors
In order not to waste money in vain and not to redo work already done, you must adhere to the following rules:
- correctly calculate the strength of the canopy so that it can withstand not only its own weight, but also the weight of the snow that will accumulate on it;
- during construction, provide a container and drain for drainage of storm water;
- the design must ensure the safety of not only the door, but also protect the entire porch as a whole;
- the canopy over the entrance should not look like a separate element, but fit organically into the exterior of the main entrance.
Advice! In order for the design to correspond to the general style of the building, it is necessary to carefully consider the choice of material during its construction.
In the photo you can see how the construction material is combined with the roofing of the house.

Types of visors
Basically this architectural element has four main forms:
- single-pitched - the most simple design flat shape, fixed at the top to the wall;
- gable - has two slopes of the same size;
- tent - made in the form of a semicircle completely surrounding the main entrance;
- arched - has a round shape and covers the entrance on both sides.
Depending on the type of attachment to the wall, visors are divided into two types:
- suspended - the structure is attached only to the wall;
- on supports - used if the structure is heavy.

Materials for making visors
Used to make the frame wooden beam or metal in the form of a pipe or profile. Depending on the chosen shape of the frame, the material for covering it is selected. For the construction of single-pitched and double-pitched structures with straight shapes, metal tiles, corrugated sheets or slate are used.
If the structure has an arched or hipped shape, then you can make a canopy over the front door from materials that can be bent - polycarbonate or soft tiles.
Before choosing a material, you should familiarize yourself with its characteristics and application features:
It is better to make the visor at the same time as roofing work on the roof of the house. In this case, there is a chance to save money and make a covering over the door from the remnants of metal tiles.

Materials for making the frame:

Attention! The forged canopy has a lot of weight, so that it does not collapse, it is necessary to correctly calculate the fastening to the wall.
The photo shows how forging is organically combined with straight metal elements and a polycarbonate coating.

Single-pitch canopy
The simplest design that you can make yourself. The work begins with measurements. It is necessary to measure the width of the porch and add 60 cm to this figure - this will be the width of the canopy. You can find out the length by measuring the distance from the door to the place where the porch ends and adding 20 cm to it. The height of the canopy attachment depends on the architecture of the building. Based on these data, a drawing of the future design is drawn up.
From metal corners, according to the obtained dimensions, cut the main structural elements - rafters, struts and wall beam. Connect all the parts together by welding. After this, the resulting frame can be attached to the wall. The wall beam and struts are fixed using stainless steel anchors.
Important! For unhindered water flow, the slope of the structure should be within 20°.
To cover the canopy with roofing material, it is necessary to make a sheathing of beams on the rafters, the pitch of which will depend on the chosen material. If corrugated sheeting is used, the distance between the slats should be no more than 30 cm. For bitumen shingles and other soft coverings, it is necessary to make a continuous sheathing.
Arched polycarbonate canopy
As in the previous case, work must begin with measurements and drawing up a drawing of the future visor. The frame can be ordered in a workshop or made independently:
- The frame can be made from profile or aluminum pipe cross section 12-16 mm. It is necessary to bend two identical arcs of the desired radius.
- The ends of the arcs are connected to each other with a straight pipe. To give greater rigidity with inside weld the connecting beam onto the visor.
- The structure will be fastened to the wall using canopies welded to the rear arch.
- Use an angle grinder to remove rust and scale. Prime the frame and paint.
- Using anchors, secure the arched canopy over the front entrance.
- The polycarbonate is attached to the frame using self-tapping screws.
Gable design
The gable canopy provides the best protection against slanting rain and has a rigid structure, which makes it stable in strong gusts of wind. Making such a visor is a little more complicated than previous types of structures.
The first step is to take measurements, calculate the dimensions of the brackets, sheathing and draw up a diagram for attaching the visor. Then you can get started:
- Make two identical brackets from metal or wood. To do this, connect two beams at an angle of 90° and fasten them with a brace.
- The brackets are attached to the wall at a distance equal to the width of the future canopy. Vertical beams are leveled and fixed using stainless steel screws.
- If you plan to make a supporting structure, then there is no need for brackets. In this case, pillars made of wood or metal serve as support, as shown in the photo. To do this, holes are dug at a distance equal to the width of the canopy. Sand is poured into the bottom and compacted. Then the pillars are installed and filled with concrete. The upper ends of the supports are fastened to the supporting beams of the canopy.
- Rafters are made of timber or edged boards. If the visor is short, then only two pairs will be enough. The rafters are fastened together with crossbars and secured to the bracket.
- After this, the ridge beam is installed.
- The next step is installation of the sheathing. The material can be timber, board or plywood sheets. The choice of material depends on your preferences.
- Cover the canopy with roofing sheeting. To protect the structure from wind and snow, install wind strips on the front of the structure.
- Now you can install the gutter fasteners and the gutter itself.
In order for the canopy over the front entrance to serve for many years, it is necessary to accurately calculate the design - the quality of the work performed primarily depends on this stage. If you are not sure about own strength, then it is better to entrust this work to professionals.

Sergey Novozhilov - roofing materials expert with 9 years of experience practical work in the field of engineering solutions in construction.
Each house is individual and most often very similar to its owner. Not every home suits expensive canopies and awnings over the entrance with wrought iron ornaments. For an ordinary house in the middle of a holiday village or in a suburban area, a canopy made of wood would be more appropriate and practical, especially if you make it with your own hands.
Simple wooden assemblies have their own charm, and many of the craftsmen admitted that working with ordinary wood is more enjoyable than implementing complex and intricate design solutions. Working with a wooden canopy is most often done for the pleasure of doing it yourself, and many true craftsmen love this kind of work with wood.
What is good about a wooden canopy over a porch?
Among the majority of options for a canopy, wood is one of the three best for building a canopy over the entrance:
- Price building wood, slats of timber and lining used for the manufacture of the canopy, less costs for a canopy with forging and polycarbonate sheets above the entrance;
- If desired, you can use wood to create the most complex and intricate design options for the frame of the canopy above the entrance with your own hands;
- If you have the skills to work with wood, tools and materials, you can build a canopy over the entrance from wood in less than a working day, without putting much physical effort into it.
Advice ! Often a wooden canopy is built during the process overhaul made the doors and entrance to the house with our own hands, so the main part of the material used was leftovers from the renovation of the porch and floor. If the proposed option is difficult for you, try making a lean-to canopy out of wood above the entrance.

But if you need a truly beautiful wooden canopy with an interesting wood texture, you will have to look for and use quite rare and expensive types of wood, preferably chestnut or walnut. And this version of the canopy over the entrance will obviously not be cheap, as will the DIY work required to make it.
Simple and practical visor design
If your house has a wide and high entrance with a porch, it will be more convenient to make a canopy made of wood with two support posts, but in practice this option is most often used as a canopy for a summer open veranda. The second option is a simple canopy made of wood with cantilever mounting above the entrance. Last option easier to manufacture, requires less wood, convenient and practically does not change appearance entrance and facade of the house.

If desired, a wooden canopy can be treated with stain or colored varnish, and the slopes can be covered soft roof. Add a traditional, rustic, DIY wood decoration above the entryway.
Advice ! When building a canopy over the entrance, do not use bars and strips made of different breeds tree. Different wood behaves completely differently, its color and texture change differently.
A tree of freshly planed dry spruce and pine, at first glance, looks equally beautiful, but after a certain period of time, from the air and sun, one will become white, and the other will acquire a reddish tint. As a result, after a couple of months, a wooden canopy over the entrance may look like an old barn made from waste wood.
We build a canopy out of wood
To build a canopy, any available wooden beam measuring 50x100 mm is suitable, the main thing is that there is enough space above the entrance. For rafters we use a board with a section of 150x30 mm; for sealing and sewing up a gable roof it is better to buy ready-made wood, better lining with a 10 mm spike. In addition, you will need 20 mm and 50 mm self-tapping screws for wood, 120 mm bolts - “capcaillie” with washers for wood. Tools include an electric drill with adjustable rotation speed, a hand-held circular saw, a gun with staples No. 50 and No. 25, a tape measure, and a building level.
We mark the fastening and cut the board for the rafters
We will assemble the canopy frame made of wood directly at the place where it is attached above the entrance. To do this, use a tape measure and a building level to mark a line and attach three pieces of timber in the shape of the letter P to the wall, above the front door to the house, with self-tapping screws. The width of the horizontal beam will correspond to the width of the canopy, approximately 100-120 cm.

We cut out the horizontal longitudinal beams of the frame with struts into the left and right vertical sections. The beam with the brace must be tightened with a self-tapping screw, but not tightened all the way, thereby ensuring flexible connection the upper end of the strut and the horizontal beam. Next, we attach each pair of beams and struts to the left and right vertical bars, previously fixed above the entrance to the wall. To do this, we drill oblique holes for the screws and tighten them until they stop, as in the photo.

We align the position of the horizontal beams lying on the struts and connect their free ends with another piece of timber. Thus, with our own hands we made a horizontal frame resting on struts above the entrance, clearly visible in the photo.

Next, from 150 mm boards, we cut three pairs of boards of the same size for future rafters, mark and cut off oblique cuts at the ends to join the rafters in the upper part of the roof. To strengthen the joint, we attach an additional piece of board to the junction of each pair and sew it with staples, as in the photo.

Assembling the frame of the gable roof of the canopy above the entrance
In assembly operations, it is better to combine mechanical fastening with gluing joints good glue based on polyurethane. This makes the visor design practically insensitive to vibrations and moisture.
Before attaching the cut rafters, you should accurately mark the location supporting surface on the horizontal supporting beams of the frame, as in the photo.


To simplify fastening, a triangle is cut out under each of the rafter boards, which is glued into the gap between the beam and the rafter, as, for example, in the photo.

This design allows you to freely level the position of the rafters with your own hands, if necessary, by simply tamping one of the boards. It is not recommended to cut grooves in the rafters; this can greatly weaken their strength.

Having marked, as in the photo, a line for drilling with a countersink, we select a groove for the bolt head, drill and tighten the bolt - a capercaillie. Ideally, the mount should “sit flush”, without leaving reverse side beams.

Having secured all three rafters to horizontal beams, we cut the lining to the width of the slope, with a small margin of 10-15 mm. As in the photo, we assemble from the cut out sections and sew up both slopes of the canopy roof with clapboard. During the installation process, do not forget to hit each board with a mallet and fasten them to the joists with staples, look at the photo.

Upon completion of the “lining”, we align the outer edge of the roof above the entrance using a manual circular saw, neatly, as in the photo.

Final design of the visor
After sealing the roof surface of the canopy with clapboard, it is necessary to lay the base for future waterproofing and roofing material. To do this, we cut out three pairs of 50 mm slats and fasten them along the surface of the lining in the places where the rafters pass, this is clear from the photo. For fastening, you can use self-tapping screws No. 25, but most often the same construction staples are used, but No. 50. For strength and better adhesion, the surface for laying the slats can be treated with waterproof glue.
Next, a waterproof OSB board, 8 mm thick, must be laid on top of the fixed slats. Look how the master does it in the photo. It will provide the necessary rigidity of the roof slope and the entire canopy structure. Let's preliminarily measure the size of future OSB boards, cut out pieces of the required size and try on their location on the roof of the canopy above the entrance.

Important ! The most difficult thing in fastening OSB boards is ensuring the correct junction of the edges of the boards at the top of the roof. Even a cut perfectly straight end will need to be adjusted with your own hands; the joint must be treated with sealant.
OSB boards are laid with the laminated surface down and the rough surface up. We sew a plastic or metal corner along the edges of the slab, covering the ends of the boards and slab from moisture, as in the photo.
Final operations
Before final fastening of the slabs, the inner surface of the wood must be treated with drying oil or waterproof varnish; condensation may accumulate in the air cushion between the lining and the slab, which will lead to swelling of the wood fibers. If the design of the canopy above the entrance does not use “eternal” wood species, such as oak or hardwood, the entire set of slats and timber must be processed protective composition from pests, it is possible to pre-coat it with drying oil and dry it thoroughly in the sun. In a good manner It is considered that wood is treated with special oil varnishes that provide a thick protective layer that is not afraid of moisture and snow.
Conclusion
There are many people who like wood products that are a little rough and not as bright as modern plastic, but very beautiful in their own way. Tree, at correct processing, over time it only becomes brighter and more interesting. But today it can most often be found above the entrance to a dacha or in light summer houses of sanatoriums and recreation centers. The wooden canopy over the entrance goes well with the red brick wall one-story building, summer buildings, log buildings and facades covered with tinted clapboard.