


We tell you how to make a pond at your dacha with your own hands, what materials can be used for this. We consider the basic rules of decoration and arrangement that will help make an artificial pond an excellent addition to the existing one. landscape design.

Types of artificial reservoirs
Before you make a pond at your dacha, you should decide on the type of future reservoir. Depending on functional purpose 4 types can be distinguished:
- Little pond– serves as a garden decoration, a small part of the overall landscape composition. Active recreation near such a reservoir is not expected.
- Fish pond. Own reservoirs with colorful fish are actively pushing small aquariums out of the market. These can be reservoirs of absolutely any shape, the main thing is that the size is comfortable for the inhabitants. You can run into such a pond decorative types fish or fish suitable for fishing and subsequent consumption. Regardless of who will be bred in the pond, it is important to take care of the water filtration system and enrich it with oxygen.
- Decorative pond– a deep reservoir, additionally equipped with curbs, a bridge, and special lighting.
- Swimming pond. Swimming pools can also be classified as types of artificial reservoirs. In addition to aesthetic functions, they allow you to cool off or swim, depending on the size.

The functions of the pond will subsequently determine the choice of location, shape, and parameters. Another important nuance for anyone who is interested in how to make a pond on a site is the choice of the style of such a pond. There are two main styles, which have many modifications:
- Formal or regular. Provides a design of a rigidly specified shape (round, rectangular, square, oval, broken). Suitable for landscape design made classic style, hi-tech, modern, minimalism.
- Landscape. Features irregular coastline, more natural appearance, does not limit the flight of designer imagination.
Choosing a place for a pond and shape
If you have already wondered how to make a pond at your dacha with your own hands, then pay more attention to its future location. You shouldn’t make a pond for the sake of a pond, when you can create a real highlight in the overall landscape design.

When choosing a place to locate a pond, it is worth considering several nuances:
- Plan a pond for open area, away from big trees. Fallen leaves will constantly clog the water.
- Avoid sunny side. The sun will constantly heat the water, dry out the pond, and promote the development of bacteria. It is not recommended that exposure to direct sunlight exceed 5-6 hours.
- Provide for the possibility of expanding the reservoir if necessary in the future. If the size of the plot allows, then the owner will eventually want a bridge, a fountain and other decorative elements.
When determining the location, take into account:
- plot size;
- relief;
- soil composition;
- groundwater level;
- electricity supply;
- visibility from the house or gazebo.

The pond should be combined with other elements of the landscape composition, buildings and the general style of the dacha arrangement. Having studied all the listed parameters, you can determine how to dig a pond, what shape and size to prefer.
Selecting a base
The market offers many ways to make a pond at your dacha with your own hands. For this, manufacturers offer various materials, although many suggest using improvised devices as a basis.
Each method has its own advantages. Everyone decides for themselves what to choose, based on the design idea, financial capabilities, and area of their summer cottage.

Tools you will need, regardless of the type of base:
- shovel;
- watering hose;
- cord (for marking);
- stakes;
- wheelbarrow for removing soil;
- cleaning filter and compressor (for fish pond);
- pump (for filling water or when constructing fountains, operating cleaning filters);
- sterilizer (needed for water purification).
Concrete base
A concrete bowl is one of the most expensive options, but guarantees a long service life of the reservoir. Most often, such a base is used for the construction of swimming pools on summer cottage, or for creating artificial reservoirs in the northern regions due to its resistance to temperature changes.

Concrete allows you to create compositions of any shape and size. The main features of using such a basis:
- It is better to choose a sunny area far from communications and trees;
- before you make a pond with your own hands, you need to dig a pit and make waterproofing;
- the concrete structure is strengthened with reinforcement;
- can be used to level the bottom surface cement mortar.
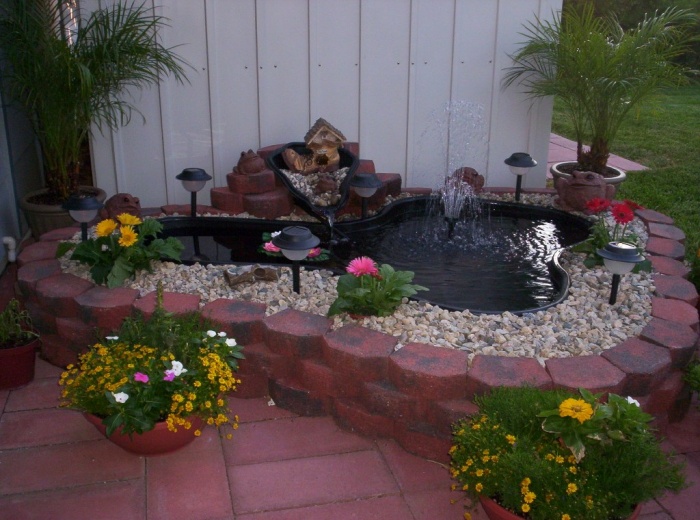
Concrete bowls are decorated with tiles, artificial stone, figurines of birds and animals.
Arrangement of a pond using a ready-made form
To simplify the work, use ready-made molds made of PVC or fiberglass. They are easy to install and durable (up to 30 years of operation). Among the disadvantages is the difficulty of transporting forms large sizes. Optimal choice– fiberglass mold with rubber base.

How to make a pond at your dacha with your own hands step by step:
- After choosing a location and a finished shape, you need to dig a pit. To do this, place the form on the ground and mark the outline of its boundaries. The pit should be 8-10 cm larger than the shape parameters.
- Installing the container in the prepared hole. Use a measuring rod to determine whether it is level.
- Filling the mold with water.
- Fill the voids formed around with sand and compact.
Before digging a pit with your own hands, you need to think through a sketch on paper, and then transfer it to the ground. It is more convenient to mark with sand or a garden hose.
To decorate the edges of the form, you can lay out stones or plant plants. This should be done after the container has completely shrunk. Often such a pond is additionally decorated with a fountain.
Arrangement of a reservoir using film
Another modern material, which is often used to create artificial reservoir any shape and size - film. You can use different types of it - PVC, polymer, butyl rubber. The choice depends on the operating conditions: the service life of a polymer film is up to 10 years, butyl rubber is more than 50 years, even in conditions of constant frost or rocky surface of the site.

How to make such a small pond at the dacha with your own hands step by step:
- Digging a pit of the required shape. Depending on the size, this can be done using an excavator or with your own hands. It is important that the bank slope level is 45°C, and the minimum depth is 60-80 cm. If the parameters are less, this threatens freezing of the reservoir in winter, excessive heating in summer, and the death of the flora and fauna of the mini-pond.
- To further secure the film around the perimeter of the pit, a ditch 15 cm deep is torn off.
- Leveling the bottom of the pit, clearing it of branches, stones, roots that can damage the film. Additionally, it is recommended to sprinkle the surface with washed sand and cover it with geotextile fabric.
- Covering the prepared pit with film. The sheet must be laid loosely and secured at the edges with bricks.
- Fill with water and leave for a day so that the material takes the desired shape. Water must be supplied to the center of the pit without pressure.
- Trim off the excess film, leaving 20-25 cm under the blind area.
The calculation of the required film sheet is done as follows: add 2 depths and 1 meter of reserve to the length and width of the pond. The edges of the film should extend 20-25 cm beyond the edge of the pond. When choosing a film, consider its thickness, composition, resistance to UV radiation, and mechanical damage.

When choosing PVC film, you need to understand the features of using different colors:
- a black film covers the bottom, which makes it possible to observe the reflection of the sky on the surface of the reservoir;
- brown film makes the pond more realistic;
- blue or cream - ideal option for a pond with fish and other inhabitants.
To make the bottom suitable for planting plants or for additional protection from mechanical damage the film is covered with pebbles or stones. This approach requires further constant cleaning of the pond due to decay of organic particles, so many people prefer to leave the film open.
You can decorate the coastline with tiles, stones, and bricks. The main thing is that the material is laid on cement mortar, and the width of the blind area is at least 60 cm.
Video description
How to make a pond with film in the video:
Pond made from scrap materials
You don’t always need to buy a ready-made form, film or make a concrete base. There are several options for those who do not want to purchase special construction and finishing materials, dig a huge pit.

The following can be used as a base for an artificial pond:
- Old bathroom. The main feature in preparing a pit is to provide a recess at the location of the drain and fill it with pebbles. This will allow water to drain into the ground if necessary. You don't have to dig a hole at all. It is recommended to cover the bottom of the bathroom with varnish or waterproof paint.
- Taz. Does not require a large pit. It can be used as a base for a temporary artificial pond, or as a permanent decoration of the site.
- Tire– allows you to arrange a small decorative element landscape design. The tire is cut in half, placed in a prepared hole, covered polymer film.
- Pots, boxes, buckets, tin barrels and to create mini-ponds on the site. Insulation is also made with polymer film. This option is suitable for growing aquatic plants.

Even with complete absence budget, you can create a pond that will become a real decoration of your summer cottage.
Water filtration and care
To turn a pond into a complete compositional element, you need to take care of its decoration. If this is a pond with fish, you cannot do without a filtration system.
For an artificial reservoir made with your own hands at the dacha, you can use the simplest system filtration. To do this, you will need a small pumping station with a sand filter. The system requires two pipes: one will output dirty water, the other is to re-supply purified water into the reservoir. If additional purification is needed, you can make a small stream with sand through which filtered water will flow.

Proper water purification in artificial reservoirs Source static.tildacdn.com
Ready-made filtration kits can be purchased in stores. Detailed instructions allow installation without the involvement of specialists.
As for maintenance, a complete cleaning once a year is sufficient for a small pond. Features of seasonal care:
- in the spring with the help submersible pump pump out all the water from the reservoir, clean the bottom of dirt manually or using a special vacuum cleaner with a dirt filter. In April, fountains and waterfalls are launched;
- V summer period It is enough to remove weeds around the pond, clean the water from filamentous algae, and add water if it dries out;
- in the fall, fallen leaves are collected using a net or a regular rake (you can cover the pond with a special net, which will protect the water from contamination during periods of heavy leaf fall);
- To prevent the water from blooming, a vessel with charcoal located at the bottom of the pond will help.

How to clean a pond of duckweed and get rid of silt, mud, and algae Source storage.kun.uz
The listed actions do not require a lot of effort, time and money, since the care is gradual.
Video description
How to make a pond filter with your own hands, watch the video:
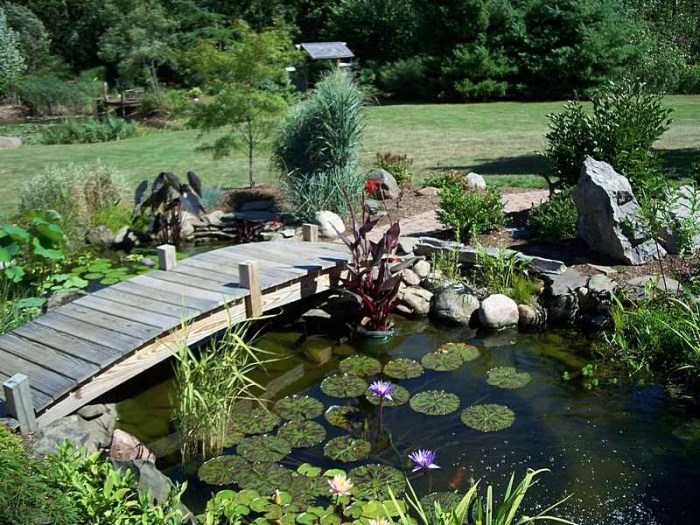
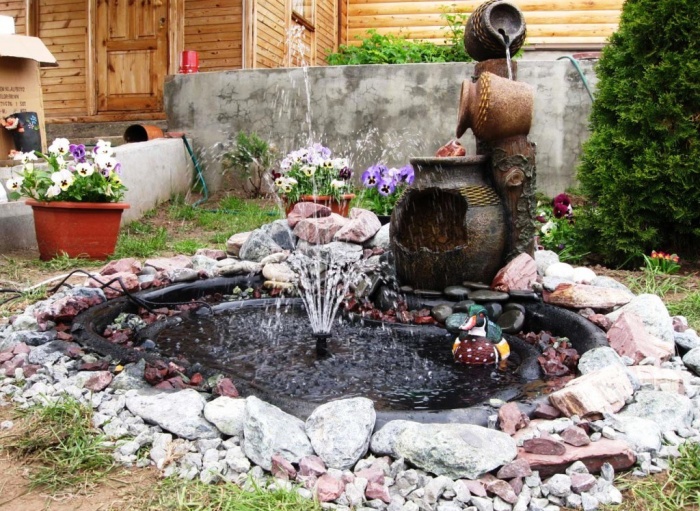
After completing all the arrangement work, you can begin the decorating stage. The decor can be stones, interesting figures, figurines, small trees.
Depending on the size of the pond and the entire dacha plot, the reservoir can be supplemented with:
- launch the fish;
- plant aquatic plants;
- make a bridge, a small island in the middle of a pond, a fountain, a waterfall;
- equip night lighting;
- put a bench, gazebo, sun loungers, barbecue;
- lay out the paths with gravel and stone;
- install a beautiful fence.

Additional elements will allow you to turn an ordinary artificial pond to a full recreation area in own garden. When choosing them, you should be guided by several rules:
- It is better to choose stones different sizes to make the composition more interesting. For safety reasons, do not use sharp stones.
- You should not dig a deep pit with steep walls, since it is very difficult to decorate it.
- Container gardening is much more convenient.

Fantasy in decoration is limitless, it all depends on the personal preferences of the owner of the summer cottage, the available budget, and the general style of landscape design.
Planting
Particular attention should be paid to planting aquatic plants. First you need to choose them correctly, since further biological balance and self-regulating processes depend on this:
- for the first deep level, a tail or arrowhead is suitable;
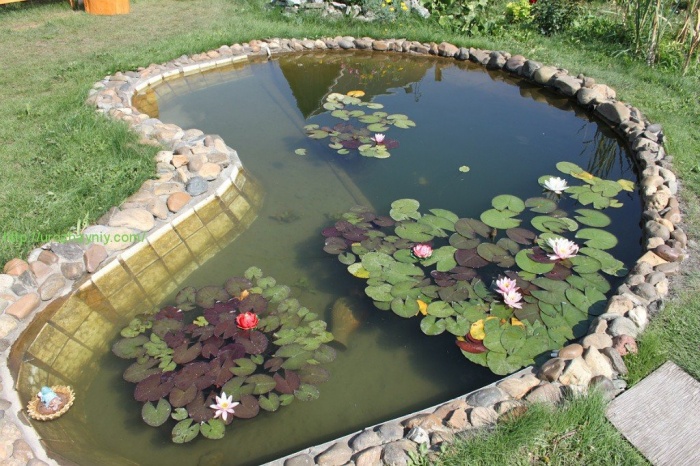
- Among the floating plants you can choose lilies, water hyacinths, and water lilies. They will not only decorate the pond, but will also protect the water from the scorching rays of the sun;
- ferns, sedges, reeds, and reeds are suitable for decorating the space around the pond;
- Among the flowering plants, the most suitable are weeding grass, bergenia, lungwort, water iris, kupena and others.

You can start planting plants immediately after starting the filtration system. It is much easier to care for them in the future if you use special containers for planting, which are placed at the bottom of the pit.
Winter maintenance of an artificial pond should begin long before the onset of frost. A special protective mesh will help protect water from excessive amounts of fallen leaves, dirt, and accumulation of swamp gas. Remove the nets after the first frost.
Key points in preparing an artificial pond for winter:
- The pond must overwinter without equipment, filters, pumps, nozzles, lamps; they must be thoroughly cleaned and stored indoors.
- Small ponds freeze completely to the bottom, so you need to remove all plants and fish.
- In order for reservoirs with a plastic bowl to withstand frost without deforming the base, it is recommended to lower several bottles filled with sand to the bottom at the rate of 1 bottle per 1 square meter reservoir
- You can start the reservoir if night temperatures are above zero.

Video description
For more information on preparing a reservoir for winter, watch this video:
Conclusion
Thus, if you understand the main nuances of arranging a pond at your dacha, then everyone can do it with their own hands. It doesn’t take a lot of time, effort and money to create an excellent water recreation area near your home.
In the summer we all want to have a good rest by the water, but not everyone has the opportunity to go to the sea. Someone is holding summer holiday on own dacha, but even on small area You can create a comfortable relaxation area for yourself using an artificial pond made by yourself.
Pond for a summer residence - where to start
So that the issue of constructing a reservoir does not seem so complicated, it is necessary to break the entire process into several stages and carry them out sequentially.

First, decide on the location for the future artificial pond and its size on your summer cottage.
How to choose the most suitable site for a pond in your country house:

Important! It is easier to build a pond of a small area. If you are confused by the amount of work or the financial side of the issue, start with a small lake.

Perhaps later, having experience and work skills, you will create a fairly large version of the reservoir at your dacha with your own hands; good experience in carrying out the preparation is shown in the video
Determining the size and shape of the future reservoir at the dacha
The depth of the reservoir, according to experts, should not be too great; for an artificial lake, a depth of up to two meters will be sufficient. The deepest part is usually made in 1/5 of the area of the entire reservoir.
When planning a pond, take into account the landscape of your dacha site. Designers advise doing it on a flat surface area, and if the topography of the dacha area is hilly, with slopes, in this case it is better to opt for a flowing stream or cascade.
You need to choose which version of the pond will fit most advantageously and interestingly into the landscape of your dacha site. Landscape designers offer a lot of design options decorative ponds, you just need to delve into the subtleties and nuances various projects and choose the best one, optimally suited for your dacha.

Varieties of shapes of water bodies
A reservoir can have clear geometric shore lines, especially if it is located on the territory near a mansion built in a strict aristocratic style, with alleys, paths, and flower beds of regular geometric shapes. In this option, a pond or lake will organically fit into the overall interior of the site.
A small pond can be made round or oval in shape, and moisture-loving plants can be used to decorate it.
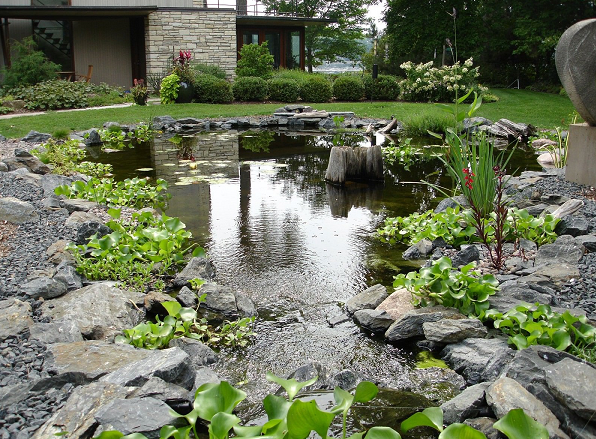
If you want to get closer to the natural landscape, the coastline is made in a winding or free-form shape so that it resembles as much as possible a natural body of water in a country house.

It is necessary to think in advance about the design style of the artificial lake so that it matches the style of the rest of the dacha, complementing it.
Before you begin work at your dacha, you also need to consider how you plan to use your future artificial pond. If you want to get a place for swimming, then it will not be possible to breed fish in it. The decorative pond cannot be used for swimming sanitary standards and hygiene requirements.
When choosing the size of a future reservoir, keep in mind that an artificial pond is the same biological system as a natural pond or lake, with optimal ratio animal and flora, with a water purification system, self-regulation of microorganisms.
It is easier to monitor and maintain the eco-balance in large artificial reservoirs; in small, as well as in small aquariums, it is much more difficult to maintain the necessary balance. But making it yourself, both financially and in terms of labor costs, is much easier to make a small pond.

Shape of a pit for a pond at the dacha
It is clear that in order to make an artificial pond in the country, first of all, you need to dig a pit of appropriate shapes and sizes. The foundation pit for a pond has its own characteristics. In shape, it resembles a deep plate with wide edges, as can be seen in the photo.

Along the edges of the pit there should be a shallow coastal zone, then there should be a protrusion that prevents the overflow of water from the coastal zone into the swimming area, and vice versa. A recess is made in the center to the required size.

To maintain ecological balance, the water in the pond must circulate, otherwise it will quickly become clogged, silt up and lose its decorative and attractive appearance.
In a small pond at the dacha, to maintain cleanliness, a skimmer is installed, which allows you to clean the surface layer of water from contaminants, and a UV sterilizer. To do this, drainage pipes are installed at the bottom of the reservoir, through which water is pumped into the filter and back to the swimming area, as in the photo.

Materials for waterproofing the bottom of a reservoir
There can be several options for making a waterproof bottom of a reservoir:
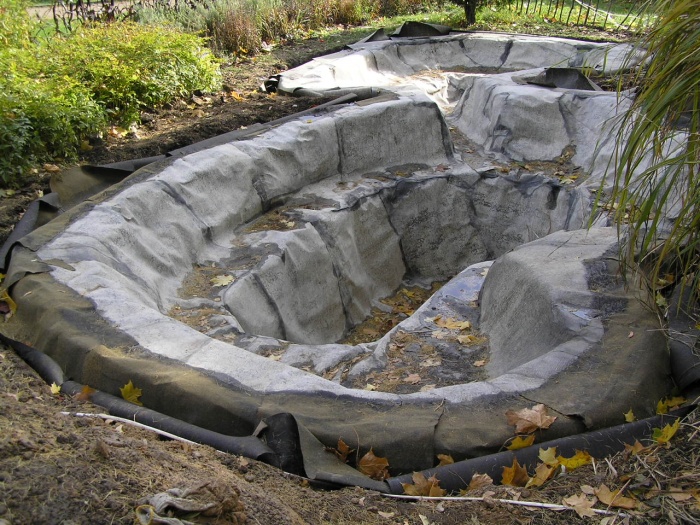
- Using a ready-made plastic mold. This choice of bottom greatly simplifies the procedure for making a reservoir for a summer residence, but it limits the possibilities for choosing the size, shape of the banks and the volume of the water space by the shape and dimensions of the selected container. Typically, such a container has a small volume of up to 4 m 3;
- The bottom of a reservoir in a country house can be made of concrete, but this will be a rather labor-intensive procedure, and additional protection from frost will be required to avoid cracking concrete base. In addition, if the need arises to remodel or dismantle the pond at the dacha, this will be quite problematic;
- One of the most budget options for the dacha there will be a pond bottom made of clay, but the process is quite labor-intensive. You will need to apply two layers of clay dough to the bottom of the reservoir bowl, and then strengthen the bottom with fine gravel, pressing it into the clay layer;
- The most optimal and most used method is to use a special film laid on the bottom of the pit.
Important! If the width of the film roll does not allow covering the entire bottom of the pit in one solid piece, it is necessary to weld the seams so that water cannot leak out of the reservoir.
When choosing film, keep in mind that cheaper options have a significantly shorter service life and are destroyed faster when exposed to frost and sunlight, video
Excavation work
Digging a pit under a body of water 20-30m2 or more with your own hands is not an easy task. It may be easier to use equipment in the form of a small excavator. If the amount of excavation work is insignificant, you may be able to do it yourself or hire several workers armed with shovels, video
The main thing is to correctly indicate the size and shape of the required pit.
We mark the boundaries of the future reservoir using a rope or hose; you can sprinkle the contours with sand so that they can be easily distinguished. Then, along the contour of the coastline, we dig a trench to approximately the depth of a bayonet, thus obtaining the first level of depth - the line of the swamp zone, up to 40 cm deep and 30-50 cm wide. Then we dig the next level inside with a gradual deepening towards the center of the pit, so that as a result It turned out to be a bowl, as in the photo.

The second level is made to a depth of 1 meter, the deepest third level is in the center of the pit.
Important! While digging a pit, check the level of the banks; they should be the same height.
Along the perimeter of the dug pit, another ditch is dug, up to 30 cm deep, so that the edges of the film can be laid and secured in it.
Film laying
Before laying the film, the bottom of the pit must be leveled, compacted, stones, tree roots, and debris must be removed. Then pour a layer of sand, 15-20 cm, carefully level and compact. After this, a layer of roofing felt or geotextile is laid, old linoleum can be used, and then the bottom is lined with film.
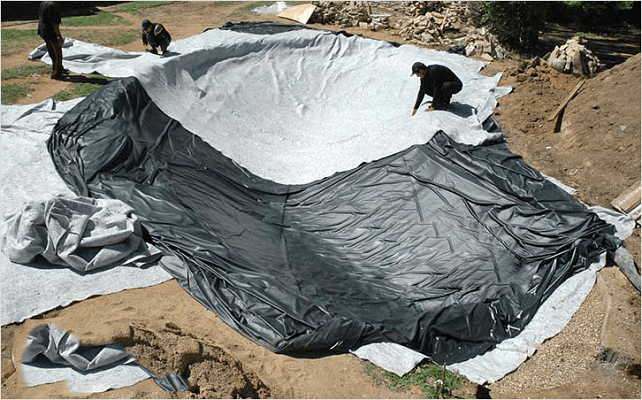
The edges of the film are secured with bricks or stones, and after that the reservoir is filled with water. Water is poured in several portions, if there are air bubbles under the film, they need to be removed during the process of filling the reservoir with water, take into account the experience of others in the video https://www.youtube.com/watch?v=JlxWYFNrkig. After this, the ends of the film are laid in the prepared ditch and secured with crushed stone or large stones.
Arrangement of a reservoir at the dacha with your own hands step by step
When you fill the pond at your dacha with water, measure how much water is required. This will be the capacity of your pond. In accordance with these data it will be possible to select required power pump, filters and other equipment for water purification in a pond at the dacha. Usually you can purchase it as a kit and install it yourself according to the instructions.
Then you need to strengthen the edge so that the earth does not crumble into the reservoir, and design the shoreline in accordance with your project.

You can place a large stone on the bottom; it must be round in shape so as not to damage the film and injure swimmers. You can also decorate the banks of a pond at your dacha with stones; it is better if large boulders alternate with smaller stones. In addition to stones, you can use driftwood in the design of a pond at your dacha, wooden structures, animal figurines and other options.
To decorate the banks of a reservoir in a dacha, moisture-loving plants with large leaves, for example, bergenia, as well as ferns, lilies of the valley, coniferous shrubs. In shallow water you can plant plants such as calamus, reeds, cattails, or water lilies as in the video
In the center of the garden pond there are water lilies and lotus. Interesting design solution there will be a creation floating in the center of the pond flower arrangement, as in the photo.
Typically, plants in special containers or pots are used to decorate decorative ponds; they are conveniently removed while cleaning the bottom and changing the water.
Conclusion
Anyone can create a reservoir in their dacha; the main thing is to carefully consider the recommendations of experts. Of course, you will have to spend time and money, but as a result you will get a wonderful place to relax and will enjoy spending time at your dacha.
How nice it is to spend time on a beautiful summer day on the shore of a picturesque forest lake, enjoying the coolness and beautiful views of aquatic vegetation. Knowing how to make a pond at your dacha with your own hands, you can arrange a similar corner on your own plot of land. You just need to decide on the design and clearly follow all the stages of work contained in the instructions given below.
Preparatory stage
Choosing a pond style
Before proceeding directly to construction, you should choose the design of the pond at the dacha - by going through many standard sketches and samples with your own hands, you can create a unique pond, adding individuality to it with the help of minor design changes or the use of additional decor.
Of course, the simplest option is a mini-pond made of tires, which, no matter what, will look great on a small summer cottage.
However, if you have enough space, and you are not bothered by the price of materials and the cost of services for constructing a pond, you can make an excellent decorative pond from concrete, which will act as a central element of the landscape design of the entire site.

Advice!
Used as temporary housing country houses After the construction of a permanent structure, block containers can be converted into a bathhouse, for example.
In this regard, it is advisable to locate the reservoir not far from them, in order to subsequently organize a recreation area there, organically completing the entire ensemble.
When choosing a style for a pond, first of all, you need to take into account the architectural design that was used when building the house and laying out the garden.
It's good when small pond at the dacha - designed and built with your own hands - is combined with the following elements:
- coastline;
- design of garden paths;
- the appearance of small garden forms and so on.
A gazebo or terrace looks most appropriate near a pond, sitting on which you can comfortably contemplate the calm surface of the water.
Let's look at some points in more detail:
- Stylistics. Features of a Japanese pond are stones various sizes and forms and conifers. This style does not accept the presence large quantity colorful herbs. The Chinese pond is decorated with brighter and lush vegetation. There must be trees and a classic convex bridge. You can also plant a pond with local plants, without various exotic specimens. This style is called “ethno-garden”.

- Geometric shape. A strict rectangular or square pond looks good next to residential building, perfectly combined with its strict forms. In addition, this form is often used when arranging a pond in the courtyard. Flower beds of the same shape and strict concrete paths organically complement the ensemble.
Advice!
Garden paths, regardless of the material used to make them, go well with ponds.
The terrace board looks organic, from which a bridge is made over the surface of the water or concrete slabs, as if floating above the surface.
Round ponds are suitable for decorating grassy lawns and neat ones. In this case additional element A pergola covered with ivy, as well as a separate group of low-growing trees, will serve.
It should be noted that it is easiest to build a round small pond at the dacha with your own hands. To do this, you can use many ready-made forms: from concrete rings for the well to the car tire already mentioned above.

Selection of location, size and material
The correct choice of the site where the reservoir will be located is the key to its normal functioning throughout the year. Otherwise, you may encounter a so-called bloom - a rapid proliferation of microscopic green algae that covers the water surface with an unaesthetic brown film.
- too much illumination leads to excessive development of harmful microorganisms in the water;
- Being in the shade negatively affects the growth of ornamental aquatic plants and the behavior of fish living in the pond.
The best option is lighting for 5-6 hours. The water surface should be open from the south. It is also inappropriate to arrange a pond in the shade of massive trees. The leaves falling from them will constantly clog the pond.
The ideal size for this hydraulic structure is 3% of the space land plot. However, not every summer resident is ready to sacrifice such an amount of land for him. In addition, you need to remember that small country pond It’s easier and cheaper to make with your own hands than a vast lake.
As for depth, a three-stage system is most often used:
- coastal zone - for aquatic plants;
- shallow water zone - for growing water lilies and water lilies;
- deep zone - for wintering aquatic inhabitants (if their breeding is planned).
The maximum required depth is 180 cm. Below this level the soil does not freeze, which guarantees the presence of water under the ice layer in winter.
Pay attention!
The deepest zone can occupy no more than 1/5 of the entire pond area.
This will be quite enough for the wintering of fish, and its increase will negatively affect the cost of work on arranging the reservoir.

Once you have decided on the size and shape, it's time to move on to choosing materials. The most expensive and reliable option– casting concrete bowl, reinforced with metal rods or mesh. A little less expensive is to use a ready-made plastic container, which can be purchased at a hardware supermarket.
However, the optimal and cheapest method is to make a pond using a special film that covers the bottom of the future pond.
Self-production
The sequence of actions for constructing a decorative hydraulic structure on a summer cottage is as follows:
- As with any other construction, first of all, you should create a sketch of the future structure. When drawing, you must adhere to the selected scale. Reflect the size of the pond, its depth, the width of the shelves on which coastal plants will be planted, as well as the design of the future landscaping. With this approach, you can avoid alterations and changes during the construction process.
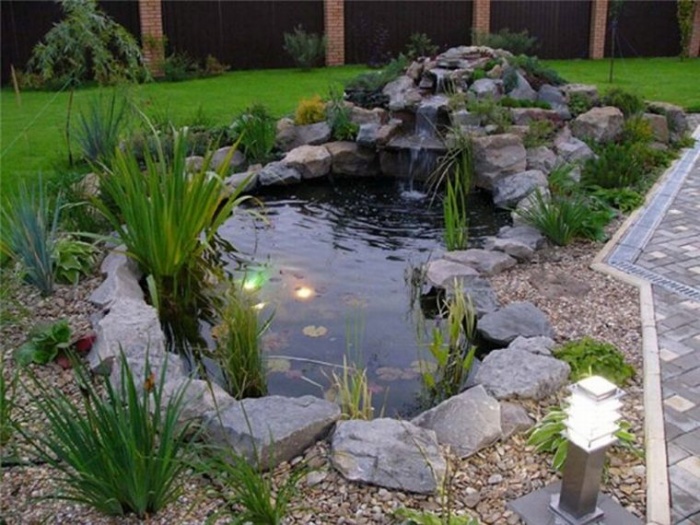
It is also advisable to provide an accent detail - a tree, stone, bridge, sculpture or island, which will become the highlight of the landscape design element being developed.

- The contour of the pond is best chosen locally. To outline it, you can use twine, a garden hose or sand. Remember that the opposite edges of the reservoir must be at the same level with each other.
The bottom also needs to be made level. Measurements can be made using a special laser tool or an ordinary long board on which a building level is placed.

- Digging a pit.
The work should be done in the following sequence:
- the soil is removed to the first depth mark;
- a new line for deepening is marked;
- digging the pit continues to the next level;
- marking is done again;
- a small depression is dug, necessary for wintering fish.
Excavation work is quite a labor-intensive task, especially if the size of the future pond is large. It is best to hire an excavator for this purpose. Otherwise, be prepared that at a certain stage of digging, debris will accumulate in the bottom area. groundwater, and therefore you have to work in semi-liquid mud.

To avoid this, you can use a water pump designed for pumping suspended matter. Dirt is dumped into an auxiliary pit.
Advice!
If on personal plot If there is no electricity, renting a diesel generator for your dacha will help you.
This unit will provide the necessary electricity not only for the pump, but also for many other tools that make the work of creating a pond easier.
- As soon as the digging is completed, its dimensions are measured using a string, taking into account the resulting depth. To this value is added about 1 meter for allowances. The resulting value is necessary to purchase a film of the appropriate size.

Many people wonder where to remove the soil that was removed during digging of a pit.
In this regard, we can recommend the following:
- raise the level of the site by evenly distributing the soil throughout the garden;
- form an alpine slide out of it;
- make the basis for ledges along which the stream will flow.
- Then the entire pond bowl is carefully lined with waterproof film. In order not to tear the coating, it is recommended to first cover the pit with an additional layer of geotextile. Then pebbles and roots will not be able to tear the film after pouring water. Cheaper options are old linoleum or a compacted layer of fine-grained sand.

Work should be carried out on a warm, sunny day. This weather makes the film more flexible; it stretches easily and follows all the irregularities and decorative curves of the pond.
- To secure the film, a small trench is dug along the edge of the pond. The edges of the material are lowered into it and covered with crushed stone. More reliable method you can't imagine.
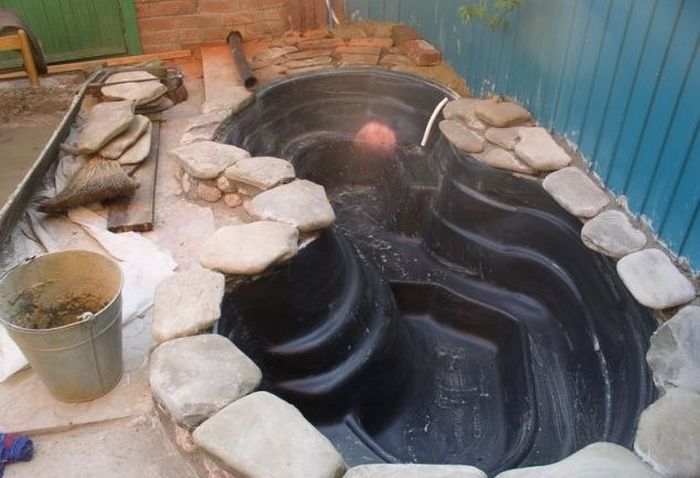
- In order to strengthen the edge of the reservoir and prevent soil from collapsing, the edges of the reservoir should be strengthened concrete blocks or plastic pipes, fixed on pegs. Wild natural stone is excellent as decor.

- The bottom of the pond is formed with crushed stone or boulders. Plants are planted in special plastic boxes, which are installed in in the right places reservoir and near it.

- Next, water is poured. The water meter readings should be recorded before and after this process. This will allow you to calculate the volume of liquid in the depression, which will be useful later when purchasing equipment and chemicals to care for the pond.
- It is best to make a pond with circulation. In this case, the water in it will be constantly renewed and will not bloom. To do this, an embankment is made near the reservoir from which the stream will flow. Water is supplied upstairs by a submersible pump equipped with a cleaning system. The decoration of all elements is at your discretion.

Conclusion
Having carefully read the material presented above, you should not have any questions about how to build a pond in your country house with your own hands. Gather additional information about the construction process artificial reservoirs you can from the video in this article.


Even in a small area, you can equip a quite decent artificial pond, sacrificing only a few beds. It won't cost much. In order to create a pond at your dacha with your own hands, you only need geotextiles, PVC film or polyethylene and a few days of free time.
Choosing a location for an artificial pond
When choosing a location for a pond great value has it illumination. Since aquatic plants require enough sunlight, it should not be too shaded. But overheating the water too much is also undesirable, as this can lead to blooming of the surface.The most suitable area for placing an artificial pond is a place near the fence in the corner of the garden, which is illuminated in the morning, but is in partial shade at noon. The pond should not be placed near large trees: growing roots can damage the covering of the pit. And during leaf fall, you will have to clean the pond of leaves almost every day.
It is better to place an artificial pond in partial shade
Pit preparation
The size of the artificial reservoir can be any - it all depends only on the desire of the owner and free space on the site. But it should be taken into account that a pond that is too large will require more care.1. With the help of driven stakes and rope, markings are made in the selected place according to the shape of the pond.

2. The turf is removed along the perimeter of the marking.
3. A small pit can be dug with an ordinary shovel. To prevent the walls of the pit from crumbling, its walls must have slight slope. There is no need to make the artificial pond too deep. Minimum depth bowls - 60 cm (plus 30-40 cm for backfilling drainage with crushed stone and sand).
4. If fish are planned to be released into the pond, its depth should be lower soil freezing level in this climatic region. Otherwise, the water at the bottom will freeze and the fish will die. In the central part of Russia, the soil freezes to a depth of about 1.4-1.5 m.
5. For planting aquatic plants, it is better if the edges of the pit are stepped. The size of each of these steps is 10-15 cm.

Stepped pit for a pond
6. All large stones and branches that can damage the not very strong film are removed from the bottom of the pit.
7. Fill the bottom of the pit with drainage: crushed stone, and then sand in each layer of 20 cm and compacted.
8. To protect against soil erosion, a layer of geotextiles. It can be replaced with any durable fabric: old carpets, blankets, old oilcloth or roofing felt. This protective layer is laid with an overlap of about 50 cm on the edges of the pit.

Laying roofing felt
9. Next, you can lay it on the bottom of the reservoir plastic film(its shelf life is about 3 years), PVC film (it will last longer, about 15 years) or durable butyl rubber. To prevent the film from being damaged when filling with water, it must be laid without tension.

A film is placed on the bottom of the pit
10. Excess geotextile and film should not be cut off immediately. They will take the desired shape only after filling the pond with water. It is better to dig around the perimeter of the pit shallow trench, into which you can place the edges of the fabric and film and lightly cover it with earth.
11. After filling the artificial reservoir with water, stones are laid along its edges, which will not only hold the material covering the bottom of the pond, but also serve as decoration. The edges of such an artificial reservoir can be decorate and decorative tiles, slate, sandstone or other suitable sized stones or bricks.

Stones are laid along the edges of the reservoir
12. The area adjacent to the reservoir can be filled with crushed stone or marble chips.

Decoration of the edge of the pond
13. In the center or at the edge of the pond you can install a small artificial fountain.
14. Along the edges of the reservoir you can install several small lamps on solar powered.
Advice. If there is too little space on the site, a small artificial pond can be made from an old wheel or bathtub, buried in the ground and trimmed around the edge with stones (see photo).

A small artificial pond made from old bath

Pond from an old wheel
Pond cleaning
To clean a large reservoir, you can use the simplest filtration system: a small pumping station with sand filter. Two pipes are installed into the pond: one serves to collect water, from the second, purified water will flow back into the pool. Additional purification can be provided by a small stream filled with sand, through which the filtered water will flow before returning to the pool. It can flow into a pond over a small waterfall.
Pond filter
A small pond only needs to be cleaned manually once a season. To do this, completely pump out the water from it using a submersible pump and remove accumulated dirt from the bottom. To clean the pond, you can also use a special vacuum cleaner equipped with a filter, which can be used to collect dirt from the bottom.

Vacuum cleaner for pond cleaning
Advice. If you place a vessel filled with charcoal, the water in it will not bloom for a long time.
Fallen leaves can be collected from the surface of the pond using a net. In autumn, during heavy leaf fall, the pond can be covered with a special net. To prevent dirt from entering during the winter, the pond is covered with any covering material.
Advice. To prevent the film from cracking in cold weather, it is better not to drain the water during the winter. To compensate for the pressure generated when ice expands, you can throw several wooden planks or plastic bottles filled with water.
Planting aquatic plants
Aquatic plants serve not only original decoration pond. Marshwort, hornwort, elodea and other plants that can saturate the reservoir with oxygen will help protect the water surface from greening.Naturally, only those plants that can develop well in a given climatic region should be planted. To decorate the pond, you can use traditional plants: reeds, sedges, reeds. Large plants(lilies, water lilies) will be able to cover the surface of the water from the bright scorching sun and reduce the heating of the water. TO flowering plants Those that prefer to settle near bodies of water include arrowhead, kupena, weeping grass, fern, bergenia, lungwort, water iris, etc.
Advice. To plant plants, you can use special containers that are placed along the bottom of the pit. In this case, caring for the plants will be much easier.

Planting aquatic plants
Video: Do-it-yourself pond at the dacha
An artificial pond is an effective component of landscape design, designed to give peace and tranquility. What could be more pleasant than sitting in a gazebo entwined with roses and admiring the mirror surface reflecting snow-white clouds and flowering shrubs? Have you been dreaming of a small pond for a long time, but don’t have enough money to equip it? No problem. You can do it yourself without the help of specialists. All you need to do is read this article carefully and apply the acquired knowledge in practice! So, how to make an artificial pond: instructions for creating it yourself.
Artificial pond on site
Choosing the right place for the pond
Choosing the right place for a pond is a guarantee that it will really please the eye clean water, and not scare away others with the stormy summer “blooming”. An artificial pond should be illuminated by the sun 6-7 hours a day. It is important to find a middle ground, because... an excess of sun will lead to intensive proliferation of algae, and a lack of it will lead to the complete extinction of “ornamental inhabitants”.
The pond should be located on an open surface, at a relative distance from trees. Otherwise, you doom yourself to constantly fishing out branches and fallen leaves from it. In addition, as plant roots grow, they can damage the base or tear the film. Do not forget that your home lake needs to be cleaned and the water in it changed from time to time. It’s good if a source of clean water is nearby - this will solve the filling problem.

Design of a recreation area with a small pond
Dimensions and design
As for the sizes, everything, of course, is individual and depends on the area of your property. It is believed that a reservoir should occupy approximately 3% of the land area. But that's up to you to decide. Do not make the pond too deep - it will be difficult to care for. Provide three degrees of depth. The first one will belong coastal plants, the second - for water lilies, the third - for fish.
If we talk about the design of the future reservoir, then you should start from your preferences and the style of the existing landscape. Do you want to emphasize the rigor and geometric nature of your home? Square or rectangular pond - best solution. Those who want to fill their space with oriental motifs should take a closer look at small tanks irregular shape, bordered by smooth boulders and low trees with bright foliage.

Original artificial pond
Very popular round ponds on a green lawn, surrounded by original lanterns. You can build a bridge across a pond from decking boards, create flower beds nearby, form stone paths, thus creating the ideal atmosphere for a good rest.

A perfectly round pond
Materials for artificial pond
You can make a pond with your own hands from different materials. The most commonly used films are film, butyl rubber, or ready-made containers. Which option to choose is up to you. But first, let's look at their advantages and disadvantages.
- PVC film. An excellent material for homemade ponds. You can easily build a structure of the desired shape. If dismantling is necessary, this will not be difficult. Affordable price film provides everyone with the opportunity to become the owner beautiful pond without significant financial costs. Among the disadvantages, it is worth noting the fragility of the material, i.e. After some time, you will have to worry about building a new reservoir.

The process of laying PVC film in a pit
- Butyl rubber. Like PVC film, it allows you to create ponds of any shape, but has a mass additional advantages. Rubber can withstand high loads and maintain excellent strength characteristics for a long time. Of course, these advantages directly affect the cost - in this case it will be an order of magnitude higher.

Butyl rubber for pond construction
- Ready-made plastic tanks. Most quick way acquire an attractive lake. Plastic containers are durable and resistant to adverse weather conditions, however, they have a limited range of sizes and shapes.

A small pond from a finished tank
Some craftsmen build ponds from what they can find in the garage - from an old bathtub, a barrel, a basin of suitable size, a trough, and even a tractor tire. Well, that’s possible. Original and well worthy of attention.
Sequence of work
Creating a pond using PVC film is considered the most common, so we will consider it.
- We make a plan. Before you begin work, sketch out a rough plan indicating the width and depth of the future pond. It is advisable to think about decoration in advance. This approach will allow you to avoid rework and, as a result, get what you wanted;
- We outline the contours of the pond. This can be done using an ordinary hose or simply by scattering sand along the expected boundaries of the reservoir. Think again whether everything suits you - at this stage you can change something;
- Digging a pit. Let's get started earthworks. We form the first two tiers of the reservoir. Approximate depth - 30 cm, width - 20 cm. Then we dig out the main bowl. Please note that the total depth must be greater than 80 cm. Otherwise, your pond will be too hot in summer and too cold in winter. In such conditions, it is unlikely that anyone or anything will live there;
- We measure the dimensions. The pit is ready, now we measure its size and depth. It adds 50 cm at the edges, and with the obtained figures we can safely go to a specialized store to purchase the required amount of film;
- Line the bottom and walls with film. To extend the life of polyvinyl chloride, geotextiles, linoleum, roofing felt are laid under it, or at least sand is poured. If you do this on a hot sunny day, you can achieve maximum elasticity from the material and easily give it the desired shape;
- Fix the edge. To do this, we dig a trench, place the wrapped ends of the film in it and fill it with crushed stone for greater reliability. Plastic pipes nailed to pegs will help prevent the edges of the reservoir from crumbling;
- Decorating the pond. Decorate the edges of the pond with stones, install a backlit fountain, and place containers with plants in the bowl. Marigold and marsh iris can be planted in the coastal zone. In shallow water there are reeds and calamus. Deep water will become great place for water lilies, water hyacinth, elodea, aponogethon;
- Fill with water. After graduation preparatory work, you can pour water into the pond. A stream that will ensure continuous circulation will help prevent stagnation. The source of the stream is raised above the level of the reservoir, and water is supplied using a pump resting at the bottom. Don't forget to install a cleaning filter.
Video: instructions for constructing a pond in a small area
The pond is ready. All that remains is to launch the fish. It is better to keep unpretentious crucian carp, koi carp and veiltails. The design of the surrounding area is a purely individual matter. Some will want to build a gazebo, others will want to create flower beds, and others will want to install a barbecue.

Koi carp in an artificial pond
How to properly care
Caring for an artificial pond does not require much effort or time. If the pond is dry, add water to it. In summer, remove string algae and weeds from around your home pond. In autumn, clear the pond of falling leaves. You can make your task easier and stretch a net over the water surface. With the onset of cold weather, the plants are transplanted into other containers and sent for the winter. The equipment is also removed. In the spring, the walls of the pond are scraped out of silt, and everything returns to normal.
As you can see, arranging a pond with your own hands is not like that. difficult task. All you need is desire, a little free time and a little imagination. Go for it!