A shower in the country is a great way to ensure a comfortable country holiday. At the same time, maximum convenience can be obtained with minimal costs, if the shower cabin for the dacha is built with your own hands. It remains only to determine a few important points.
It’s hard to imagine your favorite cottage without two things – a hammock and a summer shower. With the first one, everything is simple and you don’t have to rack your brains for a long time. But creating an analogue of a shower room in nature, although it gives enormous scope for imagination, can be fraught with a number of difficulties.

An outdoor shower can be built from almost any material available to you.
Therefore, before you start purchasing building materials, you should familiarize yourself with the basic structural elements soul, the nuances of construction and possible variations of shower cabins, because not every one will be able to fully meet the requirements of the family and fit into a certain budget.
Summer shower design
As a rule, summer shower is a frame structure of square or rectangular shape, which is installed on a prepared base and covered with any comfortable material. A storage tank with or without heated water is installed on top of the cabin.

An example of preparing a drawing of a summer shower
The design of a summer shower largely depends on the requirements that are placed on it. This could be a regular shower stall measuring 100x100 cm and 2.5 m high, or a more practical structure with a changing room. It is mandatory to organize a water drainage system and support for the frame.
Do a full-fledged strip foundation in this case there is no need. The support is usually 4 metal pipes, buried 1 m into the ground at the corners of the building. For better stability they are concreted. Metal or wooden beams, on which a drain pan is installed and the frame is attached. The rafters are strengthened on the top frame, a layer of waterproofing is laid and a tank is installed.
Main stages of construction
The process of constructing a shower cabin can be divided into several stages:
Choosing a location;
- Construction of the drainage system and foundation;
- Construction and cladding of the frame;
- Installation and connection of the tank;
- Cabin arrangement.
Where to build a shower

To build a shower, choose an unshaded place located on a hill
There should be no drafts in the area where the shower will be located. It is better if the tank is exposed to direct sunlight throughout the day. The shower should be located at some distance from the country house. And to ensure normal water flow, it is located at the highest point of the landscape.
Arranging a drain for a summer shower
The issue of water drainage can be solved in several ways, the main thing is not to make own garden swamp. The wastewater can be drained into a filtration well, from where it will gradually seep into the ground. Or they set up a filtration field. The way to organize such cleaning at dachas is often to distribute water through channels, for example, between beds.
Shower waste may drain open or in a closed way. An open drainage system, also known as a regular ditch, can be made if the soil is sufficiently moisture-resistant and the water flow is small. Sometimes the canal walls need to be further strengthened.

Options for arranging a drain for a country shower
When constructing drains with your own hands, it is important to ensure the channel slope is 0.5-1 centimeter/1 meter. Closed branch The only difference is that the water leaves through pipes dug underground. Typically, a closed type drain is installed if the water goes to an autonomous treatment facility.
Advice! To improve soil drainage near your shower, you can plant a few moisture-loving plants. Green spaces will not only decorate the landscape, but also protect the area around the shower stall from waterlogging. This is especially true in the case of open drainage.
What material to choose for walls
You can sheathe the frame in the shower with any moisture-resistant material, it can be:
- Film or tarpaulin;
- Tree;
- Fiberboard, OSB;
- Plexiglas;
- Metal profile;
- Slate;
- Shower made of polycarbonate.
Any of the selected finishing materials secured to the frame with self-tapping screws. A shower cabin made of film is sometimes called seasonal or disposable; it is neither strong nor durable.

Shower walls can be built from the material that you like and can afford
Wood looks very beautiful, but requires special processing and is not the cheapest material.
The best option may be a polycarbonate shower cabin. Working with it does not cause any particular difficulties even for beginners, variations color solutions huge, and the reliability and durability of the material fully correspond to the consumer level. The thickness of the polycarbonate for the shower should be 8 -16 mm.
Shower tank

Installing a water tank on a shower stall
There are no special requirements for water tanks. But there are a number of recommendations that will help you choose the best option.
- A metal container will heat up faster under the sun, while a plastic container is more durable because it is not subject to corrosion and is much lighter, which will significantly reduce the load on the frame.
- The volume of the tank is selected individually; on average, it will require 30-50 liters per day per person.
- Typically, the tank is painted black; it absorbs heat better, therefore, the water will heat up faster.
- The container must be closed with a lid, otherwise dust and debris will get into the water.
- Before installation on the frame, an outlet for the tap is cut out in the tank. For summer showers, stores sell shower kits that include: a tube, a watering can, a tap and special fittings. It is important that the hole in the tank matches the diameter of the parts of the selected kit.

Installation of a tank and outlet for a shower head
- A practical solution would be to install a tank with built-in temperature and water level sensors.
Advice! Recently, supports are often installed around the perimeter of the tank, which are then sheathed with polycarbonate. This creates a greenhouse effect. The tank is not blown by the wind, the water in it heats up faster and maintains its temperature longer.
Shower in the country with heated water: ways of arrangement
A shower cabin for a dacha can be made with water heating, which does not depend on
sun rays. The most common option is the installation of heating elements. They can be installed on most tanks with your own hands.

Diagram: device of a heating water tank
You can also organize water heating using gas boiler low power or boiler, but their installation in accordance with safety requirements at the dacha is sometimes impossible.
Another option - solar panels. They are glass boxes, inside of which a greenhouse effect, and the water is heated even on a cloudy day
Do-it-yourself shower arrangement
Usually placed on the floor in the shower stall wooden grate (wooden pallet) or tiled. You can also install a factory shower tray, acrylic, plastic or metal. The door for a summer shower is usually made of the same material as the walls. If the shower room has a changing room, it can be fenced off with a waterproof curtain. Don't forget about lighting. During the day, light into the cabin should pass through a window, which is often located directly under the ceiling.

Options for equipping trays for summer showers
You can also run electrical wiring to the shower and connect a lamp, special attention in this case, the focus is on wire insulation. Additional equipment for a summer shower can be anything: shelves, soap dishes, hooks for clothes and towels. Many interesting ideas can be seen in the photos of ready-made shower cabins, and some of them can rightfully be called a cottage decoration.
Construction of a summer shower: video
Country house shower project: photo


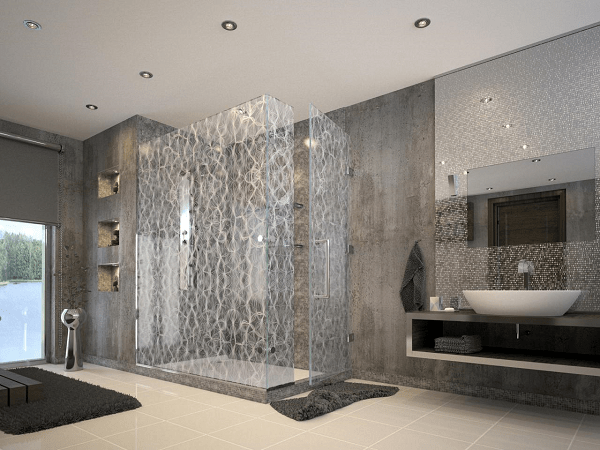
Cramped plastic shower cabins are gradually disappearing from the bathrooms of our apartments and houses, giving way to the once leading position of a new word in arranging the interior of a home shower. Today, a shower without a tray is becoming not only interesting, but often the minimized and maximally functional design of a shower without a tray allows you to throw out a clutter of plastic from the bathroom and make it more comfortable and spacious.
What is the secret of a shower stall without a tray?
Most lovers of new ideas who have built a shower stall in their home without a tray not only note beautiful design new shower, many problems associated with operation old system, gone forever. The new design of the shower cabin has become much more convenient and safer to use thanks to three main innovations:
- Instead of a slippery acrylic tray raised 15-20 cm above the tiles, in the new shower design a person stands directly on the floor;
- The functions of collecting water flowing onto the floor are performed by the floor surface made of tiles laid with a drainage slope in the direction of the drain or sewer drain;
- Instead of inconvenient curtains, sliding doors or shower curtains without a tray, a more aesthetic and practical glass fence is used.
All communications, water supplies and drain pipes are hidden in concrete walls and floors, under tile cladding and double waterproofing.

Important! A simple, at first glance, installation of a shower cabin without a tray in practice turns out to be a rather complex structure that requires high-quality and careful planning and installation of all structural elements.
Often, a floor drain is supplemented with built-in heating of the “warm floor” type. This device becomes especially useful for showers. country houses, in which heating and water heating are carried out using coal or wood stoves or boilers.
Installation of a shower stall without a tray
If the installation of cold and cold supply pipes hidden under the tiles hot water has been used for quite a long time, and any competent person familiar with installation can build a wiring according to such a scheme plastic pipes in the wall channel, then it is better to entrust the assembly and installation of the drain ladder for the tile tray to professionals.
The main problems that one has to face in the process of planning and installing a shower structure are as follows:
- To install a drain ladder, it is necessary to either redo and lower the level of sewer pipes in the house, or raise the surface of the shower floor by 10-15 cm and equip it with side skirts that prevent water from spilling throughout the bathroom;
- When using a shower without a tray, a large amount of water can scatter in the form of splashes and drops of water throughout the room, so a corner location is most often chosen for a shower stall;
- If in a plastic booth most of the splashes and spilled water were absorbed by the polycarbonate walls, then in the new design the water flows onto the wall tiles. Therefore, very high-quality waterproofing of a shower without a tray is required, laid directly under concrete screed tile bases.
In addition to the above, you will need to make the correct angle of the tile and maintain the angle of inclination of the drain pipe of the water seal. The drain itself has double waterproofing and a special flange mount, which ensures a stable position of the drain even under the weight of a very heavy person.

Features of the design and design of a shower cabin without a tray
Avoid using bulky plastic pallet in the shower room and the use of a floor-mounted water drainage system allowed us to take a completely different look at the design and design of the shower compartment. First of all, the shower space has become open and transparent, even if you install light-permeable partitions, a small structure made of glass and tiles will look much more elegant and attractive than a box made of acrylic and polycarbonate.

Layout diagrams for a shower without a tray in the interior of a bathroom and apartment
In the process of developing and designing the appearance of showers without a tray, several solutions were developed that can be called classic, widely used in the arrangement of cabins for apartments and private houses.
For example, it is enough effective solution is the use of mosaics and small tiles for finishing the walls and floors of the shower compartment. This cladding scheme makes the floor less slippery and eliminates the need for special safety silicone gratings or mats.

Advice! Making your shower floor safer can be easier and easier. in an accessible way, for example, install a grille made of polished wood, oak or walnut.
A wood surface polished and covered with waterproof varnish will reduce slipping and at the same time serve as a heat insulator if the shower room does not have a heated floor.
The design of the floor drain can be made in the form of a recess in the floor or equipped with side skirts, as in the photo. This is the most rational solution for building a shower stall in a small bathroom for an apartment with a standard layout.

Very often, designers try to hide a shower stall without a tray in a dedicated niche. Even if there are no niches in the layout of the room, they are equipped with the help of additional walls and false partitions.

A relatively new solution in the arrangement of shower cabins is the use of ceiling water dividers. Eliminating wall structures allows you to reduce water consumption and at the same time reduce the spread of drops and foam around the shower.
Forms and methods of arranging a shower enclosure without a tray
To protect the space from flying drops of water, sheet glass, molded polycarbonate or ordinary silicone shower curtains are most often used. This technique allows you to visually increase the light content relative to small space shower stall and make it more comfortable.
When using glass partitions to enclose shower stalls without a tray, an inherent drawback of this kind of solution appears - the remains of soapy water and salts are very clearly visible on the clean transparent glass surface. Therefore, shaded, frosted or textured glass will be more practical.
In private homes, a shower compartment without a tray is often equipped with a transparent ceiling, or the room is supplemented with a small window. This solution eliminates the need for additional lamps and light sources.

Often the most daring designers end up with a glass shower enclosure without a tray.

This solution makes sense for relatively small or combined bathrooms, where the use of a glass partition is not always justified. This is not to say that such a solution is very convenient, since flying spray can flood the room and make the floor wet and slippery even with the most careful use of the shower. Therefore for apartment options It would be more preferable to install at least the simplest through glass partition without a back wall.

This layout option makes it possible to block the main direction in which drops of water predominantly fly away; the absence of side panels makes it possible to effectively dry the surface of the tiles and glass from residual water with a draft. Often this scheme is used for the simplest shower designs that do not produce large quantities steam supersaturated with moisture.
In this sense, corner or completely enclosed showers are inferior to open enclosure schemes, so often a cabin sealed on three sides with glass panels has to be equipped with its own ventilation system.
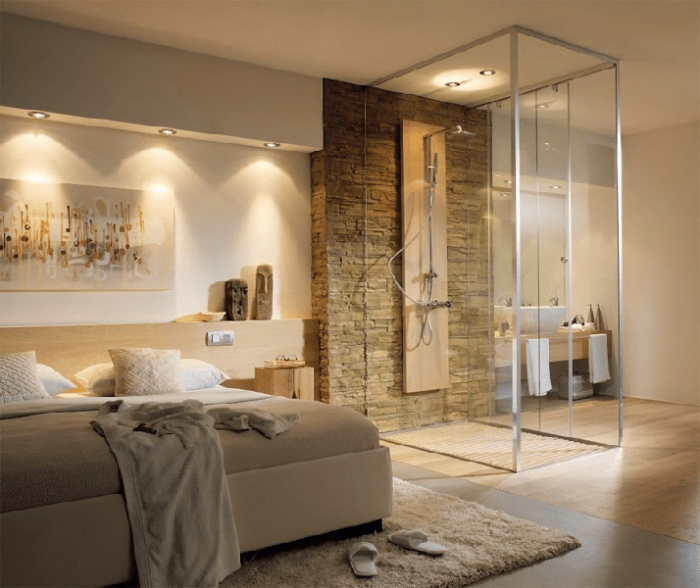
It is worth mentioning that completely enclosed shower cabins without a tray have their advantages. For example, such a design can be installed even in a residential area, in a studio apartment, where most of the space is designed as one large room. In addition, in a closed shower without a tray, you can install a steam generator for a steam room or equip a massage shower.

Conclusion
Today, a shower room without a tray is becoming the de facto standard for a comfortable modern living space. Most of the new apartments and houses are designed taking into account the wiring and arrangement of communications under floor option plum, without the use of special podiums or sides. Even if the apartment owners decide to move the shower stall from the bathroom to any other place, this will be quite easy to do due to the low level of the drain in sewer pipe. For apartments old layout It is almost impossible to carry out such a re-equipment without a radical and expensive re-laying of communications.
Having decided to arrange in country house shower, we thought. The most simple solution It would be nice to buy a fiberglass shower stall. But, having looked at the models that were installed by friends, we abandoned plastic: in dacha conditions it quickly loses its appearance, and the strength of such a cabin is low. Therefore, we decided to make a shower stall ourselves with a monolithic tray. When choosing the design and materials, we had to take into account that the house freezes in winter, and even in the off-season it can be quite cool.
Initial data
The room for the shower cabin was allocated between the outer wall of the house and the internal partition - the wall of the sauna. The water from it will be drained into the septic tank through a sewer pipe with a diameter of 110 mm, which was installed in advance during the installation of the foundation and floor (the latter is made of a concrete slab).
On aerated concrete shower walls coated with moisture-resistant cement plaster and then with a layer of fiber rubber waterproofing (in several passes), we glued ceramic tiles(we used moisture-resistant, frost-resistant tile adhesive). The level of the bottom tiles was designed to leave a gap for the multi-layer structure of the pallet. Then I assembled the drain (also called a sewer drain) and installed it in place, thoroughly sealing the pipe coming out of the floor silicone sealant(photo 1).
“Cake” of 8 layers
Surface of the slab at the base of the future shower tray I leveled it by filling it with self-leveling floor mixture, after which tile adhesive I attached sheets of insulation - extruded polystyrene foam - to it. The thickness of all layers was selected in accordance with the design of the drain: its grate should ultimately be 1-2 mm below the surface of the pan.
Finally, I adjusted the drain of the shower tray to the level and laid a plaster mesh over the insulation, securing it with self-tapping screws. Installed beacons and filled cement screed(photo 2). After the cement had gained strength (after 3 days at a temperature of +20 °C), I once again coated all the corners and joints of the planes with fiber rubber for additional waterproofing, and after it had dried, I filled it with tile adhesive. At the exit from the shower stall, I installed a water barrier made of sand-lime bricks and plastered it with moisture-resistant cement plaster over the reinforcing mesh.

To make taking a shower truly comfortable, and to make splashes of water dry faster, I decided to make a heated tray. To do this, on top of its surface and throughout the entire area of the bathroom, I laid the electrical cable of the heated floor (photo 3) according to the diagram (its total power was about 1.5 kW) and filled it with a coarse self-leveling mixture (3). It is better to use a special leveler for heated floors - it has a higher heat capacity and is less susceptible to thermal expansion.

Reference
Fiber rubber is a modern waterproofing mastic based on water based with the addition of reinforcing fibers to increase the strength of the finished coating.
Extruded polystyrene foam - foamed thermal insulation material. It differs from conventional foam plastic by having significantly greater compressive strength, which allows it to be laid as a load-bearing layer.
Sloping
After the first steps were completed, I began the final formation of the pallet bed. I primed the concrete surface of the screed with acrylic primer, and after it dried, I began to form a slope of the surface of the pallet towards the center of the shower stall. To do this, using a laser level, I marked the top line along the walls and laid out a small funnel with very sloping edges and a decrease towards the center from a thick, rough leveling mixture and tile adhesive for the natural outflow of water. I made the angular barrier of the shower tray round and injury-safe using a template from half a ventilation pipe.
The base for the shower tray was ready. For insurance, I covered it with two more layers of waterproofing, each 2-3 mm thick (photo 4).

Finishing
When the waterproofing has completely dried, it’s time finishing. I decided to use instead floor tiles glass mosaic: it is easier to adjust to uneven surface and it’s not difficult to install, since it is sold in ready-made sheets on a mesh base. Having laid out and adjusted all the sheets in place, I glued them on using special glue. The seams were grouted with latex grout with increased resistance to cracking and mold (photo 5). I applied it diagonally with an elastic rubber spatula, immediately removing the excess. To avoid leaving a whitish coating on the mosaic, I removed the grout in three steps: first with just a damp sponge, then with water with the addition of a few drops of acetic acid, and finally with crumpled dry newspaper. I waited half an hour and finally wiped off the remaining white deposits with a slightly damp sponge and newspaper until a dry, “clean” squeak was achieved (photo 6).
The shower tray turned out great. Over several years of operation and wintering in both a heated and freezing house, no cracks or damage appeared on it.

How to lay mosaic?
When adjusting sheets and needing to trim mosaic tiles It is most convenient to use nippers: the tiles are cut in one quick movement. For gluing, use special mosaic glue, and if the tiles are translucent, be sure to white. It is applied with a comb (notched) spatula with a tooth height of 3-4 mm. At a time, only apply glue to an area of one or two sheets. Having laid each sheet of the mosaic, it is carefully pressed down with the palm of your hand. The glue that has seeped into the seams is immediately removed (with a match or a plastic cross for tiles).
Country life attracts the opportunity to enjoy fresh air and unity with nature. Outside the city everything is fine, except for difficulties with hygiene procedures. Agree, would it be nice to make a heated summer shower with your own hands to solve this problem?
This option will help increase the comfort of staying at the dacha, but will not greatly affect the family budget. We will show you how to realize this idea.
The article discusses in detail the best constructive solutions and cabin construction technologies. Effective help will be useful tips on the choice of materials required in construction, arrangement of drainage, simple and quick heating of water. The information presented is supported by photo and video applications.
The comfort and ease of use of the structure depends on how well the summer shower is designed. The task of a thrifty owner is to build an economical, easily constructed and at the same time maximally functional shower, equipped with heating.
The easiest option to implement is an open shower.
An open summer shower is a framed, collapsible block or a modular container, one of the walls of which is adjacent to the main building
When choosing this arrangement option, the tank is installed on load-bearing wall buildings, positioning it in such a way that the sun's rays hit it at right angles.
Do you prefer closed designs that are convenient to use both in warm time year, and in the cold months? Build a stationary outdoor shower with the simplest system heating It may represent frame structure or capital construction.
The main advantage of this solution is that in warm times the water in the tank is heated by the sun's rays, and in cold months by means of a heating element
Traditionally, when building a shower with enough space for an adult to bathe, they focus on the following parameters:
- height– 2-3 m;
- width– 1.5 m;
- length– 1.9-2 m.
The indicated dimensions are convenient when constructing a structure from wooden boards. Taking into account the thickness of the walls in its finished form, the area of the structure is approximately 2 * 1.5 m, of which an area of 1 sq. m will be allocated for the shower stall. m, and for the locker room - 60*40 cm.
When using boards standard sizes the material is consumed with virtually no residue.
In addition to wooden planks, the most commonly used building materials for the construction of cabins are:
- polycarbonate sheets;
- moisture-resistant plywood;
- sheet metal;
- flat slate;
- lining;
- brick.
When choosing facing material It is important to focus on the exterior of the site so that the building harmoniously complements the already created architectural ensemble.
Polycarbonate shower cubicle:
Image gallery
Purchasing the necessary materials
In addition to making or purchasing a heating tank, you must purchase plastic water pipes D 50 mm. It is convenient to use a flexible silicone hose to supply water.
To set up a system of materials you will also need:
- gutter reinforced with metal mesh;
- valve with float;
- divider
To make a foundation pour when constructing a cesspool, you will need cement marked M150 and higher. The drain can be covered with waterproofing roll materials or hydroglass insulation.
To make a wooden floor in the shower, it is best to use a tongue-and-groove board, treated with a water-polymer emulsion or oil white.

For the final finishing and arrangement of the bathroom, you will need paint for exterior and interior work, spacious shelves for bathroom accessories and hooks for clothes.
To erect the structure you will need the following tools:
- building level;
- roulette;
- corner;
- screwdriver;
- self-tapping screws
To pre-mark the area, you also need to stock up on a skein of twine and wooden pegs.
Instructions for building a summer shower
There are no particular difficulties in building a summer shower in your country house yourself. The only stumbling block for a novice master may be the question of how to install a heated tank and how to organize a wastewater disposal system.
Step 1: Carrying out preparatory work
The scope of work during site preparation depends on the type of building being built. If you plan to build a temporary frame structure, to prepare the foundation, it is enough to remove a 15-centimeter layer of earth from the marked area, and then level the bottom of the dug “pit” and fill it with sifted sand.
When installing a shower stall on very heaving soils, in order to reduce the risk of it tipping over, the thickness of the non-heaving “cushion” of gravel and sand should be increased to 30-40 cm.

When constructing a wooden pouring floor over a gravel bed, be prepared for the fact that while swimming you will experience some discomfort due to a slight draft
Are you planning to build a capital country shower heated? To construct it, you will need to lay the foundation. The depth of the foundation depends on the type of materials used. For example, for brick building A foundation buried 30-40 cm is quite sufficient.
The foundation is laid in the following sequence:
- Territory marking. To create the correct foundation, wooden stakes are driven into the outer corners of the future building and string is pulled between them.
- Digging a pit. A layer of soil is removed from the marked area, going 15-40 cm deep depending on the type of building.
- Preparing the site for laying pipes. Dig trenches and level the bottom in such a way as to ensure unimpeded flow of waste water in the direction of the drainage hole.
- Installation of drain and discharge pipes. A reinforced gutter is installed on the leveled and compacted bottom, not forgetting to maintain the angle of inclination.
- Fill concrete mortar . To create a level base, pouring is carried out using a level and guides.
For interior decoration choose facing materials with increased moisture resistance: PVC film, linoleum, plastic. When choosing wooden cladding, the surface must be treated with drying oil and painted.
To make hygiene procedures more convenient and safe, a grid made of wooden boards is installed on the floor, on top of which a rubber mat is laid.
The grid is assembled from wooden slats measuring 30-50 mm. Wood preparation is the same. If you want to increase its resistance to shoe wear, treat the material with an acrylic compound used for repairing bathtubs.

It is advisable to separate the dressing room and the bathing compartment with a curtain made of waterproof textile fabric or polyvinyl chloride film
If desired, both the internal and external walls of the facing material can be painted and decorated with designs. Original design will allow you to turn the shower not only into a place for taking water procedures, but also in decorative element suburban area.
Additional interesting options arrangement garden shower suggested in these articles:
-
The heated summer shower is ready. To prevent water stagnation, it is advisable to operate the shower at regular intervals. Before a long break in use, so that sediment does not clog the watering can, it is recommended to completely empty the tank.