Garage room First of all, it is necessary for reliable storage of the car. In addition, many car enthusiasts set up a workshop, cellar, warehouse in it, and keep numerous spare parts, tools, and seasonal tires in the garage. It is important to know how to protect your garage from being opened. Today we will look at the most significant factors effective methods. Let's find out how the protection of the premises differs depending on the type of materials from which the garage is built. Having learned numerous useful tips, everyone will be able to ensure safety in their garage.
It turns out that the protection of a garage largely depends on what material it is made of. Let's look at all the main types of garages, find out how safe it is to store a car in them, and how you can enhance protection.
- Monolithic reinforced concrete structure. This best option for the garage, so that it is truly durable, reliable, and ensures safety. This design can be ordered at a Russian reinforced concrete products plant. Of course, you will need craftsmen and appropriate specialized equipment for its transportation and installation. But in this garage it is quite difficult to break through the wall. At good hinges and castles, gates, the building will become impregnable.
- Brick garages. These structures can also be very durable. But everything depends on the material and the quality of the masonry. In addition, there is a weak spot: the floor slabs on the gates. Criminals lift them with jacks, providing clearance for themselves. Experienced garage workers simply attach such a plate directly to the frame garage doors, ensuring the integrity and reliability of the structure.

- Metal buildings. Unfortunately, widespread garages made of corrugated sheets are becoming the least protected. Even teenagers can handle them without much difficulty. The metal panels themselves are vulnerable. In addition, there is a danger that the entire structure will simply be lifted above the ground. The problem is also the thickness of the metal: if it is thin, the garage is opened simple device, reminiscent of a familiar can opener. Therefore, it is important to use thick, durable metal. Good decision– a sectional garage that is assembled on site. Of course, the floor must be connected to the walls. It is also worth taking care of pouring the foundation so that it cannot be undermined.

When you have the opportunity to choose, it is better to choose a ready-made monolithic reinforced concrete garage. If it is not there, you will need to strengthen the existing structure.
Important points
Also of significant importance the following factors. If you have to choose new garage, please pay attention to the following points.
- It is advisable to have neighbors with safe, well-equipped and secure garages. This is especially true in cooperatives. If the premises adjacent to you are very poorly protected, it is through them that intruders can get into your garage. This risk factor is very serious.
- The specifics of the area, as well as the level of crime in it, play a big role. When a place is poorly lit, rarely visited, and difficult to see from different angles, the likelihood of criminals appearing increases sharply. It is better to buy a more expensive garage, but in a safe place, in a quiet area.
- Finally, having an expensive car next to you can be a negative factor. It happens that an elite car is stored in a garage, but it is well protected, closed, and has an alarm system. And then criminals can try to break into it through next room. That is, the neighboring garage is under threat.
Be careful. To make your garage more secure, try to eliminate all risk factors and take additional safety measures.
We strengthen the garage
Now we will find out how to protect garages from opening, we will consider various options. We have already found out that metal structure must be welded from thick material. It is necessary to strengthen not only your garage, but also the neighboring ones. It is necessary to prevent undermining and lifting of the box. Now let's move on to the gate.
Gate protection
The weak link is the garage door. Unfortunately, quite often criminals resort to forceful opening of gates: they make jerks using cars, attaching a cable to the doors or gate handle. This method is quite effective, especially if the place is poorly visible and illuminated, and the area is deserted. To increase the level of safety, it is necessary to make the doors solid, without cracks or gaps.
Make additional stiffening ribs on the metal gates. This is a good way to strengthen them. The best option– made of iron with a thickness of at least 3 mm. The frame must also be strong. It is advisable to weld it from channel number 6, just like the box. Additional measure– fasten the box with a reliable weld to the walls and beams of the garage.

Remember that attackers often press the gate using a crowbar. Here you need to eliminate the gap between the two swing gate leaves. Weld a strip of metal so that it is impossible to push the crowbar into the gap.
Loops
The vulnerability is often associated with loops. They are further strengthened by welding bolts. But this does not always help, since the bolt heads are cut off with a grinder or knocked off with a chisel.
Optimal modern solution– install internal hinges. In their design and structure, they resemble car hinges. Of course, they will be more difficult to install, but it is also extremely difficult for criminals to get to such loops.
Castles

Locks must be extremely secure. It is advisable to use combinations of several locks of different types. The external lock protects the metal casing quite well. True, experienced criminals also get rid of casings by threading a crowbar into the shackle. The locking design with hidden rods is more reliable. They have a streamlined shape, which makes it difficult to throw on a chain.
Most effective solution- install one that will be securely closed from the outside. Experts also advise installing several locks, keeping a distance of 30 cm between them. Then, even if you try to break in, the load will be distributed. Be sure to ensure that the locks are well recessed and in no case protrude beyond the gate.

Electronic protection
It is most prudent to install an alarm system with remote control in the garage. Then, when a penetration or attempted break-in is detected, a squad will immediately go to the site. You won't have to run telephone wires because the radio link is now used. If you just want to scare away intruders, install a sound alarm: when someone breaks in, the siren will sound. Carefully mask the alarm switch.
Video: we provide reliable protection for the garage
It is worth watching the useful materials in the video. Here, car enthusiasts tell you how to protect garages from being opened, and show everything with specific examples. For example, you can make reliable garage doors by equipping them with a special locking hatch. This will significantly improve the level of security.
You also need to pay attention to the correct installation of modern reliable locks on garage doors. The following video explains in detail how to do this.
If you follow the advice, act comprehensively, and do not leave any weak points in the structure’s protection, you will be able to ensure safety in your garage.
The gate is the face of the garage. The quality of their insulation determines the microclimate in the room. How well they function determines whether you can open the garage and drive your car out of it at any time.
Insulate garage doors and install current repairs Most car owners can do it themselves. The appropriate tools and materials are available in every private household.
Insulation of garage doors
For many car owners, a garage is more than a place to park a car. Here you can equip a small workshop, make a warehouse for useful things, and finally spend time in the company of friends.
The garage needs to be maintained at an optimal temperature in both winter and summer. According to building regulations, in a heated room this figure is +5 degrees. This will allow you not to warm up the car before starting and avoid the accumulation of moisture in hidden cavities.
Is it necessary to insulate garage doors (with an automatic mechanism, swing doors, overhead doors, sectional doors, swing doors, etc.)?
To determine whether your garage door needs to be insulated, just look at the thermal image. It shows that most of the heat leaves the room through uninsulated gates.
This factor is especially important for owners of built-in garages. Often the heating of such a room is included in the general house system. And heat loss through uninsulated gates will affect the entire house as a whole. Heat costs will increase.
Let's consider the types of gate structures and evaluate the need and possibility of their insulation.
- Roller shutter structures consisting of individual aluminum slats. Some models have polyurethane foam inside. The fabric itself is wound on a shaft located above doorway. In view of design features insulation is not possible.
- Sectional doors. It is based on sandwich panels filled with polyurethane foam. Additional insulation is not required, however, you can stick foam plastic on inner part sections.
- Swing gates. The most common design, consisting of two sashes hung on welded hinges. In the very simple version consist of metal sheet, welded to a steel frame. It is advisable to insulate such a structure during the construction stage, however, this can be done independently, after installing the gate.
- The lift-and-turn design consists of one leaf. You can make it yourself or purchase products from a reputable manufacturer. Factory fabric is a panel made of durable sheet steel and insulation, which is often polyurethane foam. A thickness of 45 millimeters is enough to prevent heat loss. Homemade gate must be carefully insulated.
Such gates do not require additional insulation
Selecting material for insulation (foam plastic, penoizol, etc.)
When choosing high-quality insulation, you need to keep in mind several nuances. So, it’s not suitable for insulating garage doors. mineral wool and other porous materials. Most often, the thickness of the walls of a garage is much less than that of a residential building. Often, corrugated sheeting or a similar product is used as the main building material. When using porous insulation, a dew point forms in it. As water accumulates in the pores, its density and thermal conductivity increase. Ultimately, this minimizes the effectiveness of insulation.
Among the most suitable materials are:
- Foam plastic. Inexpensive insulation obtained by dry heat treatment of polystyrene granules.
- Expanded polystyrene. It is also developed on the basis of polystyrene, however, using melting. There are several varieties: extruded, pressed, unpressed. The main advantages are lightness, durability and ease of processing. The disadvantage is poor vapor permeability, as a result of which increased demands are placed on the insulated room in terms of ventilation.
- Penoizol, which contains elements such as orthophosphoric acid, resins and carbide. Strong and durable material, resistant to combustion. However, low-quality penoizol can release toxic formaldehyde when burned.
- Polyurethane foam is a sprayed insulation material with excellent heat saving properties. The material is actively used in various industries.
Inexpensive insulation for gates and walls
When insulating a garage door, it makes sense to choose between expanded polystyrene and foam. The materials have the following differences:
- Strength. Polystyrene foam is a combination of individual elements. Expanded polystyrene is a single substance. The bending strength of the latter is several times higher.
- Permeability. Standard foam has voids that liquids can penetrate. Water absorption of polystyrene foam is much greater.
- Price. Polystyrene foam is noticeably cheaper.
If resistance to heavy loads is not critical for you and you want to insulate your garage door with a simple and inexpensive material, your choice is foam. In other cases - polystyrene foam.
There is no point in saving on insulation. Otherwise, the effectiveness of the work performed will be zero. The thickness of the layer depends on the climate in which the garage is located. So, in the European part of the country the weather is moderate, not too cold, however, sometimes the temperature reaches minus 25 degrees. In such conditions, the following thickness of insulation is sufficient:
- Polyurethane foam: 70 mm
- Extruded polystyrene foam: 80 mm
- Foam: 100 mm
Tools and materials
Before installation, you should carefully measure the garage door and calculate the amount of materials that will be required for insulation and cladding.
There are many facing materials on sale:

For cladding garage doors, 10 mm OSB-3 or OSB-4 boards, designed for rooms with high humidity. Standard size products - 1250*2500 mm. Two slabs are enough for finishing.
The cladding is attached to the sheathing. For this purpose small wooden blocks 40*40 mm, fixed to the supporting part of the gate structure. The boards are installed around the perimeter and on the canvas area.
The dimensions of the insulation may vary. They are selected based on the location of the sheathing: should be avoided large quantity scraps and strive to ensure that entire sheets of polystyrene foam are located between the individual bars.
In addition to materials, for high-quality insulation of gates you will need a set of household tools that most home craftsmen have:
- Electric drill.
- Electric screwdriver or set of screwdrivers.
- Set of drills for wood and metal.
- Hacksaw. If necessary, you can notice with a jigsaw.
- A metal brush with stiff bristles. Necessary for surface cleaning.
- Sandpaper
- Measuring tools: tape measure, ruler, square.
- Construction knife.
- Fasteners - screws, wood screws.
- Anti-corrosion primer and solvent, antiseptic.
How to insulate with your own hands: step-by-step instructions
The simplest way to insulate a gate is to lay a sheet of insulation directly between the frame posts, without any preparatory work. After which a suitable finishing material. However, the resulting structure will be short-lived and will not retain enough heat in the room.
Professional insulation of garage doors occurs in several stages:
Preparation
First of all, you need to treat the bars with an antiseptic in one or two layers. Remember individual means protection: wood impregnations contain aggressive chemicals.
After processing, the bars must dry. At this time, you need to prepare the gate for insulation. The surface of the canvas is carefully inspected, and if rust is detected, it is cleaned down to the metal with a stiff brush or drill attachment. If there is peeling paint, it must also be cleaned off. The resulting surface should not have rust spots and pollution. After this, the canvases are sequentially treated with a solvent and a primer.
After drying, the surface of the garage door needs to be waterproofed. If standard polystyrene foam is used as insulation, this operation is mandatory; when using extruded polystyrene foam, it can be skipped.
Waterproofing can be done using various methods:
- By gluing isolon - a two-millimeter foil film made of polyethylene foam.
- By gluing a membrane with a vapor barrier function.
- Processing bitumen mastic.
Installation of sheathing
First of all, the beams are cut required size. Places where ventilation holes and locks are located are circumscribed and will not be insulated.
In the places where the block will be attached to the frame, you need to drill holes with a 4 mm drill. The optimal step is 20–25 centimeters. If you need the screw head to be flush with the canvas, you can make small indentations. An eight-millimeter drill is used for this. It is important not to overdo it and remove only the amount of metal that is necessary to hide the head.
Before fastening, the bars are pulled to the frame using clamps. To prevent the wood from cracking, you can additionally drill holes equal to the depth of the screw. A 2mm drill is used for this.
All bars located around the perimeter of the frame are installed in a similar way. Additional crossbars are attached with self-tapping screws to the end in increments of 20–25 centimeters.
Sheets of insulation will be placed in these cells
Installation of insulation
The space between the sheathing elements is filled with foam plastic or expanded polystyrene. To do this:
- The size of each cell is measured.
- The insulation is cut according to the obtained dimensions. For this you will need construction knife and a ruler. On each side you need to leave a small margin - about 2-3 millimeters. This is necessary so that the elastic foam fits more tightly between the sheathing boards.
- The insulation is fixed in the cells.
There are several ways to attach foam between the bars:
- Using facing materials. In this case, the foam itself is not attached, but is pressed against OSB boards.
- Using "liquid nails".
- Using polyurethane foam. The material has excellent adhesion. If you choose this method, the surface must be moistened before applying the foam: hardening occurs only through direct contact with the liquid.
After installing the insulation, the remaining joints are sealed polyurethane foam. After it dries, the excess is cut off with a knife.
In this case, the gates are insulated with foam plastic
Gate cladding
In the final finishing of garage doors after insulation, OSB boards are often used. The products cover the sheathing and insulation, making the doors more presentable.
The main condition is either the absence of joints or their location on the bars. Therefore, before cutting the sheets, it is necessary to measure all surfaces.
For cutting, you can use either a regular wood hacksaw or a jigsaw, or a powerful one. circular saw. The finished sheets are tried on at the site of future installation. If necessary, holes for locks are cut in them, ventilation holes etc. After this, you can attach the cladding.
The standard fastening pitch is 12–15 centimeters on racks located around the perimeter, and about 20 centimeters on transverse strips. To avoid cracking the wood, you can drill small holes with a small diameter bit before tightening the screws.
OSB boards can be used as facing material
Repair work: how to fix problems
A quality garage door can last for decades. However, with such a long-term operation, it is inevitable that a number of works on their routine maintenance and repairs. Most operations can be performed independently.
How to Raise a Garage Door That's Sagging
The main reasons why it may be necessary to change the geometry of the gate structure are:
- General metal fatigue. Usually occurs after prolonged use.
- Loop subsidence.
- Possible deformations associated with poor-quality installation.
- Doorway subsidence.
- Other factors - for example, in hot sunny weather, deformation of the structure under the influence of high temperature is possible.
There are other reasons why the gate will need to be raised. The most common one is buying a new car that is a little low in height.
Every problem requires individual approach to correct the geometry of the gate. Many methods are available for independent work using everyday tools.
Elimination of sagging loops. To lift the hinges on the gate leaf, a special spacer washer is used. The work is as follows:
- The sash returns to its place. Using this method, you can straighten minor distortions of the gate leaves, raise the gate and make the structure move more freely. Important: the alloy from which the ball or washer is made must be harder than that used to create the loop.
- A washer is placed on the axis of the lower loop given thickness. If it was not possible to find a suitable part, a metal ball of the required diameter is inserted into the loop hole.
- The canvas is removed.
If you need to change the distance from the ground to the bottom of the sash, you can simply cut off part of the structure with a grinder and attach a rubber strip on top. This will help hide the gap that has formed. This method can be used if the bottom beam is located beyond the edges of the sheathing. If the crossbar is located close to the ground, you need to do the following:
- Carefully cut off the horizontal crossbar with a grinder.
- Trim the gate leaf to the required height.
- if necessary, attach a small rubber strip to the gate, the width equal to the distance from the bottom of the gate to the ground.
- weld the horizontal bar to the frame in a new place.
Sometimes the sashes become warped due to the deformation of the opening. In this case, you will have to either raise the opening itself, or correct the distortion on the sash itself. To slightly raise part of the structure without touching the frame, you need to cut the horizontal beam near the place of deformation, cut off 5-7 millimeters with a grinder, lift part of the sash, press the vertical beam and weld it. This method is used for small gaps. For reinforcement, a metal strip is attached to the welding site, since the risk of residual deformation remains.
If other methods do not help, you will need to increase the height of the gate opening itself. In practice, such work is associated with certain difficulties. It is necessary to install temporary supports and clarify whether reinforcement passes inside the masonry. If you do not take into account all the nuances, there is a possibility of wall destruction or roof collapse.
Raising the level of the gateway is quite complicated. Additional equipment and bricklaying skills required
Correct strengthening and protection
For installation, durable metal pins up to 20 centimeters long are used. Once installed, they are cut and sanded to ensure smooth opening and closing of the sashes. The gate is hung on the frame.
Additional reinforcement of your garage door makes sense if you are the owner of a permanent concrete building. To strengthen the walls next to the structure, you can use metal frame, welded from corners and scalded with mesh. It can be installed both at the construction stage of the building and subsequently, with inside premises.
Strong metal rods welded to the hinges make it much more difficult for an intruder to saw through. Additionally with reverse side nuts and bolts can be welded on the blades.
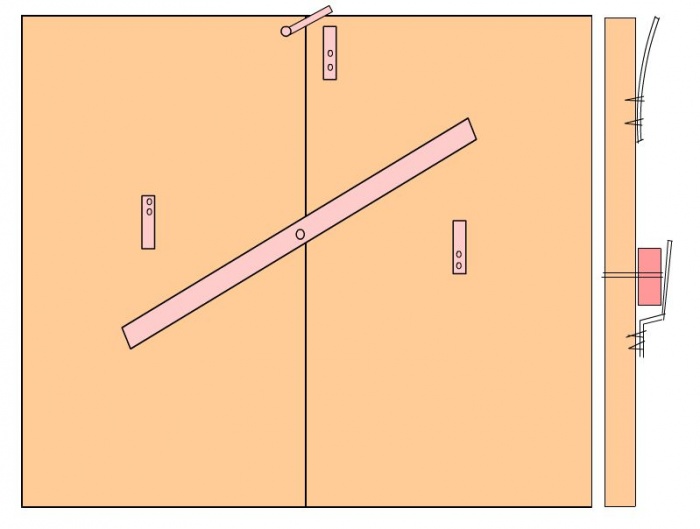
Placement of stiffeners using the example of swing gates with a separate door
To press the sashes more tightly against each other, you can use an eccentric latch. A wide strip of metal is welded onto one of the canvases, thanks to which an attacker will not be able to use a crowbar or similar tool.
To strengthen the sashes themselves, horizontal and vertical stiffeners are welded to the frame. These are transverse metal posts located at some distance from the edges of the canvas. Their number depends on what degree of rigidity is needed. The length of the crossbar is determined based on the dimensions of the canvas as the distance between the opposite posts of the frame.
If one of the doors has a door, vertical stiffening ribs are welded on both sides of it, otherwise deformation of the leaf is possible. If there is no door, horizontal or vertical crossbars are welded to the frame anywhere, most often in the center of the structure.
Replacement
Garage door replacement may be necessary for a variety of reasons. The old structure may have become rusty or warped. Or have you purchased a new gate? best quality or registration.
The first stage is the dismantling of the old structure. Before this, it is necessary to clarify whether there are additional “inserts” from thieves, such as welded to the frame above door hinges bolts, pieces of reinforcement or other similar elements. If they exist, they need to be dismantled.
The easiest way to dismantle metal swing gates. It is enough to open both doors and remove the panels from their hinges. After this, if necessary, remove the hinges themselves (with a sledgehammer, grinder, etc.) and you can install a new gate.
If the hinges become deformed or corroded, it is better to replace them.
To install the doors into an existing frame, you only need to take the necessary measurements, weld the hinges and hang the new gate on them.
If the gate is replaced along with the frame, old frame needs to be dismantled. It is better to entrust this work to professional builders, as damage to the masonry is possible. After dismantling, a new supporting frame is installed, leveled and attached to the opening with long self-tapping screws. For a conventional design, 4–6 pieces per side are enough; when installing a reinforced frame, the number of dowels reaches 10.
If garage doors are installed without a frame, on poles, their replacement occurs in several stages:
- Opening the doors all the way.
- Removing the canvases from the hinges.
- Removing hinges (if necessary).
- Cleaning surfaces from rust, eliminating possible damage. Treatment with anti-corrosion compounds.
- Welding new hinges.
- Hanging and adjusting sashes.
Adjustment in case of misalignment
Skewed gates are a problem in older garages. At some point, the doors stop closing and cling to each other and to the ground. Among the main reasons for such malfunctions are the following:
- Poor quality welding when installing the gate.
- Subsidence of the soil, the presence of trees nearby, whose roots can swell the foundation.
- Material corrosion.
As a result of the problems described above, the gate leaves sag and become deformed. The load on the hinges and the opening mechanism increases, as a result of which the gate stops opening.
To fix the problem and prevent similar situations from occurring in the future, you must perform the following operations:
Additional stiffening ribs are installed around the perimeter. These are transverse metal crossbars that strengthen the structure. Their installation proceeds as follows:
- Blanks are cut from a profile pipe, fittings or other suitable building material. The size of each corresponds to the distance between the opposite frame posts. Stiffening ribs can be horizontal or vertical; therefore, before making them, you need to measure the distance between the horizontal or vertical crossbars of the frame.
- The workpiece is placed on the canvas and adjusted according to the level and construction angle. Its ends should be adjacent to the frame posts or a few millimeters behind them.
- Stiffening ribs are welded using welding machine to the frame. They can be attached to the canvas using standard metal screws.
During long-term and active use of garage doors, it is necessary to monitor the position of the hinges, adjust them if necessary, and replace them in case of significant wear.
Garage doors must open, close and allow vehicles to pass through without hindrance.
When independently attaching hinges to swing gates and subsequent adjustments, you need to take into account several nuances:
- The weld seam that is formed when welding the loop must be directed exclusively upward.
- Welding occurs with small tacks, twice on each side alternately.
- All elements are welded flush to the rectangular garage door post.
- Before work, it is recommended to make a small backing for the bottom of the loop. Its length is equal to half the fastening element. The top of the substrate is grabbed from the end.
- Before welding the gate hinges from the inside, you need to check how easily the doors open and close. If the gate does not operate correctly, it is additionally processed by welding from the outside.
- Before the gate is finally secured, the doors are closed. To avoid sagging, a small stand is placed under the middle of each sash.
The gates open only some time after the end of work. This is necessary for the loops to cool down. When heated, the metal is very fragile and subject to deformation. If you overload the structure too early, the whole work will have to start again.
If your overhead gate is jammed, the reason is in the opening system. In the simplest case, it is enough to lubricate the roller mechanism with oil to ensure the best sliding of the door along the guides. It is also possible that individual parts, such as the shaft or spring, may be damaged. Faulty elements are replaced with new ones that are identical in functionality.
Video: Insulating garage doors
Despite the fact that insulating and repairing garage doors yourself does not require specific skills, remember: the health of your iron friend depends on how carefully the work is done. If you have any doubts about performing a particular operation, it is better to consult a specialist.
anti-burglary garages (burglary protection)
We offer several types of protection against burglary (opening) of garages:
1. Installation of protective rings from a Ø219mm pipe on external locks - with such protection it becomes impossible to cut down padlock and it is very difficult or impossible (depending on the lock) to slip a crowbar or pry bar under the lock and break it.


2. Installation of “Crabs” - corners or pins are welded onto the gate from the inside, which extend beyond the gate frame when closed. Thus, when cutting the hinges from the outside, the gate will not open, because "Crabs" won't give it.
3. Installation of a good garage internal lock, with a large cross-section and bolt stroke, having a simple and reliable design.

4. Additional welding of loops through a corner or fittings.
5. Reinforcement, if necessary, of the gate with thicker-walled metal.
6. Strengthening the walls and ceiling with a grid of reinforcement.
7. Welding additional ears for external padlocks.
8. Installing or replacing internal bolts up, down or between each other with a large diameter rod.
9. Concreting the floor with reinforcement.
10. Welding to neighboring garages (if the owners don’t mind)
other methods of anti-burglary of garages and metal doors, after individual measurement.
Departure for measurement (inspection) in Samara is free of charge.
If you don't have electricity, this is not a problem, we have a generator-electric power station.


For those interested in garage safety, we recommend reading:
Some car owners consider the garage a safe haven for storage. vehicle. But statistics show that this is where many cars were looted. Criminals quite professionally rob and steal cars from garages that are well closed. How to prevent such troubles?
Let's take into account that there are different types garages. A reinforced concrete garage is the most reliable. Of course, they can break it, but only with the help of a bulldozer or jackhammers. The second safest would be a brick garage. Much depends on the material from which it is made. Silicate blocks can be made with a simple crowbar; robbers do this quickly and quietly. And the most vulnerable are metal garages. Experienced thieves can hack them in 5 minutes. Especially accessible are those metal structures that are not attached to the floor; even a group of novice teenage burglars can open them.
Let's consider a number of recommendations regarding garage locks:
- It is necessary to install metal casings (pipe rings) so that the padlock becomes inaccessible to raiders. Of course, if they have a crowbar, this most likely will not help. But then you can use locks with hidden rods. They have quite streamlined shapes. Also use internal locks in your garage. It is important that they cannot be opened from the inside.
- If there is no gate, install several locks on the garage door. Make the distance between them 40 cm. This is important to distribute the load when trying to break in with chains or a crowbar.
- Follow this rule when installing locks: there must be elements of its mechanism hidden inside the lock. Then the thief will not be able to unscrew them.
The design of the gate itself is of great importance. It happens that they are hacked using force. They pull it right out by the roots. Of course, this is done in deserted places. Make the gate monolithic, without external handles. Do not forget that the inside of the gate must have strong corners or a profile along the entire perimeter. The hinges must be well welded to the frame of the garage itself, or better yet, reinforced. Do not screw them in, as this will make the job easier for burglars. It is better to screw, weld, nail in a timely manner, in other words, firmly connect the canopy and frame at the garage. You will have to spend a lot of time on this, but your car will not be stolen. The most unprotected boxes are those with a tin or slate roof, especially if it is nailed down. It’s also good to weld the garage to neighboring garages, if the owners don’t mind.
Some more recommendations:
- Choose a garage in busy areas.
- The area should be well lit.
- Most reliable way protection in this case - alarm. It is triggered when garages are broken into and sends special signals to security services. While the robber is busy in the garage, a patrol arrives and detains him. The owner is informed via SMS that the thief has been detained.
If you need advice from professionals in Samara, call and we will come to take measurements and help you choose the optimal list of burglary protection.
The first and most important thing for the safety of your garage is the awareness that you are at risk. Excessive self-confidence in such matters is the first assistant of a criminal. A few more tips on how to protect your garage.
Often, criminals entering the garage are not even interested in your car. The garage can even be opened because of food supplies for the winter in the cellar or an expensive radio. Once the garage of your humble servant (before work to strengthen it) was opened only in order to break through the “entrance” in the wall to the neighboring, more secure garage and take a foreign car out of it. Here you go..
Rule #1:
When choosing a garage, you need to look not only at the strength of your future doors and walls, but also the neighboring ones.
Rule #2:
The concept of “safety” refers not only to the garage itself, but also to the surrounding area. If your garage is located in a not-so-prosperous area of the city, is poorly lit, and is also poorly visible from the outside, you can be sure that sooner or later uninvited guests will visit it if it is not properly fortified.
Rule #3:
What if you already have a garage? Then take a look around. If there are bushes growing nearby or an old fence blocking the view of your garage, then it is advisable to remove these obstacles. It is worth thinking about garage lighting. It is especially easy to solve this issue by installing powerful lights on the roofs of the outer garages in garage cooperatives. In this case, energy costs can be divided among all garage owners.
The external protection seems to have been sorted out. Now let's move on to the garage itself. What can you do to strengthen your garage?
Gates:
The gate, due to its specificity, is the weakest link in the external wall complex. In order to make the gate impregnable, its doors must be made of metal with a thickness of at least 2-3 mm and welded onto a frame made of a profile of at least 50 mm. It is advisable to make the gate frame from any profile of at least 60mm (preferably larger). The box itself must be securely connected to the walls or beams, because very often seemingly impenetrable gates fly out as soon as you pull them with a cable tied to the car.
You can also weld rods onto the hinges - this will significantly increase their resistance to sawing. The same applies to eyelets for locks.
I don’t think it’s worth mentioning about the strip of metal that prevents you from pushing crowbars between the gate leaves - everyone should have it.
Now let's remember about sliding locks of the "latch" type that fix the gate leaves. Usually you close simple metal bars, and the door still dangles, but it is worth welding metal on them so that the fit is tight.
Locks:
I won't talk about castles. Better yet, I’ll give you a quote from the 8th issue of the Autoreview magazine for 2002:
“...There are many relatively inexpensive and at the same time very worthy domestic products. Pay attention to the products under trademarks ZGC, Class, METTEM, Geryon, Kerberos. When starting a conversation with the seller, ask to see locks specifically designed for installation in a garage (the marking of such a product should include the letter “G”). Immediately return those that can be opened from the inside without a key (having climbed into the garage through a tunnel or a hole in the wall, a thief should not be able to open the gate). After this, select products certified for at least the third class of burglary resistance (this parameter must be indicated in the passport). If the lock is marked with the letter “L”, this means that it is intended for installation on the left (as viewed from the hinge side) gate leaf. And vice versa.
What type of privacy mechanism is optimal for garage lock? Level key, the key of which is made in the form of a double-sided “butterfly”. Disc locks also work well.
If your garage door does not have a gate, then it is better to buy two or three mortise or rim locks. They must be installed so that the vertical distance between the key holes is 300-350 mm - this will ensure a more even distribution of loads during rough break-in attempts. Regardless of the type of locking device you choose, its design features and model, you should strictly follow three basic rules. Firstly, the security mechanism of a lock installed on a garage should under no circumstances protrude beyond the leaf of the gate or gate. Secondly, fastening must be done with bolts with a diameter of at least 8 mm, or it is better to weld the lock. And thirdly, you need to make sure that the fastening elements of the locking device cannot be unscrewed from the outside.
Walls:
For walls, we can recommend creating a powerful frame from corners and scalding this frame metal mesh, can also be recommended for the ceiling. Pay attention! Very often, concrete floors simply lie on the walls. They are very easy to lift with a hydraulic jack and get inside. Ceiling tiles must be connected to the walls with strong metal pins.
Finally:
1) Installing a howler (must be placed in a hard-to-reach place) that is triggered when the gate opens can scare away any uninvited guest. The howler can be switched off both from the outside and from the inside.
2) It is advisable to make a secret button for lighting or unscrew the plug from the shield when leaving. The absence of light will make life difficult for any burglar.
3) A small bolt, inconspicuous among the others, firmly pressing the doors to the frame (in this case you will have to carry it with you and spanner) is another obstacle for a burglar.
We can also make a metal safe from 3-4mm steel with internal locks for storing valuables, weapons, etc. and weld it to the garage wall.
Call us and we will help you reliably protect your garage and car in Samara! We also carry out any garage repairs in Samara.
Before we talk about how to install posts for swing gates, let’s highlight the product – gate posts. There is always misunderstanding with gate posts. There is mainly disagreement over whether gate posts are considered part of the gate itself or not. For some reason, many Customers are 100% sure of this and are perplexed when it is explained to them that this is not so. The client believes that gates, in principle, cannot exist only in the form of two separate leaves, and especially without welded gate hinges. Or another extreme, when the Customer still allows the existence of a similar set of gates without pillars, but it should be quite cheap. Of course, the easiest way is to direct such a Customer in a further search for the gate he needs and not save his nerves on explaining elementary things that are axioms for the gate manufacturer. But it is a fact that there are no extra Customers. The opinion that swing gates must be equipped with gate posts completely without foundation. Like, if there are gate leaves, and they cannot hang in the air, the gate hinges must be attached to something, and if so, then the gate kit must also include gate posts. Such logic about gates can only be made by a person who is very far from construction work and does not understand the technology of installing gates and the order of installation of products when erecting a fence. In reality, the gate posts are installed much earlier than the gate itself, and it is from these posts that the gate dimensions will be taken. That is, the gate posts are already ready and look good, but the gate itself is not yet in the sketches. Gate posts are, more correctly, part of the fence configuration. A smart builder who erects a fence is always interested in where the gates and gates will be located. And he always starts work by installing posts for gates and gates. And then he lays brick or other material.
Options for installing posts for metal gates
Installing gate posts is not an easy job. If you do not have experience in correctly installing gate posts, the result will be disastrous. Over time, gate posts will tilt, the gate will jam, or stop working properly altogether. All this can be avoided. What you need to know before you start installing gate posts.
The first thing is to pay attention to the material of the gate posts. Suitable material will be thick-walled rolled metal. For example, hot-rolled channel 14, 16 or a channel of smaller cross-section, pre-welded into a box. Metal posts for gates can also be profiled pipes with a cross-section of 100 x 100 mm and a wall of at least 5 mm. The thicker the pipe wall, the stronger the gate post.
Secondly, the design of metal gate posts must have lower crossbars at the base. IN ideal, the post before concreting should rest on the crosspiece of the corner 50, 63. And the other crosspiece should be recessed 100 - 200 mm from the surface of the ground. The length of the crossbars varies from 500 mm to 1 meter.
Third, it is mandatory to fill the base of metal gate posts with concrete. In this case, the gate post must be installed at a depth of at least one and a half meters, and somewhere more. It all depends on the composition and properties of the soil where the gate posts will be installed.
Fourth, do not neglect pouring liquid into the gate post concrete mortar. This will make it possible to make a strong reinforced concrete pillar with external reinforcement from the hollow pipe, thereby achieving the most rigid pillar structure possible.
Fifth, it is more reliable if the foundation of the gate posts is part of the general foundation of the fence. And concreting when installing gate posts will be carried out simultaneously with the general pouring of the foundation.
Sixth, it is more expedient to provide additional fastening between the gate post and the fence in its upper part. If you are laying a brick fence, then the brick post inside which the gate post is hidden must be additionally tied with thick metal strip with the fence itself. It often happens that a brick pillar tilts due to the load of the gate and breaks away from the fence masonry, forming a crack between them.>
Seventh, sometimes, in difficult clay soils, it is impossible to install gate posts in a strictly vertical position and securely fix them. In this case, you need to use additional upper and lower crossbars (lintels) between the gate posts. The lower lintel is made of metal similar to that used for gate posts, and is buried in the ground to a depth of 300 - 400 mm. Subsequently, a regular driveway is installed on top of the lower lintel. The upper crossbar is installed along the upper ends of the gate posts. Of course, the top lintel will not add beauty and neatness to the gate, but it is a necessary measure and a very effective one. The upper cross member must be made removable to ensure passage in case of need tall car or transporting large cargo through the gate.
How to install gate posts - much more difficult task than it might seem at first glance.
If for a fence it is enough for the posts to simply stand and not fall, then the gate is a mechanism, for the coordinated operation of which it will be necessary to maintain a certain position of both of its leaves.
Therefore, installing poles for is the most difficult and important task during their construction.
According to their rigidity to the posts, all gates can be divided into groups:
- Gates that are locked with a bolt, an electronic lock; gates with heavy leaves; gates that may be damaged by passing trucks.
- A gate that is locked with a chain or barrier.
Products of the first type are usually placed where they need to be opened and closed frequently - for example, at the entrance to a large shopping center. Typically, such a passage has a significant width - about five.
And in some cases - even more, so that two cars up to eight meters wide can easily pass each other. The doors in this case can weigh from 500 kg to four tons.
Yes, and in a private house, many will want to have a gate that closes with an electronic lock - they can be opened and closed without leaving the car, or just look from the window who has arrived and open the gate for him without leaving.
Before you install gate posts, you need to know that the most stringent requirements are imposed on them here. They must provide reliable operation bolt mechanism, stable position of both doors relative to each other.
Gates that are locked with a chain do not impose any special requirements on the rigidity of the posts.
The chain, although it does not provide sufficiently reliable protection against penetration, will still be an obstacle to the penetration of thieves.
Here it will be enough to ensure sufficient strength of the pillars themselves - after all, when using gates, it is still possible that they will be hit by a trailer.
It would also be a good idea to ensure that the pillars are maintainable. Barriers also do not impose any special requirements on the posts. An exception is electronic barriers with a beam that is locked when lowered by a stop.
In this case, the same requirements are imposed on the pillars as for gates of the first type. In addition, they should be stronger - a barrier at the entrance is easier to miss in the dark than a closed gate. The disadvantage of chain-locked gates is that you have to open and close them manually.
Gate material
- Definitely the most the best material for poles today is a metal pipe - round or square. It does not have too much mass so that the pole can be erected by one or two people without the use of equipment. Pouring concrete inside the pipe or adding lime will create an electrochemical positive potential on the surface of the pipe and increase rust resistance several times; in addition, you can order products from galvanized pipes.
- The second option is reinforced concrete. This is not very good for heavy gates - constant bending, cyclic loads, the likelihood of an accidental dynamic impact from the side of a trailer or wheel will quickly render them unusable. Reinforced concrete pillars are much more suitable for a fence. Brick pillars have the same drawback - except in cases where there is a metal pillar inside, and the hinges are attached directly to it using remote anchors, through the thickness.
- Finally, the third option is wooden pillars. Wooden giants will be more exotic and are used quite rarely - due to their low resistance to rotting and low load-bearing capacity.
Installation of posts for gates that are locked with a bolt or a heavy gate
Installing gate posts to prevent them from wandering can only be done by reliable foundation and ensuring their tight connection with each other. Communication can be made at two points - at the bottom of the entrance, at the crossing through the gate and at the top of the pillars. Usually they are welded together at these two points, placing two I-beams between them.
But for the upper fasteners there is a rather serious limitation - sometimes it may be necessary to pass vehicles that exceed the height of the dimensions of the pillars and the upper beam. Therefore, the latter is made removable.
When installing an entrance to own plot When you plan to drive only your own car, it is quite possible not to make a solid foundation for the gate, but to make separate ones for each post. In this case, they simply weld the pillars at the bottom with a thick I-beam, and on top they make the same beam, but removable, inserted into welded sockets and having welded pins for insertion.
This way, you can safely drive in and out on your own, while good stable operation of the electronic lock and opening mechanism will be ensured, and skewing of the pillars can be avoided.
However, this does not negate the laying of the foundation for each pillar separately, which should go below the freezing depth for such gates. A concrete pad is usually made in the entry area. It will be very good if the I-beam, which is welded between the pillars below, is thicker than it. In a layer of concrete it will be reliably protected from rust, since concrete produces a slightly alkaline reaction and prevents metal oxidation.
For heavier gates it is necessary to make a solid foundation. Usually it is made in the form of the letter “H” with a transverse bar that is strongly elongated horizontally.
The foundation is usually poured solid. Its depth should be below the freezing depth. Everything is done according to the same rules as the construction strip foundation for home. The thickness of the foundation grillage is about 50 cm. Theoretically, 30 will be enough, but a width of 50 allows you to save on formwork and pour the foundation into a spacer with the walls of the trench.
Near the pillars, extensions-buttresses are made in both directions, perpendicular to the entrance. Usually, even for heavy gates, a buttress in the area of a post with a total length of one meter is sufficient. The foundation is reinforced before pouring.
An I-beam is welded between the pillars at the bottom of the entrance, near the surface. Then it is poured into concrete, along with reinforcement - the concrete will be for it reliable protection from.
It is advisable to install an I-beam at the top of the pillars. Considering that, usually, heavy gates require large and heavy posts, the beam must match.
It will be difficult to remove and put it back in place - you will have to adjust it every time crane. Therefore, it is better to immediately put a significant headroom in the pillars and simply tightly weld the beam to them, once and for all.
Posts for gates
Using the same technology, you can install posts for gates and gates - with the difference that here you can take thinner posts; it is enough to install round ones with a diameter of 50 mm or square ones with a width of 50 mm, the wall thickness is 3 mm.
It is not advisable to take a smaller wall thickness - it will be difficult to weld hinges to thin metal, and this will also affect the durability of the gate.
Considering that 2.5 meters is enough for a person to pass, the pillars can be connected without any danger to each other at a height of 2.5 meters by welding a crossbar.
The second link is at the bottom, where the entrance is. It is advisable to concrete it so that it does not rust. Standard width gates - 90-120 cm. You can freely enter such a passage in winter clothes, with a baby stroller, and even bring a wheelbarrow with earth.
How to concrete gate posts - on video:
Noticed a mistake? Select it and click Ctrl+Enter to let us know.
You will need
- - pipe Ø100 mm;
- - corner 100x100 mm;
- - angle grinder (“grinder”);
- - welding machine;
- - cement;
- - sand;
- - edged boards and timber for formwork;
- - carpentry tools;
- - shovels and bayonet shovels.
Instructions
Cut blanks for gates. For racks, use a Ø100 mm pipe or a 100x100 mm corner. Their length is determined by the sum of the height of the gate and the length of the ends embedded in the ground (0.8-1 m). With a planned gate height of 2 m, the length of the blanks should be 2.8-3 m.
Make a jumper connecting the racks from a 100x100 mm corner. Its length should be equal to the width of the gate. For a standard gate, it is taken to be 3 m. If a pipe is used as posts, cut one flange of the corner on both sides at an angle of 30° and give its edge a concave shape. This is done so that the edges of the corner fit well to the posts when welding them.
Assemble the gate frame from the blanks on the ground, choosing a more level place for this. It should look like the letter “H” - two posts and a jumper placed between them at a distance of 2 m from their top (or 0.8-1 m from the bottom). In this case, two conditions must be ensured: parallelism of the racks with each other and perpendicularity of the jumper in relation to the racks.
Weld the jumper to the posts. Both corner flanges must be securely welded with a continuous seam. Weld any pieces of metal to the jumper in two or three places, pointing them down. They will act as reinforcement, firmly connecting the lintel to the foundation.
Dig a trench for pouring the foundation. Its width should be 350-400 mm, length - 3.5 meters (for a 3-meter gate). The required trench depth is determined taking into account the depth of soil freezing, its type, level groundwater. For simplicity, you can take it equal to the depth of soil freezing in your area, which can be found on construction sites.
Make wooden shields from edged boards and assemble formwork from them. Its dimensions in plan should be 0.3x3.3 m. It is advisable to make the formwork walls slightly wider towards the bottom to avoid the buoyant effect of the soil on the foundation.
Install the gate into the formwork so that the lintel is flush with the ground and the posts are vertical. To do this, place supports made of stones or metal under the posts or lintel and secure the posts on both sides with stops. Place reinforcement made of any type of metal into the formwork - wire, scraps of metal profile, etc.
Prepare sand-cement mortar with a ratio of 1:4 (cement:sand) and pour it into the formwork. To use less mortar, fill the formwork with stones and broken bricks. While pouring, tamp down the solution with a shovel. The surface of the poured foundation should be level with the ground and the lintel. Before hanging the gate itself, give the solution time to harden - at least a week.
When the territory of a site is enclosed with a fence, the question always arises about the need to install a gate. They come in several types: swing, sliding, opening in one direction or lifting. You can install it yourself only with hinged or one-way opening doors. gates. The rest are installed on special structures with the participation of specialists in this field.
You will need
- -hinges
- -bolts or welding machine
- -pillars
- -smooth block
Instructions
In summer cottages and in private houses, swing doors are usually installed. gates. This design consists of two doors, welded from iron or made from plank. In some cases, carved or forged gates.
To install the gate, dig in the posts, measuring the manufactured gates. Poles can be installed iron or wooden. Fill both with cement mortar for strength and reliability.
The hinges can be welded to the posts and gates m or fasten using bolts. Store-bought hinges are not suitable for installing gates. They are unreliable. Order powerful homemade hinges from any turning organization or purchase them at the market where they sell homemade parts. They should be on a ball mechanism, which will allow easy opening gates without making any effort.
The most difficult process is installing and securing the gate. It is impossible to carry out this procedure alone, because the doors made from any material are quite heavy. They need to be hung at a distance from the ground that does not prevent them from opening.
Place a block of the required size down the gate along the length of both leaves. Install one leaf on it and weld or screw the hinges. First this is done from above, then from below.
The second gate leaf must be installed in accordance with the first and welded or screwed on the hinges. And do the same. First, the hinge is screwed or welded at the top, then at the bottom.
If you installed a block, then both doors should be at the same distance from the ground so that distortions do not occur when closing them.
Video on the topic
Owners of their own plots try to install gates that are beautiful, comfortable, and fit well into the overall design. Wooden structures are considered the most affordable and easiest to implement.
For those who want to make their own wooden gates First you need to draw up a design drawing. This helps to more accurately imagine the scope of work and purchase the necessary materials in advance. When drawing up a drawing, you must try to ensure that all the details and structural elements are in full accordance with each other.
How to install gate supports
From wooden beams you need to make vertical supports. Their size should be calculated as follows: add another meter to the height of the gate for deepening. The greater the depth to which the supports are installed, the more stable and durable the structure is. This reduces the likelihood of misalignment during operation of the gate.
Remove debris from the area where support posts will be installed. Dig holes - their diameter should be 20 cm larger than that of the supports. Compact the bottom of the hole and make a cushion of crushed stone. The part of the pillar that will be filled with concrete must be pre-treated with a composition that will protect the wood from rotting - for example, bitumen mastic. Use a plumb line to check that the post is installed vertically. Pit with installed pole you need to pour concrete and wait until it dries.
Gate manufacturing
To make one of the gate posts, you will need one block each for the top and bottom, two bars for the side posts, and two for the middle lintel. Dimensions for gates are calculated depending on the size of the machine. All parts must be treated with antiseptic impregnation.
The frame parts are laid out on a flat surface, and holes must be drilled at the joints. Dowels are inserted into them - they add rigidity to the places where the parts are connected. Jumpers made of timber are installed in the middle of the frame. At the corners, jibs are attached, which are bars with cuts at the ends at an angle of 45 degrees.
When calculating the height of the frame, it is necessary to take into account that the sheathing boards should protrude beyond it from below and above by 20 cm. The boards must be prepared before sheathing - cut to the dimensions specified by calculation and worked with a plane. They can be attached to the frame and tightly to each other, and with a certain step. After all the sheathing boards are in place, the top must be trimmed and sanded. Now the hinges are attached to the sashes - for this, self-tapping screws with screw threads are used. Self-tapping screws can also be used to secure fasteners to racks.
The distance from the bottom of the gate to the ground must be at least 5 cm. Closed gates are secured with bolts, latches or locks - the owner chooses the method. It is better to paint the gate when assembled.
Video on the topic
A fence is an important element of fencing. When constructing it, it is necessary to determine what supports it will have. Its reliability and longevity depend on this. Pillars can be wooden, metal or concrete. Once you have made your choice, get to work.
You will need
- - pillars;
- - cord;
- - pegs;
- - saw;
- - drill;
- - gravel;
- - bitumen;
- - wedges.
Instructions
Installation of poles for fence start by marking the fenced area. Do this using a cord. Correctly calculate the number of columns, crossbars and canvases.
Hammer the pegs where the posts will be installed. Check again that the intended line is correct. The pegs must be exactly at the marking step. A crooked fence will not be strong.
Mark the height of the post. She must be taller than herself fence by a few centimeters. Considering the underground part, saw off the excess.
A garage is not only a place where a car is parked. Often tools, equipment and other things are stored in it. To protect your garage from intruders, you need to strengthen its most vulnerable part - the gate. At the same time, it is not necessary to turn the garage into an impregnable fortress - it is enough to make it so strong that it would be unprofitable for thieves to break into it, so that it would be too time-consuming and troublesome for them. Weak gates endanger not only your property, but also neighboring garages, which intruders can get into by making a hole in brick wall between garages. How to strengthen a garage door with your own hands?
Which gates need to be strengthened?
It is impossible to make the gate absolutely strong, but it is necessary to pay attention to its weak points. What does a gate do weak point garage?
- Incomplete connection of the valves,
- protruding loops for a padlock,
- protruding hinges on which the doors hang,
- weak locks,
- flaps made of thin metal without stiffeners,
- protruding handles to which a rope can be tied,
- no alarm.
The easiest way to strengthen the gate is if it is swinging, as in most Russian garages.

This design allows for various modifications.
Choosing the right locks
Which locks are most resistant to burglary? Of course, these are not padlocks. Locks that can be opened from the inside without a key are definitely not suitable. When purchasing a lock, immediately ask to see models specifically designed for installation in a garage. These are marked “G”. In the lock's passport, look at its resistance to burglary: it must be at least class three. Please note that locks marked “L” are placed on the left gate leaf when viewed from the hinge side. As for mechanisms, the most reliable are lever or disk ones.

It is best to install 2-3 overhead locks from the inside to strengthen the gate, welding them well. The distance between the locks should be about 40 cm. It is recommended to do this: make a window in the door that can be locked with a lock, through which the locks themselves open by touch. The deeper the lock is installed, the more difficult it is to open it. A flat lock is installed on the window; if there are bolt heads on the outside, they are welded so that the bolts cannot be cut off.
When installing locks, keep the following in mind:

You can additionally protect the lock like this. If there is a rack lock with a plate key on one side of the gate, then a piece of rubber about 1 cm thick and approximately 10*10 cm in size is attached to the other side using bolts. If attackers manage to bend the gate leaf and start sawing the lock, the rubber will prevent this from happening , at least quickly.
Padlock hinges are also dangerous because you can attach a cable to them and simply rip the gate off with a truck. Therefore, they need to be cut down, as well as all the protruding handles on the outside. If you do want to keep the padlock, it needs to be secured. To do this, it is placed in a recess or protection is welded around it, for example, from a thick pipe. It is better to prefer special locks that press tightly to the surface of the gate.
If there is another door to enter the garage, then you can install a revolving bolt on the gate from the inside. It looks like the picture. The bolt itself is made from a profile pipe or channel, and the brackets are made of metal or wooden blocks. The turntable rotates on a through bolt, which is not visible from the outside.
Strengthening sashes and hinges
For the gate to be reliable, it must be made of steel with a thickness of at least 3 mm, and the frame must be made from channel No. 5 or 6. The gate frame must be made from channel No. 6 and securely connected to the ceiling and beams.

Additionally, to protect against entry into the garage, you can install second lattice doors behind regular gates, which will be locked with a padlock. But this lock should be located not outside, but inside. From the outside, a closing part is welded to the gate. metal plate. Thanks to which the lock will be completely invisible. They open it by touch, putting their hands through the grate.
If the garage is permanent, then the hooks in the slabs located near the gate are welded to the gate and additionally cemented. The hinges must be welded to the garage frame and reinforced. To do this, metal rods are welded to them to make cutting difficult. However, if the burglar is armed with an acetylene cutter, then this may not help. It is best if the hinges are not on the outside, but on the inside; end hinges with thrust bearings are considered reliable.

From the inside, metal pins are also welded onto the gate, protruding beyond its outline - the so-called “crabs”. When closed, they move out to the sides and fit into holes in the walls. They will hold the gate in place and prevent it from opening or falling out, even if the hinges are cut down. A variety of such devices are ordinary large bolts with nuts. The nuts should be welded at the corners of the gate, and the bolts should pull the leaves to the frame when closing the gate. This design is not very convenient, but it is reliable and easy to manufacture.
To strengthen garage doors, welding a frame from metal corner not less than 75 mm and stiffeners. It is important to strengthen the corners.
A wide strip of steel is attached to one of the flaps so that it is impossible to insert a crowbar or other tool between the flaps. As practice shows, thieves choose garages in which the doors do not fit tightly together. Such gates are easy to open with a crowbar, and even more so with a hydraulic jack, for which a gap of only 8-4-5 cm is enough. To ensure a tight fit of the shutters from the inside, eccentric latches (clamps), such as in the photo, are installed. The doors can also be secured with long, strong hooks or vertical locks (latches).

You can increase the reliability of the gate by fixing the doors with bolts located in inconspicuous places. You can order special bolts, for example, with a pentagonal head, which you can unscrew only with the key you have.
Signaling
Also, for protection, you can set the garage to alarm the security service. Communication is carried out via dedicated radio channels; no wires need to be pulled. When a signal is received, a squad goes to the place. You can also install a “howler” alarm that makes loud sounds. Provide and disguise a switch for it.

All these measures apply to permanent garages, concrete or brick. Metal garages It is difficult to protect well, especially if they are not secured to the floor or foundation. High-quality protection in such cases, the price will be comparable to the garage itself. As for automatic gates, they are produced with varying degrees of burglary protection. The advantage of them is that when broken into, the automatic drive jams, and even if the attacker gets inside, he will not be able to steal the car.