Before decorative trim balconies or loggias need to make smooth walls for this, drywall is perfect. This material is in demand due to its characteristics: ease of installation, flexibility, the ability to correct any curvature of the wall, environmental friendliness and availability.
In this article, we will analyze the advantages and disadvantages of this material, as well as thanks to step by step instructions we will carry out the installation with our own hands.
The positive qualities of drywall include:

The disadvantages of the GKL sheet include:
- Moisture absorption. With constant contact with water, the material becomes unusable. Requires a waterproofing layer.
- The area of the room is reduced due to the installation of crates.
- It requires careful handling during transportation and installation, as the material is quite fragile.
Types of drywall and which brand to choose for a balcony

There are several types of material where each has its own performance characteristics:
- GKL - standard drywall.
- GKLU - reinforced drywall with increased resistance to stress. Cardboard sheets are light gray in color.
- GKLO is a fire-resistant option that is able to withstand direct exposure to fire for 20 minutes. Cardboard sheets are red on both sides.
- GKLVO - the material has high moisture resistance and fire resistance. Cardboard color is red-green. To use this option, you still can not do without additional waterproofing.
- GKLV - has a high degree of moisture resistance.
For the interior decoration of a loggia or balcony with drywall, a moisture-resistant option (GKLV) is perfect, so the lining will last longer compared to conventional drywall (GKL).
Suitable conditions for the use and installation of drywall
The best time for finishing is summer, when the weather is settled dry, as drywall sheets do not tolerate temperature changes.
It is advisable to finish with drywall if the balcony is subsequently glazed. In autumn, winter and spring, finishing the balcony should be done if there are already installed double-glazed windows and in the presence of thermal insulation.
If ordinary plasterboard will be used for finishing, then it is imperative to put a vapor and moisture insulating material under it.
Necessary materials and tools
To calculate the required amount of drywall, it is necessary to measure the area of \u200b\u200bthe walls that are planned for sheathing, and divide the result by 3 - this number indicates the area of \u200b\u200bone standard sheet drywall (2.5 × 1.2 m).
Hangers are purchased taking into account 3 pieces per rack profile used on the entire wall. Self-tapping screws count 4 pieces for short racks and 6-7 for long ones.
- float level;
- roulette;
- metal scissors;
- perforator and drill for concrete;
- screwdriver;
- putty knife;
- crowns.
- Waterproof GKL of green color;
- CD and UD profile;
- self-tapping screws and dowels for drywall;
- putty;
- reinforcing mesh;
- brackets that are selected based on the profile.
Finishing instructions
Before starting work, it is necessary to prepare the surface:
- Remove the old finish, if any;
- by the most important point all cracks and joints will be sealed;
- Waterproof the balcony.
How to sheathe a balcony or loggia with drywall with your own hands - step by step instructions:
- Sheathing work begins with measurements of the balcony. With scissors for metal, you need to cut off the UD profile and fix it to the extension window frame 10 cm from the ceiling. The profile installed according to the level is fastened with self-tapping screws.


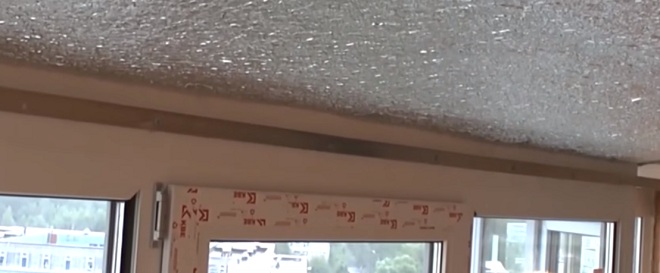
- Then we prepare a UD profile of the desired size and install it on the side wall. Holes are drilled in it, and then the dowel is fastened with nails.


- After mounting the frame, we install the CD profiles of the desired size in increments of 40 cm.

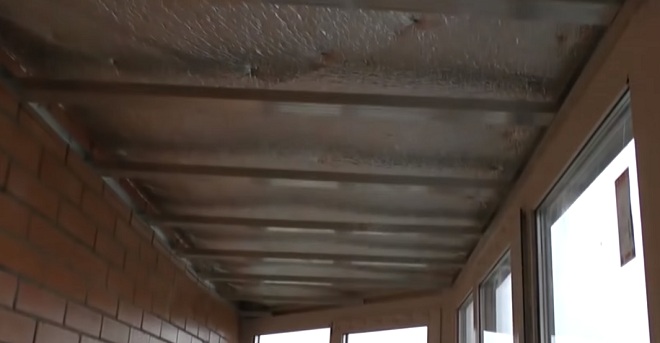
- CD and UD profile are connected with self-tapping screws.

- Next, we prepare the U-shaped brackets and bend their legs at a right angle.
- Then holes are drilled in the ceiling. U-shaped brackets are located perpendicular to the profile and the dowel is fixed with nails.


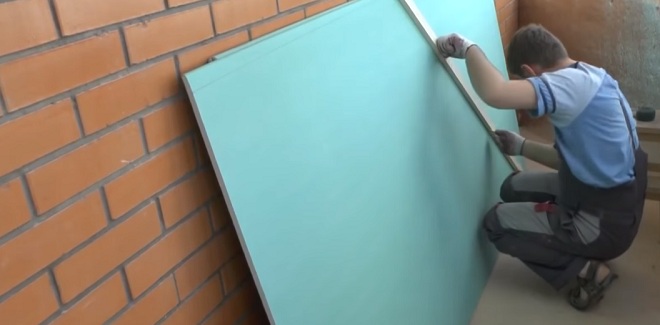
- Let's move on to the ceiling. We prepare drywall sheets of the desired shape and size. For certain areas for drywall, recesses of the desired shape are cut.

- Then the sheets are placed on the ceiling and attached to the profile with self-tapping screws.
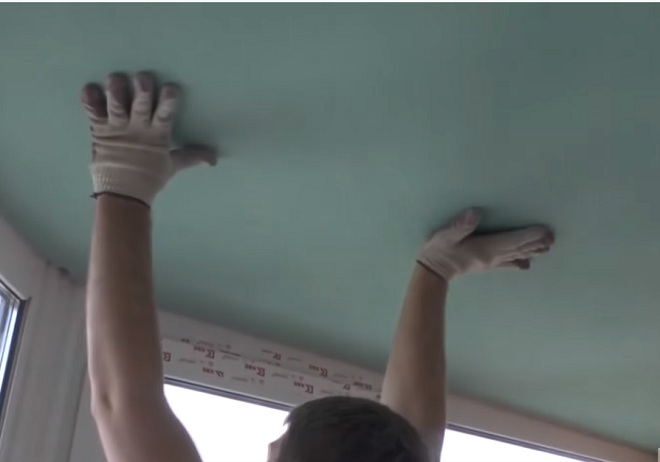


- The next sheet is attached using the same technology.


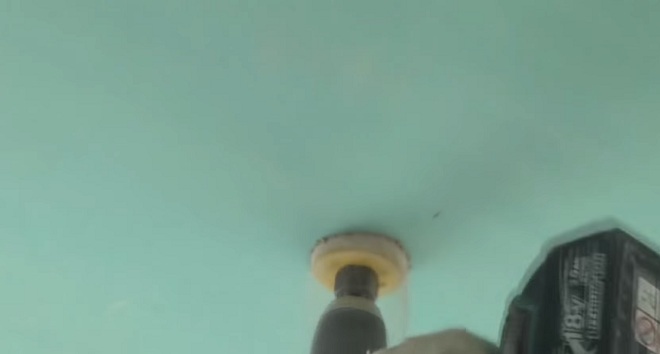
- If necessary, you can make holes for the lamps. Holes are made using a crown nozzle.
- Next, we proceed to the installation of the crate on the parapet of the balcony. We fasten the UD profile of the required length to the window sill with self-tapping screws.
- After the frame is installed, it is necessary to prepare the CD profile for the length you need.
- We install the CD profile perpendicular to the UD guides. Fastening pitch 40 cm. CD and UD profile are interconnected by self-tapping screws.

- Next, we move on to the lining of the parapet. Cut sheets to desired size.
- The first sheet is installed on the parapet of the balcony near its side wall. It is attached to the CD profile with self-tapping screws.


- The rest of the sheets are attached in the same way.

- Next, we move on to sealing the seams between the sheets of drywall. To do this, you need putty and sickle. We prepare the mixture: we combine the dry building mixture with water and with the help of a mixer we bring it to a homogeneous state and leave it to stand for a few minutes.
- Next, fill the seams with mortar and cover them with sickle. Then again apply a layer of mortar and smooth with a spatula and leave until completely dry.

- Recesses from self-tapping screws are sealed with the same solution.
- After complete drying, the surface is polished with floats to a smooth state.

- Corners can be processed using special corners made of plastic or metal. At the beginning, a solution is also applied, and a corner is glued.

- Video instruction for sealing seams and drywall joints:
- This completes the work on finishing the balcony with drywall. We strongly recommend that in addition to the text version of the instruction, you will familiarize yourself with the video instruction, as it shows the installation in a more detailed form with an explanation a large number nuances.
We sheathe the balcony with drywall with our own hands
Sooner or later, thoughts about repairing a balcony visit each of us. Along with such important components as glazing, heat and vapor barrier, wall and ceiling cladding plays a special role. Since this stage is the "calling card" of the balcony, its "face". And what it will be depends on the choice facing material. At the same time, one of the most popular options is finishing the balcony with drywall. In all the subtleties of this issue, we will try to figure it out today.
Pros and cons of drywall
Drywall is a layer of gypsum covered with cardboard on the outside. It is used for covering the ceiling and walls in the house. The flexibility of the material makes it possible to carry out wall and ceiling structures of almost any complexity on its basis. Sheathing a balcony with drywall has the following advantages:
- Leveling the surface of any degree of curvature. While plaster (the main "competitor" of drywall) can level a maximum wall with a 1.5-centimeter thickness of curvature;
- Cleanliness of work, because of which this material is also called "dry plaster";
- The ability to hide small pipes and electrical wiring under the interior plasterboard;
- Soundproofing;
- Simplicity and speed of work, the ability to create multi-tiered suspended ceilings;
- Possibility of placement on the balcony under plasterboard sheathing of steam and heat insulation;
- Hygroscopicity, due to which air exchange is maintained between the wall and the balcony;
- Availability due to low price;
- Multivariate lighting: the use of built-in lamps, ice lighting.

There are many advantages to cladding a balcony with drywall.
But, like all materials, drywall is not alien to shortcomings. These include low resistance to mechanical stress.
Important!
Therefore, covering the balcony with drywall does not imply further attachment of heavy objects to the walls, since under their weight the material can simply collapse.
Also, the casing is located at a certain distance from the wall, which as a result reduces the volume of an already small room. Well, ordinary drywall is not resistant to moisture. But this shortcoming is easy to fix. It is enough to choose waterproof drywall for covering the balcony. How is it different from the usual? Now we'll find out.
Types of drywall
Not every drywall on the loggia, with its high humidity and temperature changes, will behave properly. The industry produces several types of this material, which differ primarily in their characteristics. Let's list them:
- GKL - ordinary drywall;
- GKLV - moisture-resistant material contains fungicidal and hydrophobic additives, it is allowed to work in such wet areas as a bathroom, kitchen, balcony, including on the floor;
- GKLO - fire-resistant drywall with fiberglass reinforcement;
- Vinyl (laminated) coated with PVC film, ready for finishing without prior puttying;
- Restoration plasterboard - a thinner sheet designed for the restoration of old plasterboard and wooden structures;
- Arched thin flexible drywall: interior decoration of balconies with this material is used when it is planned to make an arch instead of a door.
In addition to the composition of drywall, the dimensions of its sheet also vary. It is produced with a width of 0.6 - 1.2 m, a length of 2-4 m and a thickness of 6-12.5 mm. Sheets of smaller sizes are suitable for working on small balconies, larger ones - on spacious long loggias.

Material happens different types, depending on resistance to fire and moisture
For mounting massive drywall sheets Requires remarkable physical strength and the help of a partner. It is almost impossible to do this work alone. In case of non-compliance specifications installation, over time, cracks may appear on the skin. What are these conditions, and in what order are the works performed? Read below.
Step-by-step instructions for facing a balcony or loggia with drywall
Finishing the loggia with drywall is done after its glazing. First, a crate is made on the ceiling and walls. Then - directly sheathe. But first of all, you need to stock up on the necessary materials and tools.
Materials and tools
To work, you need a standard set of tools, which is usually in the house of every master or repair enthusiast. If something is still missing, then it is better to take care of its acquisition in advance, so as not to waste your time on it later. So, to finish the loggia with drywall, you will need the following tools and materials:
- water or laser level;
- waterproofing and vapor barrier film;
- insulation (ecothermix, mineral wool, expanded polystyrene);
- roulette;
- dowel-screws or dowel-nails;
- hacksaw for metal;
- wood saw;
- rule 2-2.5 m;
- single-level profile connectors (the so-called "crabs");
- a hammer;
- ceiling profiles and guides;
- stationery knife;
- wood scissors;
- screwdriver;
- perforator;
- drill;
- stapler for furniture;
- electric jigsaw.
- drywall;
- mounting foam;
- putty for sealing joints.
Installation of guide profiles and frame
The interior decoration of the balcony with plasterboard begins with the manufacture of a frame on the ceiling and walls, on which it will subsequently be attached finishing material.

First, the crate of the balcony is performed, on which sheets of drywall will be attached.
The preparatory stage is carried out in this order.
- Remove the old finish from the ceiling and walls, clean from dirt.
- Blow out the cracks mounting foam, apply an antiseptic against fungus and mold.
- Mark the ceiling, for which draw an center line in the center of the room, perpendicular to which to make the rest of the lines.
- Step back from the joint with the ceiling 3-5 cm and draw one line along the entire perimeter along the walls (the lower border of the frame).
- Make marks on the ceiling at intervals equal to 1/3 of the length of the drywall sheet.
- Cut the profile to the desired length with metal shears.
- Fasten the guide profiles to the wall. To do this, attach the profile to the line planned in advance and mark the places for drilling through the holes.
- Drill holes in the wall with a hammer drill.
- Fix the profile with dowels.
- Attach the profiles to the ceiling with anchors along the edges and in the middle, starting from the corners of the balcony for subsequent plasterboard sheathing. It is advisable to do this with a partner, since bending or breaking the profile in this case is unacceptable.
- With a step of 40 cm, fix the second profile. Do the same on the other side of the balcony.
- If the length of one profile is not enough, then cut another of the required length, and connect their joints with crabs to self-tapping screws.
- After the ceiling, carry out the crate of the walls. To do this, mark lines with an interval of 0.6 m, attach a profile and mark the places for drilling holes.
- Drill holes, attach profiles and fix them with dowels.
- In the place where the joint of drywall sheets is supposed to be, lay a double crate.
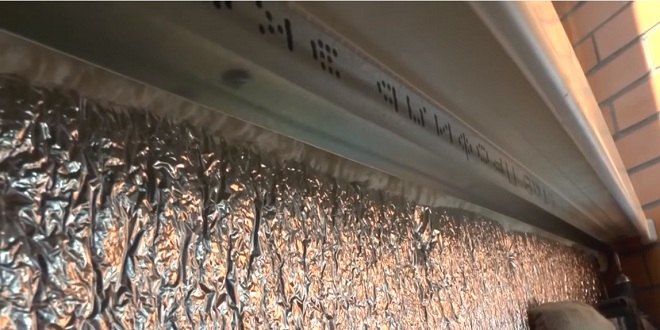
- Cut insulation sheets the right sizes a little spare. Attach them to the wall between the crate, cover with vapor barrier roll foil on top, which is attached to the frame with brackets using a mounting stapler.

Plasterboard ceiling sheathing
Drywall installation
The cladding is installed in the same order as the crate: first we perform work on the ceiling, then on the walls. In this case, a step-by-step list of actions is as follows.
- Prepare drywall. cut sheets required sizes. Make holes in them for the lamps.
- Remove an edge (chamfer) from a sheet of drywall at an angle, so that later it will be easier to putty the joints of two sheets. Tight joints are not allowed due to the possible deformation of the sheet in the future. They are filled with a special putty.
- Fix the first sheet on the ceiling with a self-tapping screw at a distance of 15-20 cm from the corner of the wall in increments of 20 cm. It is better to drown the screw head.
- Start finishing the walls with the largest of them, where a whole drywall sheet is placed. Similarly to the ceiling, fix the sheet with self-tapping screws every 20-25 cm, sinking the caps.
- After interior decoration drywall is over, you need to prime the walls and ceiling.
- Lay a sickle (reinforcing tape) along the seams between the sheets.
- To putty surfaces, giving Special attention seams and joints.
- Repeat the priming procedure, thereby preparing the walls and ceiling for subsequent painting or wallpapering.

Putty joints of sheets and places of fastening with screws
During installation, some difficulties may arise that cannot always be foreseen in advance. To avoid common mistakes beginners, we recommend that you listen to the advice of experienced craftsmen and follow the instructions clearly.
Self-finishing the balcony with drywall
If recently you are increasingly thinking about the improvement of the balcony, pay attention to such finishing material as drywall.
Features of work, pros and cons
The advantages of finishing drywall are huge:
- does not burn;
- retains heat;
- has excellent sound insulation;
- hard, but when wetted with water becomes very flexible.
Sheathing a balcony with drywall is an opportunity to save money, significantly reduce the repair time and realize your design talent. In addition, it is absolutely harmless material.

Interior decoration of the balcony with drywall
As you can see, the advantages far outweigh the disadvantages. Experienced Builders and beginners in repair are happy to use it in their work.
Lining the loggia with drywall with insulation
If you want to get a full-fledged room, then when cladding, use materials that have thermal insulation properties.
It is possible to insulate a balcony or loggia with the following materials:
Mineral wool is sold in rolls or plates. Rolled does not even need to be attached to the wall, it will be pressed down by sheets of drywall. Cotton wool plates, like expanded polystyrene, require additional fasteners. If you make a choice in favor of expanded polystyrene, then know that the joints between the plates will have to be foamed.
Video:
Finishing the balcony with drywall without insulation
If you like to drink a cup of coffee in the morning and listen to the birds singing, you can not bother with a heater. Glue drywall directly onto the walls with special glue, additionally use a cork dowel.
Sheathing the balcony with drywall for painting
Have you already decided on the color of the walls? Drywall is great for painting. Paint is best to choose water-based. It is only available in stores white color, but there are a huge number of colors. Which one to buy is up to you. If you do not know how to paint a balcony, we wrote about it.
When purchasing paint, pay attention to the following: glossy will emphasize all the roughness and the presence of hairs, and matte will hide all surface imperfections.
Not without a roller. Apply the first layer horizontally, the second vertically. If the result suits you, then you can finish painting. I wanted a brighter color - paint more horizontally. You should not wait for the layers to dry, feel free to apply the next one on a damp surface.
Finishing the loggia with moisture-resistant drywall with your own hands
Decided to sheathe the balcony with drywall yourself? Pay attention to moisture resistant drywall. For the balcony suitable material. There will be no mold, no fungus, and you are not afraid of a fire either.
Don't want to overpay? Let's correctly calculate the amount of drywall. Measure all the walls, subtract the area above the railing, but the window and balcony door feel free to include in the calculations. But required amount consider insulation without windows and doors.
One sheet of drywall requires 70 screws, and a dowel - nails - 5 pieces per bar.
See what you need for self repair balcony. Perhaps there is something at home or you can borrow from a neighbor.

Moisture resistant drywall has a green tint
We buy the following materials in the store:
- Drywall;
- profile or bar for lathing;
- drywall screws;
- insulation;
- putty;
- primer;
- paint.
You will need these tools:
First get rid of the old plaster, from all cracks, apply a waterproof putty. Treat the walls of the balcony with a primer a couple of times and you will not remember the mold for a very long time. Preparatory work left behind and you can proceed with the installation of the crate.

The metal crate will serve you for a very long time, but wooden version also not bad, and easier to work with.
Install the crate horizontally and fasten with dowels, maintain a distance of 60 centimeters. With the help of a grinder, remove unnecessary.
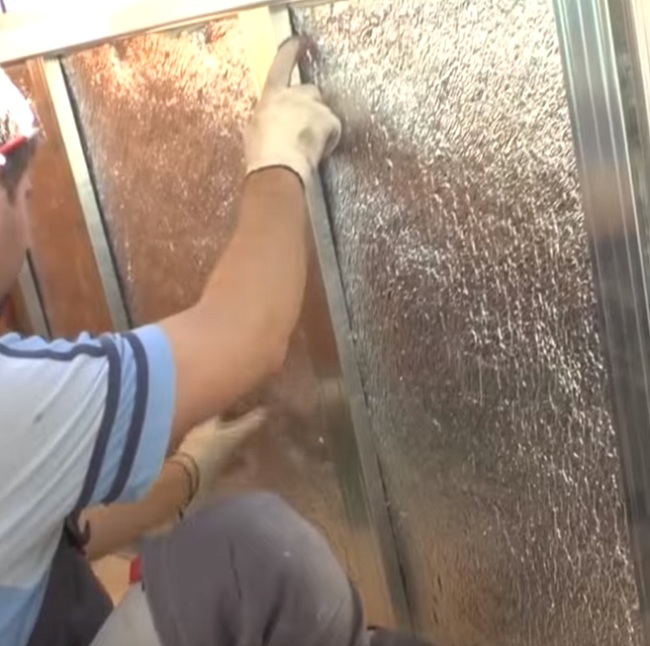
The insulation has already been selected, lay it evenly and without gaps. Roll foil is laid on top of the insulation. This is necessary for vapor barrier and will not be difficult. Fasten with a mounting stapler and proceed to the most interesting part - plasterboard lining the balcony.
Start with the largest wall, so you save material and spend less time cutting. Drywall is easy to cut with a knife, just apply a hard and even object along the cutting line, for example, a level.
The main work on finishing the balcony is over, but it's too early to relax. Prime the walls well and seal the seams and joints. Now the surface must be puttied, then proceed to the grout. Prime again and exhale. It remains the most pleasant - painting in the selected color. This article will help you with this.

In a word, it took longer to prepare than to do. Now only you have one cozy balcony with smooth walls and original design.
Sheathing the balcony with drywall - stages of work
Many residents of multi-storey buildings are thinking about overhaul balconies or loggias. In this case, an important role is played not only by high-quality glazing and insulation, but also by professional wall and ceiling cladding. One of the most common options for a balcony (loggia) is plasterboard sheathing, since this construction material has an attractive appearance and good performance. It is possible to perform such a finish with your own hands, we will understand the features.

The positive side of the facing material
In general, a standard sheet of drywall is a thick layer of gypsum covered with cardboard on both sides. The material is effectively used for finishing walls, as well as ceilings in various rooms, its flexibility allows you to perform work of almost any complexity.
Drywall combines a number of the following advantages:
- Obtaining a perfectly flat surface.
- The cleanliness of the work.
- Possibility of self-assembly.
- Simplicity and speed of work.
- Good soundproofing.
- The possibility of placing insulation materials (for drywall).
- Low cost.
- Flexibility (when wetted with water).
- Low flammability, absolute harmlessness.
- The possibility of placing additional decorative elements (lamps, paintings).
Such material can easily hide all existing wall defects (cracks, bumps and bulges) up to 2 cm in size.

The building material is made of components that are absolutely harmless to human body and the environment.
Although gypsum panels are durable, they do not provide for fastening heavy decor elements, so when planning plasterboard finishing on a loggia or balcony, do not miss this moment.
The negative side of the facing material
Like all building materials, drywall tends to have its drawbacks, which are as follows:
- fragility;
- reduction of free space;
- intolerance to prolonged humidity.
Facing material requires accuracy in transportation and work, since any physical impact can deform gypsum sheets.
Finishing the room with drywall with your own hands is carried out on special frame, due to which the free space of the balcony room is significantly reduced.
If the humidity on the balcony is high, there is a high probability of the development of fungus or mold, so it is important to carry out special treatment with antiseptics to protect drywall from moisture.

Varieties of drywall
Not every drywall installed on a balcony or loggia retains its original qualities, the main reason for this is temperature changes and high humidity in the room. That is why it is important to know the varieties of the selected building material, possible disadvantages and nuances when working with it.
- standard;
- fire resistant;
- moisture resistant;
- laminated;
- arched.
Standard drywall sheets are usually white or gray color, it does not have any additional properties. Often such material is used for a balcony room with an average level of humidity and air temperature.
The refractory material is covered with red or pale - pink With inside. The composition of gypsum sheets includes a special substance that prevents fire. They are usually used in offices or rooms that require special protection against accidental fires.
Moisture-resistant HA is painted in green or turquoise recommended for use in rooms with high humidity.

Vinyl (laminated) material is covered with a thin layer of plastic on one side. Such drywall does not require further processing.
The arched building material is quite thin and flexible; it is often used in an unusual wave-like design or in the construction of arches.
In addition, drywall sheets are different sizes and thickness.
Finishing tool kit
The standard finishing of the loggia with plasterboard is a simple process, it can really be implemented without the help of specialists. To do this, you need to choose the right building materials, tools and components:
- drywall and balcony insulation;
- building level;
- screwdriver and screws;
- perforator;
- roulette;
- hacksaw or jigsaw;
- a hammer;
- construction foam;
- wooden profiles and reinforcing tape;
- connecting "crabs";
- construction stapler;
- primer, putty.
After everything you need is ready, we proceed to the next step.
The main point in finishing the balcony is a qualitatively selected material and the correct construction of the frame on which the drywall will be attached.

preliminary lathing
The process of installing drywall requires careful manufacture and installation of the crate, which ensures the strength of the entire structure.

- We clean the walls from the previous coating, remove dust, dirt, construction waste as much as possible.
- We get rid of cracks and irregularities, cover work surface antiseptic.
- We start marking - we draw a line in the very center of the room (on the ceiling).
- Next, we retreat from the corner of the ceiling 5 cm and draw a strip along the entire balcony or loggia.
- We make markings along the walls in such a way that there are three lines for fastening per gypsum sheet.
- Preparing wooden blocks according to previously taken measurements.
- Using a perforator, we drill holes, after which we fix the frame with dowels.
- Next, we prepare the insulation material, leaving a margin of 2-3 cm.
- We fix the insulation with a construction stapler.
If the room itself is warm enough, you can not start additional insulation of the walls and ceiling. In this case, it is desirable to glue drywall on cleaned and prepared walls with special glue.

Plasterboard sheathing
Having prepared a solid frame for future sheathing, we begin installation from the ceiling, gradually moving to the walls.

- We take measurements, prepare gypsum sheets according to measurements.
- We make the markup of the installed wooden profile on drywall.
- We fix the prepared material on the ceiling with self-tapping screws.
- Gradually move on to the decoration of the walls (in a similar way).
- When all the free space is filled, the sheets need to be primed.
- We put a special construction tape on each joint.
- Carefully putty the joints.
- After complete drying, prime the surface.
- Let dry completely.
Now we boldly proceed to the design of the balcony room: painting the surface or sticking wallpaper.
Installation of walls is better to start with larger sheets of drywall, gradually moving to smaller ones.

When covering a balcony or loggia with gypsum sheets, pay attention to the following factors which will greatly simplify the work:
- Large sheets of drywall are best fixed with additional help ( heavy material may break under its own weight).
- Sheets of insulation material must be cut with a margin to avoid gaps for the passage of cold air.
- An important point is the application of an antiseptic on the prepared walls, since in autumn - winter period increases the likelihood of the formation of unpleasant mold, which is not easy to get rid of.
- Pin wooden frame better with dowels, keeping a certain distance between the fasteners (approximately 0.5 meters).
- It is necessary to fasten drywall with self-tapping screws (every 20-25 cm), while their hats are aligned with the gypsum sheet as much as possible.
Improving your balcony with drywall trim is a bit time consuming process, but sticking to step by step instructions, even without the presence of professional skills will not seem difficult.
The process of interior decoration of the balcony with drywall

Drywall is a building material with which you can make repairs in an apartment and at the same time make a minimum of effort, as well as money. Finishing the balcony with drywall is done by hand, and deep knowledge in construction matters is not required. Drywall on the balcony gives a perfectly flat surface, insulation and universal lighting.
 An example of finishing and decorating a balcony with plasterboard Back to the table of contents
Advantages and disadvantages of drywall
You can sheathe a balcony with drywall with your own hands, because it has many advantages and a minimum of disadvantages:

With all the listed advantages of GKL, there are also disadvantages:
- This type of building material does not accept high humidity. Sheets are deformed.
- If the room is constantly damp, fungus and mold will appear on drywall.
- When installing shelves, the structure should be strengthened. Otherwise, drywall will not withstand the load and may bend and burst.
 Plasterboard shelf design
From all of the above, it is clear that the advantages are much greater than the disadvantages, which, when correct installation can be removed.
Choosing the right drywall for finishing the balcony
Drywall is divided into types:
- Regular sheets. Available in colors: white, grey, brown colors. Used for interior decoration in rooms with normal temperature regime and average air humidity.
- Fire resistant drywall. Coloring can be red or pink. It differs in composition. It is mainly used in offices or production shops where there is a risk of fire.
- Moisture resistant drywall. Its coloration is green. Let's apply in bathrooms, on balconies, in a toilet and other rooms with the increased humidity.
 An example of cladding a balcony with moisture-resistant drywall
Attention! For sheathing a balcony or loggia, only moisture-resistant drywall is used. In this case, the structure will last a long time and without signs of deformation.
Moisture-resistant drywall is treated with a special tool that prevents the development of fungus and mold. It also contains substances that resist moisture.
Necessary tools and material
It is required to have a set of tools and purchase necessary materials in order to finish the balcony with drywall:
- metal profiles must be necessarily galvanized - guides and rack;
- GKL waterproof, green;
- brackets, which are selected based on the profile;
- crabs for attaching profiles;
- puncher and screwdriver or screwdriver;
- dowels, self-tapping screws for drywall;
- insulation, for sealing the balcony. It can be penoplex, construction wool, penofol;
 An example of warming a balcony before plasterboarding
After acquisition the right materials and collection the right tools, you can start the main work.
Installation technologies
Sheathing a balcony with drywall with your own hands takes place in several stages:

Ease of installation, safety and durability are the main advantages of drywall. This building material is suitable for interior cladding. Finishing the balcony with drywall is practical, has high aesthetic characteristics, you can do it yourself.


Advantages and disadvantages
Drywall is popular with professional builders and beginners alike. It is easy to use, suitable for decoration different surfaces and has many positive properties. The material consists of a solid panel glued on both sides with construction paper.
Distinctive features of drywall:
- Light weight. The panels are easy to transport due to their compactness. Also, this property simplifies the installation of parts.
- Environmental friendliness. The absence of harmful emissions makes the material safe for human health.
- Ease of processing. Drywall is easy to cut, so you can get parts of any size. This is especially important when sheathing rooms with a non-standard area.
- Fire resistance. The material is impact resistant high temperatures almost does not burn.
- Thermal insulation. This feature allows you to create a comfortable microclimate on the balcony and maintain a comfortable temperature for a person.
- Soundproofing. On the balcony, sheathed with drywall, it will be quiet, it will not hear noise from the street and from the apartment.
- Affordable price. Drywall costs less than panels from natural wood, however, is different high quality and has a decent look.

Despite the high functionality, the material has a number of disadvantages. Drywall is fragile and can be damaged by external mechanical stress, so care must be taken when transporting and storing panels. It easily absorbs moisture, not very well suited for use in places with high humidity. To eliminate this minute, it is recommended to leave the drywall in place before repairing. open form for several days.


Kinds
Modern drywall has advanced operational characteristics. Depending on its properties, there are several types of materials used for finishing different rooms.
- Ordinary. cheap material, which has no additional properties. It usually has a neutral color scheme and is used when sheathing rooms with a stable temperature regime and not high humidity.
- Fire resistant. The composition of drywall includes flame retardants, making the material less combustible. These panels meet the requirements fire safety and are suitable for decorating almost any room.
- Moisture resistant. Most suitable option for the balcony due to precipitation and temperature fluctuations. The sheets are covered with a special coating that absorbs moisture, and antifungal solutions are also applied to them to prevent mold.
The panels differ from each other in dimensions, which is also taken into account when buying building materials. Before proceeding with the repair, calculate the area of \u200b\u200bthe room, the required number of drywall sheets. To do this, you need to know in advance the dimensions of the sheets, which can be clarified on the manufacturers website or directly in the store.


Required Tools
Repair work do not require professional knowledge, and standard equipment is sufficient for their implementation. Its preparation or acquisition is one of the stages of preparation for repair. What tools are needed:
- Perforator. Used for direct mounting of panels.
- Drill, screwdriver. Needed when installing self-tapping screws, dowels and other fasteners.
- Building level, plumb. They are used to align the panels relative to each other and the surfaces located on the balcony.
- Putty knife. Required for applying putty on walls.
- Roulette and pencil. They are taken during the measurement work.

In addition to the listed equipment, you must purchase the drywall itself and the following materials:
- Insulation - to prepare surfaces for installation.
- Hydro and vapor barrier. Required for insulation.
- profiles. Needed to install the crate.
- Dowels, self-tapping screws. Fasteners are required at all stages of work.
- Primer, putty. They are used to process joints between foam sheets.
- Hacksaw for wood and metal. If necessary, it can be replaced with a grinder. It is required for processing the details of the crate.
If additional processing of materials is required, paint is purchased separately. It is suitable both for a radical change in the color of drywall, and for emphasizing the natural shade of the panels. At the stage of final finishing, impregnations are applied to protect against high humidity, high temperatures.


Preparatory stages
The balcony is finished with drywall only after the room is glazed, otherwise the panels will not hold and may be deformed due to precipitation or excessively high temperatures. Here are some other steps to prepare:
- Before sheathing, all objects are removed from the loggia, the walls are freed from traces of the old finish.
- Further, it is recommended to install steam and moisture protection. For this purpose, foil or polyethylene film is suitable, acting as a barrier. In addition, special membranes can be used.
- Insulation is necessary not only to maintain a comfortable microclimate and constant temperature, but also to extend the life of the panels. Therefore, this procedure is also required before sheathing.
It should be borne in mind that you need to process all surfaces on the balcony: not only walls, but also the floor and ceiling. The insulation must be resistant to rot, moisture and pathogenic microorganisms.

Materials used for warming the loggia:
- glass wool;
- mineral wool;
- expanded polystyrene.
The thickness of the material must be at least 50 mm so that there is no draft on the balcony. When operating in difficult climatic conditions, the insulation is additionally processed to increase resistance to high and low temperatures. It is laid between the elements of the crate, previously covered with foil for waterproofing. For installation, a construction stapler is used.
Sheathing the balcony with drywall requires the installation of a crate on which the panels will be attached. The frame is made of horizontal and vertical profiles, which are both wooden and metal. The latter are characterized by increased strength and ease of installation, therefore they are used more often.
When using wood, the bars are additionally processed.

Stages of installation of the crate:
- Creating a drawing and marking the walls in accordance with it. Thanks to this, the profiles will be located evenly, which means they will last longer.
- Installation of support profiles. The first bars are installed near the floor, the following elements are aligned along them.
- Installation of parts in accordance with the markup. To make them as even as possible, it is recommended to use the building level.
- Fastener parts. For these purposes, dowels or self-tapping screws are used, they are installed every 25 cm.
- Installation of cross jumpers. They are made from rack profiles and are positioned taking into account the workload of the walls. If it is necessary that the crate can withstand a lot of weight, the jumpers are fixed as often as possible.
Mounting hangers will make the frame more durable and rigid. A heater can be located between the cells of the crate; it is recommended to arrange a double crate at the site of future joints. At the next stage, drywall is directly attached to the crate.
In the next video, we suggest that you visually view all the above steps using the example of a ceiling crate.
How to sheathe with your own hands: a sequence of work
Sheathing starts from the ceiling, after which they move to the walls. First of all, you need to cut drywall panels of the right size, if necessary, leave room for lighting.
Simplicity of puttying of joints between panels is ensured by beveled edges - chamfers. If it is not, the surfaces are prepared independently.
The first plasterboard panels are installed on the ceiling. It is most convenient to use self-tapping screws as fasteners - their hats are recommended to be drowned inside the material. The distance between the elements is 20-25 cm, for convenience, before work, marks are made for future holes. The remaining panels are installed in the same way. If necessary, the last details are cut.
What is considered when sheathing a balcony:
- Wiring and screws must not touch.
- Metal framing is most effective in humid climates.
- wooden bars polished, covered with protective solutions.
- Fasteners cannot be twisted very tightly: the material is fragile and can be deformed.
- When installing ceiling profiles at the edges and in the middle, it is recommended to use anchors.
If you are in doubt whether it is worth sheathing the balcony with drywall (gypsum plasterboard), and at the same time insulating it, read this article. She will help you make a choice. After all, a balcony or loggia trimmed with such material, firstly, looks much more aesthetically pleasing. And secondly, a layer of thermal insulation hidden behind the cladding will allow you to get a room where you can have a good time in any weather and season.
Pros and cons of drywall
Advantages:
- Finishing balconies and loggias with plasterboard is carried out quickly.
- Plasterboard cladding makes bearing structures stronger, more durable.
- GKL is a fire-resistant material (due to gypsum), which in the event of a fire will prevent the spread of fire.
- This is budget stuff.
- Sheathing a loggia or balcony with drywall allows you to insulate it.
- GKL can be used for cladding or arranging walls, ceilings, and also as partitions. With it, you can close large defects, or you can get different design forms.
- Sheathing the balcony with drywall allows you to mount spectacular built-in lighting.
Flaws:

- As a rule, GKL is not waterproof. For installation in bathrooms, basements, open balconies or other areas with high humidity, it may adversely affect its condition. BUT wet material affected by mold. After getting wet, the material must be changed.
- GKL can be easily damaged, as it is not resistant to impact. Thus, you may have problems with holes, damaged corners, peeling tapes, cracked joints.
- Although the drywall is quite easy to install, the craftsmen must be experienced, because the finishing of the loggias with drywall must be done correctly, otherwise you will have connection problems.
When installed, this material creates a lot of dust that can easily spread throughout the house. The disadvantages of the GKL are actually quite solvable problems.
Types of drywall

- Ordinary. It is white on one side and brown on the other. This is probably the most economical type of drywall, repair and finishing with such drywall is carried out everywhere. Available in thicknesses from 3/8 to 1 inch (1-2.5 cm). This is the most common type, usually sold in 1.2 by 2.4 m (3 square meters) panels.
- Green (Moisture resistant). It has a green coating, which makes it more resistant to moisture. It is somewhat more expensive than the usual GKL. Used in wet areas: in the walls of bathrooms, basements, kitchens, laundries, utility rooms. But it is not waterproof, so it is not suitable for places where it will be in direct contact with water.
- Blue (Moisture resistant). It is used for wood cladding, because. has special absorbent properties, and wood finishing requires fewer steps. It is highly resistant to water and mildew. Worked great in bathrooms and other wet areas. In addition, this type significantly reduces noise, and also produces little dust when working with it. it great choice for loggias and balconies.
- Paperless. Coated with fiberglass rather than paper, which protects the material from rot and provides excellent mold resistance. The structure is a little more complex than regular drywall, but it is easier to cut. Remember that you need to protect yourself when working with fiberglass materials.
- Violet. This is an improved moisture-resistant material that has the same advantages as conventional gypsum board, but with superior moisture and mildew resistance. It can be installed on all walls along with the ceiling. Suitable for areas where increased resistance to moisture and mold is required. If the surface will be in contact with water, this is the material to use.
- Type X. This is the so-called fire-resistant drywall. Multiple layers can be used to achieve higher fire resistance. Finishing the loggia with such drywall will allow you to get a room where you can smoke without fear. But cutting and processing such a GKL is more difficult than a conventional panel. It is commonly used in garages where special fire regulations are required.
- Soundproof. It is a laminated material from a mixture of wood fibers, gypsum and polymers that increase the STC (sound transmission class). This material is denser than regular drywall, so it can be a little more difficult to work with than other types. Finishing the loggia with such drywall with insulation will allow you to get a quiet, comfortable room.
Tools and materials for installation
.
materials
- Plasterboard panels.
- To fill the gaps between the sheets - a special mixture (most often it is acrylic putty).
- Paper or fiberglass (serpyanka) tape for processing joints.
- Plasterboard profiles.
- Corner made of metal or paper, for drawing.
- Internal, external corners from metal profiles.
- Nails, drywall screws.
- Grinding mesh or sandpaper.
Tools

- Knife for cutting plates.
- Nozzle for a drill for cutting holes in sheets.
- Metal scissors.
- Spatulas 13 (15) and 25 cm wide for finishing seams.
- Trowel angular plasterboard.
- Container for putty.
- Drywall lift, T-jack, or Dtrywall T-square. Used for lifting and then holding drywall sheets on the ceiling.
- Electric screw gun, or screwdriver.
- Drill.
- Mount damper. Used to prevent twisting of screws.
- Measuring tape (roulette).
- Sanding block.
- A vacuum cleaner.
- Mop.
- Protective glasses.
- A hammer.
- Marking pencil.
Do-it-yourself installation technology
It begins with the fact that the old interior decoration on the balcony is completely dismantled, if necessary, the surfaces are protected by a grinder. Identified cracks and recesses should be plastered so that the wind does not blow into them. The floor of the balcony must be waterproofed, this can be done with ordinary roofing felt or mastic. Further, all drywall surfaces on the balcony are treated with an antiseptic primer to prevent the development of mold. After the primer dries, the balcony is insulated with foam plastic or foam plastic. If the balcony is closed, you can use glass wool. Balcony insulation with one drywall is ineffective. After sealing the seams of the insulation with mounting foam or special glue, foil insulation is mounted on it. After all these works, you can proceed to the device of the crate.
Lathing design
The first step is to install a UD profile on the ceiling. It is attached to the dowels, then the position of the UD profile on the floor is marked strictly vertically under it along the plumb line. The ceiling and floor profiles are screwed with screws in increments of 20-30 cm. Then guide profiles are installed in the corners of the balcony, ideally using a laser building level. The elements are connected by cutters.

Then the rack profiles are set in increments of no more than 60 cm. They are attached to the ceiling and floor rails with self-tapping screws. The guides are attached to the wall with perforated brackets in increments of 40-50 cm. Final stage crates - installation of transverse elements in increments of 40 cm. They are connected to the guides through "crabs", i.e. cross fittings. After the installation of the crate behind it are carried out engineering Communication, incl. wiring. It should be laid in special fire-prevention channels made of polymers.
Installation of drywall sheets

First, drywall boards are marked, then cut. In this case, a carpenter's knife is used. They make an incision on one side, then the sheet breaks, after which it is cut from the opposite side. It must be remembered that the material in order to avoid getting wet should not touch the floor. The distance from the sheet to the floor should be at least 1 cm.
The next step is cutting holes for electrical appliances. You can use a drill with a special nozzle "skirt".
This stage ends with the fastening of the cut GKL to the profiles with self-tapping screws, in increments of 20 cm. The fastener caps must be recessed into the plaster. The cut edges of the sheets are set close to each other, and the unedged edges of the sheets must be set at a distance of about 5 mm between them.
Finishing
General tips for finishing for painting.
- Keep your spatula and other tools as clean as possible. Remove the excess layer of putty after each pass of the spatula.
- Never mix dried putty with fresh putty. The dried composition will leave uneven surface. Remove completely dried composition from the mixing container.
- For better mixing of the mixture, use the mixing attachment attached to an electric drill.
So, make sure that ALL screws are installed correctly, i.e. embedded in the material. You must run the spatula over all the screws - if the spatula touches the head, then the screw should be tightened more.
For grouting, use a quick-drying gypsum plaster or putty with low shrinkage, preferably acrylic. Do not draw too much on the spatula. This will minimize waste.

Use flexible spatulas. Joints and holes are sealed in two movements: first, the seam is filled with the compound by moving the spatula across, and then the excess is removed by moving the spatula along the seam. Start by patching the butt joints at the ends of the cut drywall sheets.
After completing all butt joints, move on to conical joints. Conical - these are not cut seams along the edges of drywall sheets.
The last areas to be machined are the inside corners, followed by outside corners. When finishing internal corners drywall joints, work one side at a time.
Once the butt joint is filled with putty, cut off a piece of tape and stick it over the joint. The tape should be stuck in the center of the seam. Cut the tape to the length of all the seams that you will finish before starting. Important advice: Soak the reinforcing tape in a bucket of water before sticking.
Once the tape is in place and smoothed out, cover the entire joint with more putty, this time using a wide spatula. Wipe off any excess that is squeezed out of the joints. It is best to leave the compound for 24 hours before applying a second coat.

After processing the joints, the fastener heads are also closed with putty, all excess is scraped off with a spatula.
After the two layers of putty at the joints have completely dried, the surface is polished as necessary with a sheet of fine sandpaper. After removal of dust from the surface, possible detected defects are smeared for the third time.
Drywall painting. How to paint?
Finishing the balcony with any drywall ends more often with painting than with wallpapering.
- Before painting, carefully inspect the surfaces with a flashlight. Sand the imperfections with 150 grit sandpaper.
- Sweep the dust off the walls and let it settle.
- Sweep and then mop the floor.
- Wipe the walls with a barely damp sponge.
- Treat the surface to be painted with a special primer, especially carefully - at the corners and joints.
- After the primer dries, apply 2 coats of paint. More than 2 coats may be needed, each applied after the previous has dried. First, the corners are painted with a brush, then the rest of the surface is painted with a roller. The paint is applied with a roller in two directions: first along, then across.
Drywall 6 Mistakes Everyone Should Know!
Plasterboard lining will help make the balcony warm, cozy and beautiful. This building material occupies a leading position in popularity among both builders and customers.
Positive properties of drywall
- The flexibility of the material allows you to level surfaces of any curvature. Sheets of drywall can be sheathed on the surfaces of walls and ceilings. Drywall will be a good basis for wall or ceiling structures any configuration and complexity.
- Cleanliness and speed of the material laying process. Unlike the application of conventional plaster, drywall sheets are mounted faster with a minimum of dust and dirt.
- Installation of drywall structures makes it easy to hide any communications (pipes,).
- Provides excellent sound insulation and heat preservation on the balcony. Heat-insulating material is also placed under the skin.
- Finishing the balcony with drywall is available to everyone, since this building material is inexpensive.
- Due to its hygroscopicity, drywall on the balcony allows you to maintain good air exchange.
- allows you to use a variety of lighting devices: from traditional hanging lamps, to built-in spotlights.
- Drywall does not support combustion.
- The material is absolutely harmless to human health.
- The material weighs a little, which is very important for those who make repairs in old houses.

Disadvantages of using drywall
- Fragility. This is the main disadvantage, because of which it is undesirable to attach heavy objects and furniture to walls sheathed with drywall. Under the weight, the wall can simply collapse. Also, with extreme caution, drywall sheets should be transported and carried out installation work. Any inaccurate movement, strong pressure or impact can damage the material, violate its integrity.
- Reduces free space on the balcony. Due to the fact that the sheathing is mounted on the frame at some distance from the surface of the walls and ceiling, at the end of the repair, the useful space of the loggia is reduced.
Fixing drywall sheets
We prepare the material. Cut out sheets of the desired size. If necessary, we make holes in the drywall for the lamp. On a sheet of drywall, a chamfer should be cut at an angle. This will prevent further deformation of the sheets and improve the quality of the finish.

Drywall sheets are attached to the frame with self-tapping screws. Fasteners are fixed in increments of 20cm. The head of the self-tapping screw must be hidden in the thickness of the drywall sheet.
Finishing work
The assembled drywall structure is prepared for painting. To do this, the surface is impregnated with a primer, the seams between the panels are puttied. All plasterboard finishes are covered first with a starting and then finishing putty.
Having studied in detail the stages of finishing the balcony with drywall and the features of the material, you can not only save cash, but also quickly create a cozy, beautiful room for relaxation with your own hands.