The hallway is the first thing they see when entering the apartment. Often the selection in stores is the same, and choosing furniture for the hallway is not easy. And if it is not large, then the cabinet simply may not fit or will take up all the space. In this case, you can make furniture for the hallway yourself. In addition to saving money, you'll get a custom model that fits your space.
What furniture is needed for the hallway
The main rule for furniture in the hallway is that it should be roomy, compact, with a neat appearance. There is no need to decorate it excessively. In addition to decoration, it has the function of storing things. You should carefully consider the size, the presence of drawers and cabinets. It’s better if there are more of them, but you need to start from the area of the corridor; there’s no need to overload.
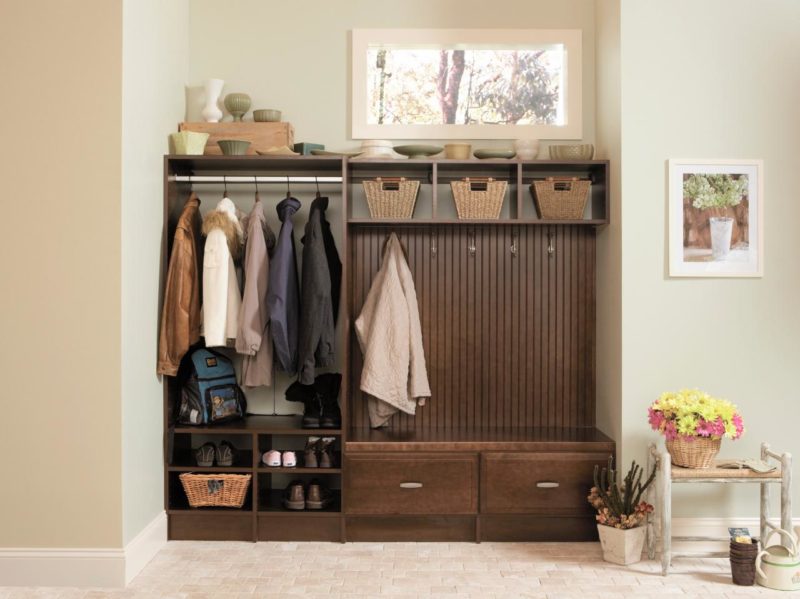
The hooks look nice unusual shape on the wall, plus a shoe rack.
Looks original, if available large hallway, wooden bench, it will add zest to the interior. A win-win wardrobe option, it will fit into any interior. And a wardrobe, if space allows - perfect solution, it is comfortable and roomy.
At small sizes, you should use:
- built-in wardrobes - take up minimal space,
- mirrors and light finishes will visually expand the space.

DIY hallway furniture
With the help of the right project, you can transform even a small area, and the hallway will look organic and spacious.
The design of this room should be combined with the interior of the entire apartment. It is permissible to pick different decor or the floor covering is different from other rooms, but the stylistic direction should be uniform.

Practicality
When choosing a model, you should pay attention to practicality. If you have a small hallway, you should stick to the standard option and choose multifunctional furniture: compartments for things and shoes.
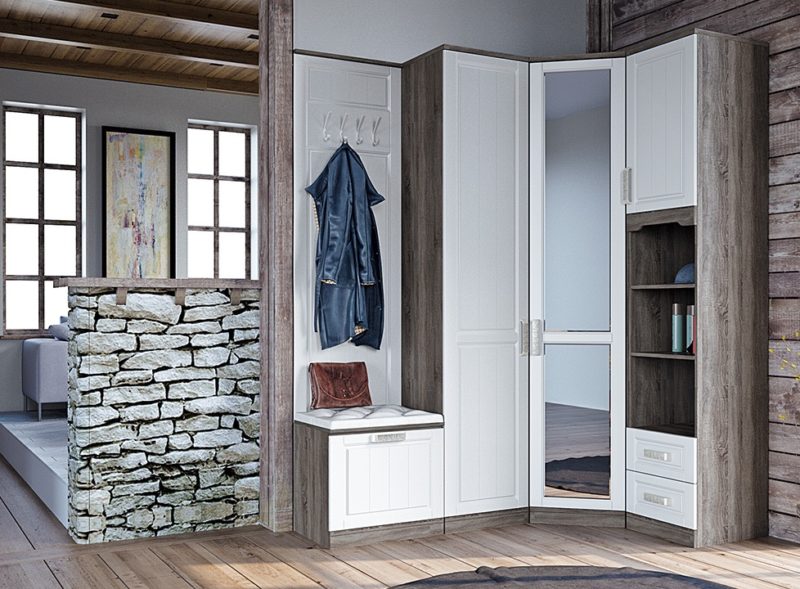
The compromise between capacity and external beauty - corner cabinet. It looks small, but has great depth, so it is roomy.
If you have a large family, you need to think about a place for the belongings of each inhabitant of the apartment.
The hallway is a room into which dirt rushes from the street. Therefore, it should not be done in light colors, it will quickly get dirty. It is not advisable to carry things such as umbrellas, strollers, bicycles deep into the apartment; it is worth providing a storage system for them in the hallway.

Individuality
Everything that is made with your own hands, including furniture, is always the embodiment of your ideas and desires. You can decorate the hallway to your taste and give it individuality. Such furniture will be one of a kind, and not mass-produced at the factory, and guests will be surprised by its exclusivity.

What you need for work
Having chosen a model and made a drawing, you should prepare everything that is needed for the work: material, fittings, tools.
Depending on the type of furniture, different fittings are needed:
- wardrobe - guides for drawers, rails for the sliding system;
- wardrobe with swing doors– hinges, handles, locks;
- hooks for clothes.

Tools
You should stock up on the following tools:
- saw or jigsaw;
- screwdriver or screwdriver;
- sandpaper;
- with a knife;
- screws;
- tape measure;
- corners;
- loops;
- plugs;
- special wooden fasteners;
- with a pipe pipe
This is a basic set that can be useful in making furniture.

We make the hallway ourselves: choosing the material
The choice of material is important; you should not choose too expensive one. In addition, it should be easy to process and safe for health.
Suitable: plywood, chipboard, fibreboard, MDF, furniture board, edged board, wooden block, drywall - they have a long service life and good quality.
- Tree. Wood is an environmentally friendly material, so it is perfect for an apartment. It never goes out of fashion, and furniture made from it speaks of the wealth and excellent taste of the owners. A hallway made of wood will harmoniously fit into any style. You can carve it, thereby adding individuality. Used to make furniture different breeds: oak, birch, pine, beech, walnut. The only negative is high price, but given the long service life, this cost will be well worth it.
- Furniture board. Made from natural materials, therefore safe for health. Looks elegant and lasts a long time. The cost is high, but below the tree.
- Chipboard. Chipboard is a common and comfortable material for making a hallway yourself. It is simply cut and processed, weighs little, and there is no need for reinforced fasteners. With all the advantages, it is affordable.
- Plywood...Has the same qualities as chipboard, but is denser and more durable. From it you can make not only parts with curved lines, but also a slotted pattern.
- MDF. Slightly less durable than plywood. But it has limitless possibilities in processing: painting, tinting, applying stain.
- Fiberboard. It is used only for making the back wall of cabinets.
- Wooden beam. Designed for collection frame structure.
- Edged boards. Relatively expensive material; pine boards are the most affordable.
- Drywall. Built-in niches are equipped with plasterboard.
- Mirror or glass. Glass or mirror inserts will decorate any room, and you can’t do without a mirror in the hallway. However, they are heavy and cannot be handled alone.

Choosing a hallway depending on the type of room
When developing the design of the hallway, you need to take into account the characteristics of the room and the number of household members. You should decide on the functional accessories of the hallway so that it is practical and comfortable. With a small area, the beauty of the wardrobe will not be visible and it will look bulky. It is better to choose a corner hallway option. In addition, there should be enough shelves and hooks for all family members.
The right solution is to install furniture along a long wall.
Regular hallway: instructions, diagrams and drawings
Do simple hallway It’s not difficult for yourself. It includes: a hanger, a shoe rack, a small pencil case or a chest of drawers with a mirror.
For this you will need:
- loops;
- furniture board;
- plywood;
- tongue and groove boards;
- three-dimensional strip.;
- pens.
The first thing you need to start with is a pencil case. To do this, planks of the required size are cut out of the shield, a lid for the top (with an overlap) and shelves. Assembly is not difficult - the strips are attached to the lid using self-tapping screws, and the shelves are installed in the same way. For structural strength, corners are cut out of plywood and fixed in the corners. A door is made from the shield, which is mounted on 3 hinges.

Now we make the cabinets. If desired, you can make only one cabinet. To make it, you need 2 sidewalls of the same size and a bottom that will connect them to each other. The lid should be made smaller than the bottom. All parts are fixed with glue and screws. Doors are cut out of the shield and attached to hinges. If you have a drawer, you will need runners. You can make them yourself from plywood, but it’s better to buy them (the box will roll out easily). The second cabinet is made according to the same principle as the first.
Now, the whole structure is assembled. The prepared boards are attached to the edge of the pencil case and to the cabinet - this will be the base of the hanger. The boards are connected at the top with a lath for strength. Hooks for clothes are attached to the slats, and a shelf for hats is screwed on top.
The final stage is the installation of handles and varnishing.

Corner option: instructions, diagrams and drawings
It’s easy to make a corner hallway yourself, but to make it stable, you need to use solid material: chipboard, plywood. The module consists of 2 parts that are connected at right angles. In addition, you should decide whether there will be a frame or the walls themselves will become the base. If the walls are smooth, then you can do without a frame; attach the shelves directly to the walls - this will be economical.
Manufacturing principle:
- a drawing is made according to dimensions, areas for attaching shelves are marked;
- Chipboard is cut with a jigsaw;
- holes are drilled for dowels on the front side of one panel and at the end of the other, holes are made for confirmations;
- the dowels are lubricated with glue and the sidewalls are assembled;
- The shelves are attached to confirmations and clothes hooks.
If necessary, you can attach a mirror to the door or make sliding doors, thereby creating a corner wardrobe.
Custom hallway with your own hands: drawings and diagrams
If you have a non-standard corridor, into which the wardrobe or hallways sold in the store will not fit, you can resort to the original and simple solution. For example, the presence of a bedside table or shoe rack, plus a hanger and a mirror.
You should start with the bedside table. From furniture board 2 sidewalls of the same size, a base and a lid are cut out. If there are skirting boards, then the corners are cut off from the sides (on one side). The back wall is made of plywood. All parts are fastened with self-tapping screws. Runners for drawers and fastenings for shelves are made inside. The doors are screwed on hinges.
A hanger in the hallway is an element you can’t do without. It’s not difficult to make and you can give free rein to your imagination. For lovers of eco-style and everything natural, tree branches are suitable instead of a hanger. Those who prefer country style need a vintage option.

Wardrobe capabilities: instructions, diagrams and drawings
Wardrobe excellent choice for the hallway, can be built-in or separate. If there is a niche, shelves are mounted in it and it is equipped with a sliding system.
The process of making a cabinet with side walls:
- A wooden frame is made.
- A place for the closet is determined. Holes are made on the walls, floor, and ceiling to fix the frame.
- The front frame is attached to the wall and ceiling with dowels, and then the side frames.
- The slats for the shelves are mounted inside. The shelves themselves are cut out of plywood.
- The sides are sheathed with plasterboard, then pasted over or painted as desired.
- Guides are mounted on the floor and ceiling.
- The doors are installed - first in the upper tire, and then in the lower one. The doors must move freely, their position is adjusted with screws.

You can make a wardrobe different sizes and models, depending on preferences and room area.
You can really make furniture for the hallway yourself. The models are quite simple and small in size. And if you have some imagination, you can turn an ordinary hanger into a unique piece.
Photo gallery
Video
For the hallway, you can assemble different furniture yourself. It will not only be functional, but also attractive. Cabinets and cabinets will fully correspond to the style of the room and its parameters. You can put together a stylish set yourself. for the hallway it is usually made from solid wood or special furniture panels, which can be ordered at any factory according to the provided project. The surface of the boards will be laminated in the required color. All that remains is to assemble the furniture according to the diagram and install it in the intended place. The hallway will be updated, and you will have comfortable furniture.
Furniture in the hallway is a mandatory attribute, because it is where shoes, clothes and other accessories are stored.
Materials for work
To assemble furniture for the corridor with your own hands, you will first have to choose an assembly scheme. Today there are many such schemes, so it will not be difficult to choose a set not only for a spacious hallway, but also for a small corridor in a city apartment.
The following materials are used for assembly:
- boards for furniture walls, for internal partitions;
- back walls made of laminated plywood;
- boards for shelves;
- doors;
- for a wall with hooks you need to take metal pipes under the frame, cladding boards, hooks;
- accessories (hinges, handles, slides);
- fastening elements (screws, nails, dowels).
Tools for work:

Figure 1. Drawing of a double-leaf cabinet for the hallway.
- saw, jigsaw, hacksaw for cutting individual elements for cabinets and cabinets;
- plane;
- chisel;
- drill with a set of drills for wood, a crown cutter;
- screwdriver;
- welding machine, if it is necessary to assemble a frame for the wall;
- hammer.
The assembly process depends entirely on which project is selected. The simplest, designed for a small room, is a set consisting of a small wall with hooks, a “pencil case” type cabinet, and a double-leaf cabinet above which you can attach a mirror. This set will look great even in a small room.
Return to contents
Assembling a double-leaf cabinet
A double-leaf cabinet for the hallway is also necessary; it usually holds most of the things, shoes, bags. Any scheme can be used for assembly. One of them is shown in Fig. 1. It is important that the piece of furniture is as comfortable as possible.
You can assemble a cabinet with two doors:
- height – 400 mm;
- depth – 490 mm;
- length – 820 mm.
You need to start by assembling the frame. First, the side walls, a partition in the middle of the cabinet and the top lid are attached to the bottom. If additional partitions will be used for two separate parts, then it is necessary to immediately place boards under them, since this will be problematic later. Nailed to the back plywood sheet with laminated surface. For fastening, screws and wooden dowels are used. If necessary, drawers are installed for the cabinet. The doors are installed last, but for them you must first provide hinges of the selected type.
Return to contents
Installation of a cabinet model "pencil case"

Figure 2. Drawing of a wall with hangers for the hallway.
One of the main pieces of furniture that is ideal for a hallway is a pencil case. This is a tall wardrobe, quite narrow, it can only include horizontal shelves for storing things. The second option is a design that has a top shelf and drawers, and the main space is given to a hanging bar.
Usually cabinets are placed near large cabinets. Ideal sizes:
- height – 2000 mm;
- width – 400 mm;
- depth – 400 mm.
The cabinet can be divided into 2 compartments, with a partition in the center. In one part of it there is usually a row of horizontal shelves, and in the other there are hangers for clothes. First you need to assemble the body for the future cabinet. To do this, connect the bottom, 2 walls and the lid with furniture screws. A partition is installed immediately, as this will be problematic later. For additional fastening, wooden dowels are used; they are coated with glue.
The next step is to attach the back wall; furniture nails are used for installation. Next, markings are made for the shelves, holes are drilled for special fasteners, the shelves themselves are installed, and a bar is hung under the hangers. If necessary, drawers are installed. When the cabinet is completely assembled, fix door hinges. To install them, holes are made with a milling cutter about half the size of the wood. When the cabinet is ready, handles, locks and other decorative fittings are attached.
Return to contents
Installing a wall with hangers

Next, a wall is placed and hangers will be attached to it. It is mounted next to the front door. An example can be seen in Fig. 2. It is best to place low cabinets for shoes under the wall. To make the wall, ordinary boards are used, their number depends on the width of the future structure, required quantity hooks Usually one hook is attached to 1 board of small width. The boards are connected to each other by a metal frame.
The first to gather metal frame. The top bar provides a wall mounting system. Loops are usually used for this. The structure will be fixed to the wall with anchors. If necessary, a frame for a horizontal shelf is mounted above the wall. After assembling the frame, you can begin finishing it. Typically, pipes are painted with anti-corrosion paint, the color of which matches the main shade of the entire kit.
The boards for the wall are selected to be the same size; the top ones should have a length equal to the width of the wall itself. The boards are processed and sanded if necessary. After this, holes are made in them for fastening to the frame. The boards are designed in full accordance with the appearance of the rest of the furnishings. The coat hooks are attached last. They can be different, but it is better to choose those that will fit the handles and hinges.
Choosing new furniture in the hallway, everyone wants it to meet all the stated needs, to be beautiful, not bulky, roomy, affordable and made of quality materials. However, given the characteristics of hallways, not everyone ready set furniture will fit according to size, color or type.
By making furniture for the hallway with your own hands, you can adjust it exactly to the size of the room, and also choose suitable color material.
In this situation ideal option will be making furniture for the hallway with your own hands. Here you can independently choose the wood material, if necessary, paint it in the color you need and, most importantly, independently determine the set of furniture you need and with exactly the dimensions that are suitable only for your hallway.
At first glance, the process seems difficult and even unrealistic self-made furniture, but in reality it’s not that complicated. Of course, to start making furniture you need to have certain skills in this area, be able to work with basic tools and know the basic technologies that allow you to correctly connect individual furniture structures.
So, let's get started and try to make furniture for the hallway ourselves, so that we can later assemble it into a single complex.
Tools and materials
For this work we will need certain tools: drill;

Without a screwdriver, the work of assembling furniture can last more than one day.
- screwdriver;
- self-tapping screws;
- sandpaper;
- screwdriver;
- saw;
- various drills.
In addition to the tools, you will need the following materials:
- furniture panels (mainly made from pine, beech) measuring 1600*400*18 mm and 2000*400*18 mm;
- boards measuring 1600*120*16 mm;
- slats measuring 3000*40*12 mm;
- plywood 6 mm thick;
- furniture hinges;
- furniture handles;
- wooden dowels.
We will make one single-door bedside table, another two-door, a pencil case and a clothes hanger.
Making a one-door bedside table

The arrangement of a conventional cabinet-cabinet.
Let's start with a single-door bedside table. We determine the height of our future cabinet and cut out two sides of the same size from a panel 1600 mm high, corresponding to the selected height. If there are baseboards in the hallway, then on one side these two side panels are cut down so that the bedside table fits flush against the wall. We also cut the top part at an angle so that the top lid is narrower than the main bedside table. We fasten the two panels using self-tapping screws by inserting the lower and upper bases. At the same time, we make the base from below not directly to the floor, but a little higher, removing the resulting gap with a front panel using wooden dowels. We fasten the base from above in the place where the cut begins. If necessary, we make the back panel from plywood. Next, we cut out the door of the bedside table of such a size that a drawer fits above it, and using a special drill we make holes for door hinges. By using furniture hinges you need to attach the door to the bedside table frame.
We cut out the runners for the cabinet drawers from plywood. For reliability, it is better to cut them out along the entire depth of the cabinet. We attach them to both sides of our frame. We make the bottom strip for the drawer from plywood, taking into account that it should fit into the holes of the runners, the back and side panels of the drawer. We make the front panel from a furniture panel slightly wider than the drawer itself.
We fasten the parts of the box with self-tapping screws. We attach the front panel after we screw the handle to it and cover it with varnish.
We cut out the top cover of the bedside table and secure it with dowels and glue. The bedside table is ready.
Manufacturing of a two-door cabinet and a pencil case

Drawing of a shoe cabinet.
Now we are making a two-door bedside table. According to the dimensions you need, we cut out the side panels, the upper and lower bases, retreating some distance from the bottom and covering them with the front panel, making cuts under the baseboards. At the same time, the height of this bedside table should be lower than that of the previous bedside table. The result was a rectangular frame. Everyone chooses the internal content according to their own wishes, arranging partitions and shelves. Everything is fastened from the sides with self-tapping screws, the top and bottom covers are attached with wooden dowels. Next, the doors are cut out to appropriate sizes and attached to our frame using furniture hinges. The back panel is made of plywood.
Next, we proceed to the manufacture of the pencil case. We cut out the side panels of the required depth from large panels, as well as the lower base, central shelf and upper base. It is recommended to divide the cabinet into two compartments in height so that the doors are light. Don't forget to make cuts for the baseboards and raise the lower base slightly above the floor. The entire structure is fastened with self-tapping screws. Two doors of equal height are cut out of large shields. Using furniture hinges and a special drill, the doors need to be attached to the frame of the cabinet. It is recommended to hang the door on 3 hinges for greater reliability. We make the back wall from plywood. Again, everyone chooses the internal content independently. The shelves are attached using special shelf fasteners. Here is your pencil case ready.
Now we collect all the furniture elements in one place, arranging them in the following sequence: first a single-door bedside table, then a double-door bedside table and then a pencil case. Now in the resulting space above the two-door bedside table we will make a clothes hanger.
Making a clothes hanger
To do this, the boards are cut to the same height, which should not exceed the height of the pencil case and should start above the two-door bedside table, and are attached to a horizontal rail with a certain distance from each other. The width of this structure should match the width of the two-door bedside table. It turned out something like a rectangular lattice. On top, stepping back a small distance from the edge, a shelf for hats is attached across the entire width of the hanger. Using sandpaper, you need to process each part of the hanger and varnish it. This hanger is attached to the wall using self-tapping screws above the two-door bedside table. Hooks for clothes are attached with self-tapping screws.
Now in our design there is space left above the one-door bedside table. You can hang a mirror in this place. It will look beautiful and harmonious if the dimensions of the mirror do not extend upward behind the wardrobe and to the side behind the single-door bedside table.
All resulting furniture must be varnished. We attach handles to all front doors using the same self-tapping screws and, if necessary, install locks and other accessories. If you did everything correctly and approached your work conscientiously, then in the end you will have a furniture set for the hallway, which is suitable for outerwear, which is convenient to hang on the open part of the hanger and put away in the closet as needed, for shoes, which are convenient put in boxes in the nightstand. A convenient shelf for hats will allow you to store them carefully and eliminate the possibility of losing them. A convenient mirror with a beautiful edging to match the style of your corridor will give you the opportunity to put yourself in order right within the corridor.
At minimum costs for materials and if you have a small set of tools, which is found in almost every apartment, if you have the desire, you can make yourself a wonderful and necessary set of furniture for your hallway.
If desired, instead of varnish, the furniture in the hallway can be coated with paint of the shade you need. The front surface of the doors can be decorated additional materials such as bamboo panels, mesh panels, glass shelves, doors. If necessary, the handles can be changed to others, thereby slightly changing the appearance of your corridor wall.
Making a hallway yourself turned out to be not so difficult, very convenient and very in an accessible way improve your boring interior.
Exactly on DIY hallway you can practice well before renovating the entire apartment. Due to the fact that the corridor most often has a small area, a lot of furniture is placed there, all the flaws of a novice master can be easily hidden. Well, the most best option– develop an interesting one, using both existing and completely new decorative elements and furniture.
How to make a hallway with your own hands
A properly developed design project can even transform it and it will turn out that you can fit much more things there than you could before. Moreover, it is important to understand how to make a hallway with your own hands, because this is still the first territory of your apartment that guests enter when entering the house. It should immediately evoke a positive impression; it could be a beautifully chosen shade of the walls and floor, unusual furniture, mirrors, wall decor.
The style that you develop for the entrance area should be similar in style to all the other rooms in the apartment, especially if they have, for example, common doorways. At open doors the dissonance of styles, shades, and decor will be too noticeable. You can take new approaches if you want to make it original, choose flooring that has not been used anywhere in other rooms, but combine it all stylistically.
But not only visual beauty or fashionable designer features of a bathtub in a properly made DIY hallway, photo one of which you see above. The convenience of using this territory is also very important. For example, all the beauty of antique dressing rooms in classic style will get lost in a narrow corridor, where, along with the opening of the doors of such a cabinet, the free space will end. That's why the best option There will definitely be a wardrobe. Likewise, if you have a large family, then a single stool for putting on shoes will create traffic jams in the queue to leave the house, so it is better to provide a spacious bench. In general, such individual needs are thought through and satisfied during the development of the project, also on an individual basis.
DIY hallway renovation
There are some pretty important things to consider when doing this. DIY hallway renovation. First of all, this is the understanding that the room is special, which is the link between the street and the apartment. Street dirt remains on the floor, rainwater drains from umbrellas, clothes and dog hair, dust can be brought with it by a bicycle, roller skates, or baby stroller. Therefore, it is optimal that all these things not only remain in the perimeter of the corridor, without dirtying the rest of the rooms, thanks to a well-thought-out storage system, but also that all this can be removed very quickly.

First of all, attention is paid floor covering, and the wealth of choice can simply make your eyes run wide. We immediately understand that carpet and large-scale carpet runners, which will accumulate dirt and dust inside themselves, are not suitable. On the other side, ceramic tiles can be slippery, and laminate or natural parquet can quickly deteriorate from constant exposure to water. Choose durable, moisture-resistant series of linoleum and laminate that can withstand fairly heavy loads and will be easy to carry out on their surface. wet cleaning. If you are worried that the coating will be cold, then lay down small textile rugs (by the way, they are now in fashion) that you can wash in a machine yourself.
The frame on the walls, although it will create ideal evenness for them, will remove a lot of useful space, which in conditions of limited footage will be simply disastrous. It is much better to stick high-quality wallpaper that can be cleaned, and sew up the bottom with plastic panels or the like facing material. Another option is not to fool around with the decor of one of the walls, but to do it along its entire length. DIY built-in hallway. Usually it consists of a spacious wardrobe and storage system, as well as mirrors, comfortable furniture for sitting, in a word, everything that we need right next to front door.
Another tip concerns choosing shades for everyone finishing materials and facade. They should be light, if possible without clear contrasting transitions with a vertical pattern or without it at all. If you also add an abundance of glossy texture, mirrors, glass, then you can visually enlarge your room many times over.
DIY wardrobe in the hallway
Do DIY hallway closet is definitely not the easiest task to start with. But if you have a small room, then perhaps you only need one to completely avoid the problem of arranging it.

Assembly complexity DIY wardrobe in the hallway consists of working with fairly specific fittings. If in classic design everything is more or less clear - you need to knock down the frame from the walls, stuff fasteners inside and lower the shelves onto it - then for the design of the coupe you need special guides along which the door will move in a horizontal plane. You can easily buy these components at a hardware store, where they will also help you make a custom-made door according to the specified dimensions.

Types of accessories for do-it-yourself hallway coupe can be different, in some cases the fastening occurs only on the upper side, and the lower one simply slides smoothly inside the guide, while in other, more expensive and reliable options, the rollers are attached to both the upper horizontal part and the lower one.
A sliding wardrobe can be so large that in this case you will most likely need to repair the walls, which will become the basis for the built-in wardrobe; most often for this they are coated with several layers of paint, so that later you can easily get rid of dust. To make it easier to enter the dressing room, make drawers and cabinets not close to the door, but a little in the back, so that it is convenient to stand inside the closet and look for the right thing. The shelves are fixed directly into the wall, and it’s up to you to decide whether to add additional doors for them or not. All systems for sliding shelves, rods for hangers, carousels for ties - all this, if desired, can be ordered today through the manufacturer’s website and without overpaying to furniture assemblers.

Built-in doors DIY hallway cabinet, photo which you see above can take over the function. In this case, the mirror will meet all standards - it will show you in full height; if necessary, in the upper part, where the guides are fixed, you can provide several spotlights that will give additional soft light to the mirror (do not use bright fluorescent lamps , it will change the shades of clothing and complexion).
DIY hallway shelf
Craft do-it-yourself shelf in the hallway will appeal even to those who do not have any serious experience in conducting repair work. Functionally for the corridor you can offer enough large number all kinds of shelves, for example, for bags, for hats, a small shelf for keys, various small things that we put out of our pockets, for newspapers, mail, receipts.
Since fastening does not present any technical difficulties, the main task becomes their beauty, compliance with the chosen style, an idea, a general concept that will unite all these elements. It can be open or closed to prevent dust from entering. You can also equip it with additional drawers or baskets that can be pulled out or completely removed. Another useful form is corner shelf, which takes up very little space and can generally be attached to the end of the closet, but you can store quite a lot of things on it.

The open shelf can be used for those shoes that are used in at the moment time, but to hide shoes or sneakers that you do not use every day, and so that they do not wrinkle or gather dust in this storage, you can use a closed structure with a door. In order to minimize its size, it is better to place the shelves inside not straight, but at an angle, so that each pair is pointing toes down. For shoes, such storage will be no different from usual, but you will save a lot of space.

Shelf for shoes in the hallway with your own hands can be made of wood, but make sure that it is either covered with a protective layer (paint, varnish) or impregnated with a special compound that will prevent it from deteriorating from contact with water. Subject to availability quality tools, you can easily make a shelf even from metal, not to mention plastic panels, which, in addition, also have an elegant appearance.

Another reason to get creative - DIY hallway hanger. The number of its varieties would be difficult to describe even in a separate article. Those who prefer natural materials and eco-style, can nail tree branches instead of hangers, and those who love country style or shabby chic may well find some vintage item at the flea market.


DIY hallway design

Examples of successful DIY hallway design prove to us that you can completely do without the services of professional craftsmen, especially when it comes to such a small room. And if earlier assembling furniture scared us, and we preferred not only to buy furniture, but also to additionally pay for the construction of the entire structure in our apartment, today a huge wardrobe can be ordered by mail from another city and assembled according to the instructions. And there are not many steps left from assembling factory parts to creating them yourself.

To make your work easier, you should use DIY hallway drawings, which are freely available on the Internet. They contain both models developed in furniture factories and homemade products by folk craftsmen who know how much more economically and better you can make an entire furniture set with your own hands if you put in a little effort.
If you're tired of constant clutter and lack of storage space, you should think about a wardrobe. The most suitable place to install it is a bedroom or hallway. In the article we will talk about the wardrobe in the hallway, it is a little different from the usual one.
As a rule, the width of the hallway is small, so narrow furniture with a depth of 45-50 cm is installed in it so as not to block the passage. You can safely subtract approximately 8 cm from the total depth - they will be eaten up by the width of the sliding door rails. If the hallway allows it, it is better to make the standard closet depth 60 cm to make it more convenient to store clothes on hangers.
The second difference: filling. If the main elements of filling a closet in the bedroom are shelves and pull-out baskets under linen, then in the corridor you need to provide space for outerwear, shoes, household goods and cleaning supplies.
View from the kitchen Glossy doors with a gray-beige pattern Section for outerwear and shoes (80 cm) Shoe shelf Wardrobe section (160 cm)
Household block (80 cm) Bright wallpaper inside View from the entrance door The width of the corridor was 150 cm View from the entrance
Filling a wardrobe in the hallway
What contents and accessories can a wardrobe have?
- Shelves can be made from the same laminated chipboard, but you don’t need to skimp on the edges: melamine won’t last long.
- Tubes for clothes are used only in cabinets with a depth of more than 500 mm (for ease of use), and the hangers are located perpendicular to the back wall.
- For wardrobes in the hallway (less than 500 mm), the use of end hangers (pull-out) will be relevant. They can be mounted in parallel back wall, but in terms of capacity they are inferior to standard clothes rails.
Sliding wardrobe 40 cm wide Narrow sliding wardrobe in the hallway Transverse rods for clothes diagram facades filling
- Drawers. Do not buy cheap white guides for 30 rubles, they will not allow you to open more than half of them normally. Ball slides are better (they are usually not painted), they allow the drawers to be pulled out completely without the risk of tipping over. The overpayment will be no more than 100-150 rubles. for a couple.
- Shoe net – important element each hallway. There are multi-level and retractable ones.
The remaining elements, as a rule, greatly increase the cost of filling, and are rarely used.
Cabinet design
 An example of filling a three-door wardrobe with an ironing board and a vacuum cleaner
 When filling a cabinet, it is usually divided into zones using partitions according to the width of the doors. In the classic version of the filling, the main place is occupied by the wardrobe section with a hanger bar, open and closed shelves for clothes and shoes. The rest of the space is occupied by a utility unit for storing an ironing board, vacuum cleaner and other things.
When designing, you can use special programs like “Basis-Closet” (it’s paid, but you can find other analogues, or do a good search on the Internet), and if you want, you can actually do everything on paper.
Since usually one wall of a built-in wardrobe is a wall, you will need a minimum of parts:
- one full-length side wall;
- 1-2 internal partitions over the entire height of the cabinet, depending on the number of doors;
- a narrow piece about 10 cm wide - to refine the remaining 3 sides of the opening (floor, ceiling and wall);
- the rest of the details for arranging the shelves (almost always a mezzanine is made for rarely used things, and the rest is optional);
 An example of a built-in wardrobe with one full-size wall. The connection between the sliding door and the wall is formed by a narrow strip of laminated chipboard.
 Minimum distance from the inside of the wardrobe door to the beginning of the shelf in the Aristo and Laguna sliding systems is 9-10 cm. The Versailles sliding system allows you to make shelves close to the top rail, but it is recommended to retreat at least 1 cm.
- If, after assembling the built-in wardrobe, the plans include a suspended or suspended ceiling, it is important to provide in advance a structure for attaching the profiles: lower the upper level of the doors slightly and do not make them directly to the ceiling. This is done using a homemade inverted U-shaped box, which is screwed to the ceiling (it will act as a base for the upper door rail). The ceiling will already be attached to the end of the box.
 Installation diagram of a built-in wardrobe and stretch ceiling
 - If you need to leave the possibility of dismantling the cabinet without replacing the suspended ceiling (or it is already installed), it is best to make the cabinet almost to the ceiling level and close the top with a lid. To prevent dust from collecting at the top, the gap is covered with a border.
- In the drawing, it is necessary to calculate the dimensions of each part and determine the location of the edge and its thickness. There is information about this in detail in a separate article. In a nutshell: it is better to order edging immediately after cutting from the same company so that the factory PVC edge can be glued on. All visible areas are covered PVC edging 2 mm, and the rest - 0.4 mm. Those parts of the parts that will be joined to others do not need to be coated.
- Another problem is crooked walls. Imagine: ordered cutting laminated chipboard, the edges were done, home delivery was ordered, and at the time of installation they suddenly discovered that there was a gap of a couple of centimeters at the back wall. If you cut the finished sheet with a jigsaw, the situation gets worse. Of course, some of the problems will be solved by adding a PVC U-profile to the end, but it is better to check the evenness of the walls in advance and, if necessary, level them. It is almost impossible to cut laminated chipboard well under a crooked wall at home; for this you will need at least circular saw with guides.
- If it is necessary to cut the laminated chipboard and the cut area is exposed (the most vulnerable place for moisture from shoes, clothes, umbrellas), it is closed. At home, there are two options: stick the melamine edge with an iron or install an overlay U-profile.
- You don’t have to finish the interior with anything, but simply cover the walls with high-quality paint in advance.
Selection of materials
For the walls of sliding wardrobes, standard laminated chipboard with a thickness of 16 mm is most often used. Of course, you can save money and use available materials, plywood and others, and then improve them: paint, glue, finish with leftover laminate, etc. But in such cases, the result will be appropriate.
To fill the blind doors of sliding wardrobes, laminated chipboard with a thickness of 10 mm is used.
The main material for making furniture is laminated chipboard; many people know about its harmful formaldehyde emissions. Edging allows you to reduce the indicator, but, of course, does not completely remove the discharge.
Many domestic manufacturers neglect the environmental friendliness of laminated chipboards to reduce production costs, and some of the types can exceed the maximum established concentration by up to 40 times. If we take chipboard from foreign manufacturers, for example, Egger with class E1, then they can emit up to 8 times more formaldehyde than recommended by GOST 10632-2007.
No longer released abroad Chipboard class E1, and only ultra-safe Super E class slabs are used.
For the corridor and hallway, class E1 is ideal, but costs more than the domestic one (450-800 versus 350 rubles per square).
For doors, try to use non-marking materials. The most win-win option is a mirror, or a mirror with laminated chipboard inserts. It is better not to use sandblasting, as stains on such glass are difficult to remove.
Cabinet assembly
- Assembly begins by installing the main walls and edging the opening around the perimeter with narrow strips of laminated chipboard.
- The frame is attached to the walls, ceiling, floor with dowels.
- The parts are assembled together using corners. If you want to do it beautifully, use plastic furniture corners that will cover the screw heads. If the main thing is a reliable result, you can use small steel angles.


- Best and modern way fastening parts to each other - use furniture bolts (Euroscrew), but they require preliminary drilling of holes, which is difficult to do by eye. To create holes, use a special confirmat drill (you can do without it, but you will have to use several drills of different diameters).
- If fastening with euroscrews is planned, furniture dowels are used for additional rigidity and preliminary fixation of parts.
- The Euroscrews are tightened with a hexagon, and plugs are inserted into the caps to match the color of the cabinet.
- When the base of the cabinet is ready, they begin to install the partitions, and then the shelves themselves.

Fastening the shelves
 Options for shelf supports made of plastic and metal
 Shelves can be attached in several ways, we list them.
- Corners - simple, but ugly. This method is good only in extreme cases when other types of fastening are not suitable.
- Confirmats (euroscrews) - reliable, suitable for high loads, but they are used only in invisible places, so as not to spoil the appearance with caps.
- Eccentrics are a good, but labor-intensive method, and the screw head (plug) will be visible from the bottom of the shelves.
- Shelf supports are the best option; they are not visible from both sides.
Sliding doors
The most complex element of a wardrobe is sliding doors. You can’t skimp on fittings here, otherwise you’ll suffer with doors jamming and falling out. In almost every city you can find domestic sliding systems from Aristo, Versailles, Polish Laguna, they are pretty good for their price.
 Attaching a 4 mm mirror to a profile using a silicone attachment
 A wardrobe in a hallway usually consists of two, less often three doors. Each door is a leaf enclosed on four sides in a frame made of aluminum profiles. It does not have to be uniform, the parts can be combined freely, and a special profile is used for joining at any angle. Standard profiles are designed for chipboard thickness of 10 mm.
A mirror 4 mm thick can also be easily inserted into such profiles, after first placing a silicone seal around the perimeter, which will add the missing 6 mm.
The main thing is to buy mirrors with a special elastic film that will hold the fragments in the event of a strong impact.
You can order ready-made doors or assemble them yourself. There are no particular difficulties: you just need to put the material in a frame and tie it with screws.
With closed handle With open handle Sectional door Vertical and horizontal profiles
Assembly begins with transverse profiles. They are filled with a rubber hammer or through a wooden spacer.
After the horizontal profiles, vertical handles are stuffed and secured with 5x30 or 6x35 mm self-tapping screws. Before the final frame tightening, the upper and lower rollers are installed.
To prevent the fastening from being visible, the holes for the screws are made with drills of several diameters: the first large hole of 9 mm will freely let the head inside the profile (if you look at it in section, you can see the compartment that will hide the head). The second 5 mm hole is made under the screw leg (see photo).
The screw head will be hidden inside the profile. The lower rollers are screwed together with the bolts
Horizontal and vertical profiles are different. In the vertical profiles, you should end up with three holes: one at the top and bottom for assembly, and one at the bottom for attaching the lower rollers.
 Top rail fastening
 The door itself will ride on guides that are mounted in the same plane at the top and bottom. The upper rails will ensure the doors are fixed relative to the depth, and the lower rails will ensure opening/closing. The lower rollers are most often made of plastic, have shock absorption in the form of a spring and a screw for adjusting the door height. The upper rollers have a rubberized surface.
 Upper and lower guides in the Prestige system
  Upper and lower guides in the Senator system
All aluminum profiles and the guides are cut to size and screwed onto self-tapping screws. You will need to install a door stop in the bottom rail. If desired, closers are installed in the upper guides, which themselves will close the door completely.
To install the doors, first insert it into the far channel of the upper guide, and then insert it into the corresponding lower channel. Second doors are also installed.
 Door installation
 After installation, the lower rollers are adjusted along the vertical wall of the cabinet so that there are no gaps. Schlegel (buffer tape) is glued to the vertical handles.


Assembly of the kitchen and wardrobe - the most available options to test your skills. Such cabinet furniture does not require development special design or using non-standard solutions. You just have to choose ready material, color and assemble it correctly.