You may not have been able to find a suitable design. Or it didn’t work out within the budget. Or maybe you just wanted to make something with your own hands, thereby making your family proud. Follow our instructions, put in a little effort - and very soon your hallway, loggia or bedroom will be decorated with a nice and functional wardrobe.


Where to begin?
So, you decided to do a real manly (and maybe also feminine) thing and assemble a closet with your own hands. The first step is to decide for what purpose you are making it, what it should look like and what functions it should perform - in other words, organize the design.
This piece of furniture will serve you for many years, so you should approach the preparatory stage with special attention:
- Decide in which room you will place the new wardrobe. Whether it will be a living room, a loggia or a corridor is important, because cabinets for different rooms, as a rule, differ in materials, fittings, and components. Then choose a place in the room and find out what size the planned product should be.
- Calculate the design parameters: width, height and depth, space between shelves, number of shelves, hooks, hanger bars or other components.


- Decide on the shade and design of the intended piece of furniture.
- What goes in the cabinet traditionally determines how the interior space will look. There are the following principles: “raw” things are placed to the side, the most necessary and small things are stored at eye level, “dry” things are on the top shelves, and valuable things are stored in drawers. For example, you cannot place a section for outerwear or umbrellas in the middle - dampness from it will spoil things on the right and left. If it is placed in a corner, then the moisture will escape out. Boxes or shelves for bed linen should not be placed above the floor - there should be a separation of about forty centimeters from the surface to prevent dust and moisture from entering. Better move them to the top section. The more carefully you think about the placement of contents, the smaller the width of the shelves, which means you save space. It is worth remembering that a successful layout guarantees convenient operation and long service life of a piece of furniture.


Popular models
There are many models of cabinets, which, as a rule, can be made of the same materials, but serve different purposes.
- For clothes. Designs of this type are distinguished by the presence of special components. A closet for storing clothes must have a hanger bar (transverse or longitudinal), shelves and hooks. You can also add a mirror to this list, drawers for underwear and a shoe cabinet. Very often, such a piece of furniture is built-in or wall-mounted - installed along the wall using an artificial niche made of plasterboard. A frame is assembled from wood or metal profiles and attached to the floor. Then it is covered with plasterboard, the structure is puttied and sanded. After this stage, the installation of shelves and doors (hinged or “compartment”) occurs.

- Shoe. There are two types of shoe storage structures. The first is as an integral part of a wardrobe for storing clothes. The second is like a separate chest of drawers, on the lid of which keys, gloves, hats and other small items can be stored. The shelves do not have to be wooden - it is possible to choose the type of dish dryer. Lattice shelves made of metal combine functionality and attractive appearance. Be sure to leave the bottom of the cabinet open, otherwise excess water will accumulate inside. The depth of the shelves should match the length of the box itself big couple shoes in your apartment.


- Book. Models bookcases divided into open and closed. The latter protect books from dust, moisture and light, but the former look better in the interior. Also distinguished are cabinet cabinets (the most common), modular (giving the opportunity to combine elements and change the appearance), built-in (with a system sliding doors), angular. Most often, these pieces of furniture are assembled from chipboard or MDF. The classic depth of a bookcase is 400 millimeters, height is 2 meters, and width is 800 millimeters. Most books and magazines fit comfortably inside at these figures. The shelves can be mounted not on the corners, but cut into the sides of the cabinet. To make the furniture aesthetically pleasing, use decorative moldings - overhead convex strips.


- Swing. This type is one of the simplest and most common for Russian apartments. The design can be very different, and the content can include shelves, drawers, bedside tables or hanging rods. These cabinets are used to store some personal items, clothing, dishes, hobby or handicraft items - in general, for anything.
- Built-in. In addition, you can assemble a cabinet placed in a niche or under the stairs, if possible. These models allow you to save space and refresh your interior design.


Options for different rooms
The design and internal contents of the cabinet depend on the purpose of the room and the required functionality.
- If you are looking for storage for your living room small size or narrow corridor, give priority to sliding wardrobes (built-in models), which do not take up much space, but allow you to accommodate a large number of of things.
- If you need to choose a wardrobe for the bedroom, then pay attention to the spacious designs that house a variety of shelves, drawers and modules, bedside tables, rods, racks and hooks. Both sliding wardrobes and regular hinged models are suitable.
- Kitchen sets usually consist of hinged cabinets with a large number of drawers.

- Looks good in a children's room non-standard models, for example, modular bookcases, distinguished by bright colors.
- The simplest swing models with a couple of shelves and mirror surfaces are suitable for the bathroom.
- The hallway is a place for built-in structures, including corner and shoe chests of drawers.
- Wardrobes on balconies and loggias are equipped with numerous shelves and compartments and are hinged structures. It is worth considering that a cabinet made of chipboard can only be installed on an insulated loggia, otherwise the panels will begin to warp and the furniture will not last long. Natural wood properly treated with water-repellent compounds will last much longer, even in the presence of excess humidity. Open shelves are the simplest option for a balcony cabinet.


What to make it from?
The materials for the production of cabinets are not particularly diverse.
Furniture panels or plates
Chipboard, laminated chipboard and MDF are panels or slabs made of compressed shavings, fibers and sawdust. MDF is a fibreboard made from very fine chips by hot pressing. This material is dense, flexible and easy to process. The fasteners inside such slabs last much longer; in addition, they do not deform due to changes in temperature and humidity. MDF is quite environmentally friendly and highly durable.
Chipboard - chipboard - consists of compressed and glued sawdust and large shavings with the addition of binding resins. This material is quite fragile and afraid of water, but you can achieve an exceptionally smooth surface. Chipboard is usually chosen for bookcases and wardrobes. The boards are cheaper in comparison with MDF and laminated chipboard.


Laminated chipboard is a laminated chipboard, the surface of which is treated with a special melamine film. In common parlance it is called “laminate”. The material is moisture resistant and has a wide color palette. Laminated chipboard is much stronger than chipboard due to the fact that the coating is pressed into the structure of the board itself.
All three varieties are quite cheap, easy to process, strong and durable.

Plywood
Plywood is a durable material that does not dry out, is environmentally friendly and does not require additional processing due to its smooth surface. Sold in whole sheets, so does not require joining. If you purchase treated and varnished plywood, you will save time due to the fact that the cabinet will only need to be assembled.


Cardboard
Making furniture out of boxes is no longer a fun hobby - it's now a serious interior design practice. By choosing high-quality cardboard, you can make not only a closet, but also a chest of drawers, a table and even a bed. Such furniture is environmentally friendly, cheap, mobile and surprisingly durable. The only negative is that if left in a humid environment for a long time, it loses its usability. To give cardboard strength, it is customary to use parquet varnish. You can work with this material by gluing sheets layer by layer, creating frame objects that are subsequently covered with paper, modular structures and even origami. Cardboard furniture should be symmetrical, or with additional supports, and with the presence of transverse parts. Keep in mind that the thicker the cardboard, the stronger it is, and light cardboard is not as durable as dark cardboard.
When designing furniture, remember that 60 millimeters will be occupied by the furniture decor, so when drawing up drawings you need to take this length into account.


Solid boards
A wooden cabinet made of pine or spruce will serve you for decades without changing its qualities. In addition, wooden furniture always looks elegant and weighty. Their cost depends on size, damage, dryness and breed. Pine and spruce are the most commonly chosen woods, with hardwoods also popular.

Lining
Wardrobes lined with clapboard can be placed on a balcony or in a storage room. This material is cheap, durable and aesthetically pleasing. When choosing a material, it is recommended to use lining made of hardwood, since coniferous wood deteriorates from long exposure to the sun.

Drywall
It is possible to make a cabinet from plasterboard, but it is still not recommended. This material is quite heavy and fragile, intended for finishing something. Therefore, it is not possible to store any tangible cargo in a drywall cabinet.
A sheet of drywall sags within six months, even if there is nothing on it.

Accessories
Furniture fittings for cabinets include:
- fastenings for shelves, hangers and mirrors;
- furniture hinges;
- roller and ball guides;
- handles and decorative fittings;
- thrust bearings and legs;
- retractable mechanisms.
Everything that is used for fastening to the wall (bolts, ties and other hardware), as well as for opening and closing doors and drawers, must be made of high-quality materials.


How to make a drawing yourself?
At first glance, assembling a cabinet is quite a troublesome and resource-intensive task, but do not forget about all the possible advantages:
- you personally select materials, which means you have the opportunity to save money and purchase only the highest quality;
- Having understood the instructions, you will understand that making a cabinet with your own hands is not so difficult: ordinary tools are used, and the materials are easy to process;
- making furniture can develop into a hobby that brings tangible dividends.

Having completed preparatory stage, start creating a drawing. The planned model of the cabinet needs to be transferred in detail to a sheet of A4 paper. First, draw the frame of the future product, indicate the dimensions of the walls, doors and bases. Then transfer the shelves and internal components onto the paper. Again, indicate the length and width on the diagram. Consider the dimensions of the structure and the layout of the apartment, calculate the number of shelves, hooks, rods, the presence of mirrors and their placement in the interior space. Do not forget that the width of ordinary clothes hangers is 40-42 centimeters, and when you hang something on them, it becomes even wider. To complete this step, use a measuring tape, a pencil, and a piece of paper.
Also, drawings can be made in special computer programs: Autocad or “Basis-furniture maker”.

When the drawings are ready, you need to start sawing the parts. However, it is quite difficult to do this at home - the machine is very expensive, and using a jigsaw leads to chipping, so hand over the sketches with dimensions for manufacturing to professionals who will do it quickly and efficiently.
When you receive the finished parts, go shopping for accessories. Mainly, you will need confirmations, rivets, guides, corners and holders. Consider the design features and your own preferences.
When choosing a system for opening doors, do not forget that they can open to the sides, up and down, or be a “compartment”.


How to assemble correctly: step-by-step instructions for assembling a wall cabinet
The first thing you need to do is mark the shelf holders and drawer guides, depending on where you want to see them and in what quantity. Make sure that the parts are parallel. Attach fasteners and, if possible - the cabinet is located at the junction of two walls - install shelves. If desired, secure them with glue and nails. Reinforce doors with awnings. Also screw in the guides if you are assembling a wardrobe.

Then you should select the required drill and symmetrically drill holes for confirmatories for butt joints. Don't forget about the holes for rods, shelves and partitions.
Start assembling the frame against the wall: arrange furniture panels, plywood or solid boards according to the drawings, connect them together using nails, screws and glue. Place the frame a few millimeters lower than the ceiling level. Install the side frame first and then the front frame. Leave gaps between the cabinet and frames.
After connecting the frames, level the position using wedges.


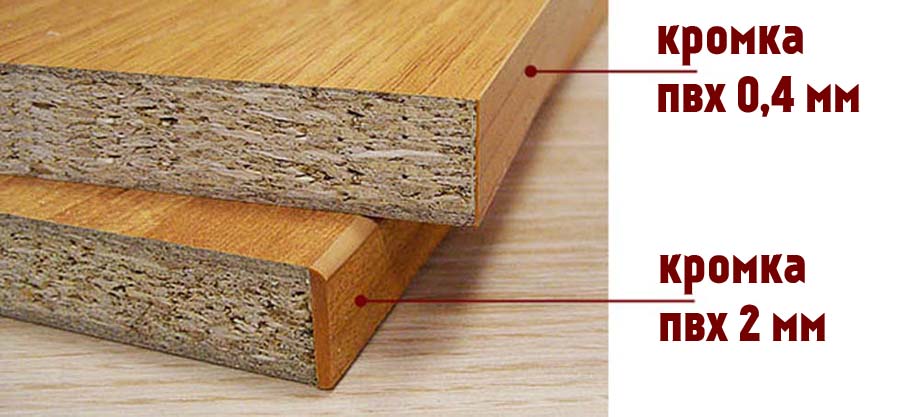
If you are using chipboard, add decorative edges along the seams. Iron it through the towel and then trim off the excess edge. The iron must be set to three-quarters of the maximum power, and then passed over the edge, the adhesive side attached to the chipboard. Afterwards, iron the hot edge with a dry cloth to press the edges more tightly, and trim off the excess with a knife. If you are using unpainted boards, then it’s time to “ennoble” the cabinet with paints, sandpaper and varnish. Roughness is best treated with fine-grained sandpaper wrapped around the object. suitable size and shapes. You can also use special furniture tapes.
Attach the doors to the body using hinges or special fittings.

Attach the plugs to the confirmations, the color of which should match the color of the entire cabinet. Install door handles and decorative elements: lights, mirrors, etc. Cabinets are made of flammable materials, so interior lights should use low-power 12 W halogen lamps. Under no circumstances use a permanent 220 W power supply - it is very dangerous. The light in the cabinet should be powered from an AC/DC adapter plugged into a socket with double-insulated wires.


Examples and options
When assembling cabinets of various models, there are rules.
Swing
If you are making a swing closet, carefully measure the dimensions of the doors. Vertically, everything must be one millimeter per millimeter, otherwise they will not fit or will not completely cover the internal space. The width of the sashes should be two to three millimeters less than the opening, since they are attached to special elements that also have their own width.
Installation of fastenings for shelves and hooks should be carried out at the base of the cabinet. Place the opposite corners strictly horizontally and check the correct installation using a level. Installation swing doors produced at the end of assembly. Legs are often attached to the bottom of a hinged cabinet. Kitchen legs are a good choice due to their low cost and adjustable height.
Thanks to the legs, all the weight will not go to the bottom, and it will not sag in a short time.

Angular
Installing a corner cabinet, start by attaching metal corners to the walls and ceiling, which in the future will prevent the doors from skewing. Then assemble the frame, mount the guides, install the door and the internal “contents”. Corner cabinets There are triangular, L-shaped, trapezoidal and five-walled.


Shoe maker
A shoe cabinet is made from an outer chipboard frame and a shelf with a front panel and partitions. Its height is measured by several shelves, and its width is the maximum size of a shoe box.


Balcony
The standard depth of a cabinet on a balcony is 600 millimeters, and the width corresponds to the width of the room. To make the structure stable, the height is set from floor to ceiling without any gaps. The distance between shelves is usually no more than 400 millimeters. Doors are assembled from boards that are fixed to the frame vertically or horizontally, or inserted using the tongue-and-groove principle.


Coupe
When assembling a wardrobe, it is worth remembering the following: if you plan a few doors, then, on the one hand, the design will be more convenient, but, on the other hand, the likelihood of distortion and jamming will be greater. The overlap section of the sashes should be in the range of 50-70 centimeters. If the overlap is too narrow, gaps will appear, and if the overlap is too large, the layout of the cabinet will be difficult. Also, the size of the door leaf should not exceed the size of the narrowest shelf, otherwise you simply will not be able to use it. In addition, take into account the permissible overlap, from which subtract 40-50 millimeters for the width of the side profiles, without which the doors will break through the walls.
There are three systems for hanging wardrobe doors: double-rail with lower support, with upper support and monorail.
They all have their pros and cons, so make your decision based on the features, furniture function and the amount of money you are able to spend.

Modular
A modular cabinet is usually made of chipboards. The modules of the simplest furniture are rectangular composite sections that can be arranged at your discretion and thereby determine the design of the room. This design consists of a main base section and additional ones attached to it. In the case when modules are attached only to the base section, they are called attached. Transition sections are used to connect other modules. Corner ones are connected to the base, but they can also be installed with transition parts. Open ones are connected to standard and transition modules. The modules are connected using fasteners, which are special ties, screw or conical.

In a niche
If you decide to place furniture in a niche, you kill two birds with one stone: there is no need to mount the side and top panels, since their role is played by the walls and ceiling of the room. All that remains is to place the shelves, rods and hooks and make the doors, which are usually “compartment” models. To install the doors, secure the upper and lower rods, and then place the door itself. door leaf.

Under the stairs
“Understaircase” furniture is mounted according to the same algorithm. They are often chosen by owners of private houses, and stairs to the second floor are used to create them. The free space under the stairs can be turned into a wardrobe for storing clothes, a pantry for food supplies or a closet for household needs, a bookcase or a wine cabinet. When making a piece of furniture, do not forget about Finishing work staircase walls - cover it with plasterboard or wallpaper.
Install shelves using wooden beams, the length of which is equal to the depth of the cabinet. To install the doors you will need door frame, matching the dimensions of the future cabinet. It is appropriate to decorate a new piece of furniture using self-adhesive film, photo wallpaper and various accessories. You can install sliding doors, but keep in mind that you will not be able to open the cabinet to its full width, so give preference to hinged doors or various combinations.

You will learn more about how to make a cabinet with your own hands in the following video.
Spacious wardrobes with a convenient sliding door system are not only a decoration for any interior, but also necessary element arrangement of modern housing. Exists big choice ready-made models with different sizes and configurations. If for some reason a person could not choose for himself suitable option, you can make a built-in wardrobe with your own hands.
To build a structure yourself, you need to collect a small set of tools, prepare a supply of materials and additional accessories for finishing the structure. Before starting work, you will need to determine the purpose and number of main sections and make the necessary measurements. In addition, you need to choose the design direction, type of lighting, style of decoration and fittings. Assembling a built-in storage system yourself is not as difficult as it seems. You can use step-by-step instructions that describe each stage in detail.
Example of a built-in design drawing
What are sliding wardrobes
A built-in wardrobe involves a special design for storing personal belongings, equipped in a niche. Often there is no back wall, and the main parts are attached to the floor, ceiling, and side walls of the room. The main difference from analogues is the sliding door mechanism. The doors move along guides in both directions. IN open state do not take up useful living space.
Work order
The wardrobe manufacturing process consists of the following stages:
- selection of materials;
- determination of the location and dimensions of the structure;
- design of door panels;
- developing a plan and selecting a method for attaching shelves;
- preparatory finishing work in the niche;
- drawing up a drawing based on the measurements taken;
- acquisition of necessary panels, auxiliary equipment, accessories;
- sawing sheets, forming blank parts;
- frame assembly, adjustment and installation of all elements;
- installation of lighting (if necessary);
- finishing the front side of the cabinet and installing doors.

Assembly master at work
Materials and tools
The development of a drawing of the future cabinet, list, depends on the choice of materials necessary tools, diagram of installation work.
Wood and lining
The traditional raw material for furniture is wood. Cabinet furniture made from natural wood lasts for many years, looks expensive, and emphasizes the status of the owner of the house.
Expert opinion
Alexander Didenko
Using raw wooden parts for arranging a niche - not the best choice. Due to the humidity that forms against the background of the temperature difference inside and outside the structure, they can become deformed. To avoid this, it is better to use straight-layer planks made of solid wood and coated with special protective equipment.
Unlike wood, lining does not require pre-treatment. Plastic or MDF panels are suitable for compartment construction. The boards are easily joined into grooves and secured with glue. Wood is used to frame the door frames.
Drywall
Finishing with plasterboard makes it possible to experiment. Difficult to find facing material better, but it is not recommended to use it as a base for a frame. The fragile structure of the sheets does not meet the requirements for load-bearing structures. The panels must be attached to a complex system of metal profile. The finished wardrobe is covered with putty and a layer of decorative cladding. These cabinets are not designed to store heavy items.
Laminate sheets, MDF and fiberboard panels
Planks made of wood chips visually imitate solid wood. There are surfaces with different relief and structure. The protective coating prevents swelling or delamination of the ends of the parts. The fabrics are resistant to mechanical damage. Building a closet will not cost much. The process itself does not require outside help.
For your information: fiberboard sheets must be of medium or high density.
Necessary equipment
To make a homemade built-in structure, you need special devices, stock Supplies.

List of tools:
- roulette;
- screwdriver;
- level for geometry control;
- jigsaw for fitting parts;
- screwdriver;
- drill;
- self-tapping screws;
- hammer.
You will also need components such as rods for hangers, guides for the movement of doors, and a door mechanism.

Filling the wardrobe
Design and drawing development
Work on the design of the future cabinet begins with planning the contents. After determining the location where the sections will be located, you can begin to calculate and display the measurements on the drawing.
Internal layout plan
When designing, it is customary to adhere to following rules:
- it is better to place the section with outerwear on the side so that moisture does not spread around the perimeter;
- for small accessories you need to allocate a prominent place so that they are always at hand;
- It is recommended to store clothes, bed linen, and towels on top, since moisture collects within half a meter from the floor and dust rises;
- To store valuable items, it is necessary to provide several drawers.

Example of interior space
Based on the planning results, it is necessary to determine the minimum width of the shelves. This parameter will be useful at the stage of calculating the valves.
Measurements and drawing
To take measurements correctly, you need to take into account several recommendations. The walls in a niche are rarely even. Errors in uneven finishing of corners are usually invisible, but a difference of even 2 mm is striking.
It is recommended to measure the width at a minimum of three points. The back wall is measured from the top, middle, bottom. Then, using a similar principle, the dimensions of the facade are determined. Height measurements are also taken in three places, separately for the front and rear walls.
Advice. To ensure that the finished structure fits into the niche without gaps, before installation all errors are carefully calculated and allowances for installation are added.
When displaying measurements on a drawing, you need to sum up the thickness of the material with edge tape, add 10 cm for a sliding door mechanism.
Blanks and accessories
It is better to order sawing into individual parts according to finished sizes from sellers of furniture materials. As a rule, such a service is provided in construction stores and retail suppliers. The advantages of this solution are:
- availability of equipment that allows sawing large sheets of blanks with millimeter precision;
- professionals calculate the optimal arrangement of parts in the sheet, which saves material, the remainder is transferred to the buyer;
- delivery of finished parts is easier than large-sized sheets, the risk of damage during transportation is reduced;
- sellers can arrange promotions when the service can be much cheaper or even free for large orders of materials, which is a nice bonus.
The ends of the parts are also additionally framed. Edge finishing provides protection of elements from moisture and temperature fluctuations. The edges of the blanks will take on a finished look.
Edging slabs with different thicknesses of trimming tape
D For laminated planks and MDF panels minimum thickness body elements should be from 1.6 cm, sashes - from 2.5 cm.
All necessary fittings, accessories, and decorative elements are sold in special stores.
Preparatory work in the niche
In order for the walls and ceiling to serve as a body for the future cabinet, you will need to prepare them first. The main purpose of finishing is that the surface should not spread dust onto storage items. Processing is easy. You will need to remove the old cladding and apply acrylic emulsion to the cleaned surface.
Expert opinion
Alexander Didenko
Furniture assembler at Mabaks
Wallpaper or paint can be easily removed with a surfactant remover. The composition of the substance is harmless and has no pungent odor. After just half an hour, the old finish can be easily removed with a spatula. Before painting, it is recommended to apply with a foam roller primer on water based (For example,OLYMP, TEX) overlapping several times, with a break of one day.
Housing Installation
In order to secure the frame the first time, it is recommended that it clearly demonstrates the nuances of installation. For built-in wardrobes, the frame functions are performed by the floor, ceiling, walls and frame for attaching the compartment guide parts.
Important: it is not permissible to mount the frame panel on uneven surface. With a sloping ceiling, curved walls or different levels the floor surface, the door leaves will not move correctly. Before installation, you will need to prepare a level base.
Laminate or wood board inserts are used to level the surface. The correct geometry is checked with a level. The frame with auxiliary strips is built into the wall using self-tapping screws.
Gaps are masked with pre-prepared decorative strips- friezes. Additional elements are cut out to match all the details and fixed with special glue.
Assembly nuances
The ceiling-height frame must be assembled in a vertical position. If you combine elements on the floor, when the body is raised, the length of the side diagonal will exceed the distance from floor to ceiling. The finished structure cannot be lifted and built into a niche.
The order of work with a suspended ceiling
The choice of a specific technology depends on the condition of the repair and the skills of the performer.
Door preparation
The key element of a compartment storage system is the door. Installation work takes place in three stages:
- determining the width and number of doors;
- choice of suspension design;
- installation of stoppers.
Calculation of the number of canvases in accordance with the width of the sashes
Comfort during operation depends on the number of wardrobe doors. More convenient are those models with 2-3 doors. It is not recommended to install doors that are too wide. Over time, panels may become seized at the top of the fasteners. Distortions are also likely to occur due to the large weight of the elements. Maximum size canvas - 60-70 cm.
For correct calculation, it is necessary to take into account the amount of overlap. If there is insufficient overlap between the door panels, gaps will be visually noticeable. If there is excessive overlap, it is more problematic to plan the internal placement for the compartment in the hallway or closet with limited space. The optimal overlap width is within 5-7 cm.

The influence of the number of valves on calculations
Another important point- The width of the panel should not exceed the dimensions of the narrowest storage compartment. Incorrect calculation will lead to partial or complete blocking of access to the section.
From the final figure you need to subtract about 4-5 cm for the side posts that limit the movement of the doors from the wall.
The calculation procedure is as follows:
- Calculations are made based on the total width of the future cabinet.
- The number of overlaps is determined as the sum of the sashes minus one.
- If the resulting value is greater than the maximum allowable panel width, the number of sashes is increased by one.
- You will need to repeat the calculations until you reach the permissible width of the web.

Example calculation
Initial data: opening - 175 cm, minimum shelf width - 45 cm. With these parameters it is impossible to make a double-leaf door system. The parameters of one panel will exceed the permissible value. With three sashes, the following result is obtained: 175–10 (or 14 cm for two overlaps) – 5 cm for the side slats = 160 (or 156) cm. When divided into three slats, the size of one panel is 53 or 52 cm, which is larger than necessary. In this case, you will need to change to 3 overlaps and 4 sashes. The result will be canvases 39/37 cm wide. Each additional sash significantly affects the rise in cost of the project. It is advisable to redo the original filling so that the shelf size is 55 cm. For convenience, you can use ours.
Suspension systems
There are single-rail systems for moving canvases and double-rail mechanisms of lower and upper types. depends on the design parameters, the intended use of the niche, and the allocated budget.

Hanging system for cabinet doors
Lower suspension
Most reliable mechanism. The movement of the shutters is ensured by rollers at the bottom, and at the top they prevent the leaf from falling out.
Advice. When purchasing accessories, you need to pay attention to the quality of the rollers. Parts must withstand increased load at the bottom of the device.
To install, you will need to fix the sash in the upper groove, then insert it into the lower one.
The operation of such a mechanism can be affected by a floor that has sagged over time. You also need to regularly clean the rollers so that the accumulated layer of dust does not interfere with the movement of the doors.

Bottom roller arrangement
Upper support
When moving, the upper rail ensures smooth operation of the mechanism without unnecessary noise. The device is inexpensive and easy to install. In order for the panel to fit into the groove, it must be tilted. It is imperative to supplement the system with lower guides so that the doors do not rub against each other.
The main disadvantage is the unreliable fastening of the sash. Accidental pressing releases the rollers from the recess. Because of this, the door leaf falls inward.

Upper support system
Single rail mechanism
The monorail system operates by two pairs of rollers moving along a separate guide bar. This type of fastening allows you to do without rails on the floor. The device is also not resistant to force. Therefore, it is recommended to strengthen the mechanism with a lower set of rollers with slats for movement. The robust suspension allows the installation of wide panels.
In addition to numerous advantages, the monosystem has several disadvantages:
- The cost of the mechanism is above average.
- The gap between the sash and the rails must be decorated with a special insert.
- Difficult installation technology. It is necessary to place the carriages on the rails in advance and fix the box to the ceiling surface. The final stage is attaching the door. Outside help is required to hang the sashes.
- The complete suspension needs to be adjusted.
Locking elements
Most often, mechanical latches are used for coupes.
There are two types of stoppers:
- recess in the guide bar;
- latch in the form of a flat spring.
Spring-action clamps are a pair of antennae, between which the wheel falls. In the case of rollers, the sides of the grooves are fixed by abutting tendrils.

IN hanging systems rubber stopper is used
Regular opening and closing often leads to misalignment and inevitable damage to the latch. The best prevention breakdowns - use of high quality fittings, careful use.
Fastening the shelves
Another simple fastening method is to use a regular MDF plinth of a suitable texture and color. It is screwed to the wall with self-tapping screws. The plinth pieces are taken one third less than the length of the shelf, the ends are cut at an oblique angle so that the fasteners are less noticeable.
Painting and installation of doors
If you plan to paint door panels, it is better to apply paint before installing the shelves. This will give you the time needed for the surface to dry completely.
Acrylic-based enamel coating is excellent for decorating cabinets. There is a large selection of colors for this finish. The dried surface acquires a glossy shine and is easy to clean.
Furniture is often coated with drying oil. Before painting, it is recommended to apply a layer of primer to ensure uniform distribution. coloring matter. Thorough surface preparation helps preserve the original appearance for many years.
You can begin installation after all parts have dried. The doors should be installed according to the specifications included in the packaging with the suspension mechanism.

Correct installation of doors
Backlight
For lighting it is recommended to mount LED backlight, which consumes little electricity, is safe and does not heat up. The resulting light is quite enough to illuminate a large dressing room. The light bulbs are powered from a power supply connected to a common network.
For your information. Wardrobes are made from fire-resistant materials. It is unacceptable to provide lighting in the closet at 220 V.
Facing
In most cases, the façade is decorated with mirror inserts, drawings, and a combination of overlays of different textures.
Advice. Mirrors mounted on a wood base greatly weigh down the canvas. It is better to buy acrylic surfaces.
Interesting option doors - . A non-standard façade is made to individual measurements. For production, inexpensive solid pine with a beautiful texture and high strength is used. Surface treatment is simple and suitable for painting.
The finished wardrobe must be inspected for defects, protruding chips, and open screws. It is necessary to eliminate all defects that could damage the items stored inside.
Comparison of costs for a ready-made and homemade cabinet
Making a wardrobe built into the wall with your own hands will cost approximately 5-10 thousand rubles, taking into account the cost of sawing work (information for 2018). If you have minimal skills, you will have to spend 4-6 days. If you have at least some experience in making furniture, then it will take 2-5 days to build a wardrobe.
It’s hard to find a ready-made wardrobe for less than 20 thousand rubles. The standard lead time for an individual order from the manufacturer is two weeks.
Homemade cabinets and partitions are cheaper than factory ones. But such work will require higher level skills. Furniture craftsmen With an established workflow, they will cope with such an order much faster. Converting a niche into a wardrobe is a great way to turn empty space into a useful functional area.
Having understood our drawings and understanding which part belongs to what, we begin the assembly.
Having selected the diameter of the drill for the holes for the comformats, take the drill in your hands and begin drilling the holes. Drill the holes symmetrically so as not to spoil the appearance of the cabinet.
- Using a screwdriver, assemble the cabinet frame onto the comformats.


- Next, you need to strengthen the doors with canopies (if the door system is ordinary) or screw in guides (if you have sliding doors).


- Then, in the places where there will be shelves and drawers, make markings for shelf supports and drawer guides. The markings must be precise so that the shelves and drawers are not awry, but run parallel.

- After marking, drill the corresponding holes and screw the shelf supports and drawer guides.

- After assembling the cabinet, bring its appearance to the ideal. As you can see, there is a missing edge at the chipboard seams. Take an iron and a towel. Carefully place the edge on the chipboard and iron it through the towel.

- After gluing the edge, pick it up sharp knife and carefully, slowly, begin trimming the excess edge.

- Finally, put the plugs on the comformats.

Now we can congratulate you! You have become the owner of a beautiful handmade wardrobe.
Using these instructions and your imagination, you can make your own cabinet with lighting inside, with built-in lamps, or with an ordinary mirror on the doors. Once you have the courage, you can create a cabinet of any design and complexity. As you can see, there is nothing difficult about this!
Comments12
- anonymous anonymous
- anonymous anonymous
- anonymous anonymous
- anonymous anonymous
- anonymous anonymous
- anonymous anonymous
- anonymous anonymous
- anonymous anonymous
- anonymous anonymous
- anonymous anonymous

More on the topic
- February 27, 2009 at 4:05 pm
- February 10, 2017 at 06:00
- April 19, 2010 at 08:59
The problem of shortage free space familiar to everyone. A lot of things, all of which are important and necessary from the point of view of the owners, are usually found in closets that take up a lot of space in small apartments.
Where can we find a way out of this situation? The solution is simple - install a wardrobe, and the appearance of your home will completely change. How to make, build and assemble a built-in wardrobe with your own hands? Do you want a built-in dressing room, hallway or bedroom? This article will help you do it yourself.

The problem of lack of free space is familiar to everyone. Where can we find a way out of this situation? The solution is simple - install a wardrobe, and the appearance of your home will completely change.
What are the benefits of built-in wardrobes (in the hallway or bedroom)?
- most often it is installed in a niche of the room, thus saving precious centimeters of living space (this is very important, especially if the apartment is small);
- Due to its design, it can accommodate a large number of things. It is much more spacious than ordinary bulky cabinets;
- The main component of such a closet is sliding doors. Thanks to them, the wardrobe can stand very close to the sofa and there will never be any discomfort when opening and closing the doors;
- has a wonderful appearance. Depending on personal preference, this type furniture can be made truly unique: it is decorated with mirrors, drawings, etc.;
- often performs by zoning the area of the room;
- there is no empty space between it and the wall, which is usually an additional dust collector;
- Safes, sockets and switches are often placed inside it, without spoiling the appearance of the walls of the apartment.
When deciding to have such a miracle at home, it is better to make a wardrobe yourself, because the cost of it in the store will not be affordable for everyone (from 13,000 to 300,000 rubles).
What type of wardrobe is better to choose?

Depending on the presence or absence of cabinet walls, this type of furniture has several types. Complete absence of side walls, top and bottom. They are completely replaced by the walls, floor and ceiling of the room (read how to properly plaster a ceiling). The shelves in such a cabinet are attached directly to the walls.
Let's consider features of this model:
- the costs of manufacturing such furniture are minimal, because you only need to purchase chipboard for shelves;
- have a large internal volume.
Among the disadvantages, it should only be noted that such a built-in wardrobe model is considered absolutely non-transportable. It will not be possible to move her to any other apartment.
- Partial or complete presence of walls. The total cost of such a cabinet will be slightly higher than that of the previously reviewed models. However, they have one significant advantage - the ability to transport and install in another location (sometimes used as ordinary cabinets).
All types of built-in wardrobes can have doors or be without them. It depends on the personal preferences of each individual person.
Secrets to choosing the right height and width
Width of built-in wardrobe depends on the size of the niche in which it will be located. Determining how many doors are needed (their maximum width is 90 cm), Special attention you need to pay attention to the guides along which the wheels will move. Their size does not exceed 4 m or 5 m (this depends on the manufacturer).
If the width of the recess in the wall is greater, then a chipboard partition will have to be installed between the guides. This must be done because metal joints will quickly deteriorate the condition of the door wheels.
Visually, it will never be noticeable that the cabinet consists of several parts. Everyone will close the sliding doors.
The smallest width of such furniture should not be less than 100 cm. This is explained by the fact that doors that are too narrow do not have good stability. If you still can’t do without small size wardrobe, you need to think about replacing the wheels in the guides with swing mechanisms.

The height of the built-in wardrobe depends on whether there is a suspended ceiling in the room or not. Depending on this condition, this type of furniture has some varieties.
Height depends on the height of the niche:
- if it is small (up to 200 cm), then it will not be possible to make the furniture different;
- in the case when the height of the room is within 280 cm, then the cabinet is made up to the ceiling, because the traditional size of chipboard sheets is 278 cm;
- if you need to make the cabinet tall, then place a mezzanine on its upper part or extend it side walls the entire structure. The mezzanine has its own doors with individual guides.
- The maximum height should not exceed 4 m.
In addition, the height of the built-in wardrobe depends on whether or not there is a suspended ceiling in the room (read how to wash a stretch ceiling without streaks). Depending on this condition, this type of furniture has several varieties:
- if the cabinet has a wooden top cover that is not screwed to the ceiling and the distance between them is within a few centimeters, the product is made up to the ceiling;
- in some cases, the top furniture rail can be mounted directly to the ceiling. This can be done if before installation stretch ceiling on concrete base screw wooden beam. The cabinet guide is screwed directly to it with self-tapping screws. In this case, there will not be the slightest gap between the furniture and the ceiling;
- the furniture does not reach the ceiling, but the intermediate distance is covered with a decorative wooden or plastic strip;
- built-in wardrobe below the ceiling by 50 cm or more. In this case, the gap is not closed by a mezzanine.
Step-by-step guide: making a built-in wardrobe
Preparatory stage
First of all, you need to take care of the condition of the niche in which the future structure will be located. To do this, it is cleaned of old finishing materials and level the surface well (find out about this).
If the wardrobe does not have walls at all, then the surface of the recess in the wall can be painted in any color or covered with new wallpaper.
In the case where the furniture is mounted with side, top, bottom and back walls, the niche must be absolutely flat. You can check this using plumb lines and levels. It is also necessary to measure the diagonals of the recess: from the upper right corner to the lower left and vice versa.
They must be absolutely the same. Will help correct all errors cement mortar or plaster. This is done in order to avoid distortions in the wardrobe.
After completing all preparatory work, must be done drawing of the future cabinet. In this case, be sure to take into account the number, size and location of shelves. Only in this case will it be possible to make it truly convenient for all family members.
Having determined the width of the built-in wardrobe, you need to mark the places where the guides will be attached along which the sliding doors will move.
Then the materials are selected. It is necessary to think about what the doors will be made of. If they are of poor quality, there is a possibility that they will be difficult to open. Preference should be given to laminated chipboard with a thickness of 0.8 cm.
Its average cost is 190 rubles. for 1 m2. When calculating the width of the required canvas, remember that one part must overlap the other by at least 50 mm.
Can also be used glass doors, but their cost starts from 20,000 rubles. They are really durable because they are made from very strong, thick glass.
It is possible to prevent cracking of such material by covering it with a special reinforcing film. It will not be possible to install rollers on this type of sliding door without the help of a professional.
The assembly process can only begin when all visible parts of the chipboard have a beautiful edge.
Required Tools for assembly:
- drill;
- roulette;
- screwdriver;
- hammer;
- construction corner;
- hex wrench;
- pencil.
Preparing the walls

Assemble the entire structure. If there are shelves, make sure that they do not extend beyond the cabinet.
- Using a tape measure and a pencil, make markings along which the cabinet will be assembled;
- put marks for shelves;
- on all planes make holes through with an 8 mm drill, at the ends with a 5 mm drill (the depth should not exceed 0.6 cm);
- assemble the entire structure. If there are shelves, make sure that they do not extend beyond the cabinet (this will interfere with the doors);
- insert stoppers for canvases into the lower guide;
- screw the upper and lower guides to the niche with self-tapping screws (parallel to each other);
- for the stability of the canvases, screw at least two rollers on top and bottom;
- insert the doors into the guides.
If there is no additional wardrobe, it is inserted into a recess in the wall and leveled using a level. You can screw furniture to the walls using dowels and screws.
Installation of a built-in wardrobe

For reliability, the structure is attached to the niche with dowels and screws.
- make markings on the wall (location of shelves);
- screw the metal corners to the walls with self-tapping screws (this is the base for the shelves);
- secure the shelves to the corners;
- connect the lower, upper and side parts to each other;
- for reliability, the structure is attached to the niche with dowels and screws;
- install guides to the lid and bottom of the cabinet;
- Attach the rollers to the doors and insert them into the guides.
Sometimes after installing the doors, a small gap appears between her and the wall. A hexagon will help fix this. They need to tighten the bolt that secures the lower rollers.
How can you tell if a wardrobe is assembled correctly?
The following indicators will help determine this:
- Complete absence of gaps between the doors and the wall.
- The door leaves move freely along the guides.
- All drawers (if any) open freely.
- The canvases have an overlap.
- The gap between the rod for hanging things on it (if there is one) and the back wall of the cabinet (or niche) should be at least 23 cm.
Having made a drawing and diagram of the cabinet and ordered materials, you can, of course, entrust the assembly work to a professional. However, you need to take into account that the cost of his services will cost approximately 3500-9000 rubles.
That is why, if you invite an assistant home, you can install the entire structure, the frame for the built-in wardrobe, yourself. The main thing is to maintain all the verticals and horizontals at the initial stages, which will ensure the correct position of the entire built-in wardrobe and the excellent operation of its doors.
Video instruction
4986 0 0
How to make a cabinet with your own hands: drawings, description, step-by-step instruction
How to save free space indoors? To do this you need to install a built-in wardrobe. I suggest simple instructions assembling a wardrobe at home. By following the suggested recommendations, you will make furniture that will not be inferior in build quality to what professional installers make.
How to assemble a built-in wardrobe at home

Making a standard wardrobe yourself from scratch will be difficult and expensive. It is much easier and more efficient to develop a furniture drawing and order production structural elements and from ready-made kit assemble a cabinet with your own hands.
The lifespan of a cabinet is largely determined by the quality of the fittings used, so we don’t save when choosing hanging mechanisms for doors.
Step-by-step instruction

Step-by-step instructions consist of the following steps:
- Room measurements.
- Project development and ordering a set of cabinet furniture.
- Assembling the body frame.
- Installation of filling.
- Installation of door fittings and sashes.
- Installation of decorative elements and lighting if provided for by the design.
Let's consider the listed stages in more detail.
Deciding on the type
| Illustrations | Types of sliding wardrobes by type of location |
 |
Built-in. Furniture of this type is installed in a niche or between two walls. |
 |
Wall mounted. This is a more common type of furniture that is assembled and installed along the wall, while the sides of the cabinet are not hidden and are visible. |
| Illustrations | Cabinet Configuration |
 |
Straight. The leading edge of such furniture is a straight line. |
 |
Angular. This category includes double cabinets, where the sections are located at right angles to each other. |
 |
Radial. In such cabinets, the front edge is curved forward or, on the contrary, concave. |
| Illustrations | Structural device |
 |
Frame. The cabinet design is based on a supporting frame, consisting of an upper and lower part, as well as two sidewalls. The rear wall is attached to the inside of the frame - a reinforcing element made of fiberboard slabs. |
 |
Frameless. This category of furniture consists of door fittings, doors and filling. Support frame and there is no back wall in such structures. |
Materials
| Illustrations | Materials for self-made wardrobe |
 |
Furniture panels. A wooden shield is a board made up of lamellas. From furniture board facades for expensive sets are manufactured.
|
 |
MDF. This type of particle board is used primarily for the production furniture facades. Due to their high density, MDF boards can be easily milled, and therefore doors with complex patterns are made from this material. |
 |
laminated chipboard. Laminated particle board is a versatile inexpensive material, which is used for the manufacture of furniture frames, sliding doors and filling. |
 |
Fiberboard. Due to its small thickness, this material has low bending rigidity and is therefore used only for padding on the back wall of the cabinet. |
 |
Drywall. To assemble built-in furniture, wall plasterboard is used; body elements and filling are made from it. |
Room measurements and calculations
Before ordering a set of cabinet furniture, we take measurements of the room near the wall where the wardrobe will be assembled and installed.

When taking measurements for built-in frameless furniture, we measure the perimeter of the niche or the distance between opposite walls and the height from floor to ceiling. That is, we need to find out the dimensions of the opening into which the guide profiles for fastening the doors will be installed.
Advice. If there are sockets or switches in the niche, this is not a problem, since there is no back wall in the frameless cabinet
For wall-mounted frame cabinets, measure the wall along which the furniture will be assembled and installed. It is important that there is a gap of at least 5 cm to the side walls, and 10 cm to the ceiling.
![]()
Walls in old apartments may be uneven and therefore, for greater accuracy, measurements are taken at several points at once. The resulting numbers are compared and the lowest values are selected for the drawing.
Horizontal measurements are taken at the floor, at the ceiling and in the middle of the room. Also in two three different points measure the distance from floor to ceiling.
Drawings with description
After the measurements have been taken, you need to select a suitable drawing and complete the detailing of the furniture.


After a drawing has been selected and materials have been selected, we order cutting of cabinet furniture elements for assembly. I recommend ordering the cutting of structural elements not from handicraft specialists, but from furniture factories.
Installation work

The cabinet is assembled on a pre-prepared floor. To avoid damaging the floor covering, lay down pieces of cardboard.
The work begins with the installation of the body, then the filling is installed and the sashes are hung. To ensure high quality assembly, we use correctly selected fasteners.
Fastening the components
| Illustrations | Elements for fastening components |
 |
Confirmation. For most connections we use confirmats 50 mm long. We use confirmata with a length of 70 mm in especially loaded fastenings. The tool for drilling a hole for confirmation is a 4 mm drill with a cutter. |
 |
Dowels. Depending on the workload of the connection, we use dowels with a diameter of 6, 8 and 10 mm. We use dowels for adhesive hidden connections or for connections reinforced with confirmations. |
 |
Minifix. We use this hidden fastening for vertical connection when assembling a furniture frame. When making a horizontal connection, we supplement the minifixes with dowels. |
 |
Rafix. This is a type of minifixes that we use for hidden fastening of shelves. |
 |
Self-tapping screws. We use 30 mm self-tapping screws as an alternative to confirmatories when making unloaded connections. We use 20 mm self-tapping screws when installing the reinforcing element - the rear wall. A 16 mm self-tapping screw is a typical fastener for most operations, including installation of guides and installation of other fittings. |
 |
Corners. We use plastic corners for lightly loaded connections, for example when installing cabinet filling. |
 |
Shelf supports. These pins hold the shelf with one edge and enter the body wall with the other edge. |
Reinforcement elements
After the body, consisting of the upper, lower and side parts, is assembled, it needs to be given sufficient strength. To do this, we attach a fiberboard wall to the back of the cabinet.

If possible, we install fiberboard in a single sheet. If this is not possible, we install the wall fragments so that they compensate for the mechanical loads that fall on the furniture body. We fasten the rear wall with 20 mm self-tapping screws in increments of 25-30 cm.
Masking fastener heads

Stickers and plugs are used to hide the holes. Both options are produced in different colors, so you can choose a similar color and make the fasteners less noticeable.

The advantage of stickers is that they have a completely flat surface, while the plugs protrude a couple of millimeters. In addition, stickers are cheaper and come in more colors.
Geometry check

During the assembly of the furniture case and before attaching the back wall to it, we check the geometry of the structure. This is done using a construction square, which is installed in the corners. All angles must be right. Similarly, we check the location of partitions and shelves in relation to the body.
Installation of doors with guides
| Illustrations | Step-by-step instructions |
 |
Installation of the upper profile. The profile is installed on dowels, which are screwed into ceiling. The installation step of fastening elements is no more than 30 cm. |
 |
Installation of the lower profile. The lower profile is installed in the same plane with the upper guides so that the subsequently installed door does not have a distortion. |
 |
Door installation. The door is driven into the upper profile by the upper rollers, raised and driven into the lower profile by the lower rollers. |
 |
Settings. According to design sliding system, the rollers are being adjusted. The doors should take a vertical position, which can be checked with a spirit level. |
| Illustrations | Description |
 |
The use of stained glass technology for decoration. It's not cheap, but it's aesthetically attractive and original solution. For safe operation stained glass is not made of composite individual fragments, but in one piece, with a pattern of glued stripes. |
 |
Sandblasting patterns on mirrors. This is an aesthetically attractive and at the same time functional option. The applied pattern decorates the mirror, but does not interfere with its intended use. |
 |
Vinyl stickers. In order not to spend money on mirrored cabinet design, you can use inexpensive doors covered with vinyl film. The advantage of this solution is that you can choose any pattern and color. |
 |
Bamboo facades. The use of bamboo in cabinet design is one of the many trends in eco-design that is fashionable today. |
 |