(20
ratings, average: 4,15
out of 5)
 Even an inexperienced gardener knows the benefits of compost, which is used to nourish the soil. It can not only fertilize the soil, but also improve its looseness and structure. Since the main components of compost are waste, nutritious fertilizer is obtained from almost nothing. In terms of cost, it is the most affordable. However, it is not enough to simply leave plant remains in one pile. To obtain valuable material, compost at the dacha must be made correctly with your own hands.
What does a compost heap consist of?
When forming a compost pit at your dacha with your own hands, you need to know that you cannot throw everything into it. The main products for composting are:
- weeds;
- lightly crushed roots, branches and tree bark;
- leaves;
- straw, mown grass, hay;
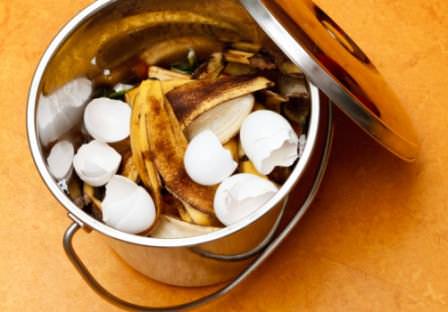
- raw berries, fruits, vegetables and peelings from them;
- coffee, cereals, tea;
- needles;
- wood ash;
- second-year manure from herbivores;
- unpainted wood waste;
- shredded paper bags, cardboard, napkins.
IN compost heap cannot be folded:

To make compost with your own hands correctly, you should add brown mass with poor fiber and green, nitrogen-rich waste. , in a ratio of 5:1. This will speed up the development of bacteria and the maturation of the compost. Waste will also rot quickly if it is pre-shredded.
How to make a compost heap with your own hands? There is nothing complicated about it. You can understand that the balance has been maintained and the compost is correct by its condition. If it's moist, steams a little, feels warm, and smells green, it has the right ratio of ingredients. If the compost heap has no visible fumes, it needs more green masses. In the presence of unpleasant odor brown ingredients are added.
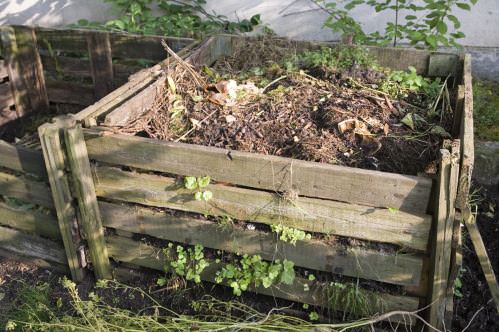
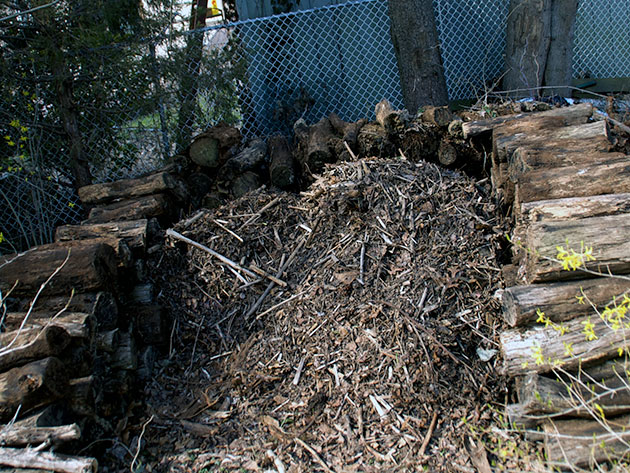
A proper composting pile consists of alternating layers of brown and green litter, as well as coarser and finer components. The finally formed compost is covered with a five-centimeter layer of soil and perforated film or old straw.
How to make compost at your dacha yourself?
 First of all, you should choose a suitable location for the compost pit. It should be hidden from prying eyes and protected from the scorching sun and winds. All leftovers and waste are placed in special compost bins, which are best made from a wooden frame.
Digs before laying organic matter compost pit 20 cm deep, the bottom of which is covered with a layer of peat or film. This will retain moisture and nutrients.
Compost heap care
The quality of compost and the period of its formation depend on proper care behind him:
- Humidity is of great importance, so the dry pile is moistened. To do this, carefully water it from a watering can, but so that it is damp, not wet. Too much humidity impairs the work of bacteria;
- The compost must be turned thoroughly every month. This will enrich the organic matter with oxygen, make it loose and contribute not to rotting, but to the burning of waste. As a last resort, you can not dig up the pile, but pierce it with a pitchfork;
- To make the compost ripen faster, more nitrogen is added to it, which is contained in slurry and green parts of the plant.
Usually organic residues are completely overheated in a year and a half. You can tell when the compost is ready by smell and visually. You should get a dark brown crumbly mass with the smell of forest soil.
How to make a compost bin with your own hands?
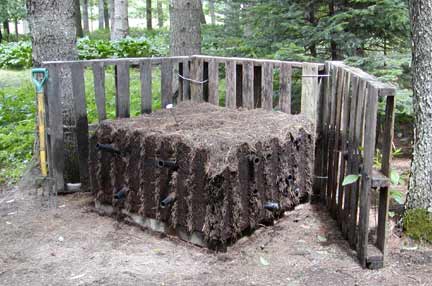
A composter at the dacha or in the garden can be made in the form of a 2 or 3 section box. It is recommended to use a composter with three sections, each of which will be intended for its own purposes:
- for waste disposal;
- for ripening compost;
- for ready-made fertilizer.
 Compost bin can be stationary or mobile(on wheels). To quickly ripen and obtain high-quality humus, the height of the box should be at least 1 meter, and each of its sections should be approximately a meter and a half in size.
Before starting work everything wooden parts are treated with a special compound that will protect the structure from moisture and insects.
Steps for making a compost bin with your own hands:
- 8 wooden blocks are buried in the ground;
- partitions are installed, for which boards are attached to the bars at a certain distance from each other;
- two compartments in the front part are sheathed only to the middle. Doors will be installed on top. Only one board is nailed to the remaining compartment from below;
- the end parts and the rear wall are sheathed;
- a large door is attached to the front wall of one compartment, and small doors to the other two;
- the finished wooden structure is coated with paint twice;
- Latch bolts and handles are attached to the box.
Once at the bottom of the compost bin drainage will be laid(dry tree branches, etc.), you can put waste in it.
How to properly make a compost pit at your dacha?
The compost pit will not darken appearance plot, but the waste in it rots for quite a long time. Since oxygen is needed for fertilizer to ripen, the compost pit must be properly equipped.
How to make your own compost bin with wood trim?
This option involves making wooden box and place it in the hole.
Manufacturing procedure:

After one half of the compost pit is filled, the raw materials are moved to the other half for oxygenation.
In the formation of humus Active participation accept earthworms. To ensure that they get into the composter, the bottom and sides of the structure are not covered with anything.
Slate compost pit
Durable and reliable design can be obtained if you build it from slate. It is produced in several stages:
- a site is selected and the dimensions of the pit are determined;
- A small depression is dug, and supports are dug into the corners. You can use pipes or boards;
- slate sheets are installed along the edges of the pit;
- The space is divided into two or three parts using slate leaves.
Concrete compost pit
The walls of the structure can be concreted, as a result of which such a pit will last for decades. To make it you will need:

When making a composter for a summer house or garden you can use barrels. It can be concrete rings or wooden crafts that are buried in the ground. The bottom of the structure is covered with drainage, and a cover with holes is installed on top to provide ventilation.
Compost pit using Finnish technology
The main requirement for a Finnish design is size. The height and sides of the box should be one meter each. If the structure is smaller, the contents in it will quickly dry out and turn into dust. In design large sizes organic matter will burn due to high temperature.
Materials for production
It is better to build a compost pit from wood. Not good a good option there will be slate. In a structure made from it, waste will be converted into fertilizer for a long time.
A cheap and convenient pit will be made from wooden pallets. They can be found or purchased inexpensively.
Prepared wooden elements are treated with an antiseptic that can protect them from the ground. After such treatment, the structure will last for several years and will not require any repairs.
To make the structure look decent, you need to buy paint.
Making a compost pit:

One meter by meter box will contain enough compost to fertilize the soil. on a plot of 5–7 acres.
Compost pit-dry toilet
 A compost bin using Finnish technology can be purchased in the store. This is a dry closet that can turn waste into compost. It consists of two containers, each of which has a volume of 80 liters.
After visiting the toilet, you will need to pour a special mixture of sawdust and peat, then turn the handle. It is located on the body and is designed to evenly distribute the contents of the container.
With this composter you can also recycle food, placing them in a container and sprinkling them with a dry mixture.
As soon as the first container is full, it is moved away and a second container is installed in its place. In the first container, the compost is ready for use. However, in such a dry closet it turns out to be too concentrated, so it should be diluted with earth, sand or peat.
Fertilizing the soil is important requirement agricultural technology of any plant, and compost is considered one of the main components for adding to the soil. Today we will learn how to make it at the dacha yourself.
Many summer residents have been preparing compost with their own hands for a long time, because this not only saves time and money, but also eliminates many unnecessary worries, which are already enough at their summer cottage.
What are the benefits of making compost at your dacha?
- Compost is considered one of the the best fertilizers, which, when added to the soil, fills it with a huge amount of microelements.
- Compost is the cheapest and most practical means for properly structuring the soil, as it increases moisture conservation and creates the loosening necessary for all plants.
- By scattering compost over the surface of the soil, you can create the best organic mulch that will conserve moisture and suppress the growth of many weeds in the area.
- Preparing compost for dacha area– this is a very useful process, as well as a significant contribution to the development and protection of environment. No mineral fertilizer can compare with high-quality compost, and a properly formed pit in which organic components rot can become a real incubator for beneficial bacteria and microorganisms.
- Preparing compost significantly reduces your physical effort, since now you do not need to remove it from the territory summer cottage a good portion of the garbage, everything can simply be placed in a special pit.

What is garden compost
Compost is a specific product obtained from organic waste under the influence of the environment and a huge variety of insects and microorganisms. It is used for structuring the soil, mulching, and fertilizing.

The bark and branches of trees, stems and leaves of plants - all this can be placed in a certain order in a special hole or simply on a pile, provide conditions for rotting and processing, and get a high-quality, truly environmentally friendly product without any harmful or toxic compounds. Naturally, the process of decomposition of all organic residues will force you to wait seriously, maybe even several years, but you will get real quality, and not a mixture prepared on the basis of unknown components from the store.

How to make compost
Professionals are familiar with making compost using the fast and slow methods. They are also called cold and hot.
Before we get into the “recipes,” we’d like to talk about building a proper compost bin or pit.
How to make a compost bin?
So, initially we need to prepare the material for the production of a compost bin in size. Almost any boards or planks that are not rotten and have not previously been in contact with toxic materials are suitable for this. In the first case, during the biological process, rotted planks can deteriorate; in the second, planks covered in paint or oil can simply poison the compost, ruining its quality irreversibly.
We would advise you to take unedged pine in boards or beams so that the finished box will last for many years, and work with this material. This way you will make a high-quality container, but won’t spend a lot of money.


Now we choose a place and begin construction. On a hill or on a flat area, it doesn’t really matter if your terrain is not rainy and the groundwater level is low. In general, it is advisable to place the place for compost slightly above the standard soil level so that it does not get washed away. So, we create four sides of a box, like a standard vegetable box, but much larger in size.

It is imperative to maintain gaps between the collecting slats to ensure ventilation of the compost for the correct internal biological processes.
We install supports at the place where the box is collected, and attach three ready-made walls to the supports. pine boards or timber. We leave the last side removable so that it is convenient for us to get the finished product for fertilizer or at the dacha.

It is advisable to place some material, for example, old linoleum, at the bottom of the box or, as they say, compost pit.
How to make proper compost quickly?
How to prepare compost correctly in a fast way? This question interests many newcomers to the dacha business, and therefore we move on to it without delay.
First of all, we create a special container - a frame that will contain all organic residues entering the compost on a single heap. It could just be a fenced pit wooden structures, a special wooden or plastic box in which there will be ventilation and access to the contents from above or from the side.
Create drainage at the bottom of the container. It can be made from a layer of hay, straw, spruce branches. The layer should be about 10 cm.
Materials and various products for composting are stacked in layers. For example, you can immediately put branches and other fruit waste, then a layer of paper, the next layer of leaves, then a layer of mown annuals or grass, and so on. It is important that the layers alternate approximately as follows, dry waste with wet waste, soft with hard. This method of laying will provide access to air, ventilation, and speed up the composting process. In this case, it is necessary to remember that compaction is of no use here, and may even cause harm.
It is necessary to lay each layer with special process accelerators, for example, nitrogen additives, which are offered in garden stores, manure of herbivores, plants such as legumes, nettles, dandelions, yarrow. You can also use rotted manure or ordinary garden soil.

To maintain the temperature and the correct internal environment, it is necessary to cover the compost storage facility with special materials - oilcloth, old rags, a piece of linoleum or carpet. The main thing is to maintain warmth inside.
In the summer, when there is a drought outside, the compost can be shed a little in order to maintain the required humidity inside the storage facility. But remember, only spill, and not fill to the top.
If you smell specific aromas from the compost bin, this may indicate that the cooking process has failed and is not proceeding correctly. If it smells like ammonia, there are too many nitrogen components in the pit (the situation can be improved by adding some torn paper). If you smell rotten eggs, it means there is not enough oxygen in the hole or box, and the contents need to be well stirred by sprinkling the layers with straw or shavings.
If you managed to make the container correctly and fill it in even layers, the compost will be ready in a few months. It is better to select it from the lower layers, so that the upper ones fall evenly, pressing on top with new organic residues.

How to compost slowly?
How to make compost from grass or branches? How to get the most correct and high-quality product? Naturally, this method is a little more complicated, or rather, longer, but as a result you will get compost that is very High Quality.
By and large, you don’t have to do anything special, just prepare everything for rotting once and wait for several years. By the way, you can install a new compost pit in the corner of your plot every year, so that in 2-3 years you can reach constant annual volumes.
So, how do you make your own compost?
If you can make compost in a barrel in a quick way, then for a slow, cold method, you will need an ordinary pit at some elevation in the area. The hole you dig is small, about the size of a shovel, but wide enough to accommodate enough branches and logs for composting. Next, broken tree branches and arrows, trimmings and rotten logs in a crushed state are poured inside the pit. Our entire pile is covered with soil on top and forgotten for a long time. In the second year, if you are very lucky, or in the third, which is stable if prepared correctly, you will receive excellent fertilizer for the garden.
When choosing from methods of preparing fertilizer, many choose the fast one, and it’s not even worth explaining the reason to anyone. But now I want to talk not about the method, but about what should go into the compost pit and what should not.
What can you make compost from?
If you want to prepare high-quality compost and also save time, Throw only the following into the rotting area:
- Kitchen waste (fruits, vegetables, cereals, tea leaves, coffee grounds);
- Straw, hay, shavings, sawdust, mown grass;
- Thin branches and stems of garden bushes and trees;
- Recycled wood from a garden shredder;
- Rotted animal manure;
- Rotted leaves and other garden waste;
- Various algae;
- Others natural materials– fabric and paper;
- Chopped weeds (avoiding rhizomatous weeds from entering the compost).
What you shouldn't compost from
When preparing fertilizer, you must also remember what should not be placed in the compost storage:
- Bones, large and hard, waste of poultry, meat, fish, droppings of domestic animals;
- Fresh leaves, rhizomatous and perennial weeds;
- Plants or debris infested with diseases or insect pests;
- Fresh manure, which can only be added to slow-cooking compost;
- Garden waste that contains toxins, poisons, herbicides, etc.;
- Unnecessary waste - metal, glass, rubber, plastic, polyethylene, etc.
How to make compost (video)
Following the simplest rules and advice experienced summer residents who have been preparing a useful “potion” for their garden for many years, you can make compost at your dacha with your own hands very simply and immediately begin fertilizing the soil to improve the quality of harvests.
How to make a compost pit correctly - every owner faces this question sooner or later suburban area. From this article you will learn how to properly arrange a place for obtaining natural fertilizers.
Compost - effective remedy to increase soil fertility. Even novice gardeners know this. But, unfortunately, not everyone knows how to set up a compost pit. There are many nuances in this matter. And only a competent approach will allow you to “kill two birds with one stone” - dispose of household waste and lay the foundations for a rich harvest.
Choosing a suitable place
If you are puzzling over the question of how to properly make a compost pit, then the first thing you should take care of is choosing a suitable location.
As a rule, a compost heap is set up behind outbuildings, in the outskirts of the site. Don't stir the pit too close to the source drinking water. The optimal distance to it is 25 meters. The place should be shaded, because direct sunlight slows down processing processes. It is important to take into account the direction of the wind; it is unlikely that the neighbors will be delighted with the smell emitted by the future fertilizer.
 Think about ease of access too. Many people forget about this, and then suffer with the storage of garbage and the selection of humus. It’s good if the surface of the earth is flat - stagnation of water reduces the flow of oxygen, which will significantly extend the “cooking” time of the most valuable additive.
Have you chosen a location for your composter? Great! Clear the ground of turf and loosen it to a depth of 30 cm. This way you will create favorable conditions for the vital activity of worms and other beneficial microorganisms that take an active part in processing.
About sizes and design features
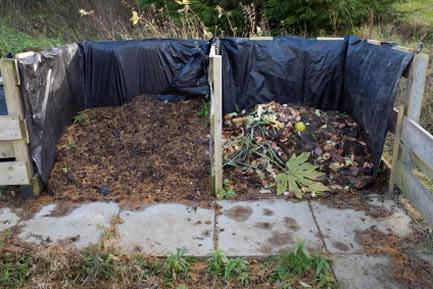
So, we sorted out the place for the composter. And then it's brewing new question, what size should a compost pit be? The size is determined according to the “two cycles” principle. That is, the first half of the pit should be occupied by waste that has accumulated over 2 years, the second half by “young” compost (no older than 2 years).
It is important to understand that the larger the compost pit, the faster it heats up to the desired temperature (up to 60 degrees). If the pit is small, then it, of course, will also heat up, but hardly to the temperature levels at which all pathogenic flora and weeds die. Experts recommend laying a compost heap with the following dimensions: height - at least 1.2 m, width - 1.5 m, length - 2 m.

Be sure to provide a removable lid for the composter. Do not cover the bottom with film, rubber, metal sheets or slate. They will prevent moisture from passing upward, which means the compost will be dry. The best floor for a compost pit is earthen.
Manufacturing options
Compost heaps can be of several types. We will consider the arrangement options, and you will choose the most convenient for you.
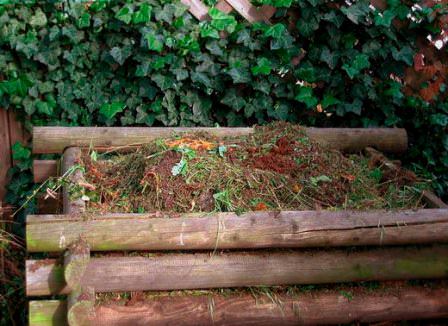
Ordinary pit
 The “composter for the lazy” is an ordinary shallow pit. First, lay tree bark, hay or branches on the bottom. Next - plant and food residues. Cover with black plastic wrap. After each new waste is dumped, cover it with grass. To be honest, this option cannot be called successful - the contents of the pit will not warm up enough, and a lot of effort will have to be spent on mixing. It's better to try and build something more effective.
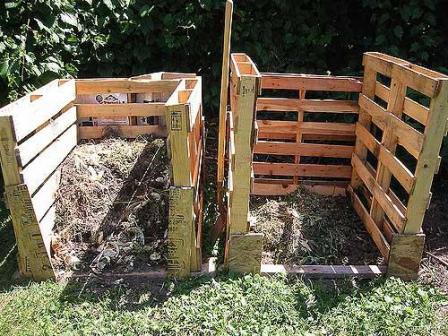
Wooden two-section composter
A wooden box immersed in the ground is the most common option. Dig a hole about 50-80 cm deep, 1.5-2 meters wide and 2-3 meters long. Dig support beams in the corners, 20 cm away from the edges of the hole. Pipe sections will do a good job with this task. Pre-treat them with a bioprotective composition.
Assemble three walls of the box from boards, providing ventilation holes. Install and level if necessary. Divide the composter into two parts using a wooden board. The first compartment is for “old” compost, the second is for “young” compost. Screw the front wall.
Cover the bottom with straw or tree bark. This will protect against the accumulation of excess liquid and ensure normal air exchange. The cover can be made from a sheet of plywood attached to back wall through loops. First treat the wooden parts with an impregnation that protects against moisture and insects, and then coat acrylic paint in two layers.

You can divide the compost pit not into two, but into three sections. The first compartment is for finished compost, the second is for ripening compost, the third is for storing new waste.
Most often, the composter is made of wood, but if desired, you can use slate, metal sheets or brick.
Composter with one section
 If a two- or three-compartment composter seems inconvenient to you, then you can make a pit with one compartment. Place the wooden box so that there is 30 cm between the ground and the edges. The mature compost will be selected from this hole. New raw materials are laid on top, that is, there is no need to loosen the fertilizer. In principle it is very convenient.
Concreted pit
For those who want to make a compost pit once and not worry about it anymore, we should recommend a concrete “tank”. Mark the area (approximately 2x3 meters) and dig a shallow trench (70-80 cm). Build formwork 10-12 cm thick around the perimeter of the future composter. Prepare concrete and pour it into the formwork. After final hardening, the formwork is disassembled. Place waste in the hole and cover it with film, metal mesh or wooden shields. That's all.
Plastic containers
 A modern interpretation of a traditional pit that requires some modification. Plastic does not allow air to pass through, so you will have to make ventilation holes yourself. This can be difficult to do. It is better to buy a ready-made plastic composter equipped with a lid, ventilation ducts and lower doors for laying out fertilizers. Volume may vary. On average - from 400 to 1000 liters. The cost varies from 2 to 10 thousand rubles.
When the work on arranging a compost pit is completed, you should think about how to use it correctly. After all, how quickly you get humus and how nutritious it will be directly depends on this.
- From time to time, “comb” the contents of the pit with a pitchfork. This will ensure access to oxygen and speed up the rotting process;
- do not forget to water the compost heap - dry waste does not decompose;
- The film covering the pit will help speed up the “cooking” process;
- sometimes add worms to the box and add drugs that activate decomposition (Compostin, Compostar, Baikal EM-1, etc.);
- lay the raw materials in layers. Alternate plant residues with food waste, wet with dry;
- will speed up the decomposition process of cow manure, as well as some plants (dandelion, chamomile, valerian, yarrow);
- do not compact the layers tightly, make sure that the contents are not too wet, too loose or, conversely, dry;
- There should be 5 times more dry material in the compost heap than wet material.
And finally, about what can be put into the composter and what cannot. This, by the way, is the defining moment for obtaining good fertilizer. Plant residues - grass clippings, straw, tree bark, leaves, branches, wood ash - are thrown into the compost pit. Food waste will also come in handy - tea leaves, peels of fruits and vegetables, eggshell, leftover porridges and soups. Black and white newspapers, napkins, cardboard, old wool or cotton items are suitable.

To enrich the contents of the pit with nitrogen, from time to time you need to add manure, bird droppings, bone meal, bean and pea stalks to it. Don't forget about superphosphates, dolomite flour and complex mineral fertilizers.
You cannot bring in animal excrement, fats, bones, spoiled foods, tomato and potato tops, weed seeds, plants treated with herbicides, inorganic waste (rubber, plastic, glass, synthetics).
Video: Construction of a modern compost pit on a personal plot
Compost is an indispensable component of nutritious soil in the garden of any gardener. In addition, it is also recognized as the most affordable fertilizer in terms of cost, since the main component of its production is waste. That is, it is made from practically nothing, because in any garden there will always be some kind of waste.
You just need to know that in order to obtain complete nutrients for the soil, the compost heap must be properly prepared. After all, compost will not only fertilize the soil, but will also improve its structure, looseness and ability to retain and absorb moisture.
What is compost
In order for the garden to be well-groomed and provide good harvest, it just needs to be fertilized. You can do this using chemical fertilizers, or you can get by with your own free, useful and safe tool.

Compost is a natural organic fertilizer that is obtained by fermentation under the action of earthworms and bacteria.
To obtain such fertilizer, a compost heap is laid. Often it is done by simply digging a hole in the ground, but it is better if it is a specially equipped place - a composting site.
Compost bins are made in the form of closed or open containers, but you can also purchase special ones plastic boxes equipped with a lid and door.
Prepared compost is added to the holes before planting. garden crops V open ground or for planting in greenhouses. Or it is scattered over the area before planting seed material and lightly mix with soil.
What is compost made from?
Many people think that to prepare compost it is enough to throw all kinds of waste into a heap in some corner of the garden. Time will pass, they will rot, and you will get fertilizer. But this is far from true.

To achieve safe and healthy compost, you need to have the right compost piles, so there are a few things to keep in mind. First of all, the composition of such a heap. It may include:
- ash, chalk, charcoal, eggshells;
- grass clippings, straw and hay;
- sawdust and tree debris;
- vegetable food waste;
- weeds and healthy green plants;
- bird droppings and animal manure;
- compost stimulants.
Composter dimensions
The components from which compost is made are placed in a compost bin. Proper compost does not release into the soil harmful substances and does not cause inconvenience with a strong unpleasant odor.
It is important to respect the dimensions of the compost bin, otherwise it will be difficult to create a comfortable temperature and humidity regime for the compost. Optimal sizes the heaps are one and a half meters in width and the same or more in length. If you make a bunch smaller in size, then it will quickly lose moisture and will not be able to warm up well. This will cause the composting process to take a long time.
Ban on compost
Before you make a compost heap, you need to know that you cannot add to its composition:
- disinfectants and chemicals;
- remnants of weeds with seeds of long-term germination or roots of creeping plants, since they do not lose their germination when composted;
- the remains of coated glossy paper, rubber, textiles, as well as animal bones and stones - all these substances do not decompose in compost;
- human feces and pet waste, which may be contaminated with worm eggs;
- diseased plants that are affected by pests and fungi, such as late blight - such residues must be burned in the garden;
- food waste of animal origin, which triggers rotting processes and causes a persistent unpleasant odor.
Open composting facility

You can compost, as advice to gardeners in specialized publications teaches, in the following way:
- Prepare a site for the composting bin. To do this, you need to choose a suitable place at the end or middle of the garden and level the ground. Shaded areas without access to direct sunlight are better suited for this purpose.
- Then fence off the area required for the composter with boards, shields or sheets of slate. Or put together a wooden box with slots for air exchange. You can also attach a special garden net to metal supports. This can be one container or two separated by a partition, one of which will be filled this year, and the second - next year.
- Dig a hole half a meter deep and add a drainage layer to the bottom. For this you can use sand, gravel, large wood debris. It is necessary to make such a layer, since it is impossible to allow the water that will wet the compost heap to collect in the compost bin. It should flow out of the compost bin without obstruction.
- Then it is necessary to lay a small layer of ready-made mature compost from last or the year before on the drainage layer. This is necessary to supply the ingredients of the heap with bacteria, with the help of which the compost is fermented.
Creating a closed composting facility
A more reliable and durable design than an open compost bin is a closed compost container. It is built with walls that have slits for ventilation, and with a lid that will allow you to mix the compost. Such a compost heap at the dacha has a neater appearance and does not interfere with the aesthetic perception of the space. As a rule, such a container is made of plastic that does not rot, does not fall apart, and will last for a long time.

To install the ventilation system, pipes are inserted into the box, which are protected with a mesh so that they do not become clogged with compost.
The advantages of a closed compost heap are that it allows heat to accumulate quickly and retains it well. This kills pests and speeds up the fermentation process.
Another advantage is that in these containers it is not necessary to strictly observe the proportions of the constituent ingredients. You can throw various acceptable waste, residues and grass into the pile in any convenient quantities. It is only important to mix it all systematically.
How to make a compost heap
For proper preparation heap ingredients needed:
- Prepare the necessary components by grinding them as finely as possible. Branches can be broken and plant debris can be chopped up with a shovel. The smaller the components of the pile, the faster the compost will mature.
- Lay the components in layers, the thickness of each layer should be up to 15 cm. In this case, it is imperative to alternate the placement of food waste, wood residues and green plant matter.
- The layers can be covered with manure or droppings, or commercial liquid fertilizers can be used. Compost stimulants are also used at this stage. It is better to use cow or horse manure for the heap, and the best poultry manure is chicken manure.
- The top of the pyramidal compost heap is covered with straw, spandbond, boards or plant stems. This is necessary for free air circulation. Gardeners often cover the pile with polyethylene, but this is not recommended: when covered with plastic film, the compost will overheat without access to air. And this is fraught with the appearance of a putrid, unpleasant, persistent odor.
Aging of compost
The preparation of compost and the duration of its ripening is directly dependent on what fractions have compost components and what fermentation mode is set. In general, fermentation and composting take a very long time, the minimum period is several months, the maximum is two to three years.

The finer the fractions of the incorporated components, the faster composting will occur. It is also important that the temperature inside the compost pyramid is close to 60 degrees or higher. This will not only speed up the process of decomposition of ingredients, which occurs with the help of bacteria, but will also help to eliminate as much as possible the possibility of germination of weed seeds. Also with such high temperature harmful insects die.
To ensure the correct fermentation regime, it is important that there is good moisture and air exchange inside the pyramid.
Providing fermentation
In order to speed up the composting and fermentation of the components of the compost heap, it is necessary to perform the following actions:
- When the weather becomes hot and dry, the compost pyramid needs to be watered. Moreover, the water should wet all layers of the heap. This process is most conveniently carried out using a large-section garden hose, because you will need a large number of water.
- Watering the heap must be done in the morning; in this case, during the day, the wet compost will have time to warm up well, and the process of active decomposition will begin.
- How to water the compost heap? Water it with regular water warm water, but from time to time it is necessary to add a compost stimulator to the water or infuse fresh manure in it.
- The compost needs to be shoveled a couple of times a season. This helps bring the well-fermented inner layers to the top. In this case, the upper ones move inward.
- Also, when mixed, the compost is saturated with air and gets rid of accumulated gases.
- With the onset of cold weather, the composter needs to be insulated, which prolongs the process of active composting. To insulate the pile, sprinkle it with humus or peat, and then top it with tops from harvested root vegetables, sunflower stems or fresh straw. This year, the remains of plants will retain heat, and next year they will serve as ingredients for a new pile.
Compost from fallen leaves
Separately, it is worth mentioning compost from fallen leaves, popularly known as “ leaf soil" How to properly make a compost pile from fallen leaves?
This compost is based on fallen leaves. The advantage of this approach is that at the end of autumn the leaves lose minerals, and only lignin, tannin and hemicellulose, which are valuable ingredients of humus, remain in their tissues. The downside is that these components rot rather slowly, which prolongs the composting time. The foliage of oaks, beeches, chestnuts, willows and plane trees contains a lot of tannin. Therefore, their leaf mass should not be used for laying in a pile, but only for covering it.
Leaf compost matures noticeably longer than usual, about two years. But gardeners do it because it is very valuable because it improves the quality of the soil. It also contains microfungi that decompose hemicellulose and lignin. And this becomes useful for those garden plants whose roots interact with fungal microflora in the process of symbiosis.

To get a good composting result, you need to consider some points:
- When creating a compost bin, you need to take into account that microorganisms come from the ground, so you need to set it up in a clean space where no chemicals have been used.
- Composting is accelerated by adding valerian officinalis, yarrow, chamomile and dandelion to the pile of herbs.
- To speed up fermentation, bioconcentrates are added to the compost. In this case, you get a so-called fast compost heap, which can mature in three weeks.
- You need to know that the high content of fresh pine sawdust in compost significantly reduces the potassium balance, therefore such compost at the ready stage must be enriched with potassium-phosphorus fertilizers.
- The presence of green components in compost should not exceed one third of the total volume, because herbs ferment slowly and may rot. If it turns out that the bulk will consist of grass, then it must first be dried in the sun.
- The highest quality compost is created using a variety of components. Not only organic components must be present, but also mineral ones. For this purpose, the compost heap is supplied with superphosphates, dolomite flour, and complex mineral fertilizers.
- It should be borne in mind that manure is a concentrated fertilizer, so its content in the compost should not be higher than 10%.
- For better stability and increased air exchange processes, the compost heap should be laid in a cone shape or in the form of a pyramid.
- In order for the heap to ripen faster, components containing a lot of nitrogen, such as straw, legumes or legumes, are added to it.
» Medicines
Annual use of growing area different cultures greatly depletes the soil. To restore its fertility, it is necessary to periodically apply fertilizers. One of the most accessible types of food, having a rich composition nutrients, is compost. This fertilizer can be made at the dacha with your own hands.
Compost is one of the types organic fertilizers, which can be prepared independently using various household and vegetable waste. A high-quality composition containing minerals and valuable trace elements is equivalent to humus. The nutrient mixture reaches readiness as a result of the decomposition of organic matter under the influence of heat and moisture. A compost heap is identified with a living biological reactor. The process of converting waste into a valuable nutritious product occurs thanks to intensively developing microorganisms.
Preparing compost is not a labor-intensive process, but the technology still has some features. Only correct composition able to restore vitality soil, increase its fertility and improve its structure. There are a great many recipes and methods for preparing organic fertilizer. Every experienced gardener has its own exclusive secrets, which consist in the use of various additives, the combination of certain components, etc.
For those who did not take care of setting up a compost pit in advance, bagged humus is offered. But before purchasing, you should collect information about the manufacturer, otherwise you may get a neutral or negative result after fertilizing the land.
 Natural compost is rotten organic waste
 What is it made from?
No matter how tempting the offers to purchase ready-made compost may be, you can only completely trust the product you prepare yourself. To obtain organic fertilizer you can use:
- waste and peeling of vegetables/fruits;
- eggshells (only from eggs that have not undergone heat treatment);
- tea leaves, coffee grounds;
- mown grass;
- dry leaves;
- peat;
- domestic animal manure, bird droppings;
- thin branches, stems;
- paper, natural fabrics, feathers (raw materials in crushed form);
- straw, shavings, seed husks.
All or part of the ingredients are filled into a box or pit in a certain order. To start the fermentation process, it is necessary to create a favorable temperature regime and high humidity.
 Compost is prepared from the remains of fruits, vegetables, eggs, straw and other things.
 The following ingredients should not be placed in a composter or pit:
- vegetable waste and fruits that have passed heat treatment (there are practically no useful microelements in them, the composition will turn out to be non-nutritious);
- weeds(all types of weeds contain poisonous or toxic substances that pose a danger to the soil and cultivated crops);
- plants affected by any diseases or pests(compost with such a component will provoke the spread of the disease on the soil and plants);
- synthetic material(it is not subject to the process of decomposition and rotting);
- citrus waste (essential oils inhibit decomposition processes; a large number of crusts can increase the acidity of the soil).
According to popular rumor You can add dog and cat feces to the compost, as well as used toilet filler. Experts do not recommend using this type waste, since animal waste products may contain worms that are dangerous to human health. Being in a warm and humid environment, they survive well, and then successfully colonize raspberries, strawberries and other fruits.
Advantages and disadvantages
To appreciate the full benefits of using compost, you need to consider its effect on the soil environment and plants.
- Compost contains a large amount of valuable minerals and trace elements in the correct proportion. When it enters the soil, rapid metabolic process, as a result of which the deficiency of missing substances is instantly compensated.
- Organic matter, when combined with soil, forms a single structure. After abundant watering or rain, micronutrients remain on the surface, unlike mineral fertilizers, which settle into deeper layers of the soil.
- Compost allows moisture and air to pass through well, which allows it to improve the soil structure in the upper layers. This is important for the normal development of the root system.
- The fertilizer contains a large amount of humus, which increases the fertility of the land.
- It is almost impossible to overfeed plants with organic matter. All components are of natural origin. They undergo natural decay processes without contaminating the soil with various toxins.
- Compost from organic fertilizers is the most accessible a way to enrich the soil with useful substances.
 Real compost has virtually no downsides and mixes completely with the soil.
 Compost has virtually no disadvantages. However, it is worth noting that when arranging a compost heap or pit, you need to choose a place away from the recreation area and home, since the process of rotting is accompanied by the release of an unpleasant odor. In addition, this object attracts flies, ants and other insects. Arranging a special box equipped with doors will help to avoid problems with such a neighborhood. Insulating a compost heap in this way also has aesthetic value; the corner of the site will not look dull.
How to make a compost bin with your own hands
To organize a place for collecting organic waste in order to obtain fertilizer, it is recommended to use a compost box. Making a storage unit is not difficult at all, following simple rules.
Requirements for construction on site
In order for the manufactured container to meet all requirements, it is worth considering important points when assembling it:
- the side walls must have holes to ensure air circulation (2 cm gaps can be left between the boards);
- there is no such element as the bottom in the box;
- the presence of a lid will limit the flow of water during heavy rains (excess moisture will provoke the development of fungus);
- the lower part of the box should be opening to ensure the intake of fertilizer (the composition ripens faster from below).
Materials for making organic fertilizer
To make a compost bin, bars and boards are selected. You can also use wooden shields. Instead of a wooden lid, a frame covered with plastic film or polycarbonate is often used. Fixation of individual elements of the container is carried out with hardware and hinges (unlocking fragments).
Optimal box dimensions: height – 1 m, width – 1.2 m.
Manufacturing instructions
- Clear the area under the compost bin from plant debris and remove the turf layer. Mark according to the drawing.
- Dig holes 35-50 cm deep in the corners to install supports.
- Install the supports in the holes, level them vertically and fill them with gravel to half the depth. The part remaining to the soil surface is filled with cement.
- 1-2 days after the cement has hardened, fill the cement fill with earth.
- Connect the supports at the top and bottom with bars (on 4 sides).
- Cover the frame with boards around the perimeter, leaving 2 cm gaps for air access. The board needs to be attached to hinges on one or both sides at the bottom so that it can open to collect fertilizer.
- The top should be equipped with an unlockable lid made from several boards without gaps.

How to make a compost heap
As an option, prepare a compost heap in one of the secluded corners of the site. A heap does not mean a random dump of garbage, but a systematic collection of organic waste. It is better to choose a place in the shade; in the sun the components will dry out. A shady shelter provides the necessary humidity, which has a beneficial effect on the decay process. Worms, wood lice and other microorganisms also contribute to decomposition.
The right materials
These products are made from natural ingredients and will not harm the soil or plants. For example, the drug Embiko Compost (Gringo) ensures the ripening of fertilizer in just 6-8 weeks.
How to determine when compost is ready
Ready compost can be identified by its characteristic dark color composition. It should be crumbly, moist, and not smelly. The ripened fertilizer has the smell of forest soil.
By following the rules for making compost, you can regularly replenish the supply of nutrient mixture for your garden with your own hands, without spending additional money on ready-made fertilizers.