Organic fertilizers are not all equally available. It is possible to obtain manure in quantities sufficient to fertilize the site only if it is possible to keep livestock. Otherwise, all that remains is to buy manure. The situation is much simpler with compost. By building a compost pit on your site, you can organize the production of excellent, highly environmentally friendly, first-class fertilizer. In addition, properly prepared compost prevents the ingress of helminth eggs, which are often found in manure.
What you need for a compost pit
Compost is a product obtained as a result of the natural processing of plants. For a small standard plot, a pit with a volume of one and a half square meters is quite suitable. A set of tools necessary for preparing a hole is available on the site of every self-respecting gardener - this is a bayonet shovel, covering material (for example, old film) and a hacksaw for wood.
To strengthen the edges of a dug hole, boards, pieces of slate, or brick can be used. The compost should be placed in a secluded area of the site and in such a way that the wind does not carry the aromas of the rotting mass to you. You should not build a structure near fruit trees - they may die from such proximity.
How to make a compost pit
Make a mark on the ground for the future compost pit and use half a shovel to remove the turf around the entire perimeter. There is no need to dig very deep - this will lead to the constant accumulation of rainwater, which will slow down the decay process. Secure wooden pegs along the edges of the removed turf. They are driven deep, after which boards are nailed to them. The result will be something like a sandbox, but it should be filled not with sand, but with plant debris.
For compost, you can use mowed grass, leaves, tops, and rotten root crops. Will fit raw fruits, cereals, branches, sawdust and even small pieces of paper. Bones, potato tops, animal excrement and inorganic waste should not be thrown into the compost.
When filling, the main thing is to dump plant residues in as large quantities as possible, but they should not be compacted, because it will turn into silage. At correct installation The compost will rise slightly above the edges of the boards. If there are no extra boards on the site, you can simply form a pile and line it around the edges with pieces of slate or rubber mats. In dry weather, the future compost must be watered.
In conclusion, the hole should be covered with film or other covering material - this will help create greenhouse effect. The process of natural processing of the contents of the compost pit will take one and a half to two years.
Any plot of land needs periodic fertilization. What could be better than high-quality compost? Buying it and then bringing it to the site is a long and expensive task. Why not produce this valuable fertilizer directly on your own land, since all the conditions have been created for this? During the warm season, a lot of organic and plant waste that need to be disposed of. It turns out that you can combine cleaning an area of waste and producing compost from it. Let's look at how you can build a compost pit with your own hands, what is needed for this, and how to avoid basic mistakes in the production of fertilizers.
Compost mind on plot of land designed for laying all kinds of plant and organic residues, waste, surplus of various products. Layered in layers, these components gradually decompose, turning into high-quality fertilizer. The question arises: how to build a compost pit with your own hands so that it produces fertilizer within a season? To do this, you need to make some effort to help the compost ripen faster.
With proper care, you can get ready-made compost in just 3 months. If the pit is not given special attention, then the waste decomposition process will continue for approximately two years.
Requirements for a compost pit
For normal and rapid maturation of compost, it needs warmth, oxygen and moisture. How to properly make a compost pit so that its contents turn into high-quality fertilizer, and the pile itself does not harm the plants and people on the site? To do this, you should familiarize yourself with some of the requirements for such structures:
- The compost heap should mostly rise above the soil level. Thanks to this, the heap warms up better and makes it easier to loosen and water. It is recommended to deepen the hole by about 50 cm, leaving barriers above the soil surface of about 1 m. The ideal width of the structure is 1.5 m, and its length is 2 m;
- If there is a source on the site drinking water, for example, a well, borehole or spring, then the distance from it to the pit should not be less than 25 m;
- It is advisable to place the pit in a place that will be remote from the house or gazebo. In this case bad smell, which may come from the compost heap, will not annoy the owners of the site;
- It is advisable to place the pit in partial shade so that it is not constantly in the sun. This will help it dry out;
- How to make a compost pit so that the runoff from it does not flow through the soil into the source clean water? To do this, if the site has a slope, it is enough to place the hole below the source;
- Do not place a hole under fruit trees, as this may lead to their death;
- The dimensions of the pit are selected taking into account the amount of plant debris and waste that is available at the dacha and will remain in the pit for two years;
- Options for making a compost pit with your own hands should take into account that it is recommended to choose the height of the fences so that it is convenient to loosen and collect compost.
Tip: The bottom of the pit should not be covered with slate, metal, rubber or film. They will not allow moisture to rise up from the soil, as a result of which the compost will constantly dry out. The bottom must certainly be earthen. But the walls can be covered with any material.
What can and cannot be thrown into a compost bin?
A compost pit built with your own hands will justify its purpose if it contains the following types waste:
- leaves, bark, needles, chopped branches and roots;
- weeded and mowed weeds, grass;
- bird droppings and rotted biennial manure;
- vegetables, fruits and berries, including peelings;
- leftover coffee, tea;
- hay, sawdust, shavings, straw;
- ash from burning wood;
- paper, paper bags, cardboard, napkins.
Advice: If a thick layer of fresh grass is placed in a hole, then the process of its decomposition may take six months to a year. In this case, cover the grass with soil.

The following cannot be placed in a hole:
- inorganic products that do not decompose. These are rubber, plastic bags, plastic, metal, synthetic products;
- feces of pets, as they may contain helminth eggs;
- bones;
- tops of tomatoes and potatoes, as they are often infected with late blight;
- chemically treated plants;
- ripened weed seeds;
- thick branches that take a long time to rot.
Possible manufacturing options
A do-it-yourself compost heap can be made in several versions. Let's list them all, indicating the features of each of them.
An ordinary pile in which waste is placed
- Select a place on the site where the compost pile will be located;
- As various wastes accumulate, they are placed in the selected location. In this case, it is advisable to lay organic matter in layers. Alternate food waste with grass and manure;
- When the height of the pile reaches 1 meter, make several depressions in it, into which pour a special compost liquid. This will speed up the ripening of the compost;
- With regular loosening and watering, the compost will mature within 3 months.
This ideal option for those who want to get by with minimal effort but still get some compost. It is advisable to form several such heaps, each of which will rot gradually.
Simple pit
A simple do-it-yourself compost pit at your dacha will be provided by an ordinary pit dug in the chosen location:

- The depth of the pit should be shallow, which will ensure easier care of its contents. It's better to make it wider;
- Branches, hay, and tree bark are placed at the bottom of the pit;
- Next come layers of food and vegetable waste;
- Since the temperature in the pit is not very high, it is advisable to cover it with film.
This is the least successful way to set up a compost bin. Mixing its contents will require more effort, and the pit will warm up less. The advantages of such a pit are its small area and simplicity of design.
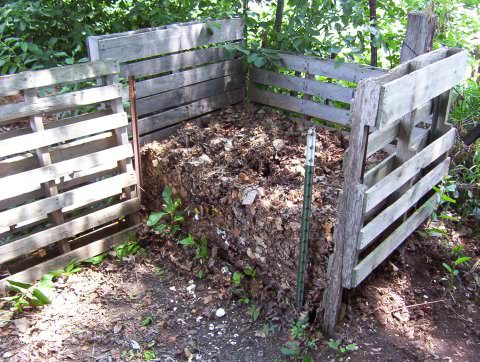
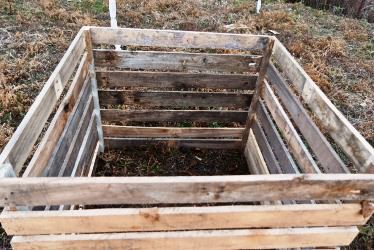
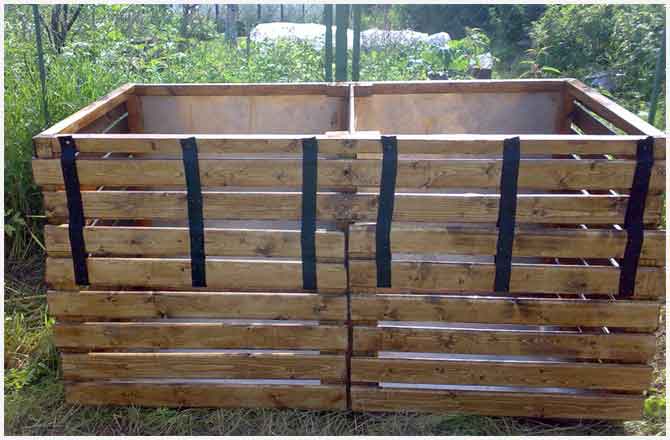
Box made of wood or other material
How to make a compost pit with your own hands so that it is convenient and inexpensive? Use boards, bars, slate, sheets of metal, etc. for this.
The order of arrangement will be as follows:
- The top layer of soil about 40 cm thick is removed from the soil;
- Pegs are driven in around the perimeter of the pit;
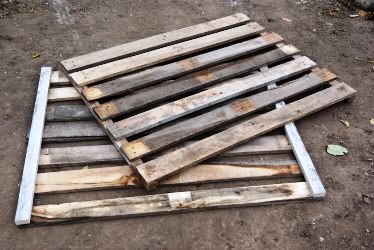
- A fence is installed around the pit. It can be wooden (boards, pallets, panels, bars) or any other. It is allowed to use any material: flat or corrugated slate, polycarbonate, metal sheets;
- The height of the fence should not exceed 1 m. This is necessary for the convenience of mixing the compost;
- The top of such a structure is covered with plywood or film.
This design allows the compost to warm up well, so it is considered optimal for use on land.

Exists original version wooden box. Its lower edges do not reach the soil surface by 25-30 cm. That is, boards or other material are attached at a certain distance from the ground. In the lower part of such a box, the compost matures faster, since it was laid earlier. As the compost matures, it is removed and the pile settles downwards. Such a pile practically does not need to be loosened. There is always the opportunity to get some ready-made compost.

Concreted pit
If you decide to build a durable structure that will last for decades, then use the advice on how to make a compost heap in a concrete pit.
The structure is set up like this:
- the site for future construction is marked out (approximately 2x3 meters);
- soil is selected at 60-80 cm;
- formwork about 10 cm thick is constructed around the perimeter of the future building;
- concrete solution is mixed;
- concrete is poured into the formwork;
- after the concrete hardens, the formwork is removed;
- waste is placed in layers in a concrete pit;
- From above, the pit is covered with wooden shields or covered with film.
This is the most expensive method of constructing a compost pit in terms of effort and investment. Such a structure should be placed where the pile will definitely not create any difficulties, since it will be impossible to move it to another place.
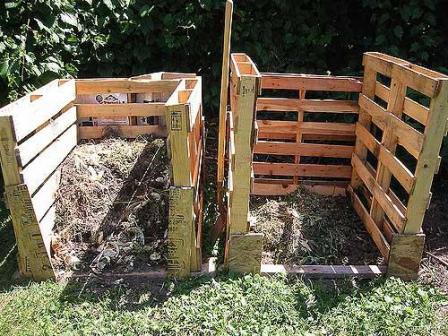
Tip: It is recommended to divide the compost facility into at least 2 sections. While you put fresh waste collected in the current season into one of them, last year’s compost will decompose in the second section.
It should also be noted that there are options for organizing a compost pit from a barrel or special plastic containers for compost, but you will additionally need to use drugs that accelerate waste processing, or add Californian worms.
How to properly operate a compost bin
We found out how to build a compost pit with our own hands using various schemes. It remains to illuminate the question of how to properly care for compost pit during the season. It is enough to perform the following simple manipulations:
- Periodically loosen the compost with a fork. In this case, oxygen will be provided inside the heap. In addition, the waste will mix with each other, which will speed up its decomposition.
- Water the pile at least occasionally, and more often during the dry season. Thus, the contents of the pit will be moistened and rot better. Overdried compost almost completely stops decomposing.
- It is recommended to cover the top of the compost with a dark film. This will create a greenhouse effect inside the heap, raising its temperature. The film will retain moisture inside and prevent weeds from germinating. In a covered heap, compost will mature in 3-4 months. If you do not cover it, the ripening process will last for a whole year.
- Periodically add California worms to the pile, which loosen the contents of the pile and partially process it.
- If possible, add drugs to the contents of the compost heap to speed up the decomposition process. For example, Compostin, Baikal EM-1, Embionic, Compostar, Sanex EcoCompost, Bioforce Compost and others.
A properly constructed compost pit, which is regularly maintained, can provide site owners with high-quality and practically free fertilizer in a very short time.
How else can you make a compost pit with your own hands? Photos will clearly demonstrate the options for making it.


Fertilizing the soil is important requirement agricultural technology of any plant, and compost is considered one of the main components for adding to the soil. Today we will learn how to make it at the dacha yourself.
Many summer residents have been preparing compost with their own hands for a long time, because this not only saves time and money, but also eliminates many unnecessary worries, which are already enough at their summer cottage.
What are the benefits of making compost at your dacha?
- Compost is considered one of the the best fertilizers, which, when added to the soil, fills it with a huge amount of microelements.
- Compost is the cheapest and most practical means for properly structuring the soil, as it increases moisture conservation and creates the loosening necessary for all plants.
- By scattering compost over the surface of the soil, you can create the best organic mulch that will conserve moisture and suppress the growth of many weeds in the area.
- Preparing compost for dacha area– this is a very useful process, as well as a significant contribution to development and environmental protection. No mineral fertilizer can compare with high-quality compost, and a properly formed pit in which organic components rot can become a real incubator for beneficial bacteria and microorganisms.
- Preparing compost significantly reduces your physical effort, since now you do not need to remove it from the territory summer cottage a good portion of the garbage, everything can simply be placed in a special pit.
What is garden compost
Compost is a specific product obtained from organic waste under the influence of the environment and a huge variety of insects and microorganisms. It is used for structuring the soil, mulching, and fertilizing.

The bark and branches of trees, stems and leaves of plants - all this can be placed in a certain order in a special hole or simply on a pile, provide conditions for rotting and processing, and get a high-quality, truly environmentally friendly product without any harmful or toxic compounds. Naturally, the process of decomposition of all organic residues will force you to wait seriously, maybe even several years, but you will get real quality, and not a mixture prepared on the basis of unknown components from the store.

How to make compost
Professionals are familiar with making compost using the fast and slow methods. They are also called cold and hot.
Before we get into the “recipes,” we’d like to talk about building a proper compost bin or pit.
How to make a compost bin?
So, initially we need to prepare the material for the production of a compost bin in size. Almost any boards or planks that are not rotten and have not previously been in contact with toxic materials are suitable for this. In the first case, during the biological process, rotted planks can deteriorate; in the second, planks covered in paint or oil can simply poison the compost, ruining its quality irreversibly.
We would advise you to take unedged pine in boards or beams so that the finished box will last for many years, and work with this material. This way you will make a high-quality container, but won’t spend a lot of money.

Now we choose a place and begin construction. On a hill or on a flat area, it doesn’t really matter if your terrain is not rainy and the groundwater level is low. In general, it is advisable to place the place for compost slightly above the standard soil level so that it does not get washed away. So, we create four sides of a box, like a standard vegetable box, but much more large sizes.

It is imperative to maintain gaps between the collecting slats to ensure ventilation of the compost for the correct internal biological processes.
We install supports at the place where the box is collected, and attach three ready-made walls to the supports. pine boards or timber. We leave the last side removable so that it is convenient for us to get the finished product for fertilizer or at the dacha.
It is advisable to place some material, for example, old linoleum, at the bottom of the box or, as they say, compost pit.
How to make proper compost quickly?
How to prepare compost quickly? This question interests many newcomers to the dacha business, and therefore we move on to it without delay.
First of all, we create a special container - a frame that will contain all organic residues entering the compost on a single heap. It could just be a fenced pit wooden structures, special wooden or plastic box, in which there will be ventilation and access to the contents from above or from the side.
Create drainage at the bottom of the container. It can be made from a layer of hay, straw, spruce branches. The layer should be about 10 cm.

Materials and various products for composting are stacked in layers. For example, you can immediately put branches and other fruit waste, then a layer of paper, the next layer of leaves, then a layer of mown annuals or grass, and so on. It is important that the layers alternate approximately as follows, dry waste with wet waste, soft with hard. This method of laying will provide access to air, ventilation, and speed up the composting process. In this case, it is necessary to remember that compaction is of no use here, and may even cause harm.
It is necessary to lay each layer with special process accelerators, for example, nitrogen additives, which are offered in garden stores, manure of herbivores, plants such as legumes, nettles, dandelions, yarrow. You can also use rotted manure or ordinary garden soil.
To maintain the temperature and the correct internal environment, it is necessary to cover the compost storage facility with special materials - oilcloth, old rags, a piece of linoleum or carpet. The main thing is to maintain warmth inside.

In the summer, when there is a drought outside, the compost can be shed a little in order to maintain the required humidity inside the storage facility. But remember, only spill, and not fill to the top.
If you smell specific aromas from the compost bin, this may indicate that the cooking process has failed and is not proceeding correctly. If it smells like ammonia, there are too many nitrogen components in the pit (the situation can be improved by adding some torn paper). If you smell rotten eggs, it means there is not enough oxygen in the hole or box, and the contents need to be well stirred by sprinkling the layers with straw or shavings.
If you managed to make the container correctly and fill it in even layers, the compost will be ready in a few months. It is better to select it from the lower layers, so that the upper ones fall evenly, pressing on top with new organic residues.

How to compost slowly?
How to make compost from grass or branches? How to get the most correct and high-quality product? Naturally, this method is a little more complicated, or rather, longer, but as a result you will get compost that is very high quality.
By and large, you don’t have to do anything special, just prepare everything for rotting once and wait for several years. By the way, you can install a new compost pit in the corner of your plot every year so that in 2-3 years you can reach constant annual volumes.

So, how do you make your own compost?
If you can make compost in a barrel in a quick way, then for a slow, cold method, you will need an ordinary pit at some elevation in the area. The hole you dig is small, about the size of a shovel, but wide enough to accommodate enough branches and logs for composting. Next, broken tree branches and arrows, trimmings and rotten logs in a crushed state are poured inside the pit. Our entire pile is covered with soil on top and forgotten for a long time. In the second year, if you are very lucky, or in the third, which is stable if prepared correctly, you will receive excellent fertilizer for the garden.
When choosing from methods of preparing fertilizer, many choose the fast one, and it’s not even worth explaining the reason to anyone. But now I want to talk not about the method, but about what should go into the compost pit and what should not.
What can you make compost from?
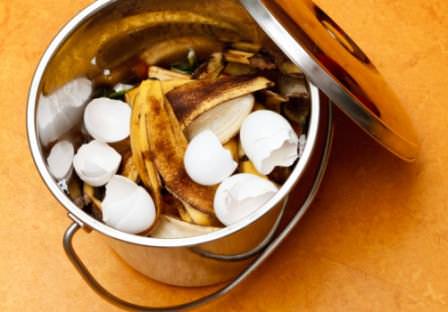
If you want to prepare high-quality compost and also save time, Throw only the following into the rotting area:
- Kitchen waste (fruits, vegetables, cereals, tea leaves, coffee grounds);
- Straw, hay, shavings, sawdust, mown grass;
- Thin branches and stems of garden bushes and trees;
- Recycled wood after garden shredder;
- Rotted animal manure;
- Rotted leaves and other garden waste;
- Various algae;
- Others natural materials– fabric and paper;
- Chopped weeds (avoiding rhizomatous weeds from entering the compost).
What you shouldn't compost from
When preparing fertilizer, you must also remember what should not be placed in the compost storage:
- Bones, large and hard, waste of poultry, meat, fish, droppings of domestic animals;
- Fresh leaves, rhizomatous and perennial weeds;
- Plants or debris infested with diseases or insect pests;
- Fresh manure, which can only be added to slow-cooking compost;
- Garden waste that contains toxins, poisons, herbicides, etc.;
- Unnecessary waste - metal, glass, rubber, plastic, polyethylene, etc.
How to make compost (video)
Following the simplest rules and advice experienced summer residents who have been preparing a useful “potion” for their garden for many years, you can make compost at your dacha with your own hands very simply and immediately begin fertilizing the soil to improve the quality of harvests.
Preparing compost at the dacha: rules and technology for making organic fertilizer
Many summer residents understand that if they use the plot annually to grow vegetables and fruit crops and do not apply organic fertilizers, then very soon the soil fertility will dry up.
About how to make compost with your own hands and fertilize everything in your dacha with it cultivated plants, will be discussed in this article.
What is compost and its benefits for plants
First, it is important to understand what compost is and how to make it to make a good fertilizer. Compost is one of the types of organic fertilizers that is obtained as a result of the decomposition of weeds, plant residues, fallen leaves, kitchen waste and manure under aerobic conditions (using oxygen). The decomposition of organic matter occurs as a result of the activity of bacteria and for this it is necessary that this biomass have a humidity level of 45-70%, and the environmental temperature varies within the range of 28-35°C. Along with bacteria, various insects and worms take part in the decomposition process. As a result of their vital activity, additional energy is generated, which contributes to better decomposition of biomass.
The materials used to make compost require grinding. Larger fragments take longer to decompose. In terms of their value, rotted plant residues are in no way inferior to humus and have the following advantages and disadvantages:
- in the composition of compost are presented in the required proportion macro- and microelements for plant nutrition;
- As soon as it gets into the soil, it takes part in metabolic processes, replenishing the lack of nutrients;
- it connects with the soil and becomes its integral part;
- after watering and as a result of rainfall nutrients do not pass into the deep layers of the soil, like mineral fertilizers, but remain in the soil horizon;
- it easily allows water and air to pass through, which is very important for the normal growth of plants;
- as part of this organic fertilizer in large quantities humus is present, which increases soil fertility;
- overdosing plants with this fertilizer is impossible, since all components are of natural origin;
- when decomposing naturally, compost does not pollute the soil with toxins;
- Of the entire list of organic fertilizers, it is the most accessible and cheapest.
No noticeable deficiencies were identified in the compost, with the exception of unpleasant odor, which may accompany the decomposition process plant residues. In addition, flies, ants and other insects will always indicate their presence around the compost heap. But this problem can be solved by installing a door on the box and placing it in the most remote place on the site.
Factors influencing the decomposition of organic matter
The process of creating organic fertilizer from food waste and grass clippings is divided into 3 stages: Decomposition. The components of the mixture heat up inside the heap, changing their structure. The resulting product contains beneficial microorganisms, including fungi, as well as earthworms, which contribute to accelerating the processing of organic matter into fertilizer. Humus formation. At this stage, it is important to supply the pile with oxygen, without which microorganisms cannot breathe. Therefore, the pile should be shoveled several times, moving its outer layers inward and vice versa. Mineralization. Nitrogen compounds decompose into bacterial protoplasm and nitrogen, and humus passes into mineral form. After this stage, it can be used for its intended purpose. To complete all stages in favorable conditions it will take approximately 10-12 months.
Choosing a location for the composter
It is better to place a compost heap, pit or box in the far corner of the garden so that they are not exposed to sun rays. If the composition for future fertilizer is intensively illuminated by the sun, the process of its preparation will be greatly delayed. Do not set up a composter near apple trees or other trees - their roots will grow into the pile and pump out all the nutrients from the pile.
Composter device
If you are thinking about how to prepare compost at your dacha, then you should familiarize yourself with the structure of the composter. Proper organization the decomposition process is the key to quickly obtaining high-quality organic matter. It’s not difficult to do if you follow the recommendations. Composting can be done in a compost heap or in a bin. The first method is called classic. Outer frame The compost heap is made of a mesh that allows air and moisture to pass through. If special additives are added to it, it ripens in 9 months. The material for making the box can be anything:
- net;
- wooden pallets;
- slate;
- boards.
You can buy ready-to-use ones on the market. plastic containers. The container volume is selected from 1 m³. If the capacity is smaller, the process of decomposition of organic matter will noticeably slow down.
Rules for laying layers
The materials must be laid in such a way that soft and wet layers are interspersed with hard and dry layers. This provides an influx of oxygen, which will speed up the decomposition process. Nitrogen and carbon components rot differently. Nitrogenous compounds decompose quickly, absorbing a lot of oxygen and releasing heat. And carbonaceous substances have a loose composition, are rich in oxygen and, when decomposed, consume nitrogen. If you put equal amounts of these ingredients into the composter, you can achieve the perfect balance. Layers 15-20 cm thick should be laid alternately and mixed well, ensuring their contact with each other. Can be distributed evenly into a pile chicken droppings, fresh manure or a special stimulant to accelerate compost maturation.
good organic fertilizer is obtained when the initial nitrogen and carbon components are taken in equal quantities. It is advisable to sprinkle the first layer of ingredients with a layer of earth mixed with lime.
What you can and cannot compost
Those people who believe that compost is just a pile of rotting plant debris in a distant part of the garden where you can throw everything are wrong. This is not the way to get proper fertilizer, you need to prepare it according to certain rules. The following components are added to the composition:
- green grass, hay and straw;
- green parts of plants and individual weeds;
- small branches, pieces of wood and sawdust;
- food plant residues;
- cattle, sheep, goat and poultry manure;
- chalk, ash, egg shells;
- special composting accelerators.
There are a number of ingredients that should not be placed in a compost bin:
- food residues of animal origin, since they stimulate the process of decay and release an unpleasant odor;
- feces of carnivores and humans, which may contain worm eggs;
- pieces of fabric, coated glossy paper, scraps of rubber, stones;
- any chemicals;
- weeds that produce seeds that remain viable for a long time, as well as underground parts of rhizomatous and root-sprouting plants that remain viable;
- plant remains inhabited by pests and affected by fungal diseases.
Methods to accelerate ripening and hot cooking method
The composting process can take from 4 months to 2.5 years; the time required for maturation depends on the size of the components and the conditions created.
Important! The temperature inside the pyramid must be raised to 60 degrees or more. High temperature accelerates the decomposition of organic matter and destroys weed seeds and larvae of harmful insects.
For instant cooking nutritional composition, it is better to use the following steps:
- provide the pile (pit) with moisture and air;
- add a special accelerator (“Baikal-Em”, “Unikal-S”) or fresh manure to the irrigation water;
- shoveling layers to improve the supply of oxygen to the heap;
- insulating the heap in winter to extend the period of active fermentation;
- watering with herbal infusion consisting of 5 parts of chopped grass, 2 parts of chicken droppings and 20 parts of water;
- watering the pile with yeast infusion;
- planting on a pile of zucchini and pumpkins, the root secretions of which contribute to the rapid decomposition of organic residues;
- the use of Californian worms in the processing of organic residues, which pass organic matter through their digestive tract and ultimately produce vermicompost.
There is another preparation method - hot composting, thanks to which the fermentation process takes place in a short time. This method has other advantages:
- weed seeds lose their viability;
- pathogenic microorganisms die;
- the substance has a fine fraction.
A variation of hot composting is the Berkeley method, thanks to which the time for processing organic matter is reduced to 18 days. When using this method, the following requirements must be met:
- the temperature in the center of the pile should be 55-65 degrees;
- the ratio of carbon to nitrogen in the substrate components should be 30:1;
- the height of the heap is increased to one and a half meters;
- all components must be crushed;
- The layers are shoveled 7 times and mixed well.
The algorithm of actions for the 18-day Berkeley method is very simple:
- form a compost heap;
- Do not touch it for 4 days;
- then turn it over every other day for 2 weeks.
The compost is of high quality, dark brown in color, with a good smell.
Important! If you notice earthworms crawling into the prepared compost, this means that it is finally ripe and contains a lot of nutrients.
Types and technology of manufacturing on site
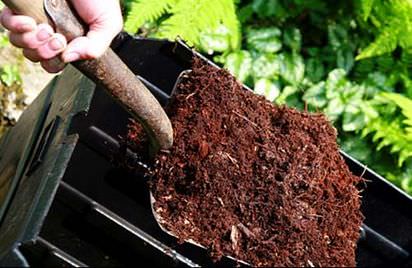
Compost is ready for use when it is completely ripe. Well-ripened material does not require additional mineral or other fertilizers and is capable of providing a decent and environmentally friendly harvest. To effectively use organic fertilizer from plant residues, you need to know how to determine its ripeness. Below are the main signs indicating that the composition has matured and is ready for use:
- the material has a homogeneous structure and it is impossible to discern individual components;
- after overheating, the compost has a loose and loose consistency;
- the compost has acquired a dark brown color;
- the finished product smells like wet soil.
Ripened compost is similar to chernozem soil with a loose and porous composition.
There are many recipes for preparing this organic fertilizer. Some of them involve the use only natural ingredients, in other options, mineral fertilizers are added to organic matter - after all, plant components contain enough nitrogen, and phosphorus and potassium are present in small quantities. To make the right compost, you need to achieve the right balance of these nutrients. Depending on the starting materials used, the list and quantity of additives can vary greatly. Below are the most common and effective technologies for making compost.
Classic based on herbs and food waste
This type is easy to manufacture, yet it is effective in use. Classic compost is prepared from simple and accessible components, among which it should be noted:
- green mass consisting of tops, branches and algae - it makes up the first layer (20 cm);
- cattle manure - second layer (10 cm);
- dolomite flour or crushed limestone - third layer (0.5 cm).
Layers should be alternated until the height of the pile reaches 1.5 meters in height. This is how you need to make this type of compost, the only drawback of which is the one-year or even two-year ripening period. The finished product can be used on site.
With manure and superphosphate
This composition, as its name implies, is prepared using superphosphate, which enriches the substrate with phosphorus. Phosphorus promotes nitrogen conservation by binding ammonia in manure. Making such compost at the dacha is not difficult. This type of compost consists of the following components:
- soil from the garden (10 cm);
- manure mixed with superphosphate in a ratio of 50:1 (10 cm).
This method is relatively fast and matures in 3 months. If the ingredients are added in the spring, then at the beginning of July the potatoes are fed with ready-made humus and the raspberries are mulched.
With added bird droppings
Chicken manure is a very valuable fertilizer, but in its pure form it is not suitable for use, as it can burn the plant. The best way its use is to add it to compost. To obtain it, mix the following ingredients:
- a layer of bird droppings 20-25 cm thick;
- straw layer - 5-10 cm;
- layer of sawdust - 5-10 cm;
- the top layer should consist of a layer of peat - 10-20 cm.
If you cover the compost pit with film, then there will be no unpleasant odor and the product will ripen in 2 months.
In addition to the above components, compost can be enriched with the following ingredients:
- superphosphate;
- wood ash;
- potassium salt;
- ammonium nitrate.
Before laying the compost with your own hands, straw and branches are placed at the bottom of the hole as drainage. Two weeks after laying the top layer, the substrate is shoveled. Thanks to this procedure, all layers mature simultaneously. To use, you can dilute the finished compost in water or apply it dry.
Peat based
With this method you need to saturate the peat mineral fertilizers, mixing everything well. The ingredients of such compost should be the following substances:
- weeds free from seeds - 100 kg;
- dry peat - 200 kg;
- ammonium sulfate - 350 g;
- sodium nitrate - 50-70 g;
- potassium salt - 50 g.
Compost is prepared as follows:
- a small layer of garden soil is poured on a flat area;
- the second layer is peat (40 cm);
- A layer of chopped branches, tops and grass is placed on the peat.
All layers need to be compacted a little, then ripening will happen faster. Thus, you can make humus from grass, peat and mineral fertilizers.
For champignons
When preparing compost for growing champignons, you need to take the following components in specified quantities:
- dry straw - 100 kg;
- liquid chicken manure - 100 kg;
- mullein, in the amount of 50 kg;
- gypsum - 5 kg;
- chalk - 3 kg;
- water to give proper moisture to the substrate.
This compost is not used for fertilizing; it is used as soil for cultivating mushrooms. The ingredients are placed in layers, pouring with water. The ripening period can be several months. During this time, the filled pile must be interrupted 4-5 times. A sign of compost humus ripeness is the condition homogeneous mass all substrate components.
How to cook in bags
Compost is prepared in bags when there is little space at the dacha. Let's try to figure out how to quickly make compost in bags and what to pour it on to speed up ripening:
- first you need to buy thick black plastic bags;
- the turf is removed from the area and placed in bags;
- crushed weeds are added to the bag;
- the mixture is spilled with vermicompost or other biostimulant;
- sealed with tape.
After a few months, the compost will finally mature and can be used to fertilize vegetable beds.
Production in boxes
Many devices have been developed for storing bionutrients for plants. People prepare compost in a barrel, pit, pile, pile and bin. Boxes can be bought or made with my own hands. They are mobile and stationary. In the stationary version, the perimeter of the planned container is first marked and stakes 1.5 meters high are driven into the corners. Then the spans are covered with boards, leaving gaps between them.
Home cooking technology
Compost can be made slowly and quick ways. Each of them has its own advantages and disadvantages. To quickly prepare compost, you need to work according to the following algorithm:
- First of all, we make a container where organic residues will be stored. This can be a well-ventilated box, hole or pile with access to the contents.
- At the bottom of the container we make drainage from a layer of hay, straw, and branches.
- We lay the components in layers and without compaction, so as to ensure the alternation of wet waste with dry, hard components with soft ones.
- To speed up the process, you can add special organic decomposition accelerators to the compost in layers: nitrogen additives, residues leguminous plants, cattle manure.
- To maintain the process temperature in the pile and create optimal conditions for beneficial microflora, you need to cover the pile with an old carpet or oilcloth.
- Every month it is necessary to shovel the compost heap so that its outer layers fall inside, and the inner ones are on top and sides.
- In the summer heat, the contents are lightly irrigated with water to maintain optimal technological humidity.
If you were able to make the container correctly and carried out composting using technology, then you will receive the finished product in 3-5 months.
If you set out to make the right compost from grass or branches, you should be aware that this process will be very long, but in the end you will get a high-quality product. You need to prepare the components for composting, place them in a pit and wait for 2 years. So, let's look at the technology for preparing a “food additive” for plants in a slow way:
- we dig a wide hole on an elevated site with a depth of 60 cm;
- inside the pit we place chopped tree branches, bark, wood particles, grass;
- We cover the pile with a layer of soil on top and wait for 2 years.
An effective organic fertilizer will be ready for use in 2 years.
Using organic fertilizer
Ripe compost is suitable for any crop with the same application rates as manure (15-20 kg per 1 m²). The methods can be very different:
- in autumn for basic tillage;
- for spring plowing;
- before planting potatoes;
- add to holes when planting seedlings;
- in spring and summer as a mulching material.
In spring and summer, the finished compost is scattered on the soil and dug to a shallow depth.
By strictly following the simple rules and dacha tips on the basis of which this useful organic matter is annually prepared at home, you can also properly make compost at your dacha with your own hands and fertilize the soil to increase crop yields and improve the quality of fruits.