The garden will be wonderfully transformed if you decorate it with handmade items. A garden designer receives the greatest satisfaction if he manages to combine beauty and benefit. From this point of view, the most advantageous decor is outdoor flowerpots and flowerpots, which will not only decorate local area, but will also shelter your favorite flowers.
Vases made from tires
Gloomy tires rarely fit into garden design. But it’s really possible to decorate them beyond recognition. For example, imitate brickwork.
A decorative flowerpot-well is built from tires, timber and metal tiles
Unique flowerpots made from tires are made quickly.
Step-by-step instruction:
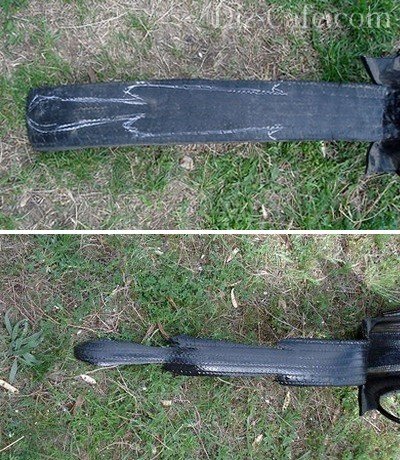
- Draw a cut line on the side of the tire with chalk.
- Use a knife to cut the tire along the marked line.
- Turn the tire over and press it down with your foot. inner part, grab the edge and pull up and towards you.
When cutting with a knife, the blade should be wiped with grease or machine oil for better glide.
Cover the rubber with primer and apply the design.
For an outdoor flowerpot, oil or acrylic paints are used
For complete camouflage, apply a mesh to the tire, then thick cement mortar with sand and stick the tiles.
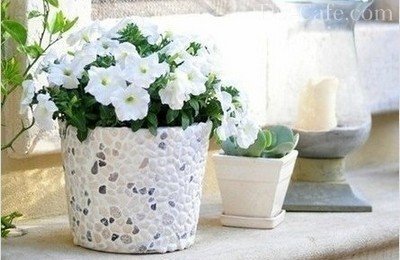
A tire pot lined with tiles or pebbles looks very stylish
Photo gallery: decorating flowerpots made from tires
Draw a landscape on the tire and plant hostas. A bright flowerpot in the shape of a parrot will decorate an unsightly place. Flowerpots in the shape of cups look very elegant. Place a flowerpot from a tire in the shape of a teapot in dining area Flowerpot made of tires green tones fits organically into any landscape A pot made of a tire in the shape of a cup is suitable for hanging plants
Making a flowerpot from a tire - video
Flowerpots made of plastic and glass containers
Ordinary garbage will serve the purpose of beauty, for example, various containers. Plastic instantly transforms if you cover it with twine.
For sticking twine on street planter Any waterproof glue will do
A great option is burlap decor.
Rough burlap highlights the fragility of flowers
Branch trimmings will also reliably hide the plastic.
The branches are glued to the flowerpot with glue or tied with twine
Apply a pattern to the pots with hot glue and cover with acrylic paint.
To create a three-dimensional pattern you will need a heat gun
Or place the bottles in gift bags.
Pots from gift bags - quick way refurbish plastic bottles
By cutting off part of the canister, create a planter for the wall.
The surface of the canister is smeared with glue and sprinkled with sand to create the effect of a “sandy” face
Secure glass bottles to the fence and plant juveniles and sedums in them.
To trim glass bottle, wrap it up copper wire at the cut site, heat the ends with a lighter and place them in cold water
If you cut a plastic bottle in half and glue the neck to the bottom, you will get an original flowerpot.
If you paint a flowerpot with silver or gold paint, you will get the feeling that the flowerpots are metal
Flowerpot made from a plastic bottle - video
Flowerpots in the shape of funny characters made from plastic containers
Invite children to help create unusual pots.
Garden flowerpots are created from any plastic containers
DIY pig pot - video
Flowerpot made from bottles
A mini flower garden made of glass looks great. The base (bucket or tire) is coated with thick cement mortar and sand. Rows of bottles are then laid by pressing the necks into the base solution.
Think about the location of the flowerpot in advance, because it is difficult to move it
Plaster plant pots
Come into fashion environmentally friendly materials. Gypsum is famous for its best plastic properties. Strips of fabric soaked in gypsum solution are wound around any container or wire frame until required thickness walls When the product is dry, it is sanded, primed, painted or decor is glued to the walls.
When making flowerpots, gypsum can be replaced with putty or alabaster
Pebbles, shells, and tiles are used as decoration.
If you mix gypsum with color desired color, we get colored seams
Pot-swan
Bird figures will add a romantic touch to the garden. For a flower pot in the shape of a swan you will need:
- gypsum - 5 kg;
- plastic bottle 5 l;
- leg-split;
- wire;
- mesh for wings and tail;
- bandage;
- primer;
- paints (white, black and red);
- putty knife;
- brush;
- emery.
It is convenient to mix plaster with a special spatula
Step-by-step instruction:
- Cut off the side of the bottle and pour sand into the resulting container.
- Insert one end of the wire into the neck, bend it and wrap it with twine along its entire length.
- Apply a 2 cm layer of gypsum mortar with a spatula onto the surface of the “skeleton” of the future bird.
- On the sides of the body, press the reinforcing mesh (wings) at an angle.
- Place several layers of bandage and plaster over the mesh to hide it.
- Form the head and beak by wrapping the wire in bandage and applying layers of plaster. Smooth out any unevenness with a brush.
- Attach a tail from mesh and process it like wings.
Dry the figurine for three days, then sand it with sandpaper. Cover the bird with primer, wait until dry and paint.
Making a swan pot is not as difficult as it seems
Making a swan pot - video
Pots from a barrel
Large containers will also come in handy. For example, iron barrels stylized to resemble human figures.
Planted in flowerpots from barrels hanging plants that fall beautifully
Or sheathed with wooden slats.
The planks are attached with a nail gun
Wooden barrels are cut in half crosswise.
You can make two flowerpots from one barrel
The cut barrel is placed on a stand so that it lasts longer
Homemade pots from a barrel - video
Pots made from unnecessary things
You don't have to throw away everything that's worn out.
Even blatant trash can be given a second life
Sometimes a pot made from old things becomes the highlight of the garden.
An exquisite flowerpot is made from a birdcage
An old umbrella will be transformed if you plant flowers in it.
To keep your umbrella decorative longer, simply place pots of plants in it.
Photo gallery: flower pots made from old things
Cut an old basketball in half Leaky watering cans are not suitable for watering, but will become a decoration for the garden Paint old colanders and plant hanging flowers in them Old flip flops and cups - a wonderful ensemble Attach the scraps sewer pipes to the wall and plant petunias in them. Wrap the unnecessary hose around the flowerpot  Weld a pot-umbrella from scraps of rebar and iron sheets
Wooden flower pots
Products made from natural materials. Among them, the tree is the leader.
A simple flowerpot is made from an ordinary stump using a drill and chisel.
Step-by-step instruction:
- On the cut of the stump, drill holes around the perimeter.
- Use a chisel to remove excess wood.
- Treat the inside of the stump with stain and dry.
- Lay polyethylene inside the flowerpot and plant the plants.
You can simply place a suitable size pot inside the planter.
Coat your wood decorations with an antiseptic to prevent them from rotting.
To prevent logs from rolling, drive stops into the ground
Pots made of timber and boards
Everything that remains after the construction of the house is used to decorate the site. Stylish containers for plants are made from timber and boards.
It is better to make a wooden planter with legs, so it will last longer
Flowerpots painted light gray are suitable for a Provence style garden.
Drill drainage holes in wooden planters
If you have scraps of wood lying around in the barn, use them to assemble flowerpots in the shape of a well, a wheelbarrow, or a bicycle.
The pot-well greatly decorates the garden
Photo gallery: wooden planters
If you put tree stumps on top of each other, you get a picturesque composition  Plant drought-resistant plants in flowerpots. Bulbous plants look great in flowerpots made from a stump: tulips, daffodils, crocuses
  Please note that untreated wood will quickly lose its appearance.
  To make the texture of the wood visible, tint it with oil. Hang small flowerpots made of wood in a gazebo. A wooden flowerpot will decorate the area near the house.
The main requirement for gabion wire is durability
Any plastic container can be easily decorated with crushed stone. Screws are screwed into the flower pots, wire is wound between them, cement mortar is placed on top and crushed stone is pressed in.
A mesh of nylon thread or wire is needed so that the cement does not fall off from the container later.
Dried products are varnished.
Holes are made in the upper part of the iron cans through which twine is passed.
The flowerpot will not fall out of the fastening, woven using the macrame technique.
If the design allows, attach three chains to the top of the planter
Sometimes flowerpots are nailed to a wooden strip, which is attached to the wall with dowel nails.
Holes are drilled in the shelves of the bookcase through which the rope is passed.
Hanging flowerpots - video
After chopping wood at the dacha, there remains a lot of beautiful bark, which I use to decorate flowerpots. The bark is cut into strips 2–3 cm wide and attached to the pot using a heat gun. Before gluing, working surfaces are dust-free and degreased. If there are gaps between the pieces of bark, I mask them with moss or lichen.
Hot-melt adhesive softens in the sun, so flowerpots decorated with bark are best kept in the shade
When creating flowerpots from scrap materials, take care of their durability. Treat wooden flowerpots with anti-rotting agents and drill drainage holes. Before decorating containers with stones or tiles, wrap them with reinforcing mesh so that the decorative mortar does not fall off over time.
Elegant flower arrangements- decoration of any area. Variegated flower beds, striking the imagination with the variety of colors and shapes of flowers, do not leave anyone indifferent. But it is impossible to highlight a flower garden against the background of the lush vegetation of the site and emphasize its beauty without a decent frame. Do-it-yourself decorative flowerpots for the garden can not only transform the area, but also give the flower beds a complete look.
A distinctive feature of a flowerpot from a traditional plant pot is the absence of drainage holes in the bottom of the container, which are necessary for draining excess water. In addition to its decorative function, a properly selected container can make caring for a green pet easier.
Since the main purpose of decorative flowerpots for the garden is to decorate the interior, the outer surface of the containers in most cases is made more beautiful and attractive
Depending on the material used to make garden flowerpots, there are the following types:
- Plastic. One of the cheapest options for pots, the main advantage of which is their light weight and ease of care.
- Wooden. The natural base of the containers allows you to protect plant roots from hypothermia and drying out, as well as maintain optimal conditions for growth.
- Metal. Modern material, characterized by durability, is excellent for outdoor landscaping.
- Clay. A material with a rough or smooth surface is a universal basis for painting and decorating with sculpting. But the ability to transmit moisture limits the scope of its application.
- Ceramic. Natural material, treated with a special glaze, is widely used both in interior decoration and for garden design.
The main requirements for flowerpots for garden decoration are the ability to maintain the shape specified by the master and high resistance to high humidity soil and temperature changes.

If we take the location of an impromptu flower garden as a basis, then there are floor structures and hanging planters for the garden
Unusual uses for old things
Outdoor planters can be made from anything. It might work old junk, carefully stored “just in case”, furniture, dishes...

Unusual hanging flowerpots can be made from old teapots, which can simply be placed along the stairs, hanging on a wire.

Even an old one can find a second life in the hands of a creative owner. travel bag without a handle, which, as the saying goes, is hard to carry, but also a pity to throw away

A wooden box, stained and decorated in the shape of a cute fairytale calf, will be a worthy frame for a flower garden
It’s easy to fill your suitcase by placing several pots of plants directly into it. If the height of the containers is significantly lower than the walls of the suitcase, you can add sea pebbles and stones to the bottom of the flowerpot, and fill the gap between the containers with moss or crushed bark.
Options for making pots yourself
For the manufacture of original containers that can fit seamlessly into landscape design and perform it spectacular decoration, you can use a wide variety of materials: burlap and rope, leftover plastic film and plastic bottles, plaster and polymer clay... Any of these materials in the skillful hands of a master can turn into a bright element of garden decor.
Decorative vase made of plaster
To make an original flowerpot that will last for years, you need to prepare:
- asbestos or polymer gypsum;
- flexible wire for arranging the frame;
- construction bandages or strips of fabric 10 cm wide;
- water-based paints and colors;
- acrylic varnish for outdoor use.
The flowerpot can have any shape: it all depends on the chosen base for the frame. In our case, a plastic bucket with a volume of 10 liters will act as a temporary base, which will be removed upon completion of the work.
Place the bucket on a flat surface, turning it upside down. To make the frame, we braid the surface of the bucket with wire, the edges of which are carefully tucked in and hidden. Remove the resulting frame from the bucket. Now you can start diluting the gypsum, the consistency of which when finished should resemble thick sour cream. Place strips of fabric or bandages into a container with a plaster solution, soaking them for 2-3 minutes. Our task: to lay a wire frame along the outer and inner walls. Lay strips of fabric, well soaked in the solution, layer by layer on the frame until the wall thickness reaches 1.5-2 cm. Carefully coat the walls of the pots with the remaining solution. Leave the structure to dry completely for 12 hours.
After the base has completely hardened, you can begin to decorate the flowerpot, decorating it with all kinds of stones, colored glass and beads
To do this, first level the surface by sanding it with sandpaper. Then we cover the bottom and walls of the product with white water-based paint, on top of which we apply the desired background for the applique or ornament with a second layer.
Hanging planter made from a tire
Old car tire– an excellent material for making decorative elements. Rubber is resistant to external influence and unfavorable weather conditions, thanks to which it is able to properly serve for more than one season.

It’s hard to believe that such a colorful parrot, swinging importantly under the canopy of a house or between tree branches, can be made with your own hands in just one day
To make a hanging planter you will need:
- tire without steel cord;
- drill and drill bit with diameter 10;
- sharp knife;
- M8 washers, bolts and nuts;
- paints for external works.
To make work easier when cutting out parts, the knife blade can be periodically moistened with liquid soap or detergent.

Symmetrical 2/3 cutouts are made along the bead wheel on both sides of the tire. On the larger side of the cut tire, we separate the side part through the triangular cutouts

The result should be a blank, which we then carefully turn inside out, giving the desired shape.
The parrot's body is ready: all that remains is to shape the bird's head and give it a recognizable outline. To do this, cut out a beak from scraps of a tire.

We insert the cut out beak of the parrot into the longitudinal incision made sharp knife along the edge of the smaller side of the body
To securely fix the beak, we compress both halves using a clamp and drill through them through hole, through which we then tighten them with a bolt. You can correct the shape of the bird locally by making several cuts with a knife.
From the long side of the workpiece, along the contour previously outlined in chalk, we cut out the tail of an exotic bird
The parrot is ready: all that remains is to tighten the side parts of the product with a rope or wire, and then paint it in bright colors.
Floor flowerpot made of twigs
To work, you will need branches 0.7-1.5 cm thick and a thin cord or twine. If possible, it is better to give preference to branches of birch, viburnum and bamboo - they look the most interesting. It is better to choose sticks of the same thickness.
To make a flowerpot, branches are cut to approximately the same length using a knife or pruning shears, which should be 1-2 cm above the pot itself. We lay out the blank sticks close to each other on a flat surface and braid them with twine so that we get a mat, the length of which should be sufficient to wrap around the pot.

Thin tree branches left after pruning the garden can be used as decorative elements. They can serve as the basis for making a beautiful flowerpot, which is perfect for decorating both the site itself and the interior of the house.

To create a larger structure, it is better to use bamboo, or round or square bars assembled in the form of a cube
Step-by-step master classes on video
A convenient option is when the branches are glued to a burlap base. We wrap the outer walls of the pot with a woven mat and secure the decoration with colorful satin ribbons or the same twine.
Even the brightest flower beds need a frame - “outfits” that will further emphasize their beauty. Street flower pots are rightfully considered the most spectacular and at the same time simple “outfits”. Making them with your own hands will not be difficult. Do you want hanging planters made from bottles, wicker from wicker, or ground-mounted from a tree stump? No problem! Read the instructions on how to make flowerpots from these and other materials, and also watch educational photos and videos - they will help you transform your garden beyond recognition.
Making flower pots from rags and cement
To make such a flowerpot, you will need:
- cement;
- old tablecloth;
- vase, pot or other vessel for form;
- water;
- bucket;
- “mixer” – attachment for a drill;
- dye.
The procedure for creating a flowerpot is very simple. First you need to prepare cement mixture. To accurately determine its volume, take a tablecloth, place it in a bucket and mark on the walls how much space it takes up - according to this mark, pour water for the solution. Add cement to the water and mix them with a “mixer”. The result should be cement laitance, reminiscent of slightly runny sour cream in consistency.
Then, when the mixture is ready, place the tablecloth in it and leave for a couple of minutes until it is completely soaked. After this, remove the material and make sure that there are no dry areas left on it.
Next, take the prepared container for the mold and hang a wet tablecloth on it. Gently straighten the material and leave to dry. When the cement mortar has completely hardened, remove the product from the mold container and paint. Use special paints for concrete - they are stronger and more durable. Once the paint has dried, you can use the pots for their intended purpose.
Making flower pots from plastic bottles with your own hands
Plastic containers are a universal material for flower pots, since several models of “outfits” can be built from them at once.
The first option is a classic flowerpot. Take a plastic bottle, two CDs, sandpaper, scissors, glue and paint. Cut the bottle into two equal parts using a wavy line. Sand both discs with sandpaper. Take the bottom of the bottle and glue it to the stripped first disc. Then take the top part: first unscrew the cap and glue it onto the second disk, and as soon as the glue dries, screw the plastic part of the bottle back to the cap. When finished, coat the pieces with paint.
The second option is a hanging planter. Here you will need: bottle, rope, paints, scissors. First, cut off the neck of the bottle - only a straight line will be used in this work. Bottom part containers. Then cut small holes on the sides for the rope. Then decorate the structure: paint, cut out patterns, draw an animal, trim the top edge - whatever you can do carefully. And then thread a rope through the holes, place a flower pot in the flowerpot and hang the structure on strong nails.
We make wooden flower pots
The easiest way to make a flower pot is from a stump or log. Take:
- wood;
- drill: drill length – at least 25 cm, diameter – at least 20 cm;
- chisel;
- protective impregnation for wood.
- Select a log or stump of the required diameter. Measure the part according to the height flower pot or a flowerpot and cut it off - this is again a flowerpot.
- Drill a series of holes into the top plane of the wood to destroy the core.
- Use a chisel to remove the wood - you should end up with an empty container. The edges need to be aligned.
- Treat the inner walls of the pots protective composition and place a flower pot in it.
Advice. The wooden planter itself can also serve as a pot, but to do this, you need to put durable polyethylene in the container and cover it with drainage on top. And only after that you can place the soil mixture with the flower.
More difficult option- flower pots made of boards and timber. You will need:
- beams with a section of 25x25 mm;
- boards 15 m thick;
- self-tapping screws;
- wood glue;
- drill;
- protective impregnation for wood.
The algorithm for making pots is as follows:
- Assemble a cube-shaped frame from the beams.
- Cut out parts for the bottom and walls from the boards. Sand the panels on all sides.
- Drill several holes in the bottom for drainage.
- Assemble the design of the flowerpots together: attach the side and bottom panels to the cubic frame using self-tapping screws. In order to give the product even greater reliability, carefully glue all joints.
- Cover the surface of the finished structure with a protective compound.
We weave flowerpots from wicker
Another simple one, but interesting option flower “outfit” - a flowerpot made of vines. Prepare for work:
- flexible vine - it can be either fresh or dried;
- plywood sheet;
- moisture-proof impregnation;
- drill;
- awl;
First, soak the vine in water - this will give it the extra flexibility needed for easy weaving. Cut from plywood sheet a blank for the bottom of an oval or round shape. Along the edge of the resulting bottom, drill identical holes with a diameter slightly smaller than the diameter of the vine. All holes should be at the same distance from the edge of the bottom. Then insert a strong twig into each hole - this will be a blank for the frame of the flowerpot.
The next step is direct weaving: lay the vine between the rods, carefully pressing each new row with an awl. Wrap the twigs until the product reaches the height you require. Laying methods can and even need to be changed after a row - this way you will achieve a different textured surface of the pots.
At the end of the weaving, either cut the rods or weave them into the main rows of the vine. Then let the structure dry a little and get stronger. Final stage– treatment of flowerpots with moisture-proof impregnation and varnishing.
We make plant pots from plaster
To make such a pot, prepare:
- gypsum;
- wire;
- textile strips no more than 10 cm wide;
- paint;
- bucket;
- protective varnish.
The first step is preparing the frame. Turn the bucket upside down and braid its surface with wire. Tuck the edges and hide. Carefully remove the finished frame from the bucket.
The second step is diluting the gypsum solution. Take gypsum and mix it with water until the mixture begins to resemble sour cream.
The third step is the construction of the “body” of the flowerpot. Dip all textile strips into the plaster solution and soak for 3 minutes. Then take out the tapes one by one and place them on the frame layer by layer. The thickness of the walls should be at least 2 cm. Then carefully treat the walls of the structure with the remaining gypsum mortar. After this, the pot should dry completely - set it aside for 10-12 hours.
The fourth step is design design. Flowerpots can not only be painted, but also decorated with a variety of pieces of glass, beads, pebbles - any small details that you like.
Advice. After drying, the walls of the pots will not be completely smooth, so the paint will not apply well. To avoid this, carefully clean the surface with sandpaper and treat the structure with a white water-based composition, and then apply paint of the required color to the pots in the second layer.
Now you know what to do beautiful flowerpot for flowers you can use almost any materials without spending a lot of time or a lot of money. The main thing is to turn on your imagination and be smart. So if you want to effectively decorate your garden, don’t rush to buy store-bought pots - take the initiative into your own hands and don’t be afraid to experiment.
How to make a flowerpot: video
Planters for the garden: photo


Beauty and comfort in a home is not only about perfect cleanliness and an exquisite interior, consisting of expensive furniture and designer renovations. Harmonious design the room consists of many parts and decorative elements, which can often both attract attention and repel due to their lack of taste.
Indoor flowers are an invariable decoration of any home, giving the room a special aura of home and freshness. But sometimes, flower lovers do not have the opportunity to place in the room the number of plants that they would like. Or, due to a change in interior style, indoor plants in simple pots do not harmonize with the rest of the details.
But don't be upset! After all, you can diversify the interior and place a larger number of flowers with the help of a flower pot - a decorative item that will emphasize all the advantages of the decor and indoor plants. You can buy a flower pot, or you can create it yourself, which will give the interior individuality and originality.

Common types of flowerpots
Before you start making flower pots with your own hands, it wouldn’t hurt to learn about its varieties. After all, today there is a huge choice flower pots, which are conditionally divided depending on their purpose:
- desktop flower pots – usually placed on cabinets, tables, counters, taking into account the stylistic decision;
- floor planters – placed in spacious rooms and used for tall indoor plants;
- wall-mounted planters – suitable for small rooms where it is important to save space;
- hanging flowerpots - in addition to originality, this type the flowerpot allows you to place indoor plants quite compactly;
- flowerpots for the garden - will perfectly enliven the space of the site and give the site a complete look.


What materials are used to make flowerpots?! A decorative floral item can be made from anything, especially if it concerns self made. During the creative process, all available means are used - from natural materials to old things or various small decorations.
- Tree. This is the most common material for creating decorative containers, when choosing which it is important to take into account its resistance to moisture, as well as the processing of the material itself.
- Glass. A flowerpot made of this material is a universal and practical item, thanks to which you can monitor the moisture level of a plant.
- Plastic. Inexpensive and easy-to-clean containers have long been in demand among many housewives due to their availability and varied colors.
- Ceramics. A more expensive option for pots, but also more varied. Moreover, ceramics can easily be modified in some ways, for example, by applying a design or coating with glaze.
- Metal. Very unusual containers for flowers made of stainless steel or forged elements will give the interior special expressiveness and emphasize the sophistication of indoor flowers.


Pots for home decor with your own hands
Flower and hardware stores offer a huge selection of flower pots. Here you can choose by size, color, and also depending on the location of the container.
But it so happens that each person is individual, and therefore in his own home he expects to see only exclusive items that will emphasize the taste of the owner of the house. With some handicraft skills, any housewife can create a real masterpiece that will refresh the interior.
So, let's begin.
Flower pots with lace
To diversify plain plastic pots, you can use pieces of bright fabric or lace. In addition, for work you will need:
- scissors;
- glue;
- pot;
- glue brush;
- material for gluing (lace, braid, ribbon).
Operating procedure:
- To start outside The pot should be wiped with alcohol to degrease the surface.
- Draw the necessary contours in place of which the decor will be located.
- Lubricate this area with glue, without going beyond the contours of the picture.
- Press well and leave until completely dry.

To secure decorative elements more firmly, you can use a glue gun, which will give the decor strength. If desired, you can decorate the pots with braid, bright buttons, beads and other interesting little things.

Flowerpot made from branches
An equally interesting option for creating a flower pot is a flower pot made from wooden circles, the manufacturing principle of which is similar to the previous one. Only for this you need to use tree branches whose diameter does not exceed 2 cm.
To prepare the material you need garden shears, with which we cut wooden mugs no more than 1 cm thick
Having previously degreased the surface, we attach the material to the pot one by one, carefully applying a small amount of transparent Moment glue.
Press it well and leave it out of the reach of children until it dries.
In order for the flowerpot to last for a long period, it is recommended to coat the product with wood varnish.
No less interesting options can be obtained by gluing river pebbles, shells, dry moss, cork, and tree bark.

Wooden plant pot with twine
An old wooden pot will sparkle with new colors if it is decorated with twine. To do this, you need to apply glue to the surface and slowly press the rope, wrapping it around the pot. It is very important to secure the rope at the end so that the product does not lose its original shape.
By pre-drilling holes for the rope, you can build a hanging planter with your own hands. To do this, you need to carefully thread the string through the holes and secure it well.

Planters made of branches or bamboo
Natural materials are the best way to decorate an interior, since they are different natural beauty and environmental friendliness. One option for creating a flowerpot is a flowerpot made from reed or bamboo branches.
To do this you need to prepare:
- chopped straight branches or bamboo;
- twine;
- scissors;
- glue "Moment" transparent;
- dense coarse fabric (burlap, linen);
- plastic pot.
Operating procedure:
- Before you start tying the sticks together, they should be aligned so that the product looks aesthetically pleasing.
- Then we tie the branches together with twine along the edges (2-3 cm to the edge), pulling them tightly so that the fabric does not fall apart.
- On outer walls Apply a layer of glue to the pot and glue burlap or linen evenly.
- We tie a cloth of sticks around the pot, and tightly tie the upper and lower parts.
- The flowerpots can be additionally decorated with flowers made from twine or burlap, which will give the product a special effect.

DIY hanging flower pots
Hanging flowerpots are often used by those who need to free up more space in their house or apartment. This decor allows you to move around the house without obstacles, so this type of flowerpot can be called the most popular.

In this way you can perfectly decorate your garden with your own hands. But before that, it’s worth remembering that materials for hanging flowerpots must be resistant to high temperature and the adverse effects of precipitation. For such purposes, a flower pot made from a plastic bottle would be suitable.

Pot made from a plastic bottle
For making decorative containers from plastic bottles There are many methods. One of them can be decorated using the decoupage technique.
Necessary materials:
- plastic bottle with a volume of 1-1.5 liters and a flat bottom;
- scissors;
- basis for decoupage;
- napkins for decoration;
- tassels;
- varnish

Operating procedure:
- Prepare the bottle for use by thoroughly washing and wiping.
- Apply a thin layer of foundation, spreading it evenly with a brush.
- After the base has dried, this usually takes 20-30 minutes, apply surfactant glue, also smoothing it well.
- Having separated the top layer of the napkin, apply it to the container and smooth it with a brush or fingertips.
- In order for the surface to dry thoroughly, it is better to leave the product overnight at room temperature.
- Then we coat the pots with varnish and dry them.
- Using a hole punch, we make holes on both sides of the pot and thread a rope, with which the plant should be tied to the mount.

Features of vertical gardening
Fans of unusual decor from plants will certainly like “living walls”, or vertical gardening. Today, this is a favorite technique of designers all over the world, emphasizing the exclusivity of expensive interiors. Professional “living walls” are not cheap, especially if everything is done according to last word equipment, including automatic watering.
Vertical gardening has a number of advantages:
- saturation of air with oxygen;
- space saving;
- improves appearance walls and complements the interior style;
- an abundance of plants on the wall are a source of additional air humidification;
- division of space into zones.

Despite the seeming difficulties in creating such walls, if you are well informed with the necessary information, you can create an extraordinary structure yourself. It is worth recalling that this type of landscaping can be built both in the house and in the garden.

Flowerpots for this type of landscaping can be wall-mounted or conventional, depending on the design and location of the plants. To create wall pots, containers made from plastic bottles that are easily attached to vertical design or a wall with a rope. To make the container more aesthetically pleasing, you can decorate it with braiding to match the interior. This decor is macrame or crocheted fabric.

An equally interesting option is pockets made of thick fabric in which you can plant climbing plants. This option is good for decorating a garden, in which you can build metal gratings or special stands.
On special frames made of stepped wood, you can place flowers in flower pots, the surface of which is decorated with natural materials.
An excellent option is a flower pot decorated with moss. All you need is dry moss and clear glue. The process of creating such a pot will not take much time, but the result will exceed all your expectations - an original and exclusive decorative item will become unusual decoration garden or home.

A flowerpot decorated with river pebbles is an interesting option for vertical decoration. The process of creating such an item will take a little longer than in the case of moss, but it is worth the effort. This decor is distinguished by its non-standard approach and originality.

No less successful in creating a beautiful flowering wall in the garden are suitable plants. For this case, climbing and hanging flowers are ideal, which proper care, in addition to landscaping, they will create a whole riot of floral colors.
Decorating a home is a labor-intensive and interesting activity that requires creative inclinations and the desire to make interior decoration unique. To do this, they use all sorts of techniques and tricks, just to stand out with originality and non-standard solutions.
Making flowerpots with your own hands is one of the ways to not only refresh and diversify the interior, but also to prove yourself as a creator and artist who creates incredible masterpieces. After all, handicrafts have always been part of art, which in turn contributed to the manifestation of human creative abilities.
So, have fun creating!
Decorating both interiors and landscapes with flowers is in demand among many people. They are successfully used by designers to implement their projects. For a more harmonious fit, use do-it-yourself flower pots, which they create at master classes based on their own sketches. But they are not the only ones who use such techniques; ordinary people successfully come up with complex designs from what is “at hand”.
Types of flowerpots by material
Hanging decorations should be selected based on location, permissible weight per support, amount of water consumed by the plant and temperature regime. The materials are as follows:
There is a large assortment on the market, but some people prefer to make outdoor hanging flower pots with their own hands and admire their creation. Hangers for pots are made from chains, ropes, metal rods and from pieces of fabric, twine and yarn using the macrame technique.
Cage, chandelier or wooden boxes
A frameless wall-mounted planter is formed directly from coconut fiber. The roots of the plant with a lump of soil are wrapped in a piece of polyethylene, then a fiber wrap is made on top of it. Everything is fixed at the base of the plant and placed with hangers in the chosen location. For the base frame, you can use a basket made of wire, metal rods or wicker. To make it yourself, you can use the following materials:
- Hard wire.
- Pieces of metal-plastic pipe.
- Unnecessary plastic arcs from a greenhouse.
- Willow or from newspaper tubes vine
- Wooden planks.
- Or whatever your imagination tells you.