With the onset of cold and snowy winter, everything around is transformed. Coming out of the house onto the street, everything around is admirable, because there are fluffy snowdrifts all around that create a fabulous landscape.
If you are the owner country house, then you should definitely be concerned with the question - How to decorate the yard in winter, especially on the eve of the New Year and Christmas holidays.
 To make something like this unusual jewelry you will need the following materials: water, any coloring (food coloring or regular paints) and balloons.
As you may have noticed, very few materials are required to make such a wonderful decoration.
To make something like this unusual jewelry you will need the following materials: water, any coloring (food coloring or regular paints) and balloons.
As you may have noticed, very few materials are required to make such a wonderful decoration.
So let's get started...
In a separate container (this can be a regular three-liter glass jar or bucket) you dilute water with any dye you like. Depending on how much dye you add to the water, the color saturation of the future ice balls will depend.
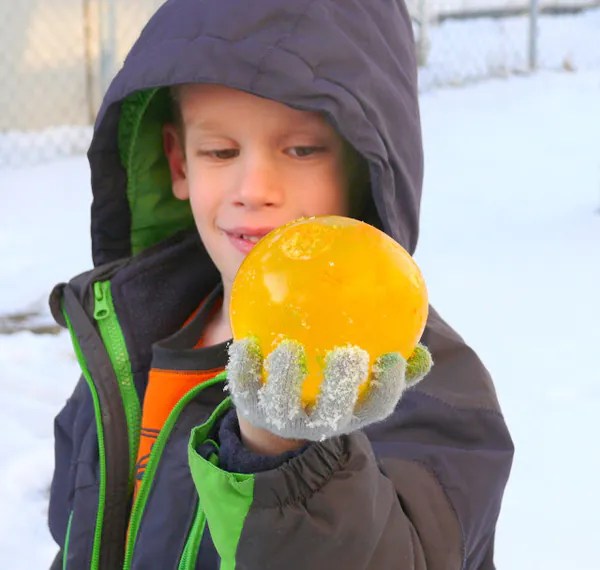
 So, colored water is ready! Now use the help of your family, loved ones or children and use a watering can or straw to fill the balloons with colored water. If you plan to make huge colored ice balls, then it is better to fill balloons right on the spot, since a balloon filled to capacity will be difficult to move from place to place.
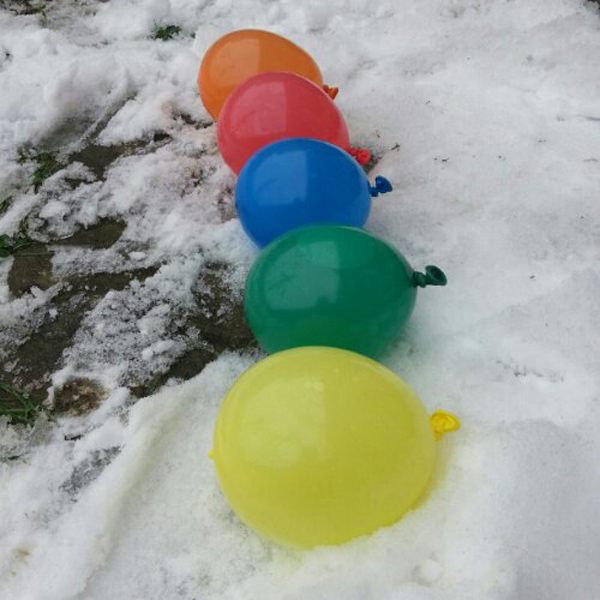 Tie a balloon filled with colored water tightly and leave it outside (in the cold, of course) until it freezes completely.
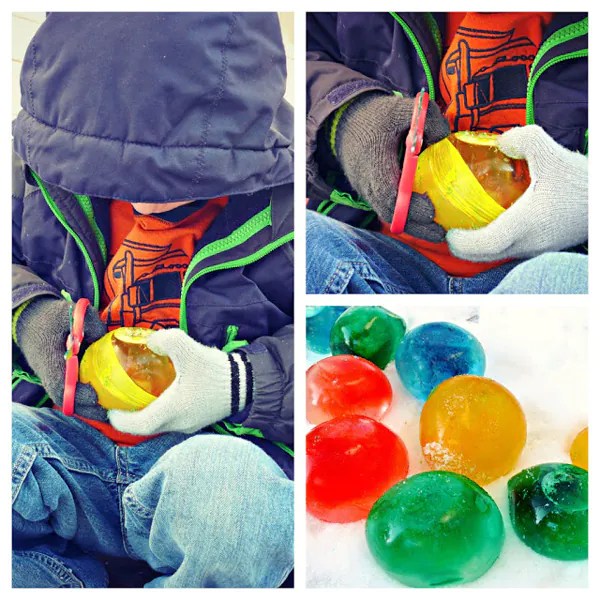 When the colorful water balloons freezes, you use scissors to release the colored ice balls from the rubber shell.
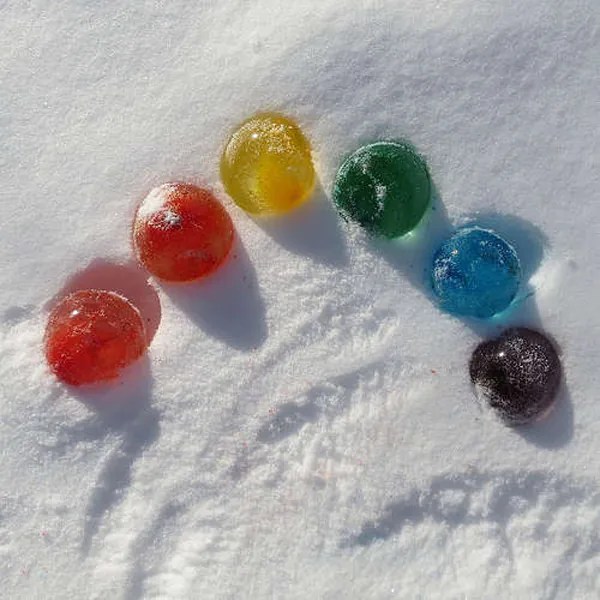
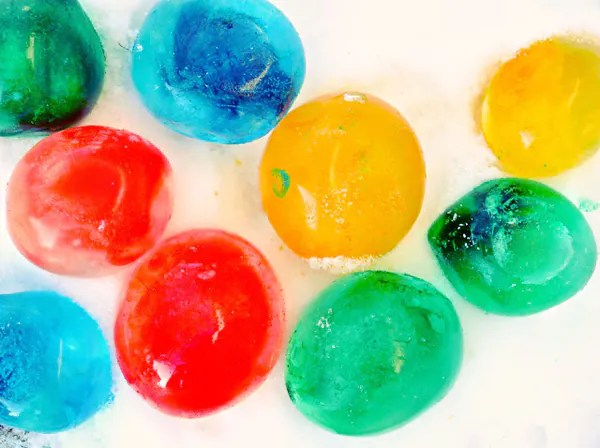 You can decorate the paths with such bright unusual ice balls, playground, railings and steps.
Winter is coming, which means it's time to think about how we will decorate our favorite area for... New Year's holidays. Multi-colored ice balls, randomly laid out throughout the area, or, on the contrary, collected into one large incredibly beautiful pyramid, can become an excellent and quite original element decor. Making such balls is not at all difficult, but they will bring an incredible amount of joy, especially if there are small children in the house who will be happy to help you with this activity.

Required materials
- balloons of different shapes;
- bright gouache, or ordinary food coloring;
- container for diluting dye;
- water;
First, let's talk about the optimal size of balls for our future multi-colored ice balls. As practice has shown, it is almost impossible to freeze a large ball. Even at a temperature of -20 C, only a 5-6 cm layer of water freezes overnight in a 3-4 liter ball. The water inside the ice crust expands when it freezes, most often breaking the ice shell. As a result, instead of a ball, you will most likely get two hollow hemispheres with uneven edges.

So don't try to make huge ice balls. Optimal size for our future multi-colored ice rariki, ordinary inflatable rariks measuring 10x10 or 15x15 cm will become. Of course, it’s also not worth filling them with water all the way.
Now let's start diluting the dye for our multi-colored ice balls. Simply dilute a jar of gouache in a one and a half liter bottle of water. For those who have pets or children at home, it is better to use food coloring, in case your beloved household members decide to taste the icy miracle.

After the dye is ready, carefully pour it into the ball almost to the brim using a funnel. Then we put it on the tap and “inflate”.
A few words about “inflating”. Everyone knows that water can only be poured into a balloon under pressure. This is either a tap or a hose with water. Ideal option when there is water supply outside. If there is none, you will have to “inflate” the balloons at home. It is best to do this above the bathtub, this will make it easier to clean up if the paint ball breaks. It is better to inflate the future ice ball together: one holds the ball, the other opens and closes the house. Practice shows that doing this alone is quite difficult.
It is best to tie the ball with an ordinary knot (loop of the ball's tail). This is more reliable and there is no hassle with threads.
Finally, the most sensitive step is freezing. We take the balls outside and carefully place them on the snow, trying to avoid contact with each other and not to go deeper into the snow. Under no circumstances should you sprinkle the balls with snow from above or below. warm blanket the water simply won't freeze. After a couple of hours, depending on the temperature outside, the balls will need to be turned over so that they freeze faster and better.


The next day, you can try to remove the “clothes” from one of the resulting ice balls. The rubber ball comes off quickly from the ice ball after a slight cut with a knife.
If everything is done correctly, the end result will be something like this. And that means you can release the remaining multi-colored ice balls.

By the way, you can use not only ordinary round balls. Try different shaped balls. Or, for example, ordinary rubber gloves. Then you will get multi-colored icy hands, which can be stuck into a snowman.


Western countries have long been practicing decoration for the New Year not only interior spaces houses, as well as streets, paying special attention decor garden territory. For example, ice Christmas decorations for the street are very popular among them, but such decor is quite suitable for our latitudes. Moreover, making street decorations from ice is very easy, as well as fun, entertaining and completely inexpensive. Basically, to make ice street decorations you will need water, a couple decorative elements(we'll talk about this in more detail below), suitable shape, as well as a spacious freezer or severe frost on the street.
How to make outdoor decorations from ice.
How to make an ice wreath.
Festive wreaths can be used to decorate the branches of trees or shrubs.
Method number 1. Take a prepared pudding mold with a vertical insert in the center. Place bright berries and green twigs (spruce, fir or thuja) along the bottom of the mold and fill the mold with water. Send the form with water to freezer until the water completely hardens. After the water turns into ice, pour it into a basin hot water and immerse the form with ice in it, with a sharp change in temperature, the ice inside the form will melt at the edges, and you can easily pull out the wreath. It's retarded just to hang the wreath on a satin ribbon.

Method number 2. We take ready-made small molds for puddings, put a composition of berries and thuja branches on the bottom, fill each mold cold water and put it in the freezer. After the water turns into ice, you can immerse the mold in hot water for literally one minute, take out the miniature wreaths and hang them on the trees using ribbons.

Method number 3. Place a glass or jar in the center of a deep round shape, lay out twigs, berries, leaves, citrus peels around it, and pour in water. To prevent the jar in the center from floating, you can pour water or sprinkle stones into it. All that remains is to expose the mold to the cold, wait for the ice to harden, take out the wreath and hang it on a ribbon.

Method number 4. Place acrylic snowflakes and Christmas tree balls into a baking dish with a vertical insert in the center, pour in a little water, and place the product in the freezer. When the first layer of water freezes, lay out a few more balls in a circle, add water again and put them in the freezer, after freezing, add more balls and put the mold in the freezer for the last time, take out the wreath, tie a ribbon and hang the product on a street tree.


Photo of ice wreaths.


How to make ice balls.
Method number 1. Let's prepare required quantity balloons, pour water into them and pour out food coloring, mix the water inside by shaking the balloons. We tie the balls and put them in the freezer or in the cold outside. When the water inside the balls hardens, cut the shell with a knife and take out the colored ice balls.


Method number 2. Will need special form to make ice balls (for drinks), you can put berries or spruce branches on the bottom of this mold, and also put in strings of pendants, pour in water and put it in the freezer until it hardens completely.


How to make an ice candle holder.
Method number 1. Place a glass of stones in the center of the food container (for weighting). Pour in water and lay spruce or thuja branches on top, and also add viburnum, lingonberry or dogwood berries. Place the mold in the freezer, after the water has hardened, take out the candlestick and place a lit candle in the center.


Method number 2. We take two bottles of different sizes with a volume of 1.5 liters and 0.5 liters, cut each bottle in half, put the smaller bottle into the larger one, secure them with tape, put berries, leaves and tree branches between the walls, pour in water, and send the product into the freezer. After turning the water into ice, remove the future candlestick from the mold and place a lit candle inside.

Photos of various ice candle holders.


Ice tree pendants.
Round flat pendants are made as follows: various berries, twigs or flowers are laid out on the bottom of a flat round plate, everything is filled with water, a thread pendant is placed on top, the composition is placed in the freezer, then pulled out, separated from the plate and hung on trees.


Ice stars.
- To make stars, you can use star-shaped ice molds or baking molds; to create regular stars, the molds should be filled with water and frozen in the freezer.
- To create colored stars, you must first add food coloring to the water.
- For bright compositions, you can put berries, various twigs, leaves in the molds, or add sparkles.

Ice cubes.
In ice trays square shape We lay out various flowers or slices of fruit, pour in water and freeze. Then take out the ice cubes and decorate with them. street flowerpots, tree branches and other yard elements.

Ice shards.
We paint the water blue, pour it into a rectangular mold in a thin layer, put the mold in the freezer, after hardening, hit the ice surface with a kitchen hammer, select beautiful fragments and place them somewhere outside.

Icy heart.
Method number 1. Place heart-shaped pebbles on the bottom of a round plate, fill with water and place in the freezer, then take out the product and place it edge-on on a flat surface.

Method number 2. Place the berries in a heart-shaped baking dish and pine needles, we send the mold to the freezer, then remove the product from the mold and place it somewhere in a visible place in the yard.


How to make garlands from ice.
In the ice mold, lay out a thick woolen thread in a circle, pour in water, and put the mold in the freezer. After the water has hardened, carefully pull the tip of the string, all the pieces of ice should jump out of the mold. To obtain a colored garland, the water must first be tinted with food coloring.
Instead of an ice tray, you can use the base of a box of chocolates.


How to effectively decorate your home for the New Year:
New Year's ice decorations will help you quickly, easily and inexpensively decorate your area for the upcoming holiday. If you have not yet tried to create street decorations from ice, then we recommend urgently rectifying the situation; we assure you that you will definitely enjoy this pastime.
The Decorol website reminds its readers that you now have the opportunity to receive notifications regarding the release of new reviews by email (fill out the subscription form in the sidebar).
Guys, we put our soul into the site. Thank you for that
that you are discovering this beauty. Thanks for the inspiration and goosebumps.
Join us on Facebook And VKontakte
Many people notice that the older they get, the more difficult it is to re-experience that magical feeling of a fairy tale and miracle that always came to us as children on New Year's Eve.
But we're in website We are sure that the New Year's mood will not keep you waiting if with my own hands make one of these wonderful decorations for your home and Christmas tree. Almost all of them, with the exception of two or three, do not require much time and any special materials - they can be made in half an hour from what is at hand.
Stars made of threads
Wreath made of balloons and an old hanger
In just half an hour, you can make a colorful wreath by purchasing a couple of sets of inexpensive balloons. Blogger Jennifer, the author of this article, recommends straightening out an old hanger, but if you don't have one, a piece of strong wire will do just fine.
- You will need: a couple of sets of balls (20-25 balls of different colors and sizes), a wire hanger or wire, fir branches, braid or a ready-made decoration for decorating a wreath.
Tablecloth made of snowflakes
A delicate and surprisingly festive tablecloth will be made from snowflakes, which we have gotten our hands on since childhood. You can sit down and cut out snowflakes with the whole family, and then lay them out on the table and fasten them with small pieces of tape. A wonderful solution for entertaining guests or just having lunch with the family during the holidays.
Multi-colored hats
The cutest colored hats can be made from leftover yarn, from which you can put together a garland for a Christmas tree or to decorate a wall. Or hang them on a window or chandelier on at different levels. Children over five years old will also be great at making this simple decoration. See details.
- You will need: bushing toilet paper for rings (or regular cardboard or thick paper), scissors, colorful yarn and a good mood.
Lamp “Snowy City”
For this charming lamp, you need to measure a piece of paper around the circumference of the jar with a small margin (for gluing), draw and cut out a simple city or forest landscape. Wrap it around the jar and place a candle inside.
- You will need: a jar, thick paper of any color, maybe white, any candle. Another option is to cover the top of the jar with “falling snow” using a special “snow” spray, which is sold in hobby stores.
Balloons with photos
A great idea for decorating a Christmas tree or as a gift for relatives and friends. The photo needs to be rolled into a tube so that it fits into the hole of the ball, and then straightened out with a wooden stick or tweezers. Small black and white rectangular photographs are suitable, and you can also cut the photo according to the shape of a ball or silhouette (as in the case of a cat in the snow).
- You will need: plastic or glass balls, photographs, various things to fill the ball - tinsel, garlands, coarse salt (for snow).
New Year's lamps
And this miracle is a matter of five minutes. It is enough to collect balls, fir branches, cones and put them in a transparent vase (or a cute jar) and add glowing garlands.
Embers
Glowing garlands, hidden among cones, branches and pine paws, create the effect of smoldering coals in the fireplace or a cozy fire. They even seem to be heating up. For this purpose, a basket that has been lying on the balcony for a hundred years, a nice bucket or, for example, a wicker container for small items from Ikea will be suitable. You will find everything else (except for the garland, of course) in the park.
Floating candles
A very simple decoration for New Year's table or for a cozy evening with friends during the New Year holidays - a composition with candles floating in a vessel with water, cranberries and pine branches. You can use cones, orange slices, fresh flowers and leaves from a flower shop - whatever your imagination tells you. And as a candlestick - deep plates, vases, jars, glasses, the main thing is that they are transparent.
Snowman on the refrigerator or door
Children will definitely be delighted with this - it’s fast, fun and very simple, because even a three-year-old can handle cutting out large parts. It is enough to cut out circles, a nose and a scarf from self-adhesive paper, wrapping paper or colored cardboard and attach them to regular or double-sided tape.
Snowflakes on the window
Interesting use for a glue gun lying around. In order to glue these snowflakes to the glass, just press them lightly to the surface. For details see our video.
- You will need: a stencil with a snowflake drawn with a black marker, tracing paper (parchment, baking paper), a glue gun and a little patience.
Christmas trees-candies
Bright Christmas trees can be built together with the kids for children's party or decorate with them festive table. Cut out triangles from colored paper or cardboard, attach with tape to a toothpick and stick the resulting Christmas trees into the candies.
- You will need: Hershey's Kisses or any other truffle candies, toothpicks, tape, colored paper or cardboard with a design.
Garland with photographs and drawings
New Year, Christmas - warm, family holidays. And it will come in very handy with photographs, children's drawings, and pictures. The easiest way to secure them is with clothespins, which can be decorated with hearts or snowflakes.
Origami star
Painted spoons
Regular metal spoons or wooden spoons for cooking with acrylic paints turn into interesting New Year's decorations. Kids will definitely love this idea. If you bend the handle of metal spoons, you can hang them on the Christmas tree. And wooden spoons will look great in the kitchen or in a bouquet with fir branches.
Snowman made from a sock
