Many people spend most of their lives at their dachas. The summer resident cares for and cherishes his brainchild, using various devices for the garden and garden in the arrangement.
The result of human labor costs is beautiful beds in the garden, giving good harvest.
Summer residents dream that their labors will always bring results in the form of a harvest. But a record harvest largely depends on how the beds were placed in the garden.
You need to clearly understand how to correctly form them, arrange them, how to arrange places for beds in your garden, what size and shape they should be.
How to arrange beds in a garden plot
First you need to draw a schematic plan of your garden plot on paper in order to have an idea of how it will all look in the end. Then make a line on the ground.
The beds should be positioned so that they receive maximum natural sunlight. Ideally, if you have sitting on the north side of the site fruit trees, covering the beds from cold winds. Examples in the photo.


If you already have old trees on your site that you do not want to uproot, then simply prune their upper branches a little so that the sun's rays can easily penetrate through them.
Remember that the beds should be located from north to south. If your site is on a hill, then make beds across the hill. This will prevent the earth from sliding down the hill during rainy and windy periods.
If the site is located in a lowland, then make high-type beds. Remember that in this case you will need drainage trenches to drain excess moisture.
You have to make beds in the garden, but you still don’t know how to arrange everything so that it is convenient. To create convenience, wide passages between the beds are suitable. Sometimes you will need to walk around the garden with a cart, and the beds should not be an obstacle in your way. Think about this in advance.
You also need to think about in which part of the garden the compost heap, into which waste from the garden will be stored. In the future, you can use the rotted material as fertilizer for garden beds.
Where the beds will be placed in the next season, you should think about it in the current one. Digging up old beds is carried out in the autumn, when the entire harvest has been harvested.
So, when creating a garden bed, you need to know:
- what shape it will be;
- its dimensions;
- location.
The shape of the bed that suits you
The form can be anything. It depends on the imagination of the summer resident and the area for planting. The beds can be straight, figured, in the form geometric shapes. There may or may not be a fence around each bed.
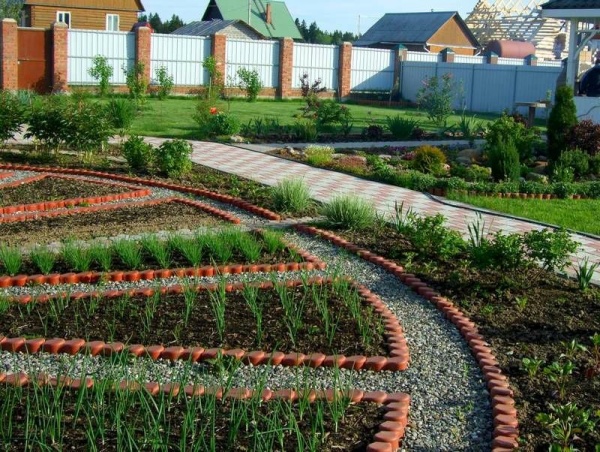
 An example of the correct distribution of beds
 How to choose the optimal bed height
The beds are high and low. The optimal height is 40 cm. These types of beds are warm, and the sun's rays quickly warm the soil in them.
The average width of the beds varies from 60 cm to 1 m. The length of the beds can be unlimited.
Some of the summer residents adhere to the Mitlider method, according to which the width of the bed should reach 45 cm, and the passages between such beds should be 90 cm. The length of one bed in this case is no more than nine meters.
Optimal location: from south to north side
The location of the beds, as mentioned above, should be from south to north. If the site is very uneven, then the beds are made on the slope on the south side, and the trees are planted on the north.
You might be interested

Various useful devices for the garden and garden
Using various devices for both the garden and the garden, as well as creating homemade products, greatly simplifies the life of summer residents.
If you like beds with sides, then your imagination is unlimited. Use various materials to create sides: boards, strips of slate, metal, brick. You can even purchase factory-made galvanized steel curbs and fences coated with polymer material. Quite a popular trend in recent years began the production of shaped fences for beds from tires painted in various colors.

DIY homemade items look beautiful in the garden. The paths between the beds, lined with tiles, stones, or completely sown with grass, look aesthetically pleasing.
Any design solution will give your beds an excellent look that will delight your eyes all season long.
The beds need a compass
Do we always place the beds correctly relative to the cardinal directions?
Some people may not think this question worth attention. Meanwhile, this factor directly affects productivity. In the conditions of the last cold summer, we were convinced of this by the example of planting potatoes in our country and in our neighbors. A kind of experiment came out, the results of which I want to write about.
Illuminated the comb - got a tuber
We and our neighbor on the left plant potatoes in rows directed from west to east (3-B). And the neighbor on the right has rows going from north to south (N-S). This is the picture we get. In the rows at the direction N-S bushes covering both the earth and each other with shadow. The soil is not illuminated, does not warm up and remains cold. Only the ground between the rows heats up. While the bushes are growing, this is still tolerable - they do not oppress each other. But over time, such plantings begin to lag behind in development compared to bushes growing in rows 3-B. The soil here does not have time to dry out, and in wet conditions During the cold summer, woodlice begins to go wild.
And when planting in the direction of rows 3-B, even with a distance between them of 60-70 cm, the bushes and soil on the crests of the rows are illuminated by the sun. There is no need to make more row spacing than this: woodlice appears in them, which oppresses the bushes and gives way to late blight. And at an interval of 60-70 cm, the bushes quickly close together, creating uncomfortable conditions for the wood lice. And this is not unfounded data, but the result of many years of studying the influence of woodlice on potatoes depending on the width of the rows and humidity. In our area, the optimal distance is 60 cm for early and 70 cm for more powerful late varieties. During the pre-harvest period, woodlice still covers the potato field with a thick carpet, but this has little effect on the final harvest.
Note
IN southern regions planting potatoes direction N-S may be justified, since the soil in the rows heats up and dries out less, and the bushes are not oppressed by the shadow. But in our latitudes such a landing is undesirable.
Results
The neighbor on the right received a low harvest last season with small tubers. But she planted more than 20 varieties of potatoes! And the neighbor on the left, who planted potatoes, like us, across the plot in direction 3-B, had a quite decent harvest, although he planted only one variety. The tubers were formed of medium size, smooth, without fines. By the way, both neighbors equally contributed sufficient amounts of aged manure in the spring.
But we didn’t bring in manure last year, we simply didn’t have it. We made do with ash, onion peels and a small amount of “mineral water” - all this was poured into the holes when planting. During the first hilling, a pinch of complete mineral fertilizer was scattered around the stems. This technique is mandatory for us; it helps increase the yield. After all, stolons and additional roots are formed precisely in the zone of the first hilling, so an unspent supply of nutrition is needed there.
We planted 6 varieties. Bellarosa, Rodrigo and Latona gave (per hundred square meters) 300 kg, Lasunak - about 350, Galaxy -400, Ryabinushka - 450 kg. This is slightly lower than the harvest in 2016, but for a cold summer it’s not bad.
If the area is narrow and stretches in a north-south direction, planting in transverse rows also allows rain and melt water to drain faster. And if it stretches from west to east, then when forming longitudinal rows, transverse drainage grooves must be made every 10-15 m.
TOOLS FOR CRAFTSMAN AND CRAFTSMAN, AND HOUSEHOLD GOODS VERY CHEAP. FREE SHIPPING. WE RECOMMEND - 100% CHECKED, THERE ARE REVIEWS.
Below are other entries on the topic “How to do it yourself - for a homeowner!”
How to design beautiful beds for the lazy, tall and smart beds - this is what a gardener needs to know who wants to make his life as independent as possible from gardening worries. If you wish, you just need to master the method of designing lazy beds, which you can see in the following photos. A garden bed of this type will allow you to enjoy a well-deserved rest at the dacha and will not require weeding every time. In addition, it is not only convenient, but also increases crop productivity.
Everyone knows how much time and effort needs to be devoted to each planted crop, which, however, sometimes does not even justify the result: the seedlings may not germinate or do not ultimately produce a normal amount of harvest. In this case, you should pay attention to the technology of lazy beds on your site!
Beautiful and comfortable
A lazy bed is a completely new approach to gardening, which will allow seedlings to grow on their own and produce several times more yield. It is based on a rule that states that digging and weeding the soil is prohibited, except for its preparation and planting itself. Even though constant weeding can remove weeds and fluff up the soil, sooner or later it will dry out and will not be able to provide sufficient moisture for crops.
In this approach, preparation for future planting is very important - it is advisable to do this in the fall, when you can collect material for mulching the soil (you need to cover it with straw, sawdust, pine cones, etc.), which, in turn, will prevent weeds germinate in an area with such cover.
- Install your own irrigation system. It is not necessary to choose the most expensive systems available in stores. In the case of such vegetable gardens, those from which you only need to press a button are quite suitable - and there will be no need to water it yourself. Watering will allow you to make beautiful beds: green and lush. It is also worth noting: watering can be done infrequently, but abundantly, giving the plants the necessary moisture until your next visit.
- A tool for working in the garden is the key to saving time. Therefore, it is worth choosing one piece of equipment for many years. It may include not only the usual shovel and buckets, but also various little things that will make your work easier. Also, find a place for your inventory in advance.
- At the beginning of the planting season, dig up the ground once and prepare it for future seedlings or seeds. Plant the plants and don’t disturb the earth anymore: mulching will do its job and protect you from weeds. All that remains for you before harvesting is to water the garden beds on time.
It's interesting and effective way, which is suitable for both lazy gardeners and experienced gardeners who know their business. A garden bed of this type will be worth the effort and can bring a lot of convenience.
High beds as a way to obtain an intensive harvest
Even though this is a very labor-intensive process at first - building the frame itself and watering the beds, it will allow you to forget about the bad climate and low yields.
The high bed is always exposed to the rays of the sun, which helps to warm up the soil layer, so it can be planted as early as April without fear of freezing, and the lower mesh will prevent the invasion of moles and mice. A frame that is not too wide (within 150 cm) will allow you to care for the bed on both sides. If you divide it into two strips 80 cm wide, you can even make it yourself greenhouse, passing the film over both landings. It is worth noting that it is the high beds that provide the earliest harvest of first salads and then fastidious vegetables. The only problem is more frequent watering, since water does not stay in such land for a long time.
Despite all the difficulties at the beginning, planting justifies the effort put into it and lasts for a long time without bringing much trouble, and the garden bed has beautiful view.

Digging smart garden bed for fragrant herbs you only need to apply once, before planting the seedlings. Then it requires a minimum of attention and care
The garden bed is the main part of the site, and the entire future harvest depends on its correct location.
At first glance, there is nothing complicated in placing beds, but in practice everything is much more complicated, because you need to know what was previously grown on the site, analyze soil fertility. In addition, it is necessary to know the characteristics of the crops that will grow here. Light-loving plants grow very poorly in the shade, and moisture-loving plants require frequent watering.
Preparatory stages
 Before placing the beds, the gardener must solve several problems:
- determine the types of vegetables and in what quantities need to be grown;
- calculate the size of the beds and their number;
- draw up a site plan showing all the beds.
This scheme will last for many years to come. It will help you comply with the rules of plant proximity and adhere to the correct sequence of crop rotation, which will allow maintain soil fertility and increase the productivity of the site.
To understand how to correctly position a ridge on a site, you need to consider the following factors:
- All vegetables love light, so it is better to plant them on the south side of the site.
- Vegetable compatibility. Potatoes get along well with cabbage, eggplant, peas, and horseradish. Tomatoes grow well with basil, spinach, and dill. Carrots get along well with onions, peas, and beans. Cabbage will not grow well next to tomatoes, cucumbers - with potatoes, peas and beans - with onions and garlic.
- Onions do not require much light to grow, so they can be planted along a fence or under trees.
- Each crop has different soil nutritional requirements. For convenience, you need to divide the site into 4 zones. In the first zone with very nutritious soil, it is better to plant potatoes, cabbage, pumpkins, and cucumbers. In the second zone, onions, carrots, beets, radishes, and peppers will grow well. In the third zone it is best to plant beans, peas, and beans. They will feel good in the fourth zone perennials(berries and herbs).
- The specific smell of some plants (onions, sage, thyme, dill, garlic) can protect nearby plants from pests and diseases. Dill will protect cucumbers from diseases, and onions will repel carrot flies. Sage can cover up the smell of cabbage, and pests will pay less attention to it.
- In one bed you can only grow those plants whose roots are located at different levels.
You cannot plant the same crop every year in the same place. Correct alternation should occur as follows: first, you can plant fruit plants, on the second - root vegetables, on the third - legumes, on the fourth - deciduous. In the second year, fruit crops should be transferred to the fourth ridge, root crops to the first, legumes to the second, and deciduous crops to the third. It is possible to return to the original version only after 3-4 years, since root crops greatly deplete the soil, and it requires time to recover.
The location of the beds depending on the cardinal directions
 Largest quantity sunlight and heat located on the south side of the site. This is where all heat-loving plants need to be planted.
The central part is also well suited for growing many crops. The sun will move across the sky, illuminate every corner of the site and all plants will receive required quantity Sveta.
The northern side of the site receives the least amount of light and heat. Here it is best to install outbuildings and plant trees so that they do not interfere with other plants receiving enough light.
Beds with low plants are best placed in a direction from north to south. It is especially important to follow this rule if the site is located in a lowland.
The beds located on sunny side plot or on hills, it is better to place it in the direction from east to west. Plants will shade the paths, therefore, the soil will retain greatest number moisture.
To determine correct location beds, it is necessary to take into account the region of the country in which the site is located. Residents of the northern and central regions, which are the rainiest, are advised to orient their plantings from north to south so that the plants do not shade each other. In vegetable gardens in the southern part of the country, where it is constantly hot, it is recommended to place the beds from west to east. The tops of the plants will shade the soil between the rows and retain more moisture.
Correct placement of beds bears fruit on the site:

Types of beds
Before you start digging a bed, you need to decide what shape it will be. Basically, gardeners prefer to make beds in the form of a rectangle. But the bed can be of absolutely any shape. The main thing is to rationally distribute the area of the plot in order to grow more vegetables and berries.
beds There are several varieties:

Each gardener decides for himself what size his garden bed will be. The width can be any, but the most convenient width is considered to be from 60 to 100 cm. The length of the bed can also vary depending on the wishes of the owner.
It is necessary to leave a distance of 90 cm between the beds. It is not recommended to make the paths narrower, because the vegetables will grow and tops will significantly reduce this area.
After the most successful location of the bed has been chosen, the shape and size have been determined, you need to mark the area on which it will be located. Then the bed is dug up, cleared of debris, and treated with solutions that will protect the plants from diseases. You can use a solution for treatment copper sulfate or Fungicide Topaz. Next, the soil needs to be loosened and large lumps of earth broken up.
 It is recommended to place currants, gooseberries and raspberries in well-lit and moist areas of the site. First, you definitely need to dig up the ground, remove weeds and spread fertilizer. In this case you should not use nitrogen fertilizers, because they make it difficult for plants to survive. Phosphate fertilizers will go here (for berry crops only 15 g is enough), potassium (for black currant 15 g, for all other berries 30 g). After the hole is dug, it is filled fertile soil and the above fertilizers. Wood ash can be used instead of fertilizers. Next, add organic fertilizers and mix everything thoroughly.
Experienced gardeners advise place currant bushes at a distance of 1.5 m from each other, and gooseberries at a distance of at least 2 m. Failure to comply with this rule will lead to a decrease in yield and a decrease in the life expectancy of these bushes. Maintaining this distance is also necessary to make the beds more convenient to process and harvest.
First, all seedlings must be carefully examined. If there are damaged or dry roots, they need to be trimmed.
Currant seedlings must be planted at an angle to create favorable conditions for the appearance of new roots.
Raspberries and sea buckthorn are planted separately in specially designated areas. The distance between rows of raspberries should be at least 1.5 m. They produce many root shoots, while sea buckthorn grows long roots. If these types of shrubs are planted close to other plants, then root system vegetables will be injured and they may die.
Strawberries can feel good and bear fruit in one place for about 3 years without any problems. Then it must be completely eliminated. You can plant vegetables in its place, and transplant strawberries in place of vegetables. Currants, gooseberries and raspberries can remain in one place for many years and bear fruit successfully if they are properly cared for (systematically pruned so that new young branches grow and sprayed). And if you do not give them the necessary attention, they will wither away from disease. And then there will be no point in transplanting them to another place.
 In order for the garden to produce a good harvest, trees should not be placed randomly, as this complicates maintenance.
There are several schemes that can be used to position the trees correctly:
- Quadratic. They are planted in several even rows. The distance between trees should be at least 6 meters.
- IN checkerboard pattern. Here the plot is represented as a chessboard, and in the center of each square is a tree. This scheme is used for plants with a small crown.
It is better to plant fruit trees on a hill on the south side of the site. If there are several of them, then you need to do this so that the height of the trunks increases in the northerly direction.
It is undesirable to plant trees closer to the house than 5 meters, as their root system can damage the foundation. It’s also better not to plant trees along garden paths. The crown and falling fruit will interfere with movement.
Gardeners should always keep an eye on their garden. Of course, now all vegetables and fruits can be easily purchased in stores, but the availability own garden It not only saves the family budget, but also guarantees that all products were grown without the use of nitrates and other harmful substances.
Correct location of beds, compliance with the rules and sequence of planting crops, timely care taking care of plants will allow the gardener to grow a good harvest and provide his family with a full range of all the necessary vitamins and microelements until the next harvest season.
At first glance, garden beds in the country do not require decorative elements, but in fact they play a big role not only in the yield, but also in the appearance of the entire garden plot. While working in the garden, almost each of us would like to see our plot as well-groomed and pleasing to the eye as possible.
Form
The shape of the beds on the site primarily depends on your fantasies and what you want them to look like in the end. There are a great variety of decor options: beds square shape, round, in the form of animals, various objects and other things. If you wish, you can even not adhere to the standard rules when building a garden bed, but come up with something new and unusual. Place the beds on garden plot recommended taking into account the terrain features.
As a rule, there are no strict recommendations for sizes, but there is one nuance that should be taken into account when making calculations. The size of the bed should be such that from any side you can reach its middle without any inconvenience. If you need to build a garden bed near a fence or wall of a house, then first think about whether you can easily reach the opposite side.
Attention ! The width of the wall bed should be within 70 - 80 centimeters. The width of the bed, located directly on the site and adjacent to the wall or fence, varies from 1 meter in width, from 2.5 meters in length, and the depth ranges from 20 to 50 centimeters. It is recommended to make the distance between the beds themselves from 50 to 70 centimeters. Paths and paths between them should be approximately 20-50 centimeters below the surface layer of the bed.
Organization
If the dacha plot is located in lowlands and places where dampness prevails, then the beds are best built in autumn period. It is recommended to choose a small size (1 by 1 meter), and the height should be no more than 30 centimeters. Thus, the soil will warm up much better, and the snow cover will melt away much faster in the spring.
- to start, take four wooden boards;
- then assemble them into a 1 by 1 meter square;
- after the base is ready, install the structure on a horizontal surface and fill it with soil mixed with fertilizer. If you need early and bountiful harvest, then in this case it is best to arrange raised beds.


The construction process is as follows:
- in a suitable area it is necessary to dig a hole 40-50 centimeters deep. Choose the length of the pit according to your preferences. As for its width, the recommended width is from 1 to 1.2 meters;
- Then, along the perimeter of the dug hole, it is necessary to install a kind of frame. The material for the frame can be chosen based on your own preferences, for example, stones, bricks, small logs and others. Frame, the height of which should be from 40 to 50 centimeters, with inside must be covered with plastic film;
- then an iron mesh must be installed at the bottom of the pit, which will protect the crop from rodents;
- then you should carefully fill the hole. To begin with, a layer of sawdust, shavings, cardboard and other similar long-decomposing material (1/3 of the pit height) is poured onto its bottom. Sprinkle the layer with a little earth and water;
- Finally, we fill in the soil, which should be mixed with manure and mineral fertilizers.

Location
If the plot small sizes, some problems may arise with the location of the beds. To place beds in a small area as rationally as possible, you should adhere to the following rules:
- it is necessary first of all to use any horizontal surfaces and suspended structures;
- the second option could be to combine a beautifully decorated garden bed with a relaxation area;
- it is also worth paying attention to various items on your site (unnecessary barrels, old carts, etc.), which can be used for planting vegetables.
Attention ! Remember that the beds must be placed on level ground. horizontal surface, thereby avoiding possible accumulation of excess moisture.

Tillage
As a rule, the beds are dug up twice a year, in spring and autumn, adding all the necessary mineral and organic fertilizers. If digging occurs in the autumn, it is best to leave the soil blocky, which will help retain moisture. In addition, if the soil remains blocky, the pest larvae in it will freeze and die. Also, instead of autumn digging, you can mulch. To do this, you will need to fill the soil with a sufficiently large layer consisting of peat, sawdust and rotted compost. In the spring, the unrotted layer must be removed using a rake, and then the soil must be dug up.

Sides
Many people often do not pay enough attention to the design of the edges of their garden beds. As a rule, simple paths are made between them or they are lined with boards around the perimeter. But some people want to create a beautiful view throughout the entire plot, including the garden. You can decorate the sides in different ways, from scrap or purchased materials, for example, ready-made sides bought in a store, sides made of bricks or slate. It all depends on your imagination.

Species
Vertical
The vertical bed will become good decision For small area. You can build it from scrap materials, for example, from boxes. But it is worth remembering that not all types garden crops suitable for growing in such a bed. Will fit the following types: strawberries, onions, lettuce, tomatoes, cucumbers.

From car tires
To do this you will need several rubber tires from car wheels. First you need to prepare them: clean them from dirt and paint them. Then soil with organic and mineral fertilizers is poured into the tire. The following types of crops are suitable for cultivation: parsley, dill, radish.

Green wall
If there is a fence or other building on your site, then to give it an attractive appearance you can try to build a so-called green wall. There is nothing complicated about this, you just need to attach the boxes to the fence or to the wall of the building, cover them with soil and plant the plants.
You can also go a more original route and use simple ones instead of boxes. plastic bottles. To do this, screw plastic bottles to the required surface, then cut a hole in the top of the bottle and fill it with soil. After this, you can plant the necessary crops.

Weaving arch
At your summer cottage, you can build an arch from weaving types of crops, for example, cucumbers. To do this, we need several boxes where we fill the soil and plant the cucumber seedlings. Then you need to build an arch from small pipes (if you are making an arch yourself, then you cannot do without the ability to work with welding). After the arch is ready, the boxes with seedlings must be placed at the bottom of the structure. As the cucumbers grow, they need to be tied up.
Spicy
A spice bed in a dacha occupies a special role, because the crops growing on it can be used as medicines, seasonings for dishes, or simply playing the role of ornamental plants.
Attention ! The spice bed is best placed in those areas of the site where sunlight predominates.
Spicy herbs will be ideal solution to create an original landscape design. Spicy crops do not require close care from the summer resident; they will also help protect the garden from various types of pests:
- lavender will help prevent the spread of aphids on rose flowers;
- a thyme border around the perimeter of the bed will prevent the spread of pests on vegetable crops;
- Yarrow will give carrots a sweeter, richer flavor.

Suitable plants
- Melissa;
- thyme;
- yarrow;
- sage;
- fennel.
Ornamental plants
- common basil;
- lemon balm;
- mint;
- parsley;
- medicinal rosemary;
- thyme;
- caraway;
- Salvia officinalis;
- coriander;
- fragrant onion.
Worth paying attention
When installing spice beds It is worth taking into account that some types of crops (such as lemon balm or thyme) can grow to impressive sizes, thereby displacing other crops. For this reason, plant growth must be monitored and controlled very carefully.
Growth control is carried out as follows: plants must be trimmed in time, an area must be allocated for subsequent growth, or it must be limited by constructing sides of tiles or bricks. Thus, the area where it is planned to plant plants will be divided into squares, which are laid out in a checkerboard pattern using slabs or bricks. Crops are planted in free squares.
When planting greenery, you need to consider:
- when planting spicy and medicinal plants need to be given special attention their environmental requirements;
- For spicy and medicinal beds, you need to choose specific planting material.
If you follow these simple rules, and also take advantage creative ideas, you can give your site a pleasant appearance.