 Quick key.Participants of NTTM of the Novokuybyshev Freight Motor Transport Enterprise of the Middle Volga Transport Administration introduced a high-speed universal key for screwing in studs. Thanks to the use of interchangeable inserts with central threaded holes for different diameters of studs, it can be used for screwing studs of any size.
The key consists of a hollow body, a spring, a bolt, a stud, a conical thrust bearing and an insert. Before starting work, an insert with a thread corresponding to the size of the stud is inserted into the key body. When screwing by hand, a handle is put on the shutter shank, with a mechanical drive, the key is attached to the cartridge. During the rotation of the tool, the insert is screwed onto the stud and deepens it into the part. At the same time, under the action of a spring, the shutter, held in the lower extreme position by a finger, enters the horizontal part of the groove, providing automatic locking with the upper end of the stud.
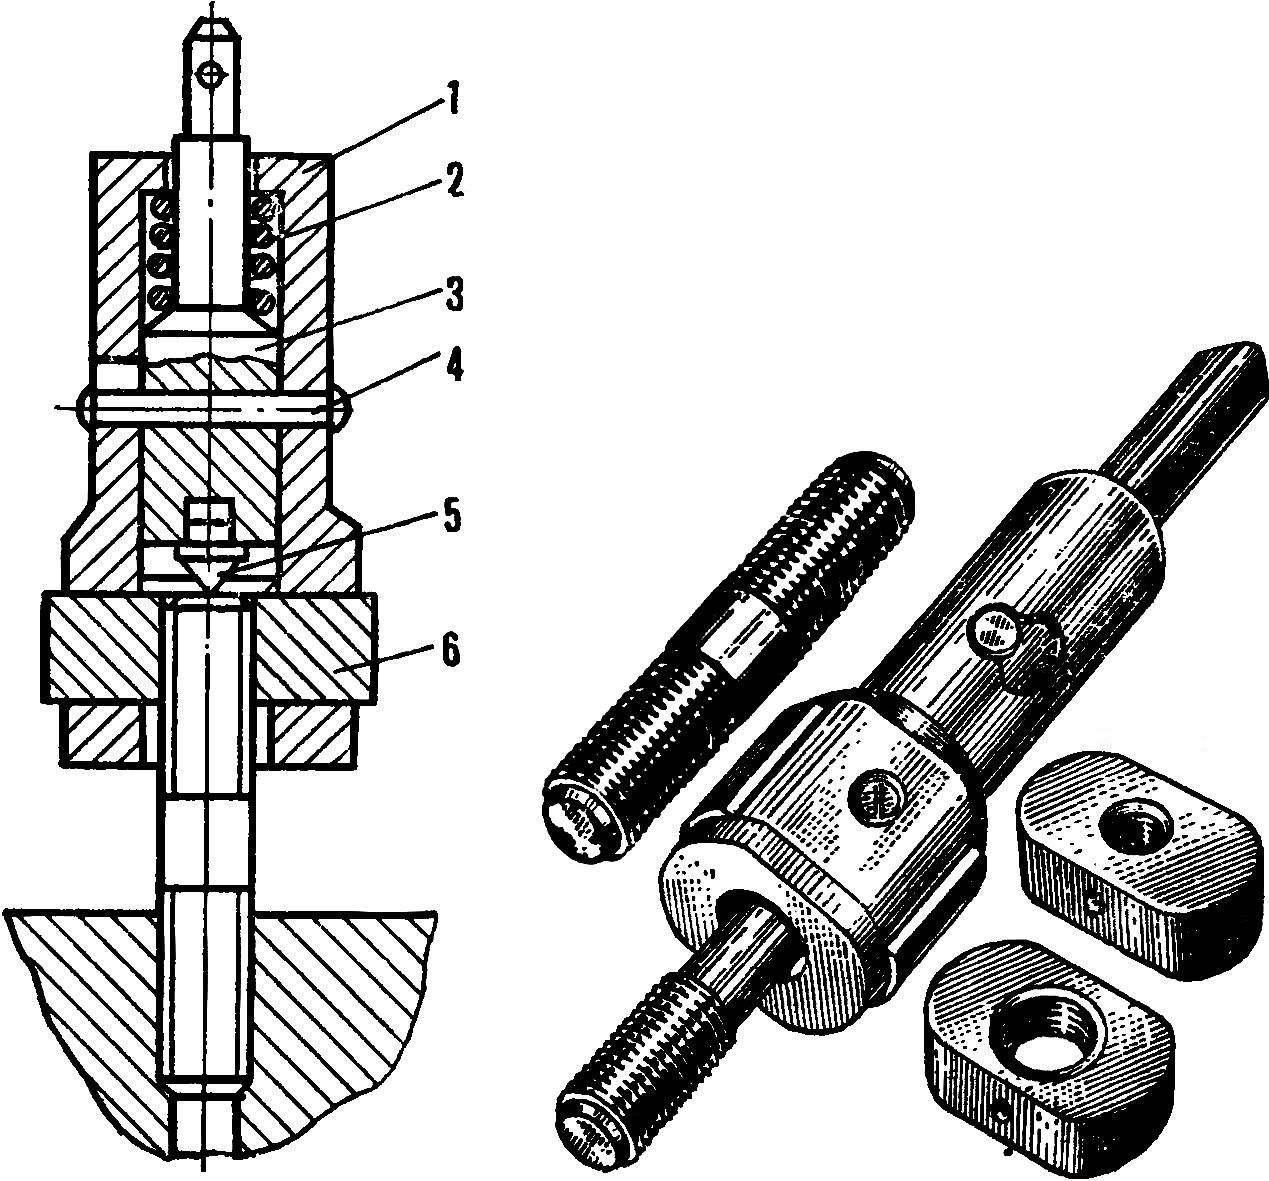
Universal hairpin:
1 - housing, 2 - spring, 3 - shutter, 4 - pin, 5 - conical thrust bearing, 6 - insert.
When the key is reversed, the finger moves from the horizontal part of the groove to the vertical one and moves the thrust heel away from the end - the key is easily screwed from the stud installed in the part.
Blanket for concrete. Like a thick carpet measuring 400X1500X40 mm, it spreads on the surface of freshly laid concrete, warming it up and thereby accelerating setting, hardening and drying.
Portable construction heaters-spreads were proposed by the participants of the NTTM of the Kuibyshev Civil Engineering Institute named after A. I. Mikoyan. They have already been widely used in construction sites"Kuibyshevgidrostroya", where they are used for active heat treatment of concrete and reinforced concrete structures up to 250 mm thick with one-sided heating and up to 500 mm with two-sided.

1, 5 - rubberized fabric, 2 - mesh heaters, 3 - glass wool, 4 - moisture glass wool.
In the section, the blanket is a multi-layered "pie". The role of "crusts" in it is performed by a rubberized fabric, which forms an outer moisture-proof shell. Immediately behind it are two layers of mesh heaters, separated by moisture-resistant glass wool. They are covered with a thick heat-insulating layer of glass wool. heating elements made in the form of mesh strips 250 mm wide, placed at a distance of 100 mm from each other and connected in series by soldered copper plates.
The maximum temperature reached by the heaters is 180°, on the contact surface "blanket - concrete" up to 80°.
The blanket can be successfully used for many other construction needs: warming up the soil in winter, drying and heating floors, bases under soft roof.
Hydraulic muscles. The wrench for tightening nuts is still a manual tool, and this operation is difficult to mechanize. True, pneumatic or electric wrenches have long been used on assembly lines. But this is, firstly, in the stationary conditions of the enterprise, and secondly, with limited rotational loads transferred to the hands of the worker. But what if the installation takes place in the field, say, on the laying of an oil or gas pipeline, and you have to tighten the nuts the size of a saucer?
To facilitate such a labor-intensive operation, a mechanized tool complex developed by NTTM participants, innovators of the Neftekhimmontazh trust of Glavneftemontazh of the USSR Minmontazhspetsstroy is called upon. It is a machine for tightening large diameter threaded connections on the flanges of pipelines and equipment operating under high pressure. It consists of a portable pumping station, a hydraulic jack with brackets and a set of special spanners.
Pumping station creating through a hose high pressure the necessary force on the tool is assembled from a single-plunger pump, an oil reservoir with a pressure gauge and a drilling machine that acts as an electric drive. The reciprocating motion of the pump plunger is given by an eccentric roller mounted on the machine spindle and pushing the plunger head during rotation.
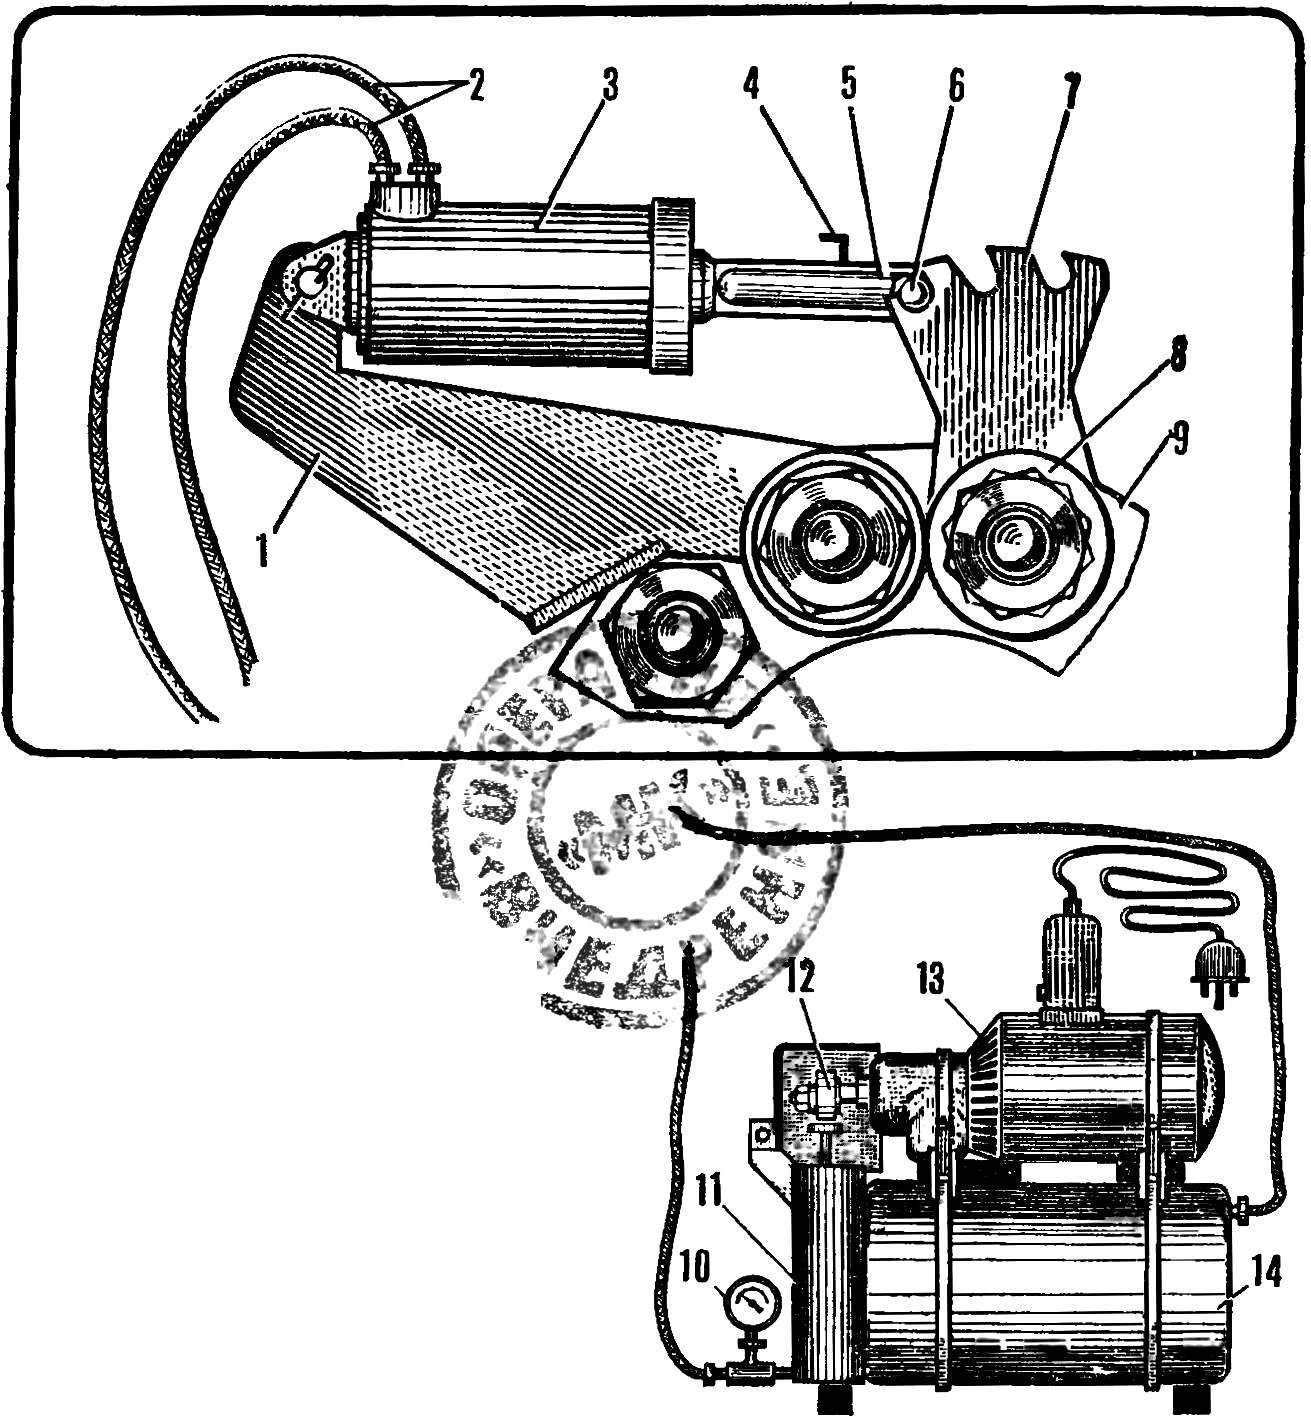
1 - hydraulic tong bracket, 2 - hoses, 3 - hydraulic jack, 4 - handle, 5 - plunger tip, 6 - pin, 7 - comb, 8 - wrench, 9 - flange, 10 - pressure gauge, 11 - pump (НРД-400) , 12 - eccentric roller, 13 - electric drilling machine (IE-1023), 14 - oil reservoir.
A special wrench with a special comb on the lever is put on the screwed nut to engage with the tip of the hydraulic jack. The hydraulic jack itself on a bracket with a hole of a suitable diameter is installed on a nut adjacent to the screwed nut. In this case, the finger of the tip at the jack plunger enters the corresponding groove at the wrench comb. The pump is turned on, and under liquid pressure (200 kgf / cm 2), the plunger through the tip presses on the key lever, creating a force of over 5 thousand kgf. This allows without special efforts tighten nuts with a threaded hole diameter up to 102 mm and a wrench size up to 146 mm.
With the help of a complex tool, you can also unscrew threaded connections of large diameters, selecting in each case the appropriate wrench and bracket for the hydraulic jack.
Vibration tamer. Air plays such an unusual role in the pneumatic tool introduced by the NTTM participants at the Kolomna Diesel Locomotive Plant named after VV Kuibyshev. For grinding heads hard-to-reach places in stamps, molds and parts of complex configuration, a small-sized machine powered by a network is used here compressed air. The novelty compares favorably with the existing tool. One of the important advantages is that its handle is designed to dampen the vibration that occurs on it during operation.

Good time everyone. In this article we will talk about such a tool as a stud driver. Many faced such a task as unscrewing the hairpin. Usually, many people do this with the help of two nuts, but it also happens that the threads on the studs are broken, and in such cases there is also a way out, for example, you can weld a nut. But all this takes time, and with the help of such a tool it is done many times easier and faster. Here is the hero of our article and decided to make himself such a tool. And for this, he took a piece of round timber and, for a start, processed it into lathe before the right sizes(Diameter 30 mm., Length 40 mm.)


Then make holes in these places. And since the holes should not be in the center, the author will make substrates for the workpiece on one of the sides.
After one hole was made, the author decided to make two more holes. One is 10mm, the other is 8mm.

I also made the substrates and started processing.
It turned out here is such a blank of the second part.

I connected it to the first part, and turning the second part in the first, made a mark. According to which in the future he will make a groove of the first part in this way.
Thank you all! And see you again.
Production video:
How to unscrew the pin? Consider several ways, taking into account the condition of the stud and the available tool.
How to unscrew the stud by the threaded part
If the stud is long enough and the threaded part for 2 or more nuts is available, then we use one of the following methods:
- screw the nut, screw the second one all the way into the first one (it is advisable to use high nuts), after which unscrew the stud with a locksmith tool (wrench or other);
- use a special tool - a stud driver, for the size of the stud or universal.
How to unscrew the stud if only 1 nut thread is available? In this case, at least 4 methods are available:
- cut the nut on one side with a hacksaw (the direction of the cut is along the axis of the threaded part), screw it onto the stud, tighten it with a pipe wrench so that the threaded part, choosing the gap in the section, tightly grabs the stud, direct the force in the direction of unscrewing;
- screw the nut onto the thread, weld it to the stud (for example, semi-automatic welding) and unscrew with a key (or a head with a knob);
- screw the nut onto the thread, drill a recess in the end of the stud (approximately half the diameter of the stud), drive a TORX nozzle (E-profile, or another similar one with longitudinal ribs) into this recess and unscrew the nozzle by the shank (you can help with the force of the second hand with an open-end or ring wrench that applies force to the nut in addition to the main force on the torx);
In the way with a screwdriver for this purpose better fit large version or power version with T-handle.
How to unscrew the stud for a smooth cylindrical part
If only a smooth section of the stud is available (for example, the threaded part is broken off), then the following techniques are applicable;
- clamp the cylindrical part in a suitable tool (pliers, pipe wrench, small vice, clamp or other) and apply force in the direction of unscrewing;
- weld a metal bar to the broken end by welding as a T-handle;
- put on a nut of a slightly larger diameter, weld it to the stud in a circle and unscrew it with a wrench;
- use a square washer with a thickness of a nut or more, with an inner diameter of the same size as the diameter of the cylindrical part of the stud (ideally, if the washer sits on the cylindrical part of the stud with an interference fit), cut it on one side similarly to the nut in the previous subsection, put it on the stud, tighten pipe wrench and unscrew;
- use a die (the one used for threading), turning the end of the stud to the square of the desired size;
- use a hairpin;
- with a hacksaw for metal, make a cut at the end under a flat screwdriver, with which to remove the stud.
How to unscrew a broken hairpin
If the pin is broken and there is no part protruding above the surface, then you can unscrew it in the following ways:
- with a semi-automatic welding machine, gradually and carefully “build up” a couple of centimeters (if the end of the stud is within reach welding wire) and for this “growth” turn out using a clamping tool;
- use a special tool - an extractor (it looks like a tap, the working part is conical, the direction of the thread is opposite to the thread of the stud): align the protruding end of the stud with a file (or even saw it off with a hacksaw), punch exactly in the center, drill a hole of the desired diameter along the axis of the stud and depth (approximately 2/3 of the length of the working part of the extractor), insert the extractor and rotate with force until the pin is unscrewed;
- preparation with drilling as in the previous method, only apply a tap on the left thread of the stud (if the stud is in the right direction) - when the tap, cutting the thread, rests on the bottom of the drilled recess in the body of the stud, the chip is often unscrewed;
- drill the center of the stud, choosing the diameter so as not to touch the threaded part of the socket, and then remove the remaining metal of the stud;
- drill out the broken part of the stud and the threaded socket on drilling machine or hand drill with a larger diameter drill for a repair pin.
It can be difficult to align the end of the stud if the break occurs in depth. In this case, the end burr will be invaluable help.
Another variation for the drill method. You can use drills with a left-hand direction of rotation and an electric drill with a direction switch and speed control. When drilling at low speeds, the wedged thread loosens and due to the left rotation of the drill, the rest of the stud is easily pulled out of place and comes out of the threaded socket.
Drilling is often wiser to do in several passes, from a small drill to those that are larger, to the desired diameter.
How to unscrew a stuck hairpin
A soured hairpin must be unscrewed with additional tricks, both in terms of tools and in terms of methodology.
- apply several hammer blows to the end of the stud along its axis without damaging the edge of the thread;
- apply several light blows from different sides on the side surfaces of the stud (at the same time screw the nut onto the threaded part to prevent damage), while preventing bending;
- apply special penetrating compounds - WD-40, liquid key and their analogues, giving the necessary time in accordance with the instructions for these drugs from their manufacturer before trying to unscrew;
- use an extension to a hand tool to increase the force applied (a longer crank or by putting a pipe of a suitable diameter on the swivel end hand tool;
- when unscrewing the welded nut, use not an open-end wrench, but a Super Lock head, in which the force is applied not to the corners (edges), but to the planes;
- instead of applying physical force and a hand tool, use an impact wrench (if it is not in the home workshop, then you can contact the nearest tire service or car service, delivering the part with the stuck pin there);
- when screwing two nuts, screw the first one all the way with so much force that it cuts into the cylindrical part of the stud, and use the second nut not a standard one, but a self-locking one (this will allow you to use much more effort, reducing the risk of idle unscrewing of the nuts);
- heat several times and let cool, at the final stage heat and unscrew.
When unscrewing a stuck stud by a welded or screwed nut, it is better to use the tool that is structurally stronger and more tightly covers the perimeter of the working surfaces of the nut, excluding licking of the edges:
- 6-sided head instead of 12-sided;
- Super Lock head instead of the usual one;
- box wrench place open-end wrench;
- collar instead of a ratchet.
How to unscrew the stud from the exhaust manifold
If the steel stud is stuck in a steel or cast iron manifold, then you can heat it until the metal turns red, using a carefully gas cutter, a gas burner from a can, blowtorch or other suitable equipment.
How to unscrew the stud from the exhaust manifold to prevent cracks in the cast iron? First of all, it is impossible to artificially intensively cool the cast-iron part. At the same time, it is necessary to heat the collector itself, without touching the stud: the collector will warm up and expand a little in the area of the threaded hole with the soured stud, and the difference in heating of the parts will further weaken the sticking.
How to unscrew the pin from aluminum part
Parts made of aluminum and its alloys cannot be intensively affected cutting torch and other powerful equipment due to the risk of parts melting or otherwise being damaged by high temperatures. In this case, you can:
- you can only heat the hairpin and then not to red;
- use a hot air gun (thermal gun) to heat an aluminum part or use a blowtorch to a limited extent in a more gentle temperature regime than a gas burner can provide.
How to unscrew the stud from the engine block
First of all, when choosing an approach, one must proceed from the material from which the engine block is made. In the case of a cast iron block, we use the approach with intense heating until reddening gas burner. If the block is aluminum, then in the area of the coked stud we warm it up gently with a hot air gun, preventing damage to the expensive part from high temperatures.
For example, it is often very difficult to unscrew the pin from the ZMZ 402 engine block. It is distinguished by systemic problems with unscrewing certain studs due to the material of the block and the characteristics of its heating during operation.
Several cycles of heating and gradual cooling will greatly facilitate the unscrewing of the stud from block 402. Recall that the unscrewing of the stud is carried out in a heated state. It will also be very useful to have a shock effect on the hairpin - along its axis or loosening with blows on the sides from different sides.
How to unscrew a broken stud from the block, we outlined above in a separate subsection, the techniques for this part are not original.
How to unscrew the stud from the cylinder head (cylinder head)
When deciding how to unscrew the stud from the cylinder head, one must also proceed from the material of the head. Cast iron heads are rare, mostly on older cars, and most often they are made of aluminum alloys.
On block heads, you often have to deal with stuck, soured studs.
To unscrew the stud from the cylinder head, you can use the most convenient and effective ways and methods listed above. Often this is the two-nut method, the use of an extractor, or drilling. To enhance the impact, it is more expedient to apply a preliminary loosening tapping on the sides, the use of penetrating compounds, and rotations with two tools.
Conclusion
Faced with the question of how to unscrew the stud from the block, head, manifold, starter, wheel hub or other part, you can choose effective solution tasks from several methods and techniques, taking into account the available tools and means. Locksmith tools available in almost any garage, as well as specialized ones, such as a stud gun, can be used.
Before unscrewing the pin, it is worth applying a shock effect to it. Also, if the threaded socket in the part is through, and the end of the stud sticks out, then the visible part of the thread should be cleaned of contaminants, which can create additional difficulty when unscrewing. The preliminary application of penetrating compounds also facilitates the extraction operation.
Tools
When mounting various equipment, cabinets, clamps, and so on, threaded studs are used. It's one thing if these studs have a turnkey hexagon inside, but if it doesn't, then you have to use stud drivers.
Stud drivers are designed for a certain thread diameter: 6, 8, 10, 12, 14. This is a rather complex device that has a body in the form of a cylinder, with edges for a key at the end, and inside there are rollers in the form of studs. When turning, the rollers are pressed tightly against the thread of the stud and hold it when twisting or unscrewing.
Such devices are also used when the bolt breaks off and a piece of thread remains. But they are not cheap. Although it seems to be a universal tool. But for different thread thicknesses, it must be of the appropriate diameter.
Such a tool is not always at hand, so many people tighten the studs with improvised means, pliers or two nuts, at best, couplings. However, if a bolt of small length is screwed into the coupling, then the stud screwed into the coupling will be fixed with an oncoming screw and it will be possible not only to tighten it, but also to unscrew it.
In addition, when twisting and unscrewing, it is better to use an electric drill with the appropriate bits. Screwing in is not difficult enough, since the bolt previously screwed into the threaded sleeve not only prevents the stud from screwing in deeply, but also fixes it. Therefore, if necessary, unscrew the pin, he holds it.
If you need to remove the clutch, then it is enough to hold the clutch wrench or pliers and it will twist off the hairpin.