Features of installing a wooden fence for a summer house with your own hands
A strong fence around your home is an important necessity. A high fence not only protects property, but creates a feeling of psychological comfort.
Wooden fences have always been considered ideal option fencing. They are made from clean environmental materials and are quite easy to use. self-construction. Properly constructed and maintained wooden fences can last up to four decades.
What types of wooden fences are there?
All products of this type can be divided into two large groups:
If we consider wooden fences by design, the following options can be distinguished:

What kind of wood to make a fence from?
Experts advise using coniferous trees. It may larch or spruce, cedar, pine. It should be borne in mind that pine is not very durable. In principle, any type of wood is suitable for a wooden fence, the main thing is that it is of high quality. If you want to save money, then you can safely take spruce or pine. Before use, the wood must be thoroughly treated with an antiseptic containing olive oil.
Preparing tools for installation
We will need:

Step-by-step construction of a wooden fence with your own hands
Stage No. 1
Take wooden pegs about 60 cm in length. Each one needs to be sharpened. Then a site plan is taken and pegs are driven in around the entire perimeter of the territory.
The distance between them should be around two meters from each other.
Then the pegs must be looped with lacing. It needs to be stretched well.

Stage No. 2
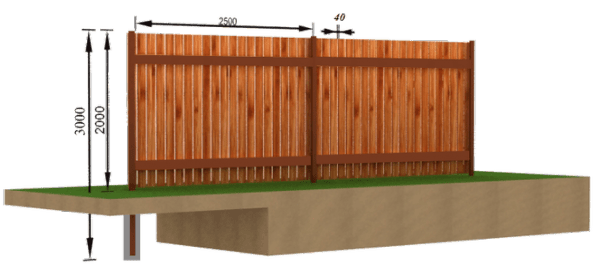
It is necessary to determine the required height of the fence. It is important that it is not too high (because it may obscure the plantings) or too low (so as not to expose the area to view). Optimal the average height is considered to be 1.5-2.5 meters.
The boards are cut to the designated length. They will need to be processed grinding machine and make a semicircular or triangular profile. If you need to save time, you can buy ready-made boards.
Stage No. 3
There comes a moment when the pegs are removed one by one, and in their place a well is drilled to a depth of about 50-80 cm under supports for the future fence. To make the work go faster, it is better to do this using a drill. If there is no access to a drill, then the holes can be made with an ordinary shovel.

Stage No. 4
Pre-prepared supports can now be dug into the ground. The beams can have a cross section of 50*50 mm or 75*75 mm. The bars must be installed strictly vertically; for greater accuracy, it is recommended to use a plumb line. The wells are filled with earth and compacted tightly. To consolidate the results of the work and make the fence durable, supports need to be cemented.
Stage No. 5
A nail is driven into the top of each beam, and they are tied together around the perimeter with tightly stretched lacing. This must be done in order to correctly align the fence height.
Stage No. 6
The veins (section 10*2.5 cm) are attached to the beams with nails. They must be placed at the same distance from each other. This is done at a height of about 20-30 cm above the soil level. The nails must be suitable size to punch through the veins and protrude with reverse side by a few centimeters. The protruding parts of the nails must be carefully bent.

Stage No. 7
The boards prepared for the fence are nailed onto the nails. If you want to make a solid fence, then the boards are nailed end to end. You can also leave a small distance between them from one to five centimeters.
Painting and processing of a wooden fence
 The installation stages of the wooden fence have been completed, but there is still a lot of work ahead. We must protect wooden fence from bad weather and insects. For this purpose, special measures, in particular - processing and painting.
Experts recommend using regular drying oil as a protective material. This product is common and affordable. If finances allow, then hardware stores offer many options for stronger and more expensive wood protection.
After the applied protective layer has dried, you can begin painting.
For this purpose, special paints for wood are selected, which are presented in a wide range on modern construction markets. This combination: drying oil and special paint will protect the fence from the sun and moisture.
This is important! Painting a wooden fence should be repeated once every two, maximum three years.
Wooden fencing has many advantages - it is an environmentally friendly material and beautiful appearance, reliable protection and long service life. In order for the tree to fully reveal these qualities, you need to properly install the fence and necessarily protect the wood with drying oil and paint.
How to extend the life of a wooden fence
For additional protection from rain and snow, many professionals recommend installing a special canopy on the top of the fence. To do this, you will need to install special additional strips onto which the visor can be attached.
Installing such a canopy is a painstaking and time-consuming task, but the product can protect the tree from moisture as much as possible, and the appearance of the fence will become more original and individual.
To protect bottom part fencing, you must constantly:
- Remove excess grass. A lot of vegetation near the fence leads to high humidity. This can cause early rotting of the tree.
- After removing excess grass, a thin layer of gravel is poured along the fence. This will prevent excess moisture from accumulating in this place.

How extend the life of wooden fencing still at the construction stage:
- Make sure there are no anthills or large thickets in the installation site.
- Impregnate the wood with special antiseptics before construction begins.
- Upon completion of installation, coat the entire structure with primer. This will strengthen the fence and provide excellent protection from adverse weather conditions. weather conditions. Primer can only be done in warm weather, when the wood is completely dry.
- Additional primer is done using paint that contains: natural oils. This doubles the strength of the material. Layer oil paint should dry for about 24 hours before applying a second one. Then the material will be well saturated.
When the materials are prepared, there are tools, as well as free time, building a wooden fence with your own hands is a task that even a beginner in construction can do. But it is important not only to install the fence correctly, but also to provide it with constant care and protection. Then the wooden fence will last up to forty-five years.
Step-by-step video instructions for building a wooden fence
On video - self-construction wooden fence:
Photo gallery of various wooden fences
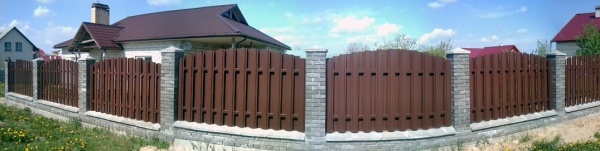
The photo shows examples of the implementation of various decorative and unusual wooden fences installed on summer cottage. Some of the ideas can help you make your own decisions.
Today, wooden fences are gaining popularity again. Modern analogues made from other materials, of course, are no worse, but from time immemorial, humanity has valued and still values naturalness. Nothing beats naturalness solid wood. Our website presents several types of wooden fences and fences for the home and detailed instructions on how to make them yourself.
Main types of wooden fences
For any owner of a private home, a fence made with your own hands is a special pride. But before you begin its construction, you need to choose the type of structure. Types of wooden fences for private houses and photos for them:
Wattle
Wooden wicker fence. By type, this is the most ancient variety - rods intertwined with each other in a special way and knees driven into the ground. An antique wicker wooden fence (you can see it in more detail in the photo below) is very unusual; making it with your own hands is not at all difficult, but, unfortunately, it has a short service life.

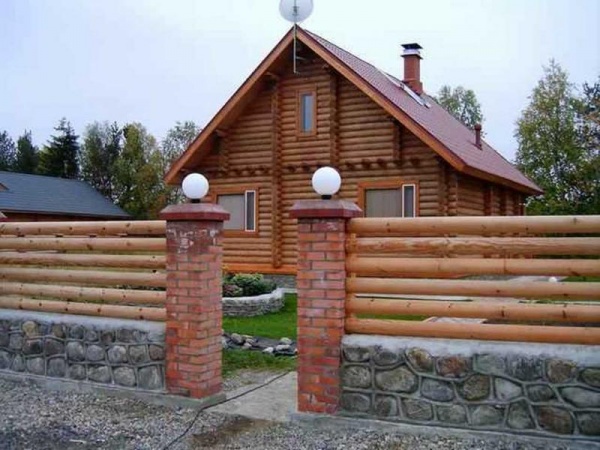
Ranch
Although this name is reminiscent of American films about cowboys, it should be noted that in our country, such structures were erected a long time ago. They were used to fence gardens, orchards, agriculture animal grazing areas. By design, these are several boards (poles) nailed to a wooden beam.

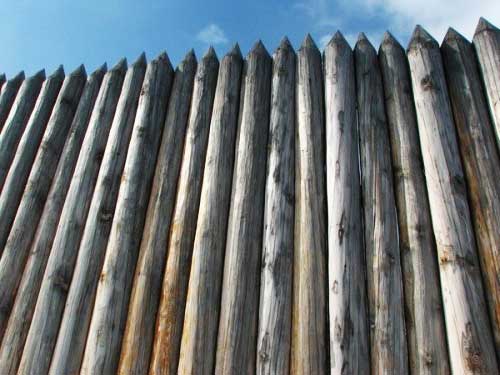
Palisade
This is also a type of antique fencing that you can make yourself. The stakes are pointed at the top at an angle of 40 degrees. Has an impressive appearance
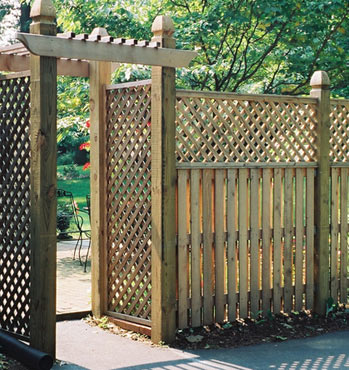
Lattice
Attractive appearance, such an openwork wooden one is easy to make with your own hands, most often serves as a decorative element personal plot or for its zoning. A decorative wooden fence is not particularly durable. It can be made by crossing straight or diagonally slats or narrow boards.

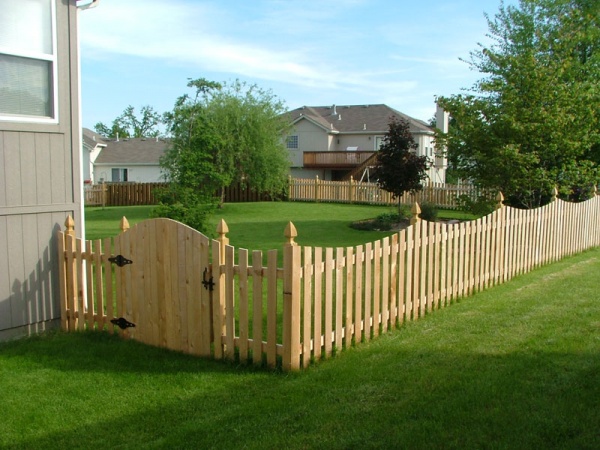
Fence
The traditional type of wooden fencing is a picket fence. The simplest manufacturing option: the boards are attached in a vertical position to the veins, and those, in turn, to wood posts driven into the ground. This is the most economical and quickly erected way to fence your site. Apparently that's why it became so popular. Easy to use, making it yourself is simple and quick, and with proper care it will last a long time.

One more distinctive feature The advantage of this fence is that it clearly delineates the boundaries without obscuring the area itself.


Separation of wooden fences according to installation technology
Wooden fences, as you can see in the photo above, are:
- No foundation. In this case, only wooden poles or metal supports will be needed.
- On the foundation. The above-ground part of the foundation is made simultaneously with the wooden beam.
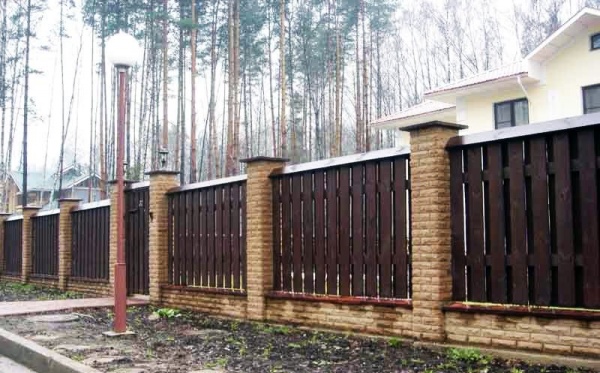
As for finishing, it can be done using any material, taking into account your preferences: stone, corrugated board, brick. A solid wooden fence with a base always looks respectable, stylish, and solid. To make it you need to spend a lot of money, there is an option to reduce the cost of the design - this is to make a wooden fence with your own hands from start to finish.
Stages of installation of wooden fences
Rustic style (Country) has always been and remains at its peak fashion trends. Wooden picket fences are its striking element, and the simplicity of the lines, even without decorations, always looks modern and elegant. Do with my own hands not difficult at all. How to make a wooden fence more complex design? First you need to decide on the material of manufacture.
Important ! When choosing a material for a wooden fence, make sure that the solid wood is free from rot and other damage. Treat the wood with an antiseptic. Or buy ready-made material.
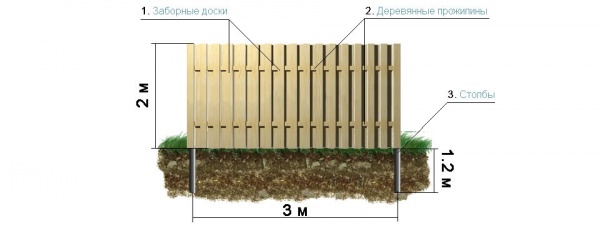
Step-by-step instructions for installing a wooden fence
If you have already decided on the material, choose the proportions: shape, height of the wooden fence. Only after this will it be possible to begin construction directly. How to make a wooden fence with your own hands, drawings and detailed instructions see below.

- The first step is marking the territory.

- Next, you need to calculate the number of wooden pillars, picket fences and veins.
- The ground part of the timber must be treated with tar.
- Then marking is done along a pre-tensioned cord under the beam (recommended distance is 3 meters).
- Holes are being dug out. The depth of the holes should be equal to the depth of the soil - this is about 1.5 meters. Holes can be dug with a drill.
- Think carefully about one nuance: if you are planning to make a high and heavy wooden fence, then in this case be sure to attach supports to the base metal plate. This is necessary for stability and to prevent the fence from twisting under the influence of gravity.
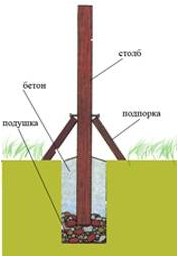
- Wooden supports are installed vertically on a 12 cm sand cushion, after which the hole is filled with small portions of soil and sand. Compact thoroughly. To make the structure more durable, the hole can be filled with concrete.
- After installing the supports, you need to calculate and determine the attachment points for the wood veins at the top and bottom.
- The picket fence is selected according to a pre-selected template, but you can make it even by cutting it along a stretched cord.

To simplify the work, you can purchase a ready-made picket fence with or without drawings.


We invite you to watch a short video with a selection of beautiful wooden fences:
How to make a checkerboard fence with your own hands
The next type: do-it-yourself wooden fences, checkered in the photo, you can clearly see the difference with the previous one.


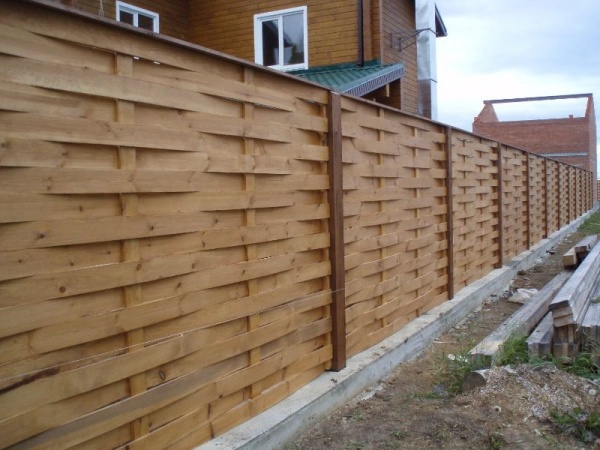
Compared to the previous one, the wooden chessboard looks more decorative. Main feature installation is that you can do it in any design: dense or with gaps.
The pillars are installed similarly to the option described above. After installation, you need to attach the beams. Can be cut into wooden pillars grooves, in metal ones it is necessary to weld the corners on which the beams will be located.
Decide in what position you want to make the checkerboard: horizontal or vertical, set the guides. With a vertical checkerboard they are made horizontal and, conversely, with a horizontal checkerboard they are made vertical.

Next, after installing the guides, you can begin installing the boards. Put them in checkerboard pattern, as shown in the figure above (one on each side). They can be secured either with nails or self-tapping screws.
Very important! Clearly measure and mark the attachment points, because small irregularities will create gaps, and this will significantly spoil the appearance of your fence.
Do-it-yourself wooden ladder fence
A wooden horizontal ladder fence is also very popular, so we will dwell on it in more detail. Making such a structure with your own hands is as easy as the previous ones. Install supports according to a similar principle (described above).

Next, you need to secure decorative wooden overlays on both sides - these will be the guides. As a rule, a channel is used for this purpose; it is easier and easier to insert the board into it at an angle. In this case, it’s up to you to decide at what angle you want to make the Christmas tree. The position is also selected according to preference. The direction can be either vertical or horizontal.


Important ! Do not forget to install cushioning material between them along with the boards. This is necessary for ventilation and to preserve the material from rot.
Do-it-yourself wooden fence for a summer cottage. The photo shows some models of finished works.

Upon completion of work, treat the fence with an antiseptic and paint the structure.
The key to the longevity of a solid wood fence
As a material for the manufacture of wooden fences, you need to choose those types of wood that are characterized by strength: ash, mulberry, acacia, oak, aspen, Siberian larch.
By the way, last option- this is a truly eternal material; when exposed to water, it does not deteriorate, but, on the contrary, strengthens. It is also worth limiting the use of pine trees to create wooden blocks. You should not use birch if you do not want to change it often; it has the lowest density among all others.

Bars for fencing are used from wood and metal, or as an alternative to wood - overlays. The tree should not be discounted. Today thanks modern technologies There are special metal consoles. Therefore, solid wood supports do not have to be dug deep. The consoles are concreted, and then a wooden beam is attached to them.
The most vulnerable areas of wood are those where the cut is made across the grain. To extend the life of wood in fence blocks, lay the boards horizontally or make canopies. Wood is vulnerable if it comes into direct contact with air:
- With high humidity, it swells and is affected by fungal deposits.
- If the air is too dry, it dries out and cracks.
How to treat a wooden fence to reduce the risk of damage and deterioration? This can be done by impregnation with an antiseptic and painting with special materials: Swedish paint, soaked in hot drying oil, yacht varnish.

You can prepare Swedish paint yourself at home. To do this you need to mix the following ingredients:
- Iron sulfate - 260 grams.
- Iron minium - 260 grams.
- Regular table salt - 260 grams.
- Rye flour will require 580 grams.
- Drying oil, can also be used linseed oil- 240 grams.
- About 4.5 liters of water.
The consumption of this mixture will be approximately 200÷300ml/m2. The expected color is golden. If you need a different color, then replace the lead with ocher or manganese peroxide.
They have always been famous for their popularity. In many ways, this has become causally related to inexpensive prices and ease of installation. But today the situation has changed a little, and now they create not just fences from wood, but real masterpieces.
Let's look at everything in detail.
Making a wooden fence on your own. Step-by-step procedure
The construction of a wooden fence can be divided into several stages, namely:
- Installation of support pillars;
- Installation of crossbars;
- Covering the installed frame.
Each stage in construction must be completed in full.
Installation of support pillars
Installation of support pillars is carried out using the backfill method. The algorithm of actions is as follows:
Important to know! Sand and crushed stone will fit more densely if the mixture is wetted with water.
Installation of cross beams
Transverse joists, which are made of wood, are best installed using brackets.
The installation algorithm is as follows:

It is necessary to pay attention to the fact that the distance between the transverse joists can be reduced. However, in this case, the structure may reduce its strength. The support itself must be at least 10 centimeters higher than the casing, and the bottom must be at a distance from the ground no more than 15 centimeters.
Covering the installed frame
Before you start installing the mounting boards themselves, you need to remember that there are several methods.
In one of the methods, the picket fence is installed on the logs before the latter are mounted into the supports, namely:

If we talk about the second installation method, it involves the direct installation of each board separately. In this case, you need to prepare for a long and labor-intensive process. After each installed board, it is necessary to measure the distance between them (if you need clearance between the boards) and check for a clear vertical line. 
It is worth noting that any of the methods is popular among owners of private and country houses, so it is impossible to say which one is better. Everyone chooses an option for themselves depending on the choice of wooden fence design. 
How can you treat and paint a wooden fence?
It is necessary to understand that an installed wooden fence takes on a variable climate in all seasons. For this reason, it is mandatory.
Important to remember! Before installation, all metal components of the fence must be primed and painted.
We should not forget that ultraviolet solar radiation is harmful to a wooden fence for the reason that as a result of their exposure, the wood loses internal moisture, thereby losing its bearing capacity and the appearance itself.
This impregnation must be applied several times to the primer with the possibility of deep penetration. After this, you can use moisture-resistant paint and varnish to give the wooden fence an attractive look.
The price of pleasure
If we talk about the cost of the necessary building materials, the average price is indicated in the table:
| Name of building material | Volume | Cost price |
| Board | 1 m 3 | About 3 thousand rubles |
| Cement | 1 kg | About 10 rubles |
| Antiseptic | 10 l. | About 2 thousand rubles |
| self-tapping screws | 500 pcs. | 300 – 400 rubles |
| dye | 3 l. | About 400 rubles |
| Metal profile | 1 meter | About 130 rubles |
| Grinding wheel | 1 piece | About 50 rubles |
| Edged board | 1 m 3 | About 4 thousand rubles |
Design options
To date, there is no material other than wood that is equally flexible for the implementation of various design solutions (at the same time, wood is very affordable in terms of price). 
And this is how this fence has internal view. No one will say that the view has become worse. 
In this version of the design solution, attention was paid to every detail. You can see how the contours themselves are worked out, and the corners are smoothed to the fullest extent. You can see in the photo sliding gates from the same yard. 
Agree, few of us know what techniques this or that designer uses to realize his fantasies. But they use: firing, create the effect of antiquity, successfully combine wood with various forged metal elements, and even simply sand the wood and paint it in various shades. 
What do you think about brutal style? Agree, the view is simply impressive. 
To implement such a design solution, you only need a jigsaw, grinder and woodworking skills. If you have the tools and desire, you can achieve the effect of shabby wood.
How do you feel about puzzles? If you wish, you can initially draw a picture on the board, and then cut it out according to the template. It is worth paying attention to the fact that this work is considered jewelry, since each board has its own distinct size and bend. 
At the same time, the most difficult process in the construction of such a wooden fence is its installation (not everyone is able to carry out such an arrangement). 
For construction, first of all, you need to carefully select the board. In no case should it be allowed to have different thickness or width in any place of the board. In this version distinctive feature is his affordable price, but this is compensated by the enormous labor that is necessary to create such a creation. 
Despite the fact that a board up to 1.5 centimeters thick is not very suitable for fences, it can be used to create an excellent lattice-type fence. Agree, the view is no worse than the previous options. And if you decorate it with greenery that will entwine it, the view will be gorgeous. 
Over the past few years, unedged boards have increased in price by more than 15-20%, but this does not prevent it from remaining in the low price range. Moreover, it is often used when constructing a wooden fence in this style. 
As you can see, this example clearly shows one of the design solutions when working with not edged board. If desired, you can achieve any exclusive solution.
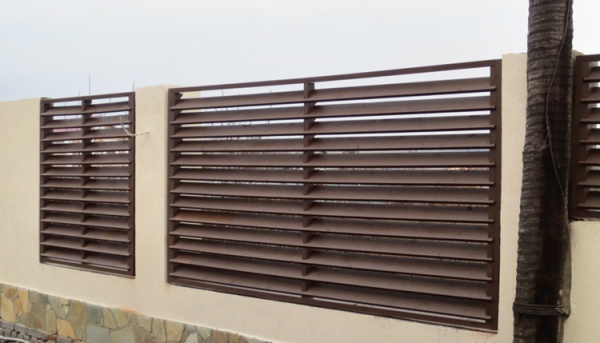
What do you think of the design solution in the style of blinds? Agree, the view is just bomb. 
A selection of wooden fences
Beautiful wooden fences
With a little woodworking skills you can create beautiful fence in a short time.

This design option is popular among many owners of private houses, since its creation does not take much time and effort. Agree that the view is very attractive.

Standard fencing that is suitable for both private homes and suburban areas. It does not require any special skills or abilities, but at the same time it looks beautiful.
Carved fences
To create carved fences with your own hands, you need to have wood carving skills. 
It can take more than 3 months to create such a fence, since every little thing plays a big role. But it's worth it. This type of fence suits any interior. 
What about this cutting option? Surely many people dream of such a fence, because it can not only emphasize individual style, but also create the illusion of antiquity.
Decorative fences
Decorative fences are often used to create rock gardens or simply in landscape design.

Small wooden fences can highlight the peculiarity of a particular plant and complement the interior of a personal plot.
If desired, you can create any decorative fence of one color or another. This does not require any skills or abilities.
Antique wooden fences
Many people dream of creating a small fairy tale from their plot and completely immersing themselves in the old days. 
This version of the antique effect is perfect for areas where wooden houses. In combination with such a fence, you can create a real fairy tale for yourself.

What if you add a little decor in the form of a thick rope? The view is simply impressive. Surely neighbors will come to the owner of such a fence with admiration.
Wood-look corrugated fences
If for some reason there is no desire to work with wood, you can install a fence made of corrugated sheets. Thus, you can not only increase the service life, but also create the illusion of a wooden fence. 
If desired, you can use corrugated sheeting in light wood tones, which fits perfectly into any interior. The service life of such a fence is over 25 years. 
Another option is to use corrugated sheeting in darker colors, which allows you to create the illusion of varnished wood. Great for wooden houses, or buildings sheathed in plastic to resemble wood.
For a private home
Depending on the wishes of the owner of a private house, the fence itself can be made in any style. 
High fences have always been popular with owners of private houses. Thanks to them, you can hide everything that happens on the site from prying eyes, making the fence beautiful and exclusive. 
Another option is to install a fence with small gaps. This type of fencing is perfect for any private home, regardless of its size and style.
From corrugated sheets to look like wood
As a rule, installation of this type of fence is affordable for any resident of our country. Such fencing is perfect for installation anywhere, regardless of whether it is a dacha or your own private home. 
In this photo you can see that the profiled sheet can combine a combination of decorative stone and wood itself. Looks great and has a long service life. 
For those who love minimalism, the option of creating a fence from corrugated sheets to look like wood is perfect. This variety belongs to the classic style and is perfect both for performing its direct duty - protecting the site, and as a good decorative element.
Made of brick and wood
When creating a fence, brick and wood combine simply perfectly. Designers often try to combine them when creating interiors both inside and outside the room. 
The fence is made in a classic style using ordinary bricks and boards. Thanks to a successfully selected combination of color palette, such a fence looks not only rich, but also very attractive.

This composition combines the figured elements of a wooden fence with a brick one. Well chosen color palette allows you to use it in any meta.
Made of stone and wood
This combination building materials in most cases it is used in country houses and dachas. 
It will be very difficult to recreate such a fence on your own, and you need not only to be able to handle this material, but also to know the intricacies of mixing a special solution. But you must admit that such fences can surprise even the most picky critic with their beauty. 
Wooden fences combined with decorative stone create the illusion of an ancient fortress. Often used for installation in country dachas or on the territory of private companies.
Wood patterns for fences
Nowadays, in the world of wooden fences, there is a trend towards using additional patterns. They allow you to create something special and unique of its kind from a simple fence. 
As you can see, such a pattern is very difficult to make with your own hands, unless a person has sufficient skills in working with wood carving. 
You can order a composition in the Chinese style from wood carving specialists, as shown in the photo. This option is considered quite common in our country.
Original wooden fences
Surely every owner of his property would like to install an original fence. But what are they? 
Such original design wooden fences are not common in our country. This is largely due to the expensive pleasure (the initial cost can range from 40-50 thousand rubles). 
This design solution allows you to not only make your neighbors look at the fence with envy, but also makes the site very rich and individual.
Horizontal wooden fences
Many of our compatriots, when installing fences, often ask themselves the question: which is better, vertical or horizontal? In fact, the only difference here is taste. 
Speaking about such a vertical fence, we can say with confidence that anyone can make it on their own, while spending a short period of time and money. Classic style Suitable for fencing any area. 
The photo shows that the vertical fence is made using complex design feature. It is very difficult to do this at home, and if you wish, you will have to seek help from specialists. But it's worth it.
Forging with wood in the fence
At all times, they gave the fence power and attractiveness. However, due to its considerable price, it is not very popular. 
The wooden fence using forged metal spokes in the photo makes it original of its kind. Gives the area style and beauty. Moreover, forged elements make the fence structure very rigid, which significantly increases its service life. 
This combination of wood, brick and, strictly speaking, forged elements makes the fence almost life-long. It is not subject to difficult climatic conditions, it is difficult to damage, and most importantly, it is beautiful and stylish.
Picket fences
Most of our citizens make fences from picket fences. You can make a very good fence with this material. Just look at these photos. 
Of course, if you paint this fence and then varnish it, it will turn out quite good, but it’s still quite attractive. What is characteristic is that it can be done in the shortest possible time (the period of its construction is no more than 1 - 2 days). 
If you have a wild imagination and the great desire of the owner of the site, you can create such a magnificent designer fence that will never cease to please the eyes of everyone around.
Fence made of wood ladder
A ladder fence is not uncommon in everyday life from owners of private houses. Firstly, this variety allows you to save on the board, since small gaps allow you to reduce the volume of material, and secondly, it turns out quite well in the end. 
The photo shows a ladder fence, which is still lined with corrugated sheets on the inside. Thanks to this, from the outside it looks very impressive, while inside the site the fence looks very neat. 
This type of ladder is in most cases installed in private country houses. Small gaps between the boards allow you to see the beautiful green spaces that can be planted behind the fence.
How to make a fence inexpensively
The video below shows how to make a cheap wooden fence.
The fence is an element of the garden landscape. In addition to their direct “responsibilities” - protecting the site from unauthorized access and indicating the boundaries of private households, fences play an important role in the aesthetic arrangement of the territory. There is a fence different types, configuration and texture, but the most popular in decorative meaning was and remains wooden version. In addition, you can make such a fence yourself, using all your imagination as a craftsman.
Making a wooden fence is quite simple compared to its metal counterpart. This option has many advantages with minimal disadvantages. For the construction of wooden fencing you can use various material– boards with different breeds trees: beech, pine, larch or oak. Coniferous wood is especially valued. Each master chooses the material at his own discretion, because the main thing is that the wooden fence is of good quality and lasts a long time.
How to make a fence correctly
Wood fences can be divided into 2 groups: hedges and palisades. Also, such fences vary in design (picket picket, wattle fence, bamboo fence, ranch, lattice and other fence design options).
The most popular and simple ones are picket fences, as well as those made by a continuous row of boards. Regardless of what kind of fence you plan to build, you definitely need to carry out preparatory work according to its structure:
- clear the area for wooden fence(remove debris, pull out grass or weeds, uproot stumps and roots of old trees, if any);
- dismantle the old fence;
- draw up a design diagram of the future picket fence, where to mark the location of the gate, taking into account boundary boundaries and signs;
- choose and buy everything necessary materials for the construction of a fence (wood, nails or construction screws treated with an anti-corrosion agent, cement to stabilize the fence support, beams and logs, paint);
- prepare tools (hammer, hacksaw, shovel, crowbar, hole drill, tamper, cord and pegs for marking the area, wheelbarrow, mixing container cement mortar or concrete mixer).
Service life of a wooden fence
 A wooden fence has a service life of about 8 years. However, if you properly care for it and repair it on time, then this period increases 3 times. A good wooden fence can last more than 30 years, although fences from historical wooden architecture are known to be over 50 years old.
The main factors for the durability of wooden fences are:
- quality of building material - wood (soft or hardwood, manufacturer);
- good quality and correct installation;
- operating conditions.
Manufacturers determine the quality of a material by its likely wear resistance. Also, the service life of the fence depends on how carefully it is handled.
The advantages of wooden fences are:
- environmentally friendly - absolutely clean natural material which does no harm environment, the sanded fence is pleasant to the touch, it does not pick up sunlight, which is important for closely growing plants;
- variability - compared to the factory version, a metal profile, which is usually installed in a vertical position, can be worked with wood various options– horizontally, vertically, diagonally, interlacing, and also use boards of various lengths, widths and thicknesses;
- ease of installation – installation of a wooden fence does not require special skills, thorough concreting and large quantity people, since a wooden fence is not heavy, it can be easily handled by one person;
- aesthetics – the natural beauty of wood leads in the selection of materials for the future fence; it looks great in any landscape design solution.
It is worth considering that wood is “afraid” of exposure to moisture, since over time it begins to rot, turn black, and become covered with mold spots. To delay these unpleasant moments, it is necessary to carefully care for the wooden fence and carry out antiseptic prophylaxis for it in a timely manner. You should also pay attention to the flammability of this building material and use special means to impregnate and protect it in order to avoid fire.
Wooden fence design
 Modern, wooden fences have different design in any format that provides a visual impression. This type of fencing is a traditional option for Russian villages, holiday villages or country cottages.
The tree is beautifully decorated, covered with various paints or varnishes, it fits harmoniously into any landscape composition. The design of a wooden fence depends on the preferences, imagination of the owner, as well as the overall compositional background. Most original fences are obtained using the following types of fences:
- solid - made in the form of a palisade made of stakes or round logs, slabs, edged boards;
- checkerboard or overlap option - boards are laid in a horizontal, vertical or diagonal position;
- “braiding” - boards are fixed between support pillars, either from the inside or the outside, by braiding them;
- – a combination of boards with round logs as support, a classic option;
- wicker fence - vines, tree branches, twigs are used;
- lattice fencing - slats are used;
- a fence in the style of a cowboy ranch - the exotic horizontal bars are attractive with brutality; it is recommended to combine them with a massive concrete or stone base.
Whatever fence design you choose, it is worth considering its role in the overall compositional picture and functionality.
Wooden fences have undeservedly faded into the background. And completely in vain! Of course, in terms of stability and reliability, fencing made from boards is significantly inferior to its brick and concrete counterparts, but a minimum of time, effort and money is spent on erecting a wooden fence.
At the same time, with all necessary measures you can handle it yourself. By showing a little imagination and doing everything according to the instructions, you will create a truly original and interesting design.

What to build a fence from?
Before starting construction, we pay due attention to the choice of source material. For the construction of the fence we use only high-quality dense wood. The wood of oak, aspen, ash, Siberian larch, alder, and mulberry is perfect.

Among all the listed options, the most interesting is Siberian larch. A fence built from it will last as long as possible. If one of the main enemies of most wood species is moisture, then larch only becomes stronger from contact with water.


We limit the use of pine only to the construction of a fence panel; in the event of breakage or wear of the fence, such material can be replaced without special financial costs and effort.
 Picket fence - pine
 Important! And under no circumstances do we use birch to build a fence - it is extremely unstable and short-lived.
It is also important to choose quality material for the manufacture of supports. Wooden pillars will be best combined with wooden spans. You can either dig them into the ground or attach them to special metal stand(consoles) concreted in pre-created recesses.
Important! To extend the service life of wood, it must be pre-impregnated. It will reduce the intensity of the harmful effects of moisture, air, fungus and other harmful microorganisms on the building material.

To consolidate the effect, it is recommended to treat the wood with a special dye, for example, Swedish paint. It will give the material a very beautiful shade. If desired, a different color dye can be applied over the dried Swedish paint.

To prepare Swedish paint we will need:
- copper sulfate– 250 g;
- salt – 250 g;
- red lead - 250 g;
- drying oil – 230 ml;
- flour – 570 g;
- water - about 4.5 liters.
Following the given proportions, you can prepare any required quantity dye.

The paint is quite economical. About 200-250 ml of dye is spent to cover 1 m2 of surface. The following recipe allows you to prepare paint golden color. If you want to get a different shade, replace red lead with manganese peroxide, ocher, or another component of your choice.
Swedish paint is prepared in the following order:
- the paste is cooked. To prepare it, stir the flour in 3 liters of water;
- the finished paste is passed through a sieve - this allows you to remove lumps from the mixture;
- the strained paste is put back on the fire. Salt and copper sulfate are added to the mixture. Constantly stir the mixture until the vitriol is completely dissolved;
- While continuing to stir the paste, add drying oil to it, and then pour in a certain amount of water (usually about 1.5 liters) until a homogeneous liquid composition is obtained.
Apply the finished paint to the wood in a double layer.

Table. How to paint a wooden fence
| Paints | Binder | Service life |
|---|---|---|
| Acrylic | Polyacrylate | 6-20 years |
| Water-dispersed | Organic solvents | >20 years |
| Oily | Drying oil | 2-3 years |
| Silicate | Liquid incandescent glass | 20 years |
| Silicone | Silicone resins | 20 years |
| Enamel | Alkyd resin | 10 years |
For example, you can assemble a fence using the wattle fence principle. The boards are attached in a curved state. Trying to straighten out, they will fit quite tightly to the support pillars.
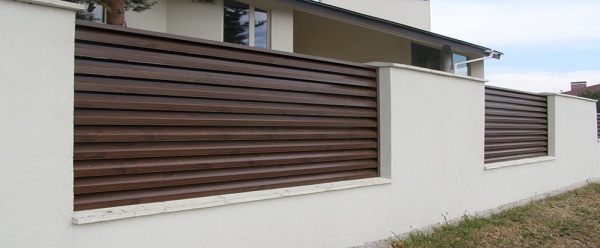
Another great option is to fill the space between the supports with wood siding. We fasten the sheathing boards starting from the bottom, maintaining a 25 mm overlap.
Fences made in the form of blinds look no less original. By laying the boards with a downward slope towards the street, you will create an invisible fence that is resistant to wind loads.
The boards can also be nailed at the ends. To perform the highest quality cladding, we first make markings on each rack.
If metal posts are installed, they can be hidden by sheathing the posts on both sides. We close the metal supports on top with wooden plugs.
If desired, you can make the fence more original using wooden support posts. We make inclined cuts-grooves in the supports, and then insert the ends of the lamellas into them. Additionally, we fasten each strip with self-tapping screws. To hide the fastening points, close the screws wooden overlays. We crown the upper part of the supports with plugs.
To make the fence look more original and modern, we can fill the boards with a small gap (up to 15 mm). At the same time, the narrower the boards are (of course, within reasonable limits), the more interesting the fence design will be.
You can also use boards of different widths. When choosing this cladding method, be sure to ensure that the pattern on adjacent sections matches.
There are a lot of wooden design options. Choose the one you like and start building the fence. You already have all the knowledge necessary for this.
Prices for various types of construction boards
Construction boards
Good luck!
Video – DIY wooden fence
DIY decorative fence. Photo


