The article describes in detail how to line a stove in a bathhouse, what brick to use, tips can be seen in the video.
How to cover a stove in a bathhouse
Considering the high thermal loads, the question is quite fair: what kind of brick is needed to line a metal stove in a bathhouse?
In most cases, the choice comes down to four options:
- Regular red brick. It can be used for lining a furnace, as it has sufficient heat resistance and good heat capacity. The best option is solid brick, since a hollow one will warm up worse and cool faster. Its great appearance will look good in the interior of the bathhouse.
- Sand-lime brick. This type is not recommended. Its components do not withstand high temperatures very well, and the appearance makes additional cladding necessary.
- Fire brick. From a performance point of view, this is good option. However, this type of brick is more expensive than regular red brick. If it is not purchased specifically for the furnace lining, then it is advisable to save it, since it is possible that it will be needed to solve more important problems.


Read also:
Why do you need a cover?
Metal stoves are inexpensive, simple in design and installation, and easy to maintain. However, they have a number of serious disadvantages, especially noticeable in a bathhouse:
- Intensive heat transfer with low heat capacity. This oven heats up quickly and cools down just as quickly. In order to heat the steam room in accordance with Slavic traditions, you will have to charge the stove with wood several times.
- The walls of the oven become heated, which leads to strong heat transfer to the wrong place (usually into the dressing room). It is easy to get burned on the walls of a hot metal stove. Moreover, it is theoretically possible to get a burn due to radiation without touching the stove at all.
Brick lining eliminates these problems.
Due to the high heat capacity of the brick, the oven gains the ability to accumulate heat and release it gradually. Yes, as a result, the stove heats up more slowly, but this ensures more even heating of the room for a longer period.
In this case, the outer surface of the brick will not be heated enough to cause a serious burn from accidental contact.
Also, the brick lining significantly improves the appearance of the stove. This effect is especially relevant if the rest of the bathhouse is designed in the same style, and is not decorated with improvised materials.
Brick lining of sauna stove photo

![]()


Do-it-yourself lining of an iron stove with bricks
Composition of mortar for stove masonry
The most suitable moment for constructing a screen is when the steam room is not yet separated from the dressing room by a partition. Another option is that the partition has already been erected, but in the lower part there is an opening for the firebox tunnel. However, if the firebox is facing inside the steam room, you can cover the stove at any convenient time.
A much more important point is preparing the base for the masonry. Due to its significant dead weight, the heater requires a concrete pedestal, but it is not always cast with additional outlet on the sides. The brick screen is not particularly heavy, but it definitely needs to be made solid. Therefore, if the protrusion of the pedestal under the heater is less than 160 mm, casting of the surrounding tape will be required.
Foundation for the heater
In some cases, it is possible to cast a reinforced concrete product directly on the floor, constructing external formwork around the perimeter of the furnace. Even a wooden floor with a sufficiently good construction can withstand 300–350 kg of distributed load. The tape should be cast almost close to the furnace body, 50–60 mm wide more bricks, that is, about 170–180 mm. The minimum height of the tape is limited by the protective layers of concrete; for a room it is about 25 mm above and below, that is, 50 mm in total plus the thickness of the reinforcement. It is better to reinforce with steel, for example, 8 mm A500C profile rod in three rows with an indentation of 40–50 mm.
Foundation for facing the heater
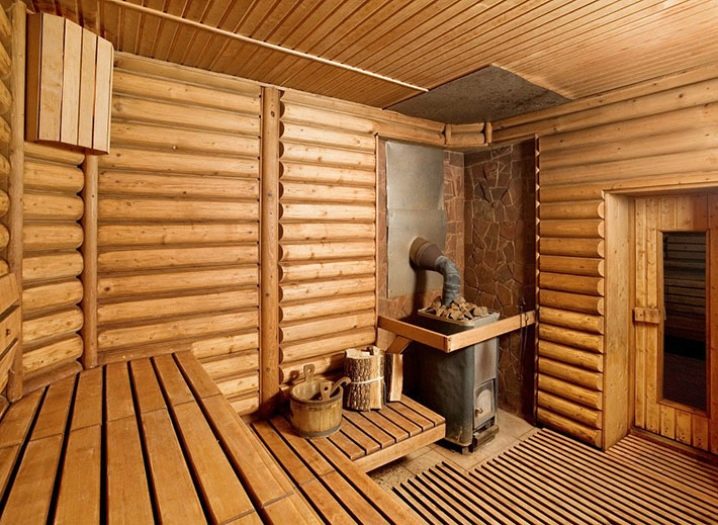
The heater can be located close to one or two walls. In this case, the screen is laid out adjacent, but the stove is usually not separated from the walls by masonry. If the lining in these places is made of flammable material, for example, wooden clapboard, it is better to immediately cut it a meter above the stove. It is also possible to have a shielding thermal insulation made of a tin sheet and a magnesite or asbestos gasket underneath.
How to line an iron stove with bricks video
Laying the furnace screen
The lining of the heater is made in half a brick with bandaging between the rows of at least a third of the length. As practice shows, this is the most aesthetic option, and it is also much easier to create loopholes for air intake. The stones must be soaked for 4-5 hours before laying.
The first row of the screen must be laid out solid. It is recommended to start with the “cheeks” - the places adjacent to the neck of the firebox. So it’s quite easy to reach the desired value of the gap between the screen and the stove body, which is optimal option is 40–60 mm. It may be necessary to trim the stones; you will also determine its size at the fitting stage.

When one or two bricks are laid on each side perpendicular to the neck of the firebox, the walls of the screen are laid across them. You should start from the front of the stove, making a small protrusion above the cheeks. When installing remote firebox The ends of the screen walls are laid out flush with the plane of the wall or with a small protrusion.
To make the masonry look beautiful, you should immediately normalize the thickness of the seams. For brick cladding ovens optimal value will be 6–8 mm. The easiest way to align seams is to lay two calibrated rods along the edges of the row required thickness, immediately forming a fillet joint. It is only important that the seam has time to settle for about 15 minutes before removing the rods.
Brick facing of the heater
Starting from the second row, you can create gaps for ventilation. If you have chosen a third of the length of the dressing, in order to leave a window in the masonry, it is enough to cut off half the extension and lay it instead of a whole brick - this way a vertical seam is guaranteed not to form above the hole.
After the walls of the screen are laid out, the front part is laid. Depending on the massiveness of the firebox neck, the brick can be laid either directly on it or on a crossbar made from a steel angle. First you need to scaffold the neck from below; here it can be convenient to place the brick on its edge.
Blind and open casing
You need to understand the thermal physics of the heater’s operation, take into account its power and design features. Too small a gap leads to overheating due to insufficient convection, the metal quickly gets tired, and the masonry collapses due to cyclic overheating. A gap of more than 70 mm is ineffective: thermal radiation will not be enough to warm up the screen, and it will lose its accumulating effect.
It is also important whether you are going to leave the gap between the oven and the screen open. A fairly powerful convection flow will be created in the free space, which is good when the steam room has a high ceiling and a significant volume. If you fill the gap on top with large stones, leveling them with the filling of the heater itself, the air flow will be limited and the screen will give off more cozy direct radiation.
In the latter case, the screen should be laid out 1–2 rows higher than the stove body. Also, do not forget about the undesirability of overheating: if with an open gap, two loopholes on one side of the stove are enough just for air intake, then a closed screen should be more ventilated. It is recommended to make 2-3 rows of holes at different heights.
Joining, cleaning
After completion of the masonry, the screen should be left to dry for a week. At this time, the oven can be lightly heated until the side walls are very slightly heated, no more. When the clay in the solution finally releases moisture, the screen can be considered complete and begin bathing procedures.
However, the appearance of such a screen is unattractive, so from the first day of drying the masonry is washed and embroidered. There are two main options for bringing a brick casing to an aesthetically acceptable appearance. The first is to let the masonry dry completely, and then sand the visible surfaces with an emery stone, removing the tarnished layer of brick and highlighting the colored veins of the seams.
Joint jointing of brickwork
The second option is to use a jointing knife and a lath the day after the masonry is completed. When the seams are laid, they are allowed to harden for several days and then the remaining mortar is cleaned from the brick wire brush, or polish protruding stones. Both options look impressive when the seams are tinted in colors ranging from sandy white to graphite
A few secrets from our specialist will help you achieve optimal quality and make the installation process easier:
Using these instructions and the tips listed above, you can easily create a casing for both a bathhouse and a home or garage stove. The main thing is to adhere to technology and comply necessary measures safety, especially when constructing holes for the air duct and firebox. Good luck!
Furnace foundations
Furnace foundation - structural element, through which the load is transferred to the ground. Foundations can be underground or above ground. Underground - serve as a support for furnaces located on the first floors of buildings, above-ground - for furnaces located on the second floors, as well as for the upper tiers of two-tier heating furnaces.
Loads from furnaces located on the first floors are transferred to the ground directly by the base of the foundation, and from furnaces on the overlying floors - through load-bearing structures buildings, as a rule, are main walls or arrays of the first tiers of heating devices. When constructing underground foundations, it is necessary to correctly assess the properties of the foundation and set the required depth so that the settlement of the furnaces does not exceed permissible values. When constructing foundations on soft soils, the constructed furnaces may collapse.
The bases for the stoves on the lower floors are strong wooden or reinforced concrete floors of the room, provided that the weight of the stove does not exceed 750 kg. The approximate weight of the furnace can be determined based on the fact that 1 m3 of the furnace, taking into account all voids, weighs 160-180 kg.
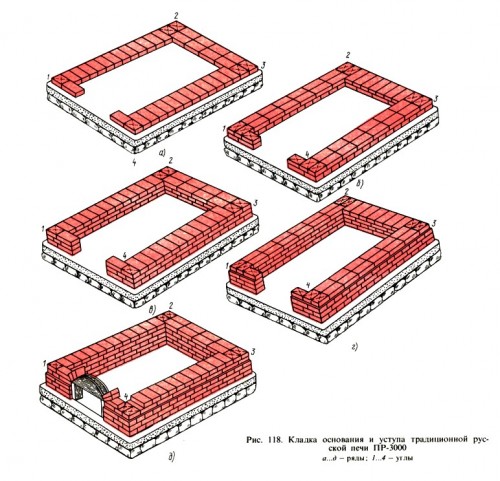
Furnaces weighing over 750 kg are built on foundations (Fig. 1).
 Rice. 1. Bases for furnaces located on the lower floor of the building:
a - near the stone walls of the building; b - in the openings of the walls at the widening of their foundations 1 - stove; 2 - waterproofing; 3 — pre-furnace steel sheet; 4 - wooden floor; 5 - rubble brick or concrete foundation; 6 - sand; 7 - open retreat; 8 — brick wall; 9 - sealing with mortar; 10 - wall lintels; 11 - blind cutting half a brick thick. Dense soils (clayey, sandy, etc.) that do not contain a significant amount of moisture serve as a reliable foundation for the foundation. Bulk soils are characterized by great looseness and a variety of composition; they must be selected to the level of permanent dense soil or thoroughly compacted. To lay foundations in damp soils, durable natural or artificial materials are used (ruble stone, iron brick, concrete, etc.), which are not susceptible to the destructive influence of moisture.
Laying foundations on dry and dense soils is carried out using lime or cement-lime mortar; on wet ones - only on cement (Tables 1 and 2).
Table 1. Compositions of solutions for constructing foundations for furnaces (in parts by volume)
| Cement-clay (cement; clay; sand) M-25 | Lime-cement (cement; lime; sand) M-10 | Lime-cement (cement; lime; sand) M-25 | Cement (cement; sand) M-50 |
| 1:0,3:4 (200) * | 1:0,6:6 (300) | 1:0,3:4 (150) | 1:0,6 (300) |
| 1:0,6:6 (300) | 1:1:8 (400) | 1:0,1:2 (100) | 1:0,4 (200) |
| 1:0,9:8 (400) | 1:0,3:4 (200) | 1:0,8:7 (200) | |
| 1:0,1:2 (100) | 1:1:10 (100) |
* Brand of cement
Table 2. Approximate composition of concrete (cement, sand, crushed stone or gravel) for foundations for furnaces
| Cement | Concrete | ||
| M-50 | M-75 | M-100 | |
| 200 | 1:3:5 | 1:2,5:4,5 | 1:2:4 |
| 300 | 1:3,5:5,5 | 1:3:5 | 1:2,5:4,5 |
| 400 | 1:4:6 | 1:3,5:5,5 | 1:3:5 |
To construct a foundation, a pit is dug in the ground, the dimensions of which in plan must exceed the dimensions of the base of the furnace or main chimney by at least 50 mm. The foundation depth for one-story stoves without mounted chimneys is at least 0.5 m. In houses where stoves are built with high mounted chimneys, as well as for main chimneys, the foundation depth is 0.75 - 1 m.
Before laying the foundation, the bottom of the pit is carefully compacted and leveled. The horizontality of the bottom surface is checked by the level specified in the rule. The first row of the foundation is laid dry from crushed stone, brick or other stone materials (without using mortar). Then crushed stone or stone materials tamped into the ground and filled with liquid solution.
The outer rows of the foundation made of brick or rubble are laid on a thick mortar, be sure to bandage the seams. Inner part the foundation is carried out for backfilling, i.e. The stones are laid dry and filled with liquid mortar. The rubble foundation is not brought to the level of the finished floor by 140-150 mm; a row of ordinary clay bricks is laid on it, then waterproofing is made of two layers of roofing felt, glassine or roofing felt, and a row of bricks is laid.
The brick foundation is made one row below the level of the finished floor, after which a waterproofing layer is laid, which protects the stove mass from moisture penetration. The last row of bricks is laid on top of the waterproofing, the top plane of which should be at the level of the finished floor. Next, the furnace array is laid out. The correctness of the laying of the corners is checked every 3 - 4 rows with a plumb line. The horizontality of the masonry is controlled by the level laid down in the rule.
It is not allowed to tie the foundation masonry with the walls of the building, since if they settle or the furnace settles, the masonry may be destroyed. Between the foundations of the wall and the furnace, a gap of 30 - 50 mm wide is left, which is covered with sand after the masonry is completed.
On wooden beam floors install stoves weighing less than 750 kg. At the same time, make sure that the base rests on at least two cross beams ceilings at the place where beams are embedded in the wall. Transfer the load from the furnace to the floor resting on wooden walls buildings are not permitted. If you want to place the stove on the second floor wooden house- you will have to build a foundation built into the floor of the first floor.
A good basis for the furnaces of the upper floor can be the array of the furnace of the lower floor (top-mounted furnaces). But it’s worth considering: the foundation must be designed to support the weight of two furnaces; if it is necessary to disassemble the lower oven, you will have to disassemble or do something tricky with the upper one.
Foundation for a brick oven
For brick stoves, the most suitable are two types of foundations: pile and rubble concrete. Let's consider the construction of a foundation made of rubble concrete material.
1. The initial stage of work involves preparing a pit, the size of which should be 15 cm larger than the dimensions of the foundation structure.
2. After the pit is ready, its bottom must be covered with a layer of crushed stone up to 15 cm.
4. After this, wooden formwork should be installed, the dimensions of which should be similar to the dimensions of the foundation.
5. From the inside, the surface of the formwork is treated with roofing felt or bitumen high temperature. After which a layer of stones with a diameter of approximately 12 cm is poured into the formwork.
6. A space forms between such large stones and to fill it you need to use small crushed stone.
7. The layer thus formed must be filled with solution. This should be a mass made of 3 parts sand and 1 part cement, the consistency of which should resemble thick sour cream.
8. An important point In solving the problem of how to make a foundation for a furnace, it is necessary to fill the furnace base. Depending on the size of the structure, this can be done in two ways. According to the first method, all construction is completed within one day. This option is suitable for small foundations. If the base is of significant size, the second method will be suitable for it, which provides for the following procedure:
- pour the first layer of stones and take a break for 24 hours;
- Following this, we form a second layer, after which there is another break for a similar period of time;
- This is how we complete the entire foundation.
9. The base for the brick stove should be 7 cm below the floor level.
10. On final stage The top surface of the masonry must be well leveled. This should be done using a level.
11. Then the surface is covered with polyethylene.
12. At this point, the foundation for the stove with your own hands is ready, after 10 days you can begin building the stove.

Construction of a pile foundation
This process begins with the installation of several piles by drilling. They will serve as a support for the entire structure. The dimensions of the foundation for the furnace are determined by the dimensions of the furnace structure. The construction process occurs in the following sequence:
- Using a drill, we make holes 1 m deep and 20 cm in diameter.
- Pour crushed stone into the bottom and compact it.
- Then we install the formwork from roofing material, previously wrapped in tubes.
- Next, fill with concrete to the bottom level of the slab.
- After 10 days, a slab of concrete material should be installed. It should have a thickness of 15 cm.
- At the final stage, we waterproof the base using hot bitumen or roofing felt.

Foundation for a Russian stove
The Russian stove is a structure that has a lot of weight. Based on this circumstance, the foundation being built must be strong and have a direct connection to the ground, regardless of the foundation of the house. Before starting the construction process, you need to remove the top soil layer 10-50 cm thick. It contains many impurities of organic origin. This makes the soil structure porous, which is highly undesirable for construction. Further actions are performed in the following sequence:
- We begin work by preparing the pit. The size of the pit should be approximately 15 cm larger than the stove parameters on each side. Thanks to this, it will be much easier to install the formwork.
- To distribute the load evenly, the stove base must exceed the dimensions of the stove by 5 cm.
- We cover the bottom of the pit with a filter pad of sand 20 centimeters thick. We perform compaction.
- To ensure sufficient shrinkage of the sand, the layer should be watered several times. When performing this procedure, the layer will decrease. Therefore, sand must be added to ensure the required thickness.
- Once shrinkage is complete, the sand should be leveled and compacted properly.
- Then we fill in a layer of crushed stone, its thickness should be 20 cm. You can mix crushed stone with stones small size or broken bricks. This layer should be covered with sand on top, which must again be filled with water. Thus, the sand will fill the resulting voids.
- Then you need to fill in another layer of crushed stone 10 cm thick.
- We make a tamper and lay the roofing material in two layers.
- To ensure the foundation is fixed, formwork must be installed. For this you can use boards or plywood sheets. Supports should be installed on the outer sides of the formwork, which will act as insurance.
- There should be a gap of 10 cm between the edge of the trench and the formwork. The walls of the structure must be moistened.
- Afterwards we fill the foundation under the stove with a thickness of 5 cm.
- After the concrete mass has hardened, it is necessary to install the reinforcement.
- The reinforcing mesh must be knitted in cells using wire.
- Then pour the second layer of concrete composition. It must be prepared from cement, sand and crushed stone in accordance with the following proportions: 1:3:5. The process of pouring the composition is carried out in stages. Each layer must be compacted and watered.
- The final layer of concrete mass is leveled and covered with a tarpaulin until completely dry.
Foundation for a fireplace stove
To make such a base, a thick monolithic slab on two concrete piles. This foundation will essentially be a concrete stand for the fireplace stove and at the same time a fire apron. The level of the structure must be equal to the floor. Then we perform the following actions:
- We form a concrete pad using beacons.
- Then we level its surface using a self-leveling compound.
- Next, we install the formwork from the boards.
- We apply a primer to the surface, after it dries, use glue to lay porcelain stoneware slabs on the foundation. If the slabs are large, both the base and the surface of the slab must be treated with adhesive. If this condition is not met, there is a possibility of voids occurring.
- To achieve correct location slabs relative to the wall should be marked on the base using a pencil.
- The glue is applied using a special comb with 10 mm teeth.
- Then we lay the slabs one after another on the surface of the base.
- At the end of the work, you should make sure that the laid slabs are horizontal.
- At this point the base for the fireplace stove is ready.
Information taken from the sites: samanka.ru, small-house.ru, www.my-71.ru,
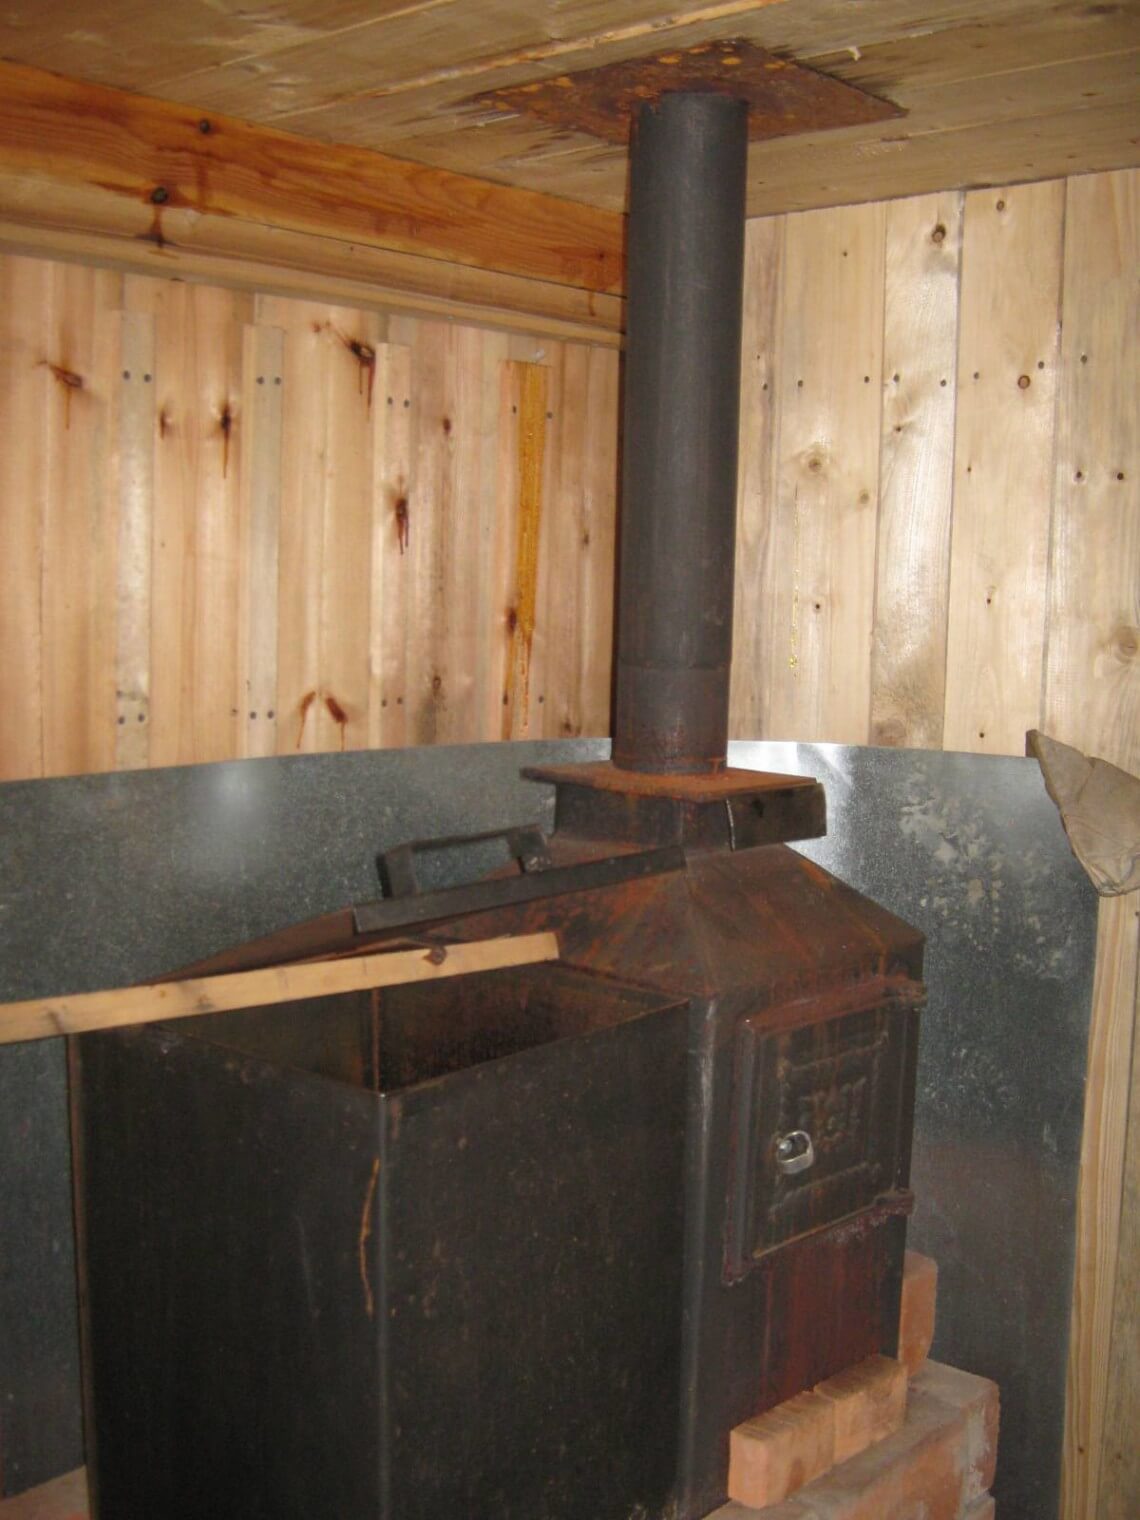
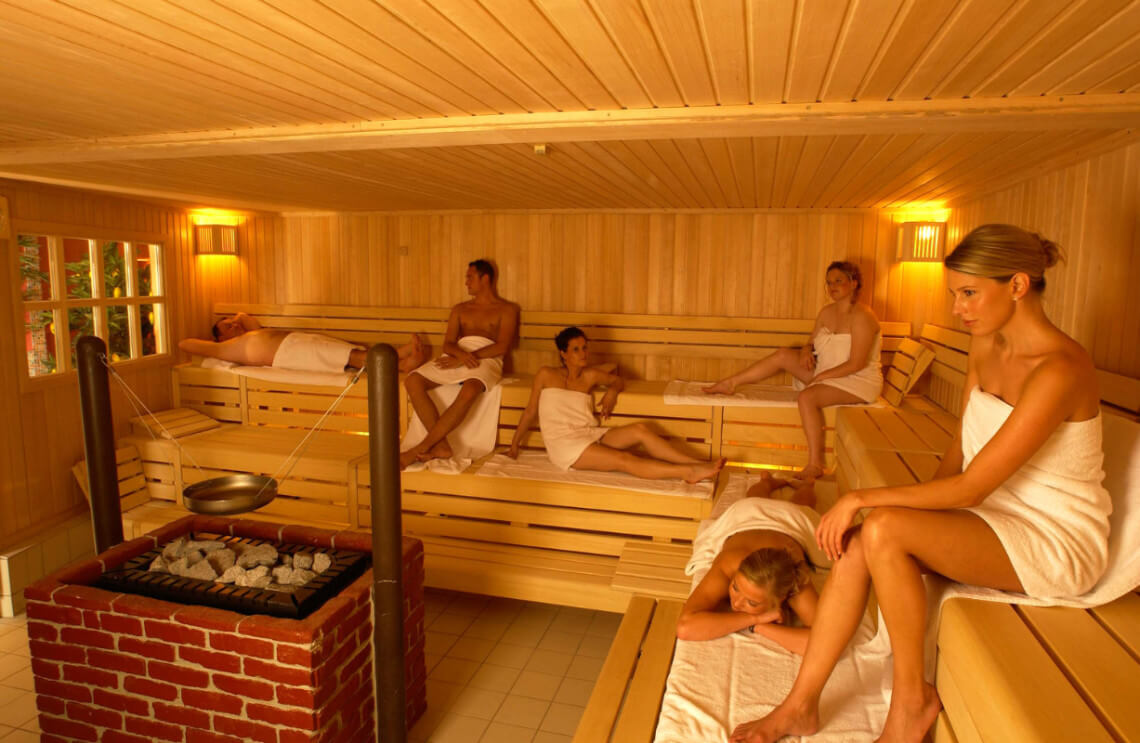
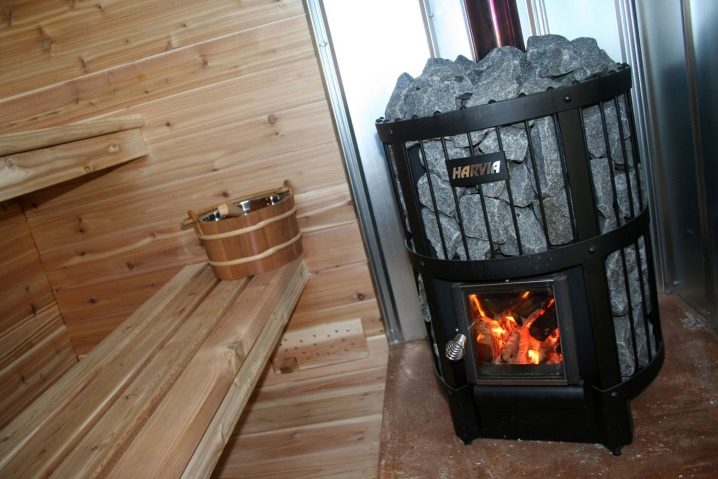
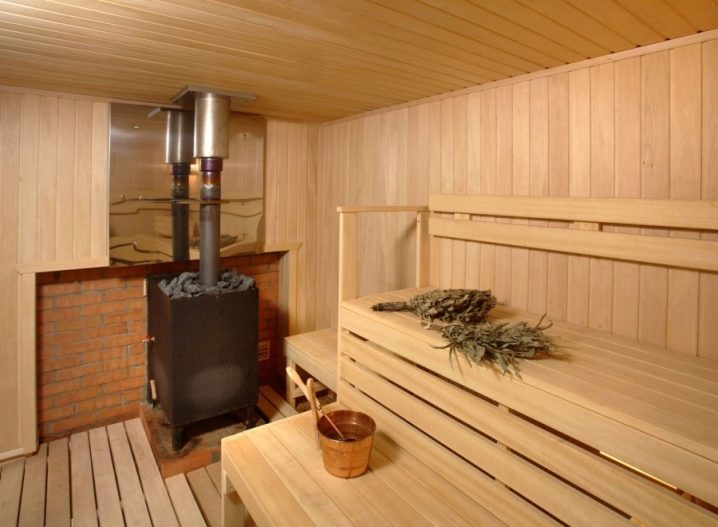
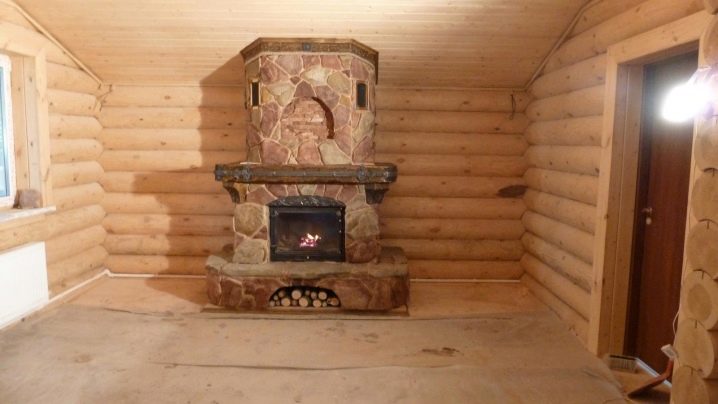
Many bathhouse owners decide to save money by purchasing in their steam rooms metal stoves. Some even make them themselves, welding them from steel sheets. But homemade options turn out to be not entirely aesthetic, and the finished ones have several negative aspects, which reduces the user’s desire to use such a stove for its intended purpose.
What could be bad about it? steel version sauna stove? The first thing to note is that it arises infrared radiation, affecting general condition person. When heating a steel structure installed in a steam room, the air quickly heats up and is unevenly distributed throughout the space. This makes many people feel headache, which does not bring any pleasure from visiting the bathhouse.
The second, also important, is the combustion of oxygen in the steam room. If you don’t take care of the forced air flow, you can simply burn out and get serious health problems. And the bath should be beneficial, not harmful. That's why knowledgeable people It is advised to line the stove with bricks to remove all these negative consequences.
What are the advantages of such cladding? The following can be distinguished positive points:
- Uniform heating of the air, which creates more comfortable conditions;
- Retains heat for a longer period;
- Oxygen is not burned;
- No possibility of getting burned by hot metal.
All these positive aspects determine the desire of the owners to use brick to give their baths maximum benefit. At the same time, the aesthetic side of the issue also takes place. It is impossible to plaster a metal stove, since the solution will not adhere to its surface. But over time, this structure will take on a less attractive appearance and begin to collapse, unless it is painted with special paint. But it is much more effective to use old time-tested methods.
Preparatory work
The main task of preparing a sauna stove for cladding is building a foundation. Many metal structures installed directly on the floor of the bath. This is due to the fact that they are relatively light in weight, which leads to savings on foundation construction costs. But when using brick when facing a stove in a bathhouse, the weight of the future structure will increase significantly, which can lead to damage to the floor.
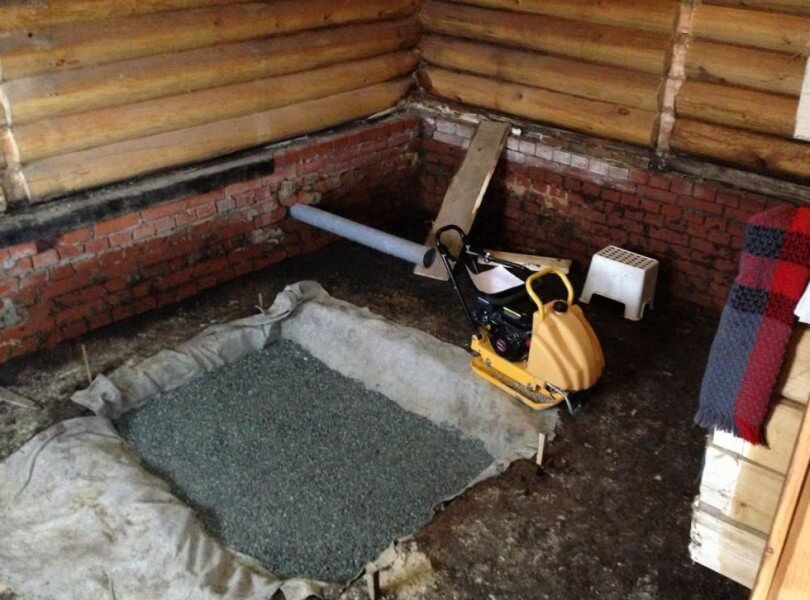
Therefore, it is necessary to dismantle the plank flooring and raise the foundation to a certain level. For this you can use concrete or ordinary brick. When choosing the latter, it is not necessary to plaster the structure, since it will not be visible due to the laid floor in the bathhouse.
It is important to remember that the foundation for the future furnace must be buried in the ground. To do this, the soil is removed to a depth of 70 cm, after which a sand and gravel cushion is made, which is properly compacted. And only after this work is completed do they begin to build the foundation.
Next you need to purchase fire brick, clay and sand. The material chosen for lining the furnace is not the same. To finish the pipe itself and the combustion chamber, solid clay bricks are used. But to decorate the sauna stove they use shaped material. But the choice remains with the owner, who, if necessary, can plaster the resulting structure and paint it with lime paint.
Preparation of the solution
Before finishing the stove in the steam room of the bath, it is necessary to prepare a masonry mortar. To do this you need to select optimal ratio between clay and sand. This can be done by mixing a small portion and rolling it out into a thin cylinder. Then they fold it into a ring and look at the walls. If no cracks have formed, then the solution is of the highest quality.
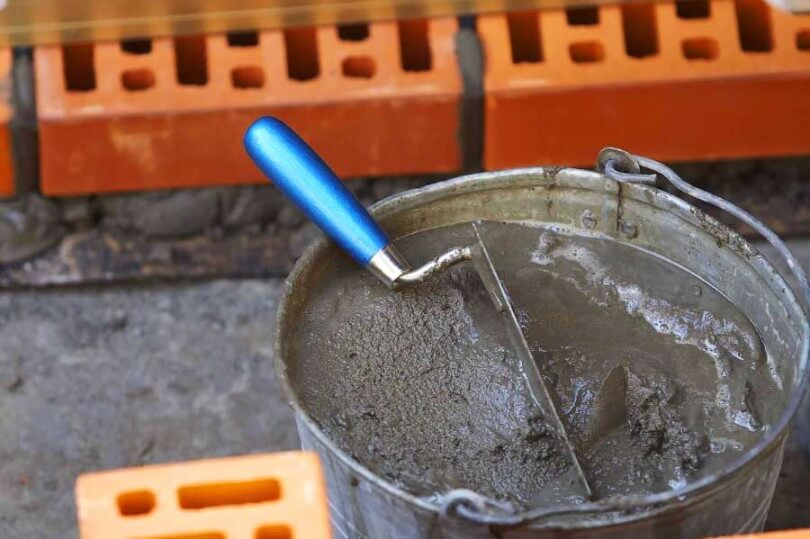
Modern craftsmen use a different composition to finish a sauna stove. It includes Portland cement, sand and tile adhesive. All ingredients are mixed and work begins. With this composition, the brick holds quite tightly, which guarantees the durability of the masonry. But cement in solution can have negative impact when heated. So the choice will remain with the owner of the bathhouse.
Brickwork
Before you start finishing the stove, you need to prepare the required tools. It is impossible to do without:
- Trowel;
- Stove maker's picks;
- Grinder with a disc for stone;
- Construction level.

This simple set will allow you to perform high-quality masonry. And you need to start with waterproofing the foundation. For this purpose, roofing material is used, which is laid on the surface of the cabinet. For greater effect, some experts may paint the base bitumen mastic and only after that apply waterproofing material.
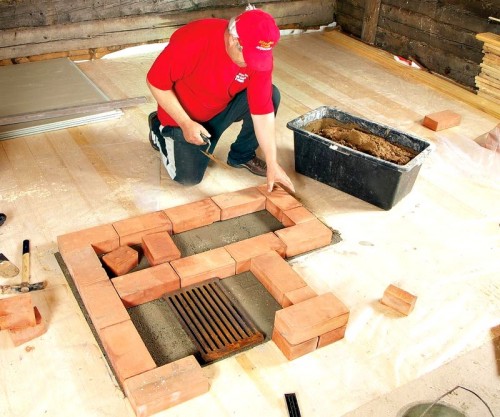
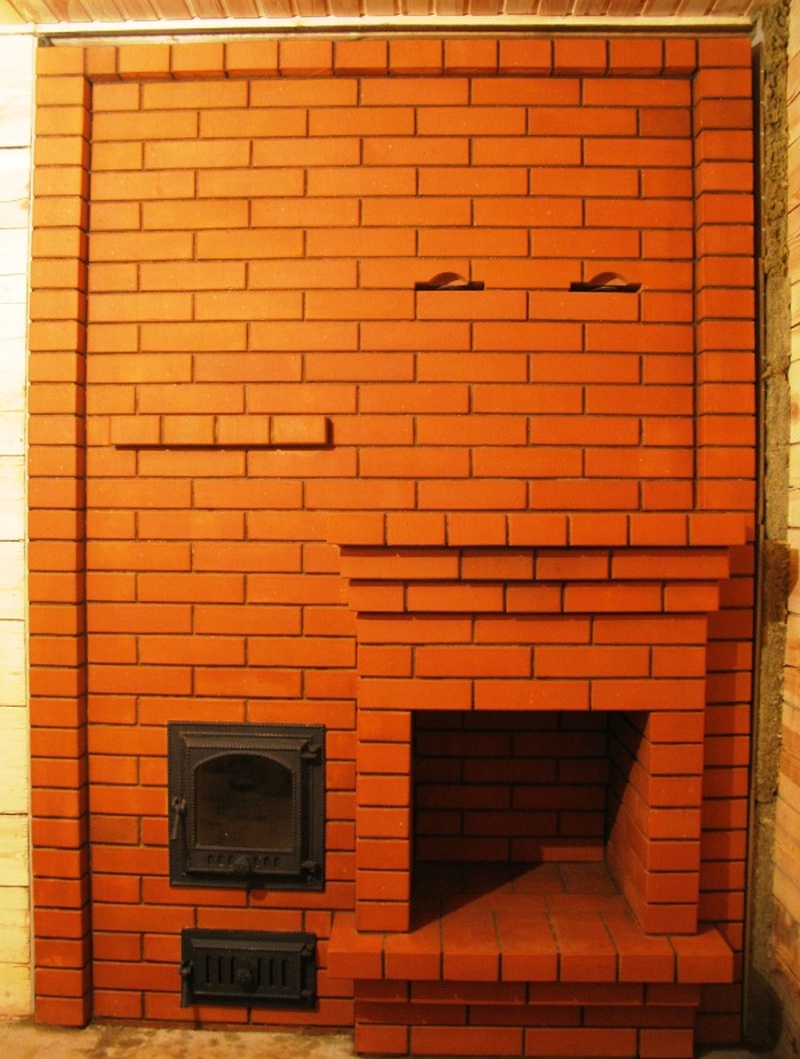
Next, lay out two rows of bricks to construct the base of the furnace. The elements must fit tightly to each other so that the seam between them is no more than one centimeter. The solution must fill all the voids; this is the only way to obtain a complete structure. Next, they install a metal stove and begin finishing it with bricks.

All rows should be offset so that the vertical seams do not coincide anywhere. This can be achieved by using alternately whole and three-quarter bricks. The thickness of the seam must be strictly the same, and the masonry must have a horizontal direction. You can check the quality and verticality of the structure using a building level.
If the finish does not turn out smooth, then there is no need to be afraid of such a development of the situation. It will always be possible to plaster the resulting masonry and then paint it, creating necessary element interior

Any cutting of brick should be done using a grinder. This is the only way to get an even, but reduced element, exactly suitable for finishing a stove in a bathhouse. To press the brick more tightly, you should use a pick, which is used to tap the newly laid part of the masonry being built.
It is important to remember that in order to get maximum adhesion between the brick and mortar, the clay material must be soaked in water. The saturated brick will reveal best qualities, and the masonry will be much stronger. Also, so as not to have to plaster the stove, the seams are made using a template. This ensures the same size.
The furnace lining is complete and finishing can begin. At this time, the brick is cleaned if the masonry is smooth. If you need to plaster a sauna stove, you should use beacons. This way the walls will be smooth and all that remains is to paint them.
 Materials suitable for finishing fireplaces and stoves: advantages and disadvantages
In the old days, going to the bathhouse was just a forced hygienic procedure. Today, everything has changed radically, and visiting the bathhouse has become a full-fledged ritual for body and soul.

Bathhouse and sauna modern man are very popular. Therefore, if possible, many people build steam rooms right in the yard own dacha or country house. Of course, the heart of any sauna establishment is the stove. She is the one who works to ensure that people get real pleasure from the steam room.

Features and Benefits
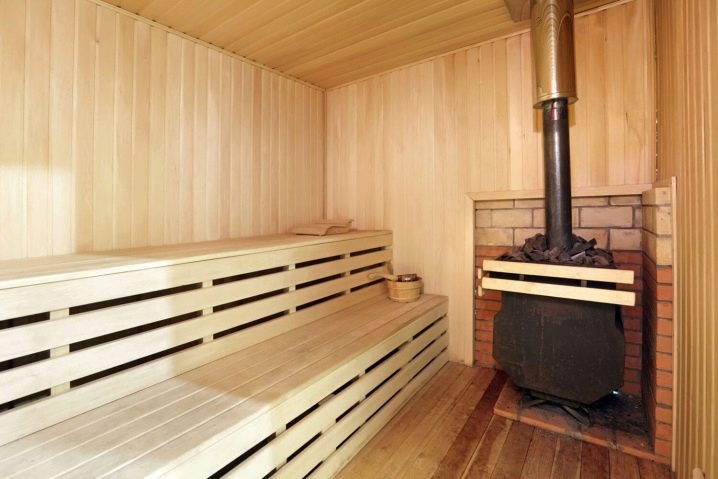
Recently, fireplace stoves have been in particular demand among those who like to take a steam bath. Such stoves are good because you can sit pleasantly near them after the main procedure.
The fireplace door is usually made of glass ceramics. It turns an ordinary heating unit into a fireplace stove. Thanks to this design, you can safely contemplate the burning flame in the fireplace without fear of getting burned.
The fireplace stove is good combination functionality, practicality and economy. It provides the necessary temperature in the steam room and produces a lot of warming steam that envelops the body like a blanket. In the antechamber it serves as a fireplace. Therefore, after the main procedures, you can enjoy relaxation, admiring the live fire in the fireplace stove.
Varieties
The heating device is the most important device that should be in the steam room. Without it, a bathhouse or sauna will become an ordinary room that does not provide any benefit. Without such a unit, you won’t be able to take a steam bath, much less relax. Today, different manufacturers offer a huge range of fireplace stoves, so choosing the right device can sometimes be quite difficult.
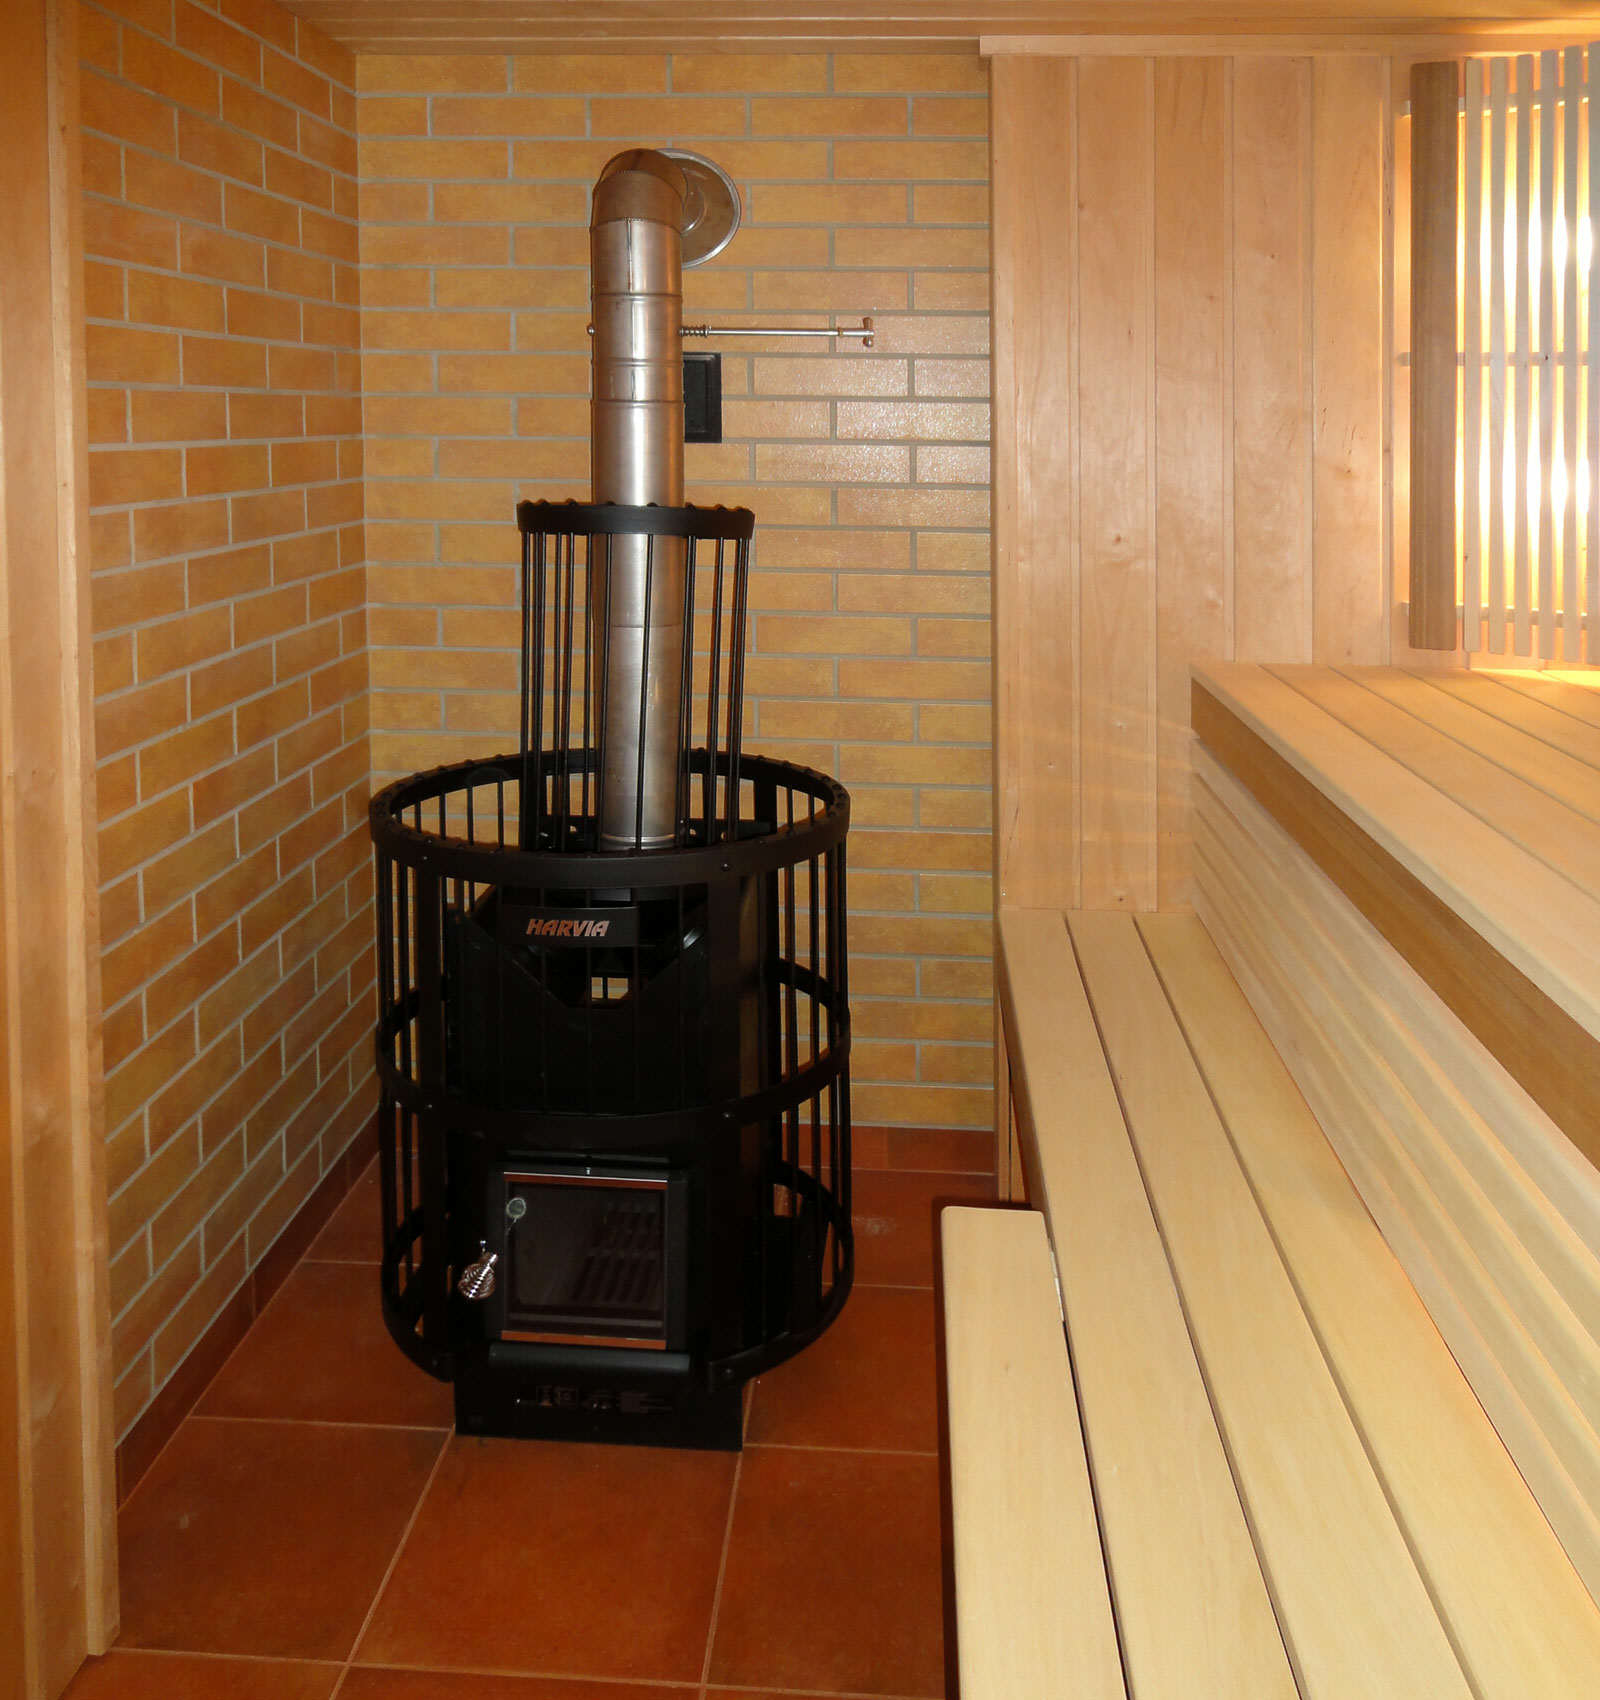
Depending on the material used, fireplace stoves are divided into brick heaters and metal ones.
According to the classification they are called:
- Heater with open or closed fireplace.
- Cold and hot.
- Furnaces long burning or direct heating.
There are two-in-one options when the oven turns into a barbecue. This combined unit is especially good for those who like to take a steam bath and eat delicious food.
If you don’t have the opportunity to spend time near a real fireplace-stove, you can buy an electric infrared fireplace. Its advantage is that the transfer of a large heat flow occurs in a relatively short period of time.


Design or how to design
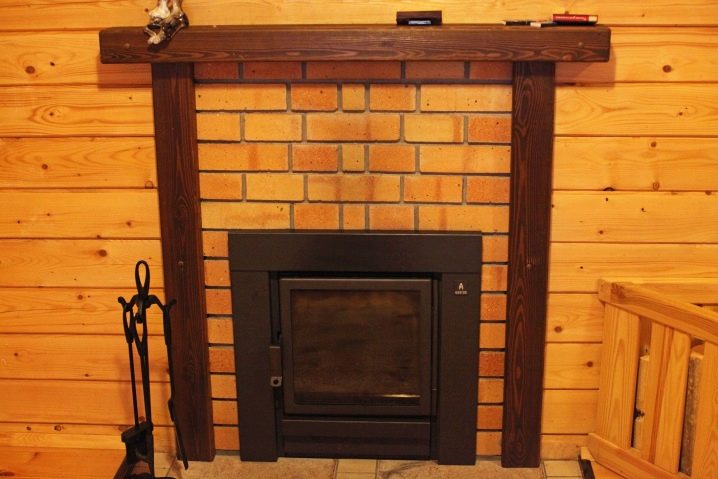
The question of how to decorate a fireplace stove in a dressing room or decorate heating equipment for a relaxation room worries many self-taught craftsmen who have decided to lay a fireplace stove on our own. This point is also relevant for homeowners who use stove heating. Finishing the hearth with ordinary plaster does not have any aesthetic value, and after a short period of operation it simply requires updating.
There are the following types finishes:
- Peasant (clay, lime and whitewash are used). A long time ago, stoves were coated with a similar mixture and then whitened. The dried walls were decorated with various designs, mostly flowers. These days this method is almost never used anywhere.
- Decorative brick. Heat-resistant material retains heat for a long time.
- Heat-resistant ceramics (terracotta, majolica, clinker, porcelain stoneware).
- Tiles. The most common method of lining heating elements. It differs from ordinary tiles in its box-shaped structure, which serves as a fastening for the tile to the surface.
How to build it yourself
There are many interesting proprietary developments in the field of construction of fireplace stoves, which can be used by everyone. But the most famous are the sauna stoves designed by Kuznetsov. In the stoves of Russian craftsmen, the flow of gases occurs naturally, and not due to draft through the chimney.
The advantages of Kuznetsov furnaces include:
- Gradual heating of the oven from the bottom row of bricks to the top.
- Low probability of cracks and other defects.
- Possibility to use heating equipment as a stove and fireplace at the same time.
- Additional heating of the walls of the fireplace stove with gases escaping from the firebox.
- Minimal soot formation, so you can forget about cleaning the chimney for a long time.

The stove is a key attribute of any type of bath - Turkish, Russian, Finnish, etc. Without it, it is difficult to imagine the amazing atmosphere that reigns in the steam room. Done with my own hands a fireplace stove is a unique structure, the likes of which cannot be found, and this is why it is valued most of all.

Of course, nowadays many bathhouses have electric ovens, but they cannot outperform real wheatears.

To make a fireplace stove, the owner of a household will have to learn basic construction skills, master the skill of working with basic tools: grater, rule, trowel. Particularly serious about the issue of construction heating device It's worth approaching if it's on the second floor.
At the first stage, you need to choose a place for heating equipment (layout), take all possible measurements, and then make a drawing and project based on the requirements of the place.

After the paper work, you can begin building the foundation. The heating system weighs at least 500 kg, this must be taken into account when pouring the foundation for the stove. The hole for the foundation must be dug at least 0.5 meters deep. Its bottom can be laid out construction waste and fill cement mortar to the floor level without taking breaks so that the foundation is solid.

After pouring the foundation, you need to pause for one week to allow the foundation to dry completely. This time can be spent on purchasing building materials and making a hole for the chimney.

On the dried surface it is necessary to lay two layers of roofing material, which is subsequently pressed with cement mortar. Tiles are placed on it (only if a branded fireplace stove is used). When creating a brick object on a waterproofing layer, the first row of bricks is immediately placed in order.