The tabletop fastening has many various nuances, without knowledge of which to proceed self-installation not recommended. It is also not recommended to install it yourself if the countertop is made of expensive materials, such as tempered glass, or the cost of installation is included in the price of the furniture. If the decision about self-installation accepted, then read on.
Modern countertops can be made of stone, wood, metal and laminated chipboard or MDF. More rarely, concrete countertops are used, which are manufactured directly at the installation site.
Ready-made countertops are installed in several stages:
- Preparation;
- cutting holes;
- installation.
Let's analyze all the stages in more detail.
Preparing the countertop
After manufacturing, the tabletop, as a rule, differs slightly from the specified dimensions. Therefore, before installation, it is necessary to completely adjust it to other kitchen furniture.
This process can be carried out according to the following scheme:
- all kitchen countertops on which the countertop will be installed are assembled, mounted and, if necessary, secured;
- the surface of the cabinets is leveled. If the furniture is equipped with adjustable legs, then you can place pieces of furniture on the same level using the adjustment method. If there are no adjustable legs, then for leveling it is necessary to place wedges under certain places;

- define optimal sizes countertops. Depending on the type of wall covering, the tabletop can be installed close to the wall (smooth apron, wallpaper, textured putty) or with a gap of 5 mm (tiles, uneven decorative finishing);
- mark the cutting lines. The surface of the tabletop in front of the cutting line is covered with masking tape for additional protection;
If the tabletop will be cut with a hacksaw, then it is better to mark and work accordingly on the front side. When using an electric jigsaw, marking and cutting are done on the wrong side. This rule will help avoid the formation of unevenness when performing work.
- The table top is trimmed and holes are prepared for installing kitchen appliances;

- the sections are processed with a file or other tools to remove irregularities.

The next stage of installation is preparing the holes for the sink and gas stove. The work is carried out in the following order:
- The location of kitchen appliances is determined. To do this, the tabletop is temporarily installed in place;
- the contours of the sink and stove are indicated on the surface of the countertop;
It will be easier to mark the contours if, when applying markings, you use not the equipment itself, but prepared cardboard (paper) templates.

- for ease of cutting, it is recommended to remove the tabletop and install it on a stand;
- the surface of the tabletop around the contour is protected with masking tape;
- in several places (at least 4) holes are drilled around the perimeter of the contour, the diameter of which does not exceed 10 mm;

- The hole is cut and the sections are processed.

Holes for the stove and additional kitchen appliances, if any, are cut in the same way.
Installation
Countertops can be produced in two ways:
- using self-tapping screws (the most common method);
- into grooves on furniture (used individually by prior order).
To attach the tabletop using the simplest and most common method, you will need:
- self-tapping screws;
- mounting angles;
- screwdriver;
- silicone sealant;
- end edges;
- plinth.
The tabletop is attached to the set according to the following scheme:
- the tabletop is installed in place in compliance with all provided gaps;
- is attached to kitchen cabinets using self-tapping screws (on the sides) and mounting angles (along the inner perimeter);

- The edges of the table top are treated with sealant and covered with end caps. If metal corners are used for protection, then additional fixation is made with self-tapping screws;

- the joint at the junction of the wall and the countertop is treated with sealant and covered with a plinth.

Sink mount
The final stage of installation - attaching the sink to the countertop - is carried out in the following way:
- the cut hole around the entire perimeter is processed silicone sealant. This is required to protect the countertop from moisture;
- placed on the edges of the sink rubber seal(mainly) or a layer of sealant;

- Using special clamps, the sink is attached to the countertop;

- the mixer is installed and connected;
- sewerage is connected.
Installation diagram for a countertop with special grooves, as well as installation diagrams for a sink and hob presented in the video.
If you are assembling a kitchen with your own hands, then at each stage you need to remember that all joints: between parts of the countertop, between the sink and the countertop, between the wall and the countertop, are sealed to protect the countertop from moisture.
A variety of furniture fittings largely determine the practicality and functionality of an interior item, and also affect its external aesthetics. We invite you to find out what furniture legs should be like so that they last as long as possible, and the room itself acquires an attractive, luxurious look.
Furniture legs and supports, as in the photo, are a type of furniture fittings for various purposes, shapes, colors. Often such components are made in the same style and color as the piece of furniture itself, therefore they are harmoniously combined with it and complement it with their beauty. However, you should not think that they perform a purely decorative function. Such products are characterized by a high functional load, therefore they are indispensable in the manufacture of cabinets, cabinets, chests of drawers, and so on:
- First, let's note the support function - thanks to the presence of such structural elements The cabinets stand firmly on the base, do not wobble or warp. Many furniture legs are equipped with the ability to adjust their height and slope. This property of sliding models allows you to securely install the cabinet even on an uneven floor. This fact is the fundamental basis for comfortable, safe use piece of furniture;
- no less important protective function furniture fittings leg. Table legs protect the bottom of the structure from scratches, chips and other types of damage. The better the product is made, the more effectively it copes with the protective function;
- In addition, the legs of the bedside tables provide the user with high comfort when using the piece of furniture.
Telescopic models have the ability to choose the height of furniture installation, which allows a person to choose the optimal height in terms of ergonomics and personal comfort.


Species
Absolutely all types of furniture legs that exist today allow you to establish interaction between the structure and other objects in the room. Such small-sized elements make the design complete, giving the space laconicism and comfort. Without the most ordinary leg, it is difficult to imagine a comfortable residential building today. Such fastening devices can give furniture stability, a luxurious, stylish look. But what type of such products should you prefer? Let us characterize the main ones below:
- regular stands without the function of adjusting their height are available at an affordable price. Often, such legs have a laconic design without any special decorative elements;
- legs with the ability to adjust the height of the furniture. Combine aesthetic appeal and high functionality;
- decorative legs are used to decorate a piece of furniture, as designers give them an original look with their own hands. Curly supports can have a non-standard shape, an attractive coating, and various types of decorations. For example, carved furniture legs act as an independent element of room design.


Manufacturing materials
Today you can see a huge variety: smooth, bent legs for furniture, with or without the ability to change the height. But first of all, it is important to pay attention to the material of the product:
- metal - look very attractive, strong, durable, made according to drawings from metals such as chrome, aluminum. Chrome is heavier than aluminum, but also stronger. Owners prefer chrome modern interiors for whom the durability and strength of furniture is important. Chrome legs are perfect for high-tech interiors where a lot of glass and metal are used. The most original form for a metal support is a wheel. Wheels can be used for furniture of very original design;
- made of solid wood ideal for wooden furniture. If durable wood is used to make a product, it will last a long time and will look luxurious and expensive. To give strength to cheap types of wood, a metal support is used;
- plastic supports do not look very attractive, but have a wide range of sizes and high functionality.
The plastic leg is optimally used for kitchen furniture or a headset in the country.


Nuances of choice
When choosing supports, it is important to pay attention to the following points.
| Selection criterion | Characteristic |
| Availability of soft padding furniture legs | Felt protective pads on furniture legs prevent the leg from damaging the bottom of the furniture. Felt is also used for their manufacture. Felt underlayment is very effective and affordable, and extends the life of the support. Therefore, you should not refuse to purchase such gaskets. Stickers for furniture legs can be picked up in the store. The choice of lining shapes is wide. |
| Material of manufacture | Metal models are more durable and practical to use, while wooden and plastic models are slightly less durable. However, when choosing a manufacturing material, a lot depends on the design features and its stylistic direction of decoration. For laconic high-tech only metal models are suitable, for country - wooden supports. |
| Design | The external aesthetics of the design must fully match the aesthetics of the headset, so when choosing such products, be sure to bring a photo of it to the store. This will allow you not to make a mistake in your choice and choose the most attractive supports. |


Video
It is simply impossible to imagine a kitchen without a table that performs two functions at once, one of them is eating, the second is preparing it. You can buy this piece of furniture at any store of relevant goods, but it is not always possible to choose the model that will be suitable for the dimensions and design of a particular room, so it is better to make the table yourself.
Figure 1. Dining wooden table You can do it yourself, so you can make it the size and shape you need.
In Fig. 1 you can see the design of the table, which will be discussed in the example. For the work process you can rent everything necessary equipment for wood processing, avoiding its purchase. As a result, you can get not only an original, but also a strong table that will fit into an interior decorated in any style.
Tools and materials:
- acrylic composition;
- putty;
- beam;
- furniture board;
- fastening fittings;
- jigsaw;
- wood glue;
- clamp;
- grinding machine.
Preparation before starting work

Tools for making a table: jigsaw, drill, screws, tape measure, ruler, pencil.
In order to make a table with your own hands, you need to prepare a furniture slab, the thickness of which can be equal to the limit of 40-45 mm, while its width can vary from 600 to 800 mm, the length of the slab can be any, but traditionally it is 1200-1400 mm . It is permissible to use the corresponding element for a kitchen set as a tabletop, adjusting it to required sizes. If it is not possible to purchase a solid tabletop, then it can be replaced with a set of boards that need to be glued together.
The legs can be made using timber that has a square cross-section equal to 60x60 mm or 70x70 mm. The legs can be shaped wooden or steel products. The structure will become rigid thanks to the timber, the cross-section of which is 40x40 mm, and the length should be such that it is possible to circle the tabletop around the perimeter. We make a table using fastening fittings, it can be presented different models, you will also need fasteners, namely bolts, screws and nuts.
Table manufacturing technology

Boards and beams must be marked to the required length and cut into blanks.
Before making a table, you have to think about what design it will have, what technical solutions will be used in the process of its manufacture, how it can then be decorated, these components will allow you to obtain a full-fledged aesthetic piece of furniture. This stage involves drawing up a sketch according to certain dimensions of the structure.
For the table, you need to choose the type of tabletop that will be easiest for the craftsman to make, and the one that will look most harmonious in the interior of the room. There are two types of countertops, one of which is distinguished by its simplicity, the second by a high degree of aesthetics and originality.
If you prefer a table top made on the basis of laminated veneer lumber, then it will act as the most simple option structures, excluding the tabletop based on a finished furniture board.
In order to make a tabletop from timber, you will need to use a saw, which can be replaced by electrical equipment: a jigsaw, a sawmill, etc.

Corners are used to attach the legs.
The timber must be cut into blanks, giving it the required length. And then you can carefully process the mating surfaces. This procedure may also involve grinding.
The ends of the workpieces must be coated with glue for working on wood, secured with clamps on a flat base until completely dry. As soon as the tabletop is ready, its surface must be thoroughly sanded. manual method or using grinder, next you have to chamfer the perimeter and round the corners.
The second type of countertop can be decorated with tiles, which can give the product high aesthetic and consumer qualities. During the manufacturing process, it is permissible to use solid wood, which can be replaced with a solid furniture board. Inner part The countertops must be removed to a depth that is equivalent to the thickness of the tiles, and it should be taken into account that the adhesive layer also has its own thickness, which will become apparent when laying the products. In order to achieve even greater aesthetics, it is permissible to form a border located along the perimeter of the tabletop, equal to 70 mm. You can more accurately calculate the size of the border by taking into account the dimensions tiles. Work to remove a layer of wood can be done, for example, with a chisel or by hand milling.
You can lay tiles on the formed base using traditional Bustilat glue, and its height should coincide with the height of the curb. Once the glue has dried, you can continue the construction process.

Self-tapping screws or special fittings are used to connect the table legs and tabletop.
At the stage of attaching the table legs, you will need to use mounting hardware. In advance, you need to drill holes on the legs, the diameter of which should be 1 mm less than the corresponding size of the screws. Now you can attach the fittings to the legs.
The next step will be to increase the rigidity characteristics of the future structure, for this purpose inside around the perimeter of the tabletop, a prepared block should be secured using self-tapping screws, which will act as a table drawer. The installation of the timber must be carried out after marking, ensuring sufficient space for the legs. Then you can match the legs and mounting hardware to the tabletop and frame.
Table surface design

Applying tiles to the countertop.
Making a table with your own hands, on last stage The structure still needs to be fully decorated. Before this process, all elements must be carefully sanded to get rid of the slightest roughness. The final finishing also allows you to reveal the unique natural structure of the wood.
Before you make a table with your own hands, you need to choose the right wood, which should have high quality, be well dried the right technology. Otherwise, the design will begin to change its characteristics over time. linear dimensions. This can happen if wood with a high moisture content has been used. Over time, it will begin to evaporate and deform the table. But even well-dried wood must be protected from external negative factors, because the kitchen is characterized by conditions with high humidity. In addition, the table is often used for cooking, which may be accompanied by exposure of the tabletop to substances harmful to wood.
After completing the manufacturing process, the table with your own hands must be covered with varnish, which can be replaced with wax. Wood is not always free from flaws or knots, which must be treated with putty, and then sanded and decorated with acrylic composition.
The surface of all table elements must be varnished in several layers. The more there are, the more attractive the appearance of the finished product will be.
After all wood cutting work has been completed, you should carefully remove workroom, this especially applies to the painting or varnishing stage. After all, dust can cause poor quality of painting. The next step is drying, which should be carried out in warm room. You can choose a varnish that will be able to give the wood the desired shade and appearance. valuable species. In addition, it will provide good protection elements from damage and rapid wear.
Making a children's table

Before you make a table for the nursery with your own hands, you should prepare a solid mass that will form the basis of the tabletop. You will need blanks for legs made of timber with a cross section of 40x40 mm. The power frame will be based on 4 bars. Model children's table may be equal to 500 mm or higher.
The connection of structural elements should be made according to the “groove-tenon” principle; for this reason, using end mills it is necessary to form grooves in the places where the legs are attached. Why do you have to mark the places for the grooves, combining paired elements, and then in the right place a blind hole should be provided. Its diameter should be equivalent to the thickness of the groove, while its depth is usually equal to 1/3 of the body of the workpiece. Now you can fix the leg blank in the clamp, and then, using an end mill installed at low speeds of an electric drill, begin sampling the wood until a groove of the required size is formed.
The ruler will allow you to measure the resulting grooves and mark the tenons on the bars for the load-bearing frame, which can then be formed. Now you can perform a test assembly. Measuring tools will allow you to check the angles between elements. Then you need to mark the workpieces and disassemble the table. Wood glue will help secure the mating elements. After waiting for the frame to dry, it is necessary to attach the tabletop to it. Why do you need to drill a blind hole in the center of the legs for a furniture pin? Next, you need to mark the positions of the tenons on the back of the tabletop by drilling matching holes.
In this case, it is also necessary to carry out preliminary fitting, only then the parts can be treated with glue and attached.
Any of these tables can be adjusted to the size of a nursery or dining room; the main thing is to take accurate measurements and make a strong connection, then the structure will serve its owners for a long time.
When fixing a wooden tabletop, take into account two important points. The fasteners must not only ensure a reliable connection between the table top and the body, but also allow the tabletop to freely change its dimensions as it expands and shrinks. Having placed the lid on glue or tightly screwed it with screws, you are own experience learn a painful lesson when seasonal wood deformations render the furniture unusable.
In this article we will talk about five proven methods correct installation DIY countertops. Due to their simplicity and reliability, these fastening options are used not only for furniture made of laminated wood and solid wood, but also kitchen countertops from MDF and chipboard, for which the problem of warping and cracking is not so relevant.
On the structural influence of seasonal deformations
Any board, be it laminated board or solid wood, is subject to swelling and shrinkage depending on the time of year and fluctuations in humidity. Tightly fixed tabletops, deprived of the ability to freely shrink and expand, under the influence internal stresses begin to deform - warp, bend, twist and eventually crack.
At seasonal change humidity levels, wood expands and contracts predominantly across the grain. The countertops of a room or kitchen set vary in width within 1 cm, depending on the size of the lid and the type of wood. Linear changes along the fibers are insignificant.
Fastening the tabletop with screws

This is a simple and time-tested option for attaching the table top to the table frames without using additional fittings. The special conical extension selected in the frame ensures slight mobility of the screw when changing the size of the tabletop. The cover itself is securely attached to the body.
Having made the basic markings, an end hole is drilled in the drawer. After this wide semicircular chisel choose a pocket for hidden installation screw.

Using a narrow chisel, make an angular expansion on the upper edge of the drawer. The extension of this groove is always done across the grain of the tabletop, since wood expands and contracts in this direction.

Installation using screws in such pockets allows you to get rid of unnecessary structural elements under the table cover. It is traditionally used in furniture classic style, where they prefer to use exclusively wooden parts. For all its advantages, this method of hidden fastening is quite labor-intensive.
Using small metal Z-brackets is another popular way to secure a countertop. The main advantages of this method are low cost, maximum simplicity and accuracy of installation, and no need for additional structural elements.

One end of the steel holder is screwed to the table top with a screw. The second is inserted into a groove sawn in the upper edge of the drawer. The recess is made in such a way that the edge of the bracket does not rest against the wood and moves freely in the groove as it expands. Thus, the fasteners allow the tabletop to change its dimensions in any direction without consequences.

Mounting on wooden clamps
Using homemade wooden clamps is simple and reliable way attaching the table top to the tabletop without purchased fittings. Clamps work on the same principle as metal Z-clamps. They are easy to make in series from scraps that can be found in every workshop. Of course, this takes time, but often not much more than it takes to go to the store for accessories.

When making wood clamps, be sure to maintain the correct grain orientation as shown in the diagram to give the bracket proper strength.


Steel figure-eight fasteners are another popular hardware option used to secure countertops. The bracket is installed in a small recess drilled with a Forstner drill or a square recess selected with a chisel so that it is flush with the upper edge of the drawer. The holder is fixed with two screws: one to the body, the second to back side countertops as shown in the photo. As the board swells or contracts, the bracket rotates slightly, preventing the wood cover from bending. The recommended distance between fasteners is 15-20 cm.

There are two types of figure-eight holders: with identical washers and different sizes. In the latter case, a washer with a large diameter is attached to the drawer. When deciding to attach the tabletop to a kitchen or room set in this way, you need to make sure in advance that the thickness of the drawer matches the diameter of the washer.
Using slotted spacers
In this case, two or three additional spacers with rectangular grooves 10-15 mm long are attached to the side frames of the headset. When changing the width of the tabletop, the screws will move freely in the grooves, thus preventing structural deformations of the wood. Additional strips act as a tie; they increase the rigidity of the body and protect the drawers from deformation.

Fastening the table legs
The legs of the table are attached to the sides of the supporting frame, and the tabletop is, in turn, attached to them. In order to ensure a tight connection between the drawers and the legs and to compensate for the shrinkage of the wood due to fluctuations in humidity, the following fastening methods are used.

Joiner joint tenon-socket
Advantages : high strength, lack of additional fittings and unnecessary fasteners, ease of manufacture.
In the kitchen, the bulk of the entire workspace is occupied by floor cabinets. They are intended for storing dishes, food and other utensils. They are built into household appliances such as: dishwashers, ovens, stoves, etc. And, of course, most of the base cabinet plays the role work surface. All these requirements for the headset require its reliability and convenience, and adjustable legs for cabinets can help with this. What are they, what are their advantages and how to install them correctly? Let's look at it in order.
Legs for kitchen base cabinets
By purchasing a ready-made kitchen set or custom-made, the first thing you should pay attention to is its base. The most common options for its design are kitchen plinths or legs. Less commonly, lower cabinets are attached to the side wall, creating the effect of furniture floating in the air.
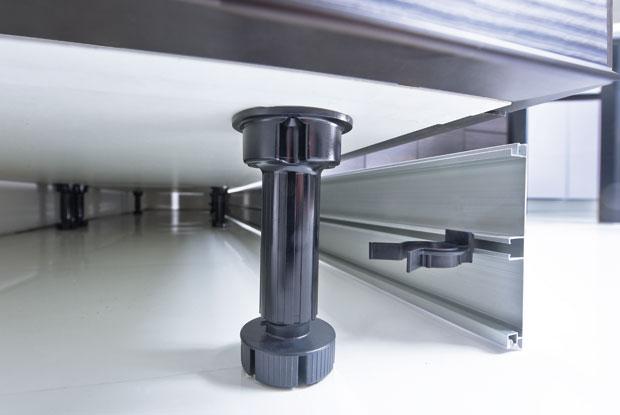
Adjustable legs for kitchen
The main requirements for a kitchen base are:
- Strength endurance. The foundation is the support for everything. He has to withstand the weight of not only the furniture itself, but also all the utensils that are stored inside it. And sometimes the weight of a person during force loads that arise during the process of cooking at the cutting table.
- The second function that the base must perform concerns appearance products. It should not stand out from the overall design of the entire kitchen, but harmoniously correspond to it.
The video shows adjustable legs for the kitchen:
Now, taking into account the main requirements, let's consider the options for the basis for a kitchen set.