How is laminate flooring done by hand? This can be easily understood if you follow the recommendations and do not deviate from the process technology, which will be given below. The main thing is that every person who at least once in his life held a tool in his hands and can use it can do this work.
Laying laminate is relatively easy thanks to a simple locking system that allows the use of tongue and groove fasteners.
Some requirements and the preparatory stage for laying laminate flooring
For the normal production of work, it is necessary that the following conditions are met:

- Before you start laying laminate flooring, you need to prepare the base. It should be smooth, without potholes and protruding elements. A floor slope of 2 mm is allowed with a length of 100 cm.
- The material itself must be put into the room where they are produced two days before the start of work. This is done for the purpose of acclimatization.
- If dents, chips and other damage are found on the laminate, the material is rejected.
- All work must be done in a room with a temperature of 16-29 ° C, with a humidity of 35-65%.
- Before it is necessary to lay a plastic film on the base to protect it from moisture and steam. The thickness of this bedding material should be 190-220 microns. For heat and sound insulation, a substrate made of polyurethane or other materials recommended by the manufacturer is laid on top.
Since concrete, linoleum, tiled or wooden floors may be present in apartments as a base, we will consider the technology for their preparation before:

- On the concrete base the material can only be laid after pouring, leveling the screed and completely drying it for a month. The old coating must be removed before applying a new layer of cement-sand mixture. After that, it is necessary to cover the resulting floor with polyethylene overlap (the allowance for the wall should be 0.15 m). All joints on the film must be fixed with tape. This is not required if a so-called dry screed is used, as it already contains a layer that protects against steam.
- If the laminate is laid on a tile or linoleum, which is laid in compliance with all the rules on quality screed, then such a base does not need to be dismantled. In this case, additional insulation from steam is not needed for laying the laminate - it is placed directly on the linoleum or tile.
- If the apartment has a wooden floor, then work can only be done if it is not affected by the fungus. If loose boards are found, they must be screwed to the lags with screws. Small irregularities are eliminated by scraping, and potholes are filled with a mixture of sawdust and glue. If the floorboards are severely damaged, they must be removed and replaced with new ones.
If possible, then a concrete or wooden base can be leveled using chipboard (plywood) sheets. They can not be isolated from steam, but they must be covered with soundproofing material
Back to index
In what cases is it impossible to lay a laminate with your own hands?

Since this material has, along with advantages and a number of disadvantages, it cannot be used in the following cases:
- if carpet is used as a base;
- it can not be used in the bathroom and similar rooms with high humidity;
- they are strictly prohibited from overlapping underfloor heating systems;
- this material must not be glued or any similar method used to attach it to the base coat.
In corridors and kitchens, laminate flooring is used, which has increased wear resistance. In this case, it is necessary to seal the lock system with special pastes.
Back to index
Methods and techniques for laying laminate
There are several types of base overlapping material:
- using glue;
- with the use of "Click" locks;
- with lock system "Lock".

The first method is similar to laying parquet board. On the edge of each panel of material, apply glue and press 2 adjacent plates to each other. This is done when it is necessary to provide high strength and protection against moisture. But such a floor cannot be dismantled later, and it is short-lived.
At the second, the spike of each panel of the next row is inserted at an angle of 27-32 degrees into the groove of the previous plate and pressed until a click is heard. For complete docking of the rows, they are knocked out with a hammer and a wooden block until the end latches are triggered.
The difference in laminate laying technique between the second and third methods is small. When using the "Lok" system, the material is laid strictly horizontally. A small gap is left between adjacent plates. The groove and tenon of the adjacent boards are combined and, with the help of a block of wood and a hammer, they are carefully driven in. This is done until the lock works.
Back to index
How to install laminate flooring

There are several options for the production of such work:
- the material must be placed parallel to the direction of light in the room;
- panels are laid perpendicular to the light flux;
- diagonal way - at different angles to the light.
In this case, you can choose the following laying schemes:
- classic version;
- type "chessboard";
- similarity of brickwork;
- diagonal cover.
At the same time, it must be remembered that it is not recommended to move the panels of adjacent rows by more than 0.2 m due to a decrease in the strength of the coating.

The classic version is most often used when laying laminate in residential and office rooms. It is very economical and is carried out in the direction of the light flux. Start work from the nearest wall, from the window. AT right places panels are cut, while the losses are no more than 4-5% of total material. It is not recommended to use panels shorter than 0.3 m unless large furniture is installed in the area to be covered.
A chessboard or brickwork consists of a subsequent row shifted by half the board. When creating such a pattern, up to 16% of the material is wasted, but the coating has a very high strength. This scheme can be used if a single-color, single-strip material is used.
The diagonal way of overlapping is one of the varieties of the classic laying of the laminate. It is produced at an angle of 45 degrees relative to the wall, where there is a doorway. Overspending of material can reach 14-16%. In square rooms, it is minimal, and if such work needs to be done in narrow or long rooms, it is maximum. This scheme is used by designers to give the interior more space in small rooms that have a corner door.
Laminate floors are considered one of the most practical, cheap, beautiful and easy to install. And this is true - you can cope with the task of laying them yourself, without even resorting to the help of specialists. The main thing is to have a desire and set aside time for work. But how to lay laminate? Let's analyze this issue in practice.
Laminate - finishing flooring, although considered easy to install and maintain, is quite delicate. It is demanding on operating conditions, on the laying process. If you neglect some of the features and rules for working with it, then the coating will not last long.


In the photo - the process of laying the laminate
Therefore, before starting work, it is worthwhile to ensure the following conditions in the room:
- temperature range - 15-30 degrees above zero;
- air humidity - about 40-70%;
- smooth, cleared of debris and dried base;
- the room must be dry. If the humidity is high, then you will have to buy a more expensive moisture-resistant material;
- heaters and other heating devices cannot be switched on while working with laminate;
- windows should be closed to avoid drafts.

Attention! Laying laminate cannot be done on sagging floors, cracked screed. Otherwise, the material will not last long. The locks connecting the coating elements will break when the material deflects, due to which the integrity of the base will eventually be violated.

It is also important to remember that the laying of the laminate can only be done 2 days after the material was brought to the place of work. This time is necessary for him to "get used" to the new operating conditions - the laminate will gain the necessary humidity, adapt to the temperature, so that during operation it will not change its dimensions excessively. It reacts sharply to changes in conditions in the room - the effect of thermal expansion may appear.

It is necessary to leave the purchased laminate in the room where the installation of the floor is planned. This is necessary for acclimatization. This process takes about 48 hours.

Choosing a laminate, you should focus not only on the color, but also on the quality of the material. It is not worth buying low-grade products that are too thin or not suitable for the operating conditions. Such a coating will serve too little, quickly lose appearance. Laminate packages must be sealed, and before installation, it is important to inspect all boards for damage, chips. Damaged laying elements must not be used.

Prices for laminate "Tarkett"
tarkett laminate
The process of laying the material may differ depending on which type of lamella is used. For example, there are three installation methods, each using a different type of material: laminate with joints Click or lock, as well as the type of coating that is mounted using glue.


Installation of laminate flooring with a click-type lock
In the case of using the adhesive method, the laminate is glued to the rough base using special compounds. The technology resembles parquet laying. Also, glue can be applied to the joints between individual planks, which are then tightly joined to each other. But this method is now practically not used, with the exception of the design of premises with very high traffic or with high humidity air. It is impossible to disassemble the laminate if necessary.
Installation of cover with type locks lock involves the connection of individual strips by the impact method. That is, during operation, the spike on one side of the lamella is driven into the groove on the other lamella. Such a coating is already losing popularity due to its shortcomings - the laboriousness of work and complex analysis if necessary.

Important! If material with this type of locks is used, then work should be done carefully - control the impact force and use a special rubber or wooden block, placing it at the point of impact.

Now most often for laying this type of floor, a laminate with joints is used. Click. Here, docking occurs due to a spike and a groove, but of a special shape, in which the elements are securely joined and connected to each other without the use of shock technology. Docking of panels occurs at a certain angle, after which the lamella falls to the floor - at this moment, snapping occurs. This connection allows, if necessary, to easily disassemble the finish and re-lay it.


Ways of locating lamellas
You can lay the laminate in different patterns, according to the schemes. Here you can choose any option that you like, the main thing at the same time is to follow the pattern. There are some of the most popular layout options. The material consumption will also depend on the choice of method.
Table. Laminate layout options.
| Layout option | Description |
|---|---|
| This is the most economical option, since the amount of scrap and waste here will be minimal. The first row is laid first, and the remaining trimmings of the last plank can be used to start the second. The main thing is that they are at least 30 cm long. The amount of waste in this case usually does not exceed 5% of the material. |
| If you look at the laminate laid in this way, then the joints will form a special pattern that resembles a chessboard. In this case, a new row always starts with a cut length so that the panel is offset to the side by 1/2 from the previously laid one. The amount of waste in this case increases to 15%. |
| Reminiscent of the classic version of laying, only performed at an angle of 45 degrees relative to the walls of the room. It looks impressive, but the amount of waste becomes even greater - more than 15%. |


![]()
To avoid possible errors while creating a drawing, it is better to design all the work in advance by sketching a laying pattern on a piece of paper. And keep in mind that the minimum offset of the joints should be 20 cm relative to the lamellas laid in the previously mounted row.

Important! Regardless of which laminate is laid and according to which scheme, there should always be a compensation gap of about 1.5 cm between it and the wall. Otherwise, the material will deform. The area of 1 m 2 of laminate under the influence of humidity and temperature can increase by about 1.5 mm.
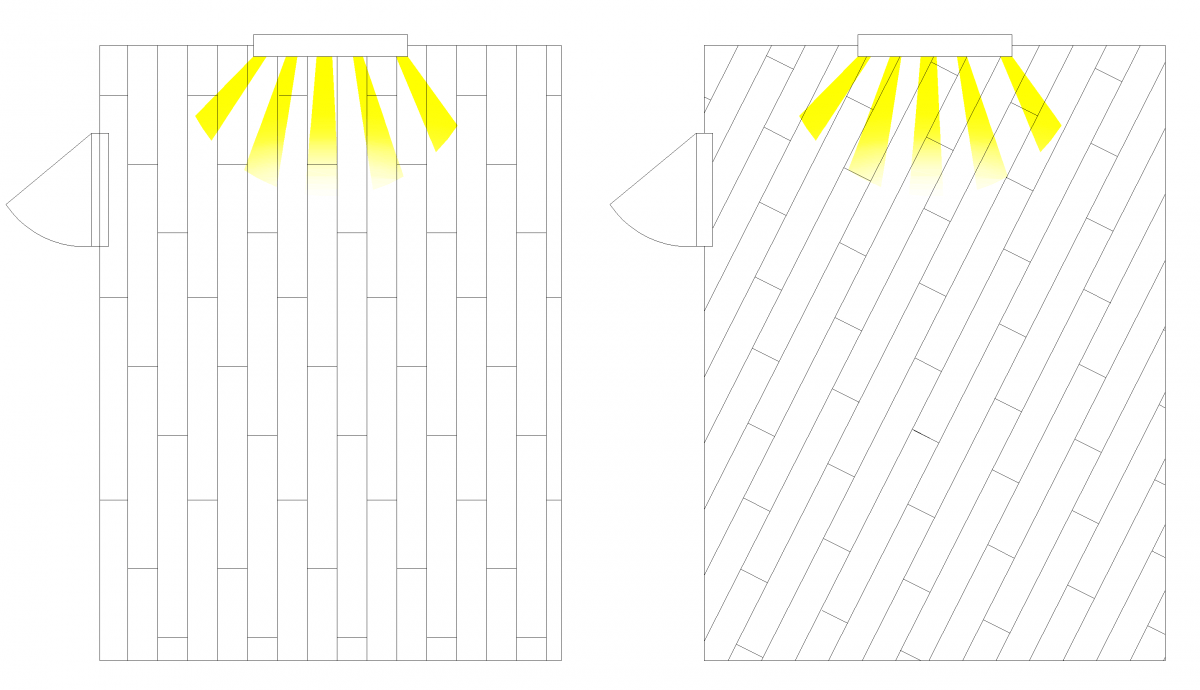
When installing a laminate floor, it is important to take light sources into account so that the gaps between the planks are less noticeable. That is, the laying is done so that they are perpendicular to the light source (for example, a window).

Also, pre-laying planning will make sure that the planks in the last row will have sufficient width (100 mm). If it turns out that they will be smaller, then it is better to narrow the first row a little.
Laminate, often used in the arrangement of the floor, can be safely called a material with balanced characteristics. In particular, it is worth noting the low cost of the laminate, which, coupled with the possibility self-laying allows you to save a significant part of the budget. How to lay out the laminate on the floor with your own hands, and will be discussed in this article.
The layout of the laminate is not the most difficult process, especially if you have some experience in the construction business. Nevertheless, it is worth studying the issue in order to avoid the most common mistakes that can be made in the process of work. Practice shows that a well-thought-out algorithm of work and high-quality preparation greatly simplify the installation of laminate.
Laminate floor design
The most important point on which further actions depend is the creation of a flooring project. There are no difficulties in this - just take a sheet of paper, draw on it the room where the laminate will be laid, and put down all the dimensions. Using a similar scheme, you can have an idea of \u200b\u200bwhat the floor structure will look like before starting work.
When designing, it is worth paying attention to the position in which the laminated panels will be relative to the source of sunlight.

Depending on this parameter, the following laying schemes can be distinguished:
- Perpendicular. Laying the laminate at an angle relative to the window allows you to mask the joints between the panels due to the rays of light.
- Parallel. This design, unlike the previous one, makes the seams very visible, which is sometimes used in design to emphasize the imitation of a wooden surface.
- Diagonally. In rare cases, laying laminated panels at an angle may be used. Installation in this case will not be easy, but if the expected result looks interesting, then the effort will be justified (more details: "").
Laying laminate can be done fifty different ways, for which the compatibility of longitudinal and end locks is used (more details: ""). The problem is that such laying of material requires serious experience, which not everyone has. That is why it is better to stop your choice when laying out laminated panels on your own for more simple models with end Lock-latches and longitudinal Click-locks.
As a rule, when laying a laminate, a perpendicular method is used. The main reason is that in addition to ease of implementation, this installation allows you to create a solid floor, on which the joints of laminated boards are almost invisible. To visually expand a narrow room, it is better to lay the laminate parallel to the window.
Diagonal styling is well suited for very small spaces. In addition, in this way it is possible to lay out the laminate in the case of a non-standard form of the room or to divide it into separate elements.

The laminate layout scheme is also necessary to determine the amount of material that will be required to complete the entire job.
The calculation of the laminate is simple:
- When laying the laminate in parallel or perpendicularly, approximately 5-7% must be added to the area of \u200b\u200bthe room;
- Diagonal styling complex and requires adjustment of the plates, so the stock should be increased to 15%.
Each pack of laminate displays the total area of all the boards inside. Having finished calculating the laying of the laminate, taking into account tolerances, you need to stock up necessary quantity material, after which you can get to work.
Installation planning
When installing laminate, you will definitely need to trim the panels. Having cut off one piece of the panel from the end, you need to lay it at the beginning of the next row so that the masonry is correct. When cutting, it is necessary to ensure that the length of the cut edge laid on the next row exceeds 30 cm (in some cases this figure can be reduced to 20 cm).

A mismatch in the dimensions of the boards can be observed both in length and in width - in this case, the panels cannot be laid without trimming (read: ""). When adjusting the width of the laminate, this indicator should not be allowed to decrease to less than 5 cm. To increase the width of the boards of the last row, it would be better to cut the first row as well. It is desirable to adjust the elements on both sides of the structure, and the canvases must remain symmetrical.
Laying can be carried out according to two concepts:
- Symmetric, in which the rows are repeated with a certain frequency;
- Asymmetric (chaotic), in which there is no clear laying sequence, and the panels are placed one after the other as the ends are trimmed.

The latter method is more profitable and simple, but it has one drawback - the insertion of parts less than 30 cm long is impossible. Preliminary offset calculation allows you to pre-fit all elements properly. Before starting work, it does not hurt to find out how to cut the laminate at homeso that the cuts are even.
When calculating the laminate laying scheme, it is necessary to take into account the thermal expansion inherent in laminated panels. The calculation uses an indicator equal to 1.5 mm per square meter of coverage. As a rule, a compensation gap of about 1-1.5 cm is left to expand the laminate, which is masked by skirting boards.
Preparing for laying laminate flooring
The preparatory work includes not only the calculation and acquisition of the necessary materials, but also the leveling of the subfloor.
To level the base floor, you can use the following methods:
- Surface grinding;
- Filling with self-leveling compounds;
- Alignment with plywood sheets mounted on logs or single mounts.
The preparation of the base is aimed at ensuring that the height differences over the entire floor area do not exceed 2 mm per two square meters. When the leveling work is completed, it is necessary to thoroughly clean the surface of debris and dust so that this dirt does not later get into the laminate locks - this may cause extraneous noise.

The material also needs to be prepared for work. It is impossible to use the laminate immediately after purchase - it must stay indoors for at least two days and acclimatize. It is advisable to put packs with laminate in the center of the room on top of each other so that moisture from the walls does not penetrate into the material.
When needed time will pass, the laminate must be removed from the packs and laid out to check for the presence of different shades - if they are found, then the coating is distributed over the entire surface of the floor. As a result, even in one room, a slight change in the color of the flooring will remain invisible (just look at any photo of laminate floors and see for yourself).
Laminate laying algorithm
The assembly of the laminate without any problems is done by hand, but for this you need a device for laying laminate, and you should also understand the sequence of work.

Laminate layout algorithm is as follows:
- After leveling the base, it is necessary to take care of waterproofing, which is especially relevant in the case of a concrete floor. The moisture resistance of the laminate is not very high, so waterproofing is needed (this rule does not apply wooden base). It is necessary to lay the waterproofing material with a 20 cm overlap, and the joints are connected with adhesive tape.
- Next, a layer of thermal insulation is laid. Thickness thermal insulation material can vary from 2 to 7 mm. During installation, the thermal insulation elements must be joined, avoiding overlap - this can cause bending of the laminated boards. The substrate is laid perpendicular to the location of the laminate and glued with adhesive tape. It is also necessary to take into account an important point in advance - the waterproofing must lie across the substrate.
- The next step is laying the first row of laminate. When connecting the locks of the plates to each other, it is worth considering the manufacturer's recommendations indicated on the packaging with the material. As a rule, a rubber mallet is used for mounting laminated panels, which allows you to protect the locking system and the panel itself from damage.
- Next, you need to assemble the second row in accordance with the selected technology. After assembly, the tongue of the second row is inserted into the groove of the first at the angle specified by the manufacturer.
- The connected rows must be moved towards the wall, while not forgetting the expansion gap. To provide the necessary space between the laminate and the walls, spacers (homemade or purchased) are used, which are installed on the ends and sides of the coating.
- Having collected the first rows, you can install the next ones using the same technology. Thus, the entire floor covering is laid, up to the last rows.
- Approaching the completion of the work, it is worth measuring all the canvases in order to fit them if necessary. Room walls are very often uneven, so accurate measurements can prevent damage to laminate flooring due to improper trimming.
- In order for the last row to be qualitatively kept in its place relative to the entire coating, a special bracket is used, which is located in basic set tools needed for laying laminate flooring. However, often the last row is fixed with the help of ordinary things, such as a hammer or mount.
Laying laminate flooring in narrow spaces
When installing laminate in almost every room, you have to deal with uncomfortable places in which it is very difficult to work. Doorways, radiators and various pipes greatly interfere with the installation of a laminated coating.
Depending on the type of interference, laying the laminate will look like this:
- When installing laminate around heating appliances to collect the correct flooring will not work. To get rid of this problem, part of the ridge is cut off, after which the panels are connected with glue.
- Equipping the floor around the pipe, you need to measure the dimensions of the latter and cut a hole in the panel, the diameter of which will slightly exceed the data obtained. Next, a cut is made in the laminate, allowing the slab to be laid in its place. The cut off part is placed behind the pipe and fixed with glue, and the remaining gaps are masked with sealant or plastic overlays.

Laying laminate in doorway starts by cutting off the bottom of the joint. In order not to cut off more than necessary, the thickness of the floor covering is pre-measured, taking into account the substrate. It is better to do trimming in another room so that dust does not get into the laminate lock, but if this is not possible, then cleaning will be required after work. On the laminate, the dimensions of the door frame are drawn, taking into account all the bends in such a way that as a result the panel lies on minimum distance from the opening.
Then you can proceed directly to the installation. The plate is mounted so that it is possible to hide the joint behind the threshold. It is also worth considering that after installing the threshold, the door should close freely. It is necessary to use camouflage strips if the dimensions of the coating exceed 10 m in length and 8 m in width - this design allows you to close the deformation gap.
Conclusion
From the above, we can conclude that do-it-yourself laminate layout is carried out without any problems, if you know the technology of this work and take into account some of the nuances that arise during the installation process. After all, laminate flooring is an inexpensive flooring, and the opportunity to save even more on installation is clearly worth it to install the flooring yourself.
One of the most popular flooring materials is the so-called laminate. It is a multi-layer coating resembling particle board with a very strong outer protective coating. The idea of manufacturing laminate panels and using them for flooring was born in the 70-80s in the West and very quickly spread throughout the world. Now this type of flooring is as popular as parquet, ceramic floor tiles. One of the advantages of the material is possibility of self-installation. Now we will decide what tools will be needed, how to choose the material and where to start laying the laminate.
Varieties and marking of laminate
Modern types of laminate, presented in the markets of Russia and the countries of the former CIS, have a thickness of 7 to 12 mm, a length of 1.2 - 2 m and a width of 180-190 mm. The main indicator for him is the abrasion class - it can be AC-3, AC-4, AC-5, AC-6. Previously, these classes were 31, 32, 33, 34, while AC-5 corresponds to class 33. It is better to choose the most wear-resistant laminate: class AC-4, AC-5 is quite suitable for a house.
All modern laminate flooring is equipped with Click or G5 locks or their modifications. The G5 lock is one of the most modern locks and is loved by all specialists. Inside the lock is a fixing plastic bar. It snaps into place when the tenon enters the groove, requiring little force. There is a laminate with chamfers and without them. The outer face of the flooring has a very wide range of decorative patterns that are under the protective top layer.
Tools and materials
 When performing flooring work, you need to stock up on a certain set of tools, it will also come in handy in the future when repairing or installing ceilings, walls or floors. The required tool kit should contain:
- tape measure and pencil;
- building level at least 1.5 m long;
- electric jigsaw with a set of blades or a circular saw;
- electric drill;
- perforator;
- construction vacuum cleaner;
- grinder with a nozzle for grinding a concrete base;
- feather drills;
- knife with spare blades;
- square;
- a hammer;
- special bracket for tightening panels;
- hacksaw for metal.
No special tool is required, and every master who performs various construction works or repair. With a large-scale performance of laying flooring, they resort to the use of a trimming machine.
 Materials required for laying laminate flooring, the number of which must be calculated and purchased in advance:
- vapor barrier film 0.2 mm thick;
- substrate;
- construction tape, adhesive tape;
- laminate panels are purchased according to the size of the area of \u200b\u200bthe room with a margin of at least 5%;
- expansion wedges;
- plinth fasteners;
- plinth around the perimeter of the room;
- additional elements for plinth: internal and external corners and plugs.
If the area of the room is large, it must be separated by expansion joints. For this, there are special flashing strips that are matched to the tone of the main laminate.
Surface preparation before laying
 You can lay laminate on a concrete floor, cement screed, wooden floor, ceramic tiles and any other flat, durable, dry floor. Highly important requirement to the base is its smooth and even surface, deviations from the horizontal must not exceed 2 mm per running meter. For this purpose, use the usual building level and measure the entire room in different directions. If deviations greater than this value are found, they must be corrected. When used as a base under laminate cement screed or concrete floor to level them, you can additionally cover them with a thin layer of the so-called self-leveling floor.
The deviation of the surface from the horizontal with proper filling will be no more than 1-2 mm per two running meters length. If for various reasons this is difficult to do, you can try to grind the bulges.
The surface before laying must be clean and dry, the humidity of the base is allowed within 40-65%. The optimum temperature for laying should be between 18 and 22 degrees Celsius. Therefore, before you start laying the laminate, the lamellas must be kept indoors for at least 48 hours in order for acclimatization to occur. During this time, all preparatory work is carried out to level the base of the floor, cleaning and marking. It is worth recalling that it is necessary to buy a laminate in an amount that is 5% larger than the floor area.
On video: underlayment and laminate laying technology.
Proper coating technology
There are generally accepted rules for laying flooring panels, in particular, The layout of the slats is made along the rays coming from the window. That is, the long side of the bar should be perpendicular to the window. Therefore, the answer to the question of where to start laying the laminate is simple: along any wall perpendicular to the window. In this case, the seams between the panels are less visible. Laying laminate on the diagonal of the room, although technically feasible, is not used due to a large number waste, and the seams with this layout will be more noticeable than with the traditional one. 
After laying the first row, the second row is shifted by 1/2 or 1/3 of the length of the laminate plank. This is done to more firmly connect the laminate into one common array. A method can also be used when the second row starts with trimming from the previous row - in this case, the minimum amount of waste is obtained. Usually, the calculation of the laying scheme of the laminate is performed.
Before starting work, a vapor barrier film with an overlap of 150 mm should be laid on the surface of the base and glued with adhesive tape. The film is laid in such a way that it goes onto the walls, where it is subsequently pressed with a plinth. Then it is necessary to lay a layer of the substrate with a thickness of 2 mm - usually it is rolled polyurethane. There is also a more expensive cork underlay, it is often used in offices, as well as when laying parquet.
 The next step is the laying of laminate boards. Before laying begins, the entire laminate should be reviewed to ensure that all locks are intact and clean. It is also necessary to calculate the laying of the laminate and find out the width of the last row of boards. This width must not be less than 50 mm.
You can start from any wall perpendicular to the window. The first row of laminate is laid along the wall, the planks are connected with end locks. At the same time, a gap of 10 mm is left between the laths of the laminate and the walls, which is provided with the help of spacer wedges. There are several ways to connect second row laminate planks. You can install each bar separately, as indicated in the instructions. But it is better if, first, the planks of the second row are connected to each other using end locks. Then the entire second lane is joined to the first, sometimes an assistant is required for this. 
Nuances and subtleties when laying laminate
With high-quality preparation of the base and correct styling laminate flooring can last a very long time - up to 20 years. At the same time, it is important to observe the humidity regime and arrange a vapor barrier, since this material is very sensitive to moisture. It is not used in bathrooms. It is also necessary to perform temperature gaps near the walls, door frames. Laminate flooring is a type of floating floor. With changes in humidity and temperature of the slab, the entire coating expands and if sufficient gaps are not made, swelling may occur.
 When installing laminate flooring in several adjoining rooms it is worth splitting the array and not making it continuous in all rooms. Better split it at the border interior doors with the help of a special pad. In this case, it is easier to make repairs if the laminate suddenly swells in one of the rooms.
In the corridor, when laying the laminate, you must use next rule: lay the panels with the long side in the direction of the predominant movement, that is, from the front door.
Conclusion
When performing work on laying flooring, you must strictly follow simple rules. Also, the durability of such a coating depends on the quality of the laminate boards. Therefore, you should not save on material, but buy flooring only from proven world leaders, since such savings can turn into big problems. Technologically, laying laminate flooring is not very difficult, and therefore this work can be done by anyone with a tool and certain skills. If it is difficult to do the work yourself, you can turn to specialists who will help you choose and lay a laminate.
Laminate laying secrets (2 videos)
Market building materials rich in variety of floor coverings. Laminated panels are the youngest type of all, however, due to the variety of textures and colors, strength and versatility, this material has managed to win the trust of consumers. Laminate laying technology is thought out and calculated, so even a novice in the construction business can lay out the floor.
What conditions for the operation of the laminate must be met?
Before you start directly laying the laminate, you need to provide all the conditions for its use. Experienced Builders know that you need to work with this flooring in a well-heated room. The house should be warm and humid. It is advisable to maintain the temperature in the apartment at the same level within 20-30 degrees Celsius. The recommended air humidity should be 40-70%.
What tools are needed?
Do-it-yourself laminate flooring is a simple task, the main thing is to prepare everything necessary materials and tools. You will need:
Laminate sheets;
Primer;
Foamed polyethylene;
Thin polyethylene, thickness - 200 microns;
Skirting boards and fixings for them;
Special wedges for gaps, wooden pegs or crosses.
To work, you need to prepare the following tools:
Construction corner and tape measure;
Knife and pencil;
Electric jigsaw or hacksaw;
Rubber mallet and wooden block.

Foundation preparation
Do-it-yourself laminate flooring requires certain preparatory work, namely the creation of the foundation. It should be perfectly smooth and even. They can serve: tile, concrete, wood or linoleum.
The most common is the technology of laying laminated concrete floor. The final layer of the finished flooring can be placed only after the base has dried. If the new house was flooded cement-sand mixture, then the laminate can be laid out only after a month. When working with an old base, you need to check its condition after the previous coating has been removed. To avoid bumps and cracks, it is leveled with a special mixture. If the damage to the concrete cannot be repaired, then a new screed is made.
Do not forget that a layer of vapor barrier must be laid on the self-leveling floor. It is made of a polyethylene film with a slight overlap on the walls (no more than 12-14 cm) and an overlap of 15-25 cm. The thickness of the vapor barrier layer should not be less than 200 microns. To make the coating uniform, its joints are fixed with construction tape.

The technology for laying laminate on a wooden floor is somewhat different from the method described above. It is possible to cover such a floor with a topcoat only if the previous old material free from pests, fungus and mold. Poorly fixed floorboards are securely fastened with self-tapping screws to wooden rails or logs. Roughness and unevenness can be easily eliminated with scraping. If there are gaps or badly damaged boards on the old floor, then it would be more expedient to replace them with new ones. To do this, you need to disassemble the floor area to the lag.
To level such a floor, you can use chipboard sheets. The technology for laying laminate on plywood will be the same as on the screed. The only difference is that chipboard does not require a vapor barrier, it is enough to place a soundproof substrate on it. You just need to put the sheets in checkerboard pattern- this is the main rule of a flat floor.
Also, laminate can be laid on durable and fixed surfaces in the form of linoleum and tiles. They guarantee a flat floor, protect against moisture, which means they can be an excellent base for finishing panels. The technology of laying laminate on linoleum or tiles has its own characteristics. Before starting work, it is imperative to check the surface with a building level, making sure that the floor is even, you can start laying the substrate for sound insulation. After carrying out all the manipulations, you can safely begin the installation of laminate panels.
Where not to lay out the laminate?
Despite the fact that some consider laminate flooring to be a universal floor covering, it can not be installed everywhere. It is strictly forbidden:
Laying laminate flooring in the bathroom, bath and other similar rooms;
Attach or glue to the floor base;
Lay it on carpets;
Lay laminate panels on matte and cable system"warm" floor, which is under electrical voltage.
Laying methods
Do-it-yourself laminate flooring involves the use of a certain method of attaching flooring panels. There are two main methods: the Click and Lok locking systems and the adhesive method. The latter is similar traditional way laying out parquet, this is the so-called tongue and groove system. The edges of the panels are lubricated special glue thanks to him they hold on tight. The glue method is used in rooms that are intensively used by people. This system provides protection against water ingress and increased strength of the seams. This process is quite laborious, plus the floor structure cannot be disassembled.
The use of locking systems greatly simplifies the laying of laminate panels. The essence of the Click system is that the spike on each row is inserted into the groove of the previous one. It snaps into place at an angle of 30 degrees, and for the end lock to work, you need to tap on the panel with a hammer.
Do-it-yourself laminate flooring castle system Lock involves mounting panels strictly horizontally. The spike is combined with a groove in an already laid structure. In order for the lock to work, it is carefully driven in with a hammer.

Laminate laying technology: scheme and installation rules
There are three main schemes for laying laminate flooring:
At a certain angle to the direction of the light, in other words, diagonally;
Parallel towards the light;
Perpendicular.
Most often, laminate laying technology involves the second option, but this is not a prerequisite. Depending on the design projects flooring can be laid in different ways. The only thing that needs to be observed is the installation of panels with a shift. Experts call this method "out of the box". The bottom line is to lay out each next panel with a shift relative to the adjacent row.
Chess layout
Outwardly, this pattern is very similar to brickwork. This three-lane scheme assumes the displacement of each subsequent row by half. The "brick" method can hardly be called economical, since the material overrun is about 15%. However, this method is the most durable of all. It is best to use material of the same color or shade when laying, so the checkerboard pattern will look more harmonious.

Classic styling scheme
Do-it-yourself laminate laying technology according to the classical method is considered the most beneficial for the owner of a house or apartment. It begins to be performed parallel to the direction of the streams of light, that is, from the nearest wall. The cut off piece of the panel becomes the beginning of the next row, this is the essence of the savings - almost all the material is used during the work. It is not recommended to use parts of the laminate with a length of less than 25-30 cm. An exception may be areas of the floor hidden from view, that is, places where large-sized furniture will stand.
Laying "diagonally"
This method involves laying the laminate at an angle of 45 degrees relative to the doorway, that is, the wall where it is located. This scheme visually transforms the space of the room, making it more spacious and free. Designers advise laying out the laminate in this way in rooms with a corner front door. The overspending of material is on average 15-20% of the total number of panels. However, keep in mind that the rooms square shape, unlike narrow or wide ones, the material is consumed with minimal residues.

Stages of work
1. First you need to leave gaps between the wall and the first row of at least 10 mm, you can adjust them using wedges or crosses.
2. Each row should be laid out with an offset of the next one by at least 15 cm.
3. It is best to start installation from a corner near the heating pipes or radiator. If you end up working in the place where the heating system is located, it will interfere.
4. Where laminate panels connect to pipes, holes must be made using a jigsaw or construction knife. Be sure to leave a gap between the radiator and the coating.
5. The final row of laminate is cut to size. The geometry of the rooms is rarely perfect, so its length, width and curves are strictly individual.
7. After all the work, you can start screwing the skirting boards and decorative thresholds near doorways. Wall planks need to be fixed with the help of adhesives, they press them tightly to the floor and evenly press on the entire area of the laminate.
The floor covering, which is mounted on a locking system, is ready for use immediately. The laminate, laid out with adhesive, should dry for some time, which is indicated on the package.

Previously, the technology of laying a laminate was considered. Preparation and recommendations of specialists will help to lay out the floor more efficiently and beautifully:
Never lay laminate flooring in wet rooms, remember, he is afraid of water;
When buying a material, pay attention to the manufacturer, evaluate the level of wear resistance and resistance to scratches and other damage;
Do not forget to check the quality of the purchased products, the service life of the flooring depends on it;
Wear resistance can be tested at home with sandpaper;
Correctly calculate the amount of material, not forgetting about overspending (on average 15%);
If the laminate smells unpleasant, then it is unlikely that it is made of quality materials;
A good floor covering should have a decent weight, lightweight materials are likely not dense enough and shock resistant;
Before buying, inspect the panels from the end, they should be even, without bends;
It is only necessary to level the base if there are many drops and irregularities on the surface;
Do not forget to leave gaps between the panels and walls, the laminate dries out and expands;
Scratches can be removed with a mixture of baking soda and water;
Laminate flooring should be washed no more than twice a week;
Water with vinegar, lemon juice will help clean the floor from dirt and dust and give it shine.
This article will help you master the technology of laying laminate and do it yourself without the involvement of specialists. Follow the instructions and your floor will be beautiful and even.