Decorative materials are installed upon completion of installation or repair of floors. The plinth is designed to hide technical gaps, ugly seam elements, and can also close communications if they are laid in the plinth niches. Skirting boards can be fixed different methods to walls or floors.
Choice suitable option depends on what flooring was chosen, the material of the plinth, and the technology that is most convenient. Despite the seeming simplicity of the process, faced with a lack of experience, I would like to ask experienced comrades: how to fix? Next, you will learn the secrets of this process and learn how to attach different types plinth to the floor.
Types of skirting boards and the secrets of their installation
Decorative trims can be purchased at a hardware store and are made from wood, plastic, or MDF.
Wooden decoration is well suited to any flooring material, but due to the high cost, it is most often used for parquet or parquet flooring. Skirting boards can be found as ordinary domestic ones made of oak, larch, alder, and corresponding to European standards, with special niches for cable laying.
 Plinth is made from various types of wood.
 It is worth remembering that wooden skirting boards should not be mounted on uneven walls, there is a risk of getting ugly, or even poor-quality work with skirting boards that cannot hold.
Before installing the skirting boards, it is necessary to cut the plank to exactly the right dimensions.
Skirting boards on MDF base
Planks with an MDF base are slats covered with foil, laminated film or veneer. In terms of aesthetic and decorative indicators, they are no worse than materials from valuable species wood, but their price compares favorably to the lower side. MDF is a fairly fragile material, which can be easily damaged if used incorrectly. That's why floor plinth from MDF, they are mainly attached to the walls with the help of hook-shaped staples, on which the planks are then hung.
 Skirting boards from MDF are similar to skirting boards from valuable varieties wood.
 For the visual design of the corners and cuts of the plinth, corners and end caps are included with it. This move by manufacturers allows you to easily dismantle the planks and install them again after the floor repair process.
Plastic plinth
PVC planks have a high strength index, and are not afraid of temperature changes, water treatment and sunlight. Plastic strips are made according to the example of wooden skirting boards and are ideal for floors covered with laminate, carpet, linoleum. But at the same time, they look tasteless when mounted on parquet.
PVC skirting boards, which are made to work with carpet and linoleum, are equipped with special grooves for securely fixing the edges of the floor covering. Light rails can be attached with liquid nails, which is quite easy and does not require a large number forces. But the disadvantage of this type of fastener is that in the future repair of the skirting board will have to be torn off the floor, and the material will be damaged.
 Plastic has a huge selection of shades.
 The advantages of plastic baseboards include the presence of internal channels for cables, as well as the possibility of using plugs to form a beautiful corner. Also, the plastic plinth does not need to be cut, but uneven wall will not become an obstacle for installation, because the plastic is quite flexible and will not break from pressing.
Mounting base of the plinth - floor or wall
The floor and the wall are perpendicular, which means that we have two options for fastening skirting boards. The preferred way would be easier and more convenient. It is easiest to attach the plank to the surface that the screw will most easily go into.
Thus, in houses with concrete floors and a cement screed, it is advised to fix the baseboard to the wall. In housing made of concrete and brick with a wooden floor, it is more reasonable to fasten the plinth to the floor.
 The process of attaching to the wall.
 For attaching the skirting board to a concrete screed floor or to concrete walls, first we drill holes with a puncher, into which plastic dowels are then driven. The distance between the fixing points is determined by the degree of unevenness of the base, as well as the parameters of the skirting boards themselves. The universal distance between the fixing points of the plinth is the gap between 30 and 40 cm.
Walls that are finished or lined with plaster, or made of drywall - will be a poor platform for fixing skirting boards. soft material will not allow fixing the plinth.
If there is no other way, then for fixing on fragile material it is necessary to buy special self-tapping screws that are suitable for working in such conditions, or finishing galvanized nails.
How to fix the plinth
There are many ways to fix the necessary skirting board to the floor. They are suitable for different situations, which means that among their abundance you can find an option for yourself.
Liquid Nails
The fastest and convenient way are the so-called "liquid nails". But they also have a drawback - when planning subsequent repairs to the plinth, you will have to purchase new trims, because. liquid nails glue the baseboard and base tightly. This fastening method is perfect for fragile skirting boards, and the processing technology itself is very simple - apply glue drops on the back side of the rail and fix it on the surface. After this process, you will know how to properly attach a fragile baseboard to the floor and during subsequent repairs, its installation will be much faster.
Special clips and fixation strips
Skirting boards made of MDF or plastic, which have grooves inside for fixing on special clips, will not have holes for fixing screws. Fastening plastic skirting boards to floors is quite simple, but you must strictly follow the technology for installing clips. Under the hidden method of installation is meant the attachment to the floor or wall of only the supporting part, on which the plinth is then hung.
Sorry, nothing was found.
In order to mount the inside, you must:
First, place the fastening element on the floor, at a distance of 5 cm from the corner from which the installation will be carried out. Then press the clip against the wall, and then mark the place for drilling the dowel holes. Further, every 50 cm, holes in the wall are marked and drilled, the diameter of the drill must correspond to the size of the complete dowels. With the help of complete fasteners, devices for the concealed fastening system are installed and it is quite simple to install the strips on the clips, just attach the skirting board and lightly press.
Mounting with dowels and screws
Plastic skirting boards for the floor are especially suitable for this method of fastening, you do not need to think for a long time how to fasten them, and if you have any questions in the process, you can always find a video experienced builders. First you need to mark the wall, starting from the corner of the long wall. Before the marking process, a corner accessory is put on the plastic plinth, and the edge of the rail is sawn at a 45-degree angle.
You can start the process of marking the base, but first, to mark the first point, we indent 5-6 cm from the corner area, and then:
- The plinth is pressed against the wall and floor, and a hole is drilled through the first point marked on the plinth so that a drill mark remains on the wall. If the plinth is plastic, then it can be pierced with an ordinary awl for marking;
- The plinth is removed from the surface;
- Holes are punched with a perforator for further clogging of dowels;
- After that, dowels are driven in, a plinth is laid according to the markup, and self-tapping screws are screwed into the holes just above the attached bar.
The next steps are similar to the previous ones. After installing the skirting boards over the entire area, the screws can be painted over with a wax pencil, the color of which should be in. If during the sawing of the planks they received minor damage, they can be hidden with a primer mixture. If you have any questions, then a photo of the process can be found on the net.
Unusual mounting method
There is also another rather non-trivial method of attaching a regular baseboard to the floor, which is only suitable for plasterboard and aerated concrete walls. We need thin nails with knocked-down hats, which are driven in from the back of the plinth with sharp sides up at a distance of 40-50 cm from each other. Next, liquid nails are taken, which are applied in drops every 20-30 cm. The plinth is pressed against the wall with such an effort that the nails enter a fairly thin wall and put the bar on the glue. This method is ideal for drywall and other substrates, since after applying the adhesive, the rail does not need to be pressed against the wall, the nails take care of this.
The above methods of attaching skirting boards will help you choose a convenient and practical option to complete the repair, as well as remove questions about how the skirting boards are attached to the repaired floor. If you think over the process and technology of installing the skirting board, then the work will be perfectly done, and you will not have to spend money on the purchase of material again. This article explains which surface to install the planks is more preferable, talks about how to glue the skirting board on the floors.
Quality of execution finishing very important. It is the little things that create comfort or, conversely, “kill” even the most good repair. In this article, we will talk about how to fix the baseboard so that it is both reliable and beautiful.
It's not about the form and range, but about the materials. The installation of skirting boards often depends on the material. Some installation methods are not compatible with all. So, skirting boards for the floor are made of four types of materials:
- wood;
- plastic;
- metal.
Metal skirting boards are more often installed in offices, although in ultra-modern high-tech, loft, minimalist styles they may be appropriate in an apartment. But, most often, wooden products are used in an apartment or house. AT last years, MFD and plastic are also becoming popular. They are easier to match the color of the flooring or door, because they are often made using the same technology.
How to fix the skirting board: to the wall or to the floor?
You can fix the floor plinth both to the wall and to the floor. The most common choice is wall mounting. This method is necessarily used if the floor covering has a sufficiently large coefficient of thermal or thermal and moisture expansion or the floor covering is not connected to the base (floating floor). These are the types of coverage:

In all other cases, the plinth can also be fixed to the floor. It's even easier. Unless, of course, this concrete screed. Nails / screws fit well into wood, plywood, SVP, OSB. If the walls are even, there will be no problems. If the curves, it will be necessary to look for elastic baseboards. Then it will be possible to hide defects due to the flexibility of the planks.
How to fix the baseboard to the wall: what are the methods, their advantages and disadvantages
Before installing the skirting boards, it is advisable to take care of improving the heat and sound insulation. There is sound insulation on a self-adhesive basis, it is sold pasted on sheets. You can find it at a hardware store or car dealer. Before fixing the baseboard, glue strips of soundproofing to its bottom. It is necessary to stick the strips with some gap - so that the air can circulate. With soundproofing it will become much quieter, the effect will be especially noticeable with a laminate.

There are three ways to attach skirting boards:
- On self-tapping screws or nails, on dowels.
- Gluing.
- On clips or mounting plates.
All three methods are not ideal. All have pros and cons. Two ways - fastening and gluing - can be used both for fixing to the wall and to the floor. The clips are attached only to the walls. Let's analyze objectively all the ways of fixing skirting boards. So it will be possible to choose the best for each specific case.
Through: on screws or nails
Mounting on self-tapping screws or dowels is called through. The plinth is drilled through, part of the fastening goes into the wall / floor. The hat remains on top. From a safety point of view, it's a great way. From an aesthetic standpoint, it's dubious. Fastener caps, if left uncovered, can be quite noticeable.
 Through fastening of the MDF skirting board to the wall is reliable, but not always aesthetically pleasing
 Of the benefits - if necessary, the strips can be removed without much damage to the wall and the baseboard itself. Especially when installing on self-tapping screws or dowels. They are normally unscrewed, and then put into place. And another advantage - you can more or less normally press the bar against curved walls (with a curvature of 4-5 mm). There are practically no other options. To improve the aesthetics, you can try to mask the fasteners, make them less noticeable. But the specific method depends on the material and will be described in the appropriate section.
If we are talking about plastic baseboards with a cable channel, then there are no disadvantages associated with protruding fastener caps. Hats will be hidden under the lid.

On glue
Gluing skirting boards to the wall works well, but only if the walls are even. Smooth - this is with a maximum deviation of not more than 1-2 mm. Otherwise, it will be necessary to fix the “problem” places at least until the glue sets. It's at least a few hours. Holding hands is too problematic. You can try to prop it up with something heavy, but it doesn't always work. Another drawback is that if you need to remove the plinth, it's not easy to do it. Either with a piece of trim, or a plinth in pieces.

Glue for gluing floor plinths - "liquid nails". When choosing, consider the material of the plinth and wall / floor. Both materials to be glued must be indicated in the instructions. Look at the setting time. It is critical just for not too smooth walls, otherwise you will keep problem areas for a long time.
You can use silicone or acrylic sealant instead of glue. It is better if it is not rigid after polymerization - it remains elastic. For example Silicone-Acrylic Sealant 420. Also make sure it is compatible with both surfaces. What is the best elastic sealant? The fact that when it will be necessary to remove the plinth, the semi-rigid mass can be cut with a knife. And this despite the fact that it holds well even on curved surfaces.
Hidden way to install skirting boards - on clips
There is a newfangled hidden way of attaching skirting boards - on clips or mounting plates. Its essence is that special plates or clips (smaller) are attached to the wall. These clips and plates have specially shaped protrusions. There are just protrusions, there are teeth. On the plinths, grooves are made for them. During installation, the grooves must be “put on” on the protrusions. The idea seems to be good, but installation may be difficult.
Clips for plinths must be set exactly in the level. If there is a laser level - it's easier, otherwise - a lot of trouble. And, even if the clips are set at the same level, it is possible to “plant” the grooves normally only on flat walls. And then, to achieve that everyone "clicked" is difficult. And if not every clip will hold, then the skirting boards move away from the wall. Often you have to additionally "attract" them with the same self-tapping screws. Mounting, to put it mildly, weak. For example, L-shaped brackets do not hold the baseboard if the floor covering - linoleum or carpet - has not yet settled down. They "squeeze" the bar out of the mount. Maybe a little later more reliable systems will appear, but so far, fixing the skirting board to the brackets is unreliable.

There is one more thing: skirting boards are removed from the clips and mounting plates easily. But it will no longer be possible to re-install the same strips - the grooves are crumbled and do not hold at all. It is necessary either to file the slats so that a “fresh” section gets on the clips, or to rearrange the clips. Which is not fun at all.
The situation is a little better with mounting on a rail - this is a special bar with grooves. It differs from clips in that it runs along the entire length of the skirting board. The guide is attached to the wall, and the plinth “snaps” onto it. Due to the fact that the guide runs along the entire length, the fastening is more reliable. And you can achieve a fit without gaps. But there is a difficulty here: the floor must be even.
How best to fix a wooden baseboard
nail wooden plinth nails - this method of fastening has been known for a long time. According to the standard, nails / dowels / self-tapping screws should be installed at a distance of 80-120 cm from each other at a height of 15-20 mm from the floor. The length of the fastener should be 3 or more times the thickness of the skirting board. Before installing fasteners, holes are pre-drilled in the array. The diameter of the drill is selected 1-2 mm less than the diameter of the fastener. This will prevent the wood from cracking.
Through fastening of the plinth is the simplest and most reliable method, but it has ceased to suit us - the requirements for the aesthetics of the finish have increased greatly. Protruding hats suit few people. There are several ways to make the mount discreet or unobtrusive. Before fixing the plinth, select one of them.

The easiest and cheapest, but not the best, is to "drown" the hats deeper, and close the holes with plastic circles. They are available in different colors to match. The solution, frankly, is so-so. Firstly, plastic, no matter how you choose, is different from wood. Secondly, the profile of the plinth does not allow these mugs to be laid evenly so that they follow the curves. Thirdly, they still fly off and get lost.
You can also cut small chopsticks out of wood and close the holes with them. It will be a little better, but not perfect. All the same, they stand out - the direction of the fibers is different.
To minimize damage to wood, fasten the baseboard to special nails - finishing. Their cap is slightly thicker than the shaft of a nail. But this method is only suitable for wooden skirting boards. And in order to drive a nail into a tree and not damage the wood, you need a chipper and a certain skill. Chipper sharp end rests on the head of the finishing nail, on its thick side with a knocking hammer, driving the nail deeper into the wood.
 Special nails and self-tapping screws - so that the fasteners are less noticeable
 The same result - with minimal damage to the wood - can be obtained using countersunk head screws. They have a small conical head. They are sometimes also called "finishing". During installation, the head of such a screw almost completely goes into the wood. There are even special self-tapping screws for wooden skirting boards. They differ in that they have two sections of thread with different direction(see the photo above on the right). The second part serves to pull the plank to the wall.
The remaining small hole is sealed with wood putty. When dry, smooth with fine grit sandpaper (400 or less). But this is if the plinth is not dyed and not polished. If the finishing was planned to be carried out after installation.
If the plinth is dark, this trick does not work. The holes from the installed nails are only visible due to the “translucent” unpainted wood. To remove this defect, in stores selling furniture fittings, look for a furniture marker or pencil suitable color. Take a piece of skirting board with you, make holes or scratches in it, and test the “candidates” on the spot. The one that will give the best result, you can buy.

How to fix a plinth made of wood in a different way? Wooden baseboards - for mounting on clips - are also sold. But these are mostly imported systems and they cost a lot. And wood, most often, veneered. In addition to the fact that it is easier to choose the color and texture, it also reduces the thermal and moisture expansion. But in wet rooms, such skirting boards, anyway, cannot be used.
What you definitely should not do is to fix the wooden skirting board with glue. Unless if the floor or wall has the same thermal and moisture expansion as the baseboard itself.
MDF plinth fixing
Choosing how to fix the MDF baseboard is more difficult. All three methods can be used: on self-tapping screws / dowels, on glue, on clips / guides. About how to fix the MDF skirting board with glue, it is worth telling in more detail. This method works with even walls - if the deviation is not more than 1-2 mm. First of all, skirting boards should rest in the room where they will be installed for at least a day, and preferably more. Glue is chosen any compatible with wood and wall material. It is more convenient if the glue is in a tube that is installed in the mounting gun. Normal Tytan fix&seal, Soudal fixall. This is from the category of "liquid nails".

First, t to the desired size, if necessary, cut at an angle of 45 °. The glue is applied with a thin “snake”, the bar is pressed against the wall. Try not to stain the front side and walls - it is difficult to remove both liquid and dried. After you have glued, go through pressing along the entire length, achieving the absence of cracks. If the "seizure" of the glue is normal, with a slight curvature of the walls it can be done without cracks. If not, you will have to use cargo in problem areas. Something heavy is needed. If the load has sharp or protruding edges, in order not to damage the baseboard, lay some kind of dense fabric between it and the load. Something like felt, a piece of linoleum with a base, etc.

But even relatively smooth walls are not a joy for everyone. What to do then? How to fix the MDF plinth in this case? If the curvature is large, then there are no options, only self-tapping screws through and through. The installation is exactly the same as described in the section above. The only difference is that it's a little easier to choose the color of the plugs if you want to use them. There is a better option: from the scraps of skirting boards that will inevitably remain, cut circles and seal the hats with them. If the holes turned out to be deep, cover them up, and on top of all the same circles. You can achieve that you simply will not find the place of installation of fasteners.
With relatively small differences - 2-3 mm, you can try to fix it on good guides. But when installing the guide, the floors must be perfectly flat, and this is also a rarity. There is a way to fix the baseboard guide so that it then "puts on" without problems. It is necessary to cut off 5-6 strips about 2 cm wide from the plinth. These strips are used as patterns.

We put two pieces on the edges of the guide, put it against the wall. We twist the screws next to the installed pieces. It turned out that we fixed the edges of the guide at the desired height. Then we install the rest of the "patterns" along the entire length. They do not allow the profile to sag, exposing it exactly at the distance that is necessary. With a step of 50-60 cm, we install self-tapping screws. If necessary, move the "patterns" to Right place. If you do this, the plinth will fall into place without problems. And there will be no gaps along the floor.
Installation of plastic plinth
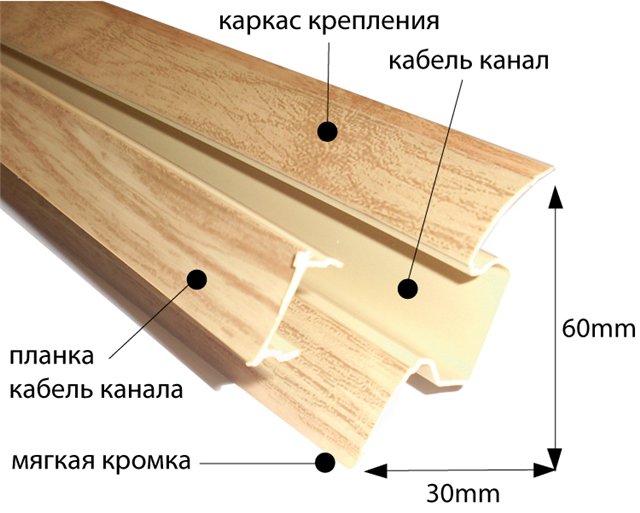
Plastic skirting boards are not as bad as they seem. Far from always they have a "very cheap" look. These are no longer those terrible shiny products made of thin-walled, intoxicatingly smelling plastic. The type of modern products is very close to MDF. Of course, you can’t confuse it with wood, but the price is several times less. There are plastic skirting boards with soft edges. They allow you to cover small gaps without special efforts. There are models with a cable channel closed with a lid of the same color. Fasteners can be installed in the channel, and then cables can be laid. Convenient, reliable and economical.

What can be stressful is plastic corners and connectors - here they look "for an amateur". But normal plastic can be washed down with a good saw and docked perfectly. Especially if there is Miter saw. But the miter box will go. Only get a special blade for a hacksaw - for plastic. If this is not found in nearby stores, use a metal sheet. If you want the joints to look flawless, fine-tune the match using fine grit sandpaper. And by the way, if the plinth consists of several parts, you assemble it and then saw it all together. Only in this way will all parts be the same.
Another point for easier joining at outside corners. They often "leave" when drilling. We take double sided tape and fix them to the wall in the desired position. In the process of installing skirting boards, segments can also be “grabbed” to each other with adhesive tape, but already ordinary.

How to fix a plinth made of PVC or another type of plastic if it does not have a cable channel (groove) into which the fasteners are installed? It can be glued, but there are mounting systems on the rail.
All of the above is also true for plastic skirting boards. The only difference is that before applying the adhesive, it is better to degrease the plastic using a suitable solvent (white spirit, for example).
How to attach a skirting board to a plasterboard wall
There should be no problems with gluing - plasterboard walls are usually even. But when using fasteners - self-tapping screws - there are nuances. The most important thing is not to twist so that the plaster does not burst. There are a few more points.
- If a starting profile is launched along the floor, there can be no problems, but it is necessary to use self-tapping screws for metal, and of good quality.
- Try to get into the racks. They should be located every 60 cm, which just coincides with the norms for installing fasteners.
- If there are no racks (GCR is glued, for example), you can either try to use longer self-tapping screws - to gain a foothold in the wall material, or use special self-tapping screws for drywall. They can be plastic or metal. Both of them are normal. They differ from ordinary ones in that their carving is much deeper. Due to this, the load is distributed over a large surface.
- If necessary, you can use special butterfly dowels.

In general, how to attach the skirting board to the plasterboard depends on how it is mounted. It also depends on what kind of skirting board you are fixing.
There are three ways to install PVC floor skirting boards. The choice of the method of mounting plastic profiles is made taking into account the design of the plinth. In turn, the type of PVC profile is selected based on what type of flooring was used in the room.
Types of floor plastic skirting boards
Models of plastic skirting boards are distinguished not only by color and texture. A different ratio of components in the composition of plastic profiles divides them into skirting boards made of hard, foamed, semi-rigid, soft PVC. The latest products are indispensable in rooms of non-standard shape (with oval walls, columns).
If we talk about the structural differences between floor profiles, then we can distinguish two main groups: skirting boards with and without a cable channel. special kind plinth - connelure. With its help, the coating (linoleum) is put on the wall. The end of the floor covering is trimmed with a special edge. Instead, you can use the L-shaped plinth for carpet.
Universal one-piece profile
One-piece PVC plinth is a non-separable profile model. It does not have removable decorative elements. This profile can be laid on any surface (carpet, linoleum, laminate).
 The method of placing wires behind the profile without cable channels
The design of the blind solid profile model does not allow placing communication lines inside, since it is not hollow. But, despite the absence of a cable channel, in a small groove with back side One-piece plinth is easy to stretch low-voltage wiring.
Attention: you can buy a common average type of skirting boards, which, when installed, form capacious gutters for laying wiring.
A wide one-piece plinth with grooves, mounted on factory mounts, is able to hide a telephone line, Internet cable, etc. However, in order to gain access to the wires, you will have to completely dismantle the profile.
Plinth with cable channel
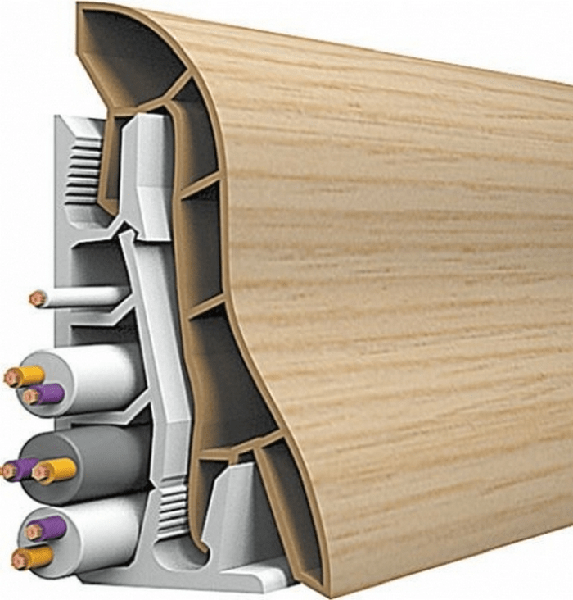
The popular skirting board model with a cable channel consists of two parts, which radically distinguishes it from a solid profile. The first part is the internal mounting plate, the second is the external decorative profile. The plinth is notable for a special cavity in the inner part, where the wire can be easily placed. To lay the cable, just remove decorative strip.
 It is possible to lay wires in a profile with a cable channel inside the plinth and behind the edge of the mounting plate
But to get to the wire hidden behind mounting plate, it will be more difficult than dismantling a solid profile mounted on clips, since the plinth with a cable channel is attached to the wall using impact screws or self-tapping screws. Therefore, in order not to break the soft edge of the panels, the screws that hold the plinth will have to be unscrewed.
L-shaped models for carpet
L-shaped floor plinths are used in rooms where carpet is laid. The strip of carpet is inserted into the skirting board and fixed in it due to the adhesive layer located under the tape on the front of the profile.
 Skirting for carpet allows you to create the appearance of the integrity of the coating
The upper part of the plinth is represented by a narrow bar that folds down. It may have different colors. The main difference between skirting boards with an L-shaped cross section is the presence or absence of stiffeners. Skirting boards with stiffeners are fastened with self-tapping screws, and those that do not have them are installed on glue.
Preparing to install skirting boards
When starting to install the floor profile, make sure that you have tidied up the surfaces adjacent to the baseboard. The walls must be leveled, pasted over or painted, the floor must be laid with a laminate or lay linoleum, carpet.
Having done the described repair work, we determine what materials, tools, components will be required to install the profiles. Before going to the store, you need to make calculations to find out how much you need to buy materials, connecting elements and fasteners.
Calculation and purchase of materials, components
To calculate how many skirting boards to buy, you should find the perimeter of the rooms and after subtracting the width doorways divide everything by the length of one profile. The number that we get when dividing is the number of skirting boards. It needs to be rounded up.

Attention: the standard length of the plinth is 2.5 m.
Next, we count the number of corners in the room. This will determine the number of external and internal corner elements. Also, as a rule, there is a need for connecting elements. Their number is easy to determine using the drawing of the room. By the number of doors, it turns out how many plugs are needed. We consider clips, screws, dowels, taking into account the perimeter of the room and the step with which they are attached to the wall.
Tool preparation
When installing skirting boards on factory fixtures or using screws alone, you will need:
- Perforator or hammer drill- for drilling concrete walls.
- Screwdriver or conventional drill- used for mounting Wall panels and walls made of wood, plasterboard.
- Screwdriver, nozzles for a screwdriver - for screwing screws.
- Hacksaw, miter box - for cutting skirting boards.
- Roulette.

However, the tools indicated in the last two paragraphs cannot be dispensed with when mounting profiles on adhesive mixtures.
Methods for mounting a floor PVC skirting board
The method of fastening plastic profiles is chosen, taking into account the type of product. Plinth with cable channel, L-shaped profiles with stiffeners are installed on self-tapping screws (impact screws). With the help of adhesives, a plinth tape and a profile without stiffeners under the carpet are mounted. One-piece profiles with grooves snap into place on special fasteners (clips).
On factory fasteners (clips)
It is possible to install a plinth on clips only in rooms with a flat floor and walls. Clips are fasteners that are installed in increments of 50 cm.
Before mounting a solid profile with grooves on plastic clips that are not adjacent to the floor without technical holes, you need to mark up. The profile, together with the attached mount, leans against the wall. A mark is placed on the level of the clip. It shows at what height the fasteners should be installed. With the help of improvised materials, the clip is set according to the level of the mark. Having moved it close to the wall, we drill the wall through the hole made in the clip, dragging the “stand” with the mount. We fix the clips above the floor level with dowels and impact screws. The plinth is connected to the fasteners by lightly pressing the bar.
 When installing the clips, we retreat from the corners by 10 cm
Installation of the plinth can also be carried out on metal clips, Bottom part which is located on the floor. When mounting a profile on them in a room with flat surfaces, it is not necessary to determine the height of the mounting location. Using a pencil and a tape measure, we make markings on the wall, stepping back from inner corner. In order not to do unnecessary work, along with a tape measure, a clip can also be placed near the wall, determining the points for drilling through the hole in the mount. The clip is placed directly on the floor.
After marking, we drill holes in the wall, the width of which corresponds to the diameter of the dowel. Clips are fastened with impact screws. A cable is laid inside the mount. Installation of profiles is carried out from the inner corner of the room.
 Installing skirting boards on metal fasteners
Installation with screws
Profiles with a cable channel can be attached to the screws. This method of installation will ensure a snug fit of the plinth to the surfaces, even if they are not even. A profile with an inner corner put on the end is applied to the place of future fastening. The first point is marked 5 cm from the corner. When the walls are even, the marks on the profile are placed in increments of 50 cm, otherwise the distance between them is reduced.
 The size of the hole drilling step depends on the condition of the walls
With the help of an awl, holes are pierced in the cable channel. There should be marks from the awl on the wall. Using the remaining marks, we drill holes in the wall with a puncher. After removing the dust, we hammer in the dowels. Self-tapping screws are attached to the holes in the cable channel and twisted until the head is immersed in plastic. The next profile is attached to the previous one with a connector and installed in the same way. If necessary, the plinth is pre-sawn off. Wires are passed through the cable channel. After laying the cable, you need to insert the decorative part of the plinth and install the plugs near the doorway.
 Installing the skirting board on self-tapping screws is the most reliable way mounting
Important: when measuring the length of the skirting boards before sawing off, it is necessary to additionally take into account the thickness of the connecting elements.
Another installation option: put the inner corner on the plinth and, having attached it, drill holes in the wall directly through the cable channel. Then you should insert the dowels and hammer in the impact screws.
 Fixing the skirting board with dowels through the cable channel speeds up installation
Mounting on adhesive mixtures
The fastest way to install a skirting board is to install it with special glue or liquid nails. All you have to do is grease adhesive mixture plinth, fitted to the size of the room, and press it against the wall. Before installing the plinth, joints and corners are put on it.

Mounting on glue is good because it eliminates laborious drilling of surfaces. True, there are also disadvantages:
- The profile is difficult to dismantle.
- Losing during dismantling appearance the product is unsuitable for reinstallation.
- There is a risk of staining adjacent surfaces, clothing with glue.
Each method of installation of floor plinths has its advantages (quick fixation or dismantling of the strips, the ability to re-install the profile without its deformation), as well as disadvantages. When choosing which one to prefer, you should take into account the condition of the surfaces to which the skirting boards will be attached, the type of flooring and installation experience.
A simple decor in the form of an overhead plank closes the joint between the wall and the floor. Most often, the plinth is carefully selected according to the height and texture of the surface so that it is possible to create a decorative transition between the wall and floor finishes. Depending on the size and material, it is necessary to choose the correct fastening of the plastic plinth to the floor, so as not to damage the plastic and ensure a strong and at the same time tight, without cracks, fit of both edges of the plank to the floor surface and the wall plane.
What gives the use of plinth
In theory, it would be possible to do without a plinth, if the ends of the floor covering are ideally precisely adjusted right up to the wall of the room. But in most cases, even when using concrete floors, not to mention wood flooring, parquet and laminate, there must be a gap between the wall and the end to compensate for the expansion of the material. Therefore, before attaching the plastic plinth to the floor, it will be necessary to take into account the dimensions and location of the plinth strip relative to the slots.
The use of decor makes it possible to solve several problems at once:
- Close defects that are most clearly manifested at the horizontal joints of the wall and flooring;
- Create an additional decorative element that borders the floor around the perimeter of the room;
- Hide wiring, cables and even water pipes.
Depending on the height of the plastic plinth and the method of fastening, it depends on whether it will be possible to complete the tasks. Most craftsmen solve the problem of how to attach skirting boards to the floor based on their design, finish and wall material.
Varieties of plastic skirting boards
Most often, a universal Z-shaped type of PVC plinth is used for edging the floor. For finishing home flooring, several types of decor are used:
- Rigid plastic bar with hard edges. This option is used for finishing flat and even walls with hard flooring;
- Hollow skirting board with flexible edges and internal cable management channel. The groove for laying the wiring is closed with latches with an additional bar;
- Flexible tape, shaped like a wooden or hard plinth, ideal for edging the joint between flooring and plastered walls.
Note! The good flexibility of the tape allows you to store the decorative element in the form of a wound roll.
The most popular hollow floor plinth fits well into the interior of any rooms and premises, the plastic has enough strength and flexibility to withstand the point load from the installed fasteners. This version of the plinth rests on the wall and floor with soft elastic edges, as a result, even significant unevenness of the walls and floor can be compensated and masked.

Hard plastic material Cheaper and tougher, it can be called a simple replacement for outdated wood floor decor. It is used, as well as a tape floor plinth, for edging large rooms with hard flooring.
In addition to the universal floor decor, specialized types of skirting boards are often used, for example, for fixing and tensioning carpet. The slats fix the fabric to the bottom edge of the wall and at the same time stretch the material to hold the synthetic fabric against the wood or plastic backing.

Mounting options for floor skirting boards
According to experienced craftsmen, it doesn’t matter how to fix the floor plinth, the main thing is to ensure that the plastic strip is fully attached to the wall and firmly fixed. decorative element in the selected area. Traditionally, two methods are used to fix floor decor:
- Mounting a plastic strip with a strong polyurethane or acrylic adhesive;
- Fixation on mechanical fasteners, most often industrial production.
The easiest and fastest way to fix the floor decorative strip is with any synthetic glue. In the production of decor inside of the floor plank, a supporting ribbed surface is made, on which a layer of glue is applied.
We glue the floor plinth
The glue method is very easy to use, but experts recommend using glue for fixing the floor plinth only for flat walls and floors. The hard plastic decor adheres well to drywall sheets and poured floor. For laminate, PVC tiles, parquet, you will need to look for special high-strength brands of glue, since the floor covering that “plays” on the foam substrate tears off acrylic adhesives and PVA.
Does not "like" acrylic glue and linoleum. For attaching the floor plank to linoleum or plastic tiles Usually polyurethane, polystyrene or even epoxy compositions are used, which can be used to glue a plastic skirting board to any surface.

If, nevertheless, a decision is made to fix the plastic plinth with acrylic glue on a wooden plank floor or parquet, the first step is to remove the paint or varnish on a thin strip of the wood surface to ensure good adhesion.
The process of sticking a floor plinth is reduced to the following operations:
- The marking of the installation of plastic strips is carried out, corners and docking adapters are selected and adjusted;
- Glue is applied to the inner parts of the plinth in short strips with a slight excess of adhesive mass;
- The floor decor is laid on the place of gluing and pressed with a heavy object.
Advice! To increase the strength of the adhesive joint, heavy objects are placed along the glued plinth and the plastic bar is wedged using wooden bars and slats.
After 5-6 hours, the fasteners can be removed, but the final setting of the adhesive base will not be completed until the next day.
The floor plastic plinth can be glued very quickly using double-sided adhesive tape or polyurethane foam. In the latter case, the foam is applied in small drops, and after the planks are put in place, they are held in a pressed position for at least 3 hours until the foam curing process is completed in full.
Except plastic pvc skirting boards, produce decorative floor elements made of polyurethane foam. The reverse side of such a decor is usually covered with a self-adhesive film, but even if it is absent, it will not be difficult to stick the material with liquid nails.
If the use of glue is difficult, small tips on how to properly fix the skirting board to the floor are shown in the video:
Fastening floor skirting boards with self-tapping screws
Before attaching a plastic baseboard to the floor, experts recommend checking and clarifying the material from which the walls are made. In the vast majority of cases, floor decor is hung on the lower edge of the walls with clips, metal or plastic clips. An overview of fittings and tips on how to attach skirting boards to the floor are shown in the video:

In the case of direct mounting of the strip, it is necessary to punch a hole in the wall for the installation of plugs for self-tapping screws and dowels. It is necessary to punch a hole in such a way that a hole of at least 30 mm deep is obtained in brick or concrete. If you try to fix a cork or dowel in the body of the plaster, anyway, clips or fastening the floor plinth under load will pull it out of the wall.

The exception is special plaster dowels that can hold plastic decor even on cement-sand plaster.

The plastic plinth is laid out along the wall, the outer bar that closes the cable channel is removed, and the places for drilling holes are marked. Usually, self-tapping screws or dowels are placed in increments of at least 50 cm. The dowel installation points are chosen so as to press the upper edge of the plank against the wall without gaps. The marking lines are transferred to the plastic and to the wall, the floor decor is removed and the condition of the wall is checked in the places of future drilling. If a void is found when tapping the wall, the point is moved to the left or right.
In order to connect the laid segment with other parts of the decor, complex corner and linear joints are used, so the length of the plank is chosen increased by the size of the overhang for attaching the corner joint. Next, a docking element for the inner corner is put on the decorative strip, after which it returns to the installation site, and drilling is performed, starting from the joint.
Despite the external plasticity and flexibility, the floor plank can easily crack if drilled incorrectly, especially at the bottom of the channel, where the thickness of the plastic wall is very thin. Therefore, a hole for installing a plug or dowel is drilled in two passes, first with a thin drill of 3-4 mm, then for the required size of the dowel.
Installation of a floor plinth on clips and clamps
The technology for installing a hollow floor plinth is not much different from the previous version, with the only difference being that special plastic mounts— clamps, photo.
It is enough to fix the clamps on the floor, and you can install the skirting boards. But not everything is so simple. This scheme works well for rooms sheathed with drywall, clapboard or plastic. Technology with clamps works perfectly only if the angle between the plane of the wall and the floor surface is 90 degrees or less.
In reality, the angle can be 95-100 o, due to which a gap is formed between the upper edge and the wall. Therefore, before performing the installation, the latches are put on the decor and laid at the installation site. It is necessary to lay gaskets under each latch in order to achieve a good fit of the upper edge of the plastic strip to the wall surface.

After marking the position and places for fastening, each latch is screwed to the wall using the same self-tapping screws, and the floor plinth simply snaps onto the fastening locks. In more detail how to install PVC floor decor, see the video:
In some decor models, metal clips are used for mounting. They are easier to work with, instead of painstakingly adjusting the angle of inclination of the mount, you can simply bend the petals of the lock to the required value.
Conclusion
Wide plastic skirting boards are almost always made either from polyurethane foam, which is easily glued to any walls, or in the form of a hollow box. The lower base of the box is attached to the walls with dowels, and the outer decorative cover simply snaps into place like a box. According to many craftsmen, the installation of a wide decor is easier and faster, they are more convenient to use and allow you to hide a significant amount of wires and communications, which, apparently, has served to increase the popularity of such decor.
The plinth performs two important functions in the arrangement of space. The structural element hides the technological seam laid along the perimeter of the room, and participates in the formation of the interior picture as a finishing touch. If the plinth is equipped with a technological recess for placing the cable, it also masks the laying of communications. If the performer does not know how to nail the baseboard, none of the duties assigned to this part will be performed adequately. In the worst case, the consequences of illiterate interference will have to be eliminated.
Question: nail the baseboard to the floor or to the wall?
Answer: to the surface to which it is easier to nail. If there are wooden floorboards or parquet on the floor, and the walls are concrete slabs, it will definitely not be as difficult to drive nails or self-tapping screws into the wood as fiddling with drilling holes in concrete to install plastic dowels or wooden plugs. And vice versa: if the floor is flooded cement screed, and the walls are made of timber, it will be much easier to attach the plinth to the wood.
They nail the baseboard both to the wall and to the floor - it all depends on the surfaces
Important. To partitions made of drywall, to walls lined with lime or gypsum plaster, to surfaces lined with soft stone, the plinth can be carefully nailed only with yellow finishing nails with miniature hats. Dowels, self-tapping screws and standard nails will not hold in them.
You can, of course, attach the plinth by “planting” it on liquid nails, but this option is applicable if interior alterations are not expected, since subsequent dismantling will be unnecessarily complicated. There is another way - mounting on special clips, but without experience you should not take it: the clips will be damaged and the skirting boards will not adjoin the wall.
Plastic or wood?
With the advent of progressive finishing materials, many owners are abandoning the usual products from pine, fir, oak, spruce, beech, larch, etc. However, the parquet floor and the surface lined with parquet boards are in better harmony with the noble plinth GOST 8242-75. It is still actively used, despite the presence of defects that are acceptable according to the standards.

Plinth made of wood is used when laying wooden floorboards and when installing parquet
Bulk polymer floors, carpet, laminated flooring, linoleum are perfectly combined with a plastic skirting board that imitates expensive solid wood material. Plastic strips are usually equipped with corners, plugs and fasteners to facilitate installation. The technological advantage of a synthetic profile is that there is no need to file joints and adjust parts. Therefore, if there is no desire to mess with the installation, it is better to choose a progressive option and feel free to take the tools in hand.

Plastic plinth is used when laying laminate, carpet, linoleum
How to nail a plastic baseboard
To wooden floor or a plastic profile is simply nailed to the wall with nails or self-tapping screws, which are deepened through the longitudinal groove of the plinth into one of the structures.
Note. If it is supposed to hide the cable in a special recess in the plinth, the wire is laid in the space allotted for it during the installation process. The cable must be located below the fasteners driven into the wall.

The plinth with the technological space is first nailed, and then the cable is laid through it, otherwise you risk damaging it
To fix the plastic plinth to the concrete base, perform the following operations:
- lay the profile strips, choosing one of the corners of the room as the starting point, continue in the direction of the standard clockwise movement;
- mark the points of future fasteners on the plinth (the step depends on the presence of irregularities in the floor or wall and on the power of the plinth);
- holes are drilled at the marked points, the size of the drill for forming holes should be less than the diameter of the self-tapping screws;
- plastic dowels are inserted into the holes obtained, after slightly shifting the plinth;
- return the planks to their place;
- screws are screwed through the hole in the dowels;
- ends plastic profile and the fastener outlet is closed with special plugs.
Advice. To obtain holes of equivalent depth, it is recommended to make a mark on the drill.

Plastic end caps for beautiful corners
At the first stages of installation, the fasteners are not thoroughly tightened, only the screws are “baited”. The final tightening is done after the plinth is laid around the entire perimeter. There is important nuance: do not be too zealous in tightening the fasteners. Plastic may crack or warp.
We nail a plinth of wood
Before installing a wooden plinth, you need to make careful measurements and, using the same ruler or tape measure, set aside the distances on the molded material for sawing off the elements. To form butt joints, sawing is carried out at an exact angle of 45º.
Note. An unsuccessfully sawn off corner can be carefully masked with a sealant, and then covered with a tone.
To wooden structures planks are attached in the traditional manner. The profile nailed to the floor should be firmly pressed against the wall, the plinth attached to the wall should not “hang” above the floor plane. The fastening step depends on the curvature of the walls.

Nailing is the easiest way to attach a wooden baseboard
Advice. For finishing driving ordinary nails into a wooden baseboard, it is advisable to use a chisel. It is necessary in order not to spoil the wood by accidental impact.
Fixing the skirting board to the concrete base
- Nails are driven into the bar prepared for installation, the tips of which should come out from the back of the plinth by a couple of tenths of a millimeter.
- The profile is installed in the planned place in order to mark the locations of the wooden plugs with nails. To do this, you need to hit lightly with a hammer on each hat.
- The marked points are marked with a pencil, then holes are drilled in these places with a drill.
- Wood plugs are inserted into the holes, into which nails are hammered without problems.
If dowels are used instead of wooden plugs, the whole process is similar to the method of fixing a plastic skirting board with self-tapping screws. First, holes are drilled in the plinth, then points are marked through them. After a drill on concrete, holes are made for dowels, plastic devices are inserted into them, strips are applied and fixed.
Important. Holes for plugs or dowels must be drilled before wallpapering.
Video with a good example of work
You still need to prepare thoroughly for the not too difficult work of installing the skirting board. You should not take on the implementation without thinking through the process and without foreseeing all possible difficulties. It would be a shame if, as a result of ill-conceived actions, you have to buy material again and eliminate errors.