When installing a capital brick oven In a summer kitchen, it should be remembered that any stove increases the fire hazard and requires compliance with all building codes and regulations. This means that for its construction it is necessary to use special refractory fireclay bricks, which are resistant to high temperatures, but at the same time are an excellent thermal conductor, warming up the room quickly enough. It is important to properly ventilate the oven. At the stage of constructing the foundation, it is necessary to lay out this area with bricks in the place allocated for the furnace. Also, in the future, when constructing a roof, it is necessary to provide for the installation of an exhaust pipe to remove it from the space. working area heat and smoke, etc.
Electric BBQ oven  Gas BBQ oven
 Barbecue oven fired with coal
  Wood-fired barbecue oven
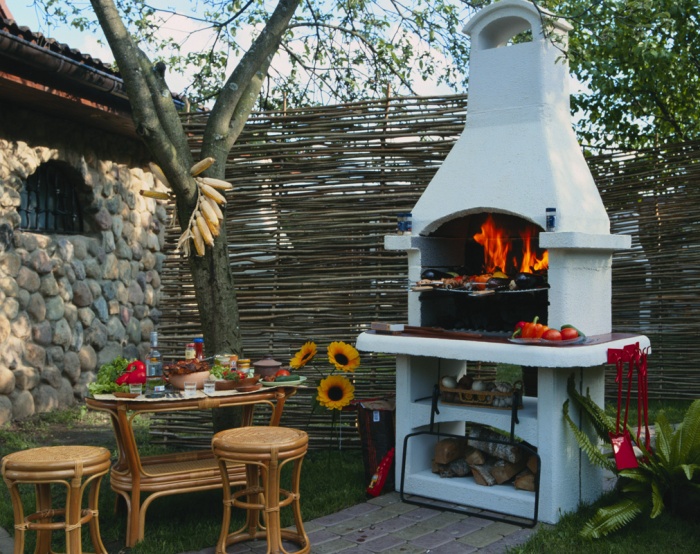
The barbecue oven can run on electricity, gas or burn coal and wood. Outwardly, it is very similar to a fireplace with a combustion chamber, which is usually located at the level of a person’s waist. A barbecue requires a reinforced foundation, and it is also important to properly install a hood through which heat and smoke will be removed.

BBQ oven with hob in the photo
The barbecue oven can have different configurations - it may include an ordinary hob or oven, grill or barbecue, countertop, space for firewood and storage of dishes. There are such designs that include not only a grill, but also a tandoor, a cauldron, a smokehouse and other elements.
If you need a multifunctional large barbecue oven, it is better to resort to the help of professionals, but a small oven can be built with your own hands.
There are many options for prefabricated barbecues and brick ovens. Based on the presented models, you can build something according to own project. The main thing is to arrange everything correctly to minimize the risk of fire, especially when building a stationary brick oven indoors.
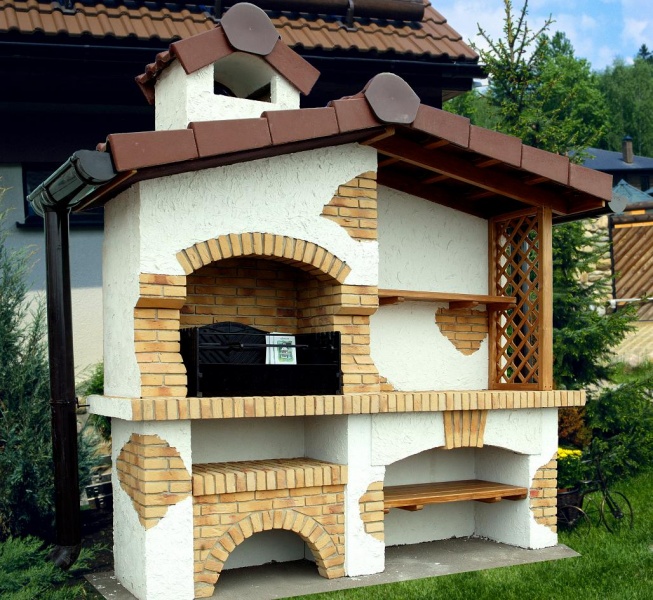
A homemade brick barbecue is a more solid version of a stationary barbecue for arranging summer kitchen.

BBQ oven in the photo
It will become an excellent decoration and, of course, will allow you to prepare more delicious and varied food. Before you build a brick barbecue, you need to know that it is also called a “barbecue”, and in the standard design plan it should include three compartments.

Of course, the construction of such a barbecue will cost more, but the meat obtained on bricks is much tastier and healthier. Durable and high-quality brick is quite expensive, but you can save money by doing all the work on building the barbecue yourself. In this case, we will describe the simplest version of a brick barbecue, which you can easily build yourself, even without much experience.
The presented option of how to build a brick barbecue with your own hands can be changed by using your own dimensions of the parts or adding some additional functional elements to the design. You can build a canopy over the barbecue stove to protect it from the rain, and arrange a dining room next to it under a tree, or install such a stove inside the summer kitchen or outside not far from it.
In the latter case, the summer kitchen itself will contain all the necessary kitchen equipment, as well as a sink and a refrigerator. It is even more convenient to place a barbecue oven outside the summer kitchen - there is less risk of fire, it will not be so hot to cook in the oven in the open air, and also the inside of the summer kitchen will remain cool, unless it is planned to be used in winter - then, naturally, the oven is installed inside .

First you need to choose convenient place for barbecue oven. If it is to be installed outside, it is necessary that the distance from the stove to the house or kitchen is not large, since during cooking you will have to constantly bring something from the kitchen - dishes, water, etc.
When choosing a barbecue design, you need to pay attention to the style that is most suitable for the architecture of all buildings on the site. It is imperative to determine in advance the size and design of the stove, where it will be placed (in an open space or inside a summer kitchen), what kind of foundation is required for it (depending on components designs).
Also on preparatory stage it is necessary to think about the lining of the firebox, take into account the shape and height of the chimney, whether the stove will be equipped with an additional oven or smokehouse, what fuel is planned to be used (coal, wood, electricity, gas).

There are really a lot of questions - is it necessary to build a canopy to protect the stove from rain, an additional table and wind protection? And also what facing material will be used, whether to install a heat reflector and a tray under the coal, what the design of the spit, grate or roaster will be, whether the inserts will be made of cast iron.

All this must be thought out in advance and then be sure to draw general view barbecue with drawing of individual parts and indicating their sizes. You should also find a place in advance to place the shelves, since they should fit well into the appearance B-B-Q. It is also necessary to provide space for storing utensils and supplies of coal or firewood.
 Barbecue grill
  Barbecue grill
When drawing up a barbecue plan, first of all, you need to take into account that the structure must be stable. It is also important to properly position the barbecue (for grilling). It should be at such a height that it is as convenient as possible for cooking. Typically the grille is installed at a height of 9-10 rows brickwork.
If the grate is too low, you will have to bend over while cooking, which is very inconvenient. And if you put the grate too high, you will have to reach high, and at the same time your face will constantly be close to the burning coals.
The grate and coal tray must be installed on brick ledges or metal rods. They must be removable, since they must be periodically cleaned of rust and stored in the house for the winter.
In a barbecue, you can use a regular stove grate. It must be taken into account that it must be larger size than a hearth with burning coals, so that the finished barbecues can be moved to the side next to the hearth, but at the same time keep them hot. The roasting rack must be protected from the wind. Under it there should be another grate, with smaller cells, on which burning coals will be located, and under it a tray into which burnt coals will fall.
Watch how to set up a brick barbecue with your own hands in the video, where all types of production elements are presented and advice from the masters is given:
Diagram, laying and ordering of a brick barbecue with your own hands
Laying a brick barbecue consists of several stages - choosing a location, drawing up a barbecue plan, building a foundation, erecting brickwork with the installation of all structural details, constructing a pipe, cladding and designing the building.
To lay a brick barbecue with your own hands with three compartments, you will need the following materials and tools:
- sand;
- cement;
- gravel;
- reinforcing mesh;
- brick;
- ceramic tiles;
- trowel.
Currently, you can buy ready-made kits for arranging a barbecue oven. The standard set includes the barbecue grill itself, a charcoal tray and fasteners. These kits can be used when building a brick barbecue with your own hands.
What the foundation of the furnace will be depends on its size. The DIY brick barbecue design suggests that you can make a concrete one strip foundation, and for a more massive structure you will need a tiled one.
The foundation completely hardens approximately 2 weeks after pouring the concrete, and only after this can the construction of the barbecue itself begin.
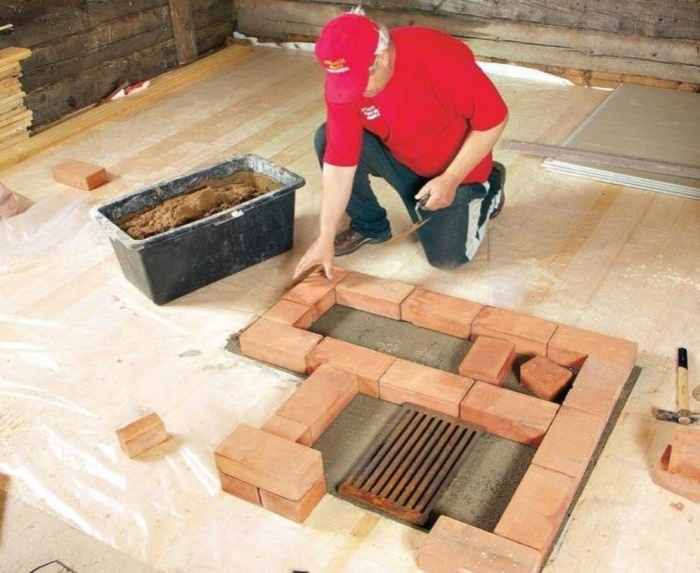
First, you need to lay 2 layers of roofing felt on top of the foundation to protect the structure from moisture, after which you can begin laying the brick stove. In this case, we are considering the option of a standard barbecue consisting of three compartments. From brick you will have to lay out a figure in the shape of the letter “W” with 4 partitions. What kind of brick barbecue will turn out, the order and diagram can be shown in advance by carefully examining the barbecue construction plan.
The rows must be laid out in a certain sequence - each next row must be shifted relative to the previous one in checkerboard pattern. This is the so-called half-brick masonry, which should provide the necessary bond of brickwork. Even before starting the laying, you need to tighten the cords indicating the position of the future wall of the barbecue, and use a trowel to apply a layer of mortar. This needs to be done along one of the walls. Then you should make small grooves in the mortar and begin laying the first row of bricks, checking it with a horizontal level.
In total you will need to lay out 8 such rows. If you plan to place a sink in the 3rd compartment, you need to leave a hole for the drain in the 6th row.
First, it is necessary to build floors that unite two adjacent compartments of the future structure. To do this, you need to cut off the metal corners of the required length and put them on top, and then make the same, but continuous ceiling of bricks in one row. To lay the 2nd layer, you must definitely use a heat-resistant clay mixture intended for ovens and braziers, since it is impossible to make a reliable grill using cement alone.
 STEP #1
  STEP #2
 STEP #3
  STEP #4
 STEP #5
  STEP #6
The most difficult stage of the work is laying the furnace itself. This can be an ordinary rectangular direct-flow furnace without a blower. The thickness of its back wall should be three bricks. There must be room in the front for a door. On the side where the oven will adjoin the brazier, you should leave a hole the size of two bricks.
It is necessary to make projections for the roasting grate and the charcoal tray. When building a brick barbecue with your own hands, order plays a very important role. important. When laying the 5th row, you need to form a supporting ledge, and then lay the 6th row of bricks across - the entire row of bricks should protrude from both sides of the wall. The next three rows again need to be laid in half a brick. This creates projections for the grate and tray.
Sometimes it happens that there is no pallet of the required size that would fit the width of the brick projections, and then a metal shelf can be used to support it.
Then, in the 10th row, you need to build another ledge and add three more rows on top using the spoon dressing method - this is the end of the main part of the barbecue.
If the stove design will use metal rods to support the barbecue, then during laying between the 6th and 7th rows, these metal rods must be laid out in all three walls. This should be done in such a way that the rods protrude from the walls by 70-75 mm and a grill with a tray can be installed on them.
The rods must continue to be laid until the 10th row in each subsequent row. This is required in order to install the roasting rack at the required height.
After this, all that remains is to lay out a rectangular roasting pan and make a pipe of any shape. This arrangement of brick barbecues is used in all similar structures without exception.
It is also necessary to arrange a barbecue work surface. The most in a simple way is a construction of a low - 6 rows high - brick wall.
This building must be done on a separate strip foundation, which is poured parallel to the side walls. Such a small wall is called a plinth wall. You need to lay it out so that the brick rests side by side.
After this you need to cut plywood sheet and lay it between the side wall projection and the baseboard wall. Lay boards on the sheet and cover them with tiles or ceramic tiles. To cover work surface You can even use ordinary paving slabs.
Expert advice
After completing the construction of the barbecue and its working surface, it is necessary to begin processing all the seams. For this purpose it is used cement mortar, which needs to fill all the seams and rub in thoroughly. Before the solution hardens, it is necessary to run jointing along the seams to give them roundness. If the craftsman does not have jointing at his disposal, this can be done using a regular cutting of a garden hose.
If the plinth wall will be connected to the main structure, then up to the sixth row the structure must be built in the form of the letter “E”, and then continue laying the side and rear walls the barbecue itself. As a result, a niche is formed under the grate with a tray, which can then be used for storage. charcoal or firewood. If this opening is equipped with a door with a handle, it will be quite possible to store dishes here.
With this, the main functional part of the stove will be built, and then the structure can be supplemented with various shelves and other elements, decorated at your discretion, etc.
The constructed furnace must “settle” for several days for the solution to completely harden. If you light a fire in it before the solution dries completely, its walls may crack.
In the future, when using the stove, it is necessary to clean the barbecue after each cooking so that dirt and grease do not accumulate, otherwise in the future you will have to thoroughly clean the stove.
DIY construction of a barbecue oven with a brick grill (with photo)
The construction of a brick barbecue does not necessarily always involve the monolithic construction of all structures. You can build a brick barbecue oven with your own hands in the so-called temporary version. This is convenient if there is no space to build a permanent, stationary structure. If necessary, such a stove can be disassembled and folded for storage in a specially designated place, and then reassembled. This is easy to do, since such a furnace is built without the use of cement or clay mortar. This is the cheapest and fastest to build brick barbecue structure. At the same time, it is very effective, because bricks laid without mortar freely allow oxygen to pass through, which promotes better and complete combustion of charcoal.
 The shape of such a barbecue can be rectangular
  The shape of such a barbecue can be round
The shape of such a barbecue can be round, triangular, square, rectangular or hexagonal. You can choose any form - it will depend on your own wishes.
Look at the photos on the page, which are built in a temporary design and at the same time allow you to cook any dishes over an open fire:
 Brick barbecue with grill
  Brick barbecue with grill
To build a brick barbecue you will need the following materials:
- boards for formwork (unedged);
- roofing felt;
- fire-resistant brick for cladding;
- clinker matching the color of the brick;
- cement mortar;
- metal pipe with a diameter of 15 cm;
- edged boards for tabletops;
- sheet of metal to cover the cutting table;
- grill grate;
- metal tray for coal.
To build a round barbecue you will need about 100 bricks, and for a different shape of barbecue - a little more.
First you need to select a site and build a strip foundation on it. It should dry for about 3 days, then you need to put roofing felt on it and only then you can start building the walls of the stove. You need to lay out the first row of bricks according to the desired shape, leaving small gaps of about 5 mm between all the bricks. The next row is laid with a shift of half a brick to ensure the strength of the wall.
When five rows have been laid out in this way, a metal tray for coal is installed. You need to lay two more rows of bricks on top, and a roasting rack on them. Next, you need to add an arch in the form of a brick gazebo to protect from the wind, that is, build protective walls on the sides and behind the barbecue.
The standard height of such a building should be 9-10 rows of bricks. You can install a tabletop next to the stove to make it more convenient to prepare food; nearby there is a table, benches, and a chaise longue.
 STEP #1
  STEP #2
 STEP #3
  STEP #4
 STEP #5
  STEP #6
 STEP #7
  STEP #8
What could be better than spending time outdoors with your family and friends? Cooking fish or meat allows you to have a pleasant time and have a delicious dinner. It is for such purposes that people buy collapsible barbecues or grills.
But relatively recently, some owners of private houses or cottages began to build brick or stone barbecues around which the whole family can gather. Also, thanks to materials such as natural stone or brick, the heat will be retained for a long time and the structure can even be used as a fireplace.
This article will tell you how to make a barbecue with your own hands, and we will also look at drawings, photos and even videos. In addition, for people who do not have the opportunity to make a stone or brick oven, a barbecue made from scrap materials would be an excellent option. But first, let's look at how to make a brick barbecue.
Brick BBQ
In order to build a brick barbecue you need to purchase some materials. To build a furnace you need to purchase fireproof and facing brick. Fireclay is ideal as a fire-resistant brick. Due to the fact that this material contains a lot of clay, it can easily withstand high temperatures. It is also very important that the brick is not too fragile and does not crumble. In addition to bricks, you need to buy clay from which the mortar will be made.

In order to prepare the solution, you need to purchase cement, red or refractory clay and sand. Cement and sand will be used to line the barbecue oven, and clay will be used to lay fire bricks.
Preparation of the solution
To build a barbecue, you definitely need a high-quality solution. It is impossible to prepare ordinary cement mortar, since high temperatures will cause the oven to crack and it will be impossible to use it. Therefore, it is necessary to prepare a clay mixture.
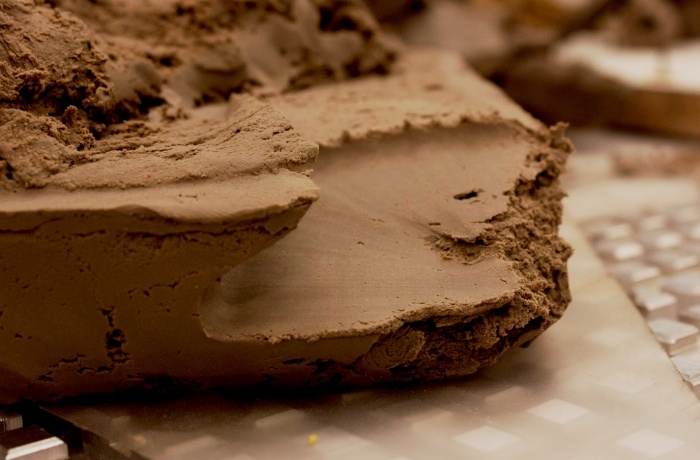
Clay mortar is divided into two types - skinny and fatty. A thin solution will not work, as after firing it will crack or, even worse, spill out of the seams. But the fatty mixture has plasticity, thanks to which the solution will be evenly distributed over the entire plane of the brick.
The process of preparing a clay solution for a barbecue oven is as follows:
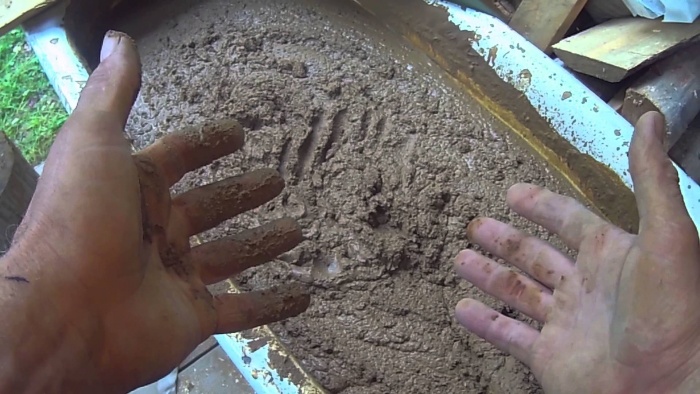
In order to understand whether the solution is of high quality or not, you need to scoop up a little of the mixture with a trowel or shovel. The solution should not stick to the shovel or leave behind too wet marks. A properly prepared solution should slowly slide off the shovel and not spread.

For a high-quality solution, you need to clean the sand from gravel or other debris. This work can be done using a sieve.
In order to give the solution greater strength, you need to add table salt to the composition. About 200 grams of salt are needed per bucket of solution.
Foundation for brick barbecue
The first thing you need to do to build a barbecue is to choose right place. Special attention fire safety should be taken into account. Trees or bushes should not grow near the stove.
Also, it is not recommended that the barbecue be located too close to the main buildings, bathhouse or utility block. Experts advise taking into account the direction of the wind so that it does not blow towards the main buildings. Also, during construction, it is necessary to think through everything in such a way that sparks are not carried by the wind to the neighbors. You can see the barbecue project in the video below.
Nature, fresh air, the smell and taste of barbecue grilled on coals are indispensable attributes of a holiday or weekend for many people. Usually, to prepare barbecue at the dacha, improvised barbecues are set up from improvised means - old bricks, stones and grates. There is an alternative - buy an electric barbecue or a ready-made metal grill with legs. But if you compare how much such a barbecue stove costs with the effect of its use, then for these funds it is better to build a garden barbecue stove with your own hands. Our article will tell you how to do this correctly.
Outdoor stove projects
Any construction, including street barbecue made of brick, you need to start with selecting a suitable project. You need to understand how much space you can allocate for its construction and what dishes you plan to cook while relaxing at the dacha. If your menu is limited to kebabs, and the budget for setting up a garden fireplace tends to zero, then with some skill you can make these simple kebabs with your own hands:

As you can see, the solution is not needed here at all, and we build the barbecue on a flat area from any suitable brick. You will only have to spend money on purchasing gratings and a thick sheet of fireproof material (pictured on the right), preferably mineralite. At the same time, the barbecue can have any size, as long as it is comfortable to cook and the required number of skewers can be placed above the coals.
Note. Unlike heating stoves made of brick, garden hearths and barbecues do not have any canonical design and dimensions; even the masonry drawings given in the literature can be easily changed to suit yourself. At the same time, it is important not to violate the concept of smoke circulation and removal of combustion products.
If you want to do the best and thoroughly build a more aesthetic barbecue, then you can take the diagram and order shown below as a basis. To build it, you will have to cast a small concrete slab yourself, which will serve as a connecting link between the brick supports and at the same time the surface for installing the metal brazier.

To prevent the smoke from the barbecue from being blown away by the wind in all directions, a smoke collector made with your own hands from sheet metal is installed on top of the supports.

The mortar for laying this simple barbecue is a regular cement-sand mortar with the addition of clay for elasticity. Brick – ceramic of any brand, and bottom part The slab can also be made from white silicate. The height and dimensions of the barbecue can vary depending on your needs, and to protect it from precipitation, it is recommended to install a canopy made from available materials.

Those owners of land and summer cottages who have enough space and opportunities should consider options for creating an entire barbecue area with a stove complex and a gazebo. In addition to the kebab bar, the complex may include the following elements:
- hob;
- grill;
- smokehouse;
- oven;
- fireplace with a cauldron for cooking Asian dishes.
What from this list should go into the barbecue area is up to you, after which you will have to find a suitable project. Fortunately, it is not difficult to find masonry drawings of garden complexes with different sets, including corner ones, on the Internet. Next, we will present a couple of barbecue oven designs as examples and tell you how to build them correctly. The same applies to gazebo projects for placing an outdoor stove, and we propose to take the following drawing with a barbecue in the form of a fireplace as a basis:

Scheme and order of the street complex
This barbecue oven is combined with hob, a grill can be fitted here if desired. There is also a firewood shed for storing logs for pre-drying. The arched vault over the firebox and the design of the chimney make this stove much like a fireplace, only for an outdoor one. So, for construction you will need:
- red stove brick (solid) – 450 pcs.;
- fireclay stone for laying the firebox – 200 pcs.;
- ceramic general building bricks – 180 pcs.;
- fireproof clay – 40 kg;
- river sand – 0.1 m3;
- cement M400 – 8 bags of 25 kg;
- combustion door 41 x 41 cm, cleaning door 14 x 14 cm;
- view – 1 pc.;
- stove 71 x 41 cm made of cast iron;
- equal-flange steel corner 40 x 4 mm – 4 m.
Below are the masonry drawings and ordering of the multifunctional barbecue stove:


Outdoor stove project with smokehouse
Those who love a wide variety of smoked meats will be interested in this design a garden stove, where a small smokehouse is installed above the hob in the smoke box. To build it, you need simpler materials, so in general, such a barbecue will cost less than the previous stove. Here is the list of materials:
- general construction ceramic brick – 430 pcs.;
- cast iron stove with 2 burners 71 x 41 cm;
- combustion door 28 x 28 cm, cleaning door 14 x 14 cm (2 pcs.); smokehouse 49 x 25 cm;
- valve 12 x 21 cm;
- steel corner for framing the slab;
- metal rods for hanging smoked meats.
The advantage of this structure is the absence of fire-resistant masonry, which greatly simplifies and reduces the cost of its implementation. The order and drawings of an outdoor barbecue with a smokehouse for DIY construction are shown in the figure:


As can be seen from the diagram, the grate and ash pan are also absent here, and in place of the ash chamber, a void is provided to be filled river pebbles. This allows you to accumulate and retain heat longer.
Metal barbecue
For a homeowner with welding skills, it is easier to make a portable barbecue out of metal yourself than to build one out of brick. Therefore, we could not ignore this very popular type of barbecue. But metal in good hands can take any form, which is where they appear different designs homemade barbecue. There is no point in presenting a traditional roasting pan with legs, but photos of more original products definitely deserve attention:

A metal barbecue made from a gas cylinder can hardly be called portable due to its considerable weight. But it has a firebox lid, which allows you to save smoldering coals for some time before frying the next portion of kebabs. Also interesting is the design of a barbecue with a lid, made with your own hands from an ordinary iron barrel:

The openwork design of a kebab bar with a polycarbonate canopy near the house looks very aesthetically pleasing, the drawing of which is shown below:

The first step in a barbecue area is to lay a foundation, since the weight of a brick oven is quite significant. There are 2 ways to construct a foundation: rubble and in the form of a “floating” concrete slab. For the first one, you will have to remove the top layer of subsidence soil in order to rest on a layer of clay. The dimensions of the pit should be 50 mm larger than the dimensions of the furnace in each direction.
A rubble foundation is laid by filling a dug pit with stone and pouring all the cavities with a liquid solution of 6 parts sand, 1 part M400 cement and 1 part lime. The upper platform of the foundation is also leveled with this solution, and after it hardens, waterproofing is laid from 2 layers of roofing material. To install a “floating” slab for building a barbecue, the following step-by-step plan is followed:
- dig a 200 mm pit on the site more oven in each direction, pit depth – 300 mm;
- compact the bottom and pour 150 mm of coarse crushed stone, which also needs to be compacted;
- place wooden formwork protruding 100 mm above ground level;
- tie a reinforcement cage of 10-12 mm rods with a 100 mm cell and lower it into the pit, resting it on the sides of the formwork;
- make concrete from cement, sand and crushed stone in the following proportions: 1: 3: 7, respectively, and pour the foundation;
- after a week, remove the formwork, and after 3 weeks, lay 2 layers of roofing felt and begin construction of the barbecue.

For laying a barbecue, it is best to use a 1:1 clay-sand solution with the addition of a special oven plasticizer and a small amount of cement (about 20%). Fireclay stones should be laid on fireclay mortar, avoiding binding with the facing ceramic masonry. The thickness of the seam should be maintained within 5 mm, the remaining mortar is removed with a trowel.
Each row of bricks should first be laid dry and, if necessary, chiselled or split. After that, each brick is soaked in a bucket of water, and then placed in the place where the mortar has already been applied. Light tapping is perfectly acceptable. At the end of each row, the horizontal is checked with a level and the vertical is checked with a plumb line. The smoke circuits of the barbecue are wiped from the inside with a damp cloth so that no solution remains on the walls.

Openings for stove fittings are made with a reserve for metal expansion of up to 5 mm, and for laying arched vaults outdoor fireplace templates of the required shape - circles - are prepared in advance. They are usually made from wood or plywood, sometimes from plasterboard. When the barbecue is completely laid out, you should let the solution harden for about 2 days (depending on the weather), after which you carefully do the first heating. More details about the construction of the barbecue are described in the video:
Conclusion
In reality, there are countless options for country barbecues and it is impossible to list even a small part of them here. Therefore, we have presented several examples to help the average person understand the essence and complexity of the task. Only the first option without a solution can be called simple in execution; the rest will require time, patience and scrupulousness in your work, otherwise the stove will not last long.
BBQ on summer cottage allows you to cook delicious food right in the open air. The owner gets the opportunity to organize picnics, holidays and other events on own plot, surprising friends with his invention. Setting up an outdoor stove is not the easiest thing.
Preliminary work
First of all, you should make drawings. Thanks to such drawings, the master will not only correctly build the structure itself, but will also pre-calculate the amount of building materials needed.
You will have to make the drawing yourself, because there is no universal barbecue design.
There is only general instructions, which can be used to guide construction. So, the grill itself should not be lower than 65-70 cm in height. At the same time, it should be convenient for the person who will work on it. The oven is usually made 10 cm below the grill itself. In general, the stove is manufactured based on specific conditions. When designing, every little detail must be taken into account so that later there are no inconveniences when using the device. For example, you need to calculate in advance where the tweezers will hang, and where you can put firewood and coal. When planning, the owner's height is also taken into account.
When the drawing is ready, you need to write a list necessary materials. Do not forget about the materials for the foundation.
Selecting a location

- The choice of place for a barbecue is made according to one main criterion - fire safety.
- There should be no trees or dry bushes near the stove.
- The stove should be located away from the main buildings (bathhouse, house, extension).
- When building a barbecue, the main direction of the wind is taken into account. It should not blow towards buildings. In addition, it must be taken into account that sparks can be carried to neighbors.
- It should not be erected next to a playground, gazebo, or greenhouses.
Always remember fire safety requirements.
When right place found, you can begin laying the foundation.
Foundation

An inexpensive and easy-to-make monolithic strip foundation is perfect for the structure. It is not necessary to deepen it too much.
- A trench about 40 cm deep is dug along the perimeter of the future structure.
- A mixture of crushed stone and gravel should be poured into the bottom of the trench. The bottom is thoroughly watered and compacted.
- Reinforcing bars are laid on top of the gravel and crushed stone. They should be folded to form a grid.
- All that remains is to make the formwork and fill the trench with concrete. For the foundation, grade 300 cement should be used.
Brick selection
To build a barbecue, you will need two types of bricks: refractory and facing.
From all types of refractory bricks the best option there will be fireclay brick. It goes to the construction of furnaces. This brick contains a lot of clay, and it withstands very well high temperatures. When choosing facing bricks, you need to pay attention to the strength properties of the material.
In addition to bricks, construction requires mortars. To do this you need to buy red clay, sand and cement. Clay will be needed for laying fireclay bricks. You need to make a clay solution from it. Cement and sand will be used for cladding mortar.

- For clay mortar you need red clay, sand, cement and water.
- The clay should be filled with some water and left there for about 5-6 days.
- After this, you need to mix the clay with water until smooth.
- Next, a little sifted sand and just a little cement of grade 200 are added to the composition.
- All ingredients should be mixed. The solution is ready.
Step by step instructions

Work order:
- Layout of the pedestal.
- Furnace installation.
- Laying out the pipe.
- Final works.
Pedestal
A barbecue pedestal should ideally have a woodpile. The amount of firewood in it is for 3 fireboxes. The work uses ordinary facing bricks. The height of the structure is about 70 cm, but the master can use his own dimensions.
Firebox and oven

When the pedestal is completed, you can proceed to the stove. It should be about 6 bricks wide and about 3 bricks deep. There is nothing particularly complicated in laying out the stove, you just need to remember that there will be another facing layer on top of the fireclay masonry.
Fireclay bricks are laid in two rows. In areas of ceilings, it is better to use reinforcing bars. The order of the barbecue is calculated in advance, at the drawing stage.
Pipe
The chimney is laid out of fireclay bricks on clay solution. A tooth is made behind the stove to improve traction. A valve is placed inside the pipe.
Final works
At the stage of final work, decorative finishing B-B-Q.
Video: the process of laying a brick barbecue

Barbecue is very often confused with barbecue or grill. In fact, you can make delicious food in any of these devices. However, all three designs work differently.
The barbecue is the simplest of these devices. Everyone who has tried barbecue at least once in their life has seen it. It is kebabs that are most often prepared on the grill. For those who have no desire to bother with construction, buying a barbecue will be the solution to many problems. It is inexpensive, easy to transport to various places and does not take up much space.
The grill today is used mainly in electric version. This is a device in which the product rotates on a spit.

In a barbecue you can smoke various foods and also dry them. It can be used to boil, steam and even bake. It’s just that most people are not interested in all the functions of the device and are limited to the most common ones.
Precautions

When working with a barbecue, you must follow safety rules.
The safety measures are as follows:
- You should not light a fire with kerosene or gasoline; there are special means for this.
- When using ignition products, there is no need to saturate firewood or coals with them. Such compositions are used for sprinkling firewood.
- We must remember that good fuel is tasty food. Therefore, approved materials should be used for kindling. Connoisseurs use birch firewood and coals, which make the products nutritious and aromatic. Using the wrong kindling materials can even lead to poisoning.
Video: laying a barbecue with a grill
Photo


If you decide to buy a barbecue grill, it is best to do this in an online store, as their prices are much cheaper. Forged barbecues are best suited for garden barbecues.
Schemes


In our guide, we will tell you how to make an outdoor grill and barbecue oven out of brick yourself. Step-by-step instructions with photos of the construction process will help you understand the details of the independent masonry of this structure.
As a result, you should have a barbecue grill as shown in the photo below.
So, you have decided on the type of grill, its size and location. Now you need to build a foundation for it.
Usually such buildings are made on the street, in a gazebo or on a terrace. If the foundation of the gazebo or terrace can support the weight of a brick stove, which is about 3 tons, then you can start construction right away. If you are going to build a barbecue from scratch, then first of all pour a suitable foundation for it: strip or tile.
You will find instructions for building such foundations in our section ““.
The next step will be to install waterproofing under the brick grill. This is done to prevent the lower bricks from getting wet by capillary suction. It will be enough to lay a roll of roofing felt or waterproofing material. At the end of construction, cut off the excess with a knife.
DIY brick barbecue grill. Step-by-step instructions with photos.
Let's proceed directly to laying the barbecue.
We recommend that you first lay out the first row of bricks without mortar and evaluate how your future structure fits onto the foundation. Don't forget to leave 1 cm gaps between the bricks. Also check the diagonals, they should match.
After this, you can start laying the barbecue. The face brick is placed on cement-sand mortar(cement-sand ratio 1:3). To make the mortar plastic, add lime or a special masonry plasticizer from the nearest hardware store. The seams are made with dimensions of 8-10 mm, for this they use a metal rod, reinforcement, etc. In places where bricks abut without ligation, the masonry is reinforced with perforated tape, wire, etc.

We make masonry with each subsequent row offset by half a brick. To cut bricks you will need a grinder with a stone disc.
We continue to lay out the barbecue grill.

Do not forget to check the verticality of the masonry in the corners at least every 3 rows. Also, check that the lengths of the diagonals of the grill match.
We continue laying.

After you have completed 8 rows of masonry, it is time to make lintels for the barbecue and table top. They should look like the ones shown in the photo below.

You can make such jumpers in several ways.
First, you can hold the bricks together with metal pins and mortar.

Secondly, you can use metal corners.
In our case, we used the second method. We stacked the corners together in an inverted T shape and sawed off half of the shelf. This is what happened.

Take a corner with a size of at least 45x45 mm. A smaller corner will sag. But don’t take it too big so that it doesn’t protrude beyond the edges of the brick.
Make the slot in the brick with a good margin so that the metal does not tear the masonry when heated.
This shelf is invisible to the eye, reliable and beautiful.

We begin to lay it out under (the bottom) of the grill. For the firebox we use refractory fireclay bricks. We do the masonry using a ready-made fireproof mixture from a building supermarket made of clay and sand. Can be used mortar. We make the seams as thin as possible, approximately 3-4 mm.
We use corners to support the bottom of the grill. Remember to leave at least 1 cm of space between the ends of the corners and the brick. This way you will protect the masonry from cracking when the corner expands.
On the first row of the bottom of the firebox we place the second row, covering all the seams of the first. This will prevent the seams from burning out and coals from getting onto the firewood in the woodshed from below. You can, of course, pour a concrete slab instead of the corners and the first row of the firebox. But in our case it was cheaper and faster to do it this way.
If you are pouring a concrete floor, then one row of refractory bricks for the bottom of the firebox will be enough.
We continue to lay out the walls of the grill.

The laying of facing bricks and fireboxes can be done either in parallel or alternately. You can first make the walls of the firebox, and then cover it with facing bricks.
Important! Between facing and fire brick leave a gap of 1 cm. The firebox and lining should not touch.
We lay the following rows of the barbecue oven.

We are approaching the moment of constructing the combustion arch. We make a circle (an arc structure made of wood) and install it in the barbecue portal. Then we lay the arch, cutting the bricks to required sizes. We place a brick castle in the middle of the top point. The arch is ready.

Pay attention! The arch made of face brick is covered from the inside with a lintel made of fireclay brick. She is placed on metal corner slightly above the top of the arch so that it is not noticeable. It looks like this.

The arch is assembled, we continue to remove the walls of the barbecue grill.
Don't forget to check the verticality of the masonry.

We are approaching the moment of constructing the smoke collector.
We bring the top of the firebox and the lining to one level and begin to lay out the smoke collector. We make masonry from solid brick grades not lower than M150. Place it on a cement-sand mortar. We place the first row flush with the inner wall of the firebox. We lay the remaining rows offset by about a third of the brick.
Do not move the bricks more than halfway, otherwise they will fall inside the firebox.

We lay the smoke collector until there is no hole left for the chimney measuring 27x27 cm, taking into account the seams. Your chimney size may differ from ours. In this case, make a smoke collector according to the size of your chimney.
Some stove makers cut off the inner edges of the bricks so that the smoke collector is smooth from the inside. We did not notice any differences in operation between the smooth and ribbed inner surface of the smoke collector. Of course, this is only true if you have followed correct proportions between the sizes of the portal - smoke collector - pipe (read about the proportions below).
This is what the smoke collector looks like without trimmed bricks from the inside.

We continue laying the pipe. Its dimensions depend on the size of your barbecue grill.
After finishing the chimney laying, we cover it with a cap to protect the firebox from precipitation.
We successfully built a barbecue grill, also known as a brick barbecue oven, with our own hands! Wait until the solution dries and you can do a test run.
Here we will look at the most frequently asked questions about laying a brick barbecue (grill) with your own hands and the answers to them.
What size should the smoke collector be?
The size of the smoke collector depends on the size of the firebox portal. Optimal ratio should be at least 100-120%. So in our step by step instructions the height of the portal is 6 rows, and the height of the smoke collector is 8 rows.
How tall should the pipe be?
The height of the pipe is proportional to the height of the smoke collector and is at least 100-120% of its height.
What diameter should the chimney be?
The cross-section of the chimney pipe depends on the area of the firebox portal. The optimal chimney area is 1/8 - 1/10 of the portal area. Extreme sizes from 1/6 to 1/13.
How to fill the gap between the firebox and the lining?
In front, around the portal, you can fill the gap with basalt cardboard. There is no point in filling the rest of the space. Therefore it is left empty.
Do I need to paint the metal corner in the lintels?
Barbecue (grill) - DIY brick barbecue. Step-by-step video instructions.