In this article you will learn how to make a carport with your own hands from wood, metal, polycarbonate, and also become familiar with all the advantages and disadvantages of each design. Here are some tips from experienced craftsmen on how to reduce the cost of construction and what you can save on.
Wood construction and its features
The main advantages of this structure are low cost and availability of materials. You can find everything you need at every sawmill, and if you have an old and unnecessary barn, you won’t have to look for materials at all. The durability of the structure depends only on its care. With timely coverage paint and varnish materials wood will last for decades. Let's consider step by step instructions construction of such a structure and approximate prices for materials.
Step 1 Floor.
Since the car will weigh from 900 kg to 2800 kg (we are calculating for a passenger car), we will need to make a screed with a thickness of 6 to 10 centimeters. We mix concrete with a ratio of 1:3:3 (cement, crushed stone, sand, respectively) and pour it into a pre-dug pit 7-10 centimeters deep. At the bottom of the “pit” you need to pour a substrate of crushed stone or fine gravel. If you want a perfectly flat floor ( extra costs), you can fill in a self-leveling mixture (3900 rubles/cube). The price of ordinary concrete when made with your own hands will cost you about 1,100 rubles per 1 cubic meter.
Step 2 Supports and harness.
Everything is simple here. Finding a square wooden beam 120x120 or a round trunk with a diameter of 150 mm and install it along the edges of the screed. We nail it right away bottom trim from a 200x20 mm board so that the columns do not fall. Then we nail the top trim, first adjusting everything to the level.
Step 3 Sheathing and roof.
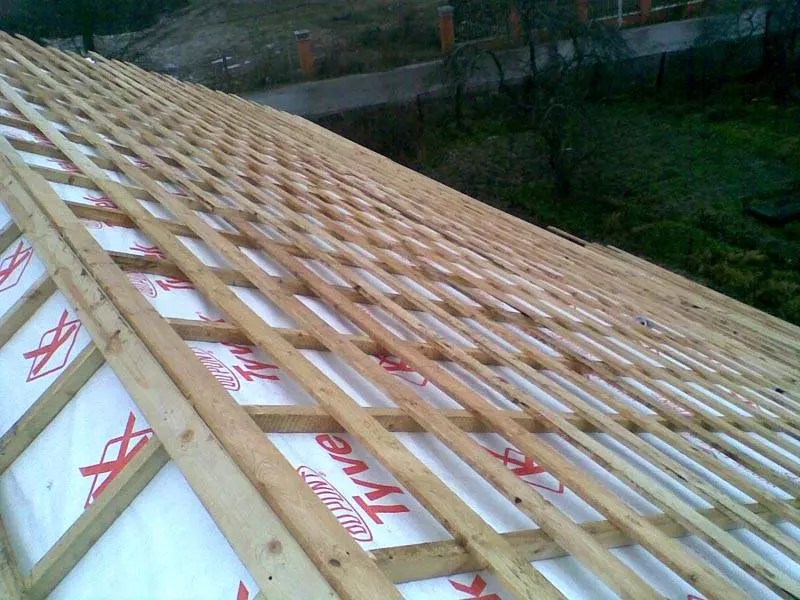
It is better to make a gable roof: measure the ridge plumb, nail 2 logs to it, measure again and nail the remaining logs. We fill boards 15 cm wide and 2.5 cm thick across the joists. The width between the joists is up to 70 centimeters. Any roofing materials can be attached to such a sheathing. The simplest and cheap option– slate. If you want an aesthetic, elegant design, use a metal profile of a certain color.
Building such a barn will not be difficult; it is erected very easily and quickly. It is advisable to have one auxiliary worker, since it will be difficult to operate the process yourself when installing the columns and roof.


Carports made of polycarbonate and features of their installation
Installing the floor is no different from the first option - we make it whatever you want, even though you can lay tiles on top. But in all other respects the structure will be significantly different. Its cost is 3 times more expensive than a wooden canopy, since rolled metal is expensive (and forging is very expensive). And polycarbonate is not cheap. If you decide to build this way, then the structure will cost you about 17-25 thousand rubles, depending on the prices at which you buy building materials.
Step 1 We put up supports.
Instead of wooden trunks, we will now have 50x50 mm squares - this will be enough. It is better to place them on mortgages, which are previously walled up in the screed. If there are none, weld an L-shaped mount with holes to the base and place it on dowels (the other side can simply be welded).
Step 2 Top harness.
We make it with two parallel welded squares. The first is butt welded at the very top, the second is 30 centimeters lower.
Step 3 Arched ceilings.
At the metal store you can buy a metal square (or rectangular profiled pipes) curved with an arch. We select it according to the size of the garage and weld it to the harness. 1 arched piece for the top square of the trim, the other for the bottom strap of the trim. Now we have a space of 30 centimeters along the entire length of the arch, which we weld with reinforcements. The first section (facade part) can be made using forging - it will look very beautiful.
Step 4 Roof.
Slate and tiles will not work because they cannot be bent into a donut shape. We take flexible polycarbonate, drill a couple of holes in it on the edge, screw it in and bend it in the right way so that its entire area adheres to the arched part, and then screw on the elements.
We looked at how to make a carport with your own hands from polycarbonate, but there are other design options with a straight or gable roof. They are less attractive in appearance, but will cost much less.


Metal canopies and why it is more profitable to make them
It is generally accepted that a metal canopy differs from a polycarbonate canopy in absolutely every way. In fact, bottom part they have almost the same. The only difference is in the thickness of the racks, the depth of the foundation for the supports and the number of reinforcements. Polycarbonate is very light and especially heavy, weighty parts are not required to attach and hold it. The metal canopy with its massive roof has slightly thicker supports and more reinforcements ( the difference in everything is 25%). The depth of the foundation is up to 70 cm with a concrete column diameter of 35 cm.
The structure of the roof, of course, is very different. Now you do not have the opportunity to bend slate or profiled sheets and you need to make a ridged gable roof. There are options with a pitched roof - very cheap and easy to install. It is generally accepted that pitched roofs are best made from profiled sheets, since 1 sheet is enough to cover the entire length of the canopy. We screw on 3-4 sheets and the construction of the roof is finished!
Another current overlap option is flexible tiles. Its cost is much higher than usual, but in appearance it is in no way inferior to euro roofing felt. Polymer materials have many advantages, in particular – absolute corrosion resistance. Ruberoid is similarly good. But the price of such a product will be from 1200 rubles per square.
Metal canopies can be decorated with forging - it looks very beautiful, although expensive. It is welded, as a rule, on the top trim and in the corners between the supports and the trim strip. If financial resources allow, you can decorate the facade forged products, covering all the corners with them.
When making carports from polycarbonate with your own hands, you will have to make a difficult choice - wooden structures are not durable and appearance, and metal structures are too heavy. Finding the golden mean is not so easy, so it’s easier to start from the budget that can be spent on building a canopy.


Ecology of consumption. Estate: A good canopy at the dacha protects the car from the sun and bad weather. When using a car intensively, a carport is much more convenient than a permanent garage. It’s not difficult to build an original and practical carport with your own hands; use our tips and recommendations.
Having chosen a suitable place, sketch out a plan diagram on paper indicating the exact dimensions, make a calculation and prepare the tool.
Necessary tool
A good owner will have almost everything to build a shed necessary tools. You can always rent what you need or ask a neighbor. There is no need for highly specialized tools, but depending on the materials used for the racks, a different set of tools may be needed:
- Entrenching tools: a shovel, a sledgehammer, a pick and a crowbar - will be required for earthworks: leveling the site and digging holes for canopy posts.
- Carpenter's tools: a hammer, a hacksaw, a chisel or a chisel - are used to install wooden posts, joists and sheathing of the canopy roof.
- Measuring tool: tape measure, spirit level or building level, plumb line, carpenter's angle - necessary in any case for correct installation and canopy installation.
- Power tools: drill, turbo sander, screwdriver and bits, jigsaw. And in the case of installing reinforced concrete or metal support posts for a carport, you will need welding machine.
Consumable fastening materials include nails, screws, bolts, metal corners etc. Their number and dimensions are determined depending on the materials and design of the canopy
Materials and their cost
Calculation of materials is made in accordance with the drawing of the carport. Taking the conditional length of the car to be 4 meters, the planned canopy is 5x2.5 m. If the car exceeds the usual dimensions, a jeep or minivan, the canopy is built somewhat more spacious, approximately 6.5x3.5 m. When designing a canopy, take into account the dimensions of the roofing sheets. The height of the canopy should allow the trunk to be opened freely. This is approximately 2.5 meters.
The number of support posts, depending on the material, canopy area and roof weight, ranges from 4 to 10 pieces. If one of the sides is adjacent to the building, fewer racks will be required. Materials for support posts and metal canopy frame:
- round pipe with a diameter of at least 1 inch or similar profiled (square or rectangular);
- a metal corner with a shelf of at least 50 mm or a channel, T-beam or I-beam with a metal thickness of 3 mm or more.
The cost of a rolled metal profile depends on the grade of metal, the most common for steel 40 GOST 1050–88, and the weight formed by the thickness of the walls. Today, a profile pipe 50x50x3 costs around 180 rubles per meter. Corner 50x50x5 - approximately 150 rubles per meter.
A frame made of wooden beams will cost less. For support posts, softwood timber 100x100 costs approximately 60 rubles per linear meter. A timber for a 50x50 frame costs about 17 rubles per linear unit. m. The price is affected by the type of wood, humidity and type of wood.
Any materials used for roofing work are suitable for covering the canopy:
1. Corrugated sheeting - with polymer coating 0.4 mm thick costs from 155 to 175 rubles/m2, a similar galvanized one costs from 130–150 rubles/m2. A galvanized steel sheet measuring 1000x2000x0.4 mm costs approximately 2,660 rubles per piece. A galvanized ridge measuring 2000x100 mm will cost 95–100 rubles per piece, and with a polymer coating - 120 rubles per piece. To install a metal roof, you will need additional and drainage elements.
2. Gray slate type SV-40 has 7 or 8 waves with a thickness of 5.8 mm and standard dimensions of 1750x1130 mm, costs 220–230 rubles per sheet. A slate sheet weighs from 19 to 25 kg, depending on the thickness and density of the material. Colored slate will cost a little more - up to 300 rubles per sheet. The disadvantages of slate include the fragility of the material and its heavy weight.
3. Metal tiles 0.4 mm thick cost from 180 rubles/m2. The working width of the metal tile is 1100 mm, the total width is 1180 mm. It is reliable and lightweight material for the roof of the canopy. It is easy to transport and install.
4. Plastic roofing is intended for canopies and awnings. As a rule, it is made of polycarbonate or polyvinyl chloride. Standard size sheet 2000x900 mm or produced in rolls of 10–20 meters with a width of 1.5 to 3 m. On average, the price of a sheet is around 300 rubles.
Installation of canopy support posts
For the support posts of the canopy, holes 0.7 meters deep are drilled or dug according to the markings. The bottom is filled with crushed stone and compacted. The concreted end of the support post is treated with an antiseptic and bitumen mastic. The support posts, positioned strictly vertically, are poured with concrete. The principle of installing supports is the same for wooden and metal racks.
After the concrete has dried, the truss structure for the roof is mounted on the racks. Wooden support posts are tied around the perimeter with a 50x150 mm board, and a rafter skeleton is installed on the resulting upper crown of the canopy. A 50x100 mm beam with an installation pitch of about a meter is suitable for it. The exact pitch size of the rafters is dictated by the width roofing material. The rafter beams are installed in places where roofing sheets overlap.
For metal racks rafter system welded on the ground. A rectangular frame is welded from a 50x50 mm corner according to the dimensions of the racks. For the corner gable roof of the canopy, rafters are welded from the same corner. For arched roof used metal strip. Holes for fastening the roof are drilled in the rafter system. Typically, the pitch of the holes for any type of roof is 10–15 cm. The rafter system is installed on support posts and secured by welding.
Carport roof decking
A sheathing is sewn onto the rafters perpendicular to them. For this purpose, both edged and unedged board 20x100 mm. The first line of the sheathing is placed along the edge of the slope, the top line at the point where the ridge is attached. The distance between the lines is 50–70 cm. The lines should be located in the places where the roof is fastened and overlaps.
Roofing sheets begin to be laid from the bottom corner to the ridge with an overlap of 10–15 cm. The slate is fastened with special galvanized nails with a large head. It is nailed with light rhythmic blows with a hammer on a slate nail installed at the top point of the wave.
For plastic slate, corrugated sheets, and metal tiles, galvanized self-tapping screws equipped with special plastic gaskets or press washers are used. Typically, one roofing sheet requires 10–12 self-tapping screws. Roofing sheets are often supplied with a set of fasteners of the corresponding color.
Roofing sheets are attached to the metal canopy frame using bolts with metal and sealing washers or metal screws, under which sealing gaskets are installed. published
P.S. And remember, just by changing your consumption, we are changing the world together! © econet
Join us on
All photos from the article
When arranging your suburban areas As a rule, owners allocate a place for their car. True, building a garage is not always advisable, since it requires significant investment and quite a lot of time. If the site is visited from time to time, then great solution in this case, it is a carport made of wood, the construction of which is the subject of this article.

General information
A carport made of wood has many advantages. First of all, it reliably protects the car from exposure to sunlight and precipitation, while being easy and quick to install, thanks to which every home craftsman can build it.
It must be said that many consider wood to be a material that is not durable enough in comparison, for example, with metal. But in reality, if the wood is treated correctly, the structure will last a very long time.
Wooden carports can have the following types of construction:
Advice!
Wooden carports are usually covered with the same roofing as the house.
Thanks to this, the design fits harmoniously into the architectural ensemble of the site.

Construction of a canopy
Project
Before you build a wooden carport with your own hands, you need to create a project for the future structure. When starting this work, first of all, you should decide on the size of the structure. The parameters primarily depend on the size of the car and the number of vehicles.
All design features structures must be displayed on paper. In addition, the dimensions of the main elements of the building must be indicated in millimeters. To correctly draw up a drawing, you can first study existing projects wooden canopies for cars.
If the family has a car, then there will certainly be one. How else? Is it possible to deny yourself the pleasure of relaxing outside the city on weekends and holidays? How and from what to make a carport for your dacha with your own hands? What are the advantages of an open canopy over a closed one? Find answers to these many other questions in our material.
Read in the article
Introduction: carports, features and nuances
A thrifty owner knows: you won’t deliver iron horse in a reliable stall, it will not serve for long faithfully. Direct sun rays, rain, snow storm - all this affects the condition of the car body. And hull repairs are not a cheap pleasure these days.
An easy and inexpensive way out of the situation is to build a carport. Most simple design you can make it yourself. You can draw up the drawings yourself, based on the size of the area and the dimensions of the machine.
Advice! The optimal height of the carport is two and a half meters. Even a jeep with an expeditionary trunk will fit under such a canopy. There is enough space above the car.
The length and width of the area under the canopy is calculated in accordance with the dimensions of the iron horse. Add half a meter on the sides and length. This is the minimum area that needs to be allocated for a car.

Building options:
- free-standing structures at the entrance with a gate or deep in the yard;
- extensions to sheds or garages;
- with access to the house (projects with a cantilever or beam-supported connection);
- ready-made prefabricated metal structures with fabric awning. This is a folding module that can be assembled and disassembled anywhere if necessary.
What should you consider when choosing a shelter for your dacha under a car?

The frame of a country canopy can be made from, from and. If a dismountable device is provided, then only metal racks are suitable.
Advice! The canopy can be arranged so that, if necessary, three or even four walls can be installed if they are made from light panels in the shape of an accordion or according to the compartment principle.

The owners of a large plot are lucky. They can afford a garage and a carport in front of it. This design also has advantages:
- You can park your car in the garage at night, and if you have to travel during the day, leave it under a canopy;
- a carport for two cars will come in handy if guests come to the dacha;
- if you install a canopy between the garage and the house, it can be used both in rainy weather, set a table there or set it up.
Advice! The space above the garage can also be used. You can place an open gazebo on the roof. From the height of the building you will have an excellent view of the garden.
In the photo there are several ideas on how to make a garage canopy with a canopy:
Carports attached to the house: photo examples

Several methods can be used to secure the roof:
- cantilever support system consists of load-bearing brackets fixed directly to the wall of the building;
- beam-supported structure consists of support posts and a horizontal support fixed to the wall;
- cantilever mount, which is only suitable for very light canopies with an awning covering.

The simplest project is open canopy. There is no need to rack your brains about how to build this simple structure. Simply install two posts at the required distance from the house and connect them to outer wall buildings with inclined beams. Then all that remains is to install the crossbars and lay the roofing material.
How to fix beams to the wall? For this purpose, you can use metal corners and.
Important! The roof of the extension must have a slope for unimpeded drainage of precipitation.

The height of the front supports cannot be less than two meters if you have a regular sedan and at least two and a half meters if you have an SUV.
The second design option is semi-closed. In this case, the canopy is positioned so that the space for the car has two or even three walls. Such a structure is installed near houses that are L-shaped or adjacent to a fence with one wall. The area, closed on both sides, is less exposed to wind and protected from slanting rain.
Closed canopy near the house– this is already a full-fledged garage. Its walls can be made of sandwich panels or polycarbonate. If the site is located in a region with a hot climate, it is convenient if the walls are sliding.

How to make a canopy extension to your house in the following video:
Features of carports for 2 cars
In order to place a platform for two cars, you need to choose a suitable place. A large canopy can completely cover, this is not always the case good option. Installation will require a minimum of six posts, but may require a dozen posts to be secure.
Advice! If you are planning a shelter for two cars, provide entry from different sides. This will make it more convenient to park and drive out.
The dimensions of the area for two cars must be no less than 8 by 6.

Another nuance - a large canopy should not have support in the center. This will interfere with free maneuver when parking.
Designs with a utility unit are convenient. You can store spare parts and other necessary items in it.
In the photo there are options for large canopies:


How to cover a carport
The roofs of suspended structures have some features that you need to know about:
| Single-pitch |  | The primitive design with a pitched roof is suitable for any site. The optimal roof slope is from fifteen to thirty degrees. Any roofing material can be laid on such a roof. |
| Gable |  | Buildings with gable roof more practical and can cover large areas. They are also suitable if you need to connect the roof to the main building. |
| Arch |  | A complex shape requires a special approach to construction work. To make it, you will need curved metal supporting arches. The difference in the upper and lower points of the arch is at least sixty centimeters |
The roof can be covered with different roofing materials. Corrugated sheeting is also most often used.
Both of these materials are affordable. Any developer can afford them. In addition, they are resistant to fire, and this is an important factor for a motorist.
And another common advantage of these materials is strength and durability. The service life of such a roof is at least fifteen years.
What makes these materials different? Metal gets very hot in the sun, polycarbonate partially transmits light and does not heat up. Metal roof very noisy. When it rains, the roar of water will be heard in the house. But she is not afraid of large hail. But polycarbonate can shatter into fragments.
Polycarbonate carports
So, the advantages of polycarbonate are obvious. Products made from it look aesthetically pleasing and reliably protect from sun and rain. The price of the material is affordable for most summer residents. It’s easy to make a polycarbonate roof for a carport with your own hands.

How to choose the right thickness of polycarbonate? The carport must be strong, so the thinnest sheets are not suitable. A thin sheet can only be strengthened by frequent lathing, but this will not add beauty to the product and will significantly increase its cost. Thin panels with a thickness of four millimeters are suitable only for lightweight ones for the dacha and other similar structures.
Advice! For a carport for 2 cars you will need a sheet sixteen millimeters thick. For the vertical walls of the garage, you can use eight-millimeter plastic.
For better protection from ultraviolet radiation, a matte sheet should be used.
In the photo there are options for canopies:


For your information! Plastic structures can have any roof, straight, arched or wavy. It should be taken into account that fallen leaves will accumulate on the wavy roof in the fall, and snow in the winter.
Polycarbonate roofing is also convenient because it is laid in one sheet and has no cracks or joints and does not require overlap. Parking racks for one or two cars are made of timber and rolled metal.

How to make a polycarbonate roof:
- a distance of seventy centimeters should be left between the lathing strips;
- the length of the sheet blank should be ten to fifteen centimeters longer than the length of the base;
- polycarbonate is cut with an aluminum saw, the protective film is not removed for cutting;
- When laying the material, place it protective film up;
- fastening is done using bolts with washers and self-tapping screws;
- for reliability, the fastening is reinforced with special glue;
- The edges of the polycarbonate are protected with aluminum construction tape.
Tips for installing polycarbonate in the following video:
How to care for polycarbonate:
- Wash and wipe plastic products with a soft sponge and plain water.
- Do not use aggressive chemicals or abrasives to clean polycarbonate.
- Sheets of roofing material are stored in rolls in vertical position. During storage, the film is not removed.
Gallery of polycarbonate carports:
1 of 4


Carport made of corrugated sheets

Advice! It is better to concrete or cover the parking area and the entrance to it paving slabs. Otherwise, in the rain or when the snow melts, the car will get stuck in the mud.
- At the site, the top layer of soil of approximately 10-15 centimeters is removed.
- Gravel is poured into the bottom to half the height of the pit,
- It is laid out on gravel. Subsequently, a fabric bedding will not allow weeds to grow and prevent sand from spilling out.
- poured onto geofabric sand-cement mixture. Lay out on a flat surface. There should be seams no larger than three millimeters between elements.
- The same sand-cement mixture is scattered over the finished flooring and driven into the seams using a broom or broom.
- The site is watered abundantly. In this way, they lay out not only the parking area for the car, but also the garden floors and the area in front of the house.
Returning to the question of how to make a country carport yourself - an extension for a car, we note that after the concrete hardens around the posts, you need to make a strong upper frame. It will become the basis of the rafter structure.
The roof can be made single-pitch or gable, as you like.
Important! All elements wooden structure must be treated with a composition against rot and insects. It would not hurt to use a fire retardant additive.
The cut edges of the roofing material must be coated with paint or varnish to protect against corrosion and then installed. To fasten the corrugated sheet, it is better to use galvanized self-tapping screws. The photo shows a diagram of how to install roofing elements:

How can you save money and cheaply build a roof over a country parking lot? You can also make a roof from scrap materials. For example, you can use an old banner. The banner will form a sealed roof that reliably protects the car from rain and sun. Not very aesthetically pleasing, but inexpensive.
Where can I buy a carport
Not everyone has the time and opportunity to do construction at their dacha. In this case, you can order work from contractors offering services in this area. Such companies will offer you several options for standard projects. In addition to, in fact, covered parking for a car, you may be offered the construction of an extension to the house or a utility block with a canopy. Most often, manufacturers use metal frame and polycarbonate coating. But you, as a customer, can decide for yourself what to make the frame from and how to cover your parking lot.

You can buy individual project. Creating such a project will not be expensive, since such structures are characterized by a primitive design (unless it is a two-story barn with a canopy).
How much does it cost to install such a structure at your dacha? The price with installation starts from fifty thousand for small canopies made of solid timber. The cost may increase depending on the complexity of the design and the availability of additional parts.
Let's sum it up
So, a canopy is one of the simplest, but at the same time very necessary buildings for summer cottage. You can make it yourself from metal or wood. The dimensions of the structure must correspond to the dimensions of the car. The placement of the canopy depends on the characteristics of your site.

When settling in country house, dacha, yard, it is worth setting aside a place to park your car. To protect your car from rain, snow, hail and other negative weather conditions You can build a carport out of wood. This design It turns out quite quickly, but at the same time it is fully capable of ensuring safety for the iron horse. But before you do it, it’s worth considering important features. The strength and durability of the structure depends on knowledge of all the nuances and details.
Types of awnings
 A carport made of wood is a convenient design that has many positive features. First of all, it protects the car from negative weather conditions. At the same time, it is quite easy to install; for this reason, even a novice home craftsman can make a canopy.
Carports made of wood can be of several types:

Canopy materials
 To make a high-quality and durable carport made of wood with your own hands, you need to thoroughly prepare. First, it’s worth understanding what parts the structure consists of, usually it includes a frame and a roof. The frame is considered the most responsible, so it must be made of durable materials.
The frame for a car canopy can be made from the following material options:
- Tree. This material is considered the most affordable and practical. It is easy to process and does not require the use of special tools for cutting and joining. But still, compared to other types of bases, wood is not durable. Over time, the material cracks, deteriorates, rots, and becomes covered with fungus. And to increase its service life, special care must be taken. Additionally, it is recommended to treat the wood surface with impregnations, varnishes, and protective paints;
- Steel profile pipe. In order to make a carport with your own hands from metal, you need a welding machine. But the finished structure can last for several decades. However, steel profile pipe there are negative aspects - the creation of curved trusses is required under the roof of wide canopies. If this is not done, the entire structure may collapse under the weight of snow;
- Combined options. Often, when constructing a carport, two types of material are used at once. Structures with a steel frame and cladding made of wooden slats look beautiful and stylish. They combine durability and stylish design.
The second part of the carport is the roof. It can be made from profile sheet or polycarbonate material. Both materials have good strength characteristics, durability and beautiful appearance. Polycarbonate carports will look more airy and aesthetically pleasing.
For areas where large hail frequently occurs, it is recommended to use more expensive types of polycarbonate that have a protective film.
Features of site preparation
 It is recommended to start building a carport with organizing the space. Its size depends on the number of machines that will be installed. If a small structure is planned, then the area of the place should accommodate one standard car.
When preparing a place for a canopy, you should follow these recommendations:
- Once a construction site has been selected, all grass, turf, and weeds must be cut off.
- The top part of the soil must be removed to a depth of 12-15 cm. Instead, a cushion of sand and crushed stone is laid, and compaction is additionally used.
- During preparation, a small slope is constructed along the way. And if the area is low-lying, then drainage pipes are laid around the perimeter.
- After making the canopy, any parking covering can be laid on the sand bed.
If the canopy is being built for a heavy SUV, then a reinforced concrete screed is suitable for the base.
To do this, plank formwork is created, it needs to be filled to the middle with concrete, then reinforced mesh is laid out and topped up concrete mixture. Complete hardening of the site occurs within a month.
Optimal dimensions of the building
 In order for carports made of wood to be convenient and comfortable, it is important to consider the dimensions; this must be done at the preparation stage, which will allow you to avoid serious problems in the future.
To accommodate a standard car with a length of about 4 meters, a canopy with dimensions of 5x2.5 meters will be convenient. But for parking large cars, for example a minivan or jeep, it is worth making a structure with dimensions of at least 6.5x2.5 meters.
Be sure to remember to maintain the required height level. The design should not only include the car itself, but its cargo on the roof rack. But still, you should not make the canopy too high, this may negatively affect its service life. The point is that when strong wind there is a possibility of the roof and its supporting elements becoming loose, and this often leads to the destruction of the entire structure.
If you are planning carports made of wood with a height of more than 3 meters, then it is important to think about the arrangement in advance cross beams with a strong base. They should cover the entire perimeter of the structure, this will greatly increase the strength of the wooden canopy. The roof should be gable; this roofing option is considered the most durable and stable.
Preparatory stage
 To create a strong and durable carport attached to a house or a permanent structure, it is important to prepare the necessary tools and materials. First of all, we mark out the place for the future structure - for this, a machine is installed in the construction area, and places for supporting elements are outlined. It is imperative to check that the supporting elements do not interfere with installing the car and opening the doors.
Usually the roof is longer than the canopy. It can extend beyond its perimeter by 50-100 cm, this is considered normal.
If polycarbonate carports are planned, the drawings will be the most important stage of construction. They are the ones who will help you do everything correctly and exactly according to the given parameters. You can make the drawings yourself or find them ready-made on the Internet.
 At self-production It is recommended to draw the planned structure on paper in several projections - from above and from the side. It is important to correctly calculate the required amount of material. It is advisable to add 10%, this will eliminate the need to purchase additional funds for construction.
For the frame you can use steel pipe or a wooden beam, it all depends on the desire of the owner. But if a tree is chosen, it will definitely need to be treated with special protective coatings.
Carports are manufactured using tools and materials from the following list:
- saw;
- hammer;
- if a canopy is being built from timber, then nails will be needed to secure it;
- to work with a profiled pipe, you will also need a welding machine;
- level;
- plumb line;
- pegs;
- twine, any strong rope or cord will do;
- shovel;
- clamps;
- Self-tapping screws will be needed for fixing and fastening;
How to make an attached lean-to carport out of wood
 As was said earlier, in order to make a strong and durable lean-to carport from wood, the drawings must be completed in advance. Without them, the construction process will not be entirely correct; they will help you perform preliminary calculations and allow you to purchase required quantity materials.
When everything is prepared, you can begin the process of constructing a lean-to structure:
- The first step is to install the supporting elements. For them, it is worth using durable timber; preference should be given to options made of pine. Its cross-section should be 7.5-16 cm.
- Holes are drilled in the ground into which the support pillars will be installed. The depth of the holes should be 4.5-6.5 cm.
- The installation of the pillars must be correct. To do this, you can use a level or a rail; it is placed on top of the supporting products. There is usually a space left between the hole and the post, it is recommended to fill it cement mortar, this will strengthen the pillars and they will stand firmly in place.
- At the next stage, the rafter system is assembled. It is made of timber with dimensions of 15x5 cm. The distance between the rafters should be no more than 100-120 cm. On one side they are attached to the surface of the wall, and on the other side to the supporting elements. For fastening you will need screws and metal corners;
- Perpendicular to the rafters are nailed edged boards, they should have a thickness of about 4 cm and a width of 15 cm. The result is small cells with dimensions of 90x90 cm;
- Roofing sheets are laid along the grid. For pitched roof slate or metal options coverings.
- To extend the service life of the canopy, the wood must be treated with special protective mixtures - impregnation, varnish, paint.
Making a stationary canopy
 Many people often wonder how to make a polycarbonate carport with a free-standing structure? Of course, it is not necessary to use polycarbonate; slate will also work, metal roofing, that's not the point at all. To make a durable and strong structure, it is important to stock up on the necessary materials in advance.
To make a small carport for one car you will need the following consumables:
- three bags of cement;
- sand;
- crushed stone with a fine structure;
- wooden supports – 6 pieces;
- board with dimensions 3x10x60 cm - 15 pieces;
- timber 5×15×60 cm – 13 pieces;
- roofing materials, polycarbonate, slate, metal tiles are suitable. A total of 18 square meters will be required;
- bolts with dimensions 10x150 - 10 pieces;
- self-tapping screws for metal tiles – 160 pieces;
- 500 grams of nails.
To perform a canopy with gable roof it is important to do everything correctly in accordance with the scheme. Drawings in this matter will be necessary; they will help calculate all the elements and allow you to mark the location of all important parts of the structure.
Before making polycarbonate carports with your own hands, prepare everything necessary lumber. They are treated with antiseptic coatings, which will protect them from insects, mold and fungal infections.
Using a tape measure, the length and width of the building are marked. Next, a rope or cord is pulled along which the supporting elements will be installed. One support column is installed in each corner of the future canopy, and they are also placed along the walls every 3 meters. Then holes are dug in the ground to a depth of half a meter.
The process of erecting a canopy
 After this, the following actions are performed:
- Posts are lowered into holes in the ground. It is important to make sure that they are evenly deepened; for this, use a level or a long board.
- Once the outer support elements are completely aligned, you can begin installing the intermediate pillars.
- It is necessary to ensure that residues from precipitation and debris do not linger on the roof surface. To do this, you need to make a height difference between the left and right sides of the building. The size of the difference must be at least 4.5 cm.
- To ensure that the supports stand firmly in place, they are filled with cement mortar. It is prepared from crushed stone, cement and sand in a ratio of 4:2:1.
- A beam with dimensions of 5x15x60 cm is placed on top of the racks. The distance between each beam should be about 80 cm.
- Beams are also laid across the canopy. In the center and along the edges, the beams are fastened using 3x10x60 cm boards and nails.
- Finally the roof is installed. It is attached using self-tapping screws, and all excess is cut off.
It is necessary to build drainage system through which water from rain and snow will come out from the roof.
To do this, ebb tides are installed around the perimeter of the canopy. Special fastenings for gutters are fixed along the entire length; they are screwed with self-tapping screws. And then ebbs are mounted into the fasteners.
Building carports is not an easy task, but it can be done. The main thing is that everything needs to be thought out and prepared in advance, and calculated correctly. Drawings or diagrams that you can make yourself or use already will help in this matter. ready-made options. Preliminary calculations will help you purchase the required amount of material, and will also allow you to do everything as needed.
The process of building a simple carport - video