Before tinning a soldering iron, you should find out what this procedure is and why it needs to be carried out. The bottom line is that as a result of soldering, due to overheating, the soldering iron tip oxidizes and, accordingly, loses the ability to normally melt the solder. Therefore, from time to time there is a need to tin it, that is, remove the oxidized film.
There are several ways you can do this, general principle which boils down to the following: using a file, sandpaper, a grindstone or any other abrasive, you should clean the tip and rub it to a metallic shine, and then cover the working part with solder.
How to tin a soldering iron tip?
All soldering irons, with the exception of the so-called soldering stations, which are solder wire made from a tin tube with rosin, must be tinned. And first of all, this applies to new tools in order to bring the tip into working condition and use it for soldering.
To tin a soldering iron tip, you should apply an abrasive material to its cut; it is most convenient to work with a small file (although each craftsman develops his own favorite method over time) and sharpen it to a shine and perfect smoothness, while making sure that the cut is even. There are no clear requirements for what shape to give the sting. The cut shape is universal, but for soldering, for example, radio components, transistors, SMD parts, a cone-shaped shape is more convenient, which ensures accuracy and quality of connections.

In addition to abrasive processing, the tip can be forged. In this case, it is possible to achieve an increase in its service life due to lower solubility in solder. You should also pay attention to the fact that the soldering iron tip can be removable, secured with a screw. In this case, it is much easier to process it with a file by simply removing it.
In order to tin a soldering iron, you need to plug it into a power outlet and wait until it warms up to its proper temperature. operating temperature. The hot tip must be dipped into rosin prepared in advance, and then into tin solder. You need to be prepared that this procedure will have to be performed several times (on average 3-5 times, but it all depends on the power of the soldering iron, the condition of the tip, and its working part).
Having taken the tip out of the solder, it must be attached to the wood. For this, craftsmen acquire small boards (preferably made from coniferous wood because of the resin, the presence of which in the wood helps speed up the process, although other boards can be used, but not materials from sawdust, such as chipboard). It is necessary to follow the sequence (first rosin, then solder on the board) until the cut of the tip acquires a uniform layer of shiny silver solder.
This is a kind of evidence that the soldering iron tip was tinned correctly and efficiently. You can tin the tip using another soldering iron, but since home craftsmen rarely have two tools available at the same time, this method rarely used.

Often, household soldering irons do not have much power, for example, from 25 to 65 W, and electrical networks cannot always provide a stable 220 V. Therefore, the tip may not heat up to its operating temperature, which may not allow it to be tinned. This will be eloquently evidenced by balls rolling out of the solder and persistently refusing to stick to the tip. In this case, there is only one way out: you need to use a voltage stabilizer or a transformer with the ability to increase the voltage. Sometimes it is allowed to increase it to 230 V.
Return to contents
How to properly prepare wires for twisting for soldering?
In order, for example, to solder copper wires to another in a twist or to a brass tin, they will need to be tinned no less carefully than the tip. For this, a soldering iron tip is used, which, of course, must be heated.
The tip, heated to the required temperature, is dipped first into rosin, then into solder, then onto a wire or tin, pressing it tightly and at the same time crawling along the surface. This procedure must be performed very quickly in order to prevent the rosin from having time to evaporate. It should be noted that this is a very painstaking work and this procedure will have to be done repeatedly until an even layer of solder is formed on the surface of the materials being prepared for soldering.

The time spent on tinning the surface differs for clean materials that have not yet had time to oxidize from parts with a decent layer of oxides. In this case, it is recommended to remove them first mechanically, for example, using a file or sandpaper. In particularly difficult cases, when it is impossible to tin the wire, it is better to use a special one instead of rosin. chemical composition, solder paste or acid, which is mainly used for tinning iron.
Solder in the form of a wire is often used for soldering. In this case, the soldering iron tip, after rosin, is quickly applied to the surface to be tinned, and at the same time, solder wire is placed at the point of their contact. The tip of the tip should be rubbed against the edge of the solder. In this way, rosin and tin interact with each other, and the contact site is enriched with this compound.
Return to contents
How is soldering of wires done?
Tinned materials are completely ready for soldering, which will ensure a reliable connection between them, for example, for safe and unhindered movement electric current(if twisting is performed electrical wires). The soldering process itself is as follows:

To solder wires with a soldering iron you will need rosin and solder.
- First, you need to bring the tip of a soldering iron with solder to the place of the connecting contact, which will envelop the tinned parts of the parts.
- Since the soldering process is ensured by the presence of rosin, as a rule, in order to perform soldering, it is necessary to dip the soldering iron into it several times and then bring it to the joint.
- The soldering process should be completed at the moment when the tinned parts of the parts are completely in the solder. At this moment, the sting is carefully removed so as not to move them.
- The soldering area is considered solidified after the shine of the solder has weakened somewhat.
IN living conditions there is a need for soldering non-ferrous metals: copper, brass, tin, lead, gold or silver - they are all quite malleable to work with. It will be much more difficult to cope with steel, iron or zinc, primarily due to the fact that they are much less amenable to tinning. But aluminum and some other metals cannot be soldered using a household soldering iron.
But a soldering iron can be used not only to connect various metal parts, but also to separate them. In this case, the reverse process is performed, but for this, the soldering iron tip must also be tinned correctly. In order to unsolder, for example, twisted wires, you need to heat the connection. The tip should be dipped in rosin and brought to the solder until the latter melts. After this, the parts are very easy to separate. In order to remove rosin residues from their surface, you can treat them with a solvent with a small brush.
During operation and storage, an oxide layer forms on the soldering iron tip. It interferes with high quality soldering. To remove this layer and prevent its re-formation, tinning is performed, or coating the copper surface with a protective layer of tin alloy. There are many in various ways tinning. Before surgery, the sting must be thoroughly cleaned.
Basic information about the tinning process
Tinning is divided into initial, carried out on a new or long-stored soldering iron, and working, performed immediately before soldering.
How to tin a soldering iron tip? First, the tip is mechanically cleaned of scale, oxide film, slag and other contaminants, then a thin layer of molten solder, most often tin-based, is applied to the prepared surface.
For mechanical cleaning apply:
- abrasive stone;
- sandpaper;
- another soldering iron.
Preparation and Maintenance
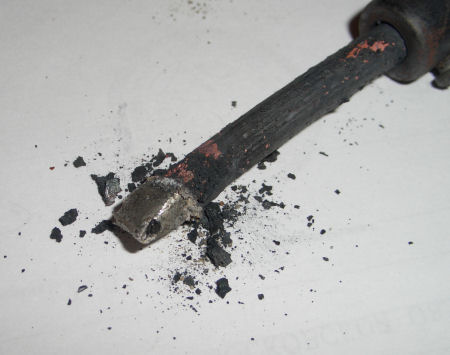
The more intense the work, the sooner the soldering iron tip burns out and becomes overgrown with scale flakes.
During prolonged heating up to high temperatures the copper from which the tip is made partially passes into the molten tin, and partially abrades on the soldered surfaces and contacts. Physical and chemical erosion of the substance occurs. In addition, under the influence of heat, an oxidative reaction of copper with atmospheric oxygen occurs. On models that allow you to regulate the temperature, it is recommended to reduce it when there are breaks in soldering, or simply turn off the soldering iron during this time.
Sequence of operations to remove scale:
- Carefully remove the sting.
- Clean off the scale layer with fine-grained abrasive paper.
- Apply a graphite protective layer to the tip by rubbing it with the lead of a simple pencil. This will slow down the reappearance of the scale layer.
- Lightly tap the heater body and turn it to remove scale from the copper rod recess.
- Insert the tip back into the mount.
To ensure electrical safety, each time before starting work, you should inspect the insulation of the network cable for absence mechanical damage and meltdowns.
From time to time it is also useful to measure the insulation resistance value. The measurement is taken between the plug contacts and the tip. The value must be greater than 10 mOhm.
Features of the sting
The sting is the main (and only) working part of the device. It is heated by an electric heater and heats the solder, rosin (or other flux) and the parts to be soldered. During operation, an oxide film invisible to the eye is formed on it, reducing the wettability of the material. Visually it looks like this: tin or rosin does not spread evenly over the entire area, but collects in a drop and flows down.
The size and geometry of the working body are chosen so that they correspond to the operations performed. So, when soldering parts large sizes and thickness, choose a powerful soldering iron with a thick tip. To install microcircuit legs, on the contrary, a particularly low-power device is required, with a thin tip and good grounding, so as not to damage sensitive components due to static charge or overheating.
A universal soldering iron is sharpened with a spatula. Thin parts are soldered with the narrow side, and more massive ones with the plane of the blade.
Tin the soldering iron tip
Before each soldering, the soldering iron must be re-tinned. The device must be turned on and wait until it warms up completely. In this case, the copper of the working body will acquire a red-orange hue. There is no need to overheat either, to avoid burning. The heated soldering iron should be pressed against a piece of rosin. The rosin will begin to melt and give off strong-smelling smoke. The melt should be evenly coated on the tip. Then you need to melt a small piece of tin and let it spread over the surface in an even layer.
How to tin a soldering iron with a copper tip
Tinning a soldering iron is a simple job and usually does not cause any difficulties. If the surface of the rod is well prepared and cleaned, then both tin-lead and silver solders fit well on it.
It is necessary to clean the surface of the rod until it is new part. First you need to work with coarse sandpaper, level the surface and give it the required shape. If it is technically possible, it is a good idea to polish the surface - this way it will oxidize more slowly.
There is another technique - binding. To do this, the tip should be pulled out of the heater and, like a blacksmith, forged with a hammer on an anvil (or a massive vice). A surface compacted in this way will also oxidize much more slowly.
After machining, it’s time to actually tin the tip. Experienced shareholders recommend various methods:
- Place a few pieces of solder in the rosin can. Heat the soldering iron and dip the stripped tip into it. Rosin melt will act as a flux additive and will prevent the metal from becoming coated with an oxide layer. Instead, it will be coated with a layer of tin. Next, you need to take a square of coarse natural cloth and wipe the freshly tinned tip. In this case, the tin will rub over the surface and stick to it perfectly. The disadvantage of this method is a lot of smoke and a strong smell.
- The next method of tinning the tip produces less smoke, but requires more labor. A piece of coarse natural cloth should be laid out on a smooth board, sprinkled with crushed rosin or a whole piece. Dip the stripped tip into rosin and rub the surface with a solder rod. This operation will have to be repeated several times, and then rub work surface o rosin cloth.
A soldering iron with a copper tip must be tinned every time before soldering and always after storage without use.
How to tin a soldering iron tip while working
If you carefully clean and tin the tip, then after half an hour of work, or even earlier, tin will no longer accumulate on it. The copper slowly began to burn, and slag residues accumulated on it. There is no point in pressing the soldering iron harder, stop for tinning. There are a number of techniques for tinning the tip.
Using a wooden block
Rough wooden block(spruce or pine, they contain natural resin, similar in composition to rosin). Pour a small amount of flux composition onto the block and put a small piece of solder. If you notice dross, you can strip and tin the tip again with little interruption.
In a metal sponge
This quick tin tip method will require some preparation. Place a household wire dish sponge in a metal cup. Bottom part The sponges should be coated with a thick flux, such as soldering lard. By slightly immersing the tip in the sponge, it can be cleaned of slag and scale. And if you pick up a drop of tin and immerse it deeper into the sponge, it will turn out to be tinned.
This method can be used to clean and tin both a classic copper tip and modern ones made of nickel or ceramic.
In rosin
This traditional way tinning will require certain dexterity and speed of movement. Copper oxidizes very quickly, and you may not have time to bring the tip from the point of mechanical cleaning to the container with flux. Therefore, they clean directly under flux, placing a file under the tip. You need to rub the tip over the file until the flux melts, after which you can tin it by holding a tin rod.
Tin the classic way
Another traditional method of tinning involves the use of refractory solder. The refractoriness of the solder allows it to evaporate more slowly from the surface of a tinned soldering iron and will remain on the copper longer. It will require:
- file with frequent notches;
- rough board made of coniferous wood;
- rosin;
- a piece of refractory solder.
The sequence of actions is as follows:
- put solder on the board;
- clean one side;
- dip deeply into rosin;
- quickly clean it on a board, running it over the solder;
- repeat for the second side.
How to tin a modern soldering iron tip
According to manufacturers' declarations, tips made of ceramic or nickel do not require tin-plating. IN real life they are also susceptible to the formation of soot and scale. It will not be possible to tin such a soldering iron in the usual way. You will need:
- cotton rags;
- jar of rosin;
- solder rod.
You should wipe the tip on a rag and immediately immerse it in rosin. Along the tip, you need to immerse a solder rod in boiling rosin. It will melt and stick to work surfaces.
Tinning methods
There are several ways to clean work surfaces before tinning:
- Using abrasive materials. Needle file, file, whetstone, sandpaper.
- Using forging. It is recommended to remove the tip before processing it.
- Using another soldering iron. The tips rub against each other.
After stripping, you should immediately, without waiting for the oxide layer to recover, immerse the tip in a container with rosin. A rod of solder is also immersed there, melting it and allowing it to spread over the surface of the rod. This operation should be repeated several times to ensure full coverage solder working surfaces.
The tip must be carefully inspected. If there are areas not covered with solder, the operation should be repeated until a dewy continuous layer is obtained.
You won't be able to tin it once and for all. Tinning needs to be repeated periodically.
How to tin a fireproof tip
The traditional tip, made of red copper, has a tendency to constantly burn out and form scale. Quite often it needs to be cleaned and tinned. On the other hand, work on desoldering microcircuits and other electronic components that are highly sensitive to overheating requires minimal presence of solder on the working part. Even the minimal heat that is stored in a drop of solder may be enough to damage them.
For the installation of such heat-sensitive parts, non-burning tips with a thin nickel layer are used. This coating is easy to scratch, and traditional sanding with a file or sandpaper for copper tips will quickly damage it. You should also not remove excess solder by tapping it on the stand.
Such working bodies can be tinned in the following way:
- prepare a piece of cotton fabric, rosin and solder;
- wet it cold water, squeeze lightly;
- place a piece of solder in a jar of rosin;
- rub the heated soldering iron firmly on the fabric, erasing the oxide layer;
- quickly dip the tip into rosin and melt the tin in it, allowing it to spread evenly;
- rub on cotton cloth.
It is permissible to use a wire sponge made of copper alloys for this. Steel wire If it doesn’t work, it will damage and tear off the nickel coating layer.
For non-burning soldering irons, it is especially important to comply with temperature regime- if it is exceeded, the tip may fail. You need to carefully monitor the temperature, and during breaks in soldering, reduce the power if the device is equipped with a regulator. If there is no regulator, the soldering iron should be turned off during breaks. Advanced models have an automatic power control function. It uses information from the temperature sensor and reduces power if the device is in danger of overheating. In addition to overheating, it is also harmful for non-burnt tips to be left without solder for a long time.
Fireproof tips have the added benefit of being easy to remove and replace. Entire sets of interchangeable working tools are available, designed for different types rations.
During operation, the soldering iron tip constantly heats up, which leads to oxidation and the need for tinning, so you should know how to tin a soldering iron tip in order to use it to make quality repairs household appliances and other devices.

Basic information about the tinning process
Soldering iron tinning is a process that involves coating the surface of the rod with a thin layer of solder, usually tin is used for this. Tinning can be either an intermediate operation before the main work, or an independent action aimed at improving the performance of the tool. Most tools, with the exception of soldering stations, are solder wires and rosin tubes and require periodic tinning. The process involves removing the oxidation film that forms on the surface due to constant overheating of the tip. New instruments that still need to be prepared for use also need tinning.
The general principle of tinning is the same: using an abrasive, the soldering iron tip is cleaned and then rubbed until shiny. The abrasive can be a soldering iron, a sharpening stone or sandpaper. It is believed that it is more convenient for novice craftsmen to work with a file, but over time, everyone chooses the material that seems most suitable for the job.
Return to contents
Tinning methods

Tinning can be done in different ways:
- using an abrasive;
- forging;
- from another soldering iron.
For tinning, the material is applied to the tip and sharpened to perfect smoothness, while constantly checking the cut: it must be even. There are no special requirements for the shape of the tip. Most often, the tip is given a cut shape, but there are exceptions - when soldering some parts, it is more convenient to make a cone-shaped tip.
Another method of tinning is by forging. This method allows you to increase the life of the soldering iron tip, since the solubility in the solder will be less. Some models of soldering irons have a removable tip, so it is better to remove it and file it.
Soldering irons used in household conditions are not always powerful; they usually range from 25 to 60 W. The electrical network, in turn, does not always provide the 220 V necessary for operation. Because of this, cases arise when the soldering iron rod does not heat up to the required temperature and tinning is impossible. A manifestation of this will be solder, which will roll off and will not be able to stick to the metal surface. In this case, for work you will have to use a transformer and increase the voltage; sometimes it is permissible to increase it to 230 V.
In order to properly tin a soldering iron, you need to turn it on and heat it to the optimal temperature. Optimal heating is determined very easily - the soldering iron rod becomes reddish in color. There is no need to tighten it, otherwise the rod may burn out. As soon as the sting acquires the desired shade, it is immediately dipped into pre-prepared rosin; resin can be used instead. Smoke will begin to emit. Next, melt the tin solder, making sure that it covers the tip evenly.

Before tinning a soldering iron tip in this way, you need to be patient: the procedure is repeated 3 to 5 times, although the number of repetitions largely depends on the condition of the solder tip and the power of the soldering iron. Having repeated the operation one last time, the tinned tip is applied to wooden surface so that the solder is better distributed over the surface of the rod. For this procedure, planks are used small size. Better fit coniferous wood, as it contains resin, which speeds up work.
When working, it is important to follow the sequence of actions: first, lower the tip into rosin, then apply it to the board. If there are areas not covered with solder, the sequence is repeated. You need to repeat as many times as necessary to get an even layer of solder. The color should be silvery and shiny - this shows that the tinning was done correctly. Another way of tinning is using a second soldering iron. Since in household Rarely can there be two instruments; this method is used very rarely.
Tinning should be repeated periodically as necessary.
Return to contents
Preparing the wire for soldering
For soldering copper wires they must be tinned in the same way as the soldering iron itself. To work, you need to warm up the tip to operating temperature. The tip is dipped into flux or rosin, then onto solder, after which the wire is pressed tightly. All this must be done quickly so that the rosin does not have time to evaporate. This work will have to be repeated several times. As a result of the procedure, a high-quality layer of solder should be obtained on the surface.
The process of tinning oxidized parts differs in time. It is recommended to first remove oxides using an abrasive material. Very difficult cases you will need tinning acid, chemical compound or solder paste. Solder wire is sometimes used for soldering. In this case, you need to dip the rod in rosin, then apply it to the surface that needs to be tinned, and put solder between them. Rub the edge of the solder with the tip of the sting.
Some wires may be protected with enamel. To remove it, you can treat the wire with acetylsalicylic acid, that is, regular aspirin. The tablet is placed in place and pressed with a soldering iron. After some time, the tablet melts and the acid attacks the varnish and is destroyed. After such a simple procedure, tinning the wire is not difficult.
The tip of a working soldering iron requires regular maintenance. Otherwise, the solder stops sticking to it, and soldering turns into a painful procedure.
The new electric soldering iron is equipped with a clean, untinned tip. For soldering irons with a nichrome heating element, it is a copper rod sharpened to a wedge.
This is convenient for connecting wires to each other and to the terminals of electrical devices. For soldering small parts It is popular to sharpen the tip with a cone, which allows it not to catch on printed circuit board neighboring elements.

Caring for an electric soldering iron with a nichrome heater
Installation of a tip in a soldering iron depends on its design. In the first case, it is held in the body by a slightly flattened part, and is inserted and removed from it with little effort. In the second, it is attached with a screw to the body of the soldering iron. This method is preferable. Both fastening methods have features that affect the methods of caring for the soldering iron tip.
At long-term operation soldering iron, scale forms between the walls of its inner part and the tip, which impairs heat transfer. If it is not removed correctly in time, then it will be impossible to disassemble this unit without breaking. The tip is periodically removed, the inner surface is cleaned with fine sandpaper and inserted back. When fastening with a screw, this is easier to do, only the screw sometimes needs to be completely unscrewed and screwed back in. Otherwise, it will not be possible to move it from its place without breaking it. When simply fixing the tip in the body, you have to forcefully pull it out. Sometimes nothing comes of this idea, and attempts to achieve your goal at any cost lead to the breakdown of the soldering iron. Therefore, the more often you remove the tip from the soldering iron and clean it, the longer their detachable connection will last.
Another problem that arises when removing the tip also leads to failure of the soldering iron. The point is that heating element wound with nichrome wire on a micanite tube. The tip is inserted inside this tube with the smallest possible gap to ensure maximum heat transfer. If carbon deposits formed during operation have tightly locked these parts together, then disassembly will lead to rupture of the micanite insulation and short circuit of part of the winding turns to each other. It is difficult to notice this, and with further operation, due to the decrease in winding resistance, the current consumed by the soldering iron will increase, the nichrome will overheat and burn out. Therefore, if you haven’t taken the tip out of the soldering iron for a long time or it resists when removed, it’s better to leave everything as it is.

The size of the part of the tip placed inside the soldering iron during simple installation is limited by the fixing protrusions. When using a screw on the housing for this purpose, the installation depth must be set correctly. If the tip is too deep, the heating area increases, and the heat transfer decreases, since a smaller part of it will be outside. As a result, it will burn faster. In addition, rosin or fat during soldering will burn out before they end up in the right place.
Another malfunction typical of electric soldering irons with nichrome heater, is a violation of the insulation between the housing and the heating element. Usually the damage occurs at the beginning or end of the winding, that is, closer to one of the terminals of the plug. The presence of a “phase” on the body of the soldering iron depends on its position in the socket. You can determine the presence of damage using a single-pole voltage indicator. To do this, you need to touch it to the body of a working soldering iron, then turn the plug over in the socket and repeat the test. If the pointer detects the presence of a “phase”, the soldering iron will have to be thrown away immediately. You can check the insulation condition with a tester or multimeter by measuring the resistance between the housing and any terminal of the plug.
The short circuit does not affect the work in any way, but if the worker touches metal objects with the tip and hand at the same time, he receives an electric shock. In addition, this can lead to failure of electronic components. When soldering them, all semiconductor elements of the device can be damaged. When the tip touches grounded metal objects, the soldering iron itself fails because a short circuit occurs inside it. If the soldering iron is powered by a step-down transformer, then damage to its insulation does not affect electrical safety.
It is not recommended to leave an electric soldering iron on for a long time without performing any work, as this will burn the tip. If situations often arise where you need to pause work and then quickly resume it, you can assemble a small device with a switch and a diode. If it is necessary to put the soldering iron into “hot standby” for a while, power is supplied to it via a diode using a switch, and it begins to work with half the power. It is convenient to place the device in the housing of an extension cord that has a standard switch. In this case, you can make one socket switchable, and use the rest at your discretion, for example, to connect equipment being repaired, an oscilloscope or other measuring instruments. The soldering iron socket can be marked with a marker or other available methods.
Sometimes a limit switch is installed on the stand, switching the power supply to the soldering iron placed on it through a diode. This method has a drawback: each time you take the soldering iron from the stand, you will have to wait for it to warm up to the required temperature. This significantly slows down soldering.

You can also use the soldering iron power regulator. You can purchase it or make it yourself. But in some cases (for example, for soldering wires in junction boxes) this device will be superfluous. For working with electronic components, adjusting the temperature of the tip is of great value, so it is better to use for these purposes ceramic soldering irons or soldering stations that have regulation and stabilization of the tip temperature, and not simply changing the power consumed by the soldering iron.

Soldering iron Atten SS-50 with temperature controller
How to properly tin a copper tip on a soldering iron
The tip must be tinned before use. Otherwise, the solder will not stick to it and soldering will become impossible. Let's look at ways to properly tin a soldering iron tip. For this process you will need:
- rosin;
- solder;
- wooden block;
- fine-grit sandpaper or file.
We clean the working surface of the new tip with sandpaper placed on a block until it shines. If the tip has been in use, its surface is uneven and pitted with cavities, then before tinning it will have to be leveled with a file. It is better to do this by removing it from the soldering iron and holding it in a vice. If, for the reasons described above, dismantling the tip is impossible, then you can do without it. It is believed that it is better to form a plane for soldering not with a file, but by forging, gradually flattening the tip of the tip with a hammer. This process is more labor-intensive and requires certain skills, but as a result, the solder will wash out the copper of their tips less. Potholes will form more slowly in it, and re-tinning will not be required soon.
Now we install the tip in place and turn on the soldering iron. At the same time, we periodically control the heating by touching the rosin. As soon as it starts to melt, cover the entire work surface with it. During the process of burning out the rosin, we repeat the process periodically, waiting for the moment when the temperature becomes sufficient to melt the solder. As soon as this happens, cover the entire working surface of the tip with solder and shake off the excess.
The surface must be completely tinned. If there are gaps or the tip is not tinned, it means that the oxide was removed poorly. In order not to cool the soldering iron and not to clean the surface again, we use a little trick.
Place sandpaper on the block and a piece of rosin on it. We melt it with a soldering iron and clean the working surface of the tip with sandpaper in rosin. Add solder periodically. This method is also suitable for quickly restoring the work surface. As soon as untreated areas appear on it, it is recommended to correct the situation with sandpaper and rosin. This will be better than later leveling the surface with a file.
How to tin a non-burnable sting
A regular copper tip has disadvantages: it gradually fades, requiring frequent repetition of the above cleaning procedures. It is impossible to remove all the solder from it, which is required for soldering the cases of some microcircuits.
Non-burnable tips, the surface of which is coated with a layer of nickel, do not have these disadvantages. But they need special care. The coating layer is thin and cannot be scratched. Therefore, nickel-plated tips cannot be cleaned with a file, needle file, or even sandpaper. You can’t even shake the solder off them by hitting them on the soldering iron stand. If the coating layer is damaged, then copper will be washed out from under it and the tip will become unusable. Therefore, it will not work to tin the same way as copper.
In order to tin a fireproof tip, you will need:
- a piece of cotton fabric (you can use an old towel);
- rosin;
- solder.
The fabric should be soaked generously in water and wrung out, and a small piece of solder should be thrown into the jar of rosin. Warm up the soldering iron, then vigorously rub its tip on a wet cloth, wiping off the oxides. Then quickly dip it into rosin, melting a piece of solder in it. The sting is tinned in a rosin medium, which dissolves the remaining oxides. After this, you need to wipe it on the same cloth that was used at the beginning.
To clean the non-burning tips during operation, special cellulose sponges are used, which are sold in electronics stores. Before use, the sponge must be soaked in water, squeezing out the excess. It is better to use glycerin, but it will not dry out. When working, you need to periodically wipe the soldering iron tip on a sponge, removing oxides and excess solder.
You can also use a wire sponge (bast) made of brass or copper for these purposes. It is also sold in amateur radio stores. A stainless steel dishwashing sponge is also suitable, but only a soft one so that it does not scratch the tip.
But all these methods may not help if the soldering iron with a non-burning tip overheats. Its temperature should not exceed 300 ˚С. Therefore, they should only be used in soldering irons that have temperature control with stabilization.
Power regulators will not help here, since it is difficult to select its operating mode. The temperature, depending on the intensity of soldering, constantly changes; when the soldering iron is idle on the stand, it is maximum; when the solder melts, it decreases. The network voltage can also change and affect the temperature. In ceramic soldering irons and soldering stations, adjustment is organized using a sensor built into the soldering iron. The initial temperature is set by the user, and the control device maintains it without his participation. It is also not recommended to keep a heated, non-burning tip for a long time without solder.
Another advantage of non-burning tips designed for ceramic soldering irons and soldering stations is that they are removable and easy to change. Manufacturers produce a wide range of blades of various shapes and sizes designed to perform different types of work. Owners of soldering irons with a nichrome heater have to resort to tricks to make them universal: come up with some kind of inserts, wind a thick wire around the tip copper wire. This does not make the soldering process more convenient, rather the opposite. And if you remember that changing the tip of such a soldering iron is sometimes not so easy, then about using various forms You should completely forget about heating surfaces for it.
Advantages and disadvantages of electric soldering irons
Ceramic soldering irons are compact and economical. Their heating element is built inside the tip and ensures its rapid heating. But these heating elements cannot withstand sudden temperature changes, so it is better not to cool them suddenly. Also, you should not use tips for which they are not designed: changing the operating temperature will instantly damage the heating element.
The most versatile tool for soldering is, of course, soldering stations. You can change the tips in them and smoothly regulate their temperature. Most of them operate at reduced voltage and are galvanically isolated from the mains, and also have the ability to connect ground to a soldering iron. Together with the use of a grounding bracelet, this helps prevent failure of radio-electronic components from static electricity and network interference.

Soldering stations have only one drawback: they take up more space on the table than a regular soldering iron, and they are difficult to work with in the field. Therefore, when choosing which soldering iron is better, you need to focus on what you will solder, where and how often. And the choice of soldering iron will determine which tip you will have to use.
Unburnt soldering iron tips require delicate handling. Under no circumstances should they be cleaned with files or sandpaper, since the protective layer is quite thin, and damage to it will lead to rapid burnout and wear of the tip. Such tips can only be wiped periodically on a special sponge (sold together with other soldering accessories) or on a wet piece of cloth.
Instead of a special sponge, a dishwashing sponge is quite suitable. Naturally, the sponge must be moistened with water. You can moisten the sponge with glycerin (sold in pharmacies), then the sponge will not dry out and will always remain wet and ready for work.
To clean the non-burn tip, among other soldering accessories, special tip cleaners are produced. This is a mesh, not to say a washcloth, made of brass shavings in the shape of a ball, into which the tip should be periodically immersed. In this case, excess solder and oxides remain inside the ball.
To clean the mesh, simply tap it on the table and all the contents will fall out. The price of the mesh is only fifty rubles - not so expensive that you can buy a few pieces in reserve.
During the soldering process, you should not “uproot” the pins of parts with a sting, shuffle around the board or knock on a jar of solder and rosin. All this can lead to damage to the fireproof coating.
The unburnt layer of the soldering iron tip oxidizes very quickly. Moreover, the higher the temperature, the more intense the oxide is formed. Therefore, there is no need to overheat above 300 degrees. When soldering with POS type solders, the optimal temperature is considered to be 250...300 degrees: the tip does not burn and soldering is pleasant, even comfortable. We will not talk about lead-free soldering here, since such solders are not used in amateur conditions. These are mass production technologies, and ordinary standard solders are quite suitable for repairs.
The smoke coming from the rosin allows you to roughly assess whether the soldering iron is overheated. At normal temperatures, a faint stream of smoke rises from a piece of rosin. If the temperature of the soldering iron is too high, touching the rosin is reminiscent of a volcanic eruption: the rosin splashes in different directions with hot drops, the smoke rises not in a thin stream, but in a large cloud that scatters along with the drops. The tinned tip turns black, and further treatment becomes impossible.
The degree of heating of the tip can also be assessed by the result of soldering. At normal heating temperatures, when the soldering iron has time to melt the solder and heat up the soldering area, the soldering itself turns out shiny with clear outer boundaries. This kind of soldering is usually called contour soldering.
If the soldering iron is not heated to the required temperature, then the soldering turns out dull and spongy. The mechanical strength of such soldering is very low; parts after such soldering can be pulled out of the circuit bare hands, especially if the structure is mounted mounted.
An overheated soldering iron heats the solder to such an extent that there can be no question of the solder spreading across the board connecting parts and traces. Here you can immediately see that there is no soldering, or rather, no soldering at all.
So, when will we start tinning the soldering iron tip?
So, let's assume that the soldering iron has not overheated, what to do next? And then everything is quite simple. You need to take a small piece of cotton fabric, a piece of an old terry towel is ideal, moisten it with water and wring it out. Squeeze until no water drips out, but the rag is damp.
In a jar of molten rosin, as is always left after soldering, put a piece of solder in the form of a large drop. Now we need to act quickly and carefully.
The tip of a heated soldering iron should be scraped against a piece of wet cloth. This is done in order to remove oxides from all sides. Before the tip has time to oxidize again, dip it in rosin, trying to get under a drop of solder. This finally removes the oxides, the solder begins to melt and sink into the rosin. Some of the solder settles on the tip, and we can assume that the tip is tinned and ready for use.
After this procedure, the sting must be wiped with the same cloth as at the beginning. The most important thing in the future is to prevent the soldering iron from overheating above 300 degrees. Otherwise, the tip will oxidize and all the work will be in vain.
How to restore a fireproof iron tip in the video:
How to avoid soldering iron overheating
Any soldering iron without a temperature regulator can heat up to 400 degrees or higher. That's when the rosin begins to hiss and splash like a volcano. How to avoid overheating?
The easiest way to change the heating temperature is using. A so-called dimmer is quite suitable here - a household lighting regulator that is placed in place of a regular switch.
If you are not too lazy, you can assemble a thyristor power regulator yourself, for example, on the Kr1182PM2 microcircuit, which allows power adjustment up to 150W. In this case, you don’t even need any radiator to cool the chip.

Figure 1. Power regulator on the Kr1182PM2 microcircuit
The power in the load is regulated by potentiometer R1. When toggle switch SA1 is closed, the load is turned off. If you install an electrolytic capacitor with a capacity of 47...500 μF in parallel with the toggle switch, the load will turn on smoothly. This, of course, is not required for a soldering iron, and when controlling incandescent lamps, the service life of the latter increases.
You can get by with a simpler regulator, assembled according to the circuit shown in Figure 2.

Figure 2. Simple power regulator
The positive half-cycle of the mains voltage passes through the diode VD1 without changes. Only the negative half-cycle passing through the thyristor VD2 is regulated. This adjustment is quite sufficient, because there is no need to heat the soldering iron to less than half the nominal power.
Such power regulators allow you to regulate the heating temperature while the soldering iron is simply lying on the stand. During the soldering process, the heat from the tip is spent on heating and melting the solder, as well as on heating the soldering area. Naturally, the tip will cool, and the faster, the smaller the tip itself and the larger the parts being soldered.
Some soldering irons contain power regulators built into the handle, but the best results can be achieved with temperature regulators used. Well, if the temperature is set to 250 degrees, it will stay that way.