The current rise in energy prices makes many people think about their economical consumption. And the first, and at the same time the most effective, method to reduce energy costs is to reduce heat loss. And one way to minimize heat loss is wall insulation buildings.
No sooner said than done. Aren't you afraid of making mistakes? Do you know for sure that you have found the right approach to the issue of wall insulation? After all, improperly insulated walls can lead to the rapid destruction of the building.
Dew point
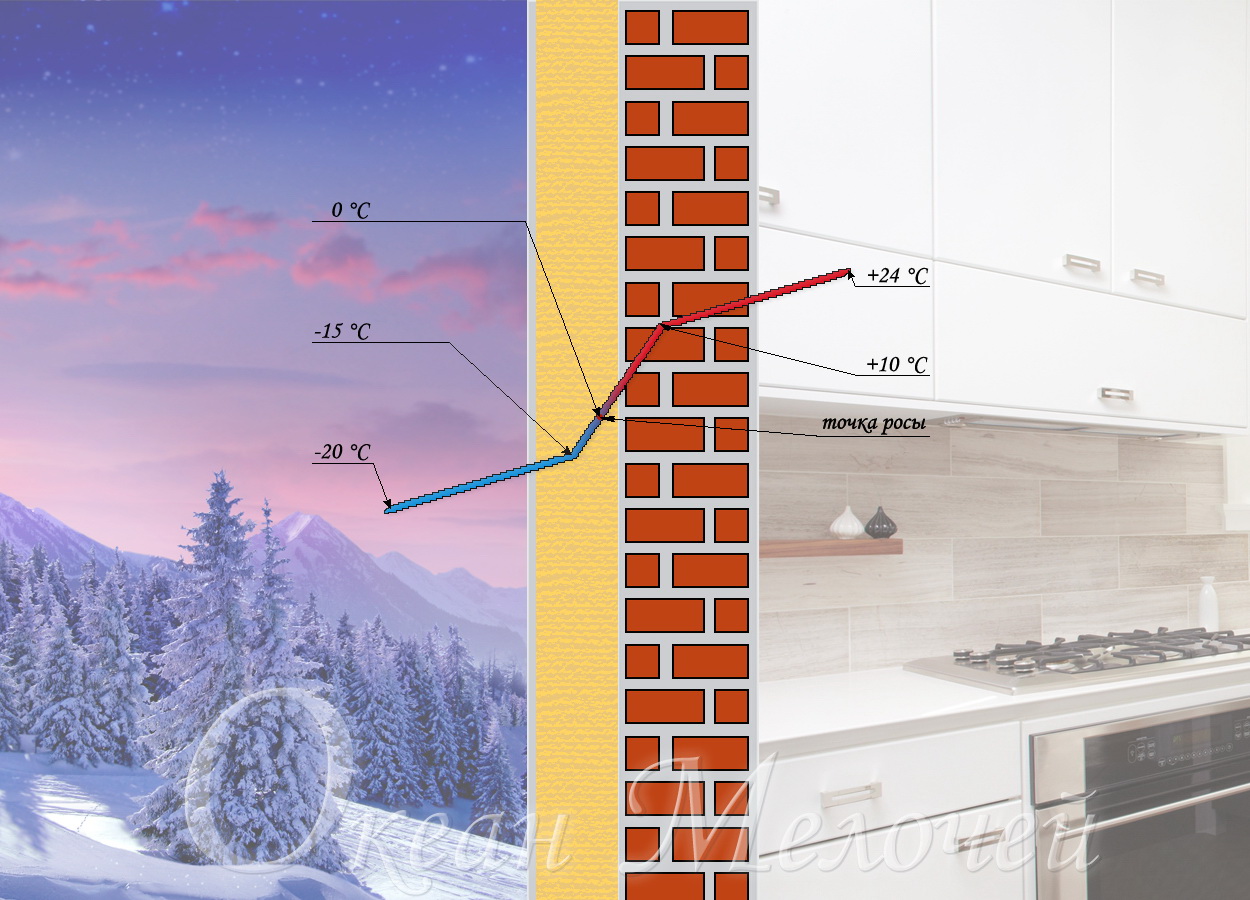
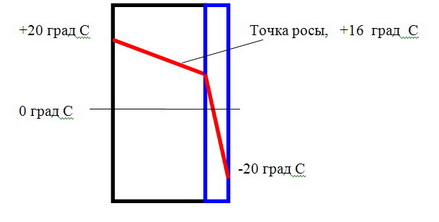
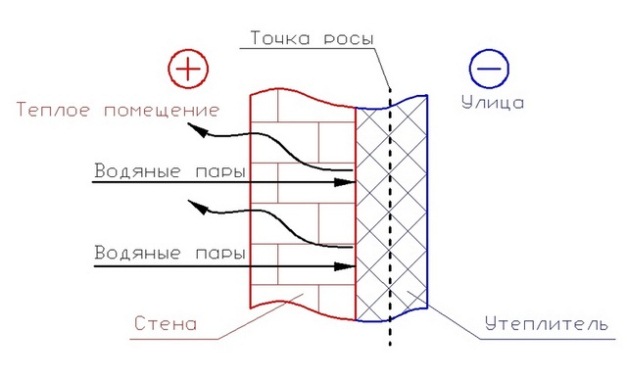
Responsible for wall insulation dew point. This is what you need to deal with first. Imagine for a moment the wall of a house. On the one hand, it is heated - there is a positive temperature on its surface, and on the other, severe frosts rage and the temperature on the outer surface is negative. As frost on one side and heat on the other move deeper into the wall, the temperature gradually levels out and at one point reaches zero. It is the location of this zero that determines the location of the dew point. This is where condensation forms.
 What do you think happens to the dew point as the temperature rises or falls (on either side of the wall)? There is no need to explain for a long time, it moves. With increased negative temperature The dew point moves closer to the inside of the house, and the moisture accumulated in its previous location freezes. As you know, when freezing, the volume of liquid increases, and this leads to the destruction of the walls of the building. Approximately the same thing happens when the outside temperature rises, only in the reverse order.
It is for these reasons that wall insulation cannot be done from inside the room. By taking such a rash step, you transfer the dew point either into the insulation or into the space between the wall and the insulation. As a result, constant freezing of the walls of the building in winter period you are guaranteed. And as a result, the rapid destruction of the walls of the building.
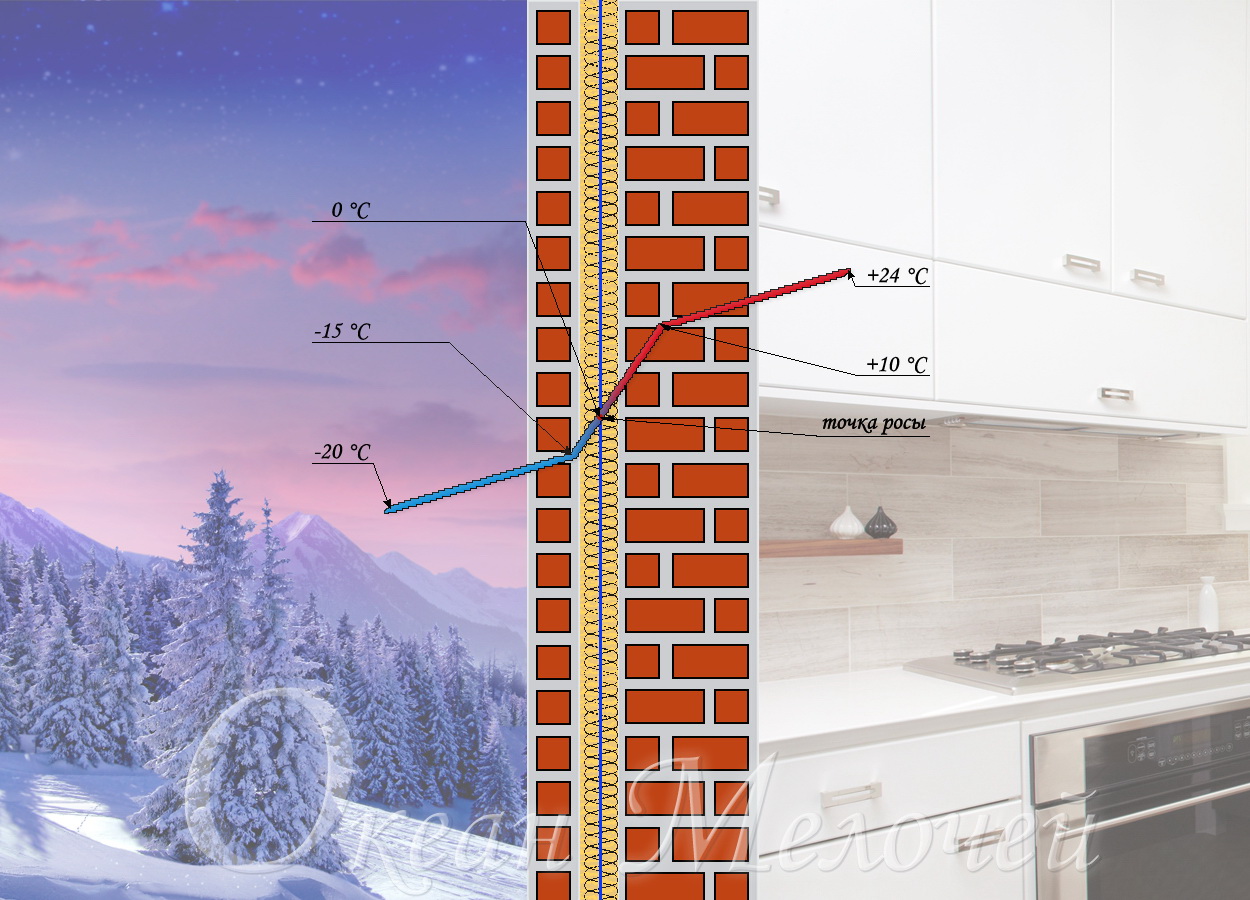 Approximately the same thing happens when creating an insulating “sandwich”, which has the following structure: wall - insulation - wall. Although in this case the dew point is located in the area of the insulation, it can shift towards the outer part of the “sandwich”. We get complete freezing of the outer wall in winter time and an excellent habitat for mold and mildew inside the wall during the rest of the year. Over time, the fungus can migrate to the interior space. Believe me, he won't keep you waiting long.
The situation changes radically when creating an outer insulating layer. Firstly, we get a fully heated internal heat the wall, and secondly, the dew point displaced beyond the walls of the building. From this moment on, everything is in the “hands” of the insulation used, its thickness and vapor permeability.
 Let's start with vapor permeability. What happens if moisture coming from inside the room and collecting in the wall blocks all exits? It simply will have no choice but to accumulate inside the walls. Periodic ventilation of the room and good heating They are unlikely to be able to prevent this process completely. So, if you want to have constantly high humidity in the room, you can use vapor-proof materials when insulating the walls. In principle, this is not so scary. Moisture must and simply must go outside the room; its excess has no place in our walls. And if you have already decided to take such a step, take care of good ventilation.
Wall insulation: materials
It is based on these considerations that when insulating walls, it is better to give preference mineral wool or peat slabs. True, there is one “but” - with increasing humidity in the insulation itself, it loses its thermal insulation properties. It is for this reason that such insulation requires additional protection.
 Firstly, they must be placed, so to speak, in a waterproof environment, sandwiched on all sides with a special cellophane film (vapor barrier and wind barrier). Secondly, appearance the building requires specific modifications. Typically, buildings insulated with such material are additionally faced with some kind of frame facades.
Now a few words about the most common material used for wall insulation. Insulation such as polystyrene foam or polystyrene foam has received widespread thanks to the low cost. When installing such thermal insulation, you need to be very careful. It's all about the thickness of the insulation. Insufficient thickness of foam or polystyrene will shift the dew point either to the surface of the outer part of the wall or to an intermediate space. And this is a guaranteed fungus, which over time can migrate indoors.
 The question remains: how to correctly calculate the thickness of the insulation so that the dew point is in the middle of it? Here two main factors are taken into account: the immediate properties of the insulation itself and the material of the walls. You need to remember that the denser the wall material, the faster it transfers temperature. For example, concrete has a high ability to conduct heat, so concrete walls warm up and freeze faster, and to insulate them a thicker layer of insulation is needed. A porous cinder block releases heat more slowly, so the insulation can be installed thinner. Along with the material of the walls, its thickness is also taken into account - the pattern is exactly the same as with the material used.
Foam and polystyrene also require additional protection. For example, foam plastic, if it gets on it sun rays, turns yellow and eventually crumbles into separate balls. Almost any façade system can be used. Starting with frame ones (siding, eco-bond) and ending with all kinds - here, as they say, it’s the owner’s business. The main thing to remember is that all plaster masses, including even warm plaster, are applied on top of the fixed metal mesh. Otherwise it will disappear.
As you can see, insulating walls with your own hands is not such a difficult process if you approach it wisely. But if you doubt your abilities even a little, then better insulation entrust the walls to specialists, this way you will avoid many possible problems.
We wish that in the most severe frosts your home will always be warm and cozy!
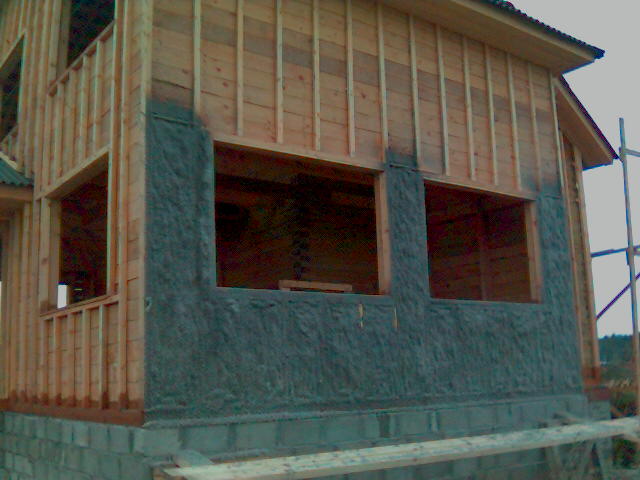
I built the walls, put a roof on the house and installed windows - the box is ready. It is at this stage that the “constructive” period of construction ends and the installation of equipment, insulation of the walls of the house and its further preparation for final finishing begin.
And it is at this stage that it is important to correctly install the insulation, and indeed the entire insulation pie on the walls of the house, so that in the future you do not end up with such headache, like the dew point in the wall from the living space.
What kind of beast is the dew point and why is the dew point in the wall bad, what does it look like in practice?
First, a little theory, and then practical examples from own experience, which I received by purchasing a box at home with a layer of insulation already installed.
Dew point temperature
The dew point tends to move. This moment depends on two indicators - temperature and humidity.
Each of them is also divided in half - into indoor and outdoor temperature, indoor and outdoor humidity.
All calculations and formulas that are used to calculate the dew point assume that moisture will condense from the steam as it moves from the inside to the outside. This is exactly the situation observed in winter, when the temperature and humidity indoors are higher than the temperature and humidity outside. The dew point temperature will be calculated based on the design values for outdoor and indoor conditions.
In summer, when the humidity and temperature outside are usually higher than the humidity and temperature indoors, the dew point is not as important. Why? Because the temperature difference is low and both temperature indicators, street and house, are in positive values.
And also because even if a dew point in the wall could form at positive values of both temperatures, this would not have a strong impact on the comfort of living in the house.
It's a different matter in winter. Moisture condensed from steam when low temperatures gets into the insulation and the wall, and freezes there. For insulation, getting wet can lead to complete loss thermal insulation properties(basalt wool), or destruction when water freezes (foam plastic). For the wall everything is the same, especially for aerated concrete and gas silicate blocks.
I personally observed the sad picture of the destruction of the wall of a block house in winter due to improperly done insulation. By spring, there were almost through holes in the 400 mm thick gas silicate wall.
How to calculate dew point
To calculate the dew point, a table of water vapor condensation values is used depending on humidity and temperature. The value of external and internal temperature and the value of external and internal humidity are taken. The dew point temperature at which water will drop out of water vapor (dew formation) is obtained.

What does this temperature give us? A lot. We are able to calculate where the steam will condense in the insulation cake, that is, where the dew point will be in the wall - in the insulation, in the load-bearing wall or on the inner surface of the load-bearing wall - right in the room.
Naturally, the most correct option- this is the dew point in the insulation. In this case there will be no negative aspects for interior spaces. To avoid any negative aspects for the insulation, it is worth choosing the right type of insulation for the walls at the planning stage.
A less acceptable option is the dew point in the wall of the house, which is load-bearing. Here, the negative aspects for the interior will depend on the wall material. This situation occurs when the insulation is installed incorrectly or the thickness of the insulation is incorrectly selected.
The most unacceptable option is the dew point inside the room, on the inner surface of the load-bearing wall. This usually happens when the house is not insulated at all or is insulated incorrectly - from the inside.
Dew point in the house - what to do?
So, the promised example is from my own experience. I purchased a box brick house, which was insulated from the inside with foam plastic. What the people who built this box were thinking about is anyone's guess. Thanks to this insulation, a dew point was obtained in the house, on the inner surface load-bearing walls, between brick and insulation.
What was the dew point in the house, in what negative aspects?
There were two of them. Firstly, the inside of the brick wall was always damp in slight plus and minus temperatures. There was a musty smell in the rooms; when opened, there were large pockets of mold under all the foam.
Secondly, in sub-zero temperatures it was impossible to properly heat this house, brickwork was excluded from the thermal circuit of the house, due to the fact that it was cut off from warm air rooms with foam plastic.
What did I do to beat the dew point in the house?
First, all the foam was removed from the internal surfaces of the load-bearing walls.
Secondly, the insulation was installed externally and was plastered using the wet facade method.
And thirdly, instead of the previous internal insulation of 50 millimeters, external insulation of 150 millimeters was installed.
At proper insulation- dew point outside, inside the house - warm and dry.
What happened? It became warm, dry and comfortable.
FINAL NOTE. Do not leave an air gap between load-bearing wall and the air of the room. Often walls are sheathed from the inside with gypsum boards - it’s cheaper and faster than plastering. However, micro-drafts form in the air gap between the gypsum board and the brick, which prevent heat transfer and heating of the inside of the brickwork.
I'm mine brick walls plastered the inside with the most ordinary plaster mixture. The top can now be painted or wallpapered. The thickness of the wallpaper is such that it can be neglected as a heat insulator.
Dew point (DP) is the temperature at which water vapor condenses and turns into water. At the same time, fog forms in the air, and condensation (dew) falls on cold surfaces. The dew point depends primarily on air humidity. We will neglect the influence of atmospheric pressure on TP in further consideration.
Using an example, let's see how it changes dew point depending on indoor humidity. Let us assume that the temperature inside the room is stable and is +20 degrees. C, and humidity will vary from 40% to 100%.
Then the surface temperature on which condensation forms will have the following values (depending on humidity):
40% - +6 degrees C and below
60% - +12 degrees C and below
80% - +16.5 degrees C and below
100% - +20 degrees C and below
As we see, when normal conditions indoors (temperature 20 degrees C and humidity 80%), water vapor will condense on the surface, which will have a temperature of 16.5 degrees C and below.
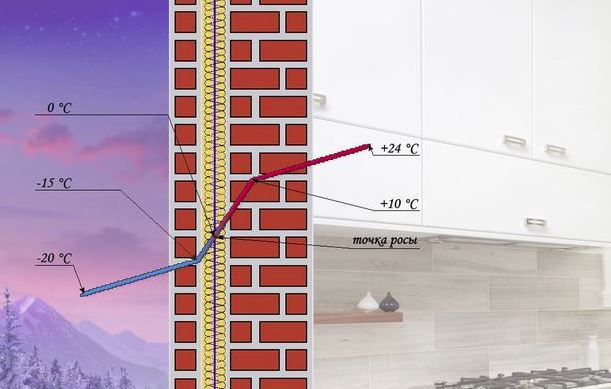
Depending on the temperature inside the room, the temperature outside, and the thermal insulation properties of the building wall, the dew point can be located either on the inner surface of the wall, or on the outer, or inside the wall. Those. Somewhere in the wall there will be a temperature at which water vapor will condense.
When the temperature and humidity of the air change both inside and outside the room, the dew point will shift along the thickness of the wall.
And the closer the TR is to the inner surface, the wetter the wall from inside the building will be. It is not uncommon for the TR to move very close to the inner surface in cold weather or to be located directly on it. Under such circumstances, mold and mildew will form on a wet wall within 2–3 years, the interior decoration will be destroyed, and the room will be high humidity and unfavorable living conditions.
When insulating a building, we also change the location of the dew point along the thickness of the wall, since the temperature of the wall will change during insulation.
Graphs of temperature changes along the thickness of the wall clearly show the position of the dew point depending on the insulation used. An example situation is indicated. The exact position of the dew point, of course will be determined only by calculation depending on the thickness and thermal conductivity of the wall materials and insulation, on the temperature outside and inside the building, on the air humidity outside and inside, and on other factors of lesser importance.

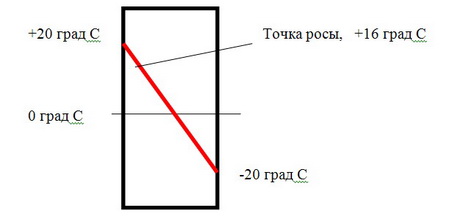
Regular wall without insulation. With an increase in air humidity and a decrease in outside temperature, the dew point moves closer to the inner surface of the walls. For “cold” walls, it is not uncommon for TR to be found indoors.
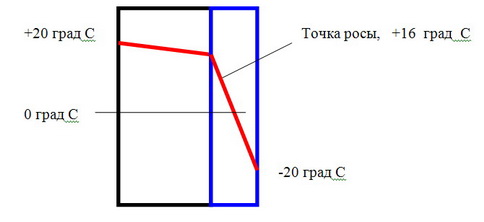
A wall with insufficient insulation. The dew point shifts to the insulated wall when it gets colder.

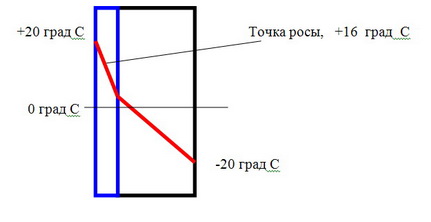
Wall with normal insulation. The dew point is in the insulation, even in very cold times.

Internal insulation. It is difficult to ensure that the dew point is not indoors. Condensation forms on the walls.
Experts agree that buildings should only be insulated from the outside. In this case, the thickness and quality of the insulation must comply with GOST. The dew point should always remain inside the insulation layer.
Insulating a building from the inside is even considered harmful. At the same time, the walls themselves become colder, as they are insulated from warm air by a layer of insulation. It is almost impossible to prevent the walls and insulation from getting wet. Many people are looking for an answer to the question: “ Is it possible to insulate walls from the inside??. The answer is almost unequivocal - no. This is harmful to the building, but most importantly, it is harmful to the health of the people living in it. Because the walls will get wet and mold and mildew will grow on them under the layer of insulation. Of course, there are options when this type of insulation is generally applicable. This can be done with sufficient thermal resistance the wall itself, in a very warm climate, with excellent ventilation and heating inside the building, but... is it then worth the risk and insulating the inner surface of the wall?
Wall insulation is one of the main issues during construction. At first glance, it may seem that it is very simple to solve it - choose the one that suits the climatic conditions and finances, and insulate it. However, this is not true. There are a number technical specifications that must be completed so that the walls of the house do not become damp inside or freeze outside during the cold season. One of these conditions is to insulate the house so that the dew point is closer to the outer wall, and in no case - inside the house. To do this, you need to be able to determine where the dew point will be located at different conditions to eliminate the possibility of condensation forming on the walls inside the room.
What is dew point
The dew point is an indicator of the temperature at which maximum saturation of air with steam occurs and it begins to condense. This indicator depends on two main factors: temperature and air humidity.
When at least one of these two quantities changes, the dew point also changes, that is, it constantly moves, just as the temperature and humidity of the air are not constant all the time.
There is a table of dew points at different temperatures and air humidity, developed by specialists. From it you can see under what conditions steam begins to condense. For example, in winter when standard temperature indoor air +20 0 C and humidity from 50% to 60%, the dew point will range from 9.3 0 C to 12 0 C. That is, condensation should not form inside the room, since under these conditions there are no surfaces with such a temperature .
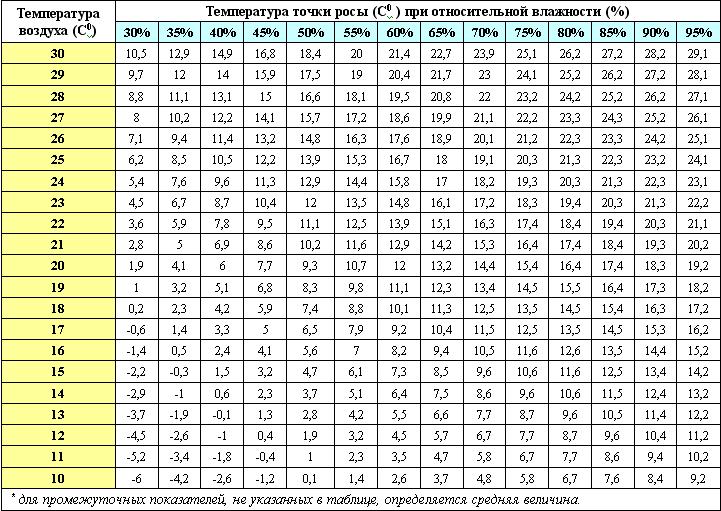
Let's look further. If the house is +20 0 C, and the temperature outside is -20 0 C, then in the wall there will be a dew point with a temperature of +12 0 C at a relative humidity of 60%. The dew point can move across the thickness of the wall depending on the temperature inside and outside the room, as well as the humidity in the wall itself. The closer the dew point is to the inner surface, the more likely it is that the wall will be wet from the inside. And this is already creating unfavorable conditions for accommodation. By insulating a house, we can shift the dew point, since this changes the temperature of the wall itself.
Where will the dew point be?
There can be three options for wall construction: without insulation, with external and internal cladding. Let's consider where the dew point might be in each of these cases?
- The design is without insulation, then the dew point is located:
- inside the wall closer to the outer surface;
- inside the wall it is shifted to the inner surface;
- on the inner surface - indoors the wall will remain wet throughout the winter period.
2. Available external insulation, then the dew point is:
- inside the insulation - this indicates that the calculation of the dew point and the thickness of the insulation was carried out correctly, and the wall in the room will be dry;
- any of the three cases described in paragraph 1 – the cause is wrong choice insulation and its characteristics.
3. The internal lining is made, then the dew point will be:
- inside the wall closer to the insulation;
- on the inner surface of the wall under the cladding;
- in the insulation itself.
From what has been discussed above, it becomes clear that the location of the dew point also depends on such characteristics of the fence as temperature and vapor permeability. Majority modern insulation materials practically does not allow steam to pass through, so external wall cladding is recommended.
If you choose internal insulation, then you need to comply following conditions, to:
- the wall was dry and warm;
- the insulation had good vapor permeability and small thickness;
- ventilation and heating functioned in the building.
Knowing possible areas of condensation formation, i.e. location of the dew point, for certain climatic zones it is possible to select a type and material of insulation that will not create conditions for damp walls inside the house.
There is an opinion that the house should be insulated from the outside, and the insulation in all respects must comply with GOST. Then the dew point will be inside the casing, that is, outside the house, and interior walls will be dry in any season. That is why external insulation is more profitable than internal insulation.
How to remove dew point from a wall (video)