Each summer resident tries to make his site well-groomed and comfortable for rest. The easiest way to "revive" and highlight your dacha among other gardens is to equip a beautiful gate. It is the entrance composition that attracts attention in the first place and creates the impression of the site as a whole. Few people will be surprised by the same type of factory designs, and experienced summer residents prefer to design and equip the entrance complex with their own hands.
Consider the features of various gates, and also give detailed instructions for planning and assembling fences made of wood and metal.
What should be a country gate
There are no clear requirements and norms for the placement and dimensions of the gate. When designing, it is important to take into account the purpose of the door, the presence of a fence on the site, the size and design of the site itself.

The nuances of arranging a gate for entering a garden plot:
The width of the canvas is about 1 m. As a rule, this is enough to bring large items and pieces of furniture to the estate. A large fence requires reinforcement of the support beams and the use of more durable fittings.
The height of the structure is limited to 2-2.2 m. This value depends on the height of the existing fence and the purpose of the sash.
Experienced summer residents agree that the optimal placement of the main entrance is close to the residential building, so that the gate can be seen from the window.
The main criteria for choosing a gate
Consider the varieties of gates for giving based on their main design characteristics: purpose, device and material of manufacture.
The purpose of the guard door
Conventionally, all country gates can be divided into three groups:

Design features of the gate
Based on the design of the frame and conjugation with the fence, the following types of country gates are distinguished:
- separate fences;
- wickets that are part of the gate;
- fences adjacent to the entrance gate.
According to the degree of openness of the door leaf, they are distinguished: curtained, free and combined.
blind gates protect the country estate from prying eyes and drafts. This option is very popular. To make the fence attractive, the canvas is framed with decorative elements made of wood or metal.
Free wickets partially block the view to the territory of the site. To create an openwork fabric, it is used artistic forging- elements are executed in the same style. Simpler products are made from a wooden picket fence or metal mesh netting. Translucent models of gates are made of polycarbonate.

Combined entrance gate created from several different canvases. From below, the gate is made deaf, and the upper part is decorated with forged inserts.
The fabric material
The most popular materials for arranging gates are metal, wood and polycomposite. Consider the features of the application of each of them.
metal gate for giving it is considered the most durable, wear-resistant and mechanically strong. The disadvantage of the model is the complexity of making it yourself. To implement the project, you will need specialized equipment and welder skills.
Types of metal fences: gates made of corrugated board, forged products or the use of sheet metal.
Features of fences from corrugated board:
- the profiled sheet is made of steel, covered with a protective layer of zinc and polymer - this ensures the resistance of the material to corrosion;
- web rigidity due to the presence of rectangular waves;
- ease of fixing sheets to a metal frame - fastening is carried out using special rivets;
- affordability and ease of use.

Decking also has some disadvantages:
- high probability of dents in case of mechanical damage;
- the formation of corrosion due to violation of the integrity of the upper layer;
- "simple" appearance.
Forged Products On the contrary, they are distinguished by sophistication and exclusivity. But for the presentability of the design, you will have to pay a relatively large cost. Forged elements greatly weight the gate. Some summer residents are alarmed by the transparency of such a fence, but this drawback can be easily eliminated by installing a polycarbonate “blind”.
Gates made of sheet metal are practical in operation, but the material is difficult to process independently.
wooden gate for giving it is appropriate if the fence on the site is also made of wood. The fence is organically combined with gabions, natural stone and brick. Advantages of wooden models:
- ease of processing wood;
- the possibility of self-manufacturing of the gate;
- availability and environmental friendliness of the material;
- beautiful appearance.

Disadvantages of wooden products:
- susceptibility to moisture, rotting and burning processes;
- the need for regular processing protective equipment and LKM;
- service life - about 5-8 years.
Polycomposite and plastic models appeared on the market recently, but have already gained popularity among summer residents. Gates are on sale various sizes, textures and colors. Assembly and installation of the fence does not cause any difficulties.
Manufacturing technology of a wooden gate
To work, you will need a hacksaw, a screwdriver with bits and drills, a level and a tape measure. From the materials you need to prepare:
- corners;
- loops;
- self-tapping screws;
- boards for door trim;
- wooden thick bars for the frame;
- support beams.
Advice. It is better to buy lumber already in finished form - dry, planed boards of the same thickness on a thicknessing machine
When choosing wood, it is desirable to give preference to:
- larch and cedar - a dense material that is resistant to weather conditions;
- spruce or pine - affordable wood, easy to handle;
- oak - durable, hard raw material with a beautiful texture;
- glued laminated timber assembled from hardwood.
Step-by-step instructions for making a gate for a summer residence:

Step-by-step installation of kalik from corrugated board
The requirements for a country gate are fully met by a fence made of profiled sheet. Prepare a drawing and assemble the gate on it with your own hands.
Drawing development and procurement of materials
Having considered the ready-made drawings of the gate for giving, you can easily draw up your own plan, based on the parameters of the site and personal preferences.
The diagram should indicate:
- the total length of the support pillars;
- the depth of the foundation for the racks;
- distance from the ground to the door leaf;
- gate width;
- frame design, number of jumpers;
- the location of the hinges and the deadbolt.
Important! Support poles must be buried below the freezing level of the soil. On heavy soils, a depth of 0.7 m is permissible, and on light, heaving soils - at least 1 m.

Based on the developed drawing, materials are selected:
- metal profile for poles - two cuts of 3.3 m each;
- plug plates for supports - two squares 80 * 80 mm;
- wall profiled sheet - 1 * 2 m;
- metal profile for the frame 40 * 40 mm - 5.5 m;
- two loops, a lock and a latch.
Additional expendable materials: waterproofing film, sand-cement mortar, metal primer and paint, rivets for fixing the profiled sheet.
To assemble and install the gate with your own hands, you will need the following tools:
- grinder and drill;
- welding machine;
- hacksaw for metal;
- drill for digging a hole.
Installation of support legs
Pre-clean and level the area, mark the place for the support beams - the distance between them should be 4-5 cm more than the width of the gate.
Procedure:
- Drill holes with a diameter of 40-50 cm.
- Cover the bottom of the blocks with a waterproofing film.
- Arrange a "pillow" of rubble.
- The edges of the metal racks that will be immersed in the ground should be cleaned of rust and treated with a primer.
- Place the beams in the pits, align the supports according to the level and fix the position with stones.
- Fill the hole with cement-sand mortar.

After a day, check the parallelism of the beams by measuring the dimensions of the opening from above and below.
Creating a frame and canvas
Sequence of work:
- Prepare the components of the frame - cut the pipe with a section of 40 * 40 mm according to the drawing.
- Lay out the segments on a flat surface and fix the structural elements with clamps.
- Check the alignment of the assembly.
- Seal the elements with a welding seam and once again check the evenness of the diagonals and the perpendicularity of the corners.
- Install the cross bar and strengthen the frame with metal corners.
- If assembly is correct, perform final welding.

"Try on" the frame by placing the frame to the support posts. Mark the places for the hinges - the distance to the edges of the canvas should be about 25-30 cm. After welding the hinges to the frame, grind the welds, cover the frame with a primer and paint.
Frame trim:
- Carry out cutting of profiled sheet.
- Fix the metal sheet with rivets. A weak fastening will lead to loosening of the canvas during the wind, and a strong fastening will lead to its deformation. Therefore, it is necessary to screw in the self-tapping screw carefully.
Final assembly of the structure
Hanging the finished canvas on the support posts is carried out after the foundation has completely solidified.
Assembly order of the wicket:
- Put the fence in the opening, placing it under the canvas wooden beam 10 cm thick.
- On the beam will designate places for reciprocal loops.
- Weld the hinges and hang the gate.
- Check door movement. Spontaneous opening or closing of the kalika is unacceptable.
- On the reverse side of the hinges, place a limiter so that the door works only in one direction.
Gates for giving: photo ideas for decorating the entrance ensemble
Kalika and the fence act as a single decorative element due to the pattern applied across the entire fence sheet.

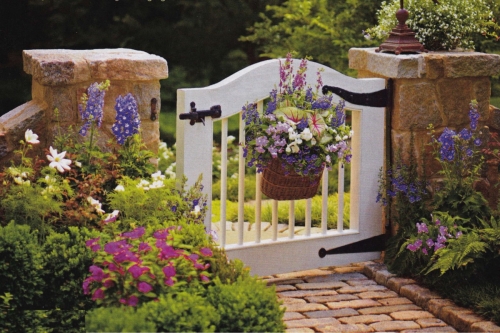
A low fence in the Provence style is suitable for separating the garden from the backyard suburban area. The white gate looks great against the backdrop of lush greenery and natural stone.
The original and at the same time simple shape of the front door emphasizes the conciseness and sophistication of the Japanese-style garden.

An unusual solution is the combination of forged elements and natural materials. skillfully executed bunches of grapes supplemented with natural vineyard branches.

Eco-decor from raw wood is appropriate for a small country estate. The gate doors, like the fence, are designed in a rustic style.
If the gate is the face of the house, then the gate is a smile on it. Even if it is somewhere inside and leads to the garden. Do-it-yourself wicket - a welcoming and relaxed smile. Therefore, it is necessary to treat the manufacture of this generally unpretentious product diligently and with soul.
materials
Here the choice is not so rich. Plastic sections of the fence, gate leaves and gates are durable, can be quite attractive and do not require preliminary excavation, but, alas, they are not fire resistant and do not resist vandalism: it is easy to stick into the ground - it is easy to pull it out. Outside of production conditions, plastics are low-tech and labor-intensive, therefore do-it-yourself gates and are most often made of wood and metal. In this case, plastic can be used as an auxiliary and finishing material, which is discussed below.
Note: fittings will also be required for gates and gates. To make it yourself (the fittings are not structurally complicated) or to buy it is a master's business. What to choose sensibly or take as a sample, see fig. right below. Something in addition, if and where necessary, see later in the course of the presentation.
In general about the design

It is customary to make the entrance gate open inwards. This is necessary, first of all, for the safety of both visitors and hosts: moving away from the swinging sash, the guest runs the risk of getting his shoes into the mud, or even crashing onto the roadway. Also, if the gate opens outward, then the hinge hinges will be on the street, which will facilitate the work of potential intruders. If the swing gate can be made to open only outward, anti-burglary hinges must be installed, and either a viewing window should be made in the sash, or an intercom should be installed at the entrance.
The width of the gate leaf (sashes without hinges and locks) is taken as for interior doors - 750-1000 mm. It is impossible to narrow its canvas to 600-650 mm, as for doors to utility rooms and common areas: they go through the gate in outerwear. If you make it wider, then accidentally unlocked, it can slam in the wind so that the loops will turn out. The height of the gate is taken according to the height of the fence, but for the same wind reasons, not more than the height of the passage above the stairs, i.e. 1.9-2 m. Between the leaf of the gate, the pole on which it is hung, and other framing elements, a gap of 6 mm from the side of the hinges, from 80 mm at the bottom and from 2 mm along other 2 sides.
In order not to put extra poles, which in this case is the most time-consuming, one of the gates is often made common with the gate: gate hinges are attached to it on one side, and gate hinges on the other. The "backbone" of this pillar in any case should be steel, although a wooden pillar is also possible for the opposite collar. A reinforced common post is also required if the gate is built into the gate. Then you need to take into account something else, see below.
Note: it is impossible to make gate pillars in the form of an asbestos-cement pipe concreted and filled with concrete, as is sometimes advised - the entire pillar turns out to be fragile. Remember - the gate posts are not piles, they are subject to fast alternating dynamic loads and without an elastic base, the posts will either crack or loosen pretty soon.
If the fence posts are solid brick, then the gates must be laid in 1.5 bricks with a gate height of up to 1.6 m and in 2 bricks with a higher height, using special schemes (orders) of 3-row dressing of seams for corner fence posts, see fig. .

This business requires a fairly large experience of a bricklayer, but steel embedded parts for attaching hinges still do not always hold securely. So it would be better to make brick gate posts by folding them around a steel pipe ridge according to a simplified masonry pattern for intermediate fence posts; rows of masonry then simply alternate in mirror image.

Brick in this case is more decorative material, so that you can use a fragile, but beautiful facing: a pipe with a diameter of up to 120 mm will enter the central clearance of the column. Mortgages, which have now become just overlays, are connected to it with pieces of reinforcing bars for welding, see fig. on right. The locations of the mortgages and their connections with the ridge must be calculated in advance so that they fall on the masonry joints, otherwise you will have to hammer grooves in the bricks. The pipe-line is being concreted "in full", not less than 0.6 m below the standard freezing depth in the area.
Note: in general, the erection and fixing of pillars and columns in the ground is a special branch of the construction industry. Concreting here requires particularly reliable. For gates and gates, it can be simplified using the techniques of TISE technology, see for example. video below. By the way, the idea of the authors is really good, but it is still not necessary to prime the concreted parts of steel parts. And we will return to the gate as such.
Video: concreting pillars for gates and gates
About corrugated board
A gate made of corrugated board is good not only due to the availability of material, speed and manufacturability, but also because the corrugated steel sheet gives the sheet additional strength. It is believed that the appearance is utilitarian. However, gates with corrugated boarding gates can be improved in various ways, see below.
wooden gates
Simple picket and rack
Cloths of gates of small height, or openwork, or located in places sufficiently protected from gusts of wind, are made of wood according to the so-called. wireframe, although in truth it is not a frame, but with a load-bearing sheathing: the entire canvas acquires design rigidity only when overhead strips are installed on the “frame”. For gates of ordinary sizes, the supporting supporting elements are made of boards (30-40) x (130-150), and overhead strips are also made of boards (15-25) x (60-100). In this case, the "frame" is made in a Z-shaped pattern, pos. 1 and 2 in fig.

wooden gates
If the decorative filling is very subtle and is not capable of bearing loads, the frame is made into a “butterfly” or “hourglass”, in the form of an X-shaped support with crossbars along the edges. In the "butterfly" under the crate of slats from 10x20 mm, 2 horizontal crossbars are placed, at the top and bottom, and the "hourglass", pos. 3, for any, even film, finish, framed on all sides. Such gates are more labor-intensive, because the support boards at the crosshairs cut into half a tree, and the hourglass must also be cut into the frame.
For a gate extended in height, the E-shaped support structure, pos. 4. A special case is a wattle gate. The wattle thing is quite strong and tough, but not for twisting diagonally. In the gate, the earth does not hold him back, so the wattle gate is reinforced with an Λ-shaped support. It is enough to reinforce only the lower half in this way, pos. 5, this does not deprive the wattle gate of a rustic look, especially when the wood darkens.
Garden and rustic
The garden gate is most often not designed uniformly and is openwork. Then, in order to ensure the rigidity and strength of the canvas, it is made framed: all the loads are taken over by a frame made of timber from 40x100. Its parts at the joints are cut into half a tree with waterproof glue and pulled together with pairs of diagonally located screws. Excellent frame gates are obtained from the wings of old doors and windows for fine glazing, pos. 1 in fig. Under an oblique lath crate without a tie-in at the crosshairs, the corners of the frame are additionally reinforced with scarves from the board (15-30) x (80-150), pos. 2. Sections of the frame for heterogeneous decorative filling are separated by crossbars, pos. 4 and 5.


Solid input
Particularly durable, and when impregnated with flame retardants, synthetic resins and made of hard rock wood and vandal-proof, there will be a shield wooden gate, see fig. left. In this case, the frame is made of timber from 50x150, and its details are connected in the corners into a tenon-groove. A grooved board from (30-40)x100 is used for filling. The dimensions of the frame are taken such that an integer number of boards fit in its window without taking into account the height of the tongue crest. Inside the frame along the contour, a groove is selected; one of the extreme boards enters it with a tongue tongue, and the tongue groove of the opposite one is connected to the frame groove with dowels (lamellae).
Note: overhead hinges of frame and shield gates can be shortened, see fig. on the right, so-called. semi-barn (overhead loops of full length - granary). You can't use card loops anyway.
Wicket - arrow

In the garden, a wooden lancet gate looks especially elegant, see for example. photo in fig. on right. The gate-arrow is considered quite laborious, but in fact it is not difficult to make it for a novice master. The material is enough for a sheet of plywood with a thickness of 5-6 mm, and from a special tool you will need a jigsaw and, preferably, a screwdriver.
The scheme of cutting the material and assembling the lancet top of the gate is shown in fig. below. You will need 12 pieces in total, 6 per side. 4 medium ones, if necessary, are narrowed from the inside under the decorative filling (shown by the dotted line). Before assembling the boom, all blanks are impregnated twice with a water-polymer emulsion, if the plywood is ordinary construction or packaging. The "legs" of the 2 middle parts are shortened by about 100 mm to fit on the spike.

An lancet pommel is assembled on PVA glue and small notched nails or self-tapping screws. Fastener length 20mm for 5mm plywood and 24mm for 6mm plywood. First, 4 front parts are assembled, including those shortened for a spike, and then 2 remaining back parts are attached to them. The parts are knocked down / screwed together with a “snake” (zigzag) in increments of 80-150 mm with an indent from the edge of 30-40 mm. The back "snake" should be a mirror image of the front.
The straight legs of the "boom" can be shortened according to the overall design of the gate. At the upper ends of its vertical posts, a spike is cut out for landing an arrow. They plant an arrow on the same PVA and reinforce it with 4 diagonal pairs of self-tapping screws, 2 each in front and behind. The back pairs should be a mirror image of the front ones.
Wicket and pergola
A pergola in a general sense is a building without walls and a roof. For example, a garden pergola may simply be a trellis tunnel through which climbing plants. The classic pergola, a colonnade in 2 more rows, crowned with crossed beams, became known in Europe thanks to the ancient Greeks, but was invented either in Ancient Egypt, or in Persia for palaces and temples.
The fact is that a classic pergola gives a rather strong psychological effect of dominance of the structure and, accordingly, of its owner. In the despotic East, the pergola was supposed to suppress the pride of the visitor before he approached the throne or altar. Unfortunately, there is no way to go into the subtleties of why this is so, but this effect is quite objective, like the pacifying effect of a pond mirror with water lilies or thoughts of abundance inspired by a lush flower bed.
Therefore, to supply the entrance gate with a monumental pergola, as in pos. 1 fig., it’s better not to: the guest may turn out to be a person on whom the course of your affairs depends. And then he will not know why he lost loyalty to you, and to you - why everything suddenly went to pieces.

In less authoritarian Europe, this was immediately understood, and the pergola, wrapped in flowers to soften the pressure, was transferred to a resting corner of the garden, where guests are allowed at the owner's choice. In addition, as soon as the arch was invented, they began to crown the pergola with it, pos. 2; rounded pommel significantly softens the effect of dominance. In the chambers, the pergola was replaced by an enfilade, inspiring a sense of grandeur, without humiliating dignity.
If the overall design still requires a classic pergola at the entrance, then it should be made visually as light as possible, and the fence and gate should be openwork and as low as possible, pos. 3. Openness will negate the dominance of the pergola. Another option is a single-row pergola, somewhat stylized as a Buddhist-Shinto shrine, pos. 4. It evokes a feeling of belittling more weakly and it is already associated with higher powers, which is not offensive to anyone in their right mind.
Metal gates

The basis of a metal gate is a metal profile; usually square. steel pipe 60x60(2-3). A rectangular frame is welded from it according to the size of the gate leaf. For reinforcement under corrugated sheathing, the 1st cross member from the same pipe, located in the middle of the web height, is sufficient. If a round water pipe is used, to reinforce under the profiled sheet, you need to put a diagonal stiffener and strengthen the corners with scarves from 200x200 to 300x300 from a steel sheet of 3-5 mm. In this case, when sheathing with a sheet 1.5 mm thick with a wave of 15x150, it is possible to bring the width of the leaf up to 1.5 m, this is already a real gate leaf, see fig.
How is the metal gate arranged for any other decorative filling, incl. and wooden, see fig. below: the frame is additionally reinforced with the same cross member, but from a professional pipe 40x25 (1.5-2), and 2 struts from the middle to the outer corners.


The reinforcement elements are edge-welded to the frame flush with the inner plane of the frame, this will give a recess for mounting the filling. Under it, from small parts (for example, a rack grate), the same pipe 40x25 (1.5-2), or a steel corner, is mounted inside along the contour of the frame.
A gate of this design, sheathed with scraps of metal siding, looks pretty decent, see fig. on right. And for the cladding of a garden or other, to which vandals cannot reach, the remains of any external finishing material: plastic lining, blockhouse, etc.
Note: the steel wing of the gate weighs more than 20 kg even without sheathing. Therefore, bearing in mind the same sudden wind loads, the hinges for it must be taken garage, see fig. left. For the gate, loops with a diameter of (16-20)x120 with a ball stop are sufficient. More powerful on the support bearing, of course, will not interfere.

The “most complete” scheme for reinforcing a metal gate, designed for any cladding and operation in the most severe conditions, turns out to be not much more material and time-consuming: it comes down to a short additional brace at each corner and mounting the gate on a separate post. A drawing of a metal gate frame with a gate for all occasions is shown in fig. below.

The manufacture of such gates with a wicket has some features, namely: first they make the gate itself, with precise installation of the pillars, checking for opening and closing, etc. Then there is a technological break of 20 days, until the concrete foundations of the gate pillars gain 75% strength; meanwhile, you can make a gate with a pillar. Its canvas is temporarily fixed tightly in the closed state with bolts or clamps. Sheathing gates and gates are not yet done.
- A pillar with a gate is placed in the well;
- Align vertically in the transverse plane, fixing with wooden inserts;
- The gate leaf is moved to the gate post, solid gaskets are placed under its edge, providing the necessary operational clearance, see above, and fixed with clamps;
- The wicket post is set vertically in the longitudinal plane, simultaneously controlling whether the installation has gone astray in the transverse plane, i.e. use 2 plumb lines;
- The wicket post is finally fixed and concreted;
- Sheathing of all sashes and installation of fittings is carried out no earlier than 7 days (at +18 in the shade) after the concrete has set in the foundation of the wicket column.
Wicket at the gate
Lots of work and a lot Money will save the gate with a gate built into the gate leaf. True, this applies only to metal swing gates. A wicket gate built into sliding or lifting gates makes them so difficult independent production, which is perhaps better to put an additional pole. If the gate is hinged, then the gate in their leaf is made according to the following rules, see right in fig. below:
- The pillar adjacent to the gate is made of reinforced steel (pipe from 100x100x4) and concreted for at least 1.2 m, regardless of the freezing depth.
- The width of the gate leaf is made no more than half the width of the gate leaf.
- The scheme of reinforcing the gate leaves is preserved, but on the gate with the gate it seems to be compressed horizontally.
- The wicket frame is made with a cross member from the main pipe (60x60x3) and a pair of diagonal stiffening ribs from the 40x25x pipe from the middle to the outer corners.

With wooden gates, the situation is somewhat more complicated: putting a gate in the leaf of a wooden gate without losing overall strength is only possible if the gate is made of durable solid (and expensive) wood. If the gate is made of ordinary coniferous wood, then the gate must be hung nearby, and the pole common to it and the gate must be steel, concreted to full depth. In both cases, gate leaves and wickets are framed with additional diagonal stiffening (see left in the figure) from timber from 150x50.
Different wicket differences

Portal
The portal of the gate is not necessarily a pergola, it has only recently come into fashion. Most often, a canopy (visor) is made over the gate from the rain, on the left in fig. He does not require extra space outside (which is no longer the property of the owner), but it is convenient for the guest, and there is reason to respect the owner. According to the old rules of hospitality, it was considered good tone if the portal-canopy of the gate is brought out at least 3-4 feet (approx. 0.9-1.2 m). Inside - as much as you like, even a continuous tunnel to the porch.
Note: from modern materials for the roof of the portal-canopy is best suited cellular polycarbonate. relatively inexpensive, technologically available for making with your own hands, strong, durable, aesthetically well consistent with a fence, gates and gates made of any material or combinations thereof.
The second type of wicket portals is constructive and technological. These are designed primarily to ensure the strength of the capital stone fence, right there. It is not forbidden to equip the capital portal of the gate with a canopy by anyone, anywhere.

Fences with gates and wickets made of mesh are not very aesthetic, they don’t block anything from view, but they are inexpensive, technologically uncomplicated, less labor-intensive and more maintainable than others. Therefore, they are most often fenced in household yards, premises for productive pets, etc. For sheathing the fence, the chain-link mesh is mainly used as it is more technologically advanced and durable.
The peculiarity of gate leaves and wickets made of mesh is that the sheathing, on the one hand, is not capable of bearing any load; on the other hand, it is freely blown and gives very little wind loads. Therefore, the sash frames can be made from a corner from 40x40 for a gate and from 60x60 for a gate. But in both cases, the reinforcement should be in the form of at least the 1st full diagonal connection, as in a gate on a frame made of a round pipe, from the same corner, see fig. Gate poles - round pipe from 100 mm in diameter or square from 60x60x3.
Forged gates
good gate hand forged to order, on the left in the figure, at current prices it will hardly cost less than 35-40 thousand rubles. And yet, forged gate, and unique, for a middle-income householder, it may not be such an inaccessible luxury at all.

Blacksmiths don't make lazy people. Blacksmith craftsmen in their free time gradually forge monograms, flowers, etc. from the remains and scraps. for sale. Big work will either be, or not, but small forged decorative elements will always find a market. Here you can buy them at reasonable prices. There is also a decor for gates with wickets, forged (more precisely, stamped) under production conditions, but such products of the same type are all the same, and handmade is handmade.
The gate, sheathed with the most utilitarian smooth steel sheet, with piece forging superimposed on it, takes on a completely different look, in the center in fig. Forging is especially well combined with wood. Look at the right in Fig. To give respectability to a completely unpretentious picket gate on a Z-frame, just 3 small forged parts are enough. That's really cheap and cheerful.
If the gate is the face of the house, then the gate is a smile on it. Even if it is somewhere inside and leads to the garden. Do-it-yourself wicket - a welcoming and relaxed smile. Therefore, it is necessary to treat the manufacture of this generally unpretentious product diligently and with soul.
materials
Here the choice is not so rich. Plastic sections of the fence, gate leaves and gates are durable, can be quite attractive and do not require preliminary excavation, but, alas, they are not fire resistant and do not resist vandalism: it is easy to stick into the ground - it is easy to pull it out. Outside of production conditions, plastics are low-tech and labor-intensive, therefore do-it-yourself gates and gates are most often made of wood and metal. In this case, plastic can be used as an auxiliary and finishing material, which is discussed below.
Note: fittings will also be required for gates and gates. To make it yourself (the fittings are not structurally complicated) or to buy it is a master's business. What to choose sensibly or take as a sample, see fig. right below. Something in addition, if and where necessary, see later in the course of the presentation.
In general about the design

Hardware for wooden gates and wickets
It is customary to make the entrance gate open inwards. This is necessary, first of all, for the safety of both visitors and hosts: moving away from the swinging sash, the guest runs the risk of getting his shoes into the mud, or even crashing onto the roadway. Also, if the gate opens outward, then the hinge hinges will be on the street, which will facilitate the work of potential intruders. If the swing gate can be made to open only outward, anti-burglary hinges must be installed, and either a viewing window should be made in the sash, or an intercom should be installed at the entrance.
The width of the gate leaf (sashes without hinges and locks) is taken as for interior doors- 750-1000 mm. It is impossible to narrow its canvas to 600-650 mm, as for doors to utility rooms and common areas: they go through the gate in outerwear. If you make it wider, then accidentally unlocked, it can slam in the wind so that the loops will turn out. The height of the gate is taken according to the height of the fence, but for the same wind reasons, not more than the height of the passage above the stairs, i.e. 1.9-2 m. Between the leaf of the gate, the pole on which it is hung, and other framing elements, a gap of 6 mm from the side of the hinges, from 80 mm at the bottom and from 2 mm along other 2 sides.
In order not to put extra poles, which in this case is the most time-consuming, one of the gates is often made common with the gate: gate hinges are attached to it on one side, and gate hinges on the other. The "backbone" of this pillar in any case should be steel, although a wooden pillar is also possible for the opposite collar. A reinforced common post is also required if the gate is built into the gate. Then you need to take into account something else, see below.
Note: it is impossible to make gate pillars in the form of an asbestos-cement pipe concreted and filled with concrete, as is sometimes advised - the entire pillar turns out to be fragile. Remember - the gate posts are not piles, they are subject to fast alternating dynamic loads and without an elastic base, the posts will either crack or loosen pretty soon.
If the fence posts are solid brick, then the gates must be laid in 1.5 bricks with a gate height of up to 1.6 m and in 2 bricks with a higher height, using special schemes (orders) of 3-row dressing of seams for corner fence posts, see fig. .

Laying orders of pillars in one and a half and two bricks with three-row dressing
This business requires a fairly large experience of a bricklayer, but steel embedded parts for attaching hinges still do not always hold securely. So it would be better to make brick gate posts by folding them around a steel pipe ridge according to a simplified masonry pattern for intermediate fence posts; rows of masonry then simply alternate in mirror image.

Scheme of the device of a gate post and a brick gate with an axial spinal pipe
Brick in this case is a more decorative material, so you can use a fragile, but beautiful facing: a pipe with a diameter of up to 120 mm will enter the central clearance of the pillar. Mortgages, which have now become just overlays, are connected to it with pieces of reinforcing bars for welding, see fig. on right. The locations of the mortgages and their connections with the ridge must be calculated in advance so that they fall on the masonry joints, otherwise you will have to hammer grooves in the bricks. The pipe-line is being concreted "in full", not less than 0.6 m below the standard freezing depth in the area.
Note: in general, the erection and fixing of pillars and columns in the ground is a special branch of the construction industry. Concreting here requires particularly reliable. For gates and gates, it can be simplified using the techniques of TISE technology, see for example. video below. By the way, the idea of the authors is really good, but it is still not necessary to prime the concreted parts of steel parts. And we will return to the gate as such.
Video: concreting pillars for gates and gates
About corrugated board
A gate made of corrugated board is good not only due to the availability of material, speed and manufacturability, but also because the corrugated steel sheet gives the sheet additional strength. It is believed that profiled sheet fences look utilitarian. However, gates with corrugated boarding gates can be improved in various ways, see below.
wooden gates
Simple picket and rack
Cloths of gates of small height, or openwork, or located in places sufficiently protected from gusts of wind, are made of wood according to the so-called. frame scheme, although in truth it is not a frame, but with a load-bearing sheathing: the entire canvas acquires design rigidity only when overhead strips are installed on the “frame”. For gates of ordinary sizes, the supporting supporting elements are made of boards (30-40) x (130-150), and overhead strips are also made of boards (15-25) x (60-100). In this case, the "frame" is made in a Z-shaped pattern, pos. 1 and 2 in fig.

wooden gates
If the decorative filling is very subtle and is not capable of bearing loads, the frame is made into a “butterfly” or “hourglass”, in the form of an X-shaped support with crossbars along the edges. In the "butterfly" under the crate of slats from 10x20 mm, 2 horizontal crossbars are placed, at the top and bottom, and the "hourglass", pos. 3, for any, even film, finish, framed on all sides. Such gates are more labor-intensive, because the support boards at the crosshairs cut into half a tree, and the hourglass must also be cut into the frame.
For a gate extended in height, the E-shaped support structure, pos. 4. A special case is a wattle gate. The wattle thing is quite strong and tough, but not for twisting diagonally. In the gate, the earth does not hold him back, so the wattle gate is reinforced with an Λ-shaped support. It is enough to reinforce only the lower half in this way, pos. 5, this does not deprive the wattle gate of a rustic look, especially when the wood darkens.
Garden and rustic
The garden gate is most often not designed uniformly and is openwork. Then, in order to ensure the rigidity and strength of the canvas, it is made framed: all the loads are taken over by a frame made of timber from 40x100. Its parts at the joints are cut into half a tree with waterproof glue and pulled together with pairs of diagonally located screws. Excellent frame gates are obtained from the wings of old doors and windows for fine glazing, pos. 1 in fig. Under an oblique lath crate without a tie-in at the crosshairs, the corners of the frame are additionally reinforced with scarves from the board (15-30) x (80-150), pos. 2. Sections of the frame for heterogeneous decorative filling are separated by crossbars, pos. 4 and 5.

Gates with cladding in a wooden frame

Shield wooden gate
Solid input
Particularly durable, and when impregnated with fire retardants, synthetic resins and made of hardwood and vandal-proof, there will be a wooden panel gate, see fig. left. In this case, the frame is made of timber from 50x150, and its details are connected in the corners into a tenon-groove. A grooved board from (30-40)x100 is used for filling. The dimensions of the frame are taken such that an integer number of boards fit in its window without taking into account the height of the tongue crest. Inside the frame along the contour, a groove is selected; one of the extreme boards enters it with a tongue tongue, and the tongue groove of the opposite one is connected to the frame groove with dowels (lamellae).
Note: overhead hinges of frame and shield gates can be shortened, see fig. on the right, so-called. semi-barn (overhead loops of full length - granary). You can't use card loops anyway.
Wicket - arrow

Lancet garden gate
In the garden, a wooden lancet gate looks especially elegant, see for example. photo in fig. on right. The gate-arrow is considered quite laborious, but in fact it is not difficult to make it for a novice master. The material is enough for a sheet of plywood with a thickness of 5-6 mm, and from a special tool you will need a jigsaw and, preferably, a screwdriver.
The scheme of cutting the material and assembling the lancet top of the gate is shown in fig. below. You will need 12 pieces in total, 6 per side. 4 medium ones, if necessary, are narrowed from the inside under the decorative filling (shown by the dotted line). Before assembling the boom, all blanks are impregnated twice with a water-polymer emulsion, if the plywood is ordinary construction or packaging. The "legs" of the 2 middle parts are shortened by about 100 mm to fit on the spike.

Details and scheme of assembly of the lancet top of the gate
An lancet pommel is assembled on PVA glue and small notched nails or self-tapping screws. Fastener length 20mm for 5mm plywood and 24mm for 6mm plywood. First, 4 front parts are assembled, including those shortened for a spike, and then 2 remaining back parts are attached to them. The parts are knocked down / screwed together with a “snake” (zigzag) in increments of 80-150 mm with an indent from the edge of 30-40 mm. The back "snake" should be a mirror image of the front.
The straight legs of the "boom" can be shortened according to the overall design of the gate. At the upper ends of its vertical posts, a spike is cut out for landing an arrow. They plant an arrow on the same PVA and reinforce it with 4 diagonal pairs of self-tapping screws, 2 each in front and behind. The back pairs should be a mirror image of the front ones.
Wicket and pergola
A pergola in a general sense is a building without walls and a roof. For example, a garden pergola may simply be a trellis tunnel through which vines are planted. The classic pergola, a colonnade in 2 more rows, crowned with crossed beams, became known in Europe thanks to the ancient Greeks, but was invented either in Ancient Egypt, or in Persia for palaces and temples.
The fact is that a classic pergola gives a rather strong psychological effect of dominance of the structure and, accordingly, of its owner. In the despotic East, the pergola was supposed to suppress the pride of the visitor before he approached the throne or altar. Unfortunately, there is no way to go into the subtleties of why this is so, but this effect is quite objective, like the pacifying effect of a pond mirror with water lilies or thoughts of abundance inspired by a lush flower bed.
Therefore, to supply the entrance gate with a monumental pergola, as in pos. 1 fig., it’s better not to: the guest may turn out to be a person on whom the course of your affairs depends. And then he will not know why he lost loyalty to you, and to you - why everything suddenly went to pieces.

Gates with pergolas
In less authoritarian Europe, this was immediately understood, and the pergola, wrapped in flowers to soften the pressure, was transferred to a resting corner of the garden, where guests are allowed at the owner's choice. In addition, as soon as the arch was invented, they began to crown the pergola with it, pos. 2; rounded pommel significantly softens the effect of dominance. In the chambers, the pergola was replaced by an enfilade, inspiring a sense of grandeur, without humiliating dignity.
If the overall design still requires a classic pergola at the entrance, then it should be made visually as light as possible, and the fence and gate should be openwork and as low as possible, pos. 3. Openness will negate the dominance of the pergola. Another option is a single-row pergola, somewhat stylized as a Buddhist-Shinto shrine, pos. 4. It evokes a feeling of belittling more weakly and it is already associated with higher powers, which is not offensive to anyone in their right mind.
Metal gates

Gate leaf from a round water pipe, sheathed with a profiled sheet
The basis of a metal gate is a metal profile; as a rule - a square steel pipe 60x60 (2-3). A rectangular frame is welded from it according to the size of the gate leaf. For reinforcement under corrugated sheathing, the 1st cross member from the same pipe, located in the middle of the web height, is sufficient. If a round water pipe is used, to reinforce under the profiled sheet, you need to put a diagonal stiffener and strengthen the corners with scarves from 200x200 to 300x300 from a steel sheet of 3-5 mm. In this case, when sheathing with a sheet 1.5 mm thick with a wave of 15x150, it is possible to bring the width of the leaf up to 1.5 m, this is already a real gate leaf, see fig.
How is the metal gate arranged for any other decorative filling, incl. and wooden, see fig. below: the frame is additionally reinforced with the same cross member, but from a professional pipe 40x25 (1.5-2), and 2 struts from the middle to the outer corners.

Wicket frame made of steel profile pipe

Gate with metal siding sheathing
The reinforcement elements are edge-welded to the frame flush with the inner plane of the frame, this will give a recess for mounting the filling. Under it, from small parts (for example, a rack grate), the same pipe 40x25 (1.5-2), or a steel corner, is mounted inside along the contour of the frame.
A gate of this design, sheathed with scraps of metal siding, looks pretty decent, see fig. on right. And for garden or other cladding, which vandals cannot reach, the remnants of any external finishing material will go: plastic lining, blockhouse, etc.

Garage hinges for gates and gates
Note: the steel wing of the gate weighs more than 20 kg even without sheathing. Therefore, bearing in mind the same sudden wind loads, the hinges for it must be taken garage, see fig. left. For the gate, loops with a diameter of (16-20)x120 with a ball stop are sufficient. More powerful on the support bearing, of course, will not interfere.
The “most complete” scheme for reinforcing a metal gate, designed for any cladding and operation in the most severe conditions, turns out to be not much more material and time-consuming: it comes down to a short additional brace at each corner and mounting the gate on a separate post. A drawing of a metal gate frame with a gate for all occasions is shown in fig. below.

Drawing of a steel frame gate with a wicket
The manufacture of such gates with a wicket has some features, namely: first they make the gate itself, with precise installation of the pillars, checking for opening and closing, etc. Then there is a technological break of 20 days, until the concrete foundations of the gate pillars gain 75% strength; meanwhile, you can make a gate with a pillar. Its canvas is temporarily fixed tightly in the closed state with bolts or clamps. Sheathing gates and gates are not yet done.
- A pillar with a gate is placed in the well;
- Align vertically in the transverse plane, fixing with wooden inserts;
- The gate leaf is moved to the gate post, solid gaskets are placed under its edge, providing the necessary operational clearance, see above, and fixed with clamps;
- The wicket post is set vertically in the longitudinal plane, simultaneously controlling whether the installation has gone astray in the transverse plane, i.e. use 2 plumb lines;
- The wicket post is finally fixed and concreted;
- Sheathing of all sashes and installation of fittings is carried out no earlier than 7 days (at +18 in the shade) after the concrete has set in the foundation of the wicket column.
Wicket at the gate
A lot of work and a lot of money will save a gate with a gate built into the gate leaf. True, this applies only to metal swing gates. A gate built into a sliding or lifting gate complicates their independent production so much that it is perhaps better to put an additional post. If the gate is hinged, then the gate in their leaf is made according to the following rules, see on the right in fig. below:
- The pillar adjacent to the gate is made of reinforced steel (pipe from 100x100x4) and concreted for at least 1.2 m, regardless of the freezing depth.
- The width of the gate leaf is made no more than half the width of the gate leaf.
- The scheme of reinforcing the gate leaves is preserved, but on the gate with the gate it seems to be compressed horizontally.
- The wicket frame is made with a cross member from the main pipe (60x60x3) and a pair of diagonal stiffening ribs from the 40x25x pipe from the middle to the outer corners.

Drawings of metal and wooden gates with a gate
With wooden gates, the situation is somewhat more complicated: putting a gate in the leaf of a wooden gate without losing overall strength is only possible if the gate is made of durable solid (and expensive) wood. If the gate is made of ordinary coniferous wood, then the gate must be hung nearby, and the pole common to it and the gate must be steel, concreted to full depth. In both cases, gate leaves and wickets are framed with additional diagonal stiffening (see left in the figure) from timber from 150x50.
Different wicket differences

Gate portals
Portal
The portal of the gate is not necessarily a pergola, it has only recently come into fashion. Most often, a canopy (visor) is made over the gate from the rain, on the left in fig. He does not require extra space outside (which is no longer the property of the owner), but it is convenient for the guest, and there is reason to respect the owner. According to the old rules of hospitality, it was considered good form if the portal-canopy of the gate was brought out at least 3-4 feet (about 0.9-1.2 m). Inside - as much as you like, even a continuous tunnel to the porch.
Note: of modern materials for the roof of the canopy portal, cellular polycarbonate is best suited. Sheds made of polycarbonate are relatively inexpensive, technologically available for making with your own hands, strong, durable, aesthetically well consistent with a fence, gate and gate made of any material or combinations thereof.
The second type of wicket portals is constructive and technological. These are designed primarily to ensure the strength of the capital stone fence, right there. It is not forbidden to equip the capital portal of the gate with a canopy by anyone, anywhere.

Mesh gate
Mesh gate
Fences with gates and wickets made of mesh are not very aesthetic, they don’t block anything from view, but they are inexpensive, technologically uncomplicated, less labor-intensive and more maintainable than others. Therefore, they are most often fenced in household yards, premises for productive pets, etc. For sheathing the fence, the chain-link mesh is mainly used as it is more technologically advanced and durable.
The peculiarity of gate leaves and wickets made of mesh is that the sheathing, on the one hand, is not capable of bearing any load; on the other hand, it is freely blown and gives very little wind loads. Therefore, the sash frames can be made from a corner from 40x40 for a gate and from 60x60 for a gate. But in both cases, the reinforcement should be in the form of at least the 1st full diagonal connection, as in a gate on a frame made of a round pipe, from the same corner, see fig. Gate posts - round pipe from 100 mm in diameter or square from 60x60x3.
Forged gates
A good custom-made hand-forged gate, on the left in the figure, will cost at current prices hardly cheaper than 35-40 thousand rubles. And yet, a forged gate, and a unique one, for a middle-class householder may not be such an inaccessible luxury at all.

Forged gate and gates with overhead forged elements
Blacksmiths don't make lazy people. Blacksmith craftsmen in their free time gradually forge monograms, flowers, etc. from the remains and scraps. for sale. A lot of work will either be, or not, and small forged decorative elements will always find a market. Here you can buy them at reasonable prices. There is also a decor for gates with wickets, forged (more precisely, stamped) under production conditions, but such products of the same type are all the same, and handmade is handmade.
The gate, sheathed with the most utilitarian smooth steel sheet, with piece forging superimposed on it, takes on a completely different look, in the center in fig. Forging is especially well combined with wood. Look at the right in Fig. To give respectability to a completely unpretentious picket gate on a Z-frame, just 3 small forged parts are enough. That's really cheap and cheerful.
And for those who want to do everything with their own hands, there is also an option: imitation forged products from sheet and profile steel without a forge and blacksmith skills. Products come out also unique, because. are made by hand. Painted with a blacksmith's patina, they can be distinguished from real forged ones only by measuring the thickness of the metal precisely in several places. How to do it yourself? See video:
Video: do-it-yourself forged gate
(Visited 4 881 times, 1 visits today)
Good afternoon, today I will tell you about all-all ways of making gates with your own hands. In this article, we will make swing WOODEN gates ... But I also told in the same detail about metal gates - in a special article Metal gates - 50 photo ideas (from forging to metal profile).
So... today you will find out ALL SECRETS... and all principles... and nuances of how to make a wooden gate yourself - from scratch - without any skills in this area. Generally! That is, you can be a green newlywed student ... or a novice summer-pensioner ... or a pampered city lady who inherited a village house ... yes, anyone. If you need a NEW GATE for a summer residence or a garden ... then ... my article is designed just for TO TEACH you to brilliantly make any gates- at least for themselves, at least for sale to neighbors ... Believe me, appreciating your skill, the neighbors themselves will come running to you with a desire to buy the same gate model (... and what, a good summer cottage business ... and fun at the same time).
Now let's get down to business... Making and installing gates - who knows, maybe this will be your new profession ... with my light hand.
Here is what we will do:
- Wooden RAIL gates ON THE FRAME (several types)
- Wooden FRAME gates (with sheathing or crate)
- Wooden GATES-PORTALS (with pergola-crate)
- Wooden gates with ROUND ARCHES (designer and simple)
Yes, yes, all this you WILL WANT and BE ABLE to do it yourself… After you read this article…

So, let's go ... Chapter One ... Let's start with a simple one (so as not to frighten off faith in the success of the gate project) ...
Wooden garden gates - RAIL (i.e. from rails, boards)
Everyone and everywhere saw such gates ... in old movies about village life ... in my barefoot childhood at my grandmother's summer vacation expanse ... at my friends' dacha.

These gates are called FRAME gates ... because. they have a FRAME-HOLDER on which the laths of the RATING are stuffed.
That is, this is the SIMPLE MODEL of a gate for a summer residence or a garden - which consists of two parts - a FRAME ... and PADDING RAILS.

Here in the picture (above and below) we see a standard gate WithZ frame. That is, first we do frame in the shape of a letterZ, and then we stuff 6-8 wide or narrow slats (boards) on it. The hinges for hanging the gate to the pole are attached to the horizontal beams of the "letter Z" of our frame.
As you can see (in the photo below) ... on the sides of the gate you can attach NOT RAILES ... but THICKER BARS ... for the solidity of the product.
Hinged hinges may be different - the main thing when choosing loops is ACCOUNT FOR THE LOAD that these loops will carry. The heavier the gate you made, the stronger the fastening loops should be. Hinged gates are called swing gates ... because they swing open, i.e. open to one side.

Here one more option THE SAME principle of creating a rack gate (on a frame in the shape of the letter z)
But with ONE DIFFERENCE... here are the padding rails different lengths... in the center is longer, shorter towards the edges.
And it turns out beautiful wave along the top edge of the gate.

Or... look on the photo of the gate below - what an interesting addition invented here !!! Alternating low and high rails ...
By the way - the frame here is ordinary (not the letter Z), but just two slats from the bottom and top (- this is done for beauty, so as not to distract attention from the original crate)
... And it's worth it ... look how interesting the CRATE is made ...

The slats go CLOSE to each other - they are stuffed WITHOUT SLICES ...
but ... ALTERNATE long and short ...
THAT is we for crates we prepare 2 GROUPS OF RAILS — LONG group and SHORT group... And we do it this way - that inside our group the slats are also not the same in length (one central is the longest, next to it 2 are shorter, further 2 are shorter ... and so on to the edges.
RAIL PACKING we do WITH ALTERNATED groups… and sizes.... that is, CLOSER TO THE EDGES we fill slightly shortened slats ... and CLOSER TO THE CENTER a little longer.
As you can see... little change...(the designer just played with the long rails) - and what a beauty it turned out.
And now let's talk about the frame - for such RAIL FRAME GATES.
As we already understood...
... A FRAME for our country gate may look like not only in the shape of a letterZ …
Here are the pictures of the gates below - we see what can be done another frame for stuffing rails. Hourglass shaped... or triangle shaped… any frame silhouette will be correct. The main thing is that he fulfills his task - he holds the nailed boards of the crate.
Therefore, you can come up with your own frame shape (and this and that will be correct). Nothing limits your imagination. It all depends on what cuts of beams were found in your yard ... and how heavy your metal hinged hinges for the future gate will withstand ... (the more beams on the frame, the heavier the weight of the finished gate will be).
Here - in fact, you have already learned how to make a frame gate ...
… AND IF YOU WANT TO MAKE THIS wicket and swing GATES - IN THE SINGLE STYLE, then here is a photo idea for you ... (gate, gate and fence - everything made by the hands of a reasonable person)
Front view (beautiful)

Rear view - so that you understand what kind of frame is at the gate here ... see? The curved cross beams… very pretty.
(don't be scared bent beam shapes in the frame ... we will now smoothly approach this)

And here's something else I wanted to add about the frame wooden gates…
If your entrance portal to the courtyard is TOO WIDE, then the swing gate can be wide, double-leaf ... Consist of two halves swinging open in different directions. Here is a close-up photo of her, whoever needs it will come in handy.

now we will talk about the FRAME frame for gates ...
WOODEN GATES – WITH FRAME FRAME…
Let's see how this is done FRAME GATE on a specific example from the photo of the gate below. I even draw assembly diagram such a gate - because the visibility in the pictures is always clearer than just "a lot of beeches".

Such a gate is made according to the principle -
- knocked down a RAM from the bars ...
- filled the frame with CASING or crate (from boards, slats, plywood)
The connection of the bars can be SCREWED ... long screws are screwed obliquely ... at an angle.

OR… you can connect the bars of the gate in the GROOVE-PIN way… The bars in their barrel have HOLES-GROOVES (recesses)… and at their ends I have EARS-PINS - the lugs are driven into the grooves (with a wooden hammer) and due to this, the frame elements are fastened.
On the diagram of the stages of ASSEMBLY OF SUCH A FRAME GATE - we see at the vertical bars of the upper crate - these very ears ... they are inserted into the holes on the bottom beam - and the upper beam of the frame is put on them (with their drilled grooves-holes falling into the ears of the crate bars).
Surely you are interested STEP 3… you probably have a question: “And what are these pins sticking out on the beams? And where can I get them?
I WILL TELL. We will fasten these beams in the same way - how the balusters of a wooden staircase are attached(gee-gee, you don’t know what balusters are?) These are the same sticks that are driven into the stairs at one end and into the railing at the other - they make up the stair railing, which prevents children from falling into flights of stairs)
Here they look like ... on the example of this carved BEAMS-BAULUSTER ... (by the way, at your gate, too, no one forbids you to use NOT SIMPLE ... but CARVED crate frames - it will be generally super).

So, these are the baluster beams are fastened with the PIN METHOD… Here's how to do it yourself. We need a plump drill ... and the same thickness of trimming a wooden stick (this will be the pins) (hmm, even simple hardwood pencils will fit for this role, they will hold very well).
So, stocked up with a drill and pins ... we begin the process. At the end of our future beam-rails - we drill a hole of such thickness that our wooden stick-pin crawled through tightly. We drill to such a depth - so that this stick only partially fits there, 2-5 cm is enough ... and so that 2-5 cm of the stick remains sticking out ...
And in this way, having put on pins on the beams of the crate ... and holes on the beam of the wicket frame, ... we will fasten the BEAMS of the battens to the FRAME of the gate.
As you can see, everything is simple. According to the laws of mechanical physics (to increase the strength, you can smear the pins with any wood glue).
Approximately BY THE SAME TECHNOLOGY these gates are made from the photo below ...
That is, you can think of their designs… the main thing is to follow a single principle A FRAME IS NEEDED ... and ITS FILLING is needed (in the form of a crate with a board or a lath ... or in the form of plywood sheathing)

And WHAT THE FRAME WILL BE for the form is up to you ... 
See how simple it really is...
You take and do - only 2 steps ... 1) Made the FRAME… 2) Made it FILLING. And everything is ready - drill holes, hang your new gate on the hinges ... And call the neighbors to grab ... 
And then .. and swing gates can be made according to the same principle of FRAME FRAME + LATTICES and SHELLING ... Beauty ... And simplicity ...

A hinged GATE can have a FRAME OF ANY FORM...
Even arched with graceful curves ... and lopsided (with an oblique slope of the upper part) ... Like here, for example (photo of the gate below).
Bent elements of the FRAME (for the frame of the gate) - sawn out of a wide thick board (or wide beam) - ordinary circular saw.

Here's another version of a FRAME GATE with BENT bars... If you can order such bent bar elements, then the shape of your gate can become more interesting... 
Or such a BENT FORM can be just CUT FROM A WIDE AND THICK BOARD... Draw on the board with a pencil the rounded outlines of the future (right and left) frame - and cut it out with a circular saw. Then assemble the frame- from three elements - two bent side and one lower straight beam.
Inside the frame - we insert the frame from the MID BEAM ... two CROSSED BEAM. Filling the lower part of the wicket frame plywood sheathing(we just fill a sheet of plywood) ... and fill the upper part with a beautiful diagonal lathing from slats.
Or here's another COMPLETELY ROUNDED GATE ...
Yes, I agree, this gate in the photo below is made of metal (those who carefully looked at the photo noticed) ... BUT ... what prevents us from making the same model of a wooden gate. Bars ... slats ... yes please !!! There would be pens with a hammer ... yes, eyes with a twinkle ... 
Hint for those with an idea- semicircular elements of the crate ... we cut with a jigsaw from a sheet of plywood ... we draw such "arcs are not very wide" and cut them out with a jigsaw as in labor lessons at school ... And the upper arc-shaped beam ... we cut not from thin plywood ... and from a thick board, with a circular saw.
The filling of the wicket frame can be FULL (i.e. without holes)…
For example, you can just stab wooden frame- HORIZONTAL boards ... (as in the photo below) ...

Or board it DIAGONALLY with boards ... now I will tell you point by point how such a gate is made ...
- We make a frame for the gate - we make it from bars (it can be rectangular, it can be with a rounded top)
- A narrow rail is stuffed to the inner barrels of the frame ... firmly, firmly ... stuffed at an angle.
- And then on this inner narrow river - a board is stuffed AN OBSOLETE ... moreover, it is stuffed on both sides of the gate - from the front and from the wrong side. So that there are no holes ... we fill the board with slats WITH GAPS between the boards 2 times narrower than the width of the board itself ... Thanks to this, the back, wrong side stuffing of the board will completely cover these slots (made by the front board).

Or you can fill at the bottom with plywood... top - butt-to-butt boards ... and for beauty on the bottom sheet of plywood sheathing fill a thin lath - in the form of a diagonal lattice-pattern. And paint it one color.

DON'T BE AFRAID…. Do it. The picture is clear ... in fact, it's simple.
You can start with the most simple options... Everything will work out ... and you will be proud of yourself - so skillful and skilled (oh yes, the guy, snap it up !!!)


And also ... if you have extra money ... or a familiar blacksmith, well done ... then such a FRAME gate can be supplemented with forging elements ... That is, in the crate of the gate, use NOT WOODEN BALUSTERS ... but metal fence - forged or welded. Here is how it is done in the photo of the gate below.

And we continue...
AND NOW IT WILL BE VERY COOL))))
WOODEN GATES ... WITH ENTRANCE PORTAL ...
Portal to another world... Oh! how beautiful and promising it sounds... But really your territory ... your garden ... this is a different world, with an atmosphere of comfort and hospitality that you and your family have created yourself.
So why not make a gate in the form of a PORTAL to happiness ...
The easiest option is in the photo below. It looks good if there are tall bushes nearby ... lush trees ... or a plant creeping along the portal.

And in the photo below we see how small arc-shaped wire frame thrown between the left and right support pillars of the gate. A wildly blooming bindweed is specially thrown over this iron wire pergola - and a beautiful portal strewn with flowers is created ... The gate opens and, passing under the flowery vault, we feel a wonderful aroma. 
More ... the entrance portal to the garden can be arranged in the shape of a PERGOLA…(a pergola is a column that supports a crate of beams). On the site "Family Handful" I devoted several articles to these wonderful structures ... see . Pergolas - how to make your own SIMPLE LESSONS.
This is how here - 4 beams on the left and on the right - they hold two horizontal beams ... a crate of boards is stuffed on them. The gate can be any (in the photo below we see a forged gate) 
And here is another version of the PERGOLA-PORTAL ...
There’s nothing wrong here either ... it’s just something awful in appearance ...
but in reality… at a look-X-ray… we see that here…
- ... 2 powerful thick beams each hold a BEAM WITH SLOTS ... there are three slots ... (the beam-column holds this beam with the help of an ordinary metal paw-thrust - they are black with 4 screws in the photo)
- 3 horizontal boards are inserted into the slot ...
- and on top of the boards there is a stuffing-crate with thick slats.
All! Finished!
Your son has already built this from Lego ... and your designer will be larger, and that's the whole difference.
The scheme, as you can see, is not complicated (drawing of the 9th grade). They took a friend to help and muddied a grandiose project ... And we already know how to make a gate (mind you, a frame one) (just learned how).
And here is another model of a gate for a summer residence - with a canopy roof ... it is a little overgrown with bindweed ... but through the green foliage you can see what is here ....
- support columns… 2 on the left and 2 on the right…
- We put a beam on each pair of columns - a left beam and a right beam.
- On these side bars - we put the roof on... the drawing of the roof-canopy will be in the form two silhouettes of the letter-A, knocked together from beams. Such beam beeches-A need 2 pieces (rear frame and front frame) which are interconnected by a beam - the ends of which are nailed to the tops of these beeches A.
And the model of the gate from the first lesson of our article is an ordinary frame in the form of the letter Z - and a crate with a board - which was then (after stuffing on the frame) cut out with a saw in a semicircle. It turned out very soft.

Wooden gates WITH ARCH VOD…
And here is another variation of the design of frame gates for the garden ... This is when the SUPPORT PILLARS of our gate - continue upward - forming arched bend.
That is, we made a gate ... installed support pillars ... hung it on the gate (with metal hinges) ... and we live ... And suddenly we wanted to add something ... And we decide to make an ARCHED Vault ... 
On a thick board (the same thickness as the supporting pillars) draw halves of the arc - cut them out - fasten one common arc together - and install it on the pillars of the support - one edge of the arc on one pillar - the second on the other pillar. The fastening of the elements of the arc can be done by the same GROOVE-PIN METHOD (which I spoke about above in this article).
Here are some more variations on the same theme...
A) a gray gate - here we insert the arc between the supporting pillars of the gate - and we sit down and fix it on the screws. And we also cut out the boardwalk of the gate itself according to a round stencil.
B) green gate - to the arched structure of the supporting pillars WE ADD PILLARS HOLDING A PERGOLA ... along which a green vine winds.

Usually these hedges are always made of bricks.(this is the most economical material) ... and then either plastered ... and painted in a color you like. Nearby you can hang a flashlight(very cozy and fabulous) ... and be sure to have more greenery around - there will be effect of an old italian house.

Or the facade of such a brick arch-hedge is tiled with stone imitating tiles.

And yet ... wooden gates can be made from UNPROCESSED WOOD ... or rather, processed by time ... and not by a carpentry machine
GATES FROM DRY WOODS… DRY BEAM AND BOUNCES.
If you live in an area rich in windbreak and dead wood, then you don’t have to go far for the material for the gate.
Here are some gentle design things you can do for your garden...
Precisely as garden gate I offer this option. For the front part of the house, such a gate, of course, will not work ... but for a corner of peace and quiet, for a lushly overgrown corner of your hacienda, such a gate will be very useful (if this is permissible by the general design plan of your garden).

And here is an example of a gate made of the same twigs.

That's all for today ... That's how many wooden swing gates we did it today - in the mind ... It remains only to do it with our own hands now - in life.
I really hope that this article has given you COURAGE and the itch of a CREATIVE EXPERIMENT.
Now the spirit of the JOINER is sitting in you. It's time to go looking for the right bars and boards for your project... or vice versa to push the birth of the idea from the materials available.
And she wrote (and in some places drew) this article - a woman.
Because ... only a woman can inspire a man to create beauty. What I actually did these two days for 16 hours.
So go and create (and I will go and finally sing ...)
Olga Klishevskaya, specially for the site
Take care of family heaps ... These are your legs and arms.
These are your ears and eyes ... and a source of warmth and affection.
If a did you like this article
And you want to thank for this painstaking work of a free author,
then you can send any amount convenient for you
on the his personal Poison wallet - 410012568032614
Gates and gates are a necessary addition to the fence of their profiled sheet. The gates provide access to the site for cars and special equipment, and the gate is for those who came on foot. Unlike a fence, the design of gates and wickets turns out to be more complex, so a separate drawing is developed for them and a special calculation of materials is made.
We want to offer you several ready-made drawings of corrugated gates and wickets that you can customize to suit your conditions. The height of the fence and gate must match the height of the fence.
The main types of gates for country and country houses
- hinged - are two hinged doors that open inward or outward. Simple and cheap to install, however, they can damage the car upon entry, especially if there is a strong wind. They also need to clear a lot of space.
- sliding or sliding gates with a guide rail - the door moves on a roller mechanism along the fence line. Complex design, special expensive fittings make such gates not the most affordable. But they provide a higher level of comfort: an automated drive makes it possible to open them without leaving the car.
Drawings of swing gates and wickets
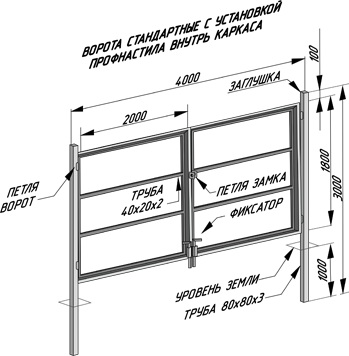
When drawing up a drawing, it is important to determine the width of the gate and wicket opening, height, as well as the frame model. Do not forget that when designing the gate, you need to properly distribute the load on the leaf, because it is attached to the side hinges and their weight completely rests on the pillars. For this reason, gate posts are often made of a thicker profile pipe or laid out of brick.
The metal thickness of the profile pipe should be at least 3-4 mm. Accordingly, the foundation under the gate supports must be sufficiently reliable. Weak supports will lead to sagging of the sashes and deformation of the structure from wind loads and the gravity of the sashes. For the frame, you need to use a lighter profile pipe in order to prevent overload on the wings, however, a frame that is too thin will not withstand wind loads.
Pay attention to the choice of gate width. The optimal width is 4 meters, it allows both cars and trucks to safely enter, even from a narrow street. Remember, the wider the leaf, the greater the load it creates on the supports (in accordance with the law of the lever).
Schemes of gates and wickets made of corrugated board with a parallel frame
1. Before us is a "classic" and well-balanced drawing of a gate with a wicket. The height of 2 meters corresponds to the traditional height of the fence from the profiled sheet. 60x60 pillars must cope with a 40x20 pipe frame. The frame itself is not overloaded, easy to calculate, does not require a lot of materials. It has only one drawback - the lack of diagonal rigidity. It is compensated by the presence of two horizontal strips of the profile pipe at once, which form three sections 60-70 cm wide on the sash.

Also characteristic feature is the presence of the upper crossbar. It gives a more balanced load distribution, prevents the posts from moving towards each other, however, for a successful entry into the site tall cars you need to make it removable.
2. Another version of the drawing. This time without the crossbar. Please note that the support poles have a larger diameter due to the lack of a crossbar.
3. Swing gates with a built-in gate. This scheme is perfect for those who have limited space to enter / enter the territory. At a width of 4 meters, both the gate and the gate are placed. However, it should be understood that the presence of a gate increases the weight of the sash, which means that the cross section of the side post should be at least 10x10 cm and it is better to place the gate closer to the post (according to the law of the lever, it will give less load to the gate support).

Schemes of gates and wickets with diagonals
The presence of diagonal elements of the frame increases the rigidity of the structure and makes it resistant to various kinds of deformations, however, it should be remembered that additional lines are an additional load and it is important to choose the right pattern here. So instead of two horizontal bars it is better to use one. Diagonal slat arrangement options are shown in the drawings below. The cross section of the supporting posts for a fence with diagonals must be at least 80x80.
1. Diagonals from extreme corners to the middle or vice versa. Such schemes look quite nice. One looks like a snowflake, the other forms a diamond pattern.


Length of the hypotenuse: where a and b are the sides of a right triangle.
2. Diagonals from one corner of the sash to another. The scheme allows you to minimize the load on the sash and at the same time give the necessary rigidity, however, welding such a diagonal is not very convenient.

3. Small diagonals at the corners of the wings. It looks quite beautiful and creates a minimum load, however, such wings have a high windage, which means they can suffer from wind loads.

In the next video you will valuable advice how to prevent bevelling of support posts under the weight of the wings:
Drawings of sliding gates from corrugated board
The best option for a sliding fence that you can build on your own is a design with a guide rail. For her, it is enough just to pick up sets of fittings and automation systems. The gate includes a sliding leaf with a bottom rail that runs along special system rollers. In order for the structure to be balanced when closed, an additional triangular console is welded to the side of the frame.

As you can see, the gate frame consists of a frame and a console, which are made of a thicker profile pipe (60x40). The internal elements of the console are also better made from this pipe. Inside the gate frame, the frame pattern can be made in different versions (with rectangles or triangles. The main thing is that the pipe be a lighter pipe (for example, 40x20). Also, do not make the grate too frequent. The procedure for installing a sliding fence is presented in the following video:
We hope that the drawings below will help you to make own gate and a gate made of corrugated board, which will be comfortable, reliable and durable.