Floors covered with laminate are considered one of the most practical, cheap, beautiful and easy to install. And this is true - you can cope with the task of laying them yourself, without even resorting to the help of specialists. The main thing is to have the desire and allocate time for work. But how to lay laminate? Let's look at this question in practice.
Laminate – a finishing floor covering, although considered easy to install and maintain, is quite delicate. It is demanding in terms of operating conditions and the installation process. If you neglect some of the features and rules for working with it, the coating will not last long.


The photo shows the process of laying laminate flooring.
Therefore, before starting work, it is worth ensuring the following conditions in the room:
- temperature range – 15-30 degrees above zero;
- air humidity – about 40-70%;
- level, cleared of debris and dried base;
- the room must be dry. If the humidity is high, you will have to buy more expensive moisture-resistant material;
- heaters and others heating devices cannot be turned on while working with laminate;
- It is recommended to close windows to avoid drafts.

Attention! Laminate flooring cannot be installed on sagging floors or cracked screeds. Otherwise, the material will not last long. The locks connecting the covering elements will break when the material flexes, which will ultimately damage the integrity of the base.

It is also important to remember that laminate flooring can be laid only 2 days after the material was delivered to the work site. It needs this time to “get used” to the new operating conditions - the laminate will absorb the necessary humidity, adapt to the temperature, so that during operation it will not change its dimensions excessively. It reacts sharply to changes in indoor conditions - the effect of thermal expansion may appear.

It is necessary to leave the purchased laminate in the room where you plan to install the floor. This is necessary for acclimatization. This process takes about 48 hours

When choosing a laminate, you should focus not only on the color, but also on the quality of the material. It is not worth purchasing low-quality products that are too thin or not suitable for operating conditions. Such a coating will serve too little and will quickly lose appearance. Packages with laminate must be sealed, and before installation it is important to inspect all boards for damage or chips. Damaged installation elements cannot be used.

Prices for Tarkett laminate
Tarquette laminate
The process of laying the material may differ depending on what type of lamellas are used. For example, there are three installation methods, each of which uses a different type of material: laminate with joints Click or Lock, as well as the type of coating that is installed using glue.


Installation of laminate flooring with a click lock
When using the adhesive method, the laminate is glued to the rough base using special compounds. The technology is similar to laying parquet. Glue can also be applied to the joints between individual planks, which are then tightly joined to each other. But this method is now practically not used, with the exception of the design of premises with very high traffic or with high humidity air. It will not be possible to disassemble the laminate if necessary.
Installation of cover with type locks Lock involves connecting individual planks using the impact method. That is, during operation, the tenon on one side of the lamella is driven into a groove on the other lamella. This coating is already losing popularity due to its disadvantages - labor-intensive work and difficult disassembly if necessary.

Important! If material with this type of lock is used, the work should be done carefully - control the impact force and use a special rubber or wooden block, placing it at the point of impact.

Nowadays, laminate with joints is most often used for laying this type of flooring. Click. Here, the joining occurs due to a tongue and groove, but of a special shape, in which the elements are securely joined and connected to each other without the use of impact technology. The panels are joined at a certain angle, after which the lamella is lowered to the floor - at this moment the snapping occurs. This connection allows, if necessary, to easily disassemble the finish and re-install it.


Methods for arranging lamellas
Laminate flooring can be laid in different patterns, according to patterns. Here you can choose any option you like, the main thing is to follow the drawing. There are several most popular layout options. The material consumption will also depend on the choice of method.
Table. Laminate layout options.
| Layout option | Description |
|---|---|
| This is the most economical option, since the amount of trimmings and waste will be minimal. The first row is laid first, and the remaining trim from the last plank can be used to start the second. The main thing is that they are at least 30 cm long. The amount of waste in this case usually does not exceed 5% of the material. |
| If you look at a laminate laid in this way, the joints will form a special pattern that resembles a chessboard. In this case, the new row always begins with such a cutting length that the panel is shifted to the side by 1/2 from the previously laid one. The amount of waste in this case increases to 15%. |
| It resembles the classic installation option, only it is performed at an angle of 45 degrees relative to the walls of the room. It looks impressive, but the amount of waste becomes even greater - more than 15%. |


![]()
To avoid possible errors When creating a drawing, it is better to design the entire work in advance by sketching out a layout diagram on a piece of paper. And take into account that the minimum displacement of the joints should be 20 cm relative to the lamellas laid in the previously installed row.

Important! Regardless of what kind of laminate is laid and according to what scheme, there should always be a compensation gap of about 1.5 cm between it and the wall. Otherwise, the material will be deformed. The area of 1 m2 of laminate under the influence of humidity and temperature can increase by approximately 1.5 mm.
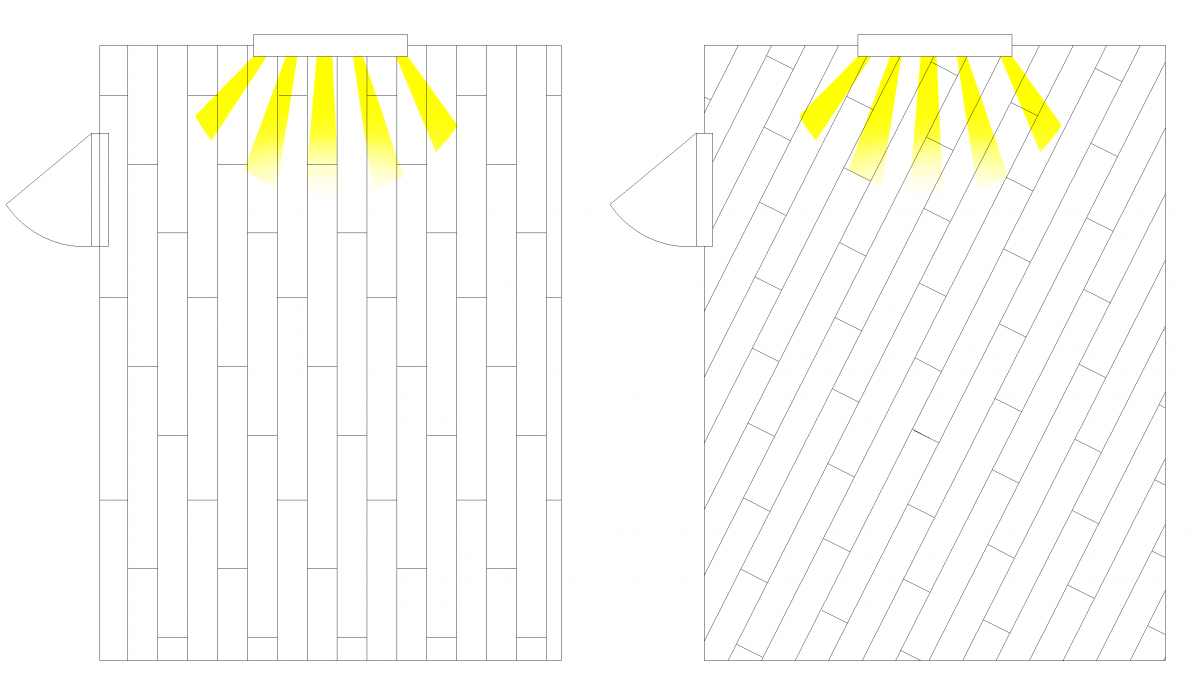
When installing laminate flooring, it is important to consider light sources so that the gaps between the planks are less noticeable. That is, they are laid so that they are located perpendicular to the light source (for example, a window).

Also, pre-planning the installation will ensure that the planks in the last row will have sufficient width (100 mm). If it turns out that they will be smaller, then it is better to narrow the first row a little.
So, the choice in favor of a laminated floor has been made, the material in the required quantity has been purchased and delivered to the installation site.
All that remains is to invite a team of craftsmen and wait for the work to be completed. Is it really necessary to pay extra money for installation of the coating?
A good owner is quite capable of coping with such a task, of course, if he has certain basic skills and the proper level of accuracy and attentiveness.
The technology of laying laminate flooring cannot be rushed. So that the installation of the coating itself does not cause difficulties, and so that the resulting floor lasts a long time without losing its operational and decorative qualities, it is necessary to carry out thorough preparation for work.
Assessing the condition of the floor surface
 Usually, even before deciding to purchase a laminate, the condition of the “subfloor” is assessed and appropriate repair and restoration work is carried out.
By and large, a laminated floor can be laid on any surface subject to the main condition - it must be smooth, durable, and free from areas of dynamic deformation.
Otherwise, “weak” places will inevitably appear on the new coating, where surface integrity may be damaged, joints may diverge, and squeaks may appear.
Ideally, the floor should be strictly horizontal, with permissible differences of no more than 1-2 mm per linear meter.
- must not have significant cracks, gouges, peeling or crumbling areas. If it is impossible to correct the existing defects, installation on an uneven floor cannot be carried out. You'll have to update the screed - or. You can start laying the laminate only after the coating has completely hardened, in accordance with the established technology concrete works deadlines.
- If it is expected, its entire surface must be carefully checked. If areas of “playing” or creaking boards are identified, they must be repaired or replaced. Possible irregularities can be processed with a plane, grinder, fill the existing depressions with wood putty.
- You can lay laminate, provided that there are no holes or bumps, delamination of joints, through wear, or areas of destruction concrete base. This coating cannot be repaired; it will be easier to remove the linoleum and carefully prepare the base for the laminate.
If funds allow, ideal option will cover the entire floor surface of 10-12 mm, having previously laid them underneath with plastic film for water vapor barrier. The process of laying laminate flooring will be significantly simplified, and the sound and thermal insulation qualities of the floor will increase significantly.
We prepare the necessary materials and tools
Good advice to all novice craftsmen - before laying the laminate, after delivering it from the store, it is worth unpacking the panels and letting them rest for 2-3 days in the room where the flooring will be carried out.
Equalizing the temperature and humidity levels of the material and the room will facilitate the installation process and eliminate the risk of warping of the laid coating.
This time can be devoted to preparation necessary tools and materials.
First of all, you need to have it in stock required quantity, regardless of the type of base.
The underlay not only has a good insulating effect - it has a shock-absorbing effect and prevents friction between the laminate board and the rigid base, which ensures the longevity of the floor covering.
 The substrate can be polystyrene or polyurethane foam, with or without a foil heat-reflecting coating, produced in rolls or in the form of rectangular panels.
More expensive, but very quality option – .
- The lining material is laid end-to-end, without overlaps, so to securely fix it on the floor you will need double sided tape. You can also use regular adhesive tape to secure the rows of backing along the seams.
- It is worth immediately preparing a set of wooden wedges, 10-12 mm thick, for laying the laminate at the required distance from the walls of the room.
- Sawing laminated panels required size You can use a regular hacksaw or jigsaw.
- For high-quality joining of seams, you will need a hammer, preferably a rubber or wooden one (mallet). You can also use metal, but only through wooden spacers (bars).
- To install sections of the coating located near the walls, you need to have a small mount, or you can make a lever from a steel strip with a hook and a shoulder protruding upward, through which the force of the hammer can be transmitted.
In principle, the materials and tools for installation are ready. However, there are a few other things to consider before you get started.
How to avoid unwanted mistakes
It is best to precede the installation by drawing up a plan carefully drawn to scale - the required visibility and clarity will appear in further actions.
What is important to consider:

- When answering the question: how to lay laminate along or across, the following is important: the direction of the longitudinal joints should be parallel to the direction of the rays from the main source natural light(windows) - in this case the seams will be practically invisible.
- The laying direction is usually from the far left corner, straight. For the panels of the first row adjacent to the wall, the groove must be outward, and the tenon must be cut so that a smooth end is obtained. Longitudinal cutting of panels is best done using a circular or vertical hand-held power saw.
- On the plan, be sure to take into account that the last strip that completes the installation must have a width of at least 100 mm. If this does not work, you will have to reduce the width of the first row. The same should be taken into account if there are any internal corners in the room.
- The thickness of the laid coating should not interfere with the free opening of the doors. Sometimes you have to remove and trim the door leaf from below in advance.
- When planning, do not forget about the pipes passing through the thickness of the floor. To cut shaped grooves for them, you will definitely need a jigsaw.
After thinking through all the theoretical issues, you can proceed directly to installation.
Laminate installation process
Laminated floor panels are available in interlocking or adhesive versions. In turn, locks can be one of several systems - “Click”, “Lock”, “5G”.
How to lay laminate flooring correctly?
Each type of laminate has its own installation features.
Features of laying laminate flooring with the “Click” system
 Currently, this is the most common locking system among laminate manufacturers and popular among craftsmen.
Its main difference from others is that it is possible to insert a figured tenon into a complex groove only at a certain angle - for different manufacturers - from 25 to 45 degrees.
When the two panels are rotated in one plane, the lock securely snaps into place.
Another convenience is that disassembling the covering is also not difficult; when you turn the panel, the lock will “open.”
- Work begins with the assembly of the first row of panels. It is laid along the wall and wedged on both sides with 10-12 mm dies. This gap is necessary to compensate for the thermal expansion of the laminate flooring. The assembly process is simple - insert the tenon at the desired angle, accurately aligning the edges, lower the panel down until it clicks into place.
- The second row is assembled by ensuring that the transverse seams are displaced by half the length of the panels (30-40 cm is allowed). The strip along its entire length is assembled completely, and only then is it connected to the first row. This will most likely require an assistant. After fixing the second row, it is also wedged from the walls with blocks at both ends.
- Further work continues in the same order until full coverage premises.
It is imperative to monitor the cleanliness of the grooves so that no sawdust or other debris remains there.
If the material fits well, you most likely won't even need a hammer.
Features of laying laminate flooring with the “Lock” system
 This locking system is gradually falling out of use, although inexpensive laminate models can be produced with it.
The connection between the tenon and the groove occurs strictly in one plane, and the engagement occurs due to special protrusions and grooves.
The joint turns out to be much less durable, although disassembly, if necessary, is not easy - the tenon may be damaged.
- When assembling the first row, after connecting the end sides of the panels, to ensure that the tenon is completely inserted into the groove, tapping with a hammer is carried out through a wooden spacer. Wedging the row away from the wall is done in the same way as in the case of the “Click” system.
- The second row is assembled gradually, one panel at a time (also taking into account the displacement of the transverse seam by half the length of the board). The first panel is inserted into the groove of the first row, tapped with a hammer until it is completely connected, and then wedged away from the wall.
- The second panel is tapped on both the long and short sides for reliable fastening of the longitudinal and transverse lock. Further work continues in the same order.
- The most difficult thing is installing the last panel of the row adjacent to the wall. This will require either a pry bar or a curved lever.
The work is carried out in rows or “ladders”, to the end of the room. The last row is also carefully mounted with power transmitted through a lever.
It is very important to correctly measure the force of the hammer blow or the force on the lever so as not to damage the surface of the laminate or break the lock's tenons.
Features of laying adhesive laminate
Although such laminated panels are equipped with a tongue-and-groove system, they do not have a locking connection. Thus, the strength of the joint is ensured only by gluing.
Such floors are distinguished by good solidity and moisture resistance, but it will no longer be possible to dismantle or repair a separate section of the covering.
The installation process is more labor-intensive, and you will also need to purchase special glue. It is not recommended to use the usual PVA.
- The technology for laying laminate is generally similar to the “Lock” system - the sequence is the same. The difference is that each groove is generously coated with glue (in accordance with the instructions included with it). Excess glue that appears after the panels are joined is immediately removed with a clean, damp cloth.
- After laying the first three rows, be sure to take a break of at least 2 hours so that the glue has time to set. The same rule applies in the future, until the entire laminate is completely installed.
Master class on laying laminate flooring in video format
A video about how to properly lay laminate flooring, the installation technology is shown, and preparatory work.
Let's finish the job
After the entire floor surface is covered with laminate, the spacer wedges at the walls are removed. The final stage will be the installation of skirting boards that will hide the expansion gaps.
It is important to remember that in no case are the skirting boards screwed to the laminated covering - only to the wall.
Transition to another coating at the junction neighboring rooms can be covered with a decorative overlay or use.
Essentially installation work finished - you can move on to cleaning the room and decorating the interior of the room. As you can see, there is nothing overly complicated. The main thing is maximum attention, thoughtfulness of every action and the highest accuracy. Everything should work out!
One of the most popular materials when decorating floors is the so-called laminate. This is a multi-layer coating resembling particle board with a very durable outer protective coating. The idea of making laminate panels and using them for flooring was born in the 70-80s in the West and very quickly spread throughout the world. Now this view flooring as popular as parquet, ceramic floor tiles. One of the advantages of the material is opportunity self-installation
. Now we will decide what tools will be needed, how to choose the material and where to start laying the laminate. 
Types and markings of laminate
Modern types of laminate, presented on the markets of Russia and the former CIS countries, have a thickness of 7 to 12 mm, a length of 1.2 - 2 m and a width of 180-190 mm. The main indicator for it is the abrasion class - it can be AC-3, AC-4, AC-5, AC-6. Previously, these classes had values of 31, 32, 33, 34, with AC-5 corresponding to class 33. It is better to choose the most wear-resistant laminate: AC-4, AC-5 class is quite suitable for home.
All modern laminate is equipped with Click or G5 locks or their modifications. The G5 lock is one of the most modern locks and is loved by all experts. There is a plastic locking bar inside the lock. It snaps into place when the tenon fits into the groove, requiring little force. There is laminate with and without chamfers. The outer front surface of the flooring has a very wide selection of decorative patterns, which are located under the protective top layer.
Tools and materials
 When performing flooring work, you need to stock up on a certain set of tools; they will also be useful in the future when repairing or installing ceilings, walls or floors. The required tool kit should contain:
- tape measure and pencil;
- building level at least 1.5 m long;
- a jigsaw with a set of blades or a circular saw;
- electric drill;
- perforator;
- construction vacuum cleaner;
- grinder with an attachment for grinding a concrete base;
- feather drills;
- knife with spare blades;
- square;
- hammer;
- special bracket for tightening panels;
- hacksaw for metal.
No special tools are required and every master who performs various tasks has a similar set. construction work or repair. When carrying out large-scale work on laying flooring, they resort to using a cross-cutting machine.
 Materials required for laying laminate flooring, the quantity of which must be calculated and purchased in advance:
- vapor barrier film 0.2 mm thick;
- substrate;
- construction tape, adhesive tape;
- Laminate panels are purchased according to the size of the room with a margin of at least 5%;
- spacer wedges;
- fasteners for baseboards;
- plinth around the perimeter of the room;
- additional elements for the plinth: internal and external corners and caps.
If the room area is large, it must be separated by expansion joints. For this purpose, there are special strips, which are matched to the tone of the main laminate.
Surface preparation before installation
 Laminate flooring can be laid on a concrete floor, cement screed, wooden floor, ceramic tiles and any other smooth, durable, dry floor. Very important requirement to the base is its smooth and even surface, deviations from the horizontal should not exceed 2 mm per linear meter. For this purpose, use a regular building level and measure the entire room in different directions. If deviations exceeding this value are found, they must be corrected. When used as a base under laminate cement screed or a concrete floor, to level them, you can additionally cover them with a thin layer of the so-called self-leveling floor.
The deviation of the surface from the horizontal with proper filling will be no more than 1-2 mm per two linear meters length. If for various reasons this is difficult to do, you can try to grind off the bumps.
The surface must be clean and dry before installation; the humidity of the base is allowed within 40-65%. The optimal temperature for installation should be from 18 to 22 degrees Celsius. Therefore, before you start laying the laminate, the lamellas must be kept in the room for at least 48 hours for acclimatization to occur. During this time, all preparatory work is carried out to level the base of the floor, cleaning and marking. It is worth remembering that you need to buy laminate in quantities that are 5% greater than the floor area.
On video: technology for laying underlay and laminate.
Correct coating laying technology
There are generally accepted rules for laying flooring panels, in particular: The layout of the slats is made along the rays of light coming from the window. That is, the long side of the plank should be perpendicular to the window. Therefore, the answer to the question of where to start laying laminate flooring is simple: along any wall perpendicular to the window. In this case, the seams between the panels are less noticeable. Laying laminate flooring diagonally across a room, although technically feasible, is not used due to large quantity waste, and the seams with this layout will be more noticeable than with the traditional one. 
After laying the first row, the second row is shifted by 1/2 or 1/3 of the length of the laminate strip. This is done to more firmly connect the laminate into one common array. A method can also be used when the second row begins with trimming from the previous row - in this case, a minimum amount of waste is obtained. Usually the laminate laying scheme is calculated.
Before starting work, a vapor barrier film with an overlap of 150 mm should be placed on the surface of the base and sealed with tape. The film is laid so that it extends onto the walls, where it is subsequently pressed against the baseboard. Then it is necessary to lay a layer of substrate 2 mm thick - usually this is rolled polyurethane. There are also more expensive ones cork backing, it is often used in offices, as well as when laying parquet.
 The next stage is laying laminate slabs. Before installation begins, it is necessary to inspect the entire laminate so that all locks are intact and clean. It is also necessary to calculate the laying of the laminate and find out the width of the last row of slabs. This width should not be less than 50 mm.
You can start from any wall perpendicular to the window. The first row of laminate is laid along the wall, the planks are connected with end locks. In this case, a gap of 10 mm is left between the laminate strips and the walls, which is ensured using spacer wedges. There are several ways to connect second row laminate planks. You can install each strip separately, as indicated in the instructions. But it is better if first the planks of the second row are connected to each other using end locks. Then the entire second strip is joined to the first, sometimes an assistant is required for this. 
Nuances and subtleties when laying laminate
With high-quality preparation of the base and correct installation Laminate flooring can last a very long time - up to 20 years. At the same time, it is important to observe the humidity regime and arrange a vapor barrier, since this material is very sensitive to moisture. It is not used in bathrooms. It is also necessary to make temperature gaps near walls and door frames. Laminate flooring is a type of floating floor. When the humidity and temperature of the slab changes, the entire covering expands and if sufficient clearances are not provided, swelling may occur.
 When installing laminate flooring in several adjoining rooms It’s worth dividing the array and not making it continuous in all rooms. It's better to split it at the border interior doors using a special threshold. In this case, it is easier to carry out repairs if the laminate suddenly swells in one of the rooms.
In the hallway, when laying laminate flooring, you must use the following rule: lay the panels with the long side in the direction of primary movement, that is, from the front door.
Conclusion
When performing flooring installation work, you must strictly follow simple rules. Also, the durability of such a coating depends on the quality of the laminate slabs. Therefore, you should not save on material, but buy flooring only from proven world leaders, since such savings can result in big problems. Technologically, laying laminate flooring is not very difficult, and therefore this work can be performed by anyone with tools and certain skills. If it is difficult to do the work yourself, you can contact specialists who will help you choose and lay laminate flooring.
Secrets of laying laminate flooring (2 videos)
Greetings, my dear readers.
In this article, we will learn - how to properly install laminate flooring in an apartment.
Laminate is a type of floor covering, the basis of which is a high-strength fiberboard coated with a special wear-resistant film.
Laminate appeared on the market relatively recently, but thanks to its operational characteristics became one of the leaders in floor coverings, winning its place from ceramic tiles, carpet and linoleum.
You can install laminate flooring yourself, without resorting to the help of craftsmen. To do this work as efficiently as possible, follow the instructions that I will provide you. Necessary tool

To install the laminate correctly and quickly, we need the following tools:
- construction tape
- building level
- construction corner
- jigsaw or hacksaw with fine teeth
- pencil
- hammer
- electric drills and a feather drill - will be needed to form holes for pipes
As you can see from the list, no specific tools are required. You can also purchase a kit for laying laminate flooring at a hardware store.
This set is inexpensive - the price ranges from 250 to 1000 rubles. It all depends on the manufacturer and for a one-time installation a cheap Chinese version is quite suitable :)

Set contents:
- Metal bracket - necessary for installing laminate adjacent to the walls. Thanks to the rubber linings, the bracket can be used as a “tamping” beam for joining panels.
- tamping block - used for joining. It has several grooves, which greatly simplifies the installation of lamellas.
- spacer wedges - necessary to create a technological gap between the wall and the laminate. They have sizes from 8 to 12 mm.
In fact, you can get by with your own set of tools, but if you still decide to buy, you will greatly simplify your work :)
Laminate flooring classes - which one to choose?

Correctly laying laminate flooring - video
The huge assortment can make even experienced builder, not to mention those who will have to buy laminate flooring for the first time.
So which laminate should you choose?
Laminate boards are divided into service classes, which will tell us about the service life of the product, depending on the loads affecting them.
Each board must pass 18 tests (European standard EN-13329), thanks to which a particular class is assigned.
This standard divides laminate into two large categories:
- commercial laminate
- for home use
Commercial laminate is designed for service in commercial premises (sorry for the taftalogy). Thanks to their increased wear-resistant characteristics, the service life of the panels can be 10 years or more. And if you use such a board at home, the time will increase significantly.
- Class 31 - designed for flooring in commercial premises with light load. Service life - no more than 3 years. If you use it at home, the period increases to 10 years. On at the moment- this is one of the most popular laminates in Russia.
- Class 32 is commercial premises with medium load. Average term operation for no more than 5 years. At home, such a floor can last from 12 to 15 years. It can be used in the kitchen. Most optimal choice In my opinion. Value for money.
- Class 33 is a very intense load. This laminate is used in places public use- bus stations, dance clubs. The service life is more than 15 years, and when used at home, some manufacturers provide a lifetime warranty.
Laminate boards for home use cannot boast of such qualities. 5 - 6 years of operation for them is the optimal result. The fact is that they are made of fiberboard or MDF, which significantly reduces their characteristics. Their main advantage is their low price.
This laminate is divided into 21, 22, 23 classes. Service life is from 2 to 6 years, respectively.
Preparing the base
So, friends.
The rules for laying laminate flooring on a wooden floor are practically no different from the rules for laying it on a concrete floor. The most important point before installation is surface preparation.

Laminate does not tolerate unevenness, dirt, or distortion.
If the subfloors in the apartment are made of concrete, then you need to check their level. Additional leveling may be required using a screed or self-leveling floors. Before arranging the screed. If the concrete is smooth, then all cracks must be caulked.
If installation will be carried out on wooden floors, then we also check their level. The surface must be leveled, either with a plane or scraper. If there are very strong differences, it is better to dismantle the old floors and fill the floors level, and if this is not possible, then you can sew plywood or OSB.
After the base is ready, it must be dedusted.
Read more about preparing the surface for laminate.
Installation of the insulating layer and substrate
Any floors tend to absorb moisture, and laminate is a wood covering that does not tolerate its harmful effects.

To prevent this process, it is necessary to separate the floors from the laminate with a special vapor barrier film 200 microns thick.
Most films are sold in rolls, and the film is hermetically sealed to achieve even better insulation. A layer called a “substrate” is placed between the laminate and the film. To find out which substrate to use, read this.
For the “substrate” you can use:

- wood-paper pulp
- cork
- foil polystyrene foam
- foamed polyethylene
Thanks to the “underlay” layer, minor differences in the floors are eliminated, and the heat and sound insulation of the floor covering also increases. In rare cases, old linoleum is used instead of a substrate.
Panel connection methods

- The glue method is practically not used at the moment. The point is pre-treatment glue the locking joints of the lamellas.

- click - locks - the share (receiving) side of the laminate lock is made with a special lock. Force will be required to connect the panels.

- lock - locks - special latches are used for connection.
Calculation of the amount of laminate
- First, we find out the area of the room by multiplying its length by its width.
- We find out the area of the laminate using the same formula, and since almost all laminate boards have a length of 1 meter, it is enough to measure the width of the board.
- Divide the area of the room by the area of the laminate - we get the number of boards!
Example:
Room – 16 m²
Laminate - length 1 m, width 0.2 m. Area = 0.2 m²
The required number of boards is 16: 0.2 = 80 boards.
Step-by-step instructions - how to lay laminate flooring yourself
First, let's look at castle method styling

1. First of all, spread out the “backing”. We glue the joints with tape.

2. We start installation from the first row.
First you need to saw off the protruding “ridge” on the board. When laying the panel, we form an expansion joint using wedges. The thickness of the seam should be from 8 to 12 mm.
IMPORTANT TO KNOW:
A deformation gap is required. It ensures uniform contraction or expansion of the coating as the humidity or temperature in the room changes.
At the end of the row you will be faced with cutting off the end board. Trimming the laminate is carried out using a construction angle and a jigsaw.
3. Installation of the second row
If the trimmed part makes up half of the panel or most of it, then we put it at the beginning of the next row. We carry out installation in checkerboard pattern. Thanks to this, a uniform load on the seams is achieved. The same principle applies to brickwork.
4. Installation of each panel is carried out as follows:
- We place the board against the groove at a slight angle
- carefully insert into the groove
- if necessary, we tap the panels for better connection
5. The last row is mounted using a metal bracket, or using improvised means. Don't forget to create a gap.
6. Upon completion of the work, remove the spacer wedges and install the baseboards.
IMPORTANT TO KNOW:
Under no circumstances should you hit the laminate directly with a hammer - this will damage the top layer. Use a “tamping” block or piece of laminate.
The locking method of laying laminate flooring - video
Adhesive method of laying laminate

Quite a popular installation method. Due to its characteristics, it has a number of advantages over the castle one:
- When the glue dries, greater strength of the floor covering is achieved than just a groove-to-groove connection.
- durability - if all operating parameters are observed, the adhesive connection will outlive the locking connection much longer
- reliability - thanks to the glue, it is unlikely that moisture or dirt will get into the joints
But there are also disadvantages:
- This installation method is not applicable if installation is carried out on heated floors.
- It is also unacceptable to use PVA glue - you will have to buy special glue for the slats
- impossibility of using the floors immediately - you need to wait for the glue to dry completely
- reuse of panels after dismantling is impossible
Adhesive method of laying laminate flooring - video
So, let's move on to installation:
1. Preparing the base, laying the “substrate”, maintaining the expansion joint - everything is identical. The only difference is in the installation method itself.
3. We get rid of the protruding groove on all panels of the first row.
4. Place the first panel against the wall, insert wedges to form a gap.
5. Apply glue to the protruding end of the groove edge of the next panel.
6. We connect the boards, and immediately remove the remaining glue, preventing it from hardening.
7. If necessary, we pad the panels.
8. We repeat all operations.
9. Upon completion of the work, remove the spacer wedges and install the baseboards.
Laying laminate around pipes and near doors
If you come across pipes along the way while laying them, don’t be afraid.

- First you need to cut the laminate taking into account the entire required length
- Then we move to measure the distance from the wall to the center of the pipe and mark the center line on the board
- We measure the distance from the edge of the board to the center of the pipe and mark the perpendicular, thereby obtaining the center of the pipe
- measure the diameter of the pipe, add 8 mm to it for the expansion joint and use a compass to mark the location of the cutout
- Using a feather drill, we make a hole and cut the laminate board along the center line for subsequent joining.
- Coat the joints of the lamellas with glue and connect
Laying laminate under door frame is divided into three ways:

1. In the first case, the laminate is installed first, and then :)
2. If the doors have already been installed, then using a fine-toothed hacksaw you will have to saw down the vertical door posts to the height of the lamellas so that they can be run under the frame.
3. The third method involves cutting flush with the door frame. But I do not advise you to use it, since without the proper skills you are unlikely to be able to cut smoothly.
Laminate layout methods

- The first way is perpendicular to the window. Thanks to falling perpendicularly sunlight The laminate joints become barely visible.
- The second way is parallel to the window. This layout is appropriate in rooms with a small area and will help to visually expand it.
- Diagonal layout. The panels are located at an angle of 45° to the walls. In my opinion, this is the most beautiful laminate layout scheme. There is a drawback - it is a significantly higher consumption of panels.
Laminate floor care

In order for laminate floors to last as long as possible, they require not only proper installation, but also proper maintenance.
The most important thing for laminate flooring is keeping it dry. If water gets on the floor, you should immediately remove it with a soft cloth.
One of the weak points of a laminate board is its locks. If it is used in rooms with high humidity, then a special sealant must be used during installation. It does not glue the panels, but perfectly protects them from moisture.
When caring for laminate flooring, do not use aggressive detergents, you should also not use parquet care products. Such products may well destroy the upper wear-resistant layer.
Laminate is also afraid of products with a high glycerin content, which destroys their edges by getting into the joints.
Conclusion
Well, that's all, friends!
In this article we learned how correctly install laminate flooring in an apartment.
I hope the information will be useful to you and help you avoid serious mistakes! Good luck everyone!