30.06.2017
The fence is an important component of the ensemble private territory. Its appearance depends on the financial capabilities and taste of the owner. The fence can be either light or temporary, set up to fix the boundaries of the site, or capital, built for years. In any design, the fence always has poles, the role of which in the design is great - they provide the direction and height of the fence, and make it possible to install the main and auxiliary elements with your own hands. Depending on the requirements, fence posts have a different design.
The main criteria for choosing suitable supports are several significant moments in construction:
- Mechanical strength.
- Aesthetics against the general background of the design.
- Resistance to the influence of external factors.
- Endurance in various operating conditions.
Before starting work, it is important to understand the features of the installation of certain columns. The installation method must be chosen by the master so that it ensures the maximum possible stability of the bearing part on the soil characteristic of the area. At the same time, one should remember about the changes that the soil undergoes under the influence of natural factors.
In addition, the fence posts are chosen, focusing on the integral design of the future fence. An important criterion for the choice of supports is the weight of the material with which the spans will be filled. Massiveness divides fences into light and heavy.
Light fences are:
- Wooden fences.
- Chain-link fences.
- Plastic fences.
- Openwork blown fences.
- Structures assembled from rods or sheet metal.
Heavy fences include the following fencing systems:
- stone;
- Concrete;
- brick;
- Large metal ones.
Installation work with poles is carried out in different ways, but when the element is buried in the soil, the builder must take into account the depth of winter freezing and the composition of the soil, and the distance to groundwater if any.
What are fence posts?
In the old fashioned way, the owner can supply wooden poles made of logs or beams and impregnated to increase the service life. The part of the column that will be underground is smeared twice bituminous mastic(with an interval of 24 hours) and sealed with roofing material. The upper part is treated with an antiseptic and stained (varnished).
The most impact resistant environment acacia, ash, pine, oak, mulberry and larch. They are not afraid of changes in temperature and humidity, mold fungi. Spruce and fir varieties are slightly inferior in endurance to the first group, but still remain in demand.
Experts consider the advantages of wood to be affordability and ease of installation, the disadvantage is not too long operation (from 5 to 10 years for light hedges).
The worst options for the manufacture of the bearing part of the fence are:
- Alder
- Aspen
- Birch.
metal poles
A more reliable variation for holding the fence are metal poles. They harmonize well with any materials and perceive significant loads. Compared to wood, iron is more durable, but it needs anti-corrosion treatment and periodic painting.

For the manufacture of metal poles use:
- Rolled profiles (channel, hot-rolled corner).
- Profile pipes round, square or rectangular section.
Read also:
Do-it-yourself lifting gates - simplicity and functionality
The advantages of iron elements include their versatility and functionality, reliability and durability, the possibility of using old materials, fast simple installation. Among the shortcomings, we note the high cost of the new metal and the need for anti-corrosion protection.
Supports made of asbestos-cement pipes and concrete
Despite the high rate of long-term operation, asbestos-cement and concrete pillars have several significant drawbacks.
Asbestos-cement pipes are bad in that they do not combine with any materials and create inconvenience when installing a fence. When filled with water and the liquid freezes, they can burst. concrete pillars hardy as a load-bearing part of the fence, but they are incompatible with small, rustic-looking fences.
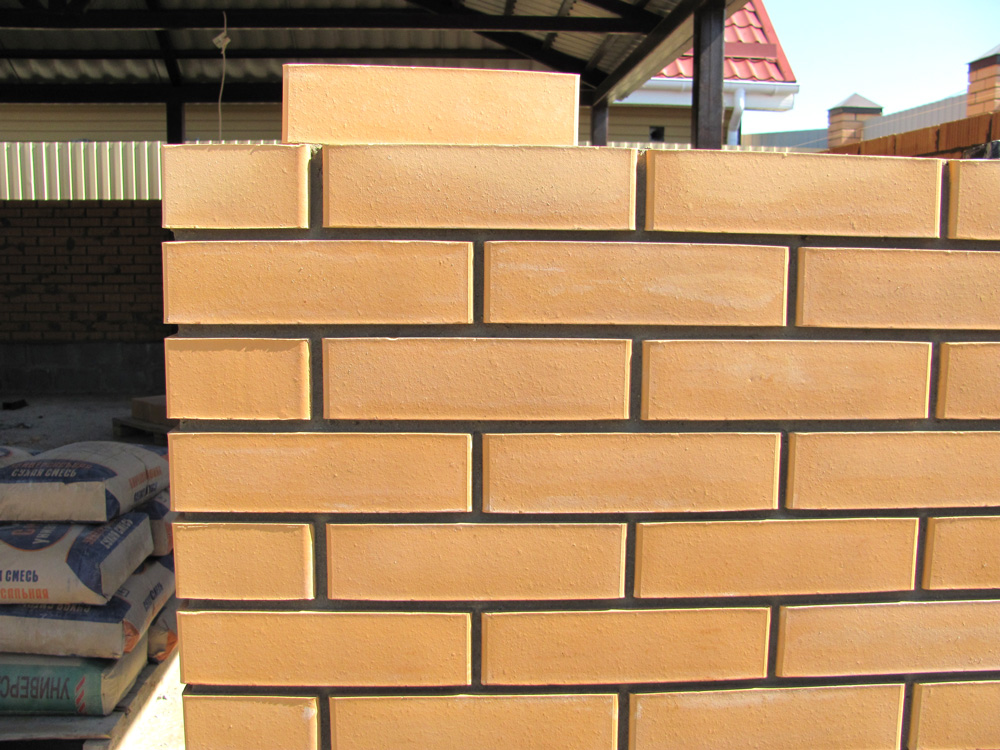
brick pillars
Brick supports require the arrangement of the foundation. They are created after installing a metal rod fixed in the base. Brick luggage is carried out around the professional pipe.
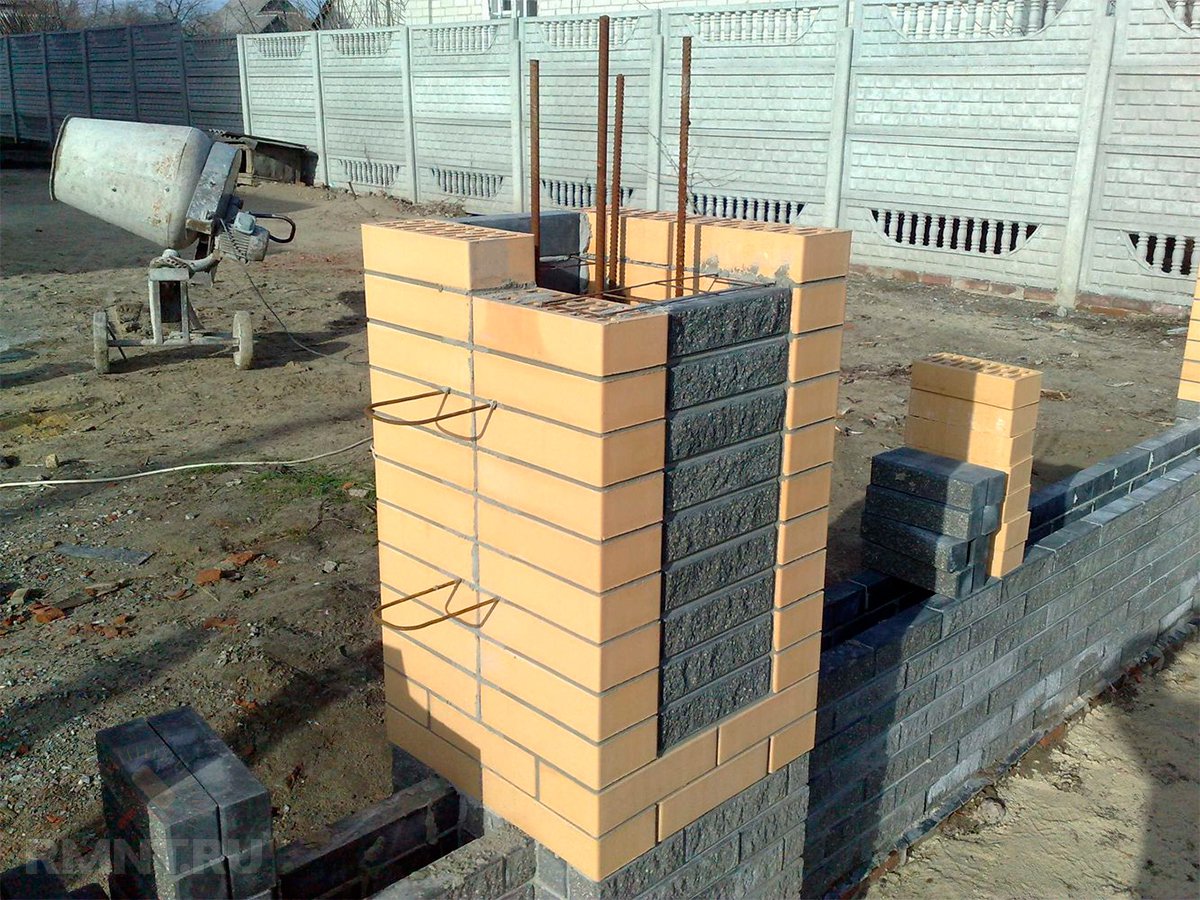
Advantages brick pillars- this is beauty, solidity, endurance of any load. Disadvantages - the complexity of the construction, which requires, in the absence of experience, the involvement of an experienced builder, and the price of the material.
How long a fence with brick pillars will last depends on the correct installation. Violation of the construction process is fraught with a distortion of the bearing part and expenses for the restoration of the structure.
Installation of wooden fence posts
Corner posts with a diameter of 15 cm are placed around the perimeter of the site. Intermediate supports can have a diameter of about 10 cm. The wood is dried and treated with a solution to protect against harmful microorganisms blue vitriol or ready-made antiseptic. The lower ends are coated with resin and covered with a cut of roofing material. So that the supporting elements can withstand moisture, they are painted over with oil paint.

Experts advise installing wooden poles "head down", i.e. to top former tree ended up in a hole. This technique will help prevent movement and accumulation of moisture inside the support. Since the load-bearing parts made of wood are used for lightweight structures, their installation does not require complex actions.
Perform work as follows:
- The soil is drilled with a drill until holes are formed with a depth of 50 cm (with aerial part of the column with a height of up to 1.5 m). For a higher fence, the embedment depth is increased, observing the rule of 1/3 of the pit from the entire length of the support.
- When digging wells, they make sure that their diameter is twice the diameter of the column. Holes of high quality in terms of geometry are obtained when the master holds the drill strictly vertically.
- A layer of crushed stone or building expanded clay is thrown at the bottom of each recess. The pillars are inserted into the pits vertically, checking the position with a level, and the side voids are covered with rubble or brick scrap. The material is rammed and the evenness of the bearing parts is re-checked.
The durability of the future fence is increased by installing logs in iron sleeves. Parts should lie close to the tree so that water does not get into it. Metal "casings" of smaller diameter help to achieve this.
How to install metal fence posts
The installation of iron columns is carried out from the markup, for which pegs and a cord are used. Sticks are driven in at the corner points of the perimeter and a rope is pulled between them. The pitch of the pillars is selected taking into account the size of the sections of the fence. Additional stakes are placed along the cord, indicating the location of the intermediate pillars.
Read also:
Fence foundation with brick pillars

Even before the start of construction, the owner must find out the features of the soil on his site. Wet soils tend to retain moisture, so in winter, frozen water will cause them to expand. They are called puffy. These include clay soils.
In dry soil conditions, holes for installing pillars are dug from 0.5 to 0.8 m deep, which approximately corresponds to one third of the length of the whole support. Heaving soils break through to the level of freezing and continue to dig another 20 cm down. You can find out the value of this level from building codes - for each region it will be different. The bottom of the recess is sprinkled with crushed stone, creating a pillow of 20 cm, and rammed well.

All points marked with pegs are also turned into wells using a drill or a shovel. Supports that are not protected from rust are treated with an anti-corrosion compound, if not over the entire surface, then at least in part of the concreting.
The prepared column is placed in the well and the free space is poured with concrete. The solution is prepared at the rate of 2 parts of cement, 1 part of sand and 2 parts of gravel. Dry ingredients are first stirred with a shovel, then water is added and kneading is continued, achieving the consistency of thick sour cream. It is very convenient and fast to prepare the solution in a concrete mixer.
In a different way, the installation of metal poles for the future fence is carried out by first concreting the holes, and then immersing the supporting element in the mass. This method provides high-strength fixation of the support.
There is also such an option for mounting pillars as driving in with a sledgehammer. It does not require auxiliary materials, but without the use of physical strength and skill, it will not work to put it into practice. What you need to do is simply drive the post into a hole of a smaller diameter so that the element is in tight contact with the ground.
Driving in posts with a sledgehammer is appropriate in the installation of light fences that will stand on heavy dense soils. In case of misalignment, the location of the supports is easily corrected with a huge hammer.
At its discretion, during the construction of the fence, the owner can apply screw piles. They look like metal pillars with a spiral at the end. Tight screwing of piles into the ground ensures reliable installation of the bearing part of the protective system.
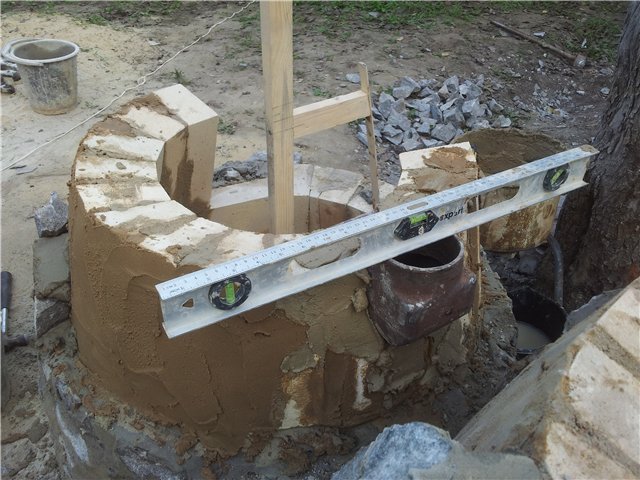
Installation of asbestos-cement fence posts
Usually, builders use asbestos-cement products with a diameter of up to 12 cm for pillars. They cannot withstand massive fences, so it makes sense to use asbestos-cement supports for light hedges. Masterfully carried out installation brings the service life of the structure to 50 years and exceeds this figure.

How to install asbestos-cement poles necessary for fastening the fence canvas:
- Wells are drilled to a depth of 80 cm with an extension at the bottom.
- The compartment is concreted and the walls of the pit are strengthened with a roofing material tube, making a protrusion of the material by 15 cm. A wooden formwork is laid around it and the well is partially filled with mortar. Before the mixture solidifies, they manage to insert an iron pin, the length of which is slightly less than the column.
- A firmly standing rod is hidden in a pole and the voids are cemented, reaching the edge of the formwork.
- The support cavity is also concreted, protecting the bearing part from rupture by freezing water. As a result, a convex hat should form on top, from which moisture will drain.
Installation of brick pillars for the fence
Usually fence posts are made 1.5 - 2 bricks thick. Construction begins with drawing a working drawing and marking the territory with the help of pegs. The sketch marks the pitch of the pillars, which, depending on the complexity of the design, can vary between 2.5 - 5 m.

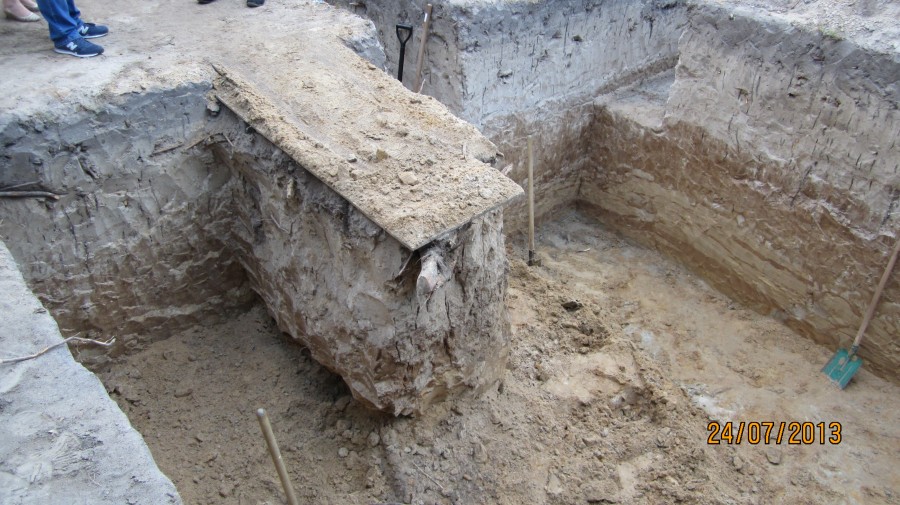
The shape of the foundation for the supporting posts is improved by equipping the expansion at the bottom. The finished pit should convey the contour of a truncated pentahedron. Such a shape will prevent the skew of the concrete tape, which is possible when seasonal changes soil. Inland, the base under the bearing part should also go below the freezing level of the soil by 0.2 m. A thick-walled pipe is placed in the center of the pit, which will take care of strengthening the structure. The cavity of the element is concreted or the pipe is covered with a protective cap. The well is filled with a solution and left to harden for a week.

Set up your own fence posts
The strength and durability of any fence is largely determined by the strength of its load-bearing elements, in particular vertical load-bearing poles, which is why it is necessary to carefully approach the issue of their selection and installation. The installation of fence posts is considered one of the most important and time-consuming stages of its installation, which requires certain skills of the performer and can be carried out in several ways. When deciding how to install fence posts, you should consider not only the type of material from which they are made, but also take into account the height of your future fence.
Types of fence posts
The choice of the type of poles for the fence largely depends on the requirements for their durability, as well as on the financial capabilities of the owner. In addition to these criteria, at present, many developers also take into account how aesthetically the fence will look, as carrier base which will be pillars of one type or another. In general, there are several main types of vertical load-bearing elements for a fence.
- Wooden poles.
- Pillars from asbestos-cement pipes.
- Concrete poles.
- Brick pillars.
- Pillars from metal pipes.
wooden poles They are characterized by relatively low cost and ease of installation, but at the same time, their durability leaves much to be desired. Even if the tree is impregnated with compounds that slow down the process of decay, the service life of such pillars will not exceed 10 years. However, they are very convenient for installing temporary fences, as well as low hedges in front gardens and gardens. It should be noted that when installing load-bearing structures from wood for low hedges, you can use such an elementary method as hammering fence posts into the ground without prior preparation.
As for asbestos-cement pipes, then they are not subject to decay, are relatively inexpensive and are a more durable material than wood, however, they are not without drawbacks. The most basic disadvantage when using them as load-bearing fence posts should be considered the difficulty of attaching horizontal logs to them. For this purpose, it is necessary to use large-diameter clamps or through fastening options, which ultimately adversely affects their strength and durability. It should be noted the sensitivity of asbestos-cement pipes to the possible accumulation of precipitation or groundwater in them, since in winter time when freezing, the ice simply crushes the pipe from the inside.
concrete pillars as load-bearing structures for the fence, they are extremely durable, but if you buy them ready-made, it will cost relatively expensive. It should be noted that it is quite possible to cast reinforced concrete pillars on your own, but this process will be extremely labor intensive. As load-bearing elements, it is recommended to use them for the construction of high and powerful fences designed for a long service life.
Pillars of brick they look very decorative, especially in combination with forging elements, but they are very expensive, and they are also very sensitive to the installation technology. As a basis for such load-bearing elements, a strong foundation is required, and it must also be remembered that they require mandatory mutual ligation using a shallow foundation. In addition, they have a large weight, as a result of which, if installed incorrectly, they quickly warp, which leads to the cost of their repair.
Poles made of metal pipes relatively inexpensive and very practical to use. They are characterized by a high degree of reliability, as well as durability and long service life. It would not be superfluous to note the high manufacturability of metal pipes, since any fasteners can be easily welded to them, and in the absence of welding equipment, ordinary hardware can be dispensed with. Due to these advantages, we can safely say that metal pipes are the most preferred type of poles for most types of fences.
Pillar Installation Method
Without dwelling on the description of the simplest installation methods, such as how to dig fence posts or how to simply hammer them into the ground, I would like to describe typical way installation of load-bearing elements of the fence, which are used as metal pipes. In general, the installation process itself can be divided into four stages:
Plot marking
At the stage of marking the fenced area, the first step is to determine its dimensions and drive in corner signal pegs as landmarks. Then you should stretch a twine or a thin rope between them, which will become the control line for installing our fence. Also, at the marking stage, it is recommended to measure the total perimeter of the fenced area and divide it into the optimal number of sections. For convenience, you can make a light wooden rail, equal to the length of the intended section plus the thickness of the column, and use it to mark the places of future holes. Although this markup method is primitive, at the same time it is reliable and has a sufficient degree of accuracy. Separately, we can mention that at this stage it is necessary to determine total pipes, which will be needed for the installation of load-bearing elements of the future fence.
Pipe preparation

Installation of support poles
At the second stage, one should preliminary training metal pipes, which is guaranteed to ensure their long service life. For this, it is recommended to use metal brush clean them of rust, and then treat with phosphoric acid. After that, the pipes must be covered with a layer of primer, and after it dries, a layer of paint for metal can also be applied on top of it. Also at this stage, it is necessary to close the pipes on one side with end caps, which will prevent atmospheric moisture from entering them. Can be used as end caps metal plates, which can simply be welded to the pipes.
Well preparation
Hole preparation is one of the most important steps in installing fence posts. They can be dug with a shovel, but it is best to use a manual garden drill for this, the diameter of which is 2 to 3 centimeters larger than the diameter of the pipes, since its use allows you to make the holes more accurate and significantly reduce the laboriousness of work at this stage. If you planned to install pillars from rectangular pipes, then the diameter of the drill should be 2 to 3 centimeters larger than the diagonal of this section. When drilling holes, remember that their depth should be more than a third of the height of the future fence, in order to guarantee its stability. Separately, it should be mentioned that if you have the opportunity to hire a motor drill, then this will minimize the labor intensity and time of work at this stage.
Pillar installation
The final process of installing pillars comes down to a few simple operations. First you need to place a brick in each hole, which will serve as the basis for the pillars. Then you should lower the pipe into the hole and set it strictly vertically with a plumb line, and then fix it with temporary wooden supports. Following this, the hole around the post must be filled up to three quarters of its depth with crushed stone of a fine fraction and tamped with manual tamper. The remaining space around the post must be filled concrete mortar, while not forgetting to form a drainage cone around the base of the column with a construction trowel. Temporary wooden supports should be removed only when you are sure that the concrete has completely cured.
Separately, it should be mentioned that, first of all, it is necessary to put corner posts, controlling their heights using a water level. After installing them, you can stretch a nylon cord between their tops, along which you can orient the installation height of the intermediate pillars. It is also necessary to remember that if the height difference between the corner posts exceeds 20 - 25 centimeters, then it is advisable to make one or more “steps” in this area. In the place where there will be a “step”, it is imperative to install an additional load-bearing element.
Summing up all of the above, we can confidently state that the installation of the load-bearing elements of the fence is a responsible and rather time-consuming task that requires certain skill and skills. At the same time, it should be noted that if all the recommendations are followed, you can independently cope with this task and provide your future fence with a reliable and solid foundation thanks to which it will serve you for many years.
It doesn’t matter which one - if the installation is done correctly, then you need to start with the pillars. And the better this is done, the stronger the fence will be and the better it will withstand bad weather. That is why the installation of poles is so important and is carried out according to technology. Only after understanding the nuances, a strong fence will be installed that will last for decades.
Types of supports and their functions
To perform this or that fence, are used different materials. This allows you to install a fence that will fit the soil and at the same time fit the landscape as well as possible.
The choice of which pole to install depends on the type of soil and on the financial capabilities of the owner. Currently, many inexpensive options are offered, made with high quality and using the latest technologies. So, let's look at the types of pillars and their features:
- The first option is this. You can either buy ready-made or make your own. Despite the fact that they are made for a long time, the result is worth it. Ready options are relatively cheap and durable.
- The next option is wooden fence posts. They require that they be treated with a special antiseptic solution, and they serve no more than ten years. They also require constant care - at least once every ten years the surface is painted.
- Metal fence posts are popular. This metal construction has a long service life. And to last even longer, they are treated with a rust remover. To prevent moisture from penetrating inside, they are covered with metal caps on top.
- Asbestos-cement. A relatively new option, which is very durable and practically does not rot over time. True, this type of installation requires a lot of time.
- And finally, the last and most effective option- These are supports lined with bricks. Such structures will stand for more than a decade. True, due to the fact that they weigh quite a lot, you will need a very strong foundation.
Also, the supports may differ in diameter.
Fence building mistakes
When installing a fence structure, several mistakes can be made at once:
- wrong foundation;
- the base is incorrectly filled;
- the supports were not installed according to a special scheme, but simply stuck into the ground.
If you choose the wrong foundation or carry out concreting, then after a few years the structure will simply collapse. Therefore, it is necessary to give Special attention installation.
Due to the fact that there are a lot of options for fences - accordingly, different supports are selected for them. Therefore, the foundation must be chosen based on what the fence itself and the material made from it will be.
Burial level
Such an indicator as depth depends on what total weight at the structure - the heavier the fence, the greater the depth. The composition of the soil also affects this indicator: how much the soil freezes, how deep are ground water.
So, for example, if the fence is light, then a depth of 50 cm will be enough. If the fence is heavy, then it will need to be tamped to a depth of at least a meter.
Vertical installation
Of course, the most difficult thing is to put up a fence with poles, if there is no such experience, or if the fence is large. Therefore, as an option, you can invite a specialist. First, the post is lowered into the hole. At the same time, how evenly it is installed is checked using a level.
In the event that the supports are set incorrectly, then in the future it will not be possible to put the fence exactly, as this will also affect the sections of the fence themselves. As a result of such work, the gate will not close as it should - or even more, efforts will need to be made.
To keep the top of the posts flat, use a rope. It is tied along the extreme pillars, and the rest of the pipes are aligned along them.
Selecting an installation method
The installation of iron and other poles depends on the design of the fence, as well as on the soil and what the owner wants from the fence.
Supports can be either concreted, previously placed in pits, or hammered into the ground. Each method has both its advantages and disadvantages.
Driving poles: advantages and disadvantages
Driving fence posts is considered the most budget option. The advantages of this method include:
- it is possible not to prepare the holes in advance;
- affordable fence installation price;
- self-assembly with a sledgehammer;
- sustainability. But only if the water soils are at great depths.
However, there are also disadvantages, including:
- low stability of the fence, especially on wet soils;
- if it is incorrect to strike, then this can lead to breaking the soil;
- under the mass of the fence, the pillars sag;
- if there are stones in the soil, then the installation of pillars will be quite problematic.
Concreting: advantages and disadvantages
Concreting is a more expensive option, with its own advantages and disadvantages. The first items include the following:
- no matter how wet the soil is, the fence will still have increased strength;
- such a fence will remain rigid regardless of the mass of the fence;
- increased corrosion resistance, especially when it comes to metal racks;
- poles are not deformed during driving;
- attackers won't be able to take it out.
As for the disadvantages, these are:
- the procedure itself is lengthy;
- increased spending;
- if the pillars are placed on heaving soil, then there is a high probability that the pillars will be pushed out of the ground.
We hammer in the pillars
In order to correctly score the pillars, it is important to take into account everything from the materials to the scheme.
Scheme development and calculation
What is important to indicate on the fence scheme? First of all, it should be indicated here, which will be 2.5-3 meters.
Knowing the area of \u200b\u200bthe plot and the distance between the pillars, it is not difficult to calculate exactly how many pillars will be needed. For example, if you have six acres, and the sides are 30 and 20 meters, then the calculations will look like this:
- First you need to calculate the perimeter by adding all the sides. Get a hundred meters.
- Next, divide the perimeter by 2.5 meters. It turns out that forty racks will be needed for a plot of six acres.
Here you should also consider the presence of gates and gates.
Choice of material and tools
To understand exactly how much material is needed, you need to calculate the height of the fence, and then add to this value that part of the support that will be driven into the ground.
It is important to remember that the support must be clogged by at least a third.
As for the material, here they use a profile either metal pipe. As tools, a sledgehammer or a special device for driving is useful.
Installation work
So, what items does the blockage consist of?
- First, we mark the territory using ordinary pegs and a rope.
- Then, using the scheme, we divide the sides into equal parts.
- We drive in the post that should be in the corner using the level.
- We drive in the remaining pillars using a suitable tool.
- On the upper cord, we determine the correctness of the driven fence.
We concrete the supports
Just like when driving a fence, calculations and drawing up a diagram are important. Let's see how this happens in practice.
Choice of method and calculations
At the initial stage, it is important to choose exactly how the concreting will take place. There are several methods for this:
- If the soil is stable, and there is little moisture, then complete concreting occurs.
- When the soil is weak and groundwater is close, partial flooding occurs.
As for the calculations, they are the same as when scoring.
Necessary materials and tools
Typically, the following materials are used for this type of mounting of supports:
- metal pipes;
- brick;
- concrete;
- stone.
As for the tools, a drilling device and a bayonet shovel are suitable here.
Installation of metal supports
Installation of such a fence is carried out as follows:
- The site, like last time, is marked around the perimeter.
- Pits are pulled out with a shovel or drill.
- Crushed stone is poured to the bottom to a depth of ten centimeters.
- Metal poles are installed in the pits.
- Concrete is mixed and poured.
- The pipe is fixed until the concrete begins to harden.
This whole story clearly demonstrates how to bury money in the ground. Obviously strangers. But if there is no mind, that is, professional qualifications are no longer foreseen, then money is buried in the ground. Fencing turns into entertainment in itself. The fence takes a whole season to install and economically resembles a skyscraper. The main items of exorbitant expenses: 1) drilling (very expensive equipment, site preparation, water fighting); 2) production of concrete (expensive equipment, the need for indoor storage of cement, water, the need for sifted sand, high-quality crushed stone of a certain fraction, manually carrying large and heavy volumes of the mixture, the need for electricity); 3) payment for unproductive labor and time of workers (cutting with a grinder, welding of some "gadgets" for which a device is needed, a welder is needed, sawing polypropylene pipes. And buy them, bring them.
Pouring concrete manually into a pipe through a funnel and without a vibrator is a medical enema in terms of sensations. It seems to be useful, but here it is stupid and inappropriate. Long, again poor quality. It seems to be easier to put a plastic cap on top of the pipe for 9 rubles and forget about this concrete through a funnel, like a nightmare.
The processes are offered hidden, require vigilant control, otherwise hidden works turn into hidden flaws. The problematic place is the filling with concrete of the required volumes in the ground. Two throws with a shovel and it seems "like concreted." In fact, it is impossible to drive concrete a meter deep and make sure that everything is fine with it without a vibrator and the appearance of a characteristic foam on the concrete surface. Therefore, bored foundations are made with a diameter of at least 300 mm. 200x200mm reinforcement cage, and there is room for a submersible vibrator.
Worst of all in the "megafence" project with time and its useless use. In short, the adviser moved on something, went crazy and went to praise himself and the “technology”.
In fact, everything happens differently. The first day they dig holes under the poles with a shovel. The second day they put an empty barrel or a tragus, they drive pipes from them into the ground. At first, one worker slightly holds the pole and looks at the plumb line, the second slave drives the pipe into the ground with a sledgehammer, standing on a barrel or goats. They change in sequence. The third day - the top of the pit of each pillar is covered with small gravel with a simple shovel or stones, broken bricks, crushed with a foot and a collar is made from mortar. Are used ready mixes M300 in bags, water, shovel. For a snack - the flattened upper ends of the pipes are cut off from above with a grinder along a cord. Everything. Pull the crossbar welding under the profiled sheet or galvanized wire (cable) under the chain-link and for centuries.
The author forgot that rust turns into magnetite, the original ore for iron smelting, pipes in the ground stop rotting. Frost heaving is greatly exaggerated. The pipe itself is slippery. The fence should be dealt with in April, while the earth is soft, loose, just the soil is already swollen after winter. This means: the pillar is set at the peak of all the negative processes of frost heaving that occurred without it. The soil will then self-compact, hold the posts very tight, and re-heaving will just put the post in the best possible condition since it was installed at the right time.
If "perfectionism" is very pressing, please paint the pipes with primer-enamel not after installation, but before installation. And not in one go, but in two, in a thin layer, as the instructions say. Well, you can still sharpen the ends of the pipes so that they drive in better. In the fall, in short, we need to prepare everything. And all these “miracle technologies” come from the fundamental impossibility for an amateur to connect cause and effect in his head. When money is tight on the thigh to make such fences, this is not a sign of genius.