Most likely, you are partial to mosaics. Such is the peculiarity of this type of art. Surely you have admired a certain street panel by an unknown artist more than once. Perhaps your home is not even deprived of factory-made mosaics. Thousands of miniature elements, assembled with a caring hand, invariably delight the eye, but sometimes bite the pocket. And they hurt your pride - you have so many wandering, but bright, ideas. Why not try it yourself? Take a chance, a mosaic made by yourself is an irreplaceable thing not only for the interior, but also for the soul.
At home, compositions are made from anything, the most incredible objects are used: mosaics from tiles, broken dishes, pebbles, broken bottles, mirrors and even.
Making mosaics is divided into stages:
- tile preparation;
- surface preparation;
- planning and sketching;
- laying mosaics;
- grouting;
Quick navigation through the article
Preparing tiles
You may already have the raw materials, but if you don't, that's okay. Any store will happily sell broken pieces and leftover ceramics for pennies. It’s good if you know a tiler who is constantly faced with the need to throw away waste. Take over his “trash” and you will find yourself with an inexhaustible supply of tiles. Stock up on multi-colored raw materials; it’s better to have a few different shades than a lot of plain tiles. It’s even better to constantly keep the future drawing in your head, it’s easier to navigate.

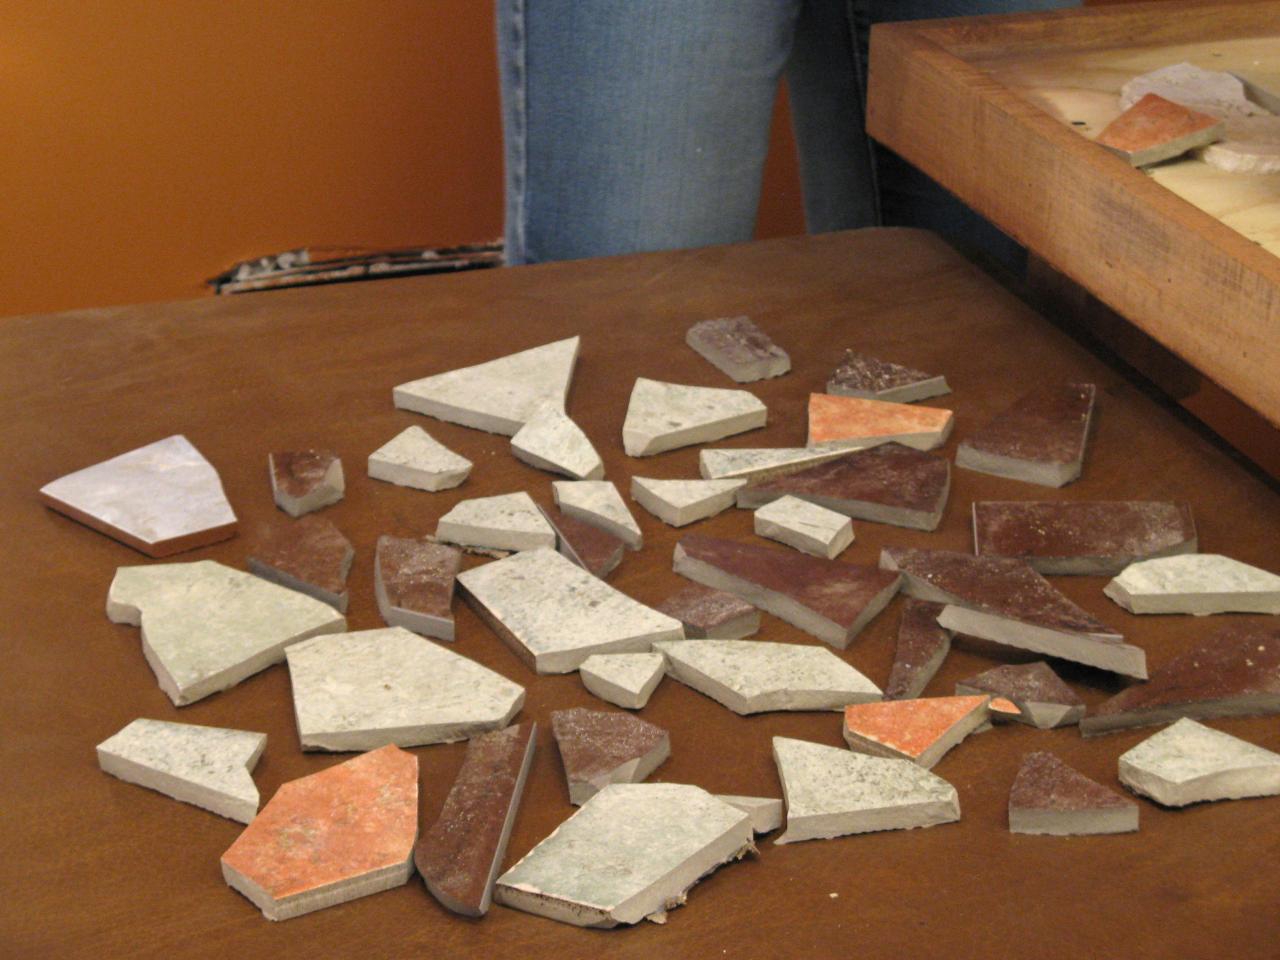
A mosaic made from broken tiles requires small fragments of different formats. We suggest cutting some of the tiles - compositions often require rectangular pieces. Cut ceramics with a glass cutter or a professional tile cutter. If you plan to create regularly, purchase an inexpensive tool. High cutting precision is of no use here. Simply break the main part of the tile into fragments. It is more convenient to do this with the help of a rag in which you will wrap the fight, and a hammer wrapped in a thick layer of fabric. The latter is necessary so as not to unnecessarily crumble the material.

Fill in the mosaic pieces different sizes, it is not difficult to adhere to a certain format. For the future: do not throw away the remaining tiles, broken dishes and so on. Put it aside for later, failed garbage will one day become part of a masterpiece.

Surface preparation
A suitable base for mosaics is cement-sand screed or plaster, putty and drywall. They provide good adhesion to glue and ceramics. It is important that the surface is clean and smooth. Remove uneven surfaces and seal cracks, if any. After this, treat the coating with a primer; it helps strengthen the base and increases adhesion.
Preparing a sketch

Even a trained eye finds it easier to navigate. An inexperienced artist, when working with a complex drawing, can’t do without it. In order not to get away from the dimensions, contours and proportions, draw a sketch on the base with a pencil. If you have artistic skills, your hands and eyes will suffice. Without such useful baggage (we are talking about skills), use the scale grid method, or even better, transfer the sketch using a projector.
Plan color scheme and divide the sketch into zones based on tonal ideas. Think about how to make a mosaic according to your design optimally.
Follow certain rules:
- Start from the center, so the composition will turn out better in terms of proportions and compliance with the sketch;
- Do the background last;
- Also leave abstraction for last, first people, animals, plants - anything that has complex geometry.
Mosaic glue
The mixture for laying out the pieces should have high adhesion to the materials you use. It is best to work with white glue; regular gray is not suitable for aesthetic reasons. For typical concrete foundations White cement glue (Kreps Reinforced White) is suitable. For installation on a non-standard base (for example wood), it is better to use reactive epoxy-based tile adhesive (Litokol Litoelastic), liquid nails or epoxy grout.

Mosaic laying
If you plan to use tiles of different thicknesses, start with the thickest one. It will serve as a guide for others. It is advisable to spread the glue on both the base and the ceramics, but one of the surfaces requires only a light coating. One that will not increase the thickness of the layer, but will have a positive effect on the strength of the installation.
Apply glue to small areas, which were previously highlighted in the sketch. Coat easy areas with a larger area, difficult ones will require slowing down. After spreading the glue onto the base with a regular spatula, remove the excess mixture with a notched spatula. If the mosaic pieces are uniform in thickness, the work will be easier. Otherwise, the difference must be compensated by adding glue. But even uniformity does not always save. Pieces that are too different in size require different gluing efforts; a smaller tile with the same layer of mixture will always fall a little deeper, so it needs more glue. The comb is just a guide; each element still has to be brought to the desired plane individually. 
A mosaic of broken tiles on a wall does not have to be in the same plane. Based on your own ideas about beauty. In addition to tiles, use other materials that will diversify the composition and allow it to match the idea. Floor mosaics must be flat; unevenness and roughness will create problems when walking on the tiles.

It is difficult to achieve an even coating using only your hands and eyes. Use a flat sheet of wood, plastic or metal to periodically press down the laid areas to level them. It is better to have sheets of different formats. The principle is simple: the more complex the pattern, the smaller the area covered at a time, the smaller the sheet.
Mosaic made from broken tiles involves laying pieces with gaps. Do not place tiles close to each other. Very precise fitting of the parts will not only complicate the work many times over, but may also cause subsequent damage to the canvas. The seams compensate for thermal expansion of materials resulting from temperature changes. But you shouldn’t make huge gaps either, use common sense. The final drawing should not be damaged. Do not place pieces of the same size next to each other. Too different formats are also not “class”; there should be differences, but within reasonable limits.
Countertop cladding

If the countertop is made of wood, clean it of paint with acetone or special removers. Then go through the sandpaper twice, first with a coarse abrasive, then with a fine one. These manipulations are necessary to increase adhesion; do not start mosaic without preparation.
How ? A different installation scheme is required here:
- Start from the edges, gradually moving towards the center;
- Compact the canvas as much as possible;
- Remove the glue immediately, high density implies large number seams; cleaning at the end will lead to unnecessary waste of time.
Video master class on decorating countertops with mosaics:

Grouting joints
This applies to both floors and walls and countertops. Grouting can be done no earlier than one day after finishing the cladding. The mosaic should dry evenly. If the room temperature is too high, cover the canvas with a damp cloth. Before jointing, remove any remaining adhesive and wipe the mosaic with a damp cloth. To work you will need a rubber spatula.
Transparent grout based on epoxy resin with chameleon effect (). It will adjust to the color of each piece. Cement mixture It is much inferior to epoxy in strength and can literally fall apart.

Apply the fugu with a rubber float, pressing it firmly into the spaces between the pieces. Remove any residue with a damp foam sponge. Epoxy mixtures must be washed off with copious amounts of water, and plaque must be removed with special detergents(Litonet gel, Sopro ESE 548). 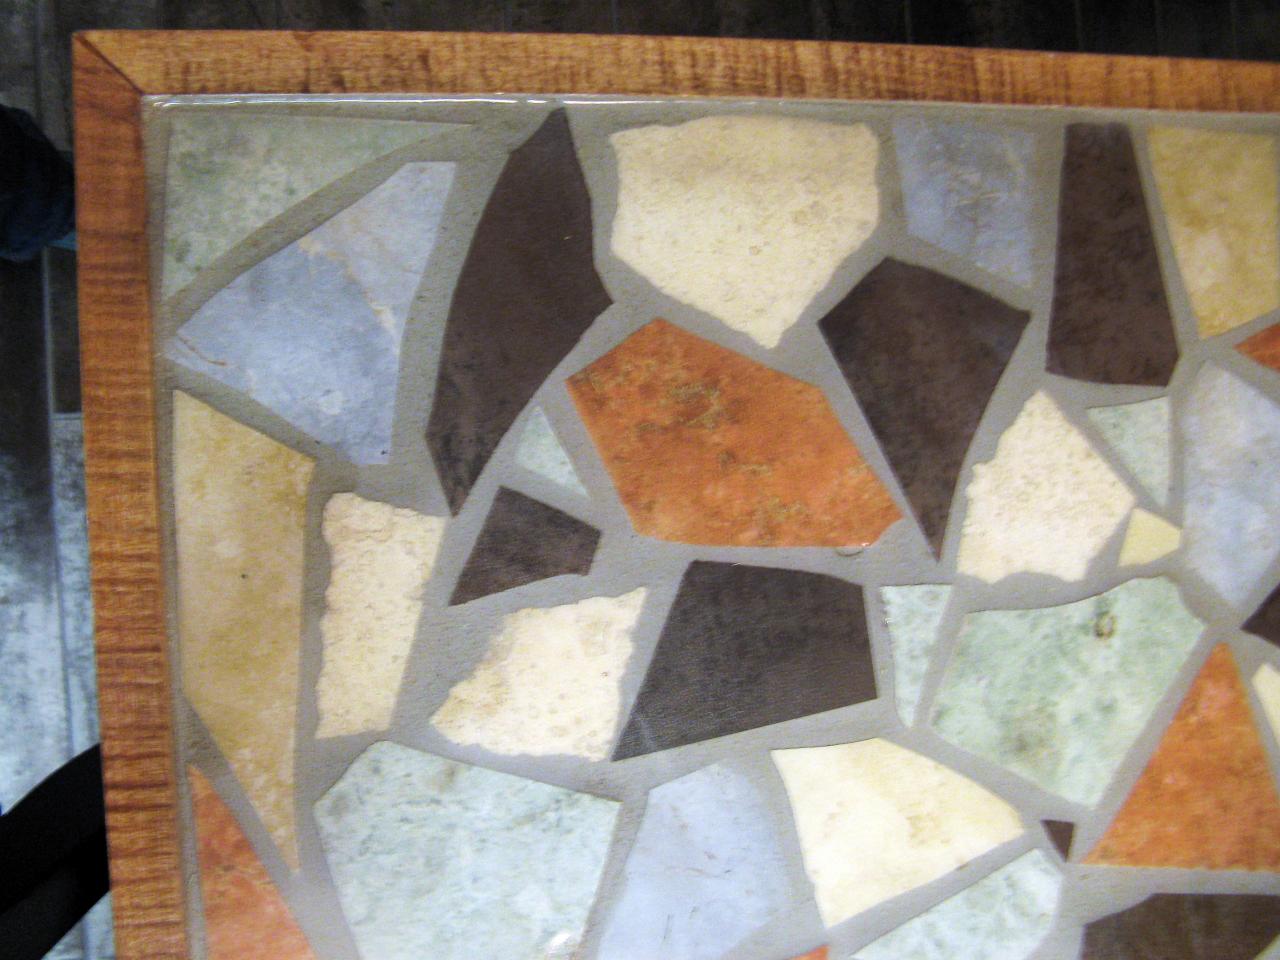

Well, now you know how to make a mosaic at home. We hope that the master class served as a starting point. Remember that mosaic requires regular maintenance. Do not wipe it with substances containing phosphoric acid. Use products with a low percentage of acidity, but even after using them, wipe the mosaic with a cloth and water.
Don't get hung up on tiles, train your imagination and use unusual and interesting objects.
comments powered by HyperCommentsThe art of mosaic dates back more than five thousand years. Over the years, there has been a period of its heyday in one state or another, followed by periods of decline and oblivion.
IN recent years Interest in mosaics in our country is constantly growing. This is explained by the fact that this technique enlivens the interior of any room, giving it originality and uniqueness. Do-it-yourself mosaics from broken tiles are created as a result of a rather long and labor-intensive process, but this does not stop true connoisseurs of beauty. This can be partially compared to traditional tiling technology.
This article makes an attempt to summarize the primary information regarding self-creation mosaics made from the material that is currently the most affordable, broken tiles. We hope that after reading this article, you will understand how to lay mosaic tiles.
Where to find material
In any specialized store you can purchase the amount of broken tiles necessary to create a picture of any size and degree of complexity for pennies, or completely free.
It is possible to purchase leftover tiles, which are several times cheaper.
The third source of obtaining the coveted materials is the tiles left after repairs (from you, neighbors or friends) and their scraps.
We are looking for supplies of broken tiles for laying in the bathroom
Where does the work begin?
From the most difficult. You'll have to sit down and the smallest details imagine what the imperishable masterpiece you are about to create will look like: the general concept of the drawing, its composition, scale and color scheme.
After this, it is advisable to transfer everything that arose in your imagination onto paper. A set of colored pencils or felt-tip pens will make it much easier for you to work out the details of your future mosaic. The sketch must be drawn to scale. This will make your future work much easier.
If you don’t have much of a creative streak, then we recommend starting work by creating an abstract mosaic design. It is much easier to arrange fragments of different sizes, laid out in random order, into a finished panel than a drawing containing specific images.
 Create a sketch or panel from broken tiles
 But a sketch will not hurt in this case either, since it, in essence, is a plan for your future work, on the one hand, and a guide to the selection of materials by color and quantity, on the other. This document allows you to get a complete picture of what the future mosaic of broken tiles, laid out with your own hands, will look like.
Selecting material to create panels
When starting the selection of broken tiles for future work, you should be guided by a number of rules, the observance of which will greatly facilitate your life in the next stages of work.
- It is advisable to use tiles that are approximately equal in thickness. If the fragments differ significantly in this parameter, then laying out the drawing beautifully will be much more difficult, since some parts of it will sink in the glue, while others will stick out from the wall. And, even discarding the aesthetic component, this should not be allowed under any circumstances. The sharp edges of protruding broken tiles can cause serious injury. If you level out the spread of thickness with glue, then its consumption will increase significantly, and this means a lot of money.
- The color scheme of a drawing, figuratively speaking, determines its soul. The more colors, tones and halftones used to create it, the more expressive and emotional your mosaic will be. If the differences in the used elements of the set concern only halftones, then the result will be an even and calm tone that is not conspicuous and does not attract undue attention. If you have certain abilities, you can lay out an excellent mosaic with your own hands, using only tile elements of the same color. In this case, you will need a special tool to prepare required quantity pieces (following the example of the Internet, let's call them pixels) of the desired shape. Otherwise, such a drawing will simply merge with you.
- If your sketch includes sharply contrasting spots, you can achieve this by combining tile pixels with elements of other broken ceramics (for example, dishes).
If small tile pixels desired color and the size is not enough, then you can fill a sufficient number of them from a whole tile of the required color.
The most convenient way to break tiles is to first wrap them in a cloth and hit them with a rubber mallet. back side tiles In this case, the layer of glaze applied to the tile will crumble less.
Glass tile pixels may be required to achieve certain visual effects. It is impossible to smash it in the way described above, since the basis of such a tile is a mesh. In this case, you will have to work with special nippers for mosaic work.
 Creating an abstraction from broken tiles
 Preparation of the base surface
Most often, mosaic tiles are laid on floors or walls. Working on the floor is practically no different from tiling them tiles, so we will not dwell on this issue.
The second option is technically more complex and begins with preparing the wall (section of the wall). This means:
- removing the existing coating from it (wallpaper, paint, tiles, etc.);
- if during the cleaning process areas of “breathable” plaster are identified, they are also cleaned;
- After removing all excess, the wall is plastered and leveled to a level with control of the horizontal and vertical of its surface. The result of all future work depends on the quality of the surface;
- After the plaster has completely dried, the wall should be treated with a deep penetration primer. This will strengthen the base of the future mosaic and increase the adhesion of the wall surface to the adhesive composition on which you will attach the panel elements;
- A sketch of the design you are going to type is applied to the prepared surface. In order to maintain the proportions as much as possible, it is recommended to first apply a scale grid to the sketch and the wall and transfer the image across the squares.
 Preparing the wall and floor for tiles
 Let's start laying
For successful work The following tool is required:
- level;
- rule;
- grater;
- trowel;
- notched spatula 4x4;
- wide painting spatula;
- fly brush;
- rubber mallet;
- rubber spatula;
- nippers for mosaic work;
- glass cutter or manual tile cutter;
- low-speed electric drill;
- mixer - nozzle;
- foam sponge;
- small container (1000 ml) for preparing grout;
- large capacity up to 6000 ml for preparing the adhesive composition;
- Coarse sandpaper;
- Metal ruler, pencils.
And material:
- Leveling putty (if necessary);
- Deep penetration primer;
- Tile adhesive ( white or colorless);
- White grout for joints;
- Crosses "1".
Before you start laying down the drawing, you will need to purchase the necessary adhesive composition for this. As such, a special adhesive is used for laying tiles.
It is advisable that the brand of glue you purchase has a white base. This color is best suited for laying out mosaics, because... goes well with all the others and evokes a feeling of lightness and cleanliness of the panel.
In cases where the work being created plans to use glass tile pixels, the most the best option will be an adhesive composition with a transparent base. This glue is more expensive, but the work is much more expressive and of high quality.
Work begins with preparation adhesive solution. It is not recommended to prepare more than 4000 ml at a time, since the process of selecting the required size and color of tiled pixels, their adjustment and installation takes a lot of time. The glue may simply dry out.
In order for the tiled pixels to stick with proper quality, the air temperature in the room should not go beyond the optimal temperature range (+5) - (+30).
Making a mosaic pattern can be done in one of the two most commonly used ways.
Classic drawing
Used for simple or abstract designs.
- The image begins to be drawn “from the center to the edges” along diverging circles. This allows you to achieve the most even horizontal line of the finished drawing.
- Initially, images are laid out (people, animals, houses, etc.), then secondary elements of the mosaic (sun, river, etc.).
- The background of the mosaic panel is laid out last.
- The outline of the image must be laid out with pixels that have at least one straight side, which makes it possible to give it clarity.
Mosaic pattern in film
Used to create complex images.
- Prepare two adhesive bases according to size created panel. We lay the first one on a flat surface and, gradually removing the protective layer from it, lay out the drawing on this base. This option is convenient because pixels can be repeatedly installed, removed and adjusted to one another, achieving greater expressiveness.
- The fully typed pattern is covered on top with a second adhesive base. We get a mosaic pattern in double-sided film.
- An adhesive solution is applied to the entire area that the design should occupy, with a small allowance.
- The adhesive base (the one on which the image was typed) is removed from the bottom side of the picture.
- The free side of the set is glued to the wall and leveled in the plane of the wall.
- After the glue has completely dried, the outer adhesive base is removed.
When working using this method, two requirements must be met:
- Adjacent tile pixels should have different colors. This allows you to get not just a colorful and bright pattern, but also creates the precondition for its visual perception as more interesting and bright. The fewer colors and tones are used in the mosaic, the calmer the panel turns out. Conversely, a wide color palette makes the drawing bright, rich and more colorful. If any pixel “does not fit” into the typed image, it should be removed and replaced with a more suitable one;
- Adjacent pixels must have different sizes. Of course, you shouldn’t overdo it, but there must be visible differences in size. Mosaic elements located nearby look especially advantageous when they not only have different sizes, but also differ in shape. At the same time, one should not forget, when typing a picture, that it is impossible to assemble mosaic elements “end-to-end”. It is necessary to leave temperature gaps, which are rubbed after completion of the masonry.
 Creating a mosaic pattern in the bathroom
 At the final stage, the seams between the elements from which the design is assembled are cut and grouted. This is done only after the glue has completely dried chemically in a natural way (after 24 - 72 hours). Drying time depends on the room temperature and the brand of glue.
Excess glue protruding beyond the plane of the pattern is carefully removed, after which the grout is diluted and applied to the desired places with a rubber spatula. In this case, you should pay attention to the fact that all the seams in the picture are tightly clogged with it. After applying grout to a certain part of the panel, you need to wipe this part with a damp sponge, which (after that) must be regularly rinsed in a bucket of clean water. This operation is performed approximately a quarter of an hour after processing the seams; it allows you to remove grout residues from the surface of the tile pixels and makes the treated seams more neat and uniform.
The final touch to working on your mosaic panel is polishing the laid out pattern, which will allow it to sparkle with all the colors of the rainbow and make your work more expressive.
This procedure is performed using any soft, lint-free fabric, onto which furniture wax is first applied. Pay attention to the composition of the latter. If it contains phosphoric acid, then it is prohibited to treat mosaics with it.
If the mosaic is heavily soiled, it can be cleaned with neutral cleaning agents that have a low percentage of any acids. After completing the work, be sure to wipe the panel and rinse it generously with running water.
Broken ceramic tiles are just unnecessary waste for some, but for creative people they can become a means of embodying the original design solution or a cute craft. A mosaic made from tiles divided into fragments can create an extraordinary, exquisite decoration in any part of the interior and exterior.
Do not delude yourself - the tile mosaic presented on this photo is produced in an industrial version, here you see the edges being completely filled with enamel and other subtleties ceramic production tiles The cost of such mosaics is often very high, but you can make perfect things and at the same time spend a minimum of money. Next we will reveal the secrets of ceramic mosaics self-made
Examples of what can be made from a bat ceramic tiles, quite a lot, for example:
- finishing of such interior items as flower pots, vases, watch dials, picture or photograph frames;
- garden paths from broken tiles;
- decoration of furniture (bathtubs, countertops, etc.);
- cladding of swimming pools, fireplaces and stoves;
- laying broken tiles on the floor and walls;
- creating panels as a separate decorative element or as part of an overall surface finishing composition.
And these are not all the options where you can use broken tiles; ideas for this are presented in numerous photos on the Internet.
In crafts made from broken tiles with your own hands, you can include auxiliary elements: shells, stones, large beads and others
Highlights
The process of decorating with tile mosaics opens up a lot of scope for creativity and involves countless ideas for decoration. You can create interesting designs from broken ceramic tiles using this pattern. A chaotic arrangement of pieces of different sizes and colors will look no less impressive. In the first case, you can use both ready-made patterns and create an ornament from broken tiles yourself. In the second, you can forget about strictly following the graphic plan and tune in to improvisation, the result of which can be a pleasant surprise.

The use of broken ceramic tiles usually involves the presence of elements not only of different shapes, but also of color and texture. This type of mosaic produces the brightest and most expressive patterns. When creating decor according to a scheme, you need to take care of the presence of fragments of certain shades and their relationships.
Worth knowing!
A mosaic of broken tiles glued to special sheets is more convenient in terms of installation, but it will not be possible to lay out such intricate patterns as from fragments, which can easily be matched to any curved lines and smooth transitions.
Effective surface design can also be achieved with the help of a monochromatic design. For example, lay out paths in the country house, create an interesting pattern from broken ceramic tiles and whole tiles of the same color, or finish any other desired area.
Installation features
The principle by which a tile mosaic is laid with your own hands (diagrams and drawings for this you can come up with yourself or contact specialists) is similar to finishing with ordinary ceramic tiles, only the process is more painstaking and requires the use of imagination.
Finishing with broken tiles involves sequential implementation of the following points:
- Drawing a sketch.
- Preparation of material.
- Surface treatment for cladding.
- Preparation of the fixing solution.
- Laying out fragments.
- Grout.
- Polishing.
During the first stage, a diagram is drawn up for the desired pattern, according to which a mosaic will be laid out from tile scraps with your own hands. This point is especially important for performing complex drawings. The resulting sketch can be applied directly to the cladding area, or can be left on a sheet of paper or in an electronic version.


Elite smalt or gilded mosaic of broken ceramic tiles is perhaps more impressive, but its price is much higher. And broken tiles can be obtained for free or at a minimal cost. It is enough to contact the nearest construction stores or ask your friends.
Sometimes, even before performing an improvised pattern, it is advisable to think in advance good combination shades.
When you can't find ready material, create a mosaic from broken tiles with your own hands.
There are several ways to do this:
- Cutting out the required pieces using a tile cutter? the elements are smooth and neat, but a special tool is required.
- Separating parts with wire cutters? suggests some restrictions on the shape of the mosaic.
- Breaking fabric-wrapped tiles with a hammer? provides a faster result, and mosaics from broken ceramic tiles are obtained in different shapes. It is advisable not to overdo it with the impact force so as not to turn the material into small crumbs.
A mosaic made from the remains of tiles is laid out with your own hands on a surface that has been cleaned of wallpaper, dirt and covered with putty. Paths made from broken ceramic tiles require more complex base preparation, which involves digging a shallow trench and filling it with sand.
Before covering the stove with a mosaic of broken tiles, it is worth sanding the surface of the bricks and clearing the seams between them to a depth of 3 mm.

Glue or white mineral mixtures are best used as a fixing solution. If the composition requires preparation or dilution in water, then it is better to do this in small portions, since it is also applied to the surface in parts.
Finishing with broken ceramic tiles is done on a surface coated with an adhesive solution. Elements, as a rule, are not laid closely, but with small gaps, which are subsequently treated with grout.
The final polishing stage gives a spectacular appearance mosaic pattern. But it is not recommended to subject floors made of broken tiles to this procedure in order to avoid the risk of increased slipping.
A beautifully laid mosaic made of broken tiles with your own hands pleases the eye with a unique pattern and significantly saves the renovation budget. Possibilities this method claddings are quite wide and varied, especially in terms of design.
Laying mosaics - general requirements
How facing material mosaics have been used since ancient times - in ancient Roman baths and ancient Greek baths, mosaic panels were real examples of high art. Even today, such decor looks great in swimming pools and saunas, in bathrooms, kitchens and toilets, on garden paths, in offices, and when decorating fence foundations or for decoration of facades. You can use not only purchased mosaics, but also use remnants of ceramic tiles, pieces of glass, metal, stone and other renovation waste - in skillful hands they will become genuine designer finds.
How to lay mosaic tiles depends on several factors:
- Where the cladding is performed - outside or inside the room, this will determine the need for frost resistance of the solution;
- If there is a large area of work, laying mosaics on a mesh is relevant; making and installing a mesh with your own hands is much easier than covering it with mosaic elements on top;
- When combining mosaics with tiles standard ceramics are always laid first. Installation openings are left for mosaic inserts and panels; their decoration is carried out after complete drying cement mortar under ceramic tiles;
- If it is necessary to lay an auxiliary mesh (see point 2), then this stage is performed before laying the finishing cladding, even if 95% of the entire surface is decorated with ordinary ceramics. For example, when laying tiles for an outdoor porch it is necessary to install a mesh in advance in the “windows for mosaics”, even if these inserts are small in size;
- Laying mosaic tiles with your own hands is associated with a certain risk from the point of view of work safety precisely when self-production its elements.
The fragments of ceramics and glass have sharp edges, sometimes up to razor sharp edges This is fraught with deep cuts with any careless movement!
Close proximity to mortar aggravates the risk by the possibility of infection in a fresh cut. When laying homemade mosaics, you must wear thick rubberized gloves and measure your movements with the characteristics of the material.
How to make a mosaic from tiles - with your own hands and not only from ceramics
When laying a mosaic of broken tiles with your own hands, garden paths are designed according to one method, borders for flower beds - according to a second one, and bathroom panels - according to a third one. This is due to the specifics of the objects being decorated and the operating conditions of the man-made mosaic.
For example, large pieces of ceramics with an extended straight chip are suitable for borders. By laying it parallel to the path, an aesthetically attractive transition from a horizontal to a vertical surface is obtained. It is quite acceptable to diversify the installation with multi-colored tiles and the same glass, shards of porcelain or splashes of polished metal, but the rampant design imagination should be kept within certain rules.
Basic ceramic elements there may be various sizes– but additional pieces of glass or porcelain should have similar dimensions. Similarly, it is advisable to transition from one color to another smoothly, or evenly alternating the tiled rainbow. The desire to test yourself in the role of an abstract artist will most likely lead to a clumsy and incomprehensible pattern - you will have to explain to each guest that this is a mosaic, and not a test for color sensitivity.
In addition, the combined use of factory-made and home-made mosaic elements is quite acceptable. For example, a do-it-yourself mosaic made of broken tiles for inserts on the facade of a house can be refined with tiles left over from a bathroom or sauna renovation. They will create a kind of “islands of geometric stability” around which you can lay out a whirlwind of ceramic creativity.
Mosaic from broken tiles - do it yourself, carefully and slowly
Laying mosaics does not tolerate chaos and is carried out in a planned manner; its typical stages are as follows:
How to make a mosaic from broken tiles with your own hands - step-by-step diagram
Step 1: Sketching
A sketch is needed for any mosaic cladding, with the exception of a thin panel strip between two rows of tiles. The sketch should take into account the size and color of the main mosaic elements. It can be done with colored pencils (markers) to scale. Drawing a picture on paper is many times easier than thinking about design moves with a solution in your hands. Consider the color and size of the existing elements, think about color transitions and porcelain or glass inserts - any impromptu construction is best achieved with precise planning...
Step 2: Working with the material
If there are not enough broken tiles for the cladding, you can use whole ones after breaking them first. Ceramics can be easily split with a sharp chisel and a short blow with a hammer - we don’t need jeweler’s precision, and it won’t be difficult to maintain an approximate size match. Ceramic tiles are well suited preliminary alignment– using an abrasive stone or sandpaper. Rounded corners and smooth surfaces will favorably emphasize the repair plan; you should not use only sharp edges and jagged edges.
Abrasive and sanding preparation will increase the labor intensity of our mosaic project - but the attractive appearance of the tiled surface and its reflection in admiring glances are worth the effort.
Step 3: Surface Preparation
The base for the mosaic should not have large irregularities and at the same time be rough - if the installation is carried out using standard cement mortar. This method is good for horizontal surfaces of any length - floors, upper sections of borders, bath racks, etc. Vertical and inclined surfaces will have to be laid out on adhesive compounds - therefore, they must be smooth, because The adhesive layer is much thinner than the cement mortar. Universal tile adhesive with the addition of waterproof and frost-resistant (for outdoors) additives will be the best installation solution.
Step 4: Lay out the mosaic beauty
After checking the pictorial sketch, we begin cladding in large fragments. The mosaic pieces are positioned freely relative to each other - significant gaps are then filled with small fragments. It is important to maintain an even laying line using a long and massive metal ruler. How to make a mosaic from tiles with your own hands, if large pieces “disturb the order”, not a single guide can tell you self-repair . Mosaic elements are placed on the glue (mortar) with characteristic vibrating movements, with “twisting”. Then there will be no air gap left under each tile; it will be in complete contact with the base. Rushing during such work will only cause harm - do not be surprised at the low speed of cladding; thoroughness and adherence to the sketch are more important than performance records.
Step 5: Grouting
Grouting mosaic joints is carried out in two stages. First, a liquid mixture is prepared based on the used solution (glue), and all remaining gaps are treated with it. When the primary grout has dried, it is necessary to treat the seams with decorative grout. These compositions are sold in any hardware store and allow color pigmentation within a wide range. The key to the durability of secondary (decorative) grout is the shallow depth of the installation layer, which requires two-stage processing of mosaic seams.
Increase in price building materials leads to the inquisitive Russian mind looking for ways to save on repairs and decoration, using relatively cheap materials and turning the home into a real palace. Mosaic made from broken tiles is one of the wonderful and at the same time economical ways to decorate the interior.
Where can I get materials?
The first thing that comes to mind is purchasing and then dismembering an entire tile in the backyard of your house. However, this is not at all necessary. Often, building materials stores throw away broken tiles and, when someone wants to take them, they give them away for a small price, or even for free. Of course the most economical option is old tiles, remaining after repair. Even the smallest pieces of it can do a good job, so don’t rush to get rid of them.
You can make broken tiles yourself, or you can get them at your nearest building materials store.
Saving in this case is not synonymous with poverty or consumer goods. It is in this situation that masterpieces are most often born.
Preparation for the process
Of course, the quality of your work depends on how far in advance you have thought through your composition. If you are a person who is able to recreate and retain in your head the image of a future creation down to the last detail, then you will significantly save your time. However, if you are not confident in your abilities, then the best option will draw a sketch to scale corresponding to the panel on the wall. This sketch will become a work plan according to which you can gradually create your drawing.
For those who are confident, a good challenge would be to create a specific image in the form of a pattern or ornament using mosaics. Those who prefer not to bother about this can resort to abstraction. Nevertheless, it is easier to lay out multi-colored pieces of tiles in an abstract pattern than in some invented image.
Preparing the wall
The wall must be ready for gluing the mosaic, that is, it must be smooth without cracks or potholes. If it is covered with wallpaper, the easiest way to remove it is by moving it from bottom to top, prying it up with a spatula or the tip of a knife. Wallpaper residues are wetted and can be easily removed afterwards. Chips and uneven surfaces are filled with putty to achieve the best smooth surface.
Puttying the wall is a must to make it absolutely smooth
A drawing is applied to the surface of the wall. As a rule, this drawing is quite large, and it is quite difficult for an inexperienced person to cope with transferring it to the wall. To make your life easier, use a scale grid, with which you can create a drawing of almost any size. One more good solution the position can become a projector.
The temperature in the room when working with tiles should be between +5 and +30 degrees.
Tile mortar
A solution for working with ceramic tiles is very easy to find. The whole question is what color will it be? Typically a white solution is used to keep the design clean.. But when using, in addition to the ceramic components of glass, you can also buy a transparent solution. It is more expensive, but the result is worth it.
There is no need to rush in this matter; accuracy is the key to success.
The solution is applied to the wall using a spatula. It is applied in an even layer and not immediately to the entire surface. This work is being done in sections. They smeared the area and laid pieces of tiles. It is easiest for those who are creating a specific image to divide the work into stages. We decided to first make an element of one color - we did it, then we move on to another section of a different color.
Execution of the drawing
There are rules for laying out a picture that you should follow if you want to create a neat and complete image:
- The work begins in the center of the composition, and then from this center the work is carried out in all directions. Thanks to this approach, the work turns out smooth and proportional;
- If you are working on a complex drawing in which there are people, plants or animals, first work on them, and then the river, the sun, etc.;
- The background is laid out last.
You can choose any pattern or image - the complexity depends on your skills and capabilities
Completion of work (video)
After the creation of the drawing is completed, you just have to leave the wall alone for a day so that everything dries thoroughly. You can then use a damp cloth to remove any remaining adhesive from the tiles, leaving them clean and sparkling.
Mosaic grout is the next thing that should be in your hands. It’s easy to get, but you need to use it in sections. After 15-20 minutes, when it darkens, all that remains is to remove the excess using the same damp cloth.
Mosaic care
Mosaic is quite unpretentious in terms of care and does not require special care. However, there are rules here too:
- It is forbidden to wipe the mosaic with substances containing phosphorus, as well as wax or oil products;
- Abrasive products should be excluded from the list of cleaning products;
- For cleaning, use neutral products with a minimal amount of acid, and after use, rinse the surface thoroughly with running water.
Using mosaic tiles on a countertop
Now that we have learned the technique of working with mosaics and how to transfer a design from a sketch to work surface, let's ask ourselves a question - why not emphasize the beauty of our wall with some piece of furniture covered with mosaics?
The answer is simple - it’s very possible, and the best thing for this purpose is a tabletop as a flat horizontal plane on which you can create another masterpiece.
Mosaic on the tabletop is a great opportunity to give the table a second life
It is logical that before starting work, the surface of the countertop should be freed from varnish and paint, which can be easily done with the help of a special solvent. Now sandpaper (two or three) will be used, and after rough processing, sanding will be done with one or zero.
All this is necessary to ensure the best adhesion of the mosaic to the tabletop; if cleaning is not done, the mosaic will easily lag behind the table surface.
The drawing is again invented by you personally to your taste. For those who again prefer simplicity and efficiency, we recommend using a circular pattern.
How to cut a mosaic?
It happens that you have too large parts of a tile or an entire tile in your hands, but you need much smaller parts. And this is where a glass cutter comes to the rescue. It can process tiles just as easily as glass, and in the future you will only have to use a tile cutter to bring it to the desired geometry if you wish.
Let us immediately make a reservation that most of the mosaic particles will probably turn out uneven. There is no need to be afraid of this - such mosaics will only add beauty to your drawing.
Glue and grout the tiles
To glue the tile pieces to the countertop, you will need latex adhesive. And this is where the fun begins, because the process of gluing a tabletop is the opposite of the process of gluing a wall.
- Pasting is done from the edges of the table with gradual advancement to the center, and not vice versa;
- Place the mosaic elements close to each other - the result should be a flat and smooth surface;
- You will have to apply glue not to the table, but to the mosaic particles, each separately. The work is of course more painstaking and takes more time, but it is worth it. Each particle is strongly pressed against the table surface;
- Excess glue is removed immediately after gluing the tiles.
It is best to grout mosaics using white mortar - it is the best as a background color
Once the drawing is laid out, let it dry for a day. And here we already remember what we did on the wall. After a day of drying, we take the grout in our hands and carefully rub all the seams with it. After the grout has dried, remove any excess with a soft spatula and wipe the surface with a cloth.
Do not rush to help the grout dry faster - the longer it dries, the stronger the composition will hold. If your work takes place during the summer heat in a dry room, cover the table damp cloth to lower the drying temperature.
Mosaic polishing
Polishing helps the mosaic look much better and brighter. To begin with, remove some of the grout that has had time to dry with fine sandpaper. Then we take a lint-free cloth, apply a small amount of furniture wax to it and carefully go over the entire tabletop. After this, you can rub your hands together with satisfaction and admit that the work is finished.
Laying out a mosaic design using ceramic tiles is a truly creative process that can be fun. In addition, it is not limited only to the surface of the walls or countertops, and the mosaic itself is not limited only to ceramic tiles. Everything is limited only by your imagination, which is capable of creating unimaginable works of art.
Photo gallery of mosaics on walls and countertops
 beautiful flower from mosaic in the bathroom
  Simple and concise geometry
  Curvilinear mosaic pattern
  Stunning mosaic panel
  Original table with complex mosaic design