We are building a plywood boat from seven parts.

A small article about the Jack Sprat, (), attracted the attention of our team of yachtsmen. I really liked the boat for its compactness (2.3x1.3 m), fairly large capacity - in the photograph there were four adults and two children in it, and simplicity of manufacturing technology.
We took as a basis those given in the article overall dimensions tuzik and within a week they made a similar plywood boat.
The boat was built using sheets of ordinary construction plywood 4 mm thick, glued together (a miter joint was used) to a length of 2400 mm. From these, in accordance with the sketches provided, sheathing blanks were cut out.
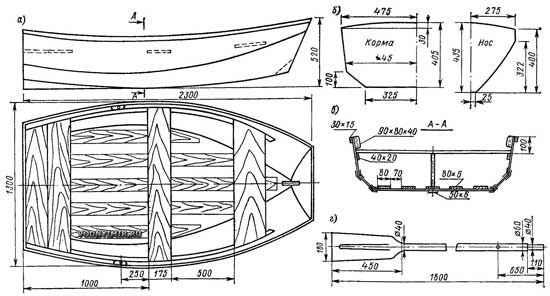
General view of the boat (a), cutting of the transoms (b), section along the midship frame (c) and sketch of the oar (d)
Cut out the outer sheathing sheets.

enlarge, 1303x993, 120 KB
The body assembly looked like this. Having laid the bottom blank on the floor and the corresponding edges to it - the blanks of the zygomatic girdles, we connected them together. First, the blanks are connected approximately in the middle of the length of the boat using paper clips copper wire with a diameter of 1.5 mm. Then, gradually bringing the edges together, the same clips are sequentially placed in the bow and stern along the entire length of the cheekbone. At the extremities, the shape of the hull is determined by the bow and stern transoms.
Holes with a diameter of 2 mm for paper clips must be drilled in advance in increments of 100-120 mm along a line knocked out at a distance of 8-10 mm from the edge of the workpiece processed to a clean size. It is better to twist the ends of the wire from the outside of the body, as shown in the sketch.
The sequence of making connections along the grooves of the casing:
a - placing wire clips and crimping them; b - the groove is ready for laying internal fiberglass tapes; c - diagram of the arrangement of tapes in the connection

In the same way, the side blanks were attached to the zygomatic belts of the skin. Staples were also used to connect the skin to the transoms.
Then all connections were glued from the inside in two or three layers with fiberglass tapes. After the epoxy resin had cured and the ends of the staples had been removed, the same strips of fiberglass were applied to the grooves on the outside of the housing. When the transverse cans and bow book (120X120) were inserted, and the fenders were glued along the upper edges of the sides, the hull acquired the necessary rigidity. The bottom was reinforced with thin pine strips glued to the plywood from the inside.
As it turned out, for the convenience of assembling the body using this method, it is best to use plywood of the same thickness everywhere, as provided by Jack Holt, the author of the tuzik. To increase the moisture resistance and durability of the plywood body, we pasted it on the outside with two layers of thin fiberglass on epoxy resin. A “false keel” with a section of 50x6 was glued to the bottom. A small fin was installed in the stern to increase stability on course. Styrofoam blocks were secured under the cans. The total weight of the boat turned out to be 35 kg.
Four years of operation of the boat as an onboard tug on the yacht “Vityaz” confirmed its high performance qualities. It was also used quite successfully under the Salyut engine.
We think that by slightly reducing the side height, and, consequently, reducing the weight (this will be especially noticeable if waterproof plywood is used), a boat of this type can also be recommended to motorists for transportation on the top trunk of a minicar.
A.K. Kartsev, “Boats and yachts”, 1979, No. 01(077).
======================================================================
Sail on the Chizhik.

A mast with a sail installed on a regular rowing boat does not yet turn it into a real sailboat. In addition to the sail and spar with rigging, allowing you to set the sail and control it, you need a rudder with an increased area of the feather and, of course, a centerboard or centerboards that keep the boat from excessive lateral drift (drift) during lateral and, especially, courses steep to the wind - at an angle of up to 40-50° towards the wind.
The placement of the crew, and therefore the arrangement of the cans, on a sailing boat is always different from that on a rowing or motor boat: the crew must tilt the boat, counteracting the heeling pressure of the wind, and for this people need to be placed along the side. In addition, the dimensions and shape of the boat's hull must correspond to sailing conditions, i.e., be designed for movement at a relatively low speed.
"Chizhik" (see "KYa" No. 24) was designed as a rowing boat with the possibility of using low-power outboard motor: Naturally, the design of the boat was designed specifically for these use cases. So, on the “Chizhik” a longitudinal middle bank for the rower was arranged; thanks to this, it is possible to give the boat an optimal trim depending on the number of passengers, there is free space for passage along the boat, and on the sides of this can you can sleep on the fir trees. However, this same can is not at all needed on the “Chizhik” - a dinghy.
Basic data of the Chizhik boat
Maximum length 3.47m
Maximum width 1.47m
Side height 0.5m
Load capacity 300kg
Power up to 5 PM, l. With.
To transform the “Chizhik” into a sailing boat, corresponding changes in the design of its hull are necessary, so readers of the collection interested in this issue are offered two options:
Option 1 - most fully takes into account the sailing requirements - rowing boat, but provides for significant changes to the original project. This option is best implemented by those who are just planning to build “Chizhik”;
Option 2 is a compromise solution that involves a minimum of changes to a finished boat, built according to the original drawings.
In option 1, equipment is required for a centerboard well, a transverse and two side cans in the cockpit, and fastening of removable parts - the mast and rudder. The hull of the boat is built according to the original design, but the side stringer is brought to the shank. 1. Instead of a longitudinal can, a centerboard well is installed, which is a narrow box, open only at the bottom, secured with screws and glue above the slot for the centerboard in the keel. The well is secured by a transverse can, resting on the side stringer.
The walls of the well and the flooring of the can are cut from waterproof plywood 6 mm thick. The final assembly of the well is carried out after attaching the vertical posts to the spline from the inside. 2. On the Chizhik, it is the well that is closed at the top that is convenient - through the open well (involuntarily it would have to be made low), with any significant waves, water would begin to splash into the boat.


Alyosha" is the first dinghy based on the Chizhik, built in Gus-Khrustalny by V. Zhirnov.
The hull is manufactured exactly according to the drawings given in No. 24 “KYA”. A rigid canister is placed across the hull, securing the centerboard well. The stern fin is made higher, up to 120 mm, on the transom. The dinghy is armed with a sloop with a sail area of about 6 m2. Full Height mast, fastened with a forestay (st. rope diameter 3) and shrouds with screw turnbuckles, - about 8 m from the steps. The mast and boom (2.0 m) are glued together from pine slats and have a sealed groove. The boom-sheet cable strap is hung on the transom. A block with a diameter of 25 mm slides along the shoulder strap; the sheet is passed through a block approximately in the middle of the boom and a foot block attached to the bottom.
Due to the tourist purpose of the boat, it is necessary to use a centerboard; simpler fixed - “sticking” centerboards cause hard impacts when colliding with underwater obstacles and are inconvenient, and sometimes even dangerous, when sailing in an unfamiliar area.
The centerboard rotates on an axis, the cheeks of which are attached with screws to the outside of the keel to avoid drilling holes in the lower part of the centerboard well. The centerboard is rotated using a rod made of a metal rod or a thick-walled tube with a diameter of 20 mm, riveted to its rear edge (do not forget to put a plug in the tube!). The rod must be very carefully bent around a circle with a radius of 250 mm (along the axis). At its exit from the centerboard well, a seal made of microporous rubber about 10 mm thick is installed, pressed with a metal pad. The hole in the rubber should be smaller in diameter than the rod. The centerboard is raised and lowered by a pusher made of a 4X30 metal strip, hinged to the rod with an M8 screw. At the aft end of the pusher, it is advisable to install a handle in the form of a wooden ball (the idea of this design was borrowed from an old dinghy).
The leading and trailing edges of the centerboard should be sharpened, and it is advisable to fasten a protective brass strip 1 mm thick along the leading edge. The easiest to use are removable side cans, supported by a side stringer, a thrust block on the bulkhead of the aft locker, and a strip of plywood under the transverse can. They are held in place by rotary fasteners, the same as the floor fasteners. Under the longitudinal banks, foam buoyancy blocks must be securely attached to the boat hull.
The steering wheel consists of a steering block and a lifting feather. The block is assembled using glue and bolts with a diameter of 5-6 mm from three layers of bakelized plywood. The middle part, 12 mm thick, has a sector cutout for the rudder blade. The side cheeks are 8 mm thick. The tiller is attached to the block using a metal clip bent from a sheet. The steering loops are cut out of a square with a wall thickness of at least 4 mm or bent from a strip and attached to the block with screws with a diameter of 6 mm. The pins (from M8 bolts with cut heads) are screwed into the threads of the hinge holes and riveted. The lower pin must be about 20 mm longer than the upper one, otherwise the steering wheel will be difficult to install in place. The parts of the steering loops attached to the transom are also cut out from a square and installed on through MB bolts.
The rudder blade is cut from 12 mm thick bakelized plywood and, just like the daggerboard, is sharpened along the edges and protected by a rudder. The axis of the feather is an M8 bolt, the tightening of which is adjusted so that the raised feather is held by friction against the cheeks of the block. The upper part of the steering wheel blade should be sanded so that it fits freely into the slot of the block. The pen is lowered into the water directly by hand; For this purpose, a lever with a handle is provided on its rear edge. To protect against jumping out of the hinges, the steering wheel is fixed with a flat spring attached above the lower steering loop.
On the transom of the boat on the starboard side, at a distance of 400 mm from the DP, a second pair of steering loops is installed, onto which the rudder is hung when rowing. This is very convenient for the helmsman, since the tiller moves freely under right hand, and does not rest against the back; rudder displacement has virtually no effect on the boat's handling.

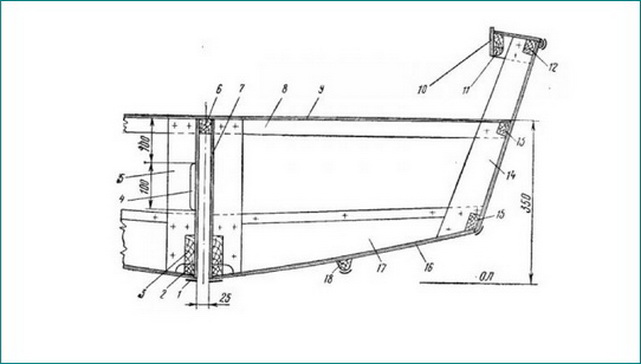
Equipment of "Chizhik" with centerboard and steering gear
1 - frame made from 1X30 strip; 2-rudder feather, buckplywood 6 = 12; 3 - handle for lifting the pen; 4- steering block; 5 - tiller, 40X40; 6 - main sheet; 7 - boom clip, 6 = 2 mm; 8- weft for halyard; 9- clip made of 3X40 strip, fasten to the beam with M 6 through bolts; 10- step pad, 6 = 2 mm with a rectangular hole for the mast spur; 11- seal of hole for rod 12; 12 - rod from a tube 0 20 mm; 13 - centerboard axis - pin 0 12 mm; 14 - centerboard, buckplywood 6 = 12; 15-cheeks of the centerboard axis, 6 = 2.5 mm; 16- well wall; plywood 6=6; 17 - stand (key) of the well 25X60; 18 - gunwale-plug well 25X30; 19 - tiller clip, 6 = 2; 20 - side cheeks of the block, back plywood 6=8; 21 - steering loop; 22- plywood gasket 6 = 6; 23 - centerboard thrust; 24 side bench seats; 25 - rudder position when rowing.
The mast blank is glued out of three or four pine bars of the required length. The mast section above the cockpit coaming and up to about half the height is a circle with a diameter of 70 /l/l. Above this level, the front and side edges are smoothly planed to a section at the top of 40X50, below - to a section at the spur of 30 X 50 ( larger size in both cases along the DP).

Option with swivels
1 - forging 20X2; 2 - keel 25X80; 3 - base of the well 20 X 60; 4 - cutout for the centerboard pusher; 5 - well stand 20X60; 6 - well gunwale 25X30; 7 - from the well, 6 = 6; 8 - stiffening rib of the transverse can 20X30; 9 - can flooring, 6=6; 10 - coaming, plywood 4X50; 11 - carleygs, 20X 25; 12 - fender beam, 18X30; 13 - can support block, 18X30; 14 - toptimbers 6 = 20; 15 - zygomatic stringer, 18X30; 16 - sheathing, 6=4; 17- flortimbers 6 = 20; 18-bottom runner 20X30.

The simplest boom swivel.
1 - boom; 2- M5 screw, 2 pcs; 3 - strip b=6 to embed into the boom; 4.6 - M8 bolts; 5 - washer 8; 7 – bracket, fasten to the mast with two 5X32 screws; 8 – clip b=2.

Option for a boat with fenders.
1-shvertsa forging, X40, brass; 2-shverts, back plywood 6=15/16; 3-weed; 4-bearing; 5-holder made of steel, diameter 3; 6-support bar; 7-longitudinal seat; 8 - transverse bank 6=6; 9-pine lining; 10-check; 11 - bent axle; 12-circlip.
A pulley for the halyard is cut into the top of the mast; The boom swivel and halyard cleat are attached below. Along the trailing edge of the mast, a rail for the mainsail sliders is fastened with screws through a 5X10 rail - a carefully aligned 2X20 metal strip.
The mast spur fits into a step socket 25 mm deep, cut out in the rear part of the stem, and reinforced with a 2 mm thick metal bracket placed on top with a rectangular hole cut through it for the spur to pass through. The finished mast, like all parts of the spar, is coated with colorless varnish (oil or pentaphthalic). There is no standing rigging - shrouds and stays are not needed; The mast, along with the boom and sail, can be easily removed from the boat. If necessary, the mast can be made collapsible. In this case, the upper and lower parts of the mast are connected by a coupling made of metal pipe with a wall thickness of about 2 mm. A 400mm long coupling is attached with screws or through bolts to the top of the mast; to fix correct position connected parts of the mast, in bottom part a screw with a diameter of MB is screwed in, and a slot approximately 20 mm deep is made in the coupling. In the area of the coupling, the rail for the mainsail sliders is fastened with short M4 screws screwed into threaded holes.
It is better to glue a boom with a cross-section of 30 X 60 from two pine bars according to the thickness. Towards the ends, the boom is planed along the lower edge to a height of 40 mm.
When equipped according to the second option, the boat is no longer equipped with a centerboard, but with hinged centerboards. On both sides in the shp area. 2 s inside of the casing, a support block is installed for the transverse can (cut on the frame), and on the outside there is a block to support the hinges. The transverse can is attached to these support bars at the side and to the longitudinal can. Below deck on both sides of the beam shp. 2, cushions for the bearings of the hinges are installed.
The doors are cut from bakelized plywood 15-16 mm thick, their vertical edges are sharpened, and protective shanks are placed on them. The upper part of the screw is placed on an axis made of a steel rod with a diameter of 16 mm, bent at a right angle. In the axle cage, the axle is fixed with a stopper in the form of an MB screw without a head, screwed into the axle and running into the slots of the cage. The screw axis is inserted into the deck bearing and secured in it with a rotary pin. The transverse movements of the axle in the bearing are limited by a piece of tube riveted to it, from which the cage bushing was made. The shverts are raised by weeds, which are laid on the ducks inside the boat.
The design of the mast, boom and rudder is the same as in option 1, but it is recommended to reduce the sail area by 1 m2, taking into account the fact that the centerboard area is smaller than the centerboard, and the possibilities for tilting the boat due to the different arrangement of the cans are somewhat worse.
Making sailing rigs is a rather complex and time-consuming task, but the pleasure of sailing will, without a doubt, more than pay for this work. However, it must be warned that steering a sailboat, even one as small as the Chizhik, requires special training for the helmsman. The best way to learn sailing is at a yacht club.
When learning the art of sailing on your own, you should strictly follow the basic safety rules:
Don't overload the boat; do not take on board people who cannot swim and small children;
When sailing, the crew must always wear life jackets;
Monitor the weather carefully; if there is a danger of a squall, immediately remove the sail and sit down at the oars;
You cannot sail when the wind is stronger than 4 points, and in the beginning, with insufficient experience, no more than 3 points;
Never lay the sheets on the cleat; always keep the halyard bay clean - ready for lowering the sail;
When going out sailing, check if you have forgotten to take the oars;
Until you have gained confidence in your abilities, do not leave the area where you may receive assistance.
immediate assistance in case of capsize.
Who doesn’t know about the property of wood to deform when it dries and gets wet, which brings a lot of problems to both carpenters and joiners? Crooked windows and doors, bubbling floors, peeling wall paneling...
But “the need for invention is cunning”! - the northerners managed to use this defect as an advantage in the manufacture of dugout boats, or aspen boats, as they are also called. From a solid aspen trunk, the inside is first selected and hollowed out to the required thickness of the sides, and then, after finishing and complete drying, hot water is poured into the “steep-sided trough”, the influence of which causes the annual rings-layers to straighten, as it were, expanding the sides...
Nowadays, there are only a few such boats left - they have practically been replaced by more durable metal ones, but previously for residents of coastal villages, these nimble, fast-moving vessels were like lifesavers: whether for fishing, or for haymaking, or for mushrooms and berries.
And since demand creates supply, there were many craftsmen in making dugouts. There are places on the Ustya where, quite recently, almost every village resident knew how to make boats. Upper Bereznik is one of these places.
Alexander Alekseevich Kazakov, who comes from the village of Tarasovskaya (part of this settlement), never made a dugout and did not want to do it on principle, remembering his father, for whom this craft, in his opinion, brought only troubles. Well, I had to not only do this, but also conduct a master class on making boats: with a wealth of theory and complete absence practices.
Adventurer? Not without this. In the early 90s, when agriculture A destructive flurry of reforms swept through, leaving the vast majority of the population out of work; he did not want to give in to difficulties. What I haven’t experienced, what I haven’t tried! Laughs: when White House They took it by storm, I was selling cranberries by the glass in Moscow to make ends meet - they arrested me to find out - what if I was a conspirator? Then they were released to go home.
In general, he was like inventing a homemade tractor, or translating an grandmother’s fairy tale into poetry... He took it and invented a toy that develops children’s thinking. Something like a Rubik's cube. Only he doesn’t have a cube, but a ball – an imitation of the earth, with continents and oceans. If assembled correctly, the ball breaks into two halves, and inside, in the opened niche, there is a prize as a reward. There is enough space to put car keys!.. or candy... He even has a patent for this toy, and in total there are a dozen or two developments!
I was in Moscow in 2002 at the international congress-forum of inventors, talked with different people. The Japanese's eyes became square when he talked about his inventions! It’s a pity that there were no funds for registration and official participation, and I was left without prizes and awards.
So the organizers of the Ustyanskaya Ssypchina, a traditional holiday designed to help revive, preserve and develop folk arts and crafts, turned to Alexander Alekseevich with a request to organize a master class for visiting craftsmen, participants in the Ssypchina. Is it any wonder that when such people get down to business, everything works out for them?!
The process of making a dugout is very long and labor-intensive - it cannot be completed in a month, let alone in the three days allotted for the master class! Therefore, Alexander Alekseevich and his assistant and namesake Vasily Ivanovich made several boat blanks in different phases of readiness. Thanks to this, in three days of the master class it was possible to go through and try out all the stages of work from marking the log to laying out the sides, bypassing the long drying process.
On August 8, 2007, our group of future “shipbuilders” of 7 people arrived in Upper Bereznik.
Alexander Alekseevich's shipyard was located in the auditorium of the rural club, where he worked as a fireman, and on the lawn in front of the club. If it rains, then there will be no talk of any work. Films have not been shown in the club for a long time, people only go to discos, so he managed to convince the management of the need for a roof over their heads - just in case. Although, by the way, we were lucky with the weather - the sun was hot all day...
On the first day, we marked out the log and started cutting it down, choosing the volume. If previously everything, from start to finish, was done manually, with the help of adzes - special axes, then, in addition to them, we were armed with the Shtil-360 chainsaw, which was used wherever possible - the manufacturing process was accelerated significantly, but the main work was still done with adzes... The work is hard and time-consuming,
On the second day we learned how to set up guardhouses. They planed cylindrical sticks, sawed them two and a half centimeters long - the size corresponding required thickness sides. They drilled holes in rows in the cut-out “deck” - the diameter of the thickness of the sticks, at a certain distance from each other, hammered the finished sticks into them, after dipping them in oil paint. They served as guides when completing the work with an adze: a hole with a guard appeared - be careful! Now you can only carefully finish the planing with a scraper and smooth it clean.
In parallel with this, they began to raise the sides of the workpiece previously hollowed out and dried by the Kazakovs. Alexander Alekseevich's boiler was flooded early in the morning, and all we had to do was throw a hose into the future boat to supply hot water. They poured water and quickly began to wipe all the walls with soaked rags. To speed up the process, they installed spacers made of spruce knots, bending them from time to time so that there was no slack.
When the sides parted by half, the branches were removed, replacing them with ready-made frames - elastic ones, placing boards on top of them, and loading bricks onto the boards. Under such pressure, the boat would eventually take the required shape. However, this happened practically without our participation.
This completed the master class. Over time, Kazakov “brought all the preparations to mind”... And in 2010, on the initiative of an employee of the Solovetsky Museum-Reserve, the transition to Solovki was successfully carried out on a dugout made by Alexander Alekseevich.

(photo by A. A. Kazakov)
On Solovki 
(photo by A. A. Kazakov)
» from the presented material you will learn how you can make yourself a “Dolblenka” boat with your own hands. What is it used for? natural material, namely a soft tree, for example willow or aspen. The tree is selected in advance, straight and without branches, and the thickness of the trunk will be responsible for the displacement of the future vessel.
This technology for creating boats is very ancient and was passed down from generation to generation, from Father to Son, today it is almost forgotten, but there are still “Craftsmen - well done” on the Russian Land!
Let's look at what exactly the author will need to build a boat? We’ll also look at all the stages and watch the movie (Cut down your botnik).
Materials
1. softwood (willow, aspen)
Tools
1. chainsaw
2. hacksaw
3. ax
4. adze
5. jointer
6. source of fire (blowtorch)
Master class from Ivan Petrovich Ovchinnikov on building a boat "Dolblenki" with your own hands
And so, the author adopted this technology from his Father, and he in turn from his parent). In ancient times in Rus', the main building material, as you know, was wood, and furniture, dishes, peasant implements, carts, etc. were also made.
Boats and longships, respectively, were also built from wood; entire artels and brigades were created for this purpose. It may seem strange.., but boats began to be made in winter time when the tree is still in a dream. The most suitable tree (aspen) was selected in the forest, cut down and shaped into a boat, after which the workpiece was covered with snow and remained in this position until early spring. During this time, the tree absorbed moisture properly. Why leave the boat in the forest, and even in the snow??? The fact is that for the further process of forming the boat, it is required to dry it over an open fire, place spacers, thereby giving it its final shape (everything is described in detail in the film)
But D. Vanya took a slightly different, easier path, chose a large and thick one (willow) in advance, cut it down to the very root, removed the bark and began to form the boat.
As you can see in the photo, the author first makes a cut, and then cuts it with a hatchet, he does everything professionally with minimum cost labor) The log is turned over by D. Vanya alone, because he is a Russian hero and eats porridge in the morning, and the master also knows the laws of physics and uses a lever (crowbar) and easily twists the workpiece as he wants) Using an ax, he sets the shape.

Then Ivan Petrovich moves on to making the inside of the boat, also using an ax and an adze.

2 partitions were left inside; they will serve as stiffening ribs for the structure of the boat.

This is what actually happens, the botnik is almost ready.

The master skillfully works with an adze, because he adopted this art from his Father.

After the boat has been made. it was processed using blowtorch so that later the wood is not afraid of moisture and serves the owner for a long time.

Our author got such a wonderful boat; now he can sail along the Don and fish. As you can see, it was quite easy for the master to cut down the boat, and the most important thing is that the material is free and given by nature itself.
You can also watch a very good film about the making of "Dugout" boats. ancient technology.
Why is the boat “black”?
Once I became acquainted with Meshchera fishing dugout boats, which are popularly called “black”. However, this name has already come into use even among scientists. And on the map of the cultural and natural heritage of the Shatura district of the Moscow region, certain symbol shows the distribution areas of such dugout boats on the rivers and lakes of the region today.
It is difficult to imagine a fisherman who has not rowed along a river or lake at least once in his life. I'm not even talking about those avid fishermen for whom a boat has become an urgent transportation necessity, and oars and sails have become unique tools of labor. In general, since ancient times, a fisherman on the water was just as inventive and savvy as in the field, forest, or yard. In accordance with the situation and often acting strictly according to his needs, he spent economically building material, knew how to quickly find among the coastal vegetation the element needed for the gear and design of the boat. Often, while traveling in remote lake regions, along the banks of small rivers, I met fishermen sitting in roughly built punts. She could have almost square shape and look like a trough or even a box. One talkative fisherman explained it this way: “I live here on the shore. What do I need? He went down, got some change for his money, and that’s all for you. And no one will attach legs to such a vessel.” In Polesie I met the owner of a boat made of tin, which had willow branches instead of frames. By the way, this is how frames used to be made - “springs”. In the reeds of the Dnieper-Bug estuary I somehow came across a long boat with holes cut out on its sides. As the local talkative Berezhanian explained, a curved rod is inserted into these holes, at the ends of which bicycle wheels with blades are attached. “Spin them to your full health and full speed ahead,” he grinned.
Perhaps the most ancient way of overcoming a water barrier was a raft, the logs of which were connected by a bast or a “tack” - steamed in hot water young tree trunks. By the way, you can find fishermen everywhere who prefer to sit comfortably with all their fishing gear not on shaky shuttles, but on wide rafts. The first ship Eastern Slavs was considered a “korab” - a canoe woven from wicker and lined with bark and skins (“korob” - a basket made of bast or wicker). Some researchers even believe that the word “ship” became known to the world from the Byzantines, who adopted it from the Slavs, changing it to “carabos”.
A more advanced floating means was the “dolbanka” - a single-tree boat, which was hollowed out from the trunk of an aspen, willow (“rebovka”), linden (“lipka”), oak (“oak”). Europeans learned about Slavic dugout boats and single-tree boats from the Greeks. “The Slavs cut down monoxyls everywhere in the winter, and in the spring they lower them into the water...” wrote the Byzantine Emperor Constantine Porphyrogenitus, who traveled along the Dnieper in the 10th century. IN different regions the construction of dugout boats had its own peculiarities. In remote Belarusian villages you can still find dugout canoes - “kamyags”. As a rule, they have a trough-shaped shape. Boards (wings, “floats”) are nailed to the sides at the level of the water surface for stability afloat. Fishermen all over the Dnieper told me about dugout canoes, and I had a chance to see them on the outskirts of Kyiv in the village of Korchevat. A local schoolboy, an avid fisherman and lover of water travel, bought a “dug” in a village near the Desna region. She still serves him well. The boy took me through the yards of local residents. In one garden we found three old “dugs” with rotten sides. There was also an old man who explained the technology for making dugout canoes: “The wood for the dugout canoes was cut down in winter or early spring. The trunk was cut lengthwise into two boats. The stern was located where the trunk was wider. First, an ax and a plane were used to make the “top” - the part that reaches the water. Then they hollowed out the middle with an adze, leaving a “sill” in the stern. To ensure that the thickness of the dovbank along the sides was the same everywhere, pegs were driven into the sides - “beacons” of the same length made of a darker type of wood. Once you reach the “beacon”, stop cutting in this place. Then they poured water into the boat and threw hot stones there to “break” the sides. “Strokes”, oars in our opinion, were made of ash, this type absorbs water the least ... "
I did not at all expect to see dolbanki in a “live” form in the Shatura region, which is part of the famous Meshchera. I even managed to photograph several of these boats in the south of the region, near the bridge over the Yalma River. Here in the lake-swamp region, without a boat is like without hands. The muddy peat banks of local reservoirs do not allow fishermen to get close to the water even in high waders. You cannot catch a fish from a peat pond without labor, which is aimed primarily at taking care of the construction and equipment of the swimming device. The idea of a dugout boat was suggested to the ancient Meshcheryaks (one of the versions of the translation of this word is “people of water”) by the hollow - “side” in the tree trunk where bees settled. Burning out a hollow with fire, expanding it with a stone ax and a bone chisel - this is the technological chain for constructing Meshchera dugouts. Boatmen mainly used poplar, linden and aspen, which, as soft woods, could be worked with a Neolithic stone axe. When bronze and iron appeared, pine was used. The patriot and Meshchera expert K.G. Paustovsky mentioned the local boats - “monoxyl” (i.e., made from solid wood): “They look like Polynesian pies. They are hollowed out from one piece of wood. Only on the bow and stern they are riveted with forged nails with large heads...”
With the help of bronze tools it was already possible to split wood along the fibers and create a boat more complex design. It was still a dugout, but already a boat-plane. The most simple design such a boat consists of five parts: an almost flat bottom, two side boards, hollowed along the entire length in the form of a gutter, and two ends. There is no bow and stern, and the ends are either two boards nailed at an angle, or more complex ones - pointed “cocors”. Straight slotted side boards are resistant to bending and allow you to do without additional fastenings. Today they are nailed together with iron nails and staples, but in the old days they were “stitched” together with a flexible juniper root - vitsa.
There is no need to turn such a boat around in narrow erik channels - it moves back and forth well. She has a very low landing - she is not afraid of shallows and snags on the river bottom, which are found in abundance on local lakes and rivers. And carpentry work was carried out using an adze axe, which has been preserved in many villages to this day. The tool is still used by carpenters, sometimes even used as a hoe when cultivating the soil. And finally: why is the boat “black”? There is nothing sinister in the name. Well, firstly, after burning out the core it became black, and the faces of the boatmen became dark from soot and soot. Secondly, before launching boats, they were often covered with resin to hide grooves, joints, and cracks. You can't imagine a more menial job. Well, the color of the water in the peat lake. Complete blackness. By the way, it was there that the dead Meshcheryaks were often sent. Especially those who spent their entire lives on the water. The deceased was placed in a boat, rolled into the river and set on fire. The flaming ark floated through the dark waters until the bottom burned out and the body plunged into the darkness of the kingdom of eternity...