Siberian cedar - coniferous decorative tree, which has healing and tasty fruits. Many people are probably interested in how to grow cedar from a nut. Some gardeners have gone through this experience. All attempts were successful. Their advice on how to properly grow Siberian cedar from a nut helped many beginners. In order to grow a coniferous tree at home, you need to know a lot: where the nut is planted, what kind of soil it needs, as well as the conditions of its maintenance. There are two methods for growing cedar at home: using cedar seedlings and nuts. Grown cedar seedlings are very expensive, so the method of growing using nuts has an advantage.
Considering that cedar is not a common gardening plant, growing it from a nut at home will be a labor-intensive and troublesome process. Caring for it involves not only regular watering and proper planting.
Preparing seeds for planting
 In order to properly grow cedar from a nut at home, you need to:
- Choose quality planting material. Cedar seeds must be undamaged. Any mold and bad smell, which the nuts emit, indicate the unhealthy state of such planting material. Seed germination lasts for 3-4 years. Proper care behind them can extend germination up to 10 years. But still, it is better to use fresher nuts for planting.
- It is very important to treat the seeds before planting. This will prevent them from becoming infected with fungus. Nuts are dipped in a 0.5% solution of potassium permanganate (weak pink color) for a couple of hours. Seed germination and preparation process Siberian cedar quite long. Don't expect a miracle - the instant growth of young seedlings. To grow cedar from a nut at home, it will take 5-8 months. Only after this the first shoots will appear.
Stratification of cedar seeds
 Before planting, the seeds are prepared. First, they are soaked in warm water for 3 days. The water needs to be changed every day. Next, you need to mix the planting material with moistened sand. The mixture is placed in boxes with holes to ensure the supply of oxygen. You can also wrap nuts and sand in a cloth. Seeds must be kept in a cool place. They are usually placed in the refrigerator. The temperature of the material for planting should be no higher than 4-5 degrees.
Seeds with sand must be constantly moistened to the same state in which they were placed in the refrigerator.
It often happens that mold appears on nuts. In this case, the sand is replaced and the infected nuts are removed.
Sowing in the ground
 After they germinate, after 5-7 months they are thoroughly washed and sown in pots. Best time for this - mid-spring. For cedar seeds, it is recommended to use sandy loam soil. The nuts are planted to a depth of 1 cm. Pots with planted seeds should be kept at a temperature of 20-22 degrees. After 1.5 months, the seedlings should germinate. They are placed in a well-lit place so that sun rays didn't hit them.
If you sow unprepared seeds directly into the ground in the spring, they will sprout only after a year, and the germination rate is only 10-15%. Sowing in the beds in the fall must be done before the ground freezes, otherwise the nuts will attract rodents with their smell, and they will literally “dig up” all the plantings. When sowing in the ground, the ground should be covered with leaves up to 5 cm thick.
Important! The emerging seedlings also need to be protected, first of all, from birds. The fact is that the sprout appears with a nut on the top, and until it falls, it attracts the attention of birds, who peck it right with the sprout.
Therefore, for at least a month, crops must be covered with netting, shields made of willow twigs, or any light covering material (spunboard).
Caring for young trees
 In summer, it is necessary to adapt young plants to air and sun. To do this, they are taken out into the garden. After this, they can be gradually planted in light, loose and nutritious soil. Young cedars successfully tolerate the transplantation procedure. They can be planted close to each other. The cedars will undergo the next transplantation at the age of three. This procedure is recommended to be carried out in the spring. Older plants are replanted very rarely. Such frequent procedures can lead to drying of the roots. As a result of this, cedars may not take root at all.
If, however, replanting an adult plant is necessary, then you first need to create a root ball. Before transplanting, about a year in advance, a cut with a diameter of 1 m is made around the tree. Only horizontal roots are cut. deep root system are not affected. It is preferable to replant trees early spring, since during autumn transplantation only half of the seedlings take root.
Because mature tree grows to almost 40 m in height, then for its full growth it is necessary to allocate an area of about 7 m in diameter.
Only in this case can you wait for fruiting.
 Trees that have reached one year of age require shade. The best place planting young plants will be a shaded area in the depths of the garden. Seedlings can also be shaded using covering or other material. As for watering, cedar is a moisture-loving plant, but excessive excess moisture can lead to its death. Therefore, competent care is important here. Grown seedlings also require proper care. First of all, it is necessary to mulch the soil around the plants. The tree trunk circle must be mulched. For this you can use sawdust, fallen pine needles and leaves.
That's all the secrets on how to grow cedar from a nut at home. Caring for a cedar tree near your home after planting is not much of a problem. Trees need to be watered only when the soil dries out. Cedar responds positively to fertilizing. Nitrogen-potassium-phosphorus fertilizers are best suited for this. Many experienced gardeners lay stones around the cedar trunk. Over time, a fungal growth forms under them, which has a beneficial effect on the growth and development of the tree. To learn how to grow cedar from a nut at home, you can watch the educational video material.
When can you get your first harvest of pine nuts?
 Cedar grows quite quickly - annual growth is up to 0.5 m. natural environment, in the taiga, cedars enter reproductive age no earlier than 40-50 years (due to the lack of sufficient lighting in the first tens of years of life), and cones with nuts are formed only once every 6-8 years. If cedar is grown in the garden or near the house and provided with adequate conditions, then you can get the first fruiting in about twenty years, and it will bear fruit every 3-4 years. Maximum fruiting occurs at 70-100 years, and from one tree you can get 15-20 kg of nuts, which under cultivated conditions are much larger than those of wild species.
Growing pine nuts is quite an interesting activity, which, with the right approach, will bear fruit. After all, here you get sprouts with an intact root system, and this is very important, because buying ready-made seedlings is not cheap. But the process itself must occur according to the rules, since there are certain conditions for how to germinate pine nuts, which should not be neglected - otherwise, there will be no result.
So, how to germinate pine nuts? The following points must be adhered to:
- When it comes to choosing nuts for planting, fruits that you collect yourself rather than purchased are best suited. This way, you will be sure that they have not been in the warehouse of suppliers for a long time, who may neglect the mandatory storage conditions. Therefore, when collecting nuts for planting yourself, you will certainly be confident of success.
- Seeds pine nuts cannot be separated from the shell. This most important rule, otherwise then they will not “lose their temper” and will not germinate.
- The seeds must be fully ripe, so collection should be done in November. If the harvesting process is carried out earlier or later, then there is unlikely to be a harvest, or rather, there will be a low probability that the plant will grow.
- Pick the cones themselves from the tree, as there may be empty or rotten fruits lying on the ground. It is important to clean around the bush; cedar loves cleanliness.
- In order for the pine cones to open on their own, dry them well. This can be done by growing them under proper conditions. Under no circumstances should the ground freeze.
- It is impossible to separate the pine nut kernel from the shell before planting for maximum proximity to natural conditions that are natural.
- A young tree should be planted before it is three years old, otherwise it will not take root and will rot. Then you just have to throw it away.
- If you lay pine needles and shells around a planted tree, you get mulching that is close to natural conditions. You can also plant tomatoes nearby.
- The cedar pine tree does not bear fruit right away, be patient. It will take more than ten years to wait, but the wait will be worth it.
Planting processes
The initial planting process or how to grow cedar from nut involves soaking the fruit. To do this correctly, it should be in a specially prepared in advance, the so-called potassium permanganate solution, for 120 minutes, and no more. The sand for planting must be thoroughly calcined (this should be done in advance) in the oven in order to kill all harmful organisms located there, as they can cause rotting. After planting the pine nut, water it generously and place it in the refrigerator.
So, you bring the home planting process closer to natural conditions. These are the conditions when the nut lies under the snow for months, and in the spring the first shoots appear. And how to germinate pine nuts at home, this is, first of all, the correct artificial conditions created by yourself.
But it’s also not worth completely forgetting about our nut during this period of time. Next, it is necessary to water the planted nuts from time to time, preferably with melted snow.
How and when - what to do
After three months, we take out our pot with the fruit and move it to sunny side, on the windowsill. We are waiting for the first shoots to appear. In two weeks, you will be able to see young shoots.
In the summer, the sprouts can be taken out into the garden for a while, so that they gradually get used to natural conditions. At first, young cedar needs care more than ever. Although it needs sunlight, it is not advisable to leave it in direct sunlight.
Regarding temperature regime, then it is sufficiently adapted to any conditions. Everyone knows where pine nuts grow and how changeable the climate is in Siberia.
But as for the humidity level, this condition must be strictly observed. Both excess and lack of moisture are equally detrimental to a young sprout.

So, among useful tips The following can be noted:
What is important to know?
To get results, you should be patient, especially since the process of caring for the tree itself is not that complicated. The main thing is to water the plant on time, clean up around it, monitor the soil, add certain useful additives to it (just note right away that such additives should not contain chemicals; pine trees do not like them).
But in a few years, a personally planted tree will delight not only you, but also your loved ones with its first fruits! And your descendants will thank you more than once for such work!
How to germinate pine nuts: Video
Let's work for Mother Nature and grow the famous Siberian tree on our site! The task is difficult, but doable. May inspiration never leave us and may our strength never run out!
If we want to grow cedar from seeds...
Buying seedlings for growing will cost more, and they may not take root. Therefore, it is better to try to grow cedar from seeds yourself. It is necessary to seriously approach the issue of choosing planting material. The seeds should not have any foreign odor. If the material is covered in mold in places, it is also not suitable for germination. However, when proper storage the seeds may remain suitable for several years.
For breeding, select the largest nuts. They are preliminarily subjected to the following procedures:
- soak;
- disinfection;
- stratification.
To prepare the seeds, they are soaked in warm water for 3 days. Moreover, the water is replaced with fresh water every day. Nuts gain moisture. To prevent seedlings from becoming infected with fungus, cedar seeds are treated with a 0.5% solution of potassium permanganate for 2 hours.

Then the nuts must be mixed with sand. The mixture must be moistened and placed in a bag made of natural fabric. They should be stored in the refrigerator at a temperature of about +3ºС. This is called seed stratification, that is, treating them with cold. Prepare for storage wooden box, make holes in it on the sides to ventilate the mixture. Place a bag of seeds in the box. The preparation is kept in the cold from autumn to spring.
During this time, it must be checked and moistened when drying. If moldy seeds appear, they need to be removed and the sand around them replaced. There is a gradual softening of the shells. And some even begin to sprout white roots.
How to plant cedar
After the required period, the seeds are removed and washed well. Then the nuts, ready for germination, are planted in pots filled with soil and sand. Sharp end each seed should be pointing downwards. The planting depth is 1 cm. In this state, the planting is kept for 1 month in the shade. It is necessary to grow seedlings when room temperature.
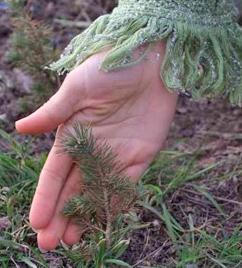
A month later, germination begins, and the pots are placed closer to the light, while avoiding direct sunlight. Roots emerge from the nuts and go deeper. A green sprout grows above the roots, in the upper part of which there is still an open shell. After a few days it subsides. At the top of the shoot, a bunch of green needles opens up like an umbrella. Typically, about 30% of all seeds germinate. This is considered a normal result.

When summer comes, the seedlings are taken out to fresh air. And for the winter it is better to hide it in a greenhouse. There you need to water it and feed it with fertilizer every six months.
As the shoots grow, they have to be transplanted into containers large sizes. Young seedlings do not need to be replanted until 3-4 years. By this time they reach a height of 25-30 cm.
Now they can be planted on open area into loose soil enriched with fertilizer. Do it better in spring. First, the seedlings are taken out into the air in pots, and after getting used to the new conditions, they can be planted in the ground.
Before planting a cedar in the ground, you need to prepare:
- suitable place;
- soil;
- seedlings correctly removed from pots.
Trees can be planted in an area where groundwater do not rise above 3 m. When planting shoots, it is important to maintain the integrity of all roots and capture them along with the ground.
Peat with soil and sand is used as planting soil. After the tree is planted, it must be watered so that the soil density becomes uniform. It is recommended to mulch the top with sawdust or crushed pine needles.
Growing cedar in open ground
There is another way to grow cedar from a nut. Without a greenhouse stage, grains can be sown immediately in open ground. It will be necessary to carry out systematic watering and weeding. You will also have to make sure that the crops are not attacked by mice or birds. If the seedlings are preserved, they will grow and develop in the same way as in the greenhouse.
Many gardeners use ready-made special soil for coniferous plantations. It is necessary to add minerals and organic fertilizers.

In the coniferous forest, litter is taken from under the trees and the planting areas are enriched with it. The litter protects the soil from loss of moisture, which is dangerous for coniferous plants. If even part of the roots dries out, the entire tree may die.
When planting, a distance of at least 3 m must be left between cedars. The surrounding neighboring trees should also not interfere with the growing cedars. It is known that cedar trees grown in a spacious place can begin to be enjoyed much earlier than those planted in the shade, next to others. And after 18-20 years, cones form on them. In some trees, fruiting age can be delayed up to 40 years.
For 1 year, the sprouts should be in a shaded area of the garden. The soil should be moist. In hot weather, you can periodically spray the pine needles to give them freshness.
If you have to transplant a plant that has reached a height of 1 m to a new place, this can only be done in the spring. At the same time, it is moved with a large volume of earth. There should be about 0.5 m around the tree. For adult seedlings, mulch is done from grass, weeds or fallen pine needles. We must remember that excess moisture is harmful to cedar, just like drought.
Growing requires a lot of patience. Growth is slow. So, after 1.5 years the plants are several centimeters tall. Despite the fact that cedar takes a long time to grow, it will delight others with its beauty.
Then you can try to grow a wonderful tree from seeds. With a little effort you can get a wonderful seedling. Our article will tell you in detail about how to plant cedar from a nut. Follow all the recommendations, and the result will definitely come.
First option
There are several different ways how to grow cedar from a nut. In any case, seed stratification is required - this means that they need to be kept at low temperatures for several months. If you are going to grow cedar from a nut at home, then you need to imitate natural conditions in which this tree grows. If you received the seeds at the end of summer or early autumn, then you should simply plant them in loose soil - then you will receive seedlings next spring. Of course, only if the planting material is of high quality.
How to grow cedar from a nut? Second option
This method is reminiscent of forcing bulbous tulips).

First you need to prepare the land (or buy ready-made one). Ideally, it should be a mixture of sawdust and sand. Place the seeds in the prepared soil, moisten it a little with a spray bottle and place it in the refrigerator (on the bottom shelf), where the seeds should remain for at least three months. As the soil dries, you need to moisten it a little, but not much. After three months, the seeds are removed from the refrigerator (it is better if this happens in the spring) and treated with a non-concentrated solution of potassium permanganate. They must spend two days in the solution. follows in a prepared mixture of sand and sawdust.
How to grow cedar from a nut? Accelerated method
If you cannot spend three months, then you can apply the accelerated stratification method.
But in this case it is necessary to strictly observe step by step instructions, only then can you count on results. The quality of the seeds is also very important - they must be clean and ripe pine nuts, with a pleasant smell and without traces of mold or any other suspicious stains. Chew a few from the batch you plan to sow - you should smell the pine aroma and see clean, firm flesh in each nut. Hull the seeds and rinse warm water(you can rub it a little with a soft toothbrush - this will clear them of resin, and it will be easier for moisture from the substrate to get inside the seed). After preparation - the stage of stratification itself. Seeds are placed in cold water. Its temperature should not be higher than zero degrees. They are kept in this state for three or four days. It is necessary to monitor the temperature of the water - it should not get hot, otherwise everything will go down the drain. This can be achieved by periodically adding, for example, ice cubes. Carefully monitor the container in which your nuts are placed for stratification. You will see that some of them will sink to the bottom. This is a very important stage. The fact that the nuts sink to the bottom of the container means that they are suitable for planting. Poor quality ones stay at the top. There will be about half of them. Take out those that have sunk and plant them in the prepared soil mixture (its temperature should be fifteen degrees Celsius). Now you know three ways to grow cedar from a nut.
Today we will talk about how to grow cedars from pine nuts, because... Many people already know what the CEDAR tree is for our Earth, for humans, and in general for the entire Universe.
It is best to plant cedars in the fall - this is natural for them, because... In the cold winter, they need to go through the so-called stratification - this is when the nuts freeze, fall asleep, and in the spring they awaken and sprout.
Cedars do not like waterlogging, but prefer well-drained soils, i.e. those where water does not stagnate. Therefore, if water may stagnate in the place where you are going to plant pine nuts, we recommend sprinkling the bed with sand on top (about 1 cm thick, but then you need to reduce the depth of planting the nuts).
You need to plant nuts to a depth of 1.5-2 cm. It is not necessary to make holes at all - just take a nut and stick it into the ground with your finger, pressing it a little. It is better to plant with the pointed tip down.
If the situation does not allow planting cedars in the fall, then you can plant them in the spring, but to do this, the nuts must lie in the refrigerator or in the cellar all winter to undergo artificial stratification. How we did it: at the beginning of winter, we ordered a lot of pine nuts from Siberia, mixed them with wet sand, put it all in boxes and put it in the refrigerator. There they lay with us until spring, in the spring we planted them in the ground.
The cedars sprout in an unusual and very cute way. First, the root goes down from the nut, and then a sprout begins to hatch from the root, lifting the nut up, i.e. small green sprouts with nuts on top will be visible from the ground. And birds really like it, especially crows. Therefore, in the spring, when the cedars begin to sprout (or even immediately after planting), be sure to cover them with branches, otherwise they will be pecked by their feathered friends.

You need to find it or make it yourself wooden box with a side height of about 25 cm, there must be holes at the bottom for the free passage of water. Sawdust (any kind, but ideally, of course, pine) mixed with pine needles is placed in the box.
Stick in pine nuts at 0.5-1 cm. They can be planted often, at a distance of 1 cm from each other (cedars grow best in this environment, so don’t worry, they will have enough there). We pour peat 1 cm thick on top (you don’t have to do this, but without it you will have to water much more often in the summer).
The box stands outside in winter.
In spring, planting must be protected from birds with something (branches, rigid mosquito netting, etc.).
Cedar trees cannot be replanted in the first year. The transplant is performed at 2-3 years of age. When digging up small cedars using the latter planting method, their roots are not damaged or torn off.
Here's what experienced people advise:
To begin with, cedar seeds need to be saturated with moisture. At the same time, wash the substances that prevent their germination from the nuts. Place pine nuts in a bucket or bowl and pour hot water. Not with boiling water, of course. So that it doesn't burn your hand.
After an hour, when the nuts are a little wet, we’ll wash them a little. Just three of them in the water, among themselves.
Some resin and substances that interfere with germination will pass into the water.
We wash the pine nuts, fill them with warm water again and leave for a couple of hours. Then, wash the nuts and change the water again. Thus, we soak the cedar seeds for about a day. By this time, most of the mature nuts will have sunk to the bottom of the bucket.
Well then, preliminary preparation We made cedar seeds.
Wet, saturated with moisture, cedar seeds are laid out on glass jars. The size of the jar depends on the number of cedar seeds. The jar can be filled halfway with seeds, maximum 2/3. It is best to take a screw-on jar. After wrapping the lid, we make holes in it, using a knife or a nail, to allow air to enter.
Cedar seeds packaged in this way are ready for stratification. Now we just have to find a place for their stratification, with a suitable temperature. I usually stratify the nuts in the cellar. The temperature there stays around 0°C. It can also be in the refrigerator. But the effect will be worse.
When stratifying pine nuts early, you can hide a jar in the garden. The main thing is to cover it with some foliage. Direct sunlight can ruin everything.
In general, stratification occurs at temperatures from +3 to -1. Freezing, even strong, is tolerated well by cedar seeds with gradual thawing.
Don't forget that pine nuts are a favorite treat for mice. Through metal cover they won’t get the nuts... But mice can easily gnaw through the plastic cover. Such lids are definitely not suitable for us.
After 2-3 months of such stratification, pine nuts can already be germinated. Or you can leave them until spring, for sowing in the garden.
Even correctly stratified cedar seeds do not germinate at the same time. And all the seeds will definitely not germinate. For example, from 100 cedar nuts, we are guaranteed to get 20-30 cedars. In principle, not so little.
______________________________

When replanting, you need to take care of the root system, make sure that all the roots go underground and do not bend or break anywhere. It is necessary to replant with a clod of earth in which the cedar was sitting, since it contains friendly microorganisms for the tree and they will increase the chances of survival (the exception is the method with sawdust and pine needles - in this case the roots remain bare, but you can still grab a little sawdust and pine needles into the planting hole).
For drainage and soil improvement, it is very good to add a little sand, sawdust, pine litter or pine nut shells to the hole where the seedling will be transplanted. This is especially recommended for clay soil.
To improve the survival rate of cedar seedlings, it is good to use mulching: mown grass, deciduous or coniferous litter, the same pine nut shells, tree bark or moss brought from the forest are laid on the ground around the trunk. prevents drying out of the soil, prevents abundant grass growth, creates a local microclimate, creates conditions for the development of worm bugs under it and gradually forms material for fertilizer by winter.
You can also feed the seedling with natural immunostimulants: infusion of nettle and horsetail, leave for a week in a barrel, 1:1 water and plants, dilute with water when feeding 1:20. Here they play a role nutrients and just information from herbs.
And one more thing. Very important: For survival and growth, cedars really need mycorrhiza, i.e. mycelium. A mycelium that maintains symbiosis with a tree and increases the area for collecting water and nutrients by 10 times. What you can do:
– you can bring forest litter with ready-made mycorrhiza.
– but it’s better to grow your own mycorrhiza on the spot: multiply mushroom spores and “sow”, or rather, spill them into the soil. To do this, old mushrooms are soaked for a day in warm water, and then the place where the cedars will grow is watered with this infusion, after which this place must be kept constantly moist (but not flooded with water). Mycorrhiza grows from fungal spores.
Boletus, porcini mushrooms, green rows, and milk mushrooms grow under the coniferous trees. Under the birches there are boletus, porcini mushrooms, russula, milk mushrooms.
Once porcini mushroom, milk mushrooms form mycorrhizae with both conifers and deciduous trees, which means that old milk mushrooms and porcini mushrooms collected in birch groves should also be used to form mycorrhiza in places where cedars and other trees are planted coniferous trees.
Spilling the soil with an infusion of mushrooms is not only a help to the trees, but also a mushroom harvest within 2 years. And after 3 years already good harvest. This is how mushrooms are grown))
Cedars love partial shade, so it would be good to plant them near the “nanny” - this can be any bush or tree (any tree except oak and some exotic ones - the cedar will outgrow, so don’t worry about it). They are needed for protection from the sun, as well as wind, and to retain moisture.
But the most important thing when planting cedars and other trees is your thought! If your thought is harmonious, if you plant a tree with pure thoughts: selflessly, for the happiness of the tree itself, the happiness of Mother Earth and future descendants, then firstly, the survival rate of such a tree will increase many times over, and secondly, it will strengthen that thought and the energy with which you planted it. Therefore, try to plant trees, and especially cedars, with good mood, smile and joy, and then there will be more of this on earth!
P.S. And if children plant cedar trees, then this... perhaps, is simply the best thing that can happen today!