In the process of creating a pond on own dacha many questions arise general recommendations can't get by. Let's consider these questions.
How to make a natural pond?
First, let's define what is meant by this phrase:

How to choose a place and what to provide:
- distance from trees and tall bushes. The water should not be clogged with leaves or branches;
- good lighting, direct rays of the sun throughout the daylight hours are unacceptable;
- correctly located in a low area so that rainwater does not spill over the area, but flows into the pond;
- choose a flat area with a slight slope.
What to consider so that the reservoir is “alive” and does not rot:

Making a pond
A properly made pond occupies at least 10th of the site. Deep - it warms up poorly and is simply dangerous, shallow - it blooms. On the forums, summer residents are recommended optimal size reservoir 2.5 - 3 m in diameter, 1.5 deep. The hole is dug manually or using machinery. Next, waterproofing is done.
Ecopond - involves natural waterproofing, called clay castle. Only this natural material contributes to the functioning of a living ecological system. This good way make a pond without film:

How to make a small pond?
There are several simple ways arrangement of miniature reservoirs on the site. 

Since the shape is a wave-like configuration, transitions during burial are taken into account. Special steps are made, one wider than the other. After installation, the voids are filled with earth.
The form is installed slightly above ground level, a layer of sand of approximately 20-30 cm is poured under it, but first markings are made on the ground. Then you can start digging a pit. How to do this can be clearly seen in the pictures below.

How to make a big pond?
- At first mark the contours. For irregular shape A regular rope will do; for a rectangle, square - hammer in pegs and stretch a string between them.
- An excavator is used to dig a pit. You can calculate its dimensions using the formula for calculating the volume of a truncated cone. This can be easily done on a site like fxyz.ru. You just need to insert the numbers into the required line.
- Further - level the walls of the dug bowl and make them flat. Provide terraces around the perimeter of the reservoir. They prevent the soil from crumbling and serve as convenient steps when laying waterproofing. They will be useful in the future when decorating a pond.
Important! Three zones are provided in the pit bowl: deep, 1.8-2.0 meters (below the freezing level of the ground). She is being prepared so that she can successfully winter. Medium – for plants. Small - in summer such places warm up well, fry and living creatures accumulate here, and microflora multiplies.
If you are digging a pond for swimming, you do not need to deepen the bottom, it is made smooth.
Next you need:
- remove stones and driftwood from the bottom;
- prepare waterproofing material.
The Landscape Constructions company recommends first filling the bottom with sand and laying it on top. geotextiles. 
Among the existing options for waterproof coatings, they usually choose butyl rubber film. The main argument is durability. It lasts up to 20 years.
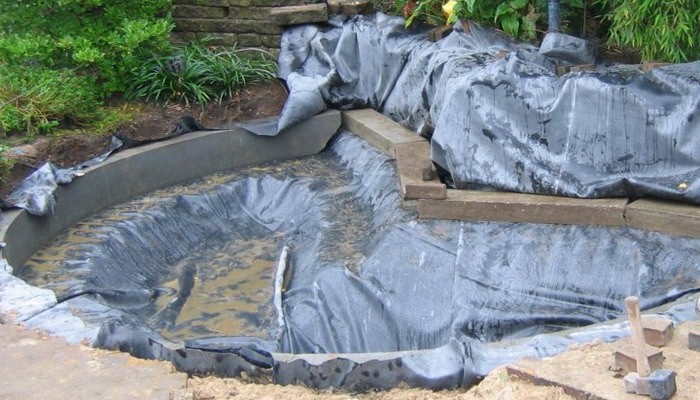
Lay out the film
How else can you waterproof a pond?

For your information! In specialized stores you can buy a ready-made plastic mold for a reservoir of 1000 liters or more.
How to build a dam?
A pit is not necessary for a pond; it is enough to make a dam using a stream or a drainage area where water flows. Running water constantly fills the reservoir. They block it in the narrowest place. First, a ditch is dug, the bottom is lined with rich clay, and compacted. Then a clay wall is erected and buried into the bottom and edges of the ravine. The dam crest is raised one meter above the future water level, and the rapids are made steep. 
Dams are built from natural materials: stone, gravel, logs, sometimes concrete. The base is supposed to be wide so that the structure can withstand water pressure.
When constructing such structures, remember about floods and consider water drainage in extreme situations.
The embankment is filled with a width of half a meter to 4 meters, a height of at least 0.5 m. The dam is filled only after the dam has settled.
Concrete dam. It is reinforced with rods, angle iron, and steel mesh. For concreting, waterproof cement is used, add liquid glass, PVA glue. 
If there is a ravine
A ravine next to an area along the bottom of which a stream flows and overflows during floods can be turned from a potential enemy into a friend and helper. The ravine is blocked from bank to bank by an embankment. Rain, spring, or river water gradually accumulates in front of it, forming a water surface.
We present such a positive experience step by step:
- Dig a bypass channel, temporarily direct a stream into it so that it does not interfere with work.
- Make shields from boards, cover them with film, and top with roofing felt..
- Make gaps in the ravine, insert shields into them, lay out a dam from stones.
- Bottom of the proposed pond fill with clay, compact, lay a layer of sand on top, level. At the end there is a pond line with film, walls with stone.
- In order to keep the water at a certain level, install overflow pipe. Excess water goes further through the diversion channel into the ravine. To avoid siltation, a septic tank is dug just upstream of the natural stream.
Such a water oasis requires virtually no costs, will avert the threat of flooding, and will decorate a vacation spot. 
How to prevent a pond from freezing in winter?
In autumn, especially tender and valuable plants are removed from the pond, and ornamental fish are moved to the aquarium. Pond at low temperatures freezes, it is impossible to counteract nature, but it is possible to make it easier for fish to winter in a reservoir and ensure an influx of oxygen. 
- Reed, cattail placed vertically. Oxygen penetrates into the water through the hollow stems.
- Polystyrene foam, straw bundles on water will slow down freezing.
- Do vent, pouring boiling water over the ice.
- IN severe frosts cover insulation (straw, burlap, roofing felt). You cannot keep such a flooring for a long time, you need natural light. A wooden or foam box is placed above the hole, an incandescent lamp is hung, the hole does not freeze.
Used here floating aerator, however, its effect is effective only at low subzero temperatures. 
Quarry pond
Such bodies of water are called quarry ponds or gravel pits. Usually these are old neglected quarries in which peat or stone was mined. The water in them stagnates, and the fish are mostly small fish. Used for fish breeding when it is possible to ensure a constant flow of water. Specialized farms on quarry ponds produce up to 2 quintals of fish per hectare. Such reservoirs are of interest to entrepreneurs. 
If there is a well
The easiest way to feed a reservoir is from a well. The owner of such a pond shared this scheme, with the help of which a good idea was realized, on a dacha forum. Water circulates and its consumption is small.
- Water from the pond flows to the filter. In this case, it acts as a skimmer.
- Water cleared of debris flows into the waterfall, saturating the reservoir with oxygen. The pump in the well turns on only when there is a need to raise the water level.
- The relay is activated, turns on the pump in the well, water enters the pond, fills it to the required level. Next comes the turn of the filter. All mechanisms come into play one by one. This scheme automatically maintains the water level necessary for the filter and waterfall to operate.
How to make a flowing pond

Bridge as a decoration for a pond
Straight, curved, hanging over the surface of the water - the bridge can be anything. Wood, concrete, stone, metal and their combinations are suitable for structures. Even the smallest bridge will enliven the area, become a continuation of the path, and add an unusual line to the landscape. 
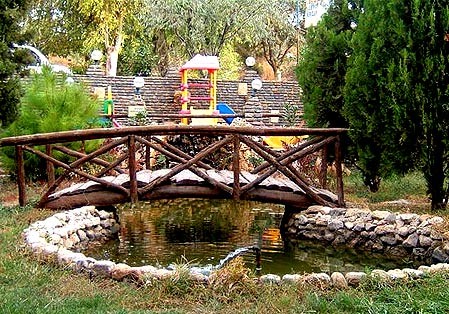
A simple bridge is easy to make:

Pond filter
Alexander Pisanets talks about how to make a filter for a pond in the video below.
Creating an artificial reservoir is absolutely not a difficult process if certain rules are followed. The most critical stage is the choice of the principle of waterproofing. Given the current variety of possibilities, choosing a specific method is sometimes quite difficult to make. Therefore, before giving preference to the option that suits your opinion, carefully read the information below about the advantages, disadvantages and technology of the most popular modern solutions in order to ensure long-term operation reservoir and its stable attractiveness.
In some cases, it is quite acceptable to create a pond without creating reliable waterproofing, but in this case, either its service life will be short, or it will be necessary to use heavy equipment to compact the soil at the bottom. 
The use of one of the technologies for arranging such a layer still brings some advantages that are quite significant:

There are 3 main ways to construct an artificial reservoir:
Important! Select the appropriate technology, taking into account the following criteria:
What materials should be used to waterproof a pond?
If you prefer the first method and decide to make waterproofing for the pond one of available materials suitable type, carefully consider the features of use of each. The most popular types:

Installation of a finished rigid form

Such products are represented on the market quite widely. model range from the following materials:
- plastic;
- fiberglass.
We can safely note this method as the simplest and less labor-intensive than all other options. Plastic forms are especially popular today, and within the framework of private landscape design, and when designing commercial or public areas. 
Advantages
Flaws

Installation technology

All work on arranging waterproofing of a pond in this way will not take much time; if you have the appropriate equipment, it is quite possible to completely complete the project within 1 day.
Sequence of actions:

Video
View an example of how you can quickly create a pond on own plot using a ready-made form.
Arranging a pond using film

One more thing modern solution which gives ample opportunities not only in relation to the initial design of the reservoir, but also to changes in its shape during operation. There are several varieties of this material, the most popular of which are:

Laying technology
The principle of waterproofing a pond with film also does not cause any difficulties when performing work, but it is still necessary to observe a certain sequence and follow the recommendations. 
Algorithm for laying waterproofing film:
- Dig a pit in accordance with the parameters specified in the project.
- Dig a small trench along the perimeter of the coastline to conveniently and securely fasten the film in the future.
- Clear the surface inside the pit of stones and ingrown plant roots.
- Thoroughly compact the soil in the pit.
- Form a sand bed from the wet material.
- Lay geotextiles on top to create additional protection for the waterproofing film.

- To lay the canvas on the bottom of the pond as quickly as possible, do the work using one of the suggested methods:

- At each tier, secure the film with stones to prevent it from shifting.

- Avoid strong tension on the canvas - it is better if there is a small sagging gap left on each tier.

- Level the waterproofing film.
- Secure the surface with stones, leaving a gap of up to 50 cm.

- Pour water into the pond.

Important! Let the water flow with low pressure. If, as the film is filled, tension occurs in some places, loosen it to prevent tearing.
- Leave for a day or two so that the canvas is completely straightened and takes the desired shape.
- Finally secure the waterproofing film in the trench on the surface using small cross-section beams or plastic pipes, tucking the excess fabric under them.
Important! If you want to hide the waterproofing film, drain the water, fill the bottom with sand and fill it again with low pressure.
- Decorate with selected plants and stones.

Video
Watch a video with an example of waterproofing an artificial lake with PVC film.
Waterproofing a pond with clay

Despite the painstaking and time-consuming work involved in waterproofing a pond with clay, this method has not lost its relevance to this day. It is preferred mainly by those owners of their own plots who strive to fulfill everything construction work exclusively from natural materials, but at the same time ensure the strength and reliability of the designed structures. 
Waterproofing technology:

Waterproofing a reservoir with liquid rubber

This method is relatively new, but is becoming increasingly popular among consumers. 
Usage liquid rubber, which is based on bitumen and polymer particles, provides many advantages:

To give you an idea of how easy it is to do the job using this material, here is an example of the standard sequence for waterproofing with liquid rubber:

Video
Watch the video, which clearly shows the process of creating waterproofing with liquid rubber, to independently evaluate all the advantages of such a solution.
Concrete waterproofing

This waterproofing option is one of the most expensive, labor-intensive and time-consuming. Besides this, competent execution A project without certain construction skills is unlikely to succeed. 
Advantages

Flaws

Device technology
The scope of work with this approach varies depending on the size of the project, its complexity and the intended installation location. 
The standard sequence consists of the following steps:

Mechanical waterproofing of a reservoir
To waterproof an artificial reservoir using this principle, you will not need any consumables, but the use of an excavator or other similar equipment is mandatory. 

Important! The effectiveness of this method lies in the fact that when pressure is applied to the soil, small particles fall into the lower layers of the soil, filling the voids. Large parts remain on the surface.
Pond without waterproofing
Creating a reservoir without a waterproofing coating is quite acceptable, for example, in the case of a high location groundwater or clayey terrain. 
The procedure for designing such a reservoir is extremely simple and consists of the following steps:

Conclusion
Regardless of which method you prefer, be sure to use quality materials and follow all the rules of waterproofing technology. In this case, you will not have to regularly carry out restoration work and spend a lot of effort and time on caring for the water surface of the reservoir.
And a pond. Even a small body of water attracts those around you like a magnet. Water is fascinating even in small quantities... Moreover, you can build a pond with your own hands in a few hours. But this is a small artificial reservoir. Building a large one will require both money and time.
Where to dig
Small artificial reservoirs are best viewed from above. Therefore, if there is a corresponding depression on the site, it is best to do it here. There is, however, in this negative side: You will have to raise the edges of the bowl higher to prevent rainwater from getting inside. The second option is to come up with a water drainage system (make a drainage system above the reservoir).
If there is a key somewhere on the site, it is logical to do natural pond, having dug or deepened the existing bowl, lined its borders with cobblestones or stones, planted plants. The stream, which is sure to exist in this case, can also be improved by lining its edges with cobblestones, drowning them in the soggy soil, you will give greater strength to the bank, and you can plant moisture-loving plants between them.
Even a small waterfall is a magical sight. How to dam a pond if there is a natural stream on your site - dig a pit, cover it with stones and direct the stream into it
Not everyone has such a luxury on their property as a stream or a spring. We have to make artificial reservoirs. When properly designed, they look no worse than natural ones.
How to make an artificial pond with a bowl (without film)
The simplest and quick way to make an artificial pond at the dacha - bury the finished bowl in the ground, shaping and decorating its edges. There are plastic bowls - ready-made in different shapes, sizes and colors (mostly blue, green and black).

Construction of a plastic garden or country pond- it’s not a difficult matter. Here are the step-by-step instructions:
- It is necessary to dig a pit in the shape of a bowl. If the shape is very non-standard, you can turn it upside down at the installation site and outline the outline with something (even dig it with a shovel). The bowl is taken to the side and a pit is dug. It should be a little larger in size - a little wider, but not deeper. The edges should either be flush with the ground or protrude slightly. If you can raise the edges a little, it will be even better: when it rains, dirty water will not flow in.
- After the required depth is reached, the bottom is leveled to the horizon: it is first leveled with a shovel, then compacted and the excess is removed with an even bar. The surface must be smooth and hard: the plastic must have good support. If the ground is poorly leveled (clay), you can pour 5-10 cm of sand, wet it and compact it.
- The next stage is installing the bowl in the pit. If the bottom has been made level, the edges of the bowl will be level with the horizon. Now the space that remains between the wall of the bowl and the pit must be filled with soil or sand and compacted well.
- Now it’s time for the design: the installation is complete, you can fill in the water.
How to use this technology to build a pond in the courtyard with lighting, see in this photo report (you can scroll through the photo gallery yourself by clicking on the thumbnails below).
We are digging a pit. We decided that the sides would be 1-2 cm higher than the level of the path - there would be less debris inside, and we would decorate the edges with stones. On this side, just below the maximum level, we cut a pipe into the bowl so that excess water would drain. She was taken to the sewer
But it is not always and not everywhere possible to constantly add and remove water to the pond. Then you will have to either plant plants that will clean it, or change it periodically.
Pond from an old bathroom
You don't have to buy a bowl at all. Any container can be used. Even old bath. It turns out very well. All the steps are the same, the pit is dug first, a bathtub is placed in it, what goes next, see the series of following photos. There's a pond on them old bath transforms into a truly lovely place.
The platform was also entangled with wire - so that the clay did not float and the platform did not sag. This is already a month later, such beauty - a garden pond built with my own hands makes me happy
Pond from a car tire (with film)
A mini pond can be made from an old one car tire, or rather from a tire. The larger it is, the larger the reservoir. The most difficult thing in this matter is to cut off one side part. If the resulting edges are sharp, they need to be sanded. The second most difficult task is to dig a hole suitable size. The difficulties ended there. The rest is quite easy.
The cut tire is installed in the hole, covered with earth on the sides, and compacted well. Also, earth or sand is poured inside and the bottom is leveled. Take a piece of thick plastic film, maybe folded in half, and cover the resulting tank. Don’t try too hard: just pour water, it will straighten the film itself.
Instead of polyethylene, you can take banner film (available from advertising companies that produce outdoor advertising) or a piece special for swimming pools and ponds. They are much stronger (but more expensive).
The protruding ends of the film are tucked around the walls of your pond and decorated with stones. The construction of the pond is completed, next comes decoration and planting. See how to make a pond from a tire in the photo report.
The next stage of making a mini-pond for a summer residence is decorating the edges with stones
There is certainly nothing complicated about such a device. Anyone can build such a pond at their dacha with their own hands, and the investment is minimal.
In general, mini-ponds are made from tanks, barrels, pans, even flower pots. The main thing is that there is a body, and designing it is not very difficult: experience gradually comes. They are placed in the garden, at the dacha, near the house. It is possible to supply water, make a stream, it can be placed under trees, for example, or shrubs. Both beauty and benefit at the same time.
Making a pond with film
By creating this artificial pond made of film, you almost exactly repeat the work described above, only without installing the bowl:
- mark the shape of the future pond;
- dig a pit, forming ledges if necessary;
- clear the bottom of any sharp objects: roots, stones, etc.;
- level the banks of your pond;
- spread the waterproofing film;
- fill the pond with water;
- fix the edges of the film;
- decorate.
A country pond created using this technology can be of a more substantial size. Important point: on loose soil, simply making a pit and laying down a film will not work. We will have to come up with some measures to strengthen the banks. In this case, you will have to either install a bowl, or make a more serious structure - from brick or concrete. Next, let's look at examples of how to inexpensively make a pond from film.
First project: sides flush with the ground
Eight simple steps and your pond at the dacha is built. How to dig and arrange a pond at your dacha and make it look like a natural one, see the photo report.
Second project: raised sides
The second version of a homemade pond in the first stages is built in almost the same way as the first. Only after the pit reached the design depth were the sides raised, lined with bricks along the edges and concreted. The result was a pond with raised sides. A water circulation system has also been made. It is shown in the figure below.

As you can see, this pond is more multi-layered and its displacement is more serious. If you want to have a pond of at least medium size and not build a serious bowl, you can do as shown in the figure: fill the created pit with sand, cover it, and only lay the film on top. Geotextiles evenly distribute the load and prevent plants from growing. This is especially true if you are building a pond in the garden and there are shrubs or trees nearby.
Serious projects: brick and concrete
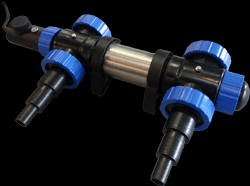
If you want to have a large pond in your country house, and you want to build it yourself, you will have to study the topic of building swimming pools. Firstly, the construction of the bowls repeats all the stages one by one. Even the forms are sometimes made stepped. True, the banks are not decorated with plants, and they are not planted in the pool itself... But the construction process itself, with reinforcement, plaster, and waterproofing is the same. Moreover, the water supply and water treatment system is also similar. Except that they are not used in ponds. chemical methods cleaning, but filters, screamers and ultraviolet can be used.
In general, a large pond is not a cheap pleasure. Moreover, it requires expenses not only for construction, but also for maintaining a large reservoir in in good condition: Filters need to be cleaned regularly and cartridges or media replaced. But of course the pleasure is great...
Not the largest pond, but it required 10 bags of cement, 30 bags of sand (20 coarse and 10 fine), a hydrophobic additive - 5 bags to make the concrete water-repellent. Plastered on a mesh fixed in the ground
Pond Plants
When shaping or choosing a bowl, consider not only its shape and depth. If you want plants to grow in your pond, a marshy riparian area is necessary. If you form a pond using film, you can make a profile approximately like the one in the picture.

It is more convenient to do this if you fill the pit with a layer of sand at least 15 cm thick. With its help you can make the relief the way you like. To make the work easier and the film not torn, lay geotextiles on the sand. This thin membrane is very tear-resistant. You can do whatever you want without breaking it. Having formed the desired bottom topography with its help, you can line the film and lay stones on it, fill it with water and plant plants for the pond at different levels.
To ensure there is enough oxygen in the water, you can plant Canadian elodea, hornwort and swampweed. They are in the photo below. Planted in water, these are aquatic plants.

A picturesque lake or pond in your country house has a lot of positive aspects.
In addition to its pleasant aesthetic qualities and high decorative value, the presence of a small reservoir contributes to the formation of a favorable microclimate on the site, especially for plants growing nearby.
If desired, a pond can also perform utilitarian functions: use for fish breeding, a source of water for irrigation. And growing ornamental aquatic plants will allow you to diversify your assortment.
However main question, which this article is devoted to, is pond waterproofing, the high role of which cannot be underestimated.
Why is waterproofing needed? Basic ways to do it
The main purpose is to retain water in the reservoir, which is especially important if the soil is sandy, permeable, and the groundwater level is low. Waterproofing of a reservoir can be different. The durability of your structure and its functionality will depend on what type you choose.

What will be the consequences of incorrectly performed work, as well as the wrong decision when choosing a waterproofing technology? The answer is to the pond drying out, silting up the bottom, etc.
When choosing a method, you should pay attention to the size of the pond, its shape, purpose, under what conditions it will be used, and what features the design will have.
The most common methods of waterproofing include the following:
1. Using special film . Suitable for ponds of any shape and size. Most cheap option The material is polyethylene, but it has some disadvantages (short-lived, low elasticity, low UV resistance).

A more durable and elastic coating is a geomembrane based on low and high density polyethylene. However, the most famous and widely used option is PVC film, which is superior to previous materials in all respects. There is also a film based on rubber.
2. Use of ready-made molds made of plastic and fiberglass , which you can easily find in specialized stores. The cost depends on the shape, size, volume and quality of the container material. So, a 370 liter polyethylene pond costs approximately 5000-6000 rubles.

3. Concrete . This is one of the most expensive and labor-intensive methods, but also the most durable and durable. It can also be safely classified as traditional. However, it is worth remembering that this material is sensitive to sudden temperature changes and soil subsidence.

In addition, not everyone can arrange such waterproofing. If you can lay down the film or install the finished form without any problems with your own hands, then concrete waterproofing You can do it yourself if you have special skills.
4. Waterproofing with clay, or making a clay castle . Clay must be laid on the bottom and walls of the reservoir with a thickness of 20-50 cm, and not in one step, but in several layers.
5. Soil compaction using the Sepp Holzer method . It consists of placing an excavator into a pond pit filled with 30-40 cm of water, which begins to press (compact) the bottom with a bucket.
6. Made of liquid rubber. That's enough new way, which has many advantages. Suitable for both decorative ponds, and for swimming pools, ponds for fish breeding.

The material itself is a two-component mastic based on a polymer-bitumen water emulsion, applied by spraying. Withstands frosts down to -60˚C, service life is at least 20 years. Compared to film waterproofing, liquid rubber has high puncture resistance.
Before you begin work on creating a pond, you should decide on the method of waterproofing and choose the option that suits you.
Waterproofing the bottom of a pond with your own hands - basic rules
Whichever method you choose, there is general rules which should be followed. First of all, you need to dig a pit under the pond the right size and shape, carefully form the bowl of the pond. Then you need to level the bottom and walls, add a layer of sand, which is compacted into the ground.
The next stage depends on the selected waterproofing material.
If we use film, we first lay the geotextile fabric(to protect the film from germinating plant roots and sharp stones). The edges of the film should extend 50 cm beyond the pond; they are well secured and masked with stones and earth. Next, fill with soil and gravel and fill with water.
If you are using a ready-made form, then you simply insert it into the pit so that the edge protrudes a couple of centimeters above ground level. Pour water into the container and use a level to adjust the position of the pond. Then fill the free space between the walls of the mold and the pit with sand, compact it, periodically moistening it.
In case of using concrete, it is better to contact a specialist. But when using clay, the base of the pit bowl should be sprinkled with ash from insects living in the soil. Then we lay a layer of clay (10-15 cm) on the bottom and walls, which should be compacted well and covered with straw from the sun. When the layer dries a little, we lay the second one, which we also tamp.
Remember that when drying clay shrinks up to 20%. As a result, the thickness of the clay castle will be 20-50 cm. After this, pour crushed stone (fractions with a diameter of 3-4 cm) and compact it. Plus we make a layer of gravel and river sand, which will serve as additional protection against erosion of the clay by water. It is worth knowing that it is impossible to put clay on a vertical wall, so the banks must be flat.
When using liquid rubber, geotextiles are laid out first, securing it with staples, and then using a sprayer, several layers of liquid rubber are applied.
Properly performed waterproofing is the basis of a beautiful pond, always filled with water.
“Invisible” lining of a decorative pond. Any pond needs lining. Here are some reliable ways to hide visible PVC or butyl lining along the edge of a pond
The most common material used for lining a pond is butyl rubber. Many books on pond construction detail how to dig a hole on a level area, line it with rubber, and lay a row of sidewalk curbs or tiles around it. However, almost nowhere is it mentioned that the edge bordered by stone will gradually slide into the pond. Another problem, which is practically not mentioned in the specialized literature, is a drop in water level due to evaporation. Even with frequent rains, in this case, after some time, an untidy butyl lining will also appear along the edges. But there is a way to avoid this if you spend a little more money and efforts during the construction of the reservoir.
Design presented at the 2000 Chelsea Flower Show: well-reinforced turf and decking surrounding a pond disguises its lining.
How to hide the lining of a pond
Bricks and block stones
The area will look more attractive if you lay bricks or blocks along the edge of the pond. Irregularly shaped blocks can easily be cut to follow the shape of the pond. It is important to line all the curves of the pond bank with stones from start to finish, and then edge it with cut blocks.
However, brick is not strong enough compared to natural stone. If you do use bricks, pay attention to their frost resistance characteristics and lay them together using lime mortar. For paving banks, special brick and concrete blocks. They fit together so tightly that to connect mortar not needed. This paving looks modern, and if the house and buildings are old, then an ordinary brick paving with joints will look more appropriate than a block one. Bricks and blocks placed at the very edge of the pond are especially at risk of sliding into the water and therefore need a good foundation.
Paving slabs
The worst option for paving the banks of a pond is stone slabs, which cannot be cut to fit the shape of the pond.
Paving stones or slabs can look much better if the edge of the pond is modeled as steps. Rough stones and slabs that imitate stone, laid randomly, look good next to an irregularly shaped pond, while rough, rough slabs in light colors can give a pond or pool with straight edges a modern, perhaps Mediterranean, style.
To fit the shape of the reservoir, the slabs can be cut, but this is quite difficult to do due to the clamp circular saw at the edges of the cut.
To minimize damage to the tool when working on very thick slabs, use a chainsaw with a belt drive and the smallest blade possible. If you use a power saw, be careful not to overheat the motor.
As with curved brick or block paving, cut stone slabs must be edged with bricks or blocks.
Natural stone
Natural slabs or stones, of course, look very attractive. However, they are much thicker than factory-made slabs and therefore more difficult to install. In addition, they can also be quite slippery if they are constantly in the shade or under trees. The most practical way to use around the edges of the pond natural stones- border the pond with their debris. It looks beautiful if you make as few joints as possible, held together with lime mortar.
Flooring
Wooden decking works well to hide the pond lining and is usually laid on a row of beams at the edge of the pond. Often the deck extends just slightly, and sometimes quite far, above the water. In the latter case, the decking or formwork hangs over the water on one side, and the opposite edge is fixed to the ground. If the overhang of the flooring above the water exceeds a meter, then a support resting on the bottom of the tank and railings will be required. This will provide it with additional stability and safety.
Do not use particleboard or toxic wood preservatives. Take a regular tree instead hard rocks or boards treated with non-toxic preservatives.
Unlike other forms of paved edges, decking more often needs to be reinforced because, when “set” on a hard edge, it can slide out of place.
How to hide the lining of a decorative pond

In order to hide the pavement and create a solid base, you will have to make an unconventional decision.
First, the paved edges of the reservoir must be secured to a suitable foundation. If the soil is hard, the foundation can be a 15 cm layer of concrete placed on a flat and wide shelf, cut around the entire perimeter of the pond about 30 cm down from the top edge.
- In clay or soft soil, the side walls should extend to the bottom of the pond. Inside the pond different heights you can arrange baskets for plants.
- In soft soil or clay, this shelf should be located as close to the bottom or foundation of the pond as possible so that the wall can be built and the slabs placed on it. In this case, you need to build a wall of concrete blocks, not reaching approximately 15 cm from the depth of the intended paving.
To build a curved wall, the easiest way is to use half blocks or inexpensive bricks. Once the foundation is completed, the pit should be covered with a dense primer fabric or geotextile, extending to the upper edges of the reservoir, then the lining should be laid so that the shape of the foundation is clearly visible underneath. If this is not done immediately, then when water appears in the reservoir, it will pull down the lining, and with it the small walls formed from it at the top.
 Depending on the shelf paving material, a low wall of stone, brick or even block can be built to end just below the proposed paving. Under low walls and wherever there may be sharp corners or additional load on the lining, additional geotextiles should be used. The picture shows how the pavement is raised and passes behind the low wall. Once construction is complete, consideration should be given to a spillway. Without it, the pool will fill to the edge of the pavement, and during a rainstorm the water will overflow over the edges. A small pipe inserted directly into the wall and brought out through the lining of the pond under the pavement will help prevent flooding. IN clay soil To prevent movement, any walls should be reinforced with sand or gravel. The lining is cut at the upper level of the low wall. In this case, when filling the reservoir with water, its level will have to drop by about 15 cm before a piece of rubber or film appears. In addition, you can stand on the edge of a pond without fear that it will slide down.