Linoleum is a universal covering that can be installed in the most different places and conditions, as well as on Various types grounds. It is often used to cover wooden floors made of boards or lined with plywood. Linoleum perfectly protects the surface from excess moisture, and at the same time it looks very nice, because the material can have any color, and choosing the color you like is not difficult. And it’s not at all difficult to lay it yourself. Today we’ll talk about how to lay linoleum on a wooden floor.

Before we talk about the linoleum flooring itself, it is worth noting several specific features of a wooden floor. This will help to understand why this appearance finishing and this type of base are absolutely compatible.

The floor, made of wood, has a multi-layer structure. It consists of joists on which wooden floorboards are laid. In the space remaining under the boards, various communications can be located, as well as layers of insulation and waterproofing. Thus, the floorboards are protected from moisture coming from below. On top, a layer of linoleum, which is not afraid of water, will help protect them from it. In general, of course, the wooden floor itself is breathable, it has good vapor permeability, but still excess moisture is harmful to it.


Not only the owners of newly built buildings are puzzled by the problem of laying linoleum on the floor. country houses, but also the owners of city apartments of old housing stock
But linoleum can also have a negative impact on a wooden floor. If ventilation is not provided under the floorboards, then moisture willy-nilly will accumulate in the area where the joists are located, because linoleum will not allow it to escape outside and will disrupt the microclimate created under the floor.
However, the linoleum-wood floor combination is one of best options finishing. Very often it is this type The finishing coating allows you to restore the former beauty of the base again. It's simple - boards lose their properties over time appearance, if they are painted, they constantly need updating paint coating, which peels off. And thanks to linoleum, you can get a beautiful appearance of the floor quite quickly. At the same time, the coating is durable and will not require updating for many years, unlike the same paint.

On a note! Wooden flooring is considered environmentally friendly; it is optimally suited for installation in apartments where people who take responsibility for their health live. And linoleum, although it is a synthetic material, will never be a source harmful substances. Therefore, these two materials - wood and linoleum - may well be neighbors.

What kind of linoleum is used on wooden floors?
Any type of linoleum is distinguished from other materials used for finishing by the following: positive characteristics. This type of coating is quite durable, has a long service life, is easy to maintain, is not afraid of water, and has a reasonable price with a wide variety of colors and textures. And there are quite a lot of types of linoleum, among them it is easy to choose the type of coating that will be optimal in terms of price and quality.

Table. Main types of linoleum.
| View | Characteristic |
|---|---|
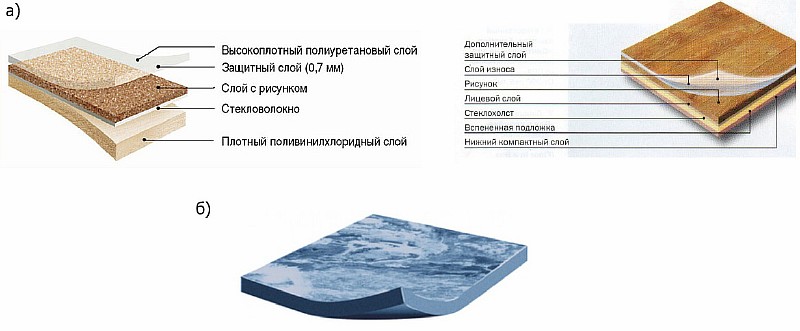
| An artificially created polymer is used to make this type of coating. The material may have several layers, a different base or not have it at all. The thickest version of this linoleum usually has a foam base and consists of four layers. Its thickness is at least 4 mm. The bottom layer is made of foamed vinyl, followed by a reinforcing layer made of fiberglass. The PVC layer sets the selected color of the material, and also protects the material from negative impact outside. This material has improved heat and sound insulation characteristics. |
| This linoleum is called “relin”. This is a multilayer material with a thickness of about 3 mm. It is made on the basis of bitumen, crushed rubber or rubber. The upper part is made of thin colored rubber. The material is elastic and not afraid of water. |
| This type of coating can have a thickness from 2 to 5 mm. Special pigments, fillers and alkyd resins are used for production. The material is resistant to abrasion, can have different colors, and has excellent sound and heat insulation properties. But in general it is a rather fragile species that can be easily damaged at a break. |
| Material that does not have a base. Nitrocellulose is used in its production process. The coating is highly resistant to moisture, does not burn, and is very elastic. |


Note! There is also thinner PVC linoleum on sale, up to 3 mm thick. Usually in this case the bottom layer is represented by felt. It also has a fiberglass core, closed PVC film. If fabric-based linoleum, it does not have a fiberglass layer. The material is not afraid of abrasion and is quite resistant to various factors. Baseless linoleum- the thinnest. It does not have any backing and is usually installed where the floor surface will experience maximum moisture exposure.

Of course, linoleum made from PVC is most often used. Compared to other types, it has a relatively low cost, but at the same time has high quality indicators.

Any type of linoleum can be laid on wooden floors. But it is still recommended to take material with sufficient thickness. If you look at the classification of linoleum, then for use at home it is recommended to purchase a semi-commercial version.
On a note! There are also domestic linoleum, characterized by the smallest thickness, and linoleum commercial, which is the thickest and toughest type of coating, ready to experience maximum loads.
When choosing a material, it is important to take into account the operating conditions. For example, in high traffic areas residential buildings Only a semi-commercial option can be installed - a household one will quickly lose its appearance. But in the bedroom or nursery the first one can become optimal solution, especially if you want to save money. In any case, it is not recommended to buy a coating less than 3 mm thick.


Methods for laying linoleum
Linoleum on wooden base- just like on another type of base - can be laid in several ways. In general, they are divided into adhesive and non-adhesive. In the first case, the material is simply rolled out on the base and fixed around the perimeter of the room with plinths. But this option is only suitable for small rooms with low traffic, otherwise the material can easily move and waves will appear on its surface.

The adhesive method can be divided into two subtypes - using glue or using double-sided tape. In both cases, the fixation will be quite reliable, but still, for rooms where the floors are under significant load, only the option using an adhesive composition will be optimal.
On a note! Typically, linoleum is laid with glue only in rooms with an area of more than 20 m2.

Rules for laying linoleum on a wooden floor
In order to properly lay linoleum on a wooden floor, it is recommended to follow several rules:
- It is recommended to lay the material so that it lies along the direction of the boards;
- when joining individual sections of the covering, you need to ensure that the joint is in the middle of one of the floor boards;
- the temperature in the room while laying linoleum should not exceed 20 degrees. But it shouldn’t be too cool here either;
- material with a marble pattern should run perpendicular to the window, then the joints will be less noticeable. In general, linoleum must be laid taking into account the direction of incidence of light rays;
- if the coating will stick to the base and there will be joints on it, then it is important not to forget to leave an overlap of about 8-10 cm. Only in this case will it be possible to beautifully and neatly connect two pieces of material.

Required tools and materials
To lay linoleum on wood floors, you will need to purchase not only the coating itself, but also certain tools and materials. It can be roulette and others measuring materials, a knife for cutting the coating, a notched trowel (if using the adhesive fixation method), a roller for rolling the surface, putty for sealing the seams between the boards.

VX75 - knife for cutting linoleum
To implement the adhesive fixation method, you will need to purchase special glue or double-sided tape. For additional leveling of the floor, plywood, as well as nails or screws, can be useful. If installation involves joining individual strips of linoleum, then you need to buy one to connect them inconspicuously.


Linoleum is used not only for residential, but also for administrative premises. This is explained by two important qualities material: low cost and ease of use.
In this article we will talk about how to lay linoleum on a wooden floor. This seems like a fairly simple question. But upon closer examination, several nuances emerge that may affect the quality of installation. Even a person who is far from construction and repair can cope with the work. However, it is better to do everything correctly right away so that you don’t have to correct your mistakes in the future.
Types of material
It all starts with the choice of coverage. In the store, you need to take into account that it is better to purchase a canvas whose width corresponds to the dimensions of the room. In this case, there will be no joints on the floor that cause trouble:
- deterioration of aesthetic properties;
- the possibility of bending the material at the seam;
- discomfort when walking;
- possibility of water penetration.
If you are laying linoleum on a multi-piece wooden floor, you will need to be very careful. All joints must be made very carefully and firmly secured. This option can be done by professionals, but for beginners it is easier to lay the material in one piece.
There are several types of material:
- polyvinyl chloride - has good thermal insulation and sound insulation properties;
- fabric - characterized by plasticity and strength;
- colloxylin - flexible and shiny;
- alkyd - quite durable, but may become cracked during use;
- baseless - helps to level the structure of the floor, copes well with mechanical loads.
The choice of linoleum for a wooden floor should be made not only for aesthetic reasons. Minimum thickness the blade is 3 mm. For your own house or apartment, it is recommended to take 4 mm or more.
Preparing the base
The coating is characterized by high flexibility; over time, it will accurately follow the contours of the underlying layer. At the same time, problems arise with an aesthetic and practical component. It is not very pleasant to walk on a surface that has noticeable changes. Therefore, it is necessary to level the base.
At this stage, you will need to seal all the cracks, depressions and gaps between the wood flooring boards. It is also worth checking the fastening of the subfloor elements. After all, no one wants to lay a brand new flooring and find out that the boards squeak underneath it.
If the rough part contains damaged elements, they will have to be replaced. Irregularities are eliminated in several ways, depending on their scale.
To remove small cracks, crevices and gaps, you will need regular wood putty.
To fill cracks, use a special wood putty  It is most convenient to sand small irregularities using an angle grinder (“grinder”)
More serious preparation of a wooden floor for linoleum implies. In this way, significant differences in height are eliminated: a completely flat flooring is obtained for the floor covering. The plywood should first be laid out on the floor. This is necessary in order to fit the sheets. Along the edges the layer is not brought up to the walls by a few millimeters. The same rule applies to all sheets: there should be a small gap between them to allow for thermal expansion.
The sheets are laid out staggered. This is reminiscent of brickwork, where each subsequent row is offset from the previous one. Fastening is carried out using PVA glue. After it dries, additional fixation is used with self-tapping screws along the edges.
 Plywood will help create a smooth and durable surface if the old floor is very uneven
 When using a floor, plywood performs several tasks at once:
- additional sound insulation;
- additional thermal insulation;
- alignment;
- preventing drawdowns flooring.
Which linoleum to buy by size
It has already been said that the width of the roll should match the size of the rooms. When laying the material in standard buildings, this usually does not cause serious problems. In order not to make a mistake before going to the store, you need to take measurements.
Width and length are measured at several points. This will allow you to take into account some of the unevenness of the walls. The purchase is made according to the maximum values. It is advisable to leave a small margin of 10-20 cm in length and width.
It is important to remember that linoleum is not cut in advance. This is a recipe for error. A solid strip with approximate dimensions (with a margin) is laid on wood flooring. In this case, small allowances should be provided along the edges. The excess can be cut off only after this procedure.
If the roll covers only half of the room or another part of it, the joint is made in the center. In this case, more material may be required, since it becomes necessary to level the pattern (as, for example, when gluing wallpaper).
After purchasing the material, it is recommended to leave it indoors for a couple of hours. In this case, the roll is not unrolled. This approach will allow the coating to adapt to the room temperature. In this case, the linoleum changes slightly in size. Then the roll is spread on the floor and left there for several days. This will allow you to make linoleum flooring with maximum adherence to the base of the floor.
Technology of work execution
There are three main ways to lay the material:
- without glue with fixation only on skirting boards for small rooms;
- on double-sided tape around the perimeter;
- on glue.
The latter method guarantees the greatest strength. It is especially relevant when covering large areas.
Fastening without glue:
- lay out the covering on the floor;
- wait a few days;
- fix it with baseboards, making sure there are no bubbles.
 Fixing the canvas to the baseboard
 Pin on double sided tape:
- glue tape around the perimeter of the wooden floor;
- lay linoleum, measure all dimensions again;
- roll the roll to the middle of the room;
- tear off the protective layer from the tape;
- unwind the roll, gluing it;
- control the absence of bubbles and irregularities;
- cut off the excess, install baseboards.
 Fastening the canvas with tape
 Fastening with glue:
- lay out the roll on the floor;
- cut the corners for a tight fit;
- roll half of the coating into a roll;
- gradually unroll the roll, applying glue to the surface (after applying the glue, you should wait 20 minutes, and only then fix the material on the flooring);
- repeat the work with the second half;
- cut off excess;
- install plinths.

When laying linoleum from two strips, tape or cold welding is used to connect them at the junction.
 Before use cold welding Apply masking tape to the joint and cut it stationery knife along the seam. This will prevent excess adhesive solution get to the front side of linoleum
 Is a substrate needed?
Preparing the floor for linoleum does not always end with leveling. In some cases, it is necessary to additionally lay the substrate. This material is needed for sound and heat insulation. It is especially necessary if plywood is not laid on the flooring. The underlay can correct minor unevenness if there is no need or time to do a full leveling.
There are five types of substrates:
- Jute. They have the ability to absorb excess moisture. The material will provide excellent additional insulation. Jute is rot-resistant and does not grow mold. In addition, it has good fire resistance.
- Cork. If you do not plan to install heavy furniture in the room. Cork would be a great option. It becomes a good additional insulation, natural and safe for humans. Disadvantage: low strength. Also, the material may have a relatively high cost.
- Linen. If you need to prevent the occurrence of mold and mildew in the room, then flax will become the best material for the substrate. It is not susceptible to the influence of various microorganisms.
- Combined. There are substrates made from several materials: linen, wool, jute. They are dense and do their job well. But during operation, their quality decreases significantly.
- PVC. Suitable for different types surfaces, is characterized by low cost.
The simplest option, which allows you to simplify your work, is to buy linoleum with a backing already glued on (check with the store salesperson).
What can any person do if he has no experience in repair work? Whitewashing the ceiling, wallpapering, laying linoleum. This is enough to make the house shine with new colors. If the floor is made of wood, then you need to know a few points about laying linoleum on a wooden floor.
Humanity's need for high-quality, comfortable and beautiful flooring has always been great. The earthen floor was replaced by clay, then concrete, covered with boards, then parquet - the history of the development of flooring is considered not in years, but in centuries. After all, it is much more pleasant to walk on a flat, warm, even soft surface. So people came up with oilcloth - a mixture of oil, resin and wax on a fabric base. Now science and technology give us more and more new species, using natural and artificial materials.
Variety of colors
- Performance characteristics. For rooms will do household coating of medium strength, and for the kitchen and corridor - semi-commercial, whose wear resistance is greater than that of the previous type.
- Softness and elasticity. For an apartment, it would be more convenient to use a material with a felt or foam base, which gives the coating good sound and heat insulation properties. The foam base, moreover, almost does not shrink and is not afraid of water, which is why it is often used in the kitchen.
- Colors. The greatest number of patterns and colors is available in a multi-layer coating made of foam materials. The thickness of the painted layer is 2-6 mm, the thickness of the protective layer (on which the service life depends) is 0.15-0.7 mm.

PVC linoleum with non-woven (felt) base
We remember that the most wear-resistant types are used in rooms where the load is maximum - the kitchen and corridor.
For rooms with medium and light loads, increased performance properties are not necessary.
Preparing floors for laying linoleum coverings
Linoleum should be laid exclusively on a flat surface. horizontal surface. If the floor is uneven, with protrusions and bumps, then in these places it will begin to wear faster and break, forming cracks.
Rough floor leveling
Consider the situation with ordinary painted wooden floors. What should be done:
- Remove baseboards;
- Remove the paint (this can be done with a regular spatula, warming the paint construction hairdryer);
- Check the strength of the flooring from the boards (if some boards begin to rot, they need to be replaced with fresh ones);
- Eliminate mobility and creaking of floorboards (the easiest way here is to attach the boards to the joists with self-tapping screws);
- Deepen the heads of nails and screws into the boards, preferably to a depth of at least 5 mm;
- Fill cracks and chips, lay patches in cracks wider than 5 mm;
- Level the floor surface (it would be most convenient to go over a parquet floor) grinder);
- Thoroughly clean the floor of debris and dust (vacuum, wash the floors, dry well).
If the height differences are small (no more than 1-2 mm), then you can start laying. In the case of very old floors, when perfection could not be achieved, you can try a couple of the most simple options leveling the surface to the desired state.
We use plywood (chipboard, OSB or MDF)
The choice of underlay depends on the unevenness of the subfloor. The greater the height difference, the thicker the substrate sheets we choose. For small differences, plywood from 5 mm thick is suitable. If we are leveling the floor in the kitchen or bathroom, then we need to use waterproof plywood. We select plywood sheets in such a way that they are laid in strips offset relative to each other by about half a sheet ( brickwork). We leave a gap of about 10 mm near the walls, but there should not be one between the sheets.
We apply special glue or mastic to the pre-treated floor (add PVA to the glue building gypsum to the state of thick sour cream). This mastic should perfectly fill the unevenness. We lay the sheets, fix them with self-tapping screws in increments of 15-20 cm, deepening the head as much as possible. We fill the gaps between the plates and the heads of the screws with putty and sand them. And you can even walk along the joints with a plane.
We wait for the plywood to dry and treat it with hot drying oil (you can simply paint it with quick-drying floor paint). After drying, installation is carried out.
We use a self-leveling mixture
To even out more in a simple way, a self-leveling mixture is used. Such mixtures can be purchased at construction stores. With their help, differences of up to 2 cm are leveled out. However, it should be remembered that the mixture is quite liquid, so when pre-treatment All cracks need to be well puttyed, ensuring tightness.
We impregnate the prepared dry surfaces with a special primer, which enhances the adhesion between the floor boards and the mixture. We cover the sides of the walls with insulating material, and glue the joint with expanded polystyrene, creating an expansion joint. IN doorway We install a wooden plank that limits the future floor.
We lay out a reinforcing mesh (with an overlap of 5 cm) and fasten it to the boards with a construction stapler. Mixing thoroughly, add the dry mixture to the water. Pour in, distribute evenly with a rubber spiked roller or rubber mop. Dry according to the manufacturer's recommendations. After drying, lay the linoleum covering on the wooden floor.


We measure the dimensions according to the largest lengths and widths of the walls, taking into account doorways, ledges and niches, with a margin of 5 cm on all sides. If you choose linoleum with a pattern, then add to the dimensions a repeat of the pattern in each direction.
The temperature in the room where installation will be carried out must be at least 15°C (and the optimum is 18°C) and remain for 48 hours before installation and the same amount after it. Air humidity is 40-60%, floors are dried as much as possible.
The purchased material should be spread on the floor with the pattern facing up and left for a day or two so that it can spread out well and acclimatize. If you bought it in winter, then let it stand in the roll for 24 hours before rolling it out.
Flooring laid in several ways. First, we lay it out on the floor (the plinths have an overlap of 4-5 cm - if the walls have ledges or niches; if at least one wall is flat, then we lay the linoleum along it with a gap of 1 cm, with an overlap on the opposite wall). We level the canvas from the center to the walls. It should lie flat, without bends or creases. The drawing should go along the most long wall. We make cuts in the corners for a better fit of the coating to the walls. All trimming is done in small sections along a metal ruler.
Free styling rules

Free laying on a wooden base
Suitable for rooms up to 20 square meters. m inclusive, where there will be no heavy load on the floor (for example, constant rearrangement of heavy furniture). Linoleum on a thick base, most often foam, is well suited for this layout. It should be selected as a whole piece, so as not to make unnecessary joints, which may move during this installation.
The straightened canvas is covered with aluminum nozzles under the baseboards, and secured in the doorway with metal slats.
Fastening with double-sided tape

We cut the stock to fit the baseboard
To fix it more firmly, the sheets are placed on double-sided tape. We glue the tape on one side along the perimeter of the floor. For better fixation (if there are sufficiently intense loads on it), the adhesive tape is glued in stripes over the entire surface, or crosswise in places of the highest load.
We glue the linoleum itself in parts. Having folded half of the canvas, remove the protection from the tape. We straighten this part, fixing it with tape. We bend the second half and repeat the operation. After it is laid evenly and glued, we trim the overlaps with 10 mm gaps at the walls. Next, we lay the baseboard and secure the linoleum in the doorway with a batten.
Bonding technology

Applying adhesive for installation
If the room is more than 20 sq. m or more than two strips will be laid, then it needs to be placed on glue. What glue to use is most often indicated in the instructions, and a salesperson at a hardware store can also give advice on this.
First the floor and bottom part We cover the canvas with a primer and only then proceed to gluing. Having folded back about a third, use a notched trowel to evenly distribute the glue or mastic. We lay linoleum on top of the adhesive layer, straightening it and pressing it well to the floor. It is best to press with a special heavy roller or wooden block. We carefully ensure that no air bubbles remain between the floor and the covering sheet. We move the roller or block in the direction from the center to the walls. We glue the remaining material in exactly the same way.
We process the edge along the walls in the same way as in previous cases, install a plinth and a fixing strip.
The glue should dry from 7 to 10 days. During drying, make sure that there is no swelling of the linoleum. If a bubble does appear, you need to put a plywood sheet on it, and put something heavy on top, for example, a bag of sand.
Joining two or more strips of linoleum
If the room is too large or you are simply unlucky to find a covering of the required width and you have to lay two (or more) strips, then such joints also need to be glued. The overlap of the strips should be at least 10 cm. We carefully monitor the coincidence of the pattern. We cut both layers approximately in the middle of the overlap. We achieve a perfect combination of canvases, joint to joint.
Now these joints need to be glued. Most convenient way- cold welding. Apply masking tape along the seam. We guide the tip of the tube with cold welding glue along the joint of the strips. The fusion adhesive should penetrate 2-3 mm into the seam. We leave the excess to evaporate. Under no circumstances should you remove it yourself! Once the edges are completely welded, the masking tape can be removed.
That's all the main secrets correct installation linoleum cloth. The worse the condition of your floors, the more work you will have to do and vice versa.
Enjoy your renovation!
Laying linoleum on a wooden floor is one of the construction tasks that can be done by people without special training, and in order to lay the material correctly, it is enough to familiarize yourself with all the nuances and rules for performing this work. What does a person who decides to replace an old wooden floor with a new beautiful coating need to know? First you need to learn as much as possible about such a practical covering as linoleum, and then how best to lay it.
Exists a large number of types of linoleum
Linoleum: advantages, types, classification
Linoleum is made mainly from natural raw materials: tree resin, jute fabric, linseed oil, cork flour, limestone powder. This flooring is almost universal - it is optimal for apartments, residential buildings, offices and even production premises. The material is ideal for flooring in high-traffic areas, such as the kitchen, corridor, living room.
The popularity of linoleum is due to its many advantages:
- strength;
- waterproof;
- wear resistance;
- elasticity;
- ease of installation and maintenance;
- a wide range of;
- acceptable price.
Depending on the raw materials from which it is made, linoleum is divided into the following types:
- Polyvinyl chloride, made from polymer material. Available on various bases: foam, heat-insulating, fabric, and also without base.
- Alkyd linoleum. It contains alkyd resins, mineral fillers and pigments. It is made from both synthetic and natural bases. Available in single-color, multi-color, and with a pattern. It is characterized by high heat and sound insulation properties, resistant to abrasion, but quite fragile, prone to the formation of breaks and cracks.
- Rubber linoleum or relin. Product thickness 3 mm. Its bottom layer is made of a mixture of bitumen with crushed recycled rubber, and the top layer of coating is made of colored rubber. Characterized by increased water resistance and elasticity. It is mainly used in industrial and production premises.
- Colloxy linoleum is usually a baseless coating that contains nitrocellulose. The material is characterized by moisture resistance, elasticity, fire safety, and has a peculiar shine.
In accordance with the manufacturing technology of linoleum, the pattern applied to the base is covered with a protective layer, the thickness of which determines its wear resistance and, of course, cost.
Linoleum has a separate classification based on wear resistance. It is divided into:
- domestic;
- semi-commercial;
- commercial.
Domestic linoleum has fairly low wear resistance; it is usually used in residential premises.
Semi-commercial linoleum is characterized by average wear resistance, therefore it is recommended as a floor covering in rooms and offices with average traffic.
Commercial linoleum has very high wear resistance. This characteristic determines its use in high-traffic areas.
The use of linoleum according to the classification is advisory in nature. However, the selection of flooring in accordance with the purpose of the room and its degree of load is the key to its successful operation and long-term use. For laying on a wooden floor, it is better to choose linoleum with high sound and thermal insulation properties. Having decided on the choice of linoleum, we proceed to its flooring.
Step-by-step instructions for laying linoleum
Linoleum must be laid only on a perfectly flat surface. Why? The fact is that if there are irregularities and flaws on the surface of the base, they will appear on the linoleum. In other words, the better the floor is prepared, the more beautiful the new coating will look and the longer its service life will be.

Preparation wooden surface(plywood flooring)
A plank floor becomes deformed and damaged during use, so experts recommend laying slabs of fiberboard, chipboard or plywood when preparing floors for linoleum. If the quality of the wooden floor is not bad, the thickness of the slabs can be 5-8 mm. If there are large differences, their thickness should be at least 15 mm. Next, we carry out the work of preparing the floor in the following sequence:
- Filming old paint from the painted floor using a spatula, pre-heating it with a hair dryer.
- Using a hammer and bit, hammer the nails into the boards to a depth of 6-7 mm. We nail additional boards that squeak when walking to the joists.
- We level the surface using a plane (manual or electric) or a parquet sander.
- If you decide to lay linoleum on an old base, you need to vacuum it, wash it thoroughly and dry it.
- If you decide to lay plywood, you will need PVA glue or glue for laying parquet, to which filler is added to increase viscosity. Sheets of plywood are glued with an offset of half a sheet.
- Next, we additionally attach the glued plywood to the floor with nails. We fill the gaps between the sheets of plywood with the same mastic that was used to glue the plywood to the floor. We sand the joints.
- We soak the dried plywood sheets hot drying oil.
The surface is ready for laying linoleum. The work is painstaking, but it will pay off in the future with beauty and durability.
To lay linoleum on a wooden floor, you must first leave it in this room for a couple of days so that it can stand and straighten out. room temperature. Its surface should be perfectly flat, without a single bend or fold. If you notice the presence of any bend, it should be straightened by pressing the linoleum with boards, books, and other objects.
Linoleum should stand and straighten for a couple of days indoors
If you find too many creases or folds in the material, it is better to replace it, since during installation it will create additional difficulties, and after installation the floor will be uneven and, accordingly, impractical.
Important! Laying linoleum on a wooden floor should be carried out at a room temperature of at least 16ºC and humidity within 40-60%.
Counting the quantity required material:
- measure the length and width of the room and add 10 cm;
— take into account protrusions (the space under the door, window, closet);
— if there is a pattern, we take into account the reserve for 1 pattern repeat in both directions.
Important! If linoleum is cut incorrectly, leaving allowances, it may later happen that it will form waves.
Before installation, choose right direction linoleum to hide the seams. Marble and plain linoleum must be placed along the line of light. If there are drawings, they are placed in the longitudinal direction so that they match. If linoleum is laid on a wooden floor, then the joints are made in the middle of the board.
We prepare the tools necessary for installation:
- well-sharpened knife;
- steel notched spatula;
- wooden spatula;
- short and long rulers;
- glue, composition for welding seams
- double-sided adhesive tape.
Linoleum flooring methods
No gluing . This method is the fastest, but it is suitable for low-traffic areas of no more than 12 m2. With this type of flooring, the coating wears out faster and there is a high probability of wave formation.

Laying linoleum using a glueless method
Gluing with double-sided tape . This method will protect the linoleum from rapid wear. And if the need arises, it can be peeled off without difficulty, although traces of the tape may remain on the floor of the room.

Gluing linoleum with double-sided tape
Bonding with glue . This method does not have the disadvantages of the first two. If the area of the room exceeds 20 m2, then this is the only acceptable method. In this case, the service life of linoleum increases significantly. But laying the coating in this way is a rather labor-intensive process.

Laying linoleum with glue
The process of laying linoleum
We spread the linoleum on the floor, not forgetting to leave a margin on the baseboards (5-10 cm).
We smooth the coating with our hands from the middle to the walls, and so that it fits better to the walls, we make small cuts in the corners.
If we lay linoleum without gluing, cut it off sharp knife excess along the baseboard, then secure it in the doorways with metal slats.
If we glue it with double-sided tape, then first stick the tape around the entire perimeter of the room without removing the protective layer. Unroll the roll and fold one half over the other. Now remove the protective paper, spread the linoleum, smooth it with your hands from the center to the walls.
We do the same with the other half. Cut off the excess along the baseboard. We secure it in the doorways with sill strips.
If we are installing with glue, then after bending one half of the linoleum, apply the glue to the floor and spread it with a roller or notched trowel. Leave for 20 minutes, then unbend the folded part of the covering and carefully smooth it out with your hands.
We perform the same operations with the other half. We cut off the excess linoleum, press the edges against the walls with a plinth, and install slats-thresholds in the doorway.

The edges of the linoleum are pressed with a plinth, doorways install metal slats
If, for example, for some reason it is necessary to lay not one strip of linoleum (the room is large, or it was not possible to find linoleum of the required width in the store), but several, then they will have to be joined. This is done as follows:
- We lay the strips of covering so that they overlap each other by approximately 10 cm.
- We bend one strip, apply glue to it and glue it to the floor. We do the same with the other strip.
- Using a sharp knife, cut off both layers of linoleum at the overlap, remove the trimmings and carefully glue both edges so that the resulting joint is as inconspicuous as possible.
- After the glue has dried, we glue the joints using a special liquid for cold welding of seams. First apply adhesive tape to the seam. After a few hours, when the seam begins to weld, the tape must be removed.
After gluing the linoleum, press it tightly with a roller or a special roller. Until the coating is completely dry, do not step or walk on it.

Do not walk on glued linoleum until it is completely dry
Having familiarized yourself with the intricacies of choosing linoleum and the process of laying it on a wooden floor, there is no doubt that it will not be difficult for you to do it yourself. You can safely get to work. And in a dozen or two years, when you want to renew your floor, it will not be difficult to change the coating to another if the base has been properly prepared.
Linoleum is a popular material for finishing flooring. This finish is considered the easiest to install and is affordable. When working with a wooden surface, many people have a question about whether a backing is needed for linoleum, and what material to choose. This article describes in detail what to lay on a wooden floor under linoleum, and the technology for laying the underlay.
Benefits of the substrate
The underlay is a layer between the floor and the finishing coating. The material has many advantages.
- High levels of sound insulation prevent noise from penetrating into neighboring apartments multi-storey buildings.
- Laying the underlay has good thermal insulation properties; it is used in rooms with a cold surface, especially if the room is not heated.
- Thanks to the interlayer, linoleum does not adhere tightly to the floor surface, due to this, minor flaws are hidden, that is, the material hides minor defects and creates an ideal coating.
The layers can have a linen, jute, cork or wood fiber base. You can use multi-layer linoleum, which has high sound-proofing and heat-insulating properties, and does not require laying an additional layer.
Choosing a wood floor underlay
Wooden coatings are distinguished by high environmental friendliness and thermal insulation characteristics, while the surface can wear out and requires updating. You can lay linoleum on a wooden surface without removing the floorboards if they are in good condition.
The underlay will increase the level of thermal insulation; it retains heat even in the harshest weather. When laying multilayer linoleum, it is not necessary to use a backing.
If the floors squeak, or if there is minor defects, it is necessary to put a layer, this will help compensate for all surface irregularities and get rid of unwanted sound.
Leveling the surface of a wooden floor
The preparatory stage is leveling the wooden surface under the linoleum, since depressions, cracks, bumps or nail holes will in any case form on the old covering.
For leveling, plywood with a thickness of about 7 millimeters is laid, this allows you to bring the floor to almost ideal condition. In case of significant gaps and defects, all irregularities are smoothed out and covered with wood putty, creating complete insulation of the surface.
If the floors are smooth and have minor defects, you don’t need to use plywood; it’s enough to level the boards using a planer or a grinder; the nails are sunk into the surface maximum depth, and cover with putty, in the same way, close the joints between the floorboards or other holes.
After execution preparatory work, remove all small debris using a broom or vacuum cleaner, the device will help to thoroughly remove debris.

Correct installation of underlayment on wood flooring
When the floor is completely prepared and cleared of debris, the main work begins. First, the floors are covered with plastic film, this allows you to create high-quality insulation of the surface from moisture penetration.
Then lay out the backing roll type end-to-end, all seams are sealed with construction tape or treated with sealant.
Using plywood underlayment will take more time and additional steps.
- Before laying linoleum, paint is removed from the wooden surface, then a primer is applied and left until completely dry.
- The substrate in the form of slabs or plywood is laid offset, leaving a gap of about 5 millimeters from the wall to the material. When it changes temperature regime, the material can acquire various sizes, the gap prevents the sheets from deforming during expansion.
- Self-tapping screws are reliable fasteners for the sheet substrate; they securely fix the plywood to the wooden floor surface.
- The edges are processed with a plane, all snags are removed, the holes from the screws are covered with putty.
- For fixation sheet materials You can use adhesives, but you need to clean off the old paint or varnish.
Laying linoleum is not difficult; this material is convenient and easy to work with, which you can do yourself. Before final installation, the material must be leveled, the roll unrolled, and left for a day, after which it will take the desired shape.
The material is laid end-to-end, the edges are trimmed to the right size, lubricate with glue, and press it to the surface, then the baseboards are mounted.
Types of substrate and their characteristics
- The jute backing consists of natural fiber; it is highly resistant to rotting and fire due to the addition of a fire retardant. The material absorbs and removes moisture without remaining wet.
- For cork materials, chopped cork tree bark is used; the substrate has high environmental performance, since the composition does not contain synthetic inclusions. The layer has high levels of thermal insulation and sound insulation. There are also disadvantages this insulation, low degree of rigidity, which may leave marks on the furniture, and high cost.
- The linen layer provides good ventilation between the finish coating and the floor, since the material is double pierced during manufacturing. Such ventilation prevents the appearance of fungi and mold.
- The foam layer is a synthetic roll material, which is characterized by high heat and noise insulation, low cost, ease of installation, and practicality.
Can be used combined materials made from flax, jute, and wool, this layer is distinguished by its versatility, high wear resistance, and good insulation.

Cold floors in the room require laying an additional base under the linoleum in the form of a substrate. This will provide high thermal and sound insulation of the floor, protect the surface from the cold, so the underlay can be laid even in non-residential rooms. When laying linoleum, check the surface for strength, wooden boards should not be rotten or rotten; in such cases, the floorboards are replaced, all significant differences are leveled. Finishing material using a backing can hide small cracks or defects, but it is better to fill the holes to prevent the penetration of cold.
A backing for linoleum may not always be used; it is not required if a multilayer material is being laid. If the surface is cold or has minor flaws, laying a layer is mandatory; it serves as high-quality insulation for the floor. The work is quite simple; you can do it yourself, resulting in perfect surface. Right choice material allows you to achieve the desired result, if the linoleum has a high density and cost, and also in case of doubt about the performance of the work, you can resort to the help of specialists.