Owners of private houses and cottages in the warm season are faced with the need to bring their lawn to a decent appearance. The most simple and convenient way to do this is to use a grass trimmer. You can buy it in the store, since there is no shortage of choice now, but many come to the decision to make a trimmer with their own hands. It's not too difficult and, if you have the necessary parts on hand, much cheaper than buying a new one.
How the trimmer works
To make a trimmer at home, you must first understand the principle of its operation and design. In general, all manual mowers are classified into gasoline and electric. The first option is more convenient, because the user is not tied to an outlet, but for the manufacture of a home-made device, electric motors from household appliances or tools are more often taken.
The design of both types of manual lawn mowers includes:
- engine (electrically or gasoline) - suitable for household tools (screwdriver, drill, grinder), from a washing machine, as well as a chainsaw;
- tank - for a gasoline engine;
- starter - best used a simple button with a return mechanism;
- rod - solid wood or metal pipe (aluminum pipe is perfect, as it is lighter), you can also make sectional structure, which will allow you to adjust the holder to the height of different people;
- a handle for the convenience of work, on which the button is also placed - it should have a comfortable grip and be made of non-slip material;
- knife or fishing line - it is better to use knives, as the fishing line breaks faster;
- protective cover– powerfully weld from thin metal, cut from plastic bottle large volume or use an old frying pan.
Advice! It is better to make a knife from tool steel, an old disk from circular saw or scissors. It may be whole or replaceable blade. The second option is more convenient, since in case of damage it will be enough just to change the edge.

However, it should be understood that factory designs are more complicated than homemade devices. And you won’t be able to get a complete analogue of a store trimmer. Below are recommendations for assembling a functional hand mower from different equipment.
Self-made trimmer from a drill
One of the most simple ways to make a trimmer is to use old drill or cordless screwdriver. The second option is a little worse, since the battery will significantly limit the operating time. But you can increase autonomy by installing a 12-volt car battery in the design. However, given the large size of this battery, you will either have to take care of long wires, or make the entire device wheeled.
So, to make a trimmer from a drill, you need a strong holder, a power tool directly and a homemade knife. The process includes several steps.
- Holder manufacturing. It can be wood or metal, but many recommend finding an aluminum tube that is both light and heavy and at the same time highly reliable. In addition, it can be easily drilled if the trimmer is not disassembled in the future, and the drill is fixed tightly.
- Fastening to the holder of a drill (or screwdriver). This is done by means of metal brackets or clamps. Some home craftsmen claim that you can fix the tool with ordinary tape, but there are a few nuances here. First, it's not safe. Secondly, it is impossible to give the desired angle between the holder and the working mechanism with adhesive tape, which means that it will be extremely inconvenient to use such an assembly.
- Attachment to the power cable holder. This is done with adhesive tape so that the wire does not hang and does not interfere with work.
- Another important point of the design is the knife. It can be made from steel. For ease of use, it should be thin. And if the trimmer is assembled from a battery-powered screwdriver, then the material should be chosen light - this will allow you to “squeeze” the maximum operating time out of the battery. Next, the selected metal strip, sharpened on both sides, is drilled in the middle and tightly fixed on both edges on the bolt, which in turn will be fixed in the drill chuck.
- For safety during operation, you should take care of the protective cover, which can be made of plastic. A great option is to use the top of a 19 liter plastic bottle.
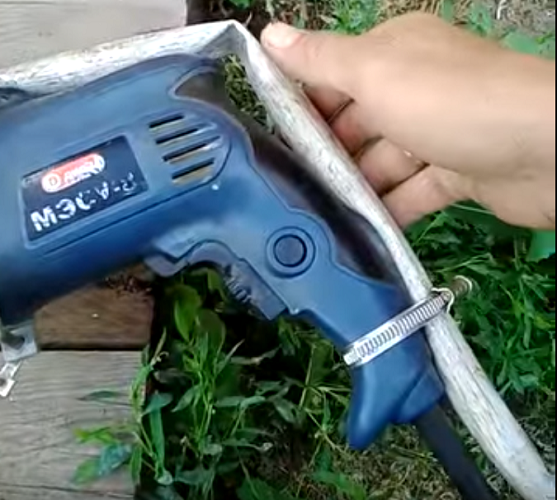
Another simple and convenient option is to make an electric garden trimmer from a grinder. In general, the assembly scheme is similar to the previous method, but with the difference that it is even easier to attach the power tool to the holder. If you remove the protective cover from the grinder, then you can screw U-shaped fasteners welded on your own into this thread. You can fix it on the holder by means of bolts or welding, if you do not plan to disassemble the homemade trimmer in the future. Some craftsmen immediately weld a protective cover to the fastener.
On a note! The convenience of using a grinder as a basis for a trimmer lies in the fact that the knife is attached to it very easily on an existing mechanism. The cutting element itself can be made from old circular knife from a circular saw. In the absence of such, you can use fishing line or wire.

Production of a manual mower from a vacuum cleaner
It is quite possible to make a trimmer from an old vacuum cleaner. In this case, the engine will have to be removed from the housing and, in this form, attached to the holder in one of two possible ways. The first option is described in the previous paragraph - fasteners are welded from metal according to the size of the motor. The protective cover can again be made from a plastic bottle.
But there is a second way to mount the motor. Due to the fact that the engine is larger and heavier, it is convenient to place it on a structure with wheels, for example, from an old sidecar. As practice shows, keeping a trimmer made from a vacuum cleaner on weight due to muscle strength is extremely tiring and inconvenient. Homemade head for attaching a knife in this case is not needed. The motor in the vacuum cleaner is equipped with a fan, removing which frees up space for installing the cutting element. The latter is done by analogy with the description for a trimmer from a drill.

Attention! When making a lawnmower from a vacuum cleaner, do not use wire as a knife. In the reviews, many craftsmen write that the high speed developed by the engine leads to rapid wear (tearing off) and, accordingly, frequent replacements of the fishing line. It is easier to immediately make a knife from a rectangular piece of metal.
Lawn mower based on chainsaw
The chainsaw is a tool loved by the people. A huge number of removable units were created for her - from a cultivator nozzle to a drill. There are other options for its use. One of them can be a trimmer, or rather, a lawn mower on wheels, since a lot of weight will not let you hold such an assembly in your hands.
Based on the size of the tool, a trolley is made. It may look like a metal frame with wheels at the corners and a handle for moving. The most convenient number of wheels, according to experts, is 4. This improves maneuverability. A chainsaw is attached inside with the steering wheel and tire removed so that the shaft is facing down. A steering wheel is attached to the handle of the future trimmer and the cable is lengthened to be able to start the device without bending over.

The greatest difficulty in making a lawn mower from a chainsaw lies in the mowing mechanism. To make it, you need to weld a special nozzle. To do this, you need to take two metal pipes 40 cm long and 50 and 58 mm in diameter. A smaller diameter tube is welded to the engine sprocket. After that, it is inserted inside a larger diameter pipe and fastened with bolts and lock nuts. This is done in order to be able to adjust the height of the knives. If this option is not required, one pipe can be dispensed with.
A knife is welded to the second part of the pipe. Due to the high performance of the engine, it is possible to make a cutting disc from metal with a thickness of 4 mm and a diameter of up to 180 mm. Blades 120 mm long and 30 mm wide are bolted to the disc. An old two-handed hacksaw will serve as an excellent material for their manufacture. Such a cutting block is suitable for tall and thick grass - the engine power is enough to cope with it, and the knives will not quickly become dull and become unusable.

Reinforced design with two blades
To increase the width of the treated area in one pass, you can make a design with two knives. In this case, a pulley or sprocket is attached to the crankshaft. Using a backpack belt or a bicycle chain, torque is transmitted to the knife shaft. In this case, the cutting parts are carried forward on the sides. And the frame in this case is made so that the cutting elements do not reach the front wheels. They are mounted with bearings and also have a pulley or sprocket.
The sprocket and pulley are selected in such a way that the rotation of the knives is carried out at a speed of 500 rpm - this ensures a smooth cut. The sharpening angle of the knife is optimally done at 60 degrees, otherwise it will often need to be sharpened again. The length of the knives is selected based on the width load-bearing structure, so that when rotating between them there is a minimum gap. The part opposite to the tip is bent at a slight angle, which makes it a kind of blade. This gives airflow - the grass will not stick. The knife should not be fixed tightly so that when stones hit it changes its position, since it is easier to put it back in place than to repair the engine or shaft.
Advice! To properly assemble a chainsaw mower, it is recommended to watch thematic videos, since the design here is more complicated than that of previous models.
Making electric braids from a washing machine with your own hands
You can also make an electric scythe based on the engine from the washing machine. It is asynchronous and is activated by a button. The winder can be made from a return button, for example, from measuring instruments. The rather compact dimensions of the motor make it possible not to make a large cart, as in the previous version.
On a note! The convenience of using such an engine lies in the fact that it already has a pulley, and replacing a piston with a more convenient one is not needed here. The belt and the second pulley are right there - in the washer.
Knives are made by analogy with the descriptions above. But there is one important point - in order to prepare the engine from the washing machine for work as a trimmer, you should not forget to make a protective cover for it. It will protect the drive from the grass. But at the same time, it is necessary to take care of protection against overheating, that is, the casing must be larger in size and have holes for ventilation. For this purpose, an old bucket or a large-capacity plastic bottle will do. Do not forget to take breaks - such a motor is not designed for long-term operation.

Conclusion
So, making a trimmer with your own hands is quite realistic. With all necessary elements it will not require any costs and will take a minimum of time. However, when assembling, it is extremely important to think about your own safety. It is recommended to use existing manufacturing schemes or watch a video on the topic, and not invent your own design, which may not take into account some of the nuances and become not only ineffective, but also dangerous.
The most reliable trimmers
Trimmer Huter GET-400 on Yandex Market
Trimmer STAVR TE-1700R on Yandex Market
Trimmer Makita UR3502 on Yandex Market
Trimmer Husqvarna 128R on Yandex Market
Trimmer GARDENA SmallCut 300/23 on Yandex Market
DIY lawn mower
General arrangement of the lawn mower
- Motor.
- The frame on which all mower units are fixed.
- knives.
- wheels.
- Handles for management.
- Details of the control system: switch, RCD, power cable with plug.
The frame of the simplest design is a metal sheet 2-3 mm thick with a hole in the middle for the passage of the motor shaft. The sheet is reinforced with a frame of metal corners. The engine is attached to the sheet from above, a protective cover is attached to the bottom, on the sides of the axle for the wheels, handles for control.
If the motor is flanged, it can be mounted directly to the sheet by drilling holes in the latter that match the holes in the flange. If the engine is of a conventional design, two perpendicular racks from the corner must be welded or screwed to the sheet so that they coincide with the legs of the engine.
Holes are drilled in the corners for mounting the engine. If the holes are made in the form of grooves, this will allow the engine to be displaced relative to the frame during mounting, thus changing the distance from the knives to the ground. This design feature will be useful in selecting the optimal grass cutting height. But it's easier to make holes for different positions of the engine in height.
The central place of the lawn mower is the cutting unit, which consists of a mandrel with two short (or one long) knives fixed on it.
Engine
To connect a three-phase motor to a single-phase network, it is necessary to use a circuit with working and starting capacitors. There is a lot of information on the Internet about connecting three-phase motors to a single-phase network. It is not difficult to find formulas for calculating the required capacitance of capacitors. In practice, they take about 200 microfarads for a motor with a power of about 2 kW. For a power of 500-600 W, 60-80 microfarads is enough.
When making a casing for the engine, it is necessary to provide holes for engine cooling.
Craft a lawnmower do it yourself It is also possible using a conventional electric drill with a speed of up to 3000 rpm. It is not so difficult to come up with a drill attachment to the frame. How to make a trimmer from a drill and a grinder with your own hands. However, you need to understand that in terms of reliability and duration of continuous operation, a drill cannot be compared with asynchronous motor, so if you have to mow a relatively large area, preference should be given to the latter.
The drill is more suitable for making homemade trimmer.
In the case of a drill, it is very easy to make a knife mount. How to make a lawn mower yourself from improvised lawn mower or trimmer from a drill. A knife with a hole in the center is clamped with a nut on the bolt, and the bolt is clamped in the drill chuck.
Mandrel
The mandrel must be securely fastened to the motor shaft. This is usually done with bolts screwed into the flange perpendicular to the axis of the shaft.
Similar posts
As a mandrel, you can use a stone holder for a sharpener.
To prevent grass from wrapping around the shaft, it can be closed with a tin can.
If a suitable pulley or other suitable parts are not found, you will have to order the manufacture of a mandrel to a turner or make it yourself from a suitable pipe diameter and a strip or circle welded to it. There are three problems here: finding a suitable pipe diameter, ensuring the perpendicularity of the welded strip or circle with respect to the pipe and centering the mandrel after its manufacture. With some effort, all these problems can be solved.
The execution of knives has two main options. The first is a knife in the form of a long strip, which is attached to the mandrel symmetrically about its axis. The length of the knife in this case is equal to the width of the grip - usually 30-50 cm. How to make a trimmer with your own hands from a grinder, a vacuum cleaner. The sharpened ends of the strip act as cutters. The knife and the mandrel in this case can be one integral part in the form of a plate, to which a flange with a mounting hole is welded or riveted.
MINI LAWN MOWER FROM DRILLS
Today I will tell you how to do MINI LAWN MOWER from drills.
Electro trimmer do-it-yourself lawn mower from a drill
Trimmer.
The second option is two short knives 50-80 mm long, which are mounted along the edges of the mandrel at an angle of 180 ° to each other. They can be located straight or with a slight slope. You can fasten the knives with two or one bolt. The first method is more reliable, however, fastening with one bolt allows the knife to fold (without breaking or deforming) when it hits an obstacle - a stone or a bump. The fastening of the folding knives should be regularly inspected, because. over time, the screws can fray.
Steel for knives must be hard enough, but not brittle, otherwise the knives may break, which will not only require their replacement, but also create a risk of injury from a flying piece. The experience of amateur craftsmen shows that a hacksaw blade for wood with a thickness of 2 mm is very well suited as a material for lawn mower knives. The technology for making a knife from them is simple. Two blanks in the form of strips are marked on the canvas (or one long knife is made from the canvas with sharpening at the ends and holes for fastening in the middle), which are then cut out with a grinder. Holes for fastening are drilled in the blanks. After that, it remains to sharpen the knives, attach them to the frame and center.
If drilling holes is problematic, then you can put the canvas on a metal surface with a hole of a slightly larger diameter than the hole in the canvas should be, and hit with a punch. The protrusion formed after the impact is removed with a file (if the metal is soft enough) or on a sharpener. If the hole does not meet the desired diameter, the process is repeated.
In fact, there are many options for making workable knives, as well as materials for their manufacture. The main thing is to sharpen them well, center them (so that there is no vibration) and securely fasten them. When fastening the knives to the mandrel, use washers and locknuts. Without this, the mounting bolts will loosen from vibration.
If possible, the cutting edges are better do slightly bent down, like branded lawn mowers. This will reduce winding of the grass on the motor shaft. Or you can do disk covering the shaft. Also, if the engine power is close to the power of branded lawn mowers, you can buy a branded lawn mower blade (see here).
wheels
There is no unequivocal opinion on what number of wheels is optimal - 2, 3 or 4, among the craftsmen who operate homemade lawn mowers. 3 or 4 wheels are good because they set the exact distance from the knives to the ground. Two wheels make the mower more maneuverable and allow you to cut grass in any hidden places. In addition, it is easier to find two identical wheels than three or four. However, you can make wheels yourself, for example, from plywood and bearings, so the last argument is not so convincing. Ultimately, the choice is up to the artist himself.
If a two-wheeled lawnmower is selected, then there must be protection against touching the ground with a rotating blade.
If a three-wheeled lawnmower is selected, two wheels must be on the side of the handle so that the front of the mower can be lifted to turn by pressing on the handle.
Similar posts
The larger the diameter of the wheels, the better. A lawnmower with small wheels is more difficult to roll over the grass.
At the end of the article there is a video demonstrating the operation of the second lawn mower.
Without a bag, the grass will stack in the direction specified by the cutout. Without a hole in the casing, the grass will be crushed, it will be mulching. But for all this, a sufficiently powerful engine is needed, and in order to avoid stuffing cut grass into the engine, the space between the engine and the knives must be closed with a disk.
Working with the mower will be safer if one of the handles is equipped with a lever, which, when released, cuts off the power supply to the engine.
Security measures
It is necessary to carefully insulate all points of connection of electrical wires - both on the engine itself and on the control parts. The insulation on the supply cable must not be damaged. To power an electric motor, it is necessary to have a double-insulated cable with at least 3 cores. The body of the mower is reliably grounded, for which one of the cable cores is used. How to make a trimmer with your own hands from a grinder, a vacuum cleaner, a drill, a chainsaw. Homemade protective cover, trimmer knife, backpack strap. Or connect the lawn mower to the network without fail using an RCD - a residual current device designed to de-energize electrical devices when a person touches their parts, which are energized due to insulation failure.
The mower must not be operated without a protective cover. When working, make sure that there are no people nearby. Broken knives fly out at high speed. And if the operator himself is protected by a casing, then for some designs of homemade lawn mowers, the front area of \u200b\u200bthe mower remains open. From a trimmer to make a lawn mower. How to wind a fishing line on an electronic trimmer calm. Mow preferably in rubber boots. This will protect against the consequences of hitting various objects that are thrown by a rotating knife.
Do not use the mower in wet weather and early in the morning when there is dew.
Below is an example of an incorrect homemade lawn mower.
The engine is completely open, while there is no makeshift casing for it, there is not even a protective disc on the side of the knives, although there huge hole. There is no casing protecting the lawnmower from a flying knife or a thrown stone. The handles are welded on and cannot be tilted and cannot be removed when storing or transporting the mower.
Step by step instructions about how to wind the fishing line on the trimmer reel With the onset of spring, you often spend time in the cottage or in the garden. From problems such as grass and weeds, you will be protected by a trimmer. Uh...Post Views: 1
Bulgarian trimmer. At any moment, the grinder easily turns into a mower, and vice versa. For a mower, you need to add an extension cord or a soft double wire with a cross section of 2.5, a socket, a switch and a plug. Cut the wire from the side of the socket 30 cm and insert the switch (preferably from a drill, grinder of the same power) 
In my case, I will not use the grinder, so I removed part of the grinder body with a button to reduce the size.
 The main thing is to close all the holes for cooling, I sealed them with adhesive tape, and the body was part of a plastic bottle.
Since the ventilation is closed, it is necessary not to overload.

All parts of the mower are assembled from improvised means, the body and handle are taken from the heating 15th pipe, fastening with a grinder is a steel plate from 2 to 3 mm, bent at an angle of 90 degrees, and welded to the pipe at an angle of 45 degrees. 
Handle (pipe corner) 90gr. the M10 thread is attached to the body with a bolt and can be adjusted for growth, a belt clings to it. 
All dimensions in the mounting photo are for a grinder with a 180 disc. Therefore, the bolt holes must be adjusted to the dimensions of the grinder body. 
The switch was moved to the edge of the case, adding 1.5 m. copper wire 2.5 sec., and secured with electrical tape pre-insulated (inserted into the camera from the bike) 
The most important and difficult detail In my case is the fastening of the fishing line. It took me several months to test different versions of fasteners to achieve the desired result.
The mount is made from two old diamond discs on stone. the core of the disk is cut out by a grinder as in the photo. 
We grind more corners, then we put this core of the disk on a grinder, and do not press hard, we sharpen on an emery stone to a circle of 90mm. 2 pcs.  We note the diameter of 50mm. on one and drill holes as in the photo. Holes 4.5 and 3.5 are for fishing line 4 and 3 diameters.
You can also drill 2.5 for 2.5 line. We fasten the fishing line as in the photo, the fishing line is 18cm. insert into the holes and bend.

The long edge of the fishing line should be between two disks, we press it with a stronger nut (we turn the nut over).
It's been over 3 years and it still works!
How to make a trimmer with your own hands
The question of how to make a trimmer with your own hands is always relevant among owners of private houses with a small plot of land. A neat and well-groomed lawn near the house is not only beautiful, but also safe in terms of the absence of ticks on it.
How to get rid of ticks in a summer cottage was described earlier, but today the question will be considered - how to make a trimmer with your own hands from the most available means for this.
Today on sale you can find various options for trimmers, powered by both electricity and gasoline. However, it is not always possible to buy a trimmer, and in most cases, it is not so necessary.
The advantages of a homemade trimmer from a drill or grinder is that when you need to mow the lawn near the house, the trimmer is easily assembled. When not needed, the drill or grinder is removed from the trimmer and used for its intended purpose.
How to make a trimmer from a drill and grinder
In order to make a trimmer from a drill, you will not need a lot of materials and tools. You will also not need to disassemble the drill in order to make a manual trimmer out of it with your own hands.
In addition, a drill can be replaced cordless screwdriver, which can be connected to a car battery to increase the duration of the trimmer.
Making a trimmer from a drill with your own hands
The main requirements for a homemade trimmer are primarily for its safety. The knife of a homemade trimmer is very sharp, so the presence of a protective cover on the trimmer is a must.
The same applies to the trimmer handle, on which the drill will be fixed. The handle must be made of durable materials, of course it can also be made of wood, but it is better to use an aluminum pipe for this purpose.

In addition, working with the trimmer after its assembly should be not only as safe as possible, but also convenient. Therefore, be sure to adjust the trimmer holder to your height, maybe install an additional handle on the side of it, etc.
First, the trimmer handle is prepared, on which the drill should be fixed. To fix the drill, you will need long bolts and metal clamps. Be sure the power cord of the drill must be tied to the trimmer handle. It is impossible for the wire to hang out and be a danger if it gets under the cutting element of the trimmer.
How to make a trimmer knife: materials
The knife of a homemade trimmer is attached to the drill with a nut and bolt, which is clamped in the cartridge. Be sure to remember to install a protective cover on the trimmer before this in order to ensure your own safety while mowing grass.
A trimmer knife can be made from tool steel or other very durable material. You should know that the thinner the trimmer knife is, the better it will cope with cutting grass. The length of the trimmer knife depends primarily on the protective cover and the cutting width of the grass to be cut. Most often, the length of the trimmer knife does not exceed 30 centimeters.
Do-it-yourself grinder trimmer
The question of how to make a trimmer from a grinder with your own hands is solved in approximately the same way as the above-described production of a trimmer from a drill. There is only a slight difference in the attachment of the grinder to the holder. Trimmer handle can be selected metal pipe, to which at the end you need to weld a plate with a hole for fixing the grinder with a bolt.

Small changes also affected the knife of a homemade trimmer. In the case of using a grinder, here the knife is not in the form of a long rectangle. The knife of a homemade trimmer from a grinder is made of a disc for concrete, with sharp edges pre-cut, which are just designed for mowing grass.
The question of how to make a trimmer from a drill or a grinder is completely solved on our own. The main thing is not to forget about safety precautions and carefully study this issue.
Only after that, you can safely take on the manufacture of a trimmer with your own hands.
samastroyka.ru
How to make an electric trimmer with your own hands from a vacuum cleaner or other power tool

I faced the issue of accurate and quick mowing of grass near the fence of the dacha a long time ago when I had to learn how to use an ordinary scythe - Lithuanian.
I immediately thought that it would not hurt to buy a simple lawn mower, which at that time was not easy. So I decided to experiment with a homemade design.
As a result, I gained practical experience in mowing grass, thanks to which I was able to buy a trimmer that is well suited for my purposes.
Based on the knowledge gained, I give advice to the home master on how to make electric trimmer from used equipment based on an electric motor from a vacuum cleaner, drill or grinder with pictures, diagrams and photographs that allow you to repeat a similar design.

Please note that my lawn mower was assembled in haste from the most available materials. Its fastening was made for reliable operation without observing any design conditions, but with the provision of elementary safety requirements. So do not judge strictly for the unpresentable appearance of the structure.
Safety regulations
I'll start with this section to remind you: any homemade lawn mower design can be harmful to health. This requirement is especially relevant for:
- electrical equipment;
- parts of mechanisms rotating at high speed.
Let's take a quick look at these two factors.
Trimmer Electrical Hazard
Electricity does not care about your health. It creates a current path where the best conditions and less electrical resistance are provided for it. You can get an electric shock even from random things: clothes, surrounding objects, a standing car. There is nothing strange in this. We need to take care of ourselves, use protective equipment.
When creating an electric trimmer with your own hands, immediately pay attention to the strength and quality of the insulation of all current-carrying parts both inside the engine and on outdoor circuit. It must be installed by a qualified person.
During operation, a homemade trimmer must:
All three listed devices should be checked. They must meet safety requirements in terms of technical characteristics, settings, and be properly adjusted.
Dangers of the Mechanical Circuit
Collector motors develop very high rotational speeds. For vacuum cleaners, they can range from 11,000 to 30,000 rpm. This is quite enough for a small pebble, piece of wire or wood chips to fly out from under the cutting head, like a bullet from a rifle.
The difference will be that the direction of the bullet is chosen by the sniper, and the pebble from the lawn mower is chosen by chance. It is impossible to predict where he will fly. Therefore, when working, you must:
- ensure a stable position of the body, which is general requirement safety when working with all tools;
- protect yourself with tight clothing made from natural cotton fabrics or jeans;
- wear sturdy shoes on your feet, not open sandals;
- use goggles or a protective mask.
Lawn mower from an electric motor from a vacuum cleaner
My design is:
- collector motor;
- its attachment point on a wooden rod;
- homemade cutting knife;
- support wheel;
- switch buttons;
- protective covers.
electric motor
The design of the lawn mower is based on a collector motor from an old Soviet-era vacuum cleaner for 300 watts of the Buran brand. It had to be abandoned from its intended use after various gaskets began to wear out as a result of long-term operation, air movement was disturbed. I was tired of eliminating the fistulas that appear, affecting the pressure and suction, so I bought a replacement for him.
Appearance assembled trimmer from the engine side is shown in the photo. Since it is no longer in use, it is covered with rust, and the remnants of the cut grass have long dried up and remained stuck to all the details. It is much more convenient for me to work with a factory design.

The engine didn't have to be rebuilt at all. Just with the help of an electric drill, a vice and a hacksaw, I made several fasteners and protective covers. In the next photo, a cap cut from a plastic bottle is raised, covering the brush assembly.

The working knife is hard to see in this picture, but it can be seen above.
For greater clarity, he lifted the protective cover with his finger and showed a close-up of the engine from the side of the brushes. Here, all factory parts remained in working condition.

On the opposite side, a factory-mounted condenser works.

Barbell
The fastening of all parts of a homemade trimmer is made on a dried wooden stick without any processing. I drilled mounting holes in it, and screwed some details, for example, the handle bracket with a piece of wire.

All these connections are visible in different pictures.
Homemade grass knife
It is noteworthy that when I removed the fan impeller, I saw: the freed space on the rotor shaft is ideal for mounting homemade knife. Even the nut and gaskets did not have to pick up.

Unsuccessful experience
At first I tried to attach wire of different diameters to the shaft. She normally started to mow the grass, but very quickly broke off. Its structure cannot withstand the mechanical tensile and bending loads developed by high engine speeds and oncoming grass. Therefore, trimmer manufacturers produce different grades of fishing line.
How to make a lawn mower
I made a knife for a homemade trimmer using the following technology:
- took a metal plate of mild steel;
- cut it out in a rectangular shape;
- drilled a hole in the center along the diameter of the shaft;
- sharpened the edges to reduce the load when mowing.
To show how it is fastened through the factory sleeve, I unscrewed the nut a little, and simply bent the knife itself by hand.

support wheel
The main disadvantage of this lawnmower design, as with all trimmers with a lower electric motor, is the need to apply great physical effort to keep the knife in the desired plane when mowing. At the same time, the muscles of the worker tense up, and he himself quickly gets tired. Needs ground support.

Therefore, I attached small wheels from an old children's cart to the engine body and rod using adapters. They are light but make the job much easier.
Switch button
It must be placed on the handle directly under the palm.

So you can quickly turn off the trimmer.
Design choice
I used a special fastening of a button with a self-return from one of the measuring electrical devices that have exhausted their resource. It is simply screwed to a wooden rod with soft copper wire in isolation, and for better clarity, the photo is shifted from its axis to one side.
The switching capacity of the contacts with a margin withstands the power developed by the motor of 300 watts.
I draw attention to the self-return function. Apply conventional switch I do not recommend. If during work you accidentally fall, lose balance or something unexpected happens, and the working trimmer slips out of your hands, then you cannot stop it instantly. A sharp knife will cut anything in its path.
To prevent accidents in such situations, even on the factory trimmer, I excluded the function of constant work by removing the corresponding switch. I think that safety and health are more expensive than such conveniences with risks.
Mounting method
Random access to the electrical contacts of the wires is limited by the insulation of a special insulating tape.

In the next photo, I deliberately exposed them. This will give you a better view of the mounting and connection.

By the way, I did the soldering with the same soldering iron. The moment about which I had the most a large number of comments. Although there are many other designs described in a separate article on choosing soldering irons for home master.
The wires to the button of a homemade lawn mower are simply wrapped around the bar, and with reverse side twisted and soldered into the gap of one power cable core. Connections are insulated with electrical tape, closed with protective cambric.

According to safety rules, any switch or control button must switch the phase, and not zero. But in the design under consideration, it does not make much sense to determine its position each time, and the home-made trimmer was created for the sake of experiment, and not for long-term work. He has proven himself quite satisfactorily when mowing the lawn.
Protective cases
You have already seen their image in all the photos above. On top of the engine, to protect the collector assembly during operation, I simply inserted a cut off neck from a plastic bottle.
The bottom cover was made from the body of the same vacuum cleaner, cutting out part of the sector from it. I attached it with screws and nuts.
Trimmer from a drill or grinder
The principle of creating a homemade design based on this tool is exactly the same as in my case.

The engine is mounted on the lower end of the rod, and the working knife is made in the form of a nozzle.

The principle of fastening the knife
For a drill, you can screw two nuts onto a regular stud, tightening them with wrenches, and use the plane of the created stop to install the knife.

The mounting nut will complete this design. If you put wide washers, then the fixation will be stronger. The lock nuts can be replaced with one, but it will need to be welded. The pin is inserted into the drill chuck with the opposite end and clamped like a drill.
The knife hole must be drilled in the center, and the assembled nozzle must be well balanced. Otherwise, lateral beats will occur, for which the drill bearings are not designed.
Install right direction rotation of the rotor by the switch of the drill. When you turn on the trimmer, the nut should work on the knife clamp, and not unscrew. Otherwise, the sharp-edged blade may fly out of the mount.
Trimmer Line Attachment
You can make a reel for attaching fishing line with your own hands, but I don’t see much point in this matter. It’s easier to buy it in a store or use it from a broken trimmer.
The fact is that in the process of work, when the fishing line is shortened, its cutting length can be restored by simply hitting the rotating head on the ground. This function works by maintaining the exact dimensions of the nozzle after complex mechanical adjustments. A one-time attachment of the fishing line requires frequent shutdowns of the trimmer to replace it.
Take care of your safety first. For this:
- remember the rules for handling electricity again;
- do not work without protective covers with open rotating knives;
- do not trust strangers without proper preparation for your dangerous homemade products;
- when mowing, do not be distracted, but control the working area. Do not allow children, animals, casual visitors to it.
A homemade lawn mower helps to feel all the charms and disadvantages of electric grass mowing, the features of the operation of such devices, the need to balance the center of mass. After gaining a little experience in using it, it is easier to choose a factory model, professionally prepared for long-term use.
housediz.ru
How to make a trimmer with your own hands from a grinder, a vacuum cleaner, a drill, a chainsaw
All owners of personal plots are faced with the problem of mowing the grass, which is growing literally before our eyes, and it takes several times to ennoble their site several times during the season. The usual manual scythe has long been replaced by gas trimmers and electric trimmers. But the price for them is not reduced and is quite tangible for many owners of cottages and private houses. Craftsmen nevertheless found a way out of this situation and learned how to make trimmers with their own hands literally from improvised means, using gas and power tools that were not intended for these purposes.
From Bulgarian
Most often, a home-made electric trimmer is made on the basis of an ordinary grinder, which is available to every home master. This tool is almost ideal for conversion into a trimmer. It has more power than store-bought machines and a higher number of revolutions per minute. In addition, the standard nut used in the angle grinder to secure the discs already has holes through which it is easy to insert the fishing line (cord).

So, there are many options from which to make a barbell (holder). The simplest is a longer wooden holder than for a shovel. A grinder is attached to its end at the right angle with the help of regular tape. The fishing line is inserted into 2 holes of the nut, after which it is twisted. Thus, in a few minutes you get a trimmer that can mow the grass without any problems.
For the safe operation of a home-made device, you can improve it by making a protective cover (how to do this will be discussed later).

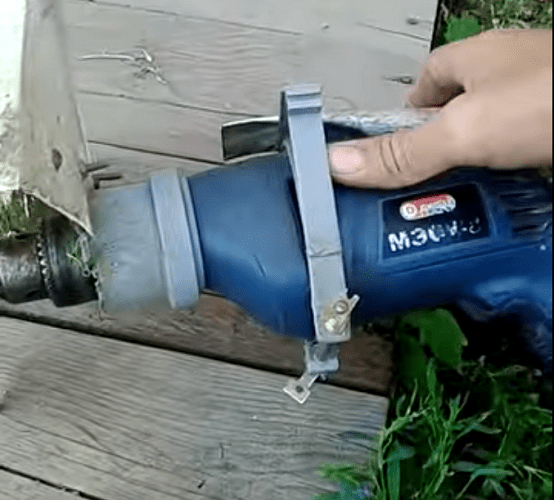
For advanced craftsmen with welding machine, you can advise a more advanced design for fixing the grinder and the protective cover. It is made of an aluminum tube (serves as a holder) and a metal square profile. Looking at the figure below, you can understand the principle of manufacturing the holder.

The grinder is fixed on the holder with bolts inserted into the holes that are designed to fasten the handle to the device.

The following photo shows how this design looks from below.

By the way, you can also screw the holder (rod) to the holes for attaching the handle when you want to make a simple trimmer that is easy to assemble and just as easy to disassemble if you need to use the grinder for its intended purpose.

To make it more convenient to hold the trimmer in your hands during work, and it does not rotate around the axis of the rod, you can attach a side handle made of bent pipe.

From a vacuum cleaner
The trimmer from the engine from the vacuum cleaner is made according to the same principle as from the grinder. The motor must be mounted on the rod, and either knives or a plastic or metal disk should be attached to the motor shaft, into which the fishing line should be inserted. From above the cutting tool is closed by a protective casing.

To prevent dust and small particles of cut grass from entering the motor removed from the vacuum cleaner, it can also be hidden in plastic casing made from a sewer pipe, as shown in the following photo.

Since the motor in the vacuum cleaner is high-speed, it needs to be provided with cooling. Therefore, under the washer into which the fishing line is inserted, it is recommended to insert a home-made disk with slotted and curved blades so that it acts as a fan that creates a vacuum. It is required so that air is sucked in through a hose from above and cools the motor.

In order to ease the load on the hands of the mower operator, the unit can be installed on a platform with wheels. In this case, you will already get something similar to a lawn mower.

You can also use either a pulley with a suitable mounting hole or a plastic wheel from a trolley to secure the line.

From a drill
The simplest mower is made in a matter of minutes from a drill or screwdriver. But first you must make a knife from sharpened metal plate with a hole drilled in the center. A bolt is inserted into this hole and clamped with a nut.


Since the drill with this nozzle does not have a protective casing, such a tool is quite dangerous for the user. To protect yourself, you can place a drill, like a grinder (this was discussed above), on a shovel handle or on an aluminum pipe.

Also, to protect the user of the mower from knives, a casing can be attached to the drill (it is attached to a plastic pipe and put on the body of the device).
The drill is attached to the bar with clamps.


From a chainsaw
For a chainsaw, many different nozzles have already been invented that expand the capabilities of this unit, for example, a cultivator, a drill, outboard motor, as well as a braid nozzle. You can see what it looks like in this video. In case you want to make a trimmer out of a chainsaw, then the maximum that you can do is a lawn mower on wheels, since the engine of the unit is quite heavy, and you won’t be able to apply the trimmer manufacturing options described above (with a lower drive position).
Therefore, the trolley is made first. It can be welded from a corner of 25x25 mm. The dimensions of the frame should be 500x600 mm. Wheels are attached to the corners of the frame.

When installing the trolley handle, make sure that it does not block the winder (starter).
The gasoline engine is mounted (screwed through the holes to secure the tire) to the frame so that the gearbox is rotated 90 degrees and the shaft is at the bottom.
Now it remains only to attach the cutting tool to the shaft of the unit. This is done in the following way.
- It is necessary to weld a small piece of pipe, 80 mm long and 50 mm in diameter, to the “asterisk” of the apparatus. It is best to cut the pipe lathe so that the ends are perfectly even.
- Next, find a pipe with a slightly larger diameter - equal to 58 mm. It must also be cut to a length of 80 mm. Thus, you will get a telescopic shaft, which is connected with 2 bolts (m6) located opposite each other. Bolts must have locknuts. Below is a diagram on which the trimmer head is made, which serves to secure the cutting tool.

Several holes must be made in the telescopic tubes so that the height of the knives above the ground can be adjusted.
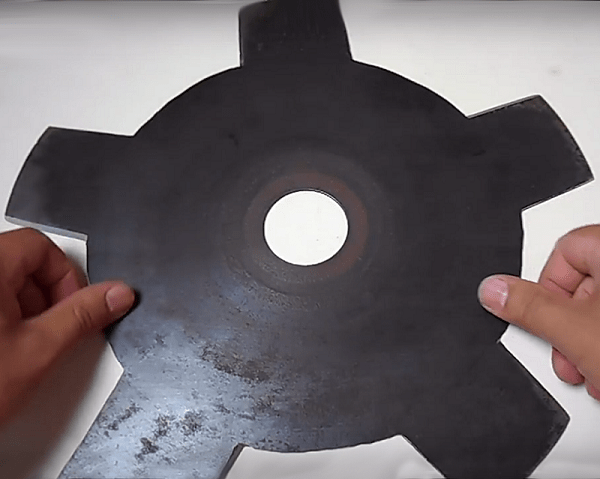
It is better to make a knife of such a design as in the following figure.

Due to the fact that movable knives on rivets are fixed on the disk, they will simply bounce off when they meet a stone or a dry branch. This will protect the shaft and gearbox from damage that can occur when the tool jams.
The rivets that hold the knives on the disk must be metal.
The disc diameter (made from 4 mm sheet steel) should be 180 mm. Knives are made from strips 30 mm wide and 120 mm long, cut by a grinder from a hacksaw blade for wood.
DIY trimmer knife
If you need to mow plants with thick or stiff stems, then ordinary fishing line will not cope with this task. Therefore, you cannot do without a special metal knife. Trimmer knives can be bought at a specialized store, or you can make it yourself, for example, from an old circular saw blade (without soldering). The knife is made as follows.

Homemade protective cover
If you are making homemade mower then you will definitely need a protective cover. It will protect your eyes, body and legs from injury from small pebbles and splinters of knives if they break.
The casing for the trimmer can be made from a sheet of aluminum or thin tin.

In this way, it is possible to manufacture and install a protective cover on a trimmer purchased in a store if the shield is split for some reason. Shields in factory machines are made of plastic and often break if you unsuccessfully hit the trimmer head on the ground to lengthen the line.

Trimmer belt
For more comfortable work with the trimmer, if you intend to process a large area overgrown with grass, it is advisable to use a special belt. This device removes fatigue from the hands and back of the mower operator and greatly facilitates the process when compared with the same work, but without a belt.
Straps are shoulder and knapsack. The shoulder strap is the most simple fixture and consists of a loop with two or one latch (carbine), with which it is attached to the mowing unit. A plastic plate is usually attached to the second carabiner, protecting the operator's side from pressure from the trimmer bar.

The shoulder strap is usually used with light trimmers, weighing 3-4 kg. For heavier units, it is more convenient to use a backpack strap.

A trimmer belt can be easily ordered online or bought at a specialized store that sells these machines and accessories.
The price of backpack straps starts from 250 rubles and above.

If there is a desire to make it with your own hands, then any housewife, looking at this device, can easily sew it from improvised means (old belts and belts). You may have to buy buckles and carabiners. But still, we recommend buying a ready-made knapsack suspension and not wasting time and money on making a device that is worse in quality than the finished one.
technika.expert
Homemade from a screwdriver: an electric generator, a grinder, a trimmer, a lawn mower, an engraver, a brush cutter
A screwdriver is widely used in various fields of activity for working with fasteners. different kind: self-tapping screws, screws, bolts with nuts, furniture confirmers, screws and others. Also, with the help of this power tool, holes will be rolled into different materials, for example, in various metals, in lumber, in concrete. At the same time, the functionality of the operated model is determined by the value of its power and torque, the presence of a shock function.
From a screwdriver, you can make a variety of equipment and tools for domestic use at home. In addition to the power tool itself, in many cases, additional parts and materials will be required for rework. But home-made devices will still cost less than factory counterparts, allowing you to automate and make it more efficient. manual labor.
Ideas for homemade technology from a screwdriver
The entire range of screwdrivers is divided into mains and cordless models. Both types of products work due to electrical energy, which drives an electric motor. Only the electric motor itself for network devices is designed for an alternating voltage of 220 V, and for battery technology for a constant voltage of different values, for example, 12 V, 14.4 V. These design features, together with the technical characteristics, largely determine which homemade products from a screwdriver can be assembled .
Electricity is one of the main types of energy used by mankind. Due to electricity, household appliances, industrial equipment, machine tools, and power tools function. The work is done by electric motors. different design and power, which are powered by alternating or direct currents. For this reason, the following technical devices can be assembled on the basis of a screwdriver or from its individual parts:
- garden shredder of grass and branches;
- trimmer (electric scythe);
- camping manual generator;
- engraver (mini-drill, dremel, drill);
- wind generator;
- lawn mower;
- grinder;
- mini-machines: drilling, grinding, thicknessing, turning, sawing, sharpening;
- tool for knitting reinforcement;
- gate opening drive;
- vehicles for children: ATV, bicycle, scooter;
- a small ice drill, a hole drill, a construction or kitchen mixer.
The powerful impact type model can also be converted into a concrete rammer with a special attachment.
The implementation of each option takes different time and requires additional (insignificant) costs, or does without them at all.
Assembling a manual camping electric generator and a homemade wind generator
It will not be difficult to make a home-made generator from battery models of the tool, which will produce electricity when the attached handle is rotated by hand. Such a device is useful in field conditions. To make a dynamo, you do not need to radically modify the product. Everything you need to create a camping generator is already in the design of the device, only minor improvements will be needed.
With the help of the created equipment, it will be possible to charge 6 or 12 V batteries.
For alteration, a power tool with an operating voltage of 18V and above is suitable. Modification is carried out in the following way:
- disassemble the electric screwdriver;

- carefully solder the electronic board;
- instead of batteries, they put a diode bridge that is suitable in terms of parameters (dimensions, technical characteristics) inside the battery case;

- make a comfortable handle with a handle;
- the end without a handle is fixed in the cartridge.
The final design after the done manipulations will look something like in the photo below.
The diode bridge is necessary so that the handle of the generator can be turned in any direction. Instead of a handle, you can insert a nozzle with blades. Then you get a simple wind generator.
An electric generator powered by wind is also made in a different way, in the form of a weather vane. In this case, the following is done with the battery device:
- disassemble the screwdriver;
- take out the electric motor by disconnecting its contacts;
- remove the cartridge with the gearbox (rotary part);

- the shaft of the electric motor is inserted into the cartridge, clamping it;
- a round metal plate about 1 mm thick is bolted to the gearbox gear, which will serve as the basis for fixing the blades made, for example, from plastic pipes;
- a clamp with a clamp is put on the shaft between the cartridge and the gear;

- cut out a rectangular base from plywood or thin metal;
- using a clamp with a clamp, an engine with a cartridge is attached to it, having drilled holes for fastening in the right places;

- make a casing to protect the wind generator (from precipitation, dust and other unforeseen influences), for example, from under a coffee can;
- insert the base with the engine and cartridge inside, fixing the elements with glue, and the cover with sealant;

- make blades by attaching them to the round plate of the unit;
- make a weather vane;
- an assembled generator is mounted on one of its ends;

- connect the wiring to the motor outputs;
- check the output voltage with a multimeter by rotating the blades by hand.
There are many options for wind generators. Even the entire screwdriver is attached to the support, providing it with a nozzle with blades.
Alteration of a screwdriver into a grinder
If angular Sander broken or it is completely absent, then it can be temporarily replaced with a cordless or mains electric screwdriver. However, there are various remodeling options. The easiest way is to use ready-made or homemade nozzles or adapters. An example of an adapter is shown in the photo below. One of its ends is fixed in the cartridge, and a disk clings to the other.

Another option that allows you to convert a drill driver into a grinder is to use a special type of nozzle equipped with a gearbox. When implementing the method, the power tool is dismantled, its gearbox is dismantled, and a nozzle is installed instead. After the transformations, you get a tool similar in appearance to an angle grinder.

It should be taken into account that such a special nozzle is expensive, and the modification work requires a lot of time.
Homemade nozzles are made from studs of suitable diameter, nuts and washers. They are used even with cordless electric screwdrivers.

The efficiency of homemade products is much lower than that of factory grinders. This is due to the large difference in the speed of rotation of the nozzles: about 3000 rpm for a screwdriver versus about 11,000 rpm for an angle grinder. A small amount of power, together with a low speed, significantly limit the functionality of the device made.
The fixtures made should only be used when emergency situations. Due to the possibility of reversing on the reworked tool, it is necessary to follow the direction of rotation of the disk so as not to injure yourself.
Converting a screwdriver into a trimmer or lawn mower
To make an electric scythe with your own hands, you will need the following parts and materials:
- a piece of plastic pipe about 2 m long;
- soldering iron with soldering kit;
- fasteners: self-tapping screws, bolts with nuts;
- 45 degrees plastic corner;
- pipe cap;
- 12 V motor from an electric screwdriver and a battery from it;
- the wire;
- adapter from 40 to 50 mm for plastic pipes;
- power button;
- plastic bucket;
- contact clips (crocodiles) - 2 pcs;
- blades from stationery knives.
The work uses a pipe and a corner to it with a diameter of 40 mm.
The conversion process is carried out as follows:
- having disassembled the electric screwdriver, they take out the motor;
- attach it to the plug, having previously marked and drilled landing holes in it;

- attach the electric motor with 2 screws;

- solder the leads to the motor;

- install an electric motor, pushing its wiring in the pipe;

- mark the location of the future switch with a marker on the tube;


- connect to the wiring switch, mount it;

- attached to the ends of the outgoing wires contact clamps for the ability to quickly connect to the battery;

- a battery holder is made from an adapter;

- connect the drive, connect the adapter to the tube;


- using a conventional terminal clamp, the nozzle is connected to the motor shaft;

- a protective cover is made from a plastic bucket;
- glue the part to the pipe;

- check the functionality of the structure.
 The created device will allow you to mow only the grass cover with soft stems. Various options there are a lot of lawn mowers based on network models of drill-drivers. The photos below show two homemade.


First, a base is created from metal, plywood or other materials, to which the wheels are then attached, as well as the control knob. Clamps or to the rack fix the electric screwdriver. A cutting nozzle is inserted into the cartridge. To protect the legs from flying grass, a casing is attached to the back of the base. Power is made through a button or directly from the network.
To assemble a sufficiently functional lawn mower, you need to take a drill driver from 0.5 kW with a power.
Assembly of the engraver
A cordless or corded model of an electric screwdriver can be turned into an engraver, which is also called a dremel, a drill, a mini drill, a straight grinder. To do this, simply buy a nozzle in the store and grind any bit under it.

Homemade cartridge allows you to use a variety of accessories designed for dremels.

The following video demonstrates the process of creating an engraver with a flexible shaft.
Making a garden shredder
garden shredder for grass and thin twigs (less than 1 cm thick) can be made on the basis of a corded drill/driver.
Create an aggregate like this:
- choose a suitable container, for example, zinc decoction;
- in the center of the bottom, a hole is drilled for the shaft, on which a knife or several blades will be fixed;
- make wood or metal carcass to install the container or put it on the edge of the table;
- a drill-driver is attached to the frame or bottom of the boil-out, which is equipped with knives;
- mount the on / off button;
- make a slot in the side of the container - cut out a rectangle in front of the bottom 10 by 20 cm;
- a sleeve is made of tin for ejection of crushed plants;
- attach it to the container;
- check the performance of the unit.

Knives are easiest to make from hacksaw blades. You need to install them sharpening down. In this case, you can make several options for blades for different herbs. If you make a nozzle in the form of knives for a drill-driver, then you can simply chop the grass in a bucket or other suitable container.

Screwdriver machines
Craftsmen made many different-purpose machines from a screwdriver. They are quite capable of handling everyday tasks.
If you need to work professionally, then more serious equipment is indispensable.
One of the options for how to convert a drill driver into drilling machine shown in the video below.
The way to create a simple lathe is shown in the video below.
Also, on the basis of a drill-driver, it is possible to assemble the simplest milling and grinding machines, which is demonstrated in the following videos.
Other non-standard ways to use the tool
Non-standard use of a screwdriver is not limited to the options considered. The video below shows how to use this power tool as a drive for an ATV and for opening doors (gates), for drilling ice, as a mixer. The video also contains other non-traditional options.
Using a case with a battery, you can make a good flashlight. The whole assembly process LED lamp shows the video below.
How to adapt a screwdriver motor to make an electric bike is shown in the videos below.
Another option for a motorized bike contains a video below.
Using a hook inserted into a screwdriver chuck, you can knit reinforcement during the construction of various objects. The following video demonstrates how this is done.
By connecting the tool to the auger of a manual meat grinder, you can automate the process of twisting vegetables and meat.
It should be borne in mind that homemade products of this kind are often very limited in load. But if they do not get practical use, then entertainment is guaranteed.
This unconventional use of a screwdriver is not limited. Craftsmen constantly put forward new ideas, while their practical implementation takes place. Other specialists adapt homemade devices for your own needs, while receiving a variety of modifications homemade technology. You can also come up with something on your own, showing technical knowledge and imagination, giving free rein to imagination and creativity. The main thing to remember: when starting to manufacture various devices, it is necessary to take into account that the created mechanisms are safe.
All owners of personal plots are faced with the problem of mowing the grass, which is growing literally before our eyes, and it takes several times to ennoble their site several times during the season. The usual manual scythe has long been replaced by gas trimmers and electric trimmers. But the price for them is not reduced and is quite tangible for many owners of cottages and private houses. Craftsmen nevertheless found a way out of this situation and learned how to make trimmers with their own hands literally from improvised means, using gas and power tools that were not intended for these purposes.
Most often, a home-made electric trimmer is made on the basis of an ordinary grinder, which is available to every home master. This tool is almost ideal for conversion into a trimmer. It has more power than store-bought machines and a higher number of revolutions per minute. In addition, the standard nut used in the angle grinder to secure the discs already has holes through which it is easy to insert the fishing line (cord).
So, there are many options from which to make a barbell (holder). The simplest is longer than for a shovel, wooden holder. A grinder is attached to the end of it at the right angle using ordinary tape. The fishing line is inserted into 2 holes of the nut, after which it is twisted. Thus, in a few minutes you get a trimmer that can mow the grass without any problems.
For the safe operation of a home-made device, you can improve it by making a protective cover (how to do this will be discussed later).

For advanced craftsmen who have a welding machine, we can advise a more advanced design for fixing the grinder and the protective cover. It is made made of aluminum tube(serves as a holder) and a metal square profile. Looking at the figure below, you can understand the principle of manufacturing the holder.

The grinder is fixed on the holder with bolts inserted into the holes that are designed to fasten the handle to the device.

The following photo shows how this design looks from below.

By the way, you can also screw the holder (rod) to the holes for attaching the handle when you want to make a simple trimmer that is easy to assemble and just as easy to disassemble if you need to use the grinder for its intended purpose.

To make it more convenient to hold the trimmer in your hands during work, and it does not rotate around the axis of the bar, you can attach side handle made from bent pipe.

From a vacuum cleaner
The trimmer from the engine from the vacuum cleaner is made according to the same principle as from the grinder. The motor must be mounted on the rod, and either knives or a plastic or metal disk should be attached to the motor shaft, into which the fishing line should be inserted. From above the cutting tool is closed by a protective casing.

To prevent dust and small particles of cut grass from getting into the engine removed from the vacuum cleaner, it can also be hidden in a plastic casing made from a sewer pipe as shown in the following photo.

Since the motor in the vacuum cleaner is high-speed, it needs provide cooling. Therefore, under the washer into which the fishing line is inserted, it is recommended to insert a home-made disk with slotted and curved blades so that it acts as a fan that creates a vacuum. It is required so that air is sucked in through a hose from above and cools the motor.

In order to ease the strain on the hands of the mower operator, the machine can be install on a platform with wheels. In this case, you will already get something similar to a lawn mower.

You can also use either a pulley with a suitable mounting hole or a plastic wheel from a trolley to secure the line.

From a drill
The simplest mower is made in a matter of minutes from a drill or screwdriver. But first you must make a knife from a sharpened metal plate with a hole drilled in the center. A bolt is inserted into this hole and clamped with a nut.


Since the drill with this nozzle does not have a protective casing, such a tool is quite dangerous for the user. To protect yourself, you can place a drill, like a grinder (this was discussed above), on a shovel handle or on an aluminum pipe.

Also, to protect the user of the mower from knives, a casing can be attached to the drill (it is attached to a plastic pipe and put on the body of the device).
The drill is attached to the bar with clamps.
From a chainsaw
For a chainsaw, many different nozzles have already been invented that expand the capabilities of this unit, for example, a cultivator, a drill, a boat motor, as well as a scythe nozzle. You can see how it looks in this video. In case you want to make a trimmer out of a chainsaw, then the maximum that you can do is lawn mower on wheels, since the engine of the unit is quite heavy, and it will not work to apply the above-described options for manufacturing trimmers (with a lower drive location).
Therefore, the trolley is made first. It can be welded from a corner of 25x25 mm. The dimensions of the frame should be 500x600 mm. Wheels are attached to the corners of the frame.

When installing the trolley handle, make sure that it does not block the winder (starter).
The gasoline engine is mounted (screwed through the holes to secure the tire) to the frame so that the gearbox is rotated 90 degrees and the shaft is at the bottom.
Now it remains only to mount on the shaft of the unit cutting tool. This is done in the following way.
- It is necessary to weld a small piece of pipe, 80 mm long and 50 mm in diameter, to the “asterisk” of the apparatus. It is better to cut the pipe on a lathe so that the ends are perfectly even.
- Next, find a pipe with a slightly larger diameter - equal to 58 mm. It must also be cut to a length of 80 mm. Thus, you will get a telescopic shaft, which is connected with 2 bolts (m6) located opposite each other. Bolts must have locknuts. Below is a diagram on which the trimmer head is made, which serves to secure the cutting tool.

Several holes must be made in the telescopic tubes so that the height of the knives above the ground can be adjusted.
It is better to make a knife of such a design as in the following figure.

Due to the fact that movable knives on rivets are fixed on the disk, they will simply bounce when they meet a stone or a dry branch. This will protect the shaft and gearbox from damage that can occur when the tool jams.
The rivets that hold the knives on the disk must be metal.
The disc diameter (made from 4 mm sheet steel) should be 180 mm. Knives are made from strips 30 mm wide and 120 mm long, cut by a grinder from a hacksaw blade for wood.
DIY trimmer knife
If you need to mow plants with thick or stiff stems, then ordinary fishing line will not cope with this task. Therefore, you cannot do without a special metal knife. Trimmer knives can be bought at a specialized store, or you can make it yourself, for example, from an old circular saw blade(without soldering). The knife is made as follows.
Homemade protective cover
If you are making a homemade mower, then you will definitely need a protective cover. It will protect your eyes, body and legs from injury from small pebbles and splinters of knives if they break.
The casing for the trimmer can be made made of aluminum sheet or sheet metal.

In this way, it is possible to manufacture and install a protective cover on a trimmer purchased in a store if the shield is split for some reason. Shields in factory machines are made of plastic and often break if you unsuccessfully hit the trimmer head on the ground to lengthen the line.

Trimmer belt
For more comfortable work with the trimmer, if you intend to process a large area overgrown with grass, it is advisable to use a special belt. This device removes fatigue from the hands and back of the mower operator and greatly facilitates the process when compared with the same work, but without a belt.
Belts are shoulder and knapsack. The shoulder strap is the simplest device and consists of a loop with two or one latch (carabiner), with which it is attached to the mowing unit. A plastic plate is usually attached to the second carabiner, protecting the operator's side from pressure from the trimmer bar.

The shoulder strap is usually used with light trimmers, weighing 3-4 kg. For heavier units, it is more convenient to use a backpack strap.

A trimmer belt can be easily ordered online or bought at a specialized store that sells these machines and accessories.
The price of backpack straps starts from 250 rubles and above.

If there is a desire to make it with your own hands, then any housewife, looking at this device, can easily sew it from improvised means (old belts and belts). You may have to buy buckles and carabiners. But still, we recommend buying a ready-made knapsack suspension and not wasting time and money on making a device that is worse in quality than the finished one.