Instructions
First, let's look at the material from which the bathtub is made; your further actions to secure it in place will depend on this.
If the bath is cast iron, then its undeniable advantage is durability, and it also retains heat for a long time. However, it is incredibly heavy and not every floor can support it, so it is advisable to build a podium for it.
If the bathtub is made of steel, then it is much lighter, cheaper, easier to install, but its service life is shorter than that of cast iron. The significant disadvantages of such a bath include the noise that the water makes when you fill it. Even your neighbors can hear it. Therefore, before installation, it must be coated on the outside with putty. It will muffle sounds and help the steel bath stay warm longer. Also, a steel bathtub quickly loses its attractive appearance: the enamel easily falls off.
Another material from which bathtubs are made is acrylic. These baths are very comfortable, beautiful, non-slippery and retain heat well. But their main drawback is low strength. No matter how much manufacturers praise acrylic bathtubs, there have been cases when such a bathtub simply could not withstand the weight of an overweight person and its legs were pressed inward.
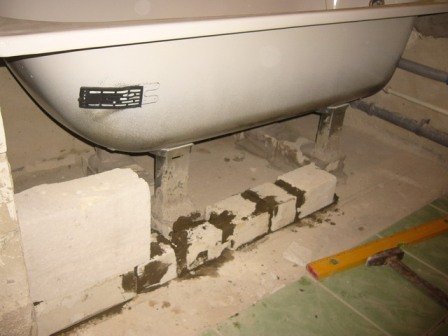
Most often, bathtubs are placed on legs. But the problem is that if you just place it on the floor, it will wobble while you take a bath, which is not very pleasant. What way out of this could there be? In the case of a cast iron bathtub, build a podium in the place where it will stand, so that the legs of the bathtub remain on the floor, and the podium supports only the bottom. The podium is made of brick and leveled using a bubble level. Then, together with an assistant, install the bathtub on the podium and, if necessary, adjust the height of the legs; this will be easier to do, since now the bathtub rests not on them, but on the podium.
The general principles for installing and securing the bathtub are as follows:
* Place the bathtub on one side and install an overflow pipe on the outside in case the bathtub overflows, and an outlet in the bottom of the bathtub;
* Connect the floor siphon to the outlet and overflow of the bathtub;
* Now attach the legs to the bathtub and place the bathtub so that the siphon pipe is inserted into the sewer pipe.
* Move the bathtub close to the walls
* Caulk the joint between the siphon and the drain;
* Place wooden plates under the legs of the bathtub so that the bathtub is installed with a slight inclination towards the drain, otherwise water will constantly accumulate inside the bathtub;
* Once the bathtub is securely fixed and the height is adjusted, it is necessary to seal the gaps between the bathtub bots and the walls using cement or putty. It is better to place a ceramic rim on top of the sealing layer.
Buying a new bathtub means not only placing the accessory in the bathroom, but also connecting and securing it. Today we will tell you how to fix a bathroom with your own hands, following all the rules.
At first glance, installing a new bathtub seems very simple process, but there are nuances, non-compliance with which can lead to certain problems. For example, if you install the bathtub not level, the water will not flow into the sewer and will constantly accumulate at the bottom; if the bathtub is not installed securely, it will wobble, which means that the drain may fail, the gaskets will loosen, and leaks will occur. To prevent this from happening, the bathtub must be installed according to all the rules, and today we will learn how to do this together.
We have already discussed several methods for installing a bathtub in our previous articles, but today we will study the algorithm for fixing bathtubs made of steel, cast iron and acrylic separately.
You should not skimp on means and materials for fixing bathtubs, because they are what give the structure rigidity, strength and durability.
How to fix a cast iron bathtub?
Classic bathtub of great weight, with many positive characteristics and original appearance. It is necessary to install this slowly and very carefully, because any mistake can lead to breakdown or, God forbid, to injury.
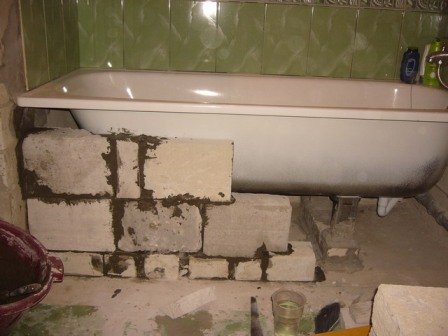
A cast iron bathtub is installed on legs, a brick base or metal frame. The most correct solution would be to install the bathtub on bricks. This way, you will create a truly reliable foundation under the bathtub from which cast iron bath won't go anywhere. You can secure a cast iron bathtub with auxiliary elements.
So, the installation itself takes place on brickwork standard height so that a siphon, etc. can be easily placed under the bathtub necessary equipment, and also, there was little space to install, for example, a shelf or make a niche for accessories. At the same time, it is worth considering that the bathtub should not be too high; its height should be equal to ease of use.
When installing the bathtub, you can consider attaching it to the walls using metal corners. It won't get you in a large sum and will not take much time, but will specifically increase the strength of the installation. The place for installing the corners is marked after fitting the bathtub on bricks; they are fixed to the wall around the perimeter, or on both sides of the bathtub, with dowels or anchor bolts. Next, the bathtub is simply reinstalled on the bricks and receives support in the form of metal corners.
The enviable strength of installing and securing the bathtub has already been ensured, but you can always add rigidity by using one interesting technique– installation of a shield on the facade of the bathtub or a convenient screen. This way, you can tie together the bathtub, frame and stiffening corners, as well as properly secure the bathtub and decorate the niche under the bathtub.
How to fix a steel bathtub?
As a standard, a steel bathtub is mounted on adhesive legs, bench legs, or ordinary legs with bolts that are screwed to the bottom. Just imagine a bathtub half filled with water and add your weight to it. Isn’t it scary to install such a bathtub on legs that are attached with glue? We would be afraid, since it is better not only to install the bath well, but also to secure the bath, than at some point to end up with it and all the liquid on the floor.
Naturally, manufacturers will promise high quality and stability, but it’s not for nothing that people began to install bathtubs on bricks and metal frames. Agree, this does have some meaning.
So, how to install and properly secure a steel bathtub? Bricks are not necessary here, since the bathtub itself is light in weight, unlike cast iron, which means a metal frame welded from a corner will be enough. Having correctly taken the dimensions and made the frame, you try on the bathtub and make an additional frame for the bathtub from a metal profile. It is very fast and inexpensive, and also provides excellent stability.
The metal profile frame is mounted to the wall, strictly under the bathtub, strictly according to the markings in order to maintain the correct height and all levels. Next, you can apply the technique we described earlier, connect this frame with the frame under the screen, and in one fell swoop secure the bathtub for its stability and install decorative panel on the facade of the bathroom, effectively closing the niche. Also, if there are legs left in the kit, and they take up space in the pantry without use, you can screw them in, but only after installing the bathtub on the frame, selecting the height of the legs according to the finished structure.
How to fix an acrylic bathtub?
Everyone says that an acrylic bathtub is very lightweight and that installing it is a piece of cake. But this is only if the acrylic bathtub is standard, but if it is oval and one and a half in size, or corner, and even with nozzles for simple hydromassage, then everything is a little more complicated. We feel that the size and additional hardware adds a bit of weight, which means that the mounting of the acrylic bathtub needs to be more thoughtful.
Of course, the kit always includes legs or even a frame for installation, depending on the bathtub model, manufacturer and cost of the accessory. But install acrylic bath We would advise using bricks or even a podium, so as not to transfer the weight only to certain points, which is why deflections and cracks occur, but to distribute it evenly across the plane. Well, in principle, there will be no problems with this, but there will be problems with the correct level setting. Here you should calculate everything very accurately, since if you install the bathtub unevenly, you will immediately see a not particularly pleasant gap between the bathtub and the floor, or you will feel discomfort from the fact that the water lingers in the bathtub. In general, everything is as usual here, with clear dimensions and adherence to levels.
The work will be more difficult and will take more time. It is the fragility of the accessory that will ensure the labor intensity, but if you do everything without haste and wisely, then everything will work out for you. Install the bathtub on bricks, make a frame from an ordinary metal profile, as is the case with a steel bathtub, and fasten the bathtub properly.
The finished structure, especially if it is single, will have enviable rigidity and strength, which means that your bathtub will remain in place until you decide to replace it.
How to secure a whirlpool bath?
SPA baths, jacuzzi, regular hydromassage baths are installed in approximately the same way as standard ones, but there is one very serious nuance here - if you do something wrong, the product may void the warranty, and if it costs a decent amount, then this is extremely undesirable. Incorrect installation, no correct connection, non-compliance with technology - and that’s all, you are alone with problems that may not happen with a new accessory, but they can happen at any moment.
We suggest entrusting the installation and fastening of SPA bathtubs to specialists, preferably the sellers of expensive bathroom accessories themselves, this will be much more correct.
In addition to installing and securing the bathtub, do not forget about other rules - mandatory compliance with levels and dimensions, correct connection of water supply and sewerage, and so on.
As you can see, there are no difficulties in this process, but only if you are confident in own strength, you have certain skills and you have everything you need in your pantry to carry out such a process. If not, then here you will have to choose, learn to fix a bathtub with your own hands, through nerves and mistakes, or pay the experts and get results.
- 1 Cast iron, steel and acrylic - what's the difference
- 2 Fastening bathtubs and communications to them
- 3 Wall mounting options
- 4 Large gap from the wall - what to do
- 5 Videos
One of the most important elements in bathrooms there is a bathtub, and this despite the fact that today relatively inexpensive shower stalls are considered more popular. Many people are interested in how to fix a bathtub to the wall so that water does not flow down the wall under the bathtub, and the bathtub itself does not wobble. For this purpose, special fasteners are used; they may differ noticeably, given the difference in types of bathtubs.
Cast iron, steel and acrylic - what's the difference
Cast iron baths. During installation, you will feel that these bathtubs weigh quite a bit, so they need to be placed on a strong and stable base.
Steel baths are fixed on a podium, the walls of which are made of bricks. A bathtub installed inside the podium will never wobble and will remain very firmly on its base. However, if you fix the bathtub in this way, then noise during its filling with water cannot be avoided.
You can reduce the sound when filling the bathtub by treating its outer part polyurethane foam or putty. Then the sound of water will not be heard, and the heat will remain in the bath longer.
Those who install an acrylic bathtub know that it retains heat much better than its cast iron counterparts, and their surface is non-slip. Acrylic bathtubs are also known for their pleasant appearance, although, however, the degree of its strength is not so high. Considering that acrylic bathtub flexible bottom, a metal frame should be made for such a bathtub, otherwise the bottom of the bathtub will bend under the weight of a person. It is also necessary to use special legs, which are part of the frame for bathtubs made of acrylic and steel.
Fastening bathtubs and communications to them
Regardless of what kind of bathtub will be installed, you need to learn a few basic principles that will help you install the bathtub correctly:
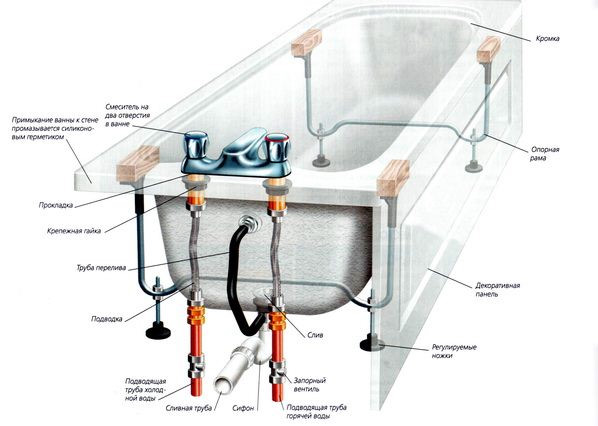
- It is more convenient to attach the drain pipes when the bathtub is lying on its side. You must turn it over on its side carefully, otherwise there is a risk of damaging the bathtub coating. After this, overflow and drain pipes are installed to it.
- The next step is to connect the siphon to pipes (usually plastic and flexible).
- The legs are attached to the bathtub in its lying position, and it is installed on them so that the siphon pipes can be easily connected to the sewer.
- The bathtub is placed on legs only after the drain has been installed.
- Once installed in the proper place, the bathtub is leveled horizontally using a level (to do this, adjust the height of the legs).
- After installation of the drainage system is completed, it must be checked for leaks. To do this, you need to run water into the bathtub, and then check whether it has leaked onto the floor. If there is a leak, the shortcomings must be eliminated - seal the seams with silicone or simply fit the pipes at the joints more tightly.
- Then, if necessary, a frame made of plasterboard or a special podium made of foam blocks is installed, which will hide the bottom of the bathtub.
How to install bathtubs from different materials? Now let's look at this in detail.
Cast iron bathtubs are often installed on four legs. These legs are connected to the body with wedges included in the kit, or the bath supports can be bolted. If a cast iron bathtub needs to be installed on an insufficiently strong loose surface, then metal plates should be used, which are placed under the legs and allow the weight of the bathtub to be correctly distributed over the surface of the base.
The diameter of such a lining must be at least 5 cm, and the thickness - 5 mm or more.
Steel bathtubs do not weigh as much as cast iron bathtubs, so making them stable is a little more difficult. It is better to install them on bricks to increase the support area. An acrylic bathtub is attached exclusively to the wall, otherwise slight play or wobble cannot be avoided. In addition, a frame is assembled, with the help of which the entire structure will be somewhat strengthened. In the video below you can see how the frame of an acrylic bathtub is installed in a bathroom:
Wall mounting options
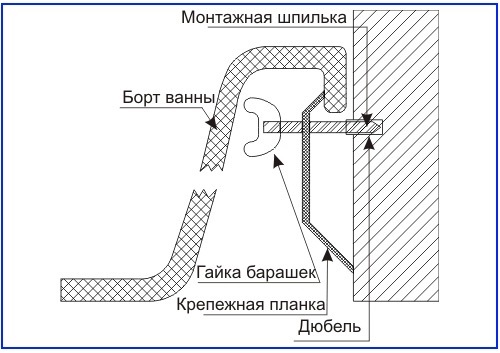
There are several ways to attach a bathtub to the wall.
Insert into a niche. If the installation of a bathtub is carried out in a bathroom where there is not even a rough finish yet, then there is no need to make a niche if, given the size, this is not necessary. The bathtub is simply installed, the walls are plastered, they are finished clean and the joint is treated with sealant so that it does not run along the wall. If you are going to install a bathtub in this way in a bathroom where there is already a rough finish on the walls, you need to purchase a bathtub of the appropriate size and prepare a niche in the wall for it. The diagram shows how to properly install a bathtub in this way.
In principle, the first method is also possible, but it is not as reliable as installation if the tiles are already in place. In this case, the bathtub is attached to the wall only using sealant and decorative plinth.
Installation on metal corner . Cast iron and steel bathtubs can be installed on a metal corner, it is attached along all the walls, and the sides of the bathtub are mounted on it. Next, if desired, a plinth is installed, the joints are treated with sanitary sealant. Why can’t you attach an acrylic bathtub to a corner? Because the side can be deformed, since with inside it is not supported by anything, which will cause the sealant to pull away from the wall and allow water to seep onto the floor.
Installation on hooks or brackets. This is the best way to attach acrylic bathtubs. To install an acrylic bathtub on hooks or brackets, you need to set the bathtub in place, leveling it. Having retreated 20 cm from its corners, make marks. Then the bath is moved aside, the thickness of its sides is measured, this distance is measured down from the marks on the wall and holes are made for one or two dowels. Install fastenings. Then the bathtub is simply placed on hooks or brackets with its sides. That's it - the bathtub is rigidly fixed. A plastic or ceramic plinth is glued on top of the seam, and the joint is treated with sealant.
Large gap from the wall - what to do
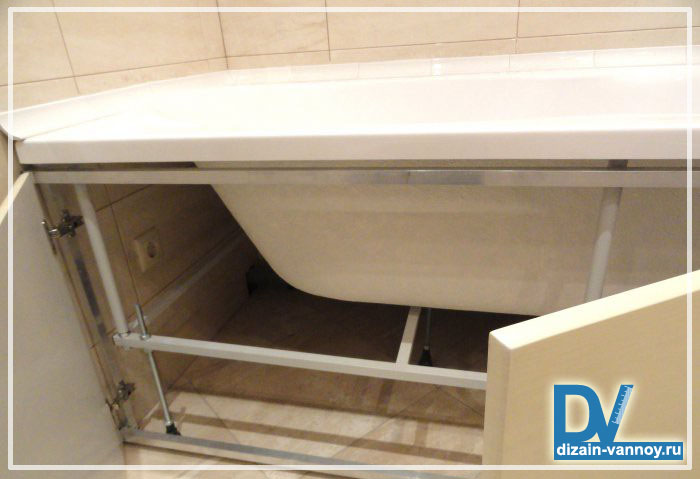
It often happens that after the bathtub has already been installed, there remains a decent distance between it and the wall. Since the bathtub in this case does not touch three walls, it will wobble. In order to firmly fix it, it is necessary to create a frame that can simultaneously be used as a shelf for shampoos and various jars.
What will you need? First of all, with the help metal profiles the frame is assembled. Then it is covered with plasterboard. For this purpose, a special moisture resistant drywall. You definitely need to make a niche with a door so you can get to the plumbing system.
Alternatively, instead of a frame, you can attach a block to the wall so that its top is slightly higher than the level of the bathtub. A shelf is made on the block that will lie on the bathtub. At the same time, it should have a slight slope towards the bathtub so that water does not accumulate.
This video shows how to use special clamps for installing acrylic bathtubs:
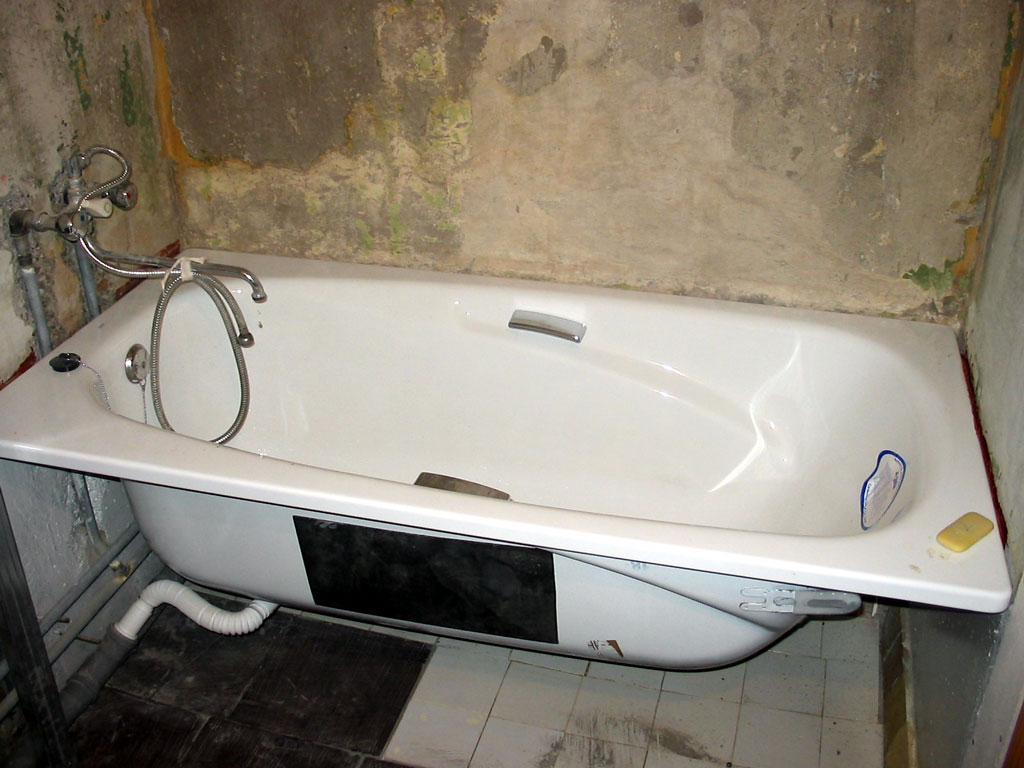
The most common on the market are steel bathtubs. One of the advantages of such containers is their relatively low cost and light weight, making installation steel bath with your own hands is quite possible.
Most common form steel baths– rectangular. And such a container always comes with legs. Bathtubs with curved shapes are also available; in this case, you need to pay attention to the presence of additional supports or a special reinforcing frame.
Preparatory work
The first step is to bring the pipes to the installation site of the mixer. To do this, it is better to use metal-plastic flexible pipes. Laying them along the bottom of the wall will not be difficult, securing them with special devices that are installed on the wall with self-tapping screws into dowels.
Laying pipes in the bathroom
At the point where the pipes turn in the vertical direction, approximately 50 cm from the floor, you need to make two grooves along the thickness of the pipes and place the pipes in them. Secure with staples. Immediately screw the corners to the ends of the pipes to install the mixer. The axial distance between the corner outlets must correspond to the average axial distance between the mixer eccentrics.
Seal the grooves with pipes using alabaster in order to speed up the hardening process of the mass. Clean the bathtub installation site from debris and dirt.
Installation options for a steel bath
First of all, you need to make sure that overall dimensions The bathtubs correspond to the size of the bathroom, otherwise installation will be labor-intensive or even impossible.
On standard legs
As a rule, bathtubs are equipped with supports, which also need to be paid attention to. The desire of manufacturers to reduce the cost of their products in order to make them more attractive often has the opposite effect - the legs can only be used theoretically:
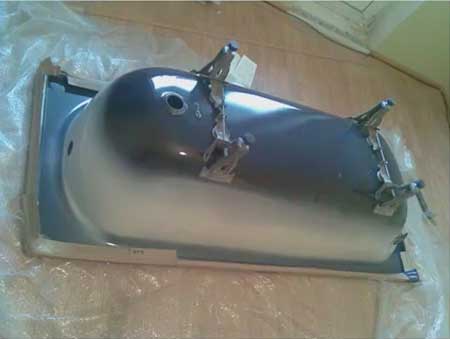
- the container must be dragged into the bathroom and placed upside down directly at the installation site;
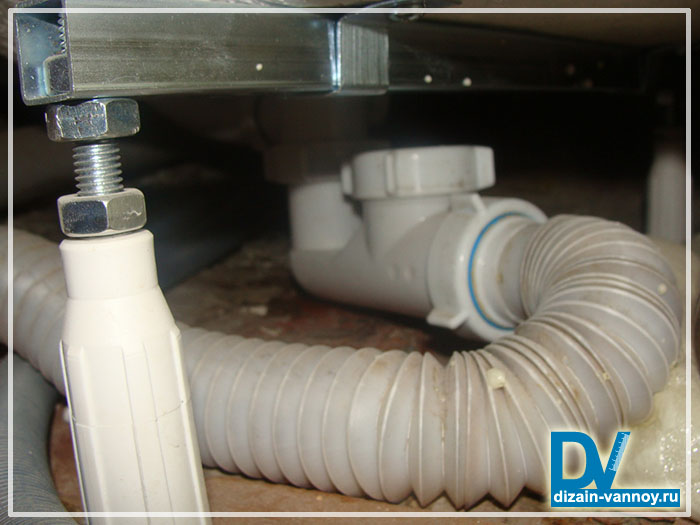
- install a siphon - to do this, screw the bushings of the upper and lower drain into the holes of the vessel. In this case, you must not forget to install the rubber gaskets from the bathtub kit, having previously treated them with silicone sealant. Connect both holes with a corrugated tube. Install a corrugated pipe at the siphon outlet, which, after installation is completed, will be connected to the opening of the gravity sewer pipe;
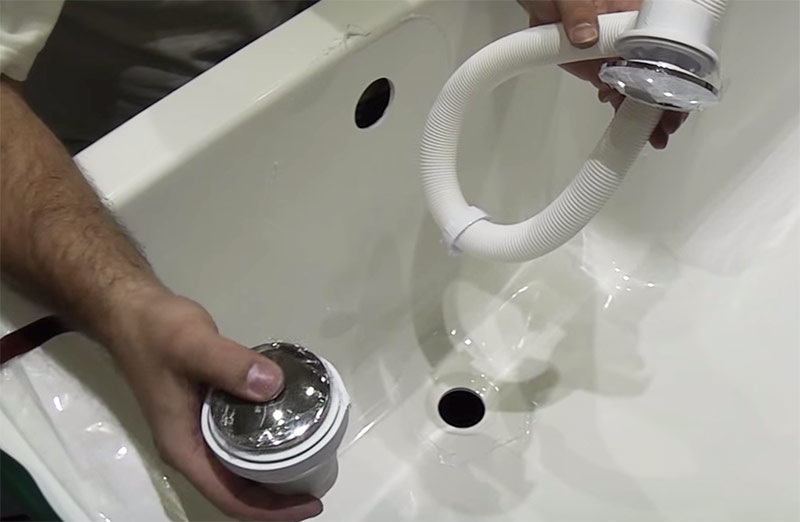 Bath siphon with overflow drain system
 - install legs - the most practical and reliable supports“P” - shaped on a self-adhesive basis. They have a slight deflection along the length, which eliminates unnecessary contact with the bathtub body. The places where the self-adhesive plates come into contact with the body must be degreased with acetone, followed by drying for 7 - 10 minutes;
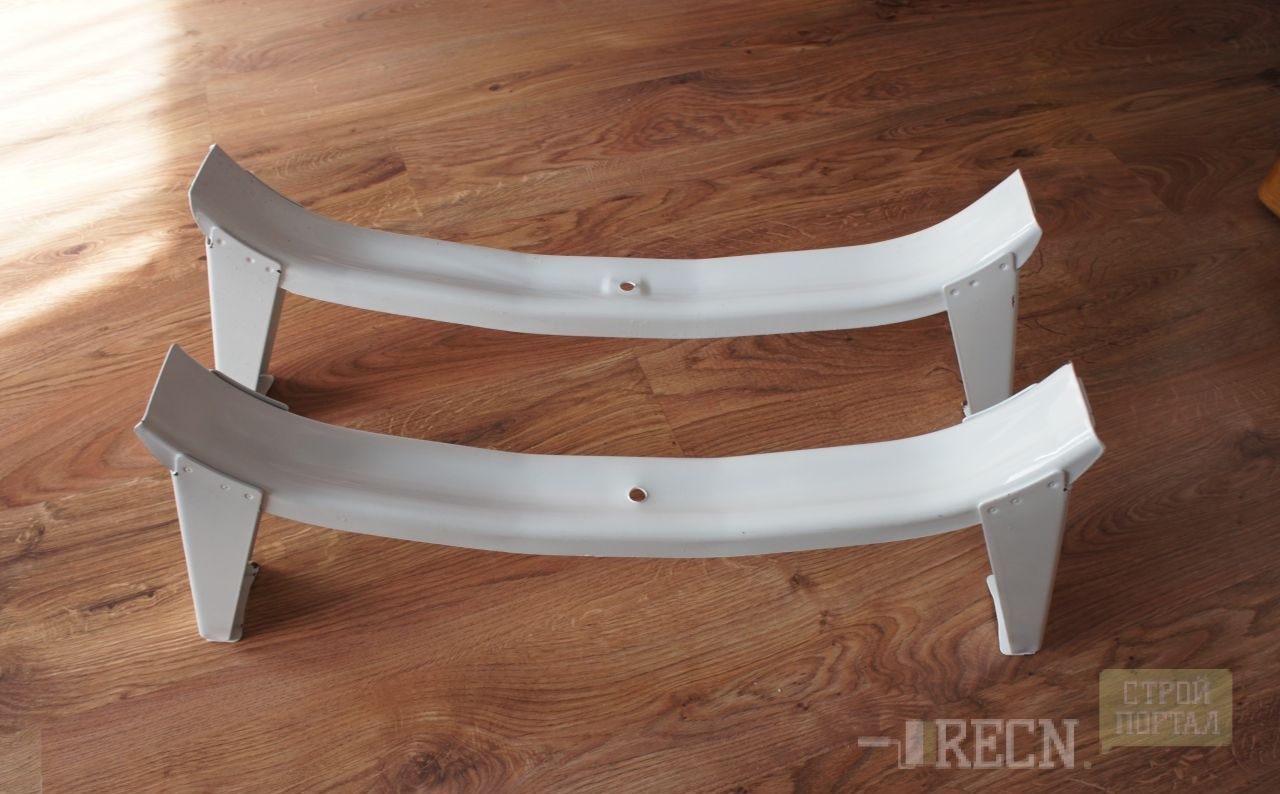 Legs for steel bathtub
 - assemble a control system consisting of threaded rods with plastic supports and nuts. Screw the studs almost all the way to the body. By turning out the studs when installing bathtubs, it will be possible to level the level of the bathtub. Install the assembled legs on the bottom of the bathtub and press it for strong gluing to the body;
 It is better to attach the legs on an inverted bathtub
 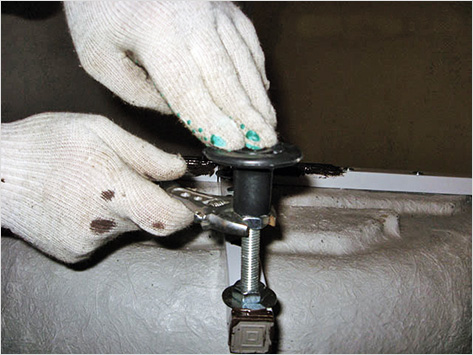 Adjusting the legs of the bathtub
 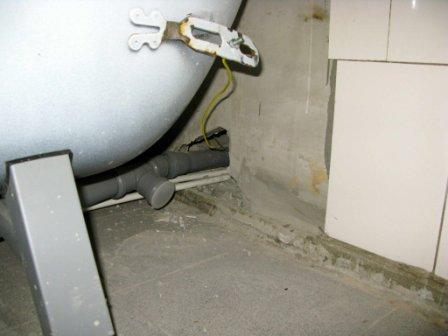 Bathtub grounding
 - turn the bathtub over and put it in place;
- check the horizontalness along the diagonals of the bathtub. To do this, you need to take a rule or a long ruler, place it diagonally across the bathtub and apply a level. There should be a slight slope towards the drain, the same for both diagonals.
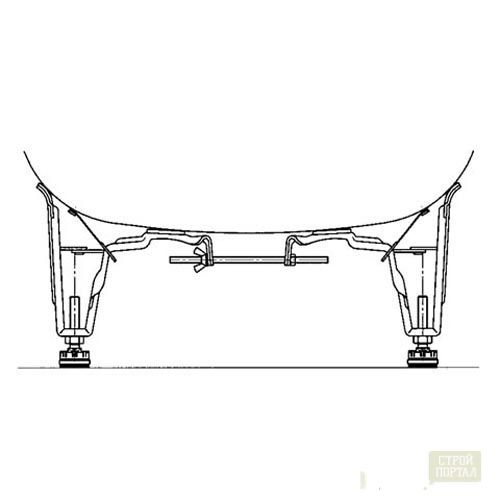 Installing a clawfoot bathtub
 If adjustment is necessary, you need to use the adjusting screws that are equipped with the legs, and then secure their position with locknuts.
 Bath installation diagram
 To the corner of the room
With this arrangement of the container, two sides of the bath will be in contact with the walls. In order to achieve a reliable installation of a steel bathtub along the short side of the bathtub, it is necessary to make an additional support.
The procedure is as follows:
- drill 5 holes with a diameter of 5.5 mm in the support shelf of the corner 32x32 mm;
- Using the resulting holes, mark the locations for drilling holes in the wall and drill them with a 6.5 mm drill;
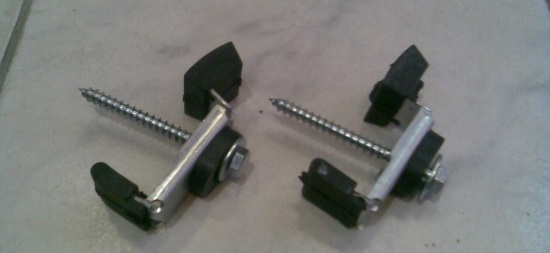 Special brackets for attaching the bathtub to the wall
 - insert bushings (dowels) into the holes and screw the corner to the wall;
- move the bathtub into place, seal the gaps between the wall and the container with silicone sealant;
- In the future, install ceramic skirting boards in this place.
 Fastening the bathtub with special brackets
 Between the walls
Bathroom designers take into account standard sizes containers, so such a coincidence is very likely. There are three contact lines and support angles are installed on both short sides of the bath. The execution procedure is the same as described above.
 Installing a steel bath between walls
 In the middle of the room
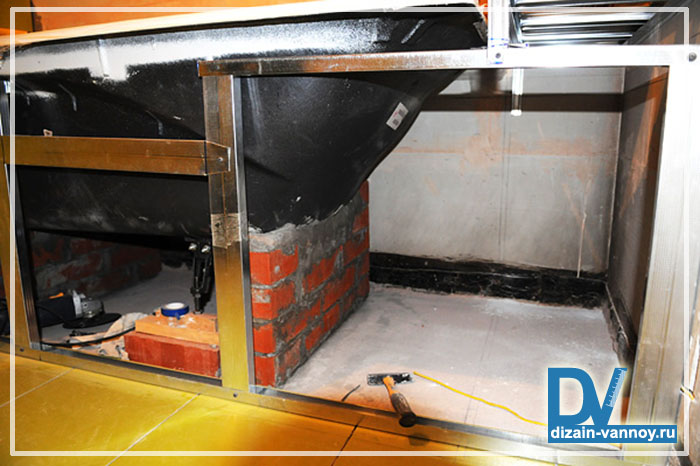
In this design, bathtubs are installed in their own homes, where it is possible to install a non-standard drainage system. The container is installed on bricks and lined with brickwork, which ensures its stability, and then tiles. A special feature of this installation is the presence of a niche at the bottom of the lining, half the length of a person’s foot in depth. In this case, the legs are not used.
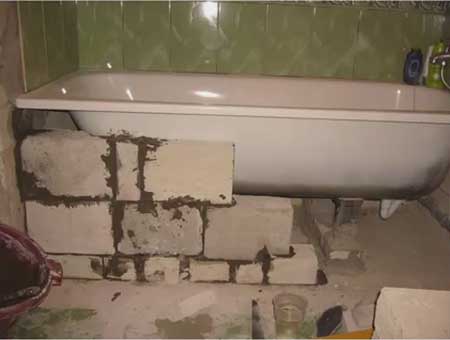 Installing a steel bathtub on bricks
 Many people consider this method preferable, especially those who are well acquainted with brickwork, and also if the height of the bathtub on standard legs for some reason does not suit the owner.
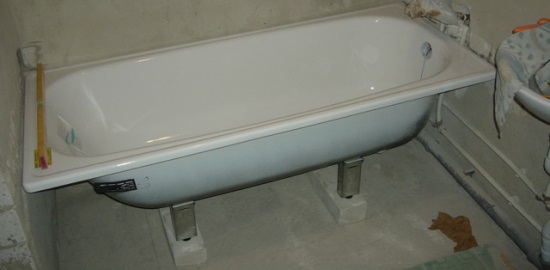 To raise the bathtub required level, you can put bricks under the legs
 An option for installing a metal container is to install it on decorative legs if the bathtub is made with design design outside.
Installation materials and tools
The necessary materials and tools are summarized in the table.
| Name | Scope of application | Conditions of use |
| Tools and accessories | ||
| Electric drill | Drilling holes in the wall for support corners. | When installed near walls without using brickwork |
| Drill with a diameter of 6.5 mm for concrete | Same | Ibid. |
| Drill with a diameter of 5.5 mm for metal | Drilling holes in the support corners | Ibid. |
| Marker | Marking locations for installing support corners on the walls, marking holes in the corners | Ibid. |
| Dowels | Attaching the support corners | Ibid. |
| Screwdriver or power screwdriver | Installation and fastening of support corners on walls | |
| Gas key | Tightening threaded connections when installing a drain system | In all installation options |
| Construction level | In all accommodation options | |
| Rule (a level bar is longer than the bathtub) | Control of horizontal installation of the container and adjustment of the slope | In all accommodation options |
| Construction trowel | Execution of brickwork when installing with tiling | When using brick supports and lining the bathtub with bricks |
| Notched spatula | Applying tile adhesive to tiles | When performing cladding |
| Wrench | Height adjustment of legs | In all locations |
| Materials | ||
| Corrugated pipe | Connecting the siphon to the sewerage system | In all installation options |
| Corner 32x32mm | Manufacturing of support devices on walls | When located near walls without the use of brickwork |
| Masonry mortar | Laying brick supports and cladding | When placed in the middle of the room or lining the bathtub with bricks |
| Sealant | When placed near walls | |
| Ceramic plinth | When sealing joints between the bathtub and the wall | When placed near walls |
| Tile | Facing device | When using brickwork |
| Tile adhesive | Facing device | Facing |
One of the important bathroom accessories is the bathtub. And although many lovers of shower cabins doubt such a statement, but admirers of relaxed lying in hot water with foam they stick to their opinions. But it is important not only to choose a font, but also to know how to secure the bathtub. It is important to level the sides and firmly install the font so that it does not wobble. And you also need to understand how to attach the bathtub to the wall so that water does not get into the cracks. As a rule, special fasteners are included with the supports. Depending on the type of bathtub, they differ for the acrylic, steel or cast iron from which the bowl is made.
Features of bath material
Before installation, it’s a good idea to understand the differences between the bowls in order to understand how the bathtub is attached to the floor and wall.
- Cast iron has a long service life, retains heat, but is heavy. Therefore, a strong fastener for the bathtub to the wall and a stable base for the bowl are important.
- The steel font can be mounted on a special podium. To do this, you need to assemble the walls from bricks, and place the bowl itself inside. This way, the bathtub does not reach the wall and will stand firmly without wobbling. Main disadvantage material - high noise threshold.
Advice! In order not to hear the bathtub filling with water, it is worth treating the entire outer surface with putty or foam. This will reduce heat transfer and allow you to fill the font with virtually no noise.
- Acrylic models They retain heat excellently, and attaching the bathtub to the wall is quick. But the strength of such bowls leaves much to be desired. If you want to know how to fix an acrylic bathtub, you need to take into account a certain flexibility of the bottom. Sometimes a person with a lot of weight can break through the bottom.
Advice! To avoid problems, the easiest way is to make a special metal mold and then install the bathtub.
There is a special fastener for a bathtub made of acrylic or steel. These are certain frame legs that help install the font and at the same time use more simple ways fastenings
Regardless of the type and type of bathtub, there are certain basic requirements and rules for how to secure a bathtub to the floor or wall. So, the order of work:
- It is easier to connect drain pipes if the bowl is on its side.
- First, the drain is secured, and only then the bowl is placed on supports.
- If the bathtub is shorter than the wall, after installation it is necessary to move the bowl tightly towards wall panel, level the horizontal level by tightening the supports. Then you need to insert spacers in some places to prevent the font from loosening. In this case, fixing the bathroom to the wall will be much easier.
Advice! Installing the bathtub against the wall is not always possible; there may be a small gap left there. Silicone sealant works great for narrow gaps.
- If the bathtub does not reach the wall and a junction is formed, it must be sealed. Grout mixtures, sealants, and moisture-resistant gypsum are well suited. It’s easier and better to take flexible compositions for the bathroom. Such mixtures have the ability to not accept water and withstand temperature fluctuations.
Advice! If you don’t know how to strengthen a bathtub and want to make a reliable, waterproof mount for the bathtub, pay attention to plastic skirting boards. Such a strip over a seam made of sealant will reliably protect against leaks. And the flexible edges of the plinth will allow you to press the edging as tightly as possible to the composition with which the gap was sealed.
Fastening bathtubs made of various materials
The choice of how to install the bath on the wall or on the floor is up to the user. But there are also certain rules and general concepts How to fix a bathtub to the floor:
- Cast iron bathtubs are installed on supports that securely hold the bowl in the selected position. It is a good idea to supplement the fastening with wedges included in the kit or tighten the structure with bolts.
Important! If installation takes place on a loose surface with reduced hardness, then it is necessary to place a steel plate or other gasket under the supports. Also necessary to distribute weight over the entire surface and prevent squeezing flooring. This technique is often used in advice on how to properly secure a bathtub to the floor. The diameter of the gaskets must be at least 5 cm, thickness more than 5 mm.
- are more difficult to securely fix, as they have less weight. In this case, you need to start installing the font before tiling the walls, so that later you don’t have to think about how to fix the bathtub on the tiles.
Advice! How to glue a bathtub to the wall if it is tiled? For this, there are certain mixtures offered by manufacturers. It's a good idea to use plumbing sealant.
- You need to know how to attach a bathtub to a wall or floor if the bathtub is made of acrylic. A hand-created frame that strengthens the structure helps eliminate the slightest backlash and swaying.
Advice! To understand how best to secure a bathtub, watch the video below. It shows the main points of operation and installation options for various types of bathtubs.
So, the main points of the stages of work on how to install a bathtub to the wall:
- The bathtub is laid on its side and a drain and overflow are installed.
- The floor siphon is connected to the pipes.
- Installing the legs, raising the bowl for the final connection to the sewerage system.
- Checking the tightness of drains.
- Build a frame for installation, place plates and install spacers.
Now you know how to securely secure a bathtub. But if you can’t place the bathtub close to the wall, you should turn the disadvantage into an advantage - make a shelf. It will take a little time to make the frame, but it will appear convenient place for storing shampoos, soaps and other household supplies. By the way, this same technique works great if the length is shorter than the wall; sometimes a small bathroom cabinet fits into the space under the shelf.
Important! Creating a shelf is a simple matter, but it is necessary to attach it with a slight slope. This will prevent water from accumulating and causing mold to form.
If we talk about how to attach corner baths, then you need to remember about the podiums. The models come complete with stands, and the presence of a podium will allow you to secure the bowl even more tightly, while the legs remain on the floor. Before laying the bathtub bowl on the podium, be sure to lubricate the walls and bottom of the bathtub with foam. In all other respects, the installation method does not differ from the above.