Who hasn't wanted to update the interior of an apartment or house? In such cases, various additional furniture is used. Traditional sofas are much easier to purchase at a furniture showroom, but ottomans are more interesting to make yourself. You can learn how to make an ottoman with your own hands from this article.
Ottoman appeared in Eastern Europe many centuries ago, the birthplace of ottomans was the East. These items quickly gained great popularity. Recently they have been given an important place in small city apartments - a soft ottoman is multifunctional.
Someone will say, why do it yourself if you can buy everything now? Yes, this is true, but homemade furniture has a lot of advantages over factory furniture. So, you can choose the color, size, shape, and type of upholstery yourself. For the production of poufs, any available materials that are in the house are suitable. This means that you can make poufs with virtually no investment. See how easy it is to make a pouf with your own hands from different materials.
Before you start work, you need to tune in to simplicity and ease. For those who decide to make poufs with their own hands, master classes from the best handicrafts will help in their work - all operations are described step by step. So, for work you need the following - this sewing machine, fabrics, padding materials, and paper. A pattern template is applied to it.
How to make a soft pouf:
1. First of all, we will make a pattern - there are many options, it’s easy to find them and choose what you like. Then the template is transferred to paper, and then to fabric. Eight blanks are cut out according to the template from the prepared fabric. You can purchase new fabric or use old clothes as material.
2. On each of the eight blanks, a corner is bent inward by 5-6 cm, and then stitched. This is done so that after assembly there is a hole in the upper part - through it the stuffing will be put into the poufs.
3. Then we sew the blanks from the wrong side together in pairs. During the cutting process, do not forget to leave an allowance of 1 cm from the dimensions of the pattern. So, you should get 4 parts.
4. Two more elements are also sewn - these are two halves of the product. Then they are stitched together and the product is turned inside out. The finished cover is stuffed with pre-selected material, and then another part is cut out according to the shape and size of the remaining hole and manually sewn to the cover.
Sewing a cover for an ottoman is not at all difficult, and the result is nice and original furniture. It is not necessary to use fabrics of the same color - multi-colored products will make the interior more lively. Different colors are especially relevant for children's rooms. The bright pouf will appeal to small children - they will play with it.
On video: soft pouf with your own hands.
Classic ottoman
We make ottomans with our own hands in a classic style:
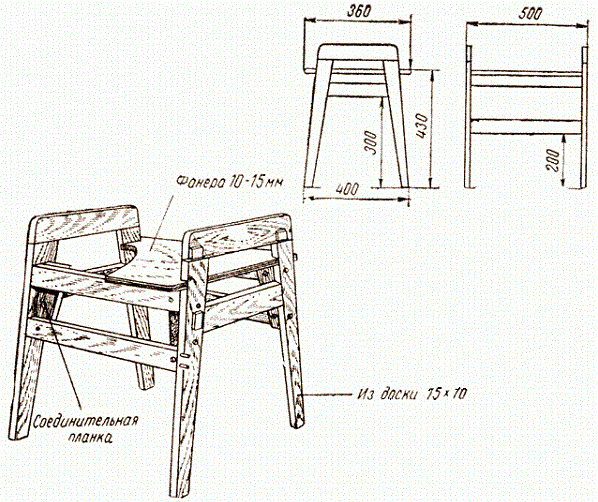
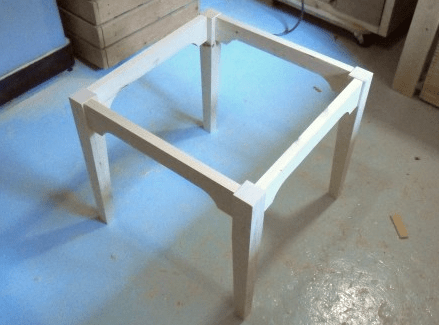
1. It is recommended to start with the legs. To do this, take two boards - the length is 48 cm, the cross-section is 5x5 cm. They are cut at 45 degrees and then knocked together - the result should be a cross. Then another block is glued to the cross with wood glue - its length is 35 cm. For reliability, it can also be secured with a self-tapping screw. The same crosspiece is attached to this block.
2. The seat is made of plywood or chipboard - take material 10 mm thick, dimensions - 40x60 cm. Foam rubber is placed under the plywood sheet. The layer thickness is 10 cm. Foam rubber is also laid - the material must be cut with a certain margin so that it bends. The foam must be bent and nailed to plywood sheet. Take the upholstery fabric and fasten it to the wrong side of the sheet. It is better to fasten the upholstery using decorative nails.
3. Additionally, crossbar boards are nailed to the crosspieces. Then wooden structure processed with stain. The seat is attached to the base and legs. The result is a cute ottoman.
Option from an old tire
Car enthusiasts have tires piling up in their garages - they can be turned into original furniture. Let's see how to make a round ottoman with your own hands:
1. Take plywood and cut two pieces out of it round parts. One circle should have the dimensions of the inner diameter of the tire, the second is cut along the outer diameter. The legs are made according to a template. The template is outlined and the workpiece is cut out from a suitable board. For a DIY ottoman you will need four elements.
2. The legs are fixed on a circle with a large diameter - this is the base. The parts are fixed at equal intervals. You can strengthen the structure with bars. The blanks for the legs are first painted and glued to the base. Additionally, you can strengthen the fastening with corners.
3. Then a layer of glue is applied to the base with legs and a tire with rim. Next, glue is spread on the lid and also glued to the top of the wheel. Then the tire is wrapped and covered with rope - you can glue it with hot glue. It's great if you use rope of different colors. After this the legs are painted.
These pieces of furniture will not be too soft, but it will original solution, capable of decorating any interior.
On video: pouf from car tire with your own hands.
Wooden model with a drawer for small items
To manufacture, you must have skills in working with wood. This will be a practical and soft ottoman with a convenient and multifunctional drawer. Wheels will be installed at the bottom for better movement.
For production, you need a laminated chipboard - a circle will be made from it (circle diameter 30 cm), and 4 rectangular blanks (dimensions 40x33 cm). You should also prepare four bars with a cross-section of 4x8x8 cm. You will need glue, wheels for furniture, fasteners, and screws. The only tools you need are screwdrivers, but better drill or a screwdriver. Foam rubber will be used for padding and fabric for decoration.
To sew covers for an ottoman with your own hands, it is advisable to have in stock sewing machine. Let's look at the step-by-step instructions:
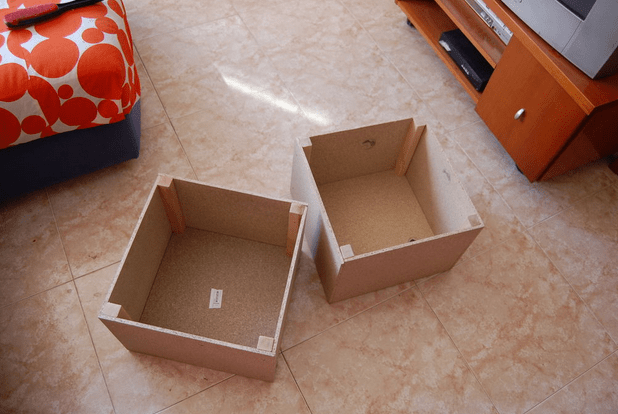
1. Take sheets of chipboard and join them to form a box. The box is glued at the junction points. Bars are placed on the lower corners, secured with self-tapping screws and additionally coated with glue. The wheels are attached to the bars below. The cover is attached with self-tapping screws and glue. The frame is ready - now what has been done needs to be decorated.
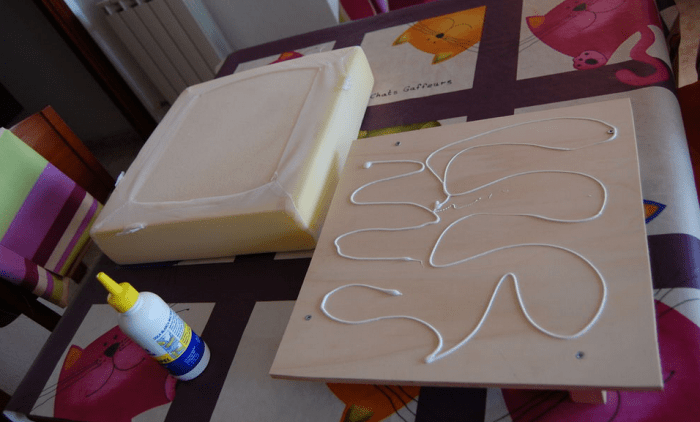
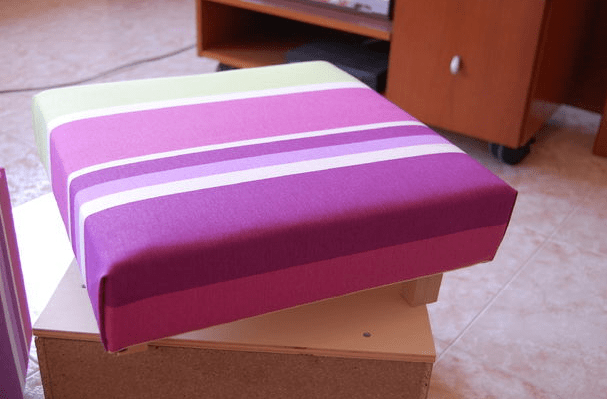
2. They take furniture fabrics– they are less subject to wear. Based on the shape of the box lid, a pattern is made for the upper part of the cape. A strip of fabric 10 cm wide is sewn to it and we sew the cape around it. Your imagination will tell you how to cover an ottoman. A layer of foam rubber is placed on the lid for softness. The cover is pulled on top. The soft ottoman is ready.

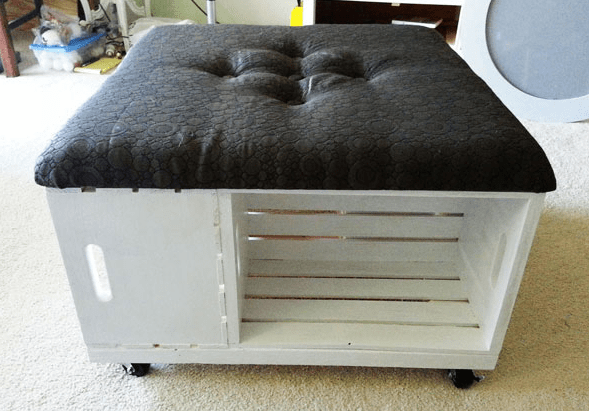
An ottoman on wheels is a pretty convenient thing, especially if it has a lid under which you can put something else. After shopping and even studying Avito, I realized that there was no suitable pouf anywhere. In stores either there are no wheels, or the colors are wrong, but on Avito the price tags are almost higher than store prices, and there are frankly a lot of used ones. Therefore, it naturally followed that I had to make the pouf myself. In my head I imagined a rather easy and quick creation process, but in reality it turned out not quite so, mainly due to inexperience. The creation process is described below.
First you need to decide on the sizes. In terms of height, taking into account the volumetric lid and wheels, the ottoman should not be higher than a standard chair, or it may be lower (depending on the purpose). To understand what sizes you need, the easiest way is to take a regular chair that you feel comfortable on and measure it. Our pouf turned out to be 42x42 cm and 55 cm in height. This height is inconvenient and should be 45-50 cm, but it just happened because I invented the production technology right during the process of creating the pouf. To make your pouf lower, parts 2 and 3 (see drawing) will not be 380, but 330 mm in height.
We will make a pouf from chipboard and upholster it with dermantine with foam filling. Below is the drawing. On it, numbers 6 and 7 indicate holes for confirmat 7x50 at the end of the part and on the plane, respectively. Such designations are accepted in the chipboard cutting office to indicate them schematically on the drawings. True, they require maintaining a distance multiple of 32 mm between the holes, but you can live with this. How to make holes yourself.
Blueprints


Assembly
Finally the parts are made, we begin assembly. Don’t forget to set the correct torque on the screwdriver, otherwise it will drive the confirm too deep( 


Padding


We agreed that the pouf would be filled with foam rubber (polyurethane foam). To do this, we need a sheet of foam rubber (usually sheets are 2x1 meter) with a density of EL3040 and a thickness of 20 mm. The walls of the pouf will be stuffed in one layer, and the lid will be voluminous and filled with three layers glued together. It is advisable, of course, to use a solid one with a thickness of 40-60 mm, but in order to save...
You can mark the foam rubber or cut it directly along the workpiece, placing something under the foam rubber so as not to cut the floor.


Having cut out the foam rubber for two opposite walls (calculated size 38x39.6), glue them to the box using PVA or glue for ceiling skirting boards. Here it is best to apply glue and then roll the foam rubber on the chipboard so that the glue is distributed over the surface as best as possible and does not harden into sausages.
Having glued two sides, we cut out the other two (calculated size 42x39.6), so that the foam rubber covers not only the box, but also the ends of the foam rubber on the perpendicular walls. It will be clearer if you look at the photo.


Cut out the foam for the lid. Everything is simple here - cut out 3 pieces exactly 38x38 or use the blank as a template and glue them one on top of the other to the lid. Then you need to cut out the side panels, which, taking into account the thickness of the chipboard (16 mm) and three layers of foam rubber 20 mm each, will be 38x7.6 cm. The other two side panels will be 42x7.6 cm.
Lid trim


Our upholstery will consist of three pieces: 1 for the lid 67x67 cm, and two 86x52 cm for the base.
Let's start with the lid. The opening of the lid is shown on the left. I'll try to explain:
42 is the width of the pouf, taking into account 2 cm of foam rubber on both sides;
7.5 cm are small flaps 1 cm wide for stitching and forming the volume of the lid 


To make it easier for you to bend the corners, cut one of the sides at an angle and bend the other side obliquely.
In general, for this purpose, I specifically bought a stapler that I had wanted for a long time and cheap staples for it No. 53, 12 mm high. Either because they were cheap (I think 20-30 rubles), or because they were too tall, they had to be hammered down with a hammer. They didn’t want to fit in completely, like the ones that came with the 8mm ones. It was possible to tighten it with nails, but a stapler is still more convenient, even taking into account finishing with a hammer))
Well, the lid is ready. You probably need to tighten it as much as possible. In my case, after sitting, folds remain on this lid. But it is quite difficult to calculate the tension; it seems that you are always tightening too much. This apparently comes with experience. 
Base upholstery

Let's start upholstering the base. Dimensions 86x52 consist of: 86 = 2 sides of 42 cm, plus 1 centimeter for two seams and 52 = 39.5 (height of the box, taking into account the thickness of the bottom) + 2 (foam rubber on top) + 1.5 (chipboard thickness) + 3.5 (for the hem) + 2 (foam thickness at the bottom) + 3.5 (for the hem). I probably didn’t explain it clearly, but that’s exactly how these dimensions were set))
We sew two pieces along the short side on both sides and put the resulting cylinder through the top onto the base, bending it inward at the top and bottom. Please note that the upholstery on top is folded directly onto the ends of the chipboard on three sides, except for one where the hinges are attached. This is exactly how I wanted to do it (as where the loops are) initially, but then I decided to simplify the process, because... V chipboard end The staples go in much easier. Thus, the hem turned out to be quite large that it had to be folded inward. I advise you to calculate in advance how you will do this so as not to waste extra material.


Loops


I used regular hinges, although you can also use special lifts. It’s easier to attach them first to the lid, then to the base, but it’s more difficult to attach them in in the right place on the lid so that the holes on the hinges then fall into the plane of the base. I attached it to the base first, but I had to struggle to get it to sit straight in the closed position after attaching the hinges to the lid.
Wheels

I bought the simplest wheels for 13 rubles with a mounting platform. I attached the first wheel by placing the platform parallel to the sides of the pouf, but I decided to place the rest at 45 degrees. It seemed more reliable to me))
Well, this is how it turned out. It was also possible to make an opening limiter and a handle from a piece of upholstery, but this threatened additional significant costs for the seamstress and I decided that over time we would do it ourselves))


Price
One of the reasons for the appearance of the do-it-yourself pouf was the price. I must say that the savings turned out to be scanty. But I just like to do things myself, this is my hobby, if you like. So:
820 - chipboard with additive;
315 - foam rubber 2x1;
660 - dermantin 138x120 cm;
300 - seamstress services;
45 - loops;
52 - wheels;
38 - euroscrews;
2230 - Total.
However, here it was possible to save, firstly, on chipboard, because I used laminated one, but it could have been cut from any material. Secondly, if you have a car, you can save another 300 rubles. I also took dermantine good quality 550 per linear meter, there was an option to take 450 or even 350
P.S. I learned a lot of useful things from
When you want to bring something new into the interior or update your style, additional furniture attributes will help you. For example, anyone can make an ottoman with their own hands - both an experienced craftsman and a beginner in this field.
Poufs are popular for a reason, because they can be used as a chair, table or as a footrest.
Poufs are popular for a reason, because they can be used as a chair, table or as a footrest. Plus, they take up little space, which is a huge plus for homes with limited space.

You are not limited in the choice of shape, parameters and raw materials.
Ottomans made by yourself have many advantages: you are not limited in the choice of shape, parameters and raw materials. To create an ottoman, you can use any available materials and it will not require large expenses, or it will be completely free.

Handmade ottomans have many advantages.
Anyone can make an ottoman with their own hands, regardless of skill level. Some of the available models will be from plastic bottles or tires. With a little more effort, you can make a pouf from boards. And if you have carpentry skills, you can easily make a wooden pouf with drawers. Having experience in cutting and sewing, you can create a unique product of any shape and model.

According to the instructions, you will receive a high-quality, original piece of furniture that will serve you for a long time.
A pouf bag that will delight children will be original and quite simple to make. To create it, you will need to sew a bag with a lining and fill it with polystyrene foam - it is sold in many construction supermarkets.

Having experience in cutting and sewing, you can create a unique product of any shape and model.
In any case, the main thing is to patiently and slowly follow each step, according to the instructions, then you will receive a high-quality, original piece of furniture that will serve you for a long time.

Anyone can make an ottoman with their own hands, regardless of skill level.
Several master classes on creating poufs from scrap materials
- Pouf made from plastic bottles.
Anyone can make it, for this take:
- plastic bottles, volume 1.5-2 liters;
- thick cardboard (equipment packaging will do);
- foam;
- upholstery fabric;
- scissors;
- thread, needle;
- scotch;
- glue.

When the ottoman is ready, the hole can be sewn tightly or a zipper can be sewn in its place.

Note: The cap on each bottle must be screwed on tightly. Secure the containers to each other with tape and place them on the first circle so that it completely occupies its space. Place the second circle on top, make sure that the elements are securely and evenly fixed.
In any case, the main thing is to patiently and slowly complete each step.

Next, start finishing the product - cut out two round and one rectangular parts from foam rubber, be sure to leave some room for seam allowances. Connect them together with strong stitches. Instead of foam rubber, you can use padding polyester, insulation, or dense fabric folded in several layers.

Anyone can make an ottoman with their own hands - both an experienced craftsman and a beginner in this field.

Some of the available ones will be models made from plastic bottles or tires.
- DIY ottoman from an old bucket.
To create it you will need the following materials and tools:
- jute rope;
- construction glue gun;
- cardboard;
- upholstery fabric;
- microfiber;
- stapler;
- large button.

Remove the handle from the bucket, place it upside down and wind the rope tightly in a circle. In order for it to hold well, each stitch must be placed on glue.

Instead of foam rubber, you can use padding polyester, insulation, or dense fabric folded in several layers.
When the entire bucket is wrapped in rope, proceed to making the ottoman seat. Make a circle out of thick cardboard that matches the diameter of the bucket. Prepare a circle from fabric too, but 10 centimeters larger. Using a button in the center, connect the fabric and cardboard. Shape the microfiber into a tube, wrap it around the button between the fabric and the cardboard, securing it with a glue gun. Fill the cardboard base to the brim with tubes. The top fabric should be stapled to back side cardboards. Now glue the part to the base and the work on the ottoman is completed.

First you will need to cut out two equal round pieces (or squares if you want to get a square ottoman) suitable size– this will be the top and bottom of the ottoman.
- A tire pouf is a great idea for a cottage or living room.
Prepare the following materials and tools:
- old tire;
- twine (at least 20 meters long);
- self-tapping screws;
- glue gun;
- a sheet of plywood 3-5 millimeters thick;
- jigsaw;
- electric drill.

First, you should measure the inner diameter of the tire before it thickens, divide this value in half and add one and a half centimeters to the result - you get the radius of the desired circle.

You can also add a strap, which makes it possible to easily move the product.
Draw it on a sheet of plywood and cut it out with a jigsaw. You should make two circles - on the seat and the bottom of the ottoman. Then drill holes in the tire and plywood, secure the parts together with self-tapping screws.
Now you can glue the rope to the tire. To create a unique design, start from the center of the seat, laying the twine in a snail pattern.

The top fabric should be stapled to the back of the cardboard.
Use clear, fast-drying, high-strength adhesive.
When the top of the pouf is completely covered, proceed to the sides of the tire. To make it easier to attach the twine, turn the product over from top to bottom. After the first circle, let the glue dry thoroughly to avoid the rope moving.

Make a case for the ottoman according to the above diagram.
Note: do not rush, apply a lot of glue, process the future pouf circle by circle. It is better if you work together - one will check that the rope lies without gaps, and the other will continue gluing. By working on such a pouf yourself, you can easily allow gaps to form and the string may be displaced from the surface of the tire.
When the glue has dried well, coat the finished pouf with clear varnish.
The product can be decorated with legs or wheels.

As decoration, attach buttons, rhinestones or borders to the seams.
- How to make an ottoman quickly without patterns.
For work, prepare:
- textile;
- stuffing material;
- scissors;
- needle, thread;
- measuring tape.
Prepare two identical round elements from fabric, the parameters of which are equal to the top and bottom of the product. Allow a few extra inches for seams.

First, measure the inner diameter of the tire before it thickens.
Then cut out two equal rectangles - their width is the height of the ottoman, their length is half the circumference of the upper and lower zones.

The seams can be decorated with ribbons and borders.
Apply seams to the resulting rectangular elements from one edge so that they form a long ribbon.
Then you need to baste the first circle to it, stitch along the seam. Then do the same with the next circle. The seams can be decorated with ribbons and borders.

Do not rush, apply a lot of glue, process the future pouf circle by circle.
This is how you can make a pouf cover without wasting time on patterns. The filler can be a variety of materials. To prevent the opening for stuffing from being noticeable, place it at the bottom of the product. When the ottoman is ready, the hole can be sewn tightly or a zipper can be sewn in its place.

Following this description, you can build a cube ottoman.
Following this description, you can build a cube ottoman. The only difference is that all the parts should be made square, and there are four of them in the side parts. In order for the product to better hold its shape, use dense fabrics, and choose synthetic padding or foam rubber as a filler.

In order for the product to better hold its shape, use dense fabrics, and choose synthetic padding or foam rubber as a filler.
There is a whole host of available unusual ideas how to make an ottoman with your own hands, don’t be afraid to imagine and experiment.

There are a whole lot of affordable, unusual ideas on how to make an ottoman with your own hands, don’t be afraid to fantasize and experiment.
VIDEO: How to make a round ottoman with your own hands
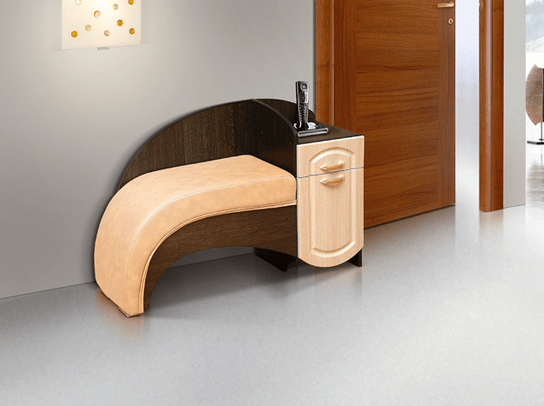
Banquette in the hallway - irreplaceable thing. You can sit on it after a hard day or accommodate guests if there are not enough chairs at the celebration. This article will tell you how to make a banquette with your own hands.
What is a banquette
Such an irreplaceable element of the interior as a banquette was invented back in the 18th century. It is a stool or a small bench with upholstery and sometimes a backrest. Some banquettes can be used to store shoes, making them even more functional. Traditionally they are made rectangular, round or square.
This piece of furniture will be a great addition to the interior of any room:
- hallway (you can sit down on the bench while tying your shoes; shoes and various shoe care products are often stored there);
- bathroom;
- kitchen (banquette is often used as an addition to the seating area);
- bedroom;
- living room (here this piece of furniture can serve as an additional place for guests).
Types of banquettes
A correctly selected banquette helps give the room coziness and comfort, creating an individual, unique atmosphere. Let's look at several main types of banquettes, which differ from each other in shape, size and material.
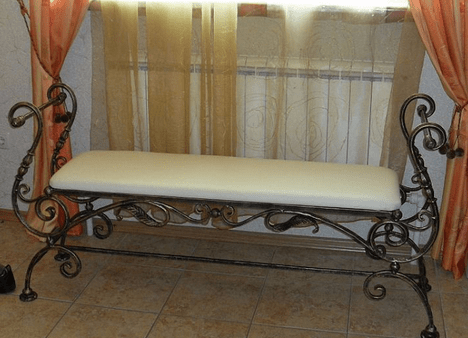
Forged
This type will look great in a Baroque, Provence or Empire style interior. This type of banquette is distinguished by forged, twisted legs. Most often, such banquettes are made without cabinets and drawers, since they are very difficult to embed. But sometimes they still make a small shelf.
Advice ! Banquettes with wrought iron legs are more suitable for a hallway than a living room or bedroom.
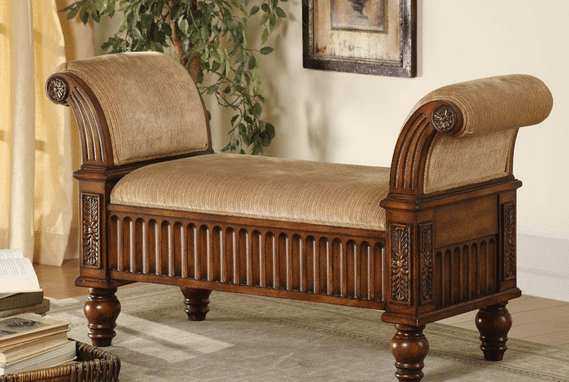
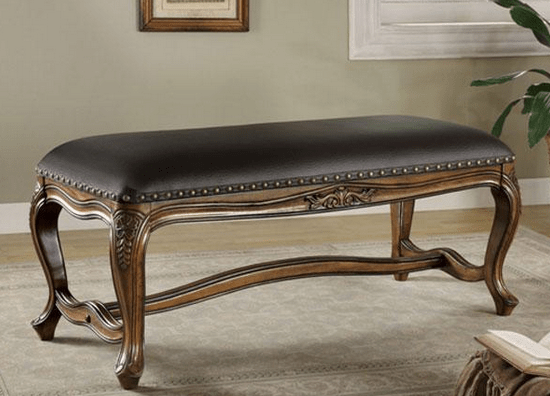
Made of wood
Banquette made of wood will do to almost any interior. It will also look good in the hallway, kitchen or living room. It is easier to build cabinets into a wooden sofa, which will immediately make the item more functional. You can also add a backrest to a wooden banquette, but this is the next look.
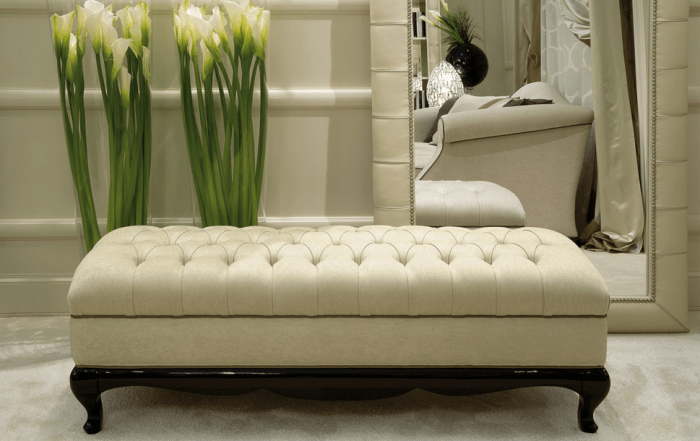
With backrest
Banquettes with backs are most convenient to use. They give the hallway home comfort and warmth. In addition, getting ready for work or a walk thanks to such sofas becomes much more comfortable. Large banquettes can be used for zoning. By the way, if you have an interior in oriental style, then you can decorate the bench with bright pillows. This also applies to forged banquettes.

Collapsible
This type of bench consists of a steel frame on which fabric or a leatherette seat is stretched. If desired, such a bench can be quickly assembled and disassembled. All its elements are fastened with bolts. Such pieces of furniture are easy to care for and functional. True, collapsible benches rarely serve a decorative function. The abundance of elements would greatly complicate the assembly process.

With drawers
A banquette with drawers is a good way to save space if the hallway is small. In the drawers (which can be retractable or have regular doors) you can store shoes, shoe care products and everything that the owners of the house want. Most often, shelves are placed under the seat. But if desired, the bench can be equipped with a side stand on which you can put a phone or decorative element, for example, a vase of flowers or a figurine.

Upholstery materials
A wide range of materials are used to upholster benches. Let's look at the most common ones:
- Fabric (this can be chinille, cotton, linen, silk or flock). The fabric is easy to clean, and its range allows you to choose materials and shades that suit your interior. The price depends on the type of fabric. Usually the price is natural materials higher than for synthetics.
- Leather This is a more expensive and noble material. If you choose a banquette with leather upholstery, then the interior should match. This material looks best with expensive wood species. As for care, leather is more capricious than fabric. But caring for her will not be a big difficulty and will not break a hole in the family budget, so there is no need to be afraid.
- Faux leather. This material is more budget-friendly. Leatherette is easy to clean, but has a shorter service life than genuine leather. If a banquette is well made, it will look as elegant as leather in a room.
Making a banquette yourself
Making a banquette for the hallway with your own hands consists of several steps. Each of the stages is quite simple, but they all require care and accuracy.
Required materials and tools
Banquettes with wrought iron frames and forging will require certain skills and professionalism. In this article we will look at the possibility of making a wooden bench with your own hands.
Necessary materials:
- Wooden beams measuring 30 by 40 or 30 by 50 mm;
- The legs can be taken from an old stool or coffee table;
- Glue, screws, pins and furniture corners;
- Plywood or MDF sheets.
The upholstery consists of a cover and a filler. The filler is usually foam rubber. It holds its shape well. If you want to make the seat softer, you can take padding polyester.
For manufacturing you will also need the following tools:
- drill, jigsaw and screwdriver;
- hammer;
- screwdrivers;
- needles and threads;
- construction stapler;
- level;
- sandpaper;
- paint, varnish and stain (optional).
Preparatory stage
Before you start making a bench, you should make a drawing. It is necessary to accurately determine the size of the room and the future product.
First you need to decide on the model. A bench with a back will be difficult to implement if you lack experience, so it is better to choose a simple, wooden model without a back. Next, based on the selected model, you need to calculate the dimensions of the remaining parts.
Advice ! If you are planning a lot of parts, then you should make a pattern, and only then start cutting the plywood.
The parts need to be cut out with a jigsaw and their edges treated with sandpaper.
Product assembly
You shouldn’t make all the necessary parts in one day, especially if this is your first experience making furniture. It may happen that you make a lot of mistakes and something will have to be redone.
First of all, you should make a seat and start from its size. Other parts are much easier to fit to the seat.

Then you need to make the legs. As mentioned above, you can take ready-made ones, but if you want to make new ones, especially for the bench, then you need to take the beams, process them using a hand cutter, and attach them to the seat with self-tapping screws. The workpiece must be coated with stain or paint.
Attention ! A hand cutter will make the legs more stylish and neat. This tool is simpler and cheaper milling machine. It will allow you to make the legs round or with non-standard protrusions.
If the future product will rest on the sidewalls, then in this case all the parts are prepared at once, cut out, polished, and then simply assembled together. You need to assemble it onto pins; for them, special holes are made at the ends of the workpieces.
After the work has been done, you can begin upholstery. On the first day you need to cut out a piece of foam rubber the right size. And then secure the foam rubber with glue and a construction stapler to the base. It is advisable to place burlap or any coarse material under the foam rubber.
Then you need to cut out a piece from the selected fabric required size with allowance. After cutting, the fabric must be carefully tucked and secured with a construction stapler.
How to sew a cover yourself
If the upholstery on an old bench is worn out, there is no need to rush to throw it away. It can always be updated. To do this, you don’t need to change the upholstery; you can simply sew a cover that will please the eye and complement the interior. Usually a cover is made for models without backs. Sew beautiful case can be done in several stages:
- On the fabric you need to mark a rectangle or square according to the size of the seat.
- The fabric needs to be folded into a scarf and measured 10 cm on each side.
- The resulting “box” needs to be cut off the corners and the edges processed.
- Then you need to take a piece of fabric, which will be equal in width to the height of the banquette itself, and sew it with a pipe. The length will depend on the number of frills planned. The frill is basted to the seat and draped. This needs to be done from the inside out.
- After this, you need to stitch the seam with an elastic band or trim it with tape.
- The edge of the cover can also be trimmed with tape, or you can simply stitch it. A decorative cord can be secured over the seam.
Conclusion
Banquettes can be completely different. When choosing materials and creating a drawing, you should not only pay attention to the materials, dimensions and design itself, but also how the piece of furniture will fit into the interior. Before you start making a bench with your own hands, you should soberly assess your strengths. If you are new to furniture making, then perhaps you should not take on complex designs with a back, drawers and shelves, and you don’t need to buy very expensive materials. There is a chance that the first pancake will be lumpy, and you will be sorry for the money you spent.
A banquette can also be made from old or even broken furniture. For example, in the next video you will learn how to make a banquette from an old, broken stool
People are designed in such a way that at times they want to change something. The interior will immediately change if you make an ottoman with your own hands for the bedroom.
The ottoman is an indispensable item in the interior. You can sit on it, put your feet on it and even lie down.
It is simply indispensable in the house: it’s good to sit on, it’s comfortable to put your feet on it, sitting on the sofa, or sit your baby on it. How to do this without having any preparation for this, we will consider further.
Tools and materials
The basis of any good furniture is strong lathing and good upholstery.
In order to make an ottoman, you will need the following materials:
In order to make a frame for the ottoman, you need a sheet of chipboard.
- Chipboard sheet size 2400x1750x16 mm. You can use the old one wardrobe or thick plywood, at least 13 mm thick. The material should not be thin so that both adults and children can sit on the ottoman.
- Beam 40x40 mm – 1.5 m.
- Rollers for furniture – 4 pcs.
- If the ottoman has an opening lid, then you need 2 hinges.
- Batting, padding polyester or foam rubber - whatever you have.
- Some thick fabric for upholstery - plush, tapestry or something else.
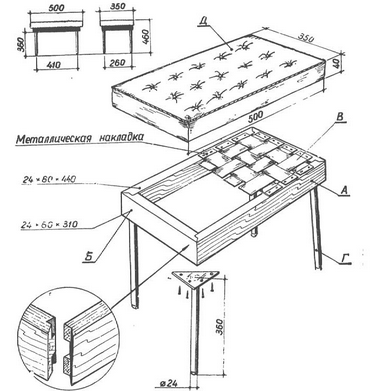
The most popular sizes for an ottoman are 400x400x500 mm. In the process of work you cannot do without the following tools:
- hacksaws with fine teeth;
- hammer;
- self-tapping screws;
- pencil with ruler;
- a screwdriver, an electric drill, or at least a screwdriver;
- construction stapler or furniture nails with caps;
- wood glue.
The work, of course, can be simplified by making an ordinary box on legs made of timber and screwed with self-tapping screws, but making an ottoman on wheels, and even with an opening top, is worthy of respect. You can hide slippers, children's toys and other small things in the niche of such an ottoman, and it is much more convenient and easier to move it around the room if it is on casters. Although you will have to work hard to make such a piece of furniture.
Return to contents
Manufacturing instructions
To upholster the ottoman you will need a construction stapler.
First of all, using a ruler and pencil, we make markings on a sheet of chipboard. We draw 5 squares with dimensions of 400x400 mm, these will be 4 walls of the ottoman and the bottom. There is no need to save money and make the bottom out of thin plywood, since a child can get into the ottoman, he can break the bottom and get injured.
The ottoman cover can have any shape: round, square or oval. For ease of work, let's try to make a square one. The lid must be made a little larger than the box so that it does not fall inside, so its dimensions will be 430 x 430 mm. The final height of the pouf will be 532 mm and it consists of:
- the height of the box itself is 400 mm;
- roller heights – 50 mm;
- bottom and lid thickness – 32 mm;
- upholstery – 50 mm.
So far, no difficulties have arisen in the work. We take a hacksaw and cut out the planned blanks. If you are not a completely experienced master and somewhere you make a mistake by a mm in one direction or another, it’s not a big deal. The upholstery will hide these small flaws. We cut the block into 4 equal segments, each 400 mm long.
The next step is to form a structure 400 mm high from the sawn walls. In everything internal corners Using glue, we glue the beams for reliability of the structure. On the front side of the box, we screw self-tapping screws into the bars for greater rigidity. In this case, it is necessary to deepen the caps so that in the future they do not break through the upholstery. You can strengthen the ottoman with metal corners. You need to fasten the sidewalls with them even before you glue the blocks.
Then coat the perimeter of the lower part of the box and the ends of the beams with wood glue. We attach the bottom to them, and for strength we screw self-tapping screws into the ends of the bars. After this, let the box dry thoroughly.
We are approaching the finish line. The sheathing of the pouf is done, let's move on to making the seat cover. Around the perimeter of the seat from the inside you need to screw 4 stopper blocks so that the cover does not move to the sides. But before this, you need to make sure that the side reinforcement bars will not interfere with the lid closing. Turn the finished pouf over and attach the wheels with self-tapping screws. They should be attached through the bottom of the ottoman to the ends of the beams. To do this, small holes are made in the bottom.
After this, carry out the test. Sit on the seat and ride on the ottoman for a little while. If it is stable enough and holds well, you can continue working. All defects must be corrected before you begin upholstering the box.


