Many owners of private houses are faced with the problem of removing large amounts of snow in winter. It can be difficult to do this manually, so equipment that can be equipped with various devices comes to the rescue. Anyone practical owner You can make a blade for a walk-behind tractor with your own hands.
Design functions
Installation equipment allows you to perform a whole range of utility and economic tasks. With its help, it is easy to clear the area of snowdrifts, fallen leaves and debris, level earthen areas, transfer soil from one place to another, and clear a room for animals.
The process of making a do-it-yourself blade for a walk-behind tractor
Any practical owner can construct a blade for the Neva or Salyut walk-behind tractor. To do this, you need to stock up on a grinder, a drill, welding machine, tape measure and necessary materials.
The proposed option for manufacturing the device is simple. Take a 200 liter steel barrel as a basis and cut it into three parts. These will be the elements of a blade blade for a bent walk-behind tractor. If you weld two parts together along the contour, you will get a product 3 mm thick. This value is sufficient to ensure the required rigidity of the blade.

To make a tool you can use gas cylinder, however, it is important to remember to take precautions. To avoid fire or explosion, the cylinder is completely filled with water.
Snow removal with a walk-behind tractor involves using a knife measuring 3*100*850 mm. To make it, you will need a five-millimeter steel strip along the length of the blade. Holes with a diameter of 6 mm are made in the knife at a distance of 10 cm from each other so that the protective rubber strip can be attached.
Then the snow clearing blade for the walk-behind tractor is reinforced with a fastening structure: a square pipe measuring 40*40 mm, which is welded to the middle part of the barrel segments fastened together. After this, a steel semicircle with three holes is mounted to the middle of the pipe to fix the rotating angles of the shovel.
Next, an L-shaped holder is welded, the ends of which are connected with bolts to the semicircle and the frame of the walk-behind tractor. The fasteners located on the segment of the profiled square pipe of the coupling mechanism allow you to adjust the lift of the blade shovel for the walk-behind tractor.

Making a shovel blade for a walk-behind tractor

The working tool is made from sheet metal 3 mm thick. For stiffeners, four-millimeter racks are used, which are located inside the structure. To fix the blade to the rods, special holes are made in them. In this case, it is important to achieve a vertical arrangement of the equipment relative to the front of the mini-tractor.
The dimensions of the blade for the walk-behind tractor are 850*220*450 mm. To fasten it, a bracket is fitted, which is mounted using M10 bolts on the legs of the motor unit, where the folding front support is located.
The equipment is strengthened with two adjusting rods. In the non-working position, they provide unloading to the bracket. A knife is mounted on the bottom of the device using bolts.
To prevent the snow dump from burying itself in the ground, its bottom is additionally lined with annealed sheet steel.
Snow plow options
Clearing snow and mud is a labor-intensive job, so to make it easier, equipment is widely used: an SUV, an ATV, a walk-behind tractor. The attachment market has different variants ready-made snow plow designs. To minimize the cost of purchasing a tool, it is easy to make it yourself.
Snow blowers are divided into three groups.
For SUV
The device can be installed on a car domestic production, and for an all-wheel drive foreign car. Convenient when the blade is disassembled. In this case, it can be easily dismantled and placed in the luggage compartment of the car. The snow blower is equipped with an electric winch, which allows you to control the tool directly from the SUV’s cabin. Depending on the amount and density of precipitation, the shovel is positioned at a certain angle.

Snow blade for "Niva"
For ATVs
The choice of device design for mounting on the frame depends on the vehicle model.
There are the following types of installation equipment:
- Front kit when the blade engages the front frame, which is typical for vehicles with low ground clearance.
- Central installation kit It fits into the structure of the ATV frame and at the same time strengthens it. This design maintains high ground clearance and ensures stability when carrying out snow removal work.
The width of the shovel depends on the power of the motor, the weight of the equipment and can be from 125 to 150 cm.


Blade for walk-behind tractor

Homemade blade shovels for walk-behind tractors do not need to be equipped with a spring damping mechanism to protect them from contact with uneven surface, since the walk-behind tractor has a low movement speed. In addition, you can eliminate the need for a lift-and-turn device, which significantly reduces the cost of a working snow removal kit.
Snow removal with a walk-behind tractor is productive due to the fact that the device not only occupies a forward position, but also turns left and right at an angle of 30 0 . The working width depends on the lift and turn bucket model. If metal with a thickness of 3 mm is used, the standard value is one meter.
Equipping a walk-behind tractor snow removal equipment, it is important to purchase metal lugs. They make snow removal easier and improve its quality.
Design features of dumps
All snow plows have general design and the principle of operation, although there are many modifications of this tool. All of them are characterized by high maneuverability, thanks to which they can clear loose snow height 30 cm.
The blade for a walk-behind tractor has the following structure:
- working body: blade shovel or knife;
- rotation angle adjustment mechanism;
- a fastening unit that secures the shovel to the chassis of the power unit.

To reduce tool vibration during operation and protect it from mechanical damage, some models are equipped with a spring-return mechanism, and a cord rubber band is installed on the knife.
The blade for a walk-behind tractor can be equipped with the following attachments:
- metal knives for leveling the soil;
- rubber plates for clearing snowdrifts.
When choosing a tool modification, it is important to make sure that it can be installed on a mechanical tractor.

Everyone who lives in a private house needs to clear the area of snow in winter. It’s especially hard for those who have a car, including me. In addition to the paths, the driveway needs to be cleaned. Remembering the winter of 2016–2017, there was a lot of snow then compared to this winter. I decided to make a shovel for a walk-behind tractor, thereby making the task of cleaning the area easier. After looking at the options for factory-made and homemade shovels on the Internet, I decided to make it myself. This option is less expensive, especially since the material is available.
To make a shovel you will need:
Materials:
- profile pipe 20×40 mm.
- iron sheet 6 mm.
- iron sheet 1.5 mm.
- corner 50×50 mm.
- corner 40×40 mm.
- strip 4x40 mm.
- iron rod 10 mm
- bolts, washers, nuts 10 mm.
- bolts, washers, nuts 8 mm.
- conveyor belt
- dye
- Angle grinder (grinder)
- welding machine, electrodes
- drill, drill bits
- hammer
- pliers
- spanners, etc.
All the materials are there, you can start working.
Shovel size 1000×450 mm. Cutting a profile pipe following sizes:
1000 mm. = 2 pcs.
450 mm. = 2 pcs.
370 mm. = 1 piece
I cut all the pipes, except the one that is 370 mm, at an angle of 45 degrees. I'm welding. I clean the welding seams on one side, where a 1.5 mm sheet of iron will be welded.
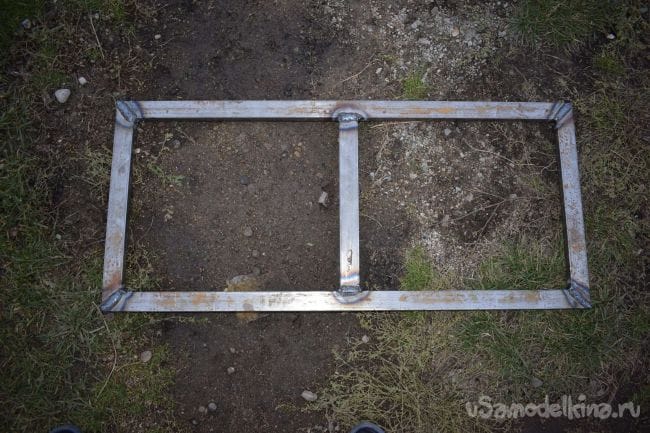
I cut 6 mm from a sheet of iron. two plates measuring 200×100 mm. (since the sheet was a used one, there was already no need to drill them).

I weld these plates to a frame made of profile pipe in the center, as shown in the photo.

I cut four strips of 4x40 mm. approximately 400 mm each. I weld them on one side to the plates and on the other to the profile pipe. They serve to strengthen the structure.
Now I cut off four corners 40x40 mm. 20 mm long. They will serve as a limiter for the rotation of the shovel (initially I didn’t want to fix the shovel with anything, it turned out to be inconvenient). I make markings and weld them to the 6 mm plates.
I drill 10mm holes. for attaching to a bracket.
I weld a 1.5 mm iron sheet.


I move on to making the bracket. I decided to make it from a 50x50 mm corner. Welded together in such a way as to form a profile pipe. I decided to abandon the use of a profile pipe in this unit due to non-standard sizes and in my opinion it will be a weak design. In my case, the width of the bracket is 47 mm, length 500 mm. I cut one shelf at each corner to 47 mm. I weld with each other.

I drill 10mm holes. for attaching to a walk-behind tractor, and for attaching a shovel. In the place where the shovel is attached to the bracket, you need to grind off the welding seam so that it does not interfere with turning the shovel.

I weld two more corners in the same way; it is not necessary to cut off the shelf on them. I drill 10mm holes. for attaching the shovel at the bottom, just like I did before.

I weld all the parts of the bracket. It turned out not quite as smooth as we would like, it does not affect the driving performance.

Now you can paint all the structures.
After assembly, I drilled two more holes to fix the shovel at the desired angle.

To fix the shovel at an angle, I use a 10 mm round timber, 70 mm long, with a washer welded on top.

This is what it looks like assembled. The angle turned out to be not large, but as practice has shown, this is quite enough.

Tighten the nuts on the bolts until the shovel rotates freely. Lock or use self-locking nuts (those with plastic inside).

I attached a conveyor belt to the bottom of the shovel. Tape extension 50 mm. below the shovel. Fastened with bolts with 8 mm plates. The pitch between the bolts is 100 mm.
Labor automation in rural areas has long ceased to be something exotic. Almost every rural yard has a walk-behind tractor, which is used to carry out all work, from cultivation to harvesting and transporting crops.
A motor cultivator is often used to remove snow and other loose substances. To cope with this task you will need a shovel for a walk-behind tractor. You can equip your walk-behind tractor with a proprietary device or make a shovel with your own hands.
1 Shovel device for walk-behind tractor
The blade consists of three main parts:
- shovel;
- attachment point;
- a device that regulates the angle of rotation of the shovel.
The attachment point is needed to secure the device to the tractor. The rotation regulator allows you to select three modes of operation of the shovel - blade: forward, left and right. When turning to the sides, the shovel tilts at an angle of thirty degrees. The rotation is done manually. When the shovel is rotated to the required angle, it can be secured. Thanks to this, clearing snow becomes more convenient.
Shovels of various modifications are found on walk-behind tractors. The device can be equipped with attachments. Metal blades level the ground. Rubber nozzles help remove snow.
The standard working width of a blade shovel is one meter. But, if necessary, you can purchase or make a shovel two or three meters wide. This is more convenient for cleaning large yards, but the bulkiness makes itself felt during work.
1.1 Branded models
Every company that produces walk-behind tractors also produces dumps for them. We sell shovels for walk-behind tractors Neva, Centaur, Premium and other models. The advantage of branded shovels over homemade devices is that a factory blade, made of high-quality steel, is more difficult to damage.
Exists a large number of variations of blades, so before making a choice, check whether this modification will fit your walk-behind tractor. Factory models are not equipped with spring damping mechanisms. This is due to the low speed. At low speeds, protection against contact with uneven ground becomes meaningless. Also, factory models do not have lifting and turning devices. Thanks to this, the overall cost of the snow removal kit is reduced.
If you want to improve the quality of work, it is recommended to additionally purchase metal ones. Pneumatic wheels are best replaced with these devices.

Prices for blades for walk-behind tractors vary slightly. For the most part, the price varies from four to six thousand rubles.
2 Homemade dump
If you don’t want to buy a branded blade, you can make a shovel for a walk-behind tractor with your own hands. The only tools you will need are:
- drill;
- Bulgarian;
- welding.
Making a blade for a walk-behind tractor with your own hands is not at all difficult. An ordinary two-hundred-liter metal barrel is suitable for this.
You need to cut the steel barrel into three equal parts. This should be done carefully so that one part is not larger than the other. Three separate curved segments emerge. Two of them need to be welded along the contours. Then the thickness of the future dump will be three millimeters. This is quite enough to get a hard accessory. A do-it-yourself shovel blade for a walk-behind tractor can be as tough as branded models, if you just choose the right material.
Reinforce the bottom of the device using a knife. Take a five-millimeter steel strip. Its length should be equal to the grip of the device. Drill five-millimeter holes in the strip, ten centimeters apart. They are needed to secure the rubber safety strip.

At the middle of the height of the blade, weld a forty-millimeter square pipe to it. Cut a steel semicircle and drill three holes in it. Weld it to the pipe. Next you will need an L-shaped holder. Insert one end of it into the hole in the semicircle, and secure the other to the walk-behind tractor frame with bolts.
2.1 Do-it-yourself shovel blade for a walk-behind tractor (video)
The harsh winter is such that owners of private houses often have to deal with snow removal. To solve the snow problem they use various devices, shovels, etc. Manually removing snow from a large area has become a rare case with the current level of technology development. And really, why waste long hours and effort on clearing snowdrifts and debris from your yard, if you can make a homemade blade for a walk-behind tractor with your own hands.
Homemade blade for walk-behind tractor do it yourself drawings
Snow plows, easily mounted on all types of equipment, significantly speed up and facilitate the process of clearing snow. Any snow blower blade for a walk-behind tractor contains three main parts - a snow shovel, a device for adjusting the angle of rotation of the shovel, and a fastening unit that secures the shovel to the frame of the tractor.
There are several designs of ready-made blades that are included in attachment kits, but such a “grader” can be made with a homemade blade for a walk-behind tractor with your own hands, the drawings are given below.
A blade shovel is an element of attachments used in conjunction with a walk-behind tractor. With its help, you can mechanize such ordinary work on plot of land like garbage disposal, snow removal winter period, as well as leveling the surface of the earth and moving it from one place to another. 
Dumping shovels have various modifications, but in general they are characterized by general principle work and devices. As a rule, they have several typical working positions. Typically these are the following three provisions:
- forward
- to the left (with a slope of 30 degrees)
- to the right (with a slope of 30 degrees)
Working with a blade for a walk-behind tractor
Before starting work, the shovel blade of the walk-behind tractor is manually rotated left and right at an angle of up to 30 degrees. The position adjustment operation is completed by setting the desired angle and securing the blade in the selected position with cotter pins.
The width of the blade shovel for a walk-behind tractor is usually one meter (some models may have a different value) with a metal thickness of the bucket from 2 to 3 mm. In the factory, dump shovels are made from high-quality steel.
Blade for walk-behind tractor device and equipment
Shovels for walk-behind tractors can be equipped with metal blade attachments, which are convenient for leveling the ground, as well as rubber attachments designed for removing snow.
Since there is a wide selection of modifications of dump shovels, when choosing such attachment Be sure to make sure that the device can be installed on your existing walk-behind tractor.

Manufacturers do not equip walk-behind shovels with spring damping mechanisms, since due to the low speed of movement, special protection against contact with an uneven ground surface is not required. The walk-behind tractor does not need lifting and turning devices, which significantly reduces the total cost of the snow removal kit.
When equipping your walk-behind tractor with accessories for snow removal, buy special metal lugs. Replacing pneumatic wheels with such “shoes” significantly improves the quality of snow removal.
Prices for mounted shovels and dumps for walk-behind tractors are low and range from 4,000 to 6,000 rubles.
How to make a blade for a walk-behind tractor with your own hands
Making a blade for a walk-behind tractor with your own hands is not at all difficult if you have an angle grinder, a drill and a welding machine in your household.
Here is one of the simple options for such a product for owners of walk-behind tractors. You won’t have to search for a suitable metal for a long time, since you can use a regular two-hundred-liter steel barrel for this.

Carefully cut it into three parts and you will get three curved segments for a shovel. By welding two of them along the contour, we get a product with a metal thickness of three millimeters, which is quite enough to ensure the rigidity of the blade.
The lower part of the blade is reinforced with a knife. To do this, you will need a steel strip 5 mm thick and a length equal to the blade grip. Holes with a diameter of 5-6 mm are drilled in the knife in increments of 10-12 cm to secure the rubber safety strip.

The design of fastening the blade to the walk-behind tractor is quite simple and can easily be implemented in a home workshop. In this case, a square pipe 40x40 mm is welded to the blade, welded from two segments of the barrel, approximately in the middle of its height for reinforcement. Then a semicircle made of thick steel is welded to the pipe in the middle, in which there are three holes necessary to fix the angles of rotation of the blade-shovel.

After this, an L-shaped holder is welded from the same pipe, one end of which is inserted into a hole in a semicircle, and the other is bolted to the walk-behind tractor frame. To adjust the lifting height of the shovel, bolts A and B are used. They are screwed into holes in a section of square pipe, which is welded to the coupling device and put on an L-shaped holder.
Do-it-yourself shovel blade for walk-behind tractor
The size of our shovel blade for a walk-behind tractor will be 850x220x450mm. The blade itself is made of steel sheet 2-3 mm thick. The racks located inside are made of sheet metal 3-4 mm thick and serve as stiffeners.

Holes are drilled into them locally for attaching the blade to the rods, taking into account the strictly vertical position of the blade in relation to the front of the walk-behind tractor.
- 1 – dump sheet (tin);
- 2 – 4-piece stand (stiffening ribs);
- 3 – bottom sheet of the dump (tin);
- 4 – knife;
- 5 – linkage mounting eye.
The bracket for securing the blade is installed on the legs of the walk-behind tractor, to which the base of the front folding support of the walk-behind tractor is attached, and the same M10 bolts are used. Rods 520 mm long are attached to the brackets with M8 bolts and wing nuts, which are attached to the blade stiffeners.

Holes are drilled in the internal stiffeners (3-4 mm thick post) to fasten the blade to the rods so that the blade is located in a vertical position in relation to the walk-behind tractor. The blade is additionally fixed on the walk-behind tractor by means of two adjusting rods: in the non-working position, they make it possible to unload the brackets. WITH bottom The blade is bolted to a blade measuring 3x100x850 mm.
- 1 – dump;
- 2 – rod;
- 3 – bracket;
- 4 – traction.
The bottom of the dump is lined with tin to prevent it from being buried in the ground. The width (depth) of the bottom can be made smaller than shown in the drawing. With a blade height of 450mm and a depth of 220mm, it looks more like a bucket.

Taking these recommendations as a basis and experimenting with sizes will help you make a shovel blade for different walk-behind tractors: Neva, Salyut, etc. Then snow removal with a walk-behind tractor will become an easy and enjoyable task for you.
Homemade knife blade for walk-behind tractor drawing

Do-it-yourself plow on a walk-behind tractor video collection
Related Posts:
 Which attachments for walk-behind tractor Neva MB-2 select
 We make attachments for walk-behind tractors with our own hands, photos and drawings
 Disc hiller for a walk-behind tractor with your own hands - photos and drawings
 What happens and how to choose attachments for the Salut walk-behind tractor
A snow blower is an indispensable machine in winter time on any summer cottage(read how to choose). If the list of your irreplaceable iron helpers already includes a device such as a walk-behind tractor, then try making a homemade snow thrower for it with your own hands.
A snow blower can also be made from a chainsaw. Find out how -.
For the manufacture of snow blower The following tools will be needed from the walk-behind tractor:
- A set of keys.
- Set of bolts and nuts.
- Drill with a set of drills.
- Angle grinder.
- Screwdriver Set.
- Hammer.
- Pliers.
- Vise.
- File.
- Electric hacksaw.
- Chain kit.
- Welder.
- Metal sheet.
- Profile pipe.
Types of snow blowers for walk-behind tractors
To properly make a snow blower yourself it is necessary to distinguish between their types and operating principles each of them.
Rotary snow blower
Rotary snow blowers are considered the most powerful among the entire range of snow removal machines offered. Machines of this type are capable of throwing snow over a distance of more than 12 meters. Read how to make a rotary snow blower.
A homemade rotary snow blower for a walk-behind tractor is a metal box with an auger shaft located in it. The rotating shaft is considered the main working mechanism of the snow removal unit.
As additional auxiliary devices in the manufacture of the mechanism, controls and clutches, as well as some spare drive parts, will be needed. Read about spare parts for snow blowers -.
A rotary snow blower for a walk-behind tractor begins to move only due to the operation of the shaft of the walk-behind cultivator itself., the torque of which transmits its energy through special adapters. Such adapters are sold in all stores specialized in the sale of garden equipment.
For more details, watch the video:
The principle of operation of such a mechanism is to capture and move snow into the mouth of the machine due to the operation of a rotary screw device. The ability to operate such a device is achieved due to flexible connection two shafts using a strong belt.
Another important mechanism in the design is an impeller, which is necessary to throw out the snow mass through a special hole brought to the top.
The shaft is a piece of pipe around which a gear unit - an auger - moves in a spiral. In order to maintain a constant torque, and therefore efficient work, the shaft is mounted on bearings.
The toothed auger is made of metal but in the form of identical and equidistant blades from each other. A plate with a sharp edge for cutting snow cover is attached to the bottom of the shovel.
To make a knife plate, use a sharp a metal sheet, with the help of which the snow layer is trimmed and folded back.
The blade parts are made of steel and then welded using a welding machine. A knife is attached to the bottom of the blade by welding. Using rods and brackets, the blade is secured to the walk-behind tractor. The traction mechanisms are held in the holes of the blade and attached to the controls through tubes.
The fan-bladed snow blower consists of following mechanisms:
- Drum and bearing.
- Impeller.
- Blades. They are located along the axis of rotation.
- Blades welded to the drum.
- Sheet steel bucket.
Using a torque transmission system, the drum axle is connected to the motor shaft.
The snow mass, entering the box, moves strictly along the guides to the blades, which throw it out.
The operating principle of a rotary and auger snow blower for Agro and Cascade walk-behind tractors
The snow thrower for Agro or Cascade walk-behind tractors looks like a huge bucket, which shovels snow inside the machine and moves it in a thin stream onto a special screw conveyor - an auger.
Below is a video of an auger snow blower for the Agro walk-behind tractor:
The mechanism consists of two paired non-cast screws made of strips with sparse teeth located along the outer edge of the strip. This design allows you to connect the halves of the bucket in such a way as to provide the greatest width for gripping the snow mass.
Below is a video of a snow blower for the Cascade walk-behind tractor:
The screws are screwed to the center of the shaft in the place where the snow falls. The rotational force of the shaft is so great that it can crush even hard layers of snow into small lumps.
To ensure that the throwing barrel is always free and not clogged with snow, screws overlap– this makes it possible to maintain a constant slow motion of the snow flow.
Screw snow blowers are called single-stage, since from the moment the snow mass enters the unit until it is thrown out, it requires passing through one stage of processing - movement along a conveyor.
Another type of snow blowers are considered two-stage, that is, such machines consist of two main working elements - an auger and a screw. These models of snow blowers installed on Agro and Ugra walk-behind tractors, and the advantage of such a mechanism is considered to be a large snow throw range - up to 25 meters.
Features of dump manufacturing
To make a homemade blade for the Salut walk-behind tractor you will need following tools:
- Drill with a set of drills.
- Bulgarian.
- Welding machine.
An ordinary steel barrel with a capacity of 200 liters will do just fine as a material for the dump. This barrel must be cut into 3 identical parts, which will act as curved segments of the dump.
The two parts need to be connected by welding to each other, resulting in the necessary for manufacturing a blade product with a thickness of 3 mm. This thickness is considered optimal to ensure the required rigidity of the equipment.
The nuances of making a homemade snow blower with your own hands
When making a blade for a Salut motor cultivator, it is necessary to reinforce the lower edge with a blade part. For this prepare a metal strip with a thickness of at least 5 mm.
The length of the strip is equal to the length of the lower part of the blade. Next, holes with a diameter of 6 mm are drilled in the prepared blank for the knife, which must be positioned every 12 cm. Using these holes, rubber is attached to the blade.
Making a dump from a barrel
A square pipe with a side length of 40 mm is welded in the middle to a dump that has already been prepared from two parts of the barrel. This element will strengthen the designs of attachments
Then to the central part of the pipe it is necessary weld the semicircle with in advance drilled holes for fastening. The semicircle must be made of thick sheet of steel.
The holder-mount for a homemade blade is L-shaped. One of the ends of this component is attached to one hole in the semicircle, and the other is screwed to the structure of the walk-behind tractor using bolts.
The height of the blade can also be changed, for this bolts are used, which need to be screwed to a section of profiled pipe.
Features of manufacturing different dumps
Blade for walk-behind tractor can be made of steel sheet with a thickness of at least 3 mm, the size of the device upon completion of work will be 85*22*45 cm.
Internal auxiliary racks must be made of material of relatively large thickness, since they act as peculiar stiffening ribs. Holes are also drilled in them for attaching the shovel to the walk-behind tractor rods.
Blade for walk-behind tractor Neva
The blade for a snowblower made from a Neva walk-behind tractor is made using exactly the same technology. A bracket mounted on the runners of a walk-behind tractor can be used to mount the blade. The bottom of the folding support located in front is also attached to them.
For fastening use bolts nomenclature M 10. The shovel blade for the Neva motor-cultivator is held on by bolts and has dimensions of 0.3*10*85 cm.
The final stage
To prevent the device from crashing into the ground, the edge of the blade is sheathed with metal. If the dimensions of the main device, the blade, are 45*22 cm, it will look like a bucket.
To extend the life of your homemade device required during first use check the condition of fastening elements every 25-30 minutes of operation.
Each time you use the machine, take the time to check the tension of the V-belt.
Check regularly and, if necessary, tighten all threaded connections.
Timely and ongoing performance of such device maintenance will allow your homemade snow blower work reliably and efficiently throughout many winter seasons.
Every craftsman is quite capable of making a snow blower for a walk-behind tractor on his own, and experiment with sizes and materials and learn how to make snow throwers for different models walk-behind tractors.
To avoid the formation of corrosion on your unit, do not forget to treat it more often. metal surfaces special chemical solutions. Compliance with all the above recommendations will allow you to avoid expensive device repairs or purchasing a new unit.
Find out how to make your own electric snow blower -.


