03/20/2018 5 867 0 Anya
skillful hands
There is no person who does not have old pens lying around at home or at work. Our article is not about the fact that hoarding unnecessary rubbish is harmful and it's time to put things in order in cabinets, tables and bedside tables, but about what can be made from old fountain pens or other similar writing products.
Content:
Making a crossbow

Whether you are a student or a student, or your work is connected with papers and their design, in any case, a noticeable amount of pens accumulate over the years various forms and flowers. Why not leave them in order to eventually make such an interesting thing as a crossbow. Such weapons were used back in the Middle Ages, but our product will not carry such a danger as in the past. Schoolchildren will be especially happy to take up the production, because it can serve as an excellent alternative to many toys and will certainly make its owner special in the eyes of their peers. Adults can act as generators of ideas in this case and the closest assistants in the manufacture.
You will need:
- one ballpoint pen with the same diameter along the entire length;
- a simple pencil (4 pieces);
- scotch;
- elastic.
Progress:
- Connect 2 pencils with tape so that their length matches each other;
- Repeat step 1 with the other two pencil pens;
- Place the first pair of pencils perpendicular to the second pair so that their edges are in the middle of the other pair, and the figure formed by them resembles an offset cross;
- Remove the rod from the handle, attach the base to the crossbow;
- The resulting wings must be arranged in the form of a bowstring. To do this, the prepared gum must be hooked on the ends of the wings;
- Insert the rod into the handle. It will serve as an arrow;
- Set the crossbow in action.
Pen stand

There are many ways to reuse old pens, but one of the most useful and functional is a stand. To get started, collect all the used pens you have (remove the refills from the inside), put all-purpose glue in front of you, as well as one of your unnecessary discs . Spread the disk with glue in a circle, stepping back half a centimeter from the edge, glue the handles one by one.
Advice! Between themselves, the handles also need to be glued so that the design is complete and does not stagger.
The resulting "glass" can be decorated at your discretion: glue beads, rhinestones, tie ribbons with bows around, lay out patterns or come up with other decorative things. When you complete the work you have begun, then you yourself and the people around you will appreciate the extravagant stand, which will reflect your identity and your own style.
baby doll
An unusual surprise for your child will be a cute doll made again from a pen.

Having set on fire the idea of making such a doll, first cut out the elements of clothing, shoes, prepare the fabric in order to fit the head and other parts of the body.

To make the head, prepare a foam or foam ball, iron the suede fabric and immediately fit the ball, cutting off any excess protruding pieces. Make hair out of another fabric, cut it into ribbons, and glue it to the head.

Next, you will need to wrap the handle with the same suede as the head, and glue the 2 parts to each other. After that, start sewing a simple dress and pull it over the body. If you have pieces of thick felt, you can sew on the hands.

At the end, shoes are glued. Can add bright decorations and other individual items.
Unusual decoration from caps
We also do not recommend throwing metal caps away, because you can build interesting decoration, which can be worn instead of a belt or necklace. To do this, simply make holes on the caps, thread a beautiful ribbon or chain. And you will amaze your friends with originality and boldness of style.

Decorations from fountain pens
Idea 1
Decorate own apartment You can also use ordinary fountain pens. Yes Yes. It's not a joke. Very beautiful curtains-threads are obtained from a handle without a rod, beads, pebbles.

Such beauty turns out like this: all the prepared elements are strung on a thick thread. You can choose the sequence yourself, as it seems beautiful and acceptable to you. Just keep in mind that it is glass handles that will look more beautiful in the interior, as they can let in rays of light and gleam in the sun.
Idea 2
If we take on the decoration of the home, then seriously. The panel will be an excellent option for decorating your walls, and multi-colored caps will be the main material in the manufacture. Mosaic technique can be mastered even by those who have never done it. On the Internet, find blanks for the future panel, print it in the right size and color scheme and transfer the cells to the material on which the drawing will be held: a piece of fiberboard, plywood, thick cardboard, etc.

Each color on the cell should correspond to a cap of the same shade.
Advice! If you don’t have a lot of different colors of caps in your arsenal, then it’s better to choose a pattern that combines a maximum of 3 colors.
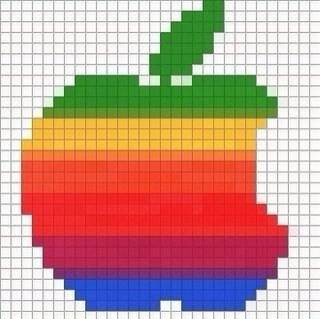
Attaching the caps to the base is not at all difficult: you just need to spread it universal glue and lean against the cage, hold a little and take on the next one. It is desirable to make the picture voluminous by adjusting the length of the caps. If they are all the same length, then with scissors you can shorten them to right size. It all depends on the image itself. In order to get as close to reality as possible, you yourself must understand what height the caps should use on what interval of the pattern. For example, the middle in an apple will be the highest, to the top and bottom of it - the caps should be lower.

Idea 3
If you have a lot of transparent handles of the same color and size, then get an extraordinary lamp with a few easy steps in your power. To do this, find a lamp with a cartridge and a wire with a plug, an old CD, glue. First of all, you need to glue several handles of this color around the disk itself, like a glass. After waiting for the glue to dry completely, proceed to create an intricate design. Act by inertia, the "plafond" should be awkward. The fancier the shape, the better.

Advice! When working on the top of the lamp, do not try to glue everything at once. This will take time, but you need to act measuredly and give time for each layer of glue to dry, and then proceed to further construction.
Variations of lamps of such a plan can be many, only related materials are changing.

Idea 4
by the most interesting point for fashionistas and lovers of exclusive things will be the option of a bag decorated with handles.

Such a bag is made as follows: the handles are untwisted, the caps and rods are removed, the cases remain. They are cut with scissors (if scissors are not taken, then you can take a knife) into pieces of the same length. Then multi-colored cones are glued with hot glue to the bag. If you want to puzzle yourself, and you have time, then pierce each cone with an awl and pull a thread through them, and then sew each line from top to bottom. In this case, the cones will not be fixed, they will be able to ring and tap.
Idea 5
You have a lot indoor plants and some of the pots are already worn out? Or you do not have a beautiful flowerpot for fresh flowers? Here's the solution - collect all the different colored ballpoint pens you have, spin them around leaving only the cases, and glue them on some tin can(as shown in the photo below with colored pencils).
Now you can pour water there and fill it with earth - it all depends on the situation and the application of the resulting piece of furniture.
A satin ribbon with a bow around the pot will look good, which can be tied both from above and in the middle and from below.

Note to housewives
If you love to knit and you have a whole arsenal of various needlework hooks, then sometimes there are situations when the hook handle is very thin or uncomfortable. An ordinary pen will come to the rescue again, or rather its base. The hook can be inserted in the middle, and the problem of comfortable knitting is solved.

As a result, we say that any unnecessary or old thing in the house can find a second wind, if skillfully applied. And for this you need to have desire, imagination and time. Only by combining these three factors can you make unusual and beautiful items that can create a unique and special style for you and your apartment.
1 / 5 ( 1 vote)
Look into your desk. Surely there was a couple (or even a good dozen) of ballpoint, gel, expensive, cheap - in a word, different pens lying around in it.
If that's the way it is, let's make them useful thing or find a worthy use for them!
What should a gift pen look like?
company car or fountain pen- a thing that is designed to emphasize the high status of the owner.
The design of this gift must be impeccable.
Manufacturing companies produce products in packaging boxes or cases, which are enough to tie up with a beautiful bow - and the gift is ready to be presented.
But to many this will seem a little original, because there are many great ways to pack:
- Wrap the box with the pen in wrapping paper. From a sheet suitable color or thick newspaper, cut out the feathers.

- If the pen is intended for a person from a writing environment, then the packaging in the form of a book is a 100% hit.
From thick cardboard, cut out 3 parts: a spine and 2 sheets of cover. Glue them with small gaps on the material with which the book will be wrapped: textiles, paper, leather. Cut off the excess, leaving allowances that need to be folded onto the cardboard.
- The pen can also be hidden in a tall jar filled to the top with various sweets. Why them? writing man thinks a lot and hard, and glucose will help the thought process! Decorate the container to your taste. A simple option is ribbons.

- It is easy to make and packaging in the form of a scroll. Aged paper looks spectacular. Soak the leaves in tea leaves, dry. Give the edges a frayed look, and tear in several places. At the end of the finished "parchment" make 2 slots (top and bottom) for ribbons or twine, then fasten the present. Remaining free place in the scroll will take the text.

An interesting move is to write a comic decree (you can be inspired by the imperial decrees of Peter I, for example) and leave a place for a signature. When the “king”, and concurrently the future owner of the pen, reads the decree, having reached the end of the scroll, he will find the “pen” and put his signature under the instruction. So you can present a gift to your leader.
- You can also romantically present a pen. To do this, wrap it with a ribbon (satin or lace), and attach a flower made of fabric or even newspaper at the end.

For each feather, make cuts in the form of a fringe along the contour. Gently iron the folds in the middle. Then arrange the blanks together, glue to the wrapper and tie with twine or woolen thread.

Now select a paper sheet of suitable size for the endpapers and carefully stick it on inside. On the back endpaper, fasten a box a couple of millimeters smaller than the cover itself. Cardboard for her is better to choose a yellowish tint - the color of the book pages.

The false book is almost finished. It remains to decorate the cover and provide it with ties. Everything is used: buttons, beads, lace, newspaper clippings. And if the future owner of the pen is working on writing a real book, then decorate the packaging in accordance with the content of the future work. You can give a gift with the words: “Is the pen great, but writes big books” and wish fruitful and uninterrupted work.

Surprise for your child
You do not know where to put a mountain of unnecessary pens? What can be done from a pen at home? We will tell and show!
A cute doll for children can be created on the basis of an ordinary ballpoint pen. In this craft, she will play the role of the body.
A ping-pong ball is suitable for a doll head. Make a hole in the ball and put it on the handle. The costume can be "sewn" both from fabric and from paper using the origami technique. If the choice is for a fabric dress, give additional volume to the body by wrapping cotton wool around it.
As for the hair, the material can also be different. It is cut into strips and glued to the ball.
Paper hair does not need to be left straight, it can be easily turned into curls if wound on a rod or pulled with scissors (depending on the density of the paper). It remains to finish the face. You can draw it with felt-tip pens or stick pieces of colored paper.

A more perfect sample of the doll is created using the so-called foamiran, which has a texture resembling suede. Its exclusivity lies in the ability to stretch and take any shape when heated.

To create these models, details of clothes and shoes are cut out of plastic suede, pieces for fitting the head and torso. This work is laborious, so it is better to start with small parts from foamiran. For example, only heads.

The foam ball is covered with a piece of plastic suede, preheated with an iron, all excess is carefully cut off. The workpiece is removed from the ball, so that later it can be put on glue. Hair is created. Then they are cut into fringes, any hairstyle is formed and glued to the head.

To attach the finished doll head to the body, i.e. Handle, wind a layer of suede around it. Parts of the toy are easy to glue together.
For a dress, cut a piece of fabric, sew it on the sides, pull it off with a thread from above and put it on the handle. You can sew on handles made of foamiran.

When the ability to work in such a technique comes, proceed to more complex toys.
https://miaset.ru/education/tips/handle.htmlCaps as parts of a three-dimensional panel
Mosaic from the caps of old fountain pens? Why not, you can make any picture in mosaic technique: portrait, landscape, still life. Print the image you like on squared paper in the desired format and color. Apply the same grid of cells to cardboard or plywood (the basis for the picture).
Each colored cell on the printout corresponds to a cell on the workpiece, a cap of the corresponding shade is selected for it.
For the first experiments, it is better to stop the choice in the pictures without an abundance of shades, otherwise there will be difficulties with color matching caps.
If the caps are with a stick, it must be cut off. We fasten caps in a lined grid with glue of a suitable color.
Additional volume is created by using caps different heights. In the figure, we determine the most convex part of the object (on an apple it is the middle of the red color) and the flattest (top and bottom). In accordance with this, we distribute the caps on the panel in height: at the top and bottom - short, and increasing towards the middle, where the highest ones will be located. Height can be adjusted by simply cutting lower part cap.
These jobs are also done with screws, but caps will do the job just fine too!


Tip: if you don’t have the right shades, just paint the caps in the desired color!
Useful use of an already useless pen

Convenient and original storage of stationery
What to come up with in addition to the classic and already boring delivery:

How many more interesting, good things can be created from a simple pen? As many as your imagination allows! It is quite possible that the listed ideas will push you to create your own masterpiece, which you will share in the comments.
Every day, schoolchildren have to write a lot of text, solve examples, and do homework. Of course, ballpoint pens wear out at the same time, and parents buy new ones. The old ones don't have to be thrown away. Let's think about what can be done from a pen if you have free time and a desire to do something yourself. First, I ask the attention of all the boys.
I have no doubt that in your arsenal there are a wide variety of pistols, machine guns, machine guns and other military equipment. But is there a weapon that you made yourself. If not, it's easy to fix with a little time. You can make a crossbow out of an old ballpoint pen.
Making a crossbow
Let's start by buying four pencils. It doesn't matter what color, you can simple. We fasten them in pairs with rubber bands, electrical tape or tape. Take your time, adjust the edges evenly. Next step: place a pair of pencils crosswise so that one lies in the center and the other is shifted to one side (like an airplane). Now we have the base of the crossbow with wings. We disassemble the old pen, we make a barrel from the flask. The main requirement for the barrel is that it has the same diameter along the entire length. We attach the barrel to the base of the crossbow. We attach the elastic band to the edges of the "wings", it will play the role of a bowstring. We install an arrow rod in the barrel and make the first shot.
Stand for pens
Girls, the task is more serious for you. You need to collect a lot of pens. Using a tube of super glue, we attach the bases of the cones from ballpoint pens around the perimeter of a small CD, placing them about half a centimeter further from the edge. Decorate outside you can use beads. It is desirable that they have a variety of shapes, colors and sizes. This will give the product a cheerful and pleasant appearance. Having shown imagination, you can make a beautiful designer stand, for example, for pencils or something else.
cheat sheets
And in the end practical advice about what can be made from a pen, for all schoolchildren: you can make cheat sheets from fountain pens. To do this, it is enough to scratch the necessary formulas, dates or other information on the edges of the pen. necessary information, which can be successfully used when writing control or passing exams. Writing on a pen is best done with an awl. If you do not have such a tool, then you can adapt the needle by first wrapping it with thread.
Almost every schoolchild, student has old fountain pens after the end of the school season. So, in order not to throw them away, we recommend making some ideological things out of them that will come in handy both in the house and in Everyday life. Let's look at the options:
Curtains
For ease, we take out the insides and drag a thin fishing line through the inside. Thus, we collect in the form of long or short threads. This invention can be used for any kind of curtains from kitchen to hallways. Then we connect each thread with a dense plastic or metal beam. Ready product fasten with screws to the wall.
Attention! In order for the curtains not to get confused, after each fitting, make a plexus, so to speak, a partition strip. You can use beads.
Necklace
In order to make a necklace, you will need to free the inside of the fountain pens from about 10 pcs. Carefully cut into small triple pieces. Paint in any suitable color with special paint in order to achieve one tone of color. Next, let dry.

Important! If you want to get an even color, then paint in parts: first one, then dry in a standing position, and then the other in the same way. When the parts are ready, take the glue and start gluing 3 pieces together. Then take a beautiful long cord and from the beginning of the first part, pass through the inside to the last. Leave the collection in the middle of the lace. On both sides, tie the knots so that they are pressed tightly against the details. Then continue the process, leaving the ends for the ties.
Contacts for voltmeter
Replace contacts with fountain pens. Release the body part and insert the old pin for contact. Connect the wires from the voltmeter to the core insert so that they, in turn, hold the case tightly. To add beauty, use transparent pens.

Take any suitable cartridge and attach the desired length of wire with a plug. Use a plain CD disc for the construction stand. On the circular axis, stick the handles in a standing position, first free them from the rods. Let dry well and then continue gluing the next so that the ends of the next row just touch the first. Well, then turn on the fantasy. The lamp can be of different shapes.

Important! If you want to get bright light, then use transparent fountain pens.
Bag
First, sew a bag out of dense fabric. Then unscrew the handles so that only the case remains. Divide the body part into three identical parts. Then, with a hot knitting needle or a hot object, make holes in each detail from the bottom and top. And fasten one at a time through the holes to the form. You can use sewing machine but better sew manually. Beautiful and bright handbag looks original.

flower pot
Take any tin can and glue one handle on the outer case. Fill in the soil and plant a plant. To give originality, you can decorate with a bow on the bottom.

We take a simple transparent bottle and connect the hole with the cork to the water hose. Next, we make holes in a circle and insert the cases of empty handles so that we get a hedgehog. Turn on the water and get a good watering for the lawn.

Crochet hook
Quite often, the handles of crochet hooks break. We propose to replace it with an exempt internal parts pen body. Both beautiful and quite comfortable.

1 / 5 ( 1 vote)
Take a look at your desk. Surely there was a couple (or even a good dozen) of ballpoint, gel, expensive, cheap - in a word, different pens lying around in it.
If this is the case, let's make a useful thing out of them or find a worthy use for them!
What should a gift pen look like?
A branded car or a fountain pen is a thing that is designed to emphasize the high status of the owner.
The design of this gift must be impeccable.
Manufacturing companies produce products in packaging boxes or cases, which are enough to tie up with a beautiful bow - and the gift is ready to be presented.
But to many this will seem a little original, because there are many great ways to pack:
- Wrap the box with the pen in wrapping paper. Cut out feathers from a sheet of a suitable color or thick newspaper.
- If the pen is intended for a person from a writing environment, then the packaging in the form of a book is a 100% hit.
From thick cardboard, cut out 3 parts: a spine and 2 sheets of cover. Glue them with small gaps on the material with which the book will be wrapped: textiles, paper, leather. Cut off the excess, leaving allowances that need to be folded onto the cardboard. - The pen can also be hidden in a tall jar filled to the top with various sweets. Why them? A writing person thinks a lot and intensely, and glucose will help the thought process! Decorate the container to your taste. A simple option is ribbons.
- It is easy to make and packaging in the form of a scroll. Aged paper looks spectacular. Soak the leaves in tea leaves, dry. Give the edges a frayed look, and tear in several places. At the end of the finished "parchment" make 2 slots (top and bottom) for ribbons or twine, then fasten the present. The remaining free space in the scroll will be occupied by the text.
An interesting move is to write a comic decree (you can be inspired by the imperial decrees of Peter I, for example) and leave a place for a signature. When the “king”, and concurrently the future owner of the pen, reads the decree, having reached the end of the scroll, he will find the “pen” and put his signature under the instruction. So you can present a gift to your leader.
- You can also romantically present a pen. To do this, wrap it with a ribbon (satin or lace), and attach a flower made of fabric or even newspaper at the end.
For each feather, make cuts in the form of a fringe along the contour. Gently iron the folds in the middle. Then arrange the blanks together, glue to the wrapper and tie with twine or woolen thread.
Now choose a paper sheet of suitable size for the endpapers and carefully stick it on the inside. On the back endpaper, fasten a box a couple of millimeters smaller than the cover itself. Cardboard for her is better to choose a yellowish tint - the color of the book pages.
The false book is almost finished. It remains to decorate the cover and provide it with ties. Everything is used: buttons, beads, lace, newspaper clippings. And if the future owner of the pen is working on writing a real book, then decorate the packaging in accordance with the content of the future work. You can give a gift with the words: “Is the pen great, but writes big books” and wish fruitful and uninterrupted work.
Surprise for your child
You do not know where to put a mountain of unnecessary pens? What can be done from a pen at home? We will tell and show!
A cute doll for children can be created on the basis of an ordinary ballpoint pen. In this craft, she will play the role of the body.
A ping-pong ball is suitable for a doll head. Make a hole in the ball and put it on the handle. The costume can be "sewn" both from fabric and from paper using the origami technique. If the choice is for a fabric dress, give additional volume to the body by wrapping cotton wool around it.
As for the hair, the material can also be different. It is cut into strips and glued to the ball.
Paper hair does not need to be left straight, it can be easily turned into curls if wound on a rod or pulled with scissors (depending on the density of the paper). It remains to finish the face. You can draw it with felt-tip pens or stick pieces of colored paper.
A more perfect sample of the doll is created using the so-called foamiran, which has a texture resembling suede. Its exclusivity lies in the ability to stretch and take any shape when heated.
To create these models, details of clothes and shoes are cut out of plastic suede, pieces for fitting the head and torso. This work is laborious, so it is better to start with small parts from foamiran. For example, only heads.
The foam ball is covered with a piece of plastic suede, preheated with an iron, all excess is carefully cut off. The workpiece is removed from the ball, so that later it can be put on glue. Hair is created. Then they are cut into fringes, any hairstyle is formed and glued to the head.
To attach the finished doll head to the body, i.e. Handle, wind a layer of suede around it. Parts of the toy are easy to glue together.
For a dress, cut a piece of fabric, sew it on the sides, pull it off with a thread from above and put it on the handle. You can sew on handles made of foamiran.
When the ability to work in such a technique comes, proceed to more complex toys.
Caps as parts of a three-dimensional panel
Mosaic from the caps of old fountain pens? Why not, you can make any picture in mosaic technique: portrait, landscape, still life. Print the image you like on squared paper in the desired format and color. Apply the same grid of cells to cardboard or plywood (the basis for the picture).
Each colored cell on the printout corresponds to a cell on the workpiece, a cap of the corresponding shade is selected for it.
For the first experiments, it is better to stop the choice on the pictures without an abundance of shades, otherwise there will be difficulties with the color selection of the caps.
If the caps are with a stick, it must be cut off. We fasten caps in a lined grid with glue of a suitable color.
Additional volume is created by using caps of different heights. In the figure, we determine the most convex part of the object (on an apple it is the middle of the red color) and the flattest (top and bottom). In accordance with this, we distribute the caps on the panel in height: at the top and bottom - short, and increasing towards the middle, where the highest ones will be located. The height can be adjusted by simply cutting off the bottom of the cap.
These jobs are also done with screws, but caps will do the job just fine too!
Tip: if you don’t have the right shades, just paint the caps in the desired color!
Useful use of an already useless pen
Convenient and original storage of stationery
What to come up with in addition to the classic and already boring delivery:
How many more interesting, good things can be created from a simple pen? As many as your imagination allows! It is quite possible that the listed ideas will push you to create your own masterpiece, which you will share in the comments.