Conditions are good dumbbells...
In my last “homemade project” - “” I told you how you can make dumbbells using bottles and sand... But these are rather primitive dumbbells, although they are very easy to make, but if you still set yourself the goal of more- to go in for sports less seriously, then you need to make good dumbbells... If, of course, you have the opportunity and means to exercise in a gym with professional equipment, then this article is not suitable for you, but if you are still “self-taught” and decided, like me , to make your own small gym - then this article is perfect for you!!!

So let's begin...
To make dumbbells we will need:
- 2 bottles of 2 l;
- cement;
- sand;
- water;
- pipe or fittings;
- drill;
- drills;
- screws or nails.
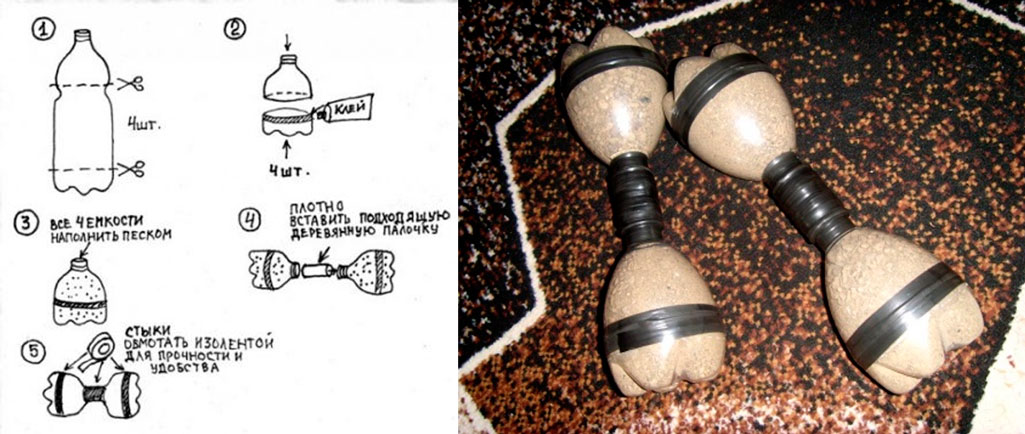
We start by cutting the bottles as shown in the photo...

The cut bottles need to be washed, cleaned and dried well...
Also, you need to clean the pipe (or fittings) and use a drill to make 5-7 holes on each side of the pipe as shown in the photo...

After this, you need to insert screws or nails into the holes in the pipe (this is done so that the pipe in the finished dumbbell does not rotate)...

Well, all the components are ready!!! Now we are preparing the cement mortar... I diluted cement with sand in a ratio of 1:2... Instead of sand, you can also use gran screening...

After the solution is ready, we place a pipe in the center of the bottle with pre-made holes and screws or nails inserted there, and fill it with the solution...

That's all... One side is ready, now you need to leave it until the solution dries completely and hardens...

After one side has hardened, proceed to the other side... We perform the same operation, wait for it to dry completely and harden...
All!!! The dumbbell is ready... Now you can use it... Good luck!
You will need:
Options
Of course, now we’re not talking about making beautiful dumbbells that you might have seen in stores. After all, in our business the main thing is not appearance, and the result. Actually, in this regard, homemade dumbbells are in no way inferior.
You may have heard talk about bottles of sand or water, irons and other devices - all this is far from what we need! Just imagine - how can a person get pumped up using two-liter bottles?
Today we will talk about the most reliable and proven method of making dumbbells. This technique was originated and widely used in China and the Philippines. Of course, we won’t be able to exactly repeat the technique of making “Shaolin” dumbbells, but we will try to get closer to the ideal.
Consumables
What should you use to make dumbbells at home? To begin with, we will need about 10 kg of high-quality cement, 105 kg of fine crushed stone, 10 kg of sand and a little water.
This number may vary depending on your athletic training. So choose the weight of the dumbbells in relation to your strength and body weight.
Then take 2 pieces steel pipe with a diameter of up to 30 mm and a length of 50 cm. We do not recommend that you take a thicker diameter, since the resulting dumbbell will be difficult and uncomfortable to hold in your hand. Next we need molds for discs, exactly 4 pieces. They can be mayonnaise buckets or cans of condensed milk.
For those for whom this option is not particularly suitable, there is great alternative. Take a round piece of radius c liter jar and press the mold directly into the ground. This way you should have two dumbbells. But that's not all!
The molds should be a copy of each other. It is undesirable that the final weight of the first dumbbell differs from the second. For accuracy, try to use available tools - marker, meter, scales, hammer, nails, etc.
Installation
Preparatory process came to its logical conclusion. Now let's get down to the actual installation itself. We have at our disposal 4 identical molds and 2 identical pieces of pipe. Next we need to make concrete. To do this, take 4 parts of crushed stone, 3 parts of sand and 2 parts of cement. While stirring, gradually add water. But not too much, since in the end our consistency did not turn out to be rare and soft. Then, during mixing, you can add crushed stone.
Once we have exactly 1 kg of concrete, you can insert the prepared handles directly into the molds. Place the pipe at the very bottom of the bucket or jar, securing it with a piece of wire. Place the handle at a position as close as possible to the center of the radius of the mold. Gradually add concrete and compact it. You can do this with your hands, or better yet, with a small piece of twig or stick. Once your mold is full, level the top.
Do the same with the second mold. Finally, leave your future dumbbells for a day. During this time, it is advisable to occasionally water your workpieces.
After a certain time has passed, carefully remove the dumbbells from the molds, turn them over, and do exactly the same operation, but with a different piece of equipment.
After both dumbbells are ready, it is advisable that you water them with water for the first 3-4 days, at least 3-4 times a day.
Conclusion
Conclusion
You did it! Now you can carry out full-fledged training by consulting with a trainer or just a knowledgeable person, or again, by turning to the Internet for advice. And if your dumbbells turn out to be heavier than you expected, that’s okay! Do fewer repetitions at first, and with each workout you will reach your goal, and who knows - maybe you will set a new Guinness record for the number of dumbbell lifts! Try, train, improve, but don’t overdo it! And, most importantly - .
Not everyone who wants to play sports has enough time to visit the gym, and home workouts require certain equipment, the cost of which is quite high. The most popular are dumbbells. They are involved in almost all exercises. And if you don’t plan to purchase sports equipment in the near future, you shouldn’t give up exercising. You can make dumbbells with your own hands from fairly cheap materials. To do this, just read the instructions on how and what they are made from.
Conventional plastic bottles allow you to short term make dumbbells that you can use right away. The main thing is to secure the structural elements well so that it does not collapse during training.
To assemble one plastic projectile you will need: 2 bottles, adhesive tape or insulating tape, filler.
Step-by-step instructions for making dumbbells from plastic bottles:
- Cut out the middle part of the bottles. The separated elements (upper and lower) are fastened using adhesive insulating tape.
- Filler is poured into the container. If the projectile is made of light weight, cement and sand are used. Dumbbells with greater mass require the addition of metal inclusions, which can be balls from bearings, nails, or various metals. The choice depends entirely on the availability of a particular material.
- When the necks of the bottles are filled, insert a pipe or stick made of metal or wood. Wrap the joints with electrical tape or tape. Thanks to this manipulation, you will get a non-slip, soft and quite comfortable handle.
Before starting classes, you should carefully check all connections so that the filler does not “leak through.”
Regular plastic bottles are suitable not only for collecting dumbbells, but also barbells. This projectile weighs much more, so the amount of starting material increases.
To assemble the bar you will need: at least 8 plastic bottles, a bar, filler material, electrical tape or tape.
Instructions for making a plastic rod:
- Bottles are filled in the same way as dumbbells.
- Select the material for the fingerboard. It is better to take fittings or pipes that fit comfortably in your hand.
- At each end of the bar, ready-made weights from filled plastic bottles are placed and wrapped with adhesive tape. There are four weights on each side.
- Check the quality of fastening. The neck should not move or form any play. If the connection is weak, add more electrical tape.
- The weight of the bar can be increased by placing additional weights in the form of bars between bottle weights and so on.
- Each additional load must be wrapped with a new layer of electrical tape. The load can be increased up to 100 kg.
It is quite difficult to navigate the choice of material. The approximate weight of a dumbbell or barbell can be calculated based on the data presented:
Weight of a two-liter plastic bottle with various fillers:
- water - 1.997;
- compacted sand - 3,360;
- wet sand - 3,840;
- crushed stone (peastone) - 2,600;
- lead - 22,800.
Weight is given in kilograms.
We collect shells from concrete

The cement base allows you to get heavier dumbbells and barbells than using plastic bottles. The pancakes are not only more impressive in weight, but also look much more solid. They are cast from cement mortar V special form, inside of which there is a neck. The disadvantage of this design is that the load of the projectile cannot be adjusted or adjusted to suit someone else.
To start working with a different weight, you will need to make a new barbell or dumbbells. Weighting agents, in fact, are individual, and also quite fragile and “free-flowing”. The last drawback is eliminated by introducing PVA glue into the solution. And if the classes are not conducted according to the principle of powerlifting, when the apparatus is thrown onto the floor, then it will last quite a long time.
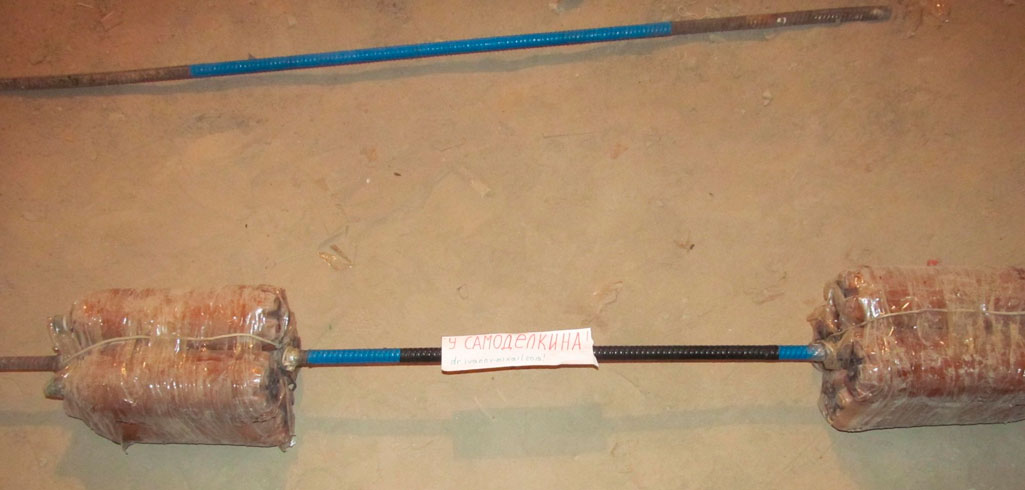
To make concrete dumbbells (barbells) you will need: metal pipe with the required length, bolts or screws, cement mortar, PVA, as well as a mold for casting the load.
Step-by-step instructions for making cement projectiles:
- At the ends of the pipe, holes are made in four directions using a drill. Screws are screwed into the holes made so that they are fixed as securely as possible at the ends and form a peculiar cross shape. They become the framework that holds the cement.
- The pancake pan is made from a flat mayonnaise or paint bucket. You can use another container. The main thing is that the weight be selected so that it is necessary for training and suits the body of the student. Glue is added to the solution for hardness or oil paint is introduced.
- Place a pipe in the poured mixture and wait about four days until it completely sets. Repeat the manipulations described in the previous paragraphs for the second side. Make a support. The structure is tied up or suspended for another four days.
- When the cement has completely set, over the next week the projectile is soaked at least twice in water so that it gains even greater strength.
Shells poured into a two-liter mold can weigh about 5 kg. The exact weight is determined by the composition of the mixture involved.
To do the Farmer's Walk, you don't need to make any apparatus. It is enough to take two ordinary cans and hang them on a stick. You can use tires filled with sand or any other filler. It is difficult to perform other exercises with a similar design. They require the use of full dumbbells.
When sports activities become regular, the need arises to purchase more professional equipment or make them from metal. They are practically no different from the factory ones. The difference is that homemade dumbbells are much cheaper. From one pipe you can simultaneously make both a bar and plates. It is best to make stacked dumbbells from metal.
To make projectiles, you need to prepare in advance: a thin-walled pipe with a diameter slightly larger than that of the bar, for which it is better to take a metal rod, locking locks and sheet steel. Work on the manufacture of dumbbells should be carried out in a locksmith workshop.
Step by step instructions:
- Approximately 35-40 cm of the neck is sawed off from scrap metal with a diameter of about 3 cm. To make the projectile comfortable to hold in your hands, about 15 cm is cut from the thin-walled pipe. The resulting piece is put on the bar. Further, if desired, it can be covered with relief or wrapped with electrical tape.
- Pancakes are cut using an autogenous machine from sheet steel. The weight of one disk with a diameter of 18 cm and a thickness of 1 cm is 2 kg. This makes it easy to calculate the required number of pancakes to get a mass of 10, 20, 30, 40 kg. The dimensions of the discs also make it quite easy to change the weight of the weights from small to maximum. Cutting a whole set of pancakes allows you to constantly work with different weights.
- The next step is the locking locks. The diameter of the pipe is larger than that of the neck. Rings with a width of 3 cm are cut from the product. They should move freely along the bar, but not slip off. One hole with a diameter of at least 1-1.20 cm is drilled into the rings. They are necessary for screwing in screws, which allows the rings to hold the plates and press against the bar. The main thing is to take care of the high-quality pressing of the screw so that there are no backlashes.
- On last stage start assembling the dumbbells. Weights are hung on the bar with a piece of pipe in the middle and secured with locking locks.
Dumbbells made using the described method are not inferior in quality to factory ones and allow you to work with both light and heavy weights.
General tips and tricks for assembling dumbbells at home

The best without any doubt are metal shells, but they are much more difficult to manufacture than other designs. It is necessary not only to make the disks, but to choose the correct width of the pancakes, and to make the locking locks in a quality manner according to the calculations. It is recommended to increase not the width, but the diameter of the disks. You can make several heavy and several small pancakes.
To make the dumbbells look presentable, the parts are sanded and painted. This will only slightly complicate the creation process and increase the cost of the shells, but they will look no worse than factory ones and have a much lower price. Exercises with such equipment will bring more pleasure, and, consequently, motivation and the effect of training will increase.
You should not waste time and effort on creating dumbbells weighing up to 100 kg. There are plenty of instructions for assembling such structures on the Internet, but it is better to immediately make a barbell with a capacity of 200-300 kilos in order to perform deadlifts. Dumbbells are not suitable for such loads. And if you lift iron, then with a serious apparatus, that is, a barbell.
If such an opportunity exists, you can purchase a bar with a handle in a store, and either make the pancakes yourself or order them from a workshop. A high-quality handle promotes comfortable exercise, and homemade pancakes significantly reduce the overall cost of the projectile.
In fashion for a long time healthy image life and constant exercise, but not everyone can afford to visit the gym several times a week. Exercising at home is good alternative for those who for some reason refused to go to the gym. However, for any workout you need sports equipment, which costs a lot of money. To avoid spending your entire salary on sports equipment, you can independently try to answer the question of how to make a barbell at home, having on hand only the items that are in your home.
A little imagination - and the barbell is ready at home
Every home is sure to have several plastic bottles, but even if they are not there, you can find empty ones from friends, acquaintances, or simply leave them after drinking mineral water or lemonade. The number of bottles depends on the load you need: on average, it is from 6 to 10 pieces of the same volume. In addition to bottles, you should stock up on a lot of tape. Bottles and tape will be your main materials needed to make the projectile.
Sleight of hand, a little imagination - and the improvised barbell is ready
Let's say you chose the maximum weight and filled eight two-liter bottles to the top with sand. It is clear that the bottles themselves will not stick to the stick and they need to be strengthened with something. For this purpose we use tape. We distribute 4 bottles on each side and wrap them several times with adhesive tape. Try it with your hands so that the improvised loads hold tight and do not fly apart at the most inopportune moment. Secure all caps and check that the internal contents do not spill out. The projectile is half ready for use. If you still don’t understand how to make a barbell at home, then move on.
In addition to the tape, you should have prepared the wire in advance. We will also use it to fasten the bottles to each other in case the tape fails and our cargo decides to fall apart. As soon as all the bottles are fastened together, we need to secure them to the handle. If you decide that you will have 4 improvised sinkers on each side, then the handle will fit into the hole between the bottles just fine. That's it, it's ours now homemade barbell ready to use.

Strength test
There is a desire to work on your body, a sports instrument made at home, too; There is very little left to check the quality of the projectile. You need to make sure that the bar does not fall apart at the most critical moment, and that the weights do not become detached from the handle.
If the bottles sit tightly on the stick and do not fidget in different directions, you have correctly solved the problem of how to make a barbell at home. If the load does not hold onto the stick sufficiently, you need to secure it additional materials. You can use glue, any other fastening compound, or simply tighten the bottles with tape more tightly.

And in conclusion
The end of our efforts should be a test of endurance. At first glance, it may seem that the weight of eight bottles collected together will be insignificant. But when you assemble them, the barbell may be too much for you to lift. In order not to overstrain yourself, you need to initially calculate the weight that you can lift without causing harm to the body. After a certain time, you can add sand to the bottles or add additional weight to each side. Well, now you know how to do it
How to make dumbbells with your own hands, drawings, calculations, description of the design.
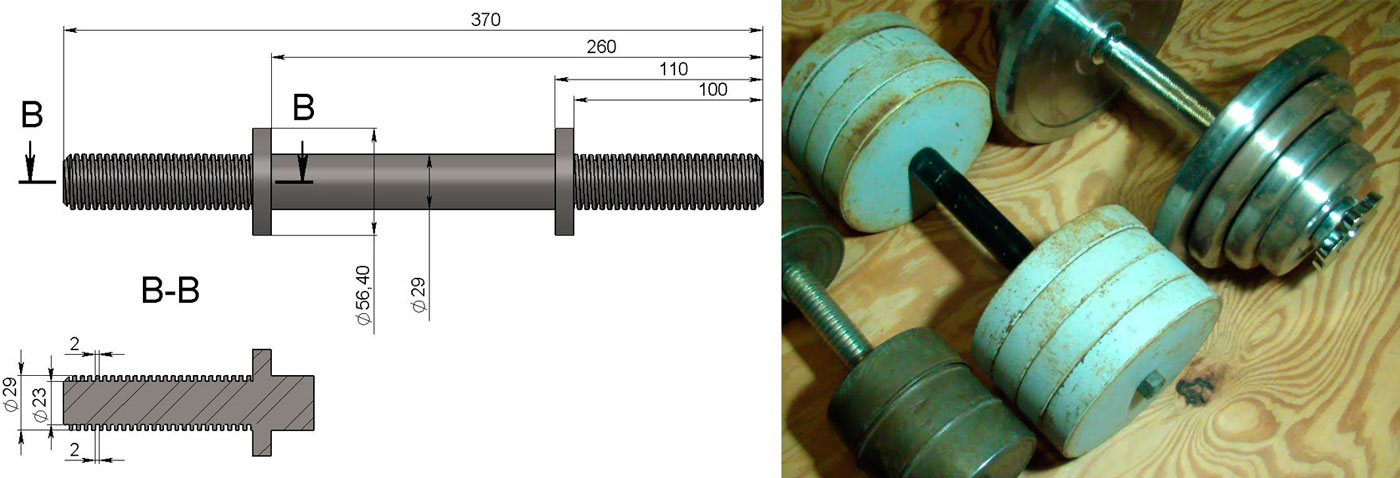
The sports equipment proposed for consideration consists of the following parts:
Handle (neck)
lock
pancakes
The parts are made of metal by turning. When manufacturing parts, it is necessary to strictly adhere to the dimensions of the drawing and the grade of metal of the corresponding density. If these conditions are met, each size will have its own weight.
PEN
We will make it from stainless steel (density – 0.00786 (g/mm³)). The handle has stops on both sides for fixing the pancakes. A square thread is cut to the stops. The square thread profile is not subject to standardization. This type of thread is used in mechanisms where spontaneous unscrewing should not occur under the influence of applied loads.

LOCK

We will make it from stainless steel (density – 0.00786 (g/mm³)). The lock has an internal square thread.

PANCAKES

We will make four designs from ductile iron (density – 0.0071 (g/mm³)). Each size corresponds to its weight. Metal pancakes, after turning, must be covered with a protective coating, preferably galvanic. This will give the product anti-corrosion resistance and good presentation.
First performance

Second performance

Third performance

Fourth performance
The thicknesses and mounting diameters of all parts are the same, only the outer diameter and the diameter of the metal sample change.
It’s not difficult to make dumbbells with your own hands according to drawings if you are a turner yourself or have someone you know.
Consider the table for the distribution of weights of the parts used (kg):
Handle – 2.0
lock – 0.5 + 0.5 = 1.0
pancake (first execution) – 1.0 + 1.0 = 2.0
pancake (second version) – 1.5 + 1.5 = 3.0
pancake (third version) – 2.0 + 2.0 = 4.0
pancake (fourth version) – 2.5 + 2.5 = 5.0
With this distribution, various weight combinations can be assembled.
We already know how to make dumbbells with our own hands, now let’s focus on weight combinations.