If you want to detonate something without getting hurt, then you need to ensure that the pyrotechnic charge detonates safely. The most common way to do this is to make a wick that can be ignited at a safe distance. Below you will see a couple of methods for making a wick.
How to make fickford cord
For insulating wires, an empty paste from an ordinary pen or a soda straw is perfect. Fill the shell with crushed (be careful, they can detonate during grinding) match heads. If you want, you can replace them with gunpowder or another similar mixture. If you ignite such a cord, then the wind will not extinguish it, and if it is also well insulated, you can use it under water. The more you compress the stuffing, the longer the fickford cord will burn.
In order to optimize the process, if you use match heads, the sulfur may not be scraped off, but immediately break off the match heads, since there are no more than 10 sulfurs on one match, and the main ingredients are Berthollet salt and phosphorus, XIOZ). Lay them out in a row, then wrap it all with tape. However, some craftsmen manage to remove sulfur with one graceful movement of their fingers.
How to make a jute wick
An ordinary jute rope is suitable, which must first be soaked in potassium or sodium nitrate dissolved in water.
How to make a stop
For this type of wick, the same jute rope is suitable, but it is better if you take an old cotton one. Repeat the already familiar soaking procedure in a solution of potassium or sodium nitrate and dry thoroughly. Then mix organic glue and powder pulp to a viscous thick consistency. Stopin is called cotton rope, which is stretched through this mixture and soaked in saltpeter.
Hunting matches - wick
Well, why is this not a wick? One match can burn for about 20 seconds without dying out even in bad weather. Just make sure that the charge does not detonate before the right time, due to sparks flying in all directions.
If we need to blow something up and not get injured, then we need to ensure the harmless detonation of the pyrotechnic charge. The most primitive way to do this is to make a fuse, one that we can light at a harmless distance. Here are a few methods for preparing the wick.
Instruction
1. Bickford cord. We take ordinary insulation from the wire or several straws for drinks fastened together. We fill them with crushed heads from household matches, gunpowder or other combustible mixture. This method is comfortable because our wick will not be able to blow out the wind. Even if it rains, he will not be able to soak such a wick. So that the "stuffing" of the Fickford cord does not burn out too quickly, it is allowed to tamp it. If we didn’t have gunpowder and nothing else besides matches, we can spare ourselves the need to scrape the heads off the matches. We break them off primitively, lay them out in a row and wrap them with tape.
2. Jute wick. We take a jute rope, soak it in a solution of sodium or potassium nitrate and dry it thoroughly. The wick is ready for use.
3. Stopin. In order to make such a wick, we also need a jute rope, but shabby cotton is also allowed to be used. We soak a not too thick rope in a solution of saltpeter, dry it. But that's not all. Now we will mix the organic glue with the powder pulp. You should get a homogeneous thick mass. Through this mass we need to stretch the rope. When everything hardens, the wick is allowed to be used.
4. Hunting matches themselves serve as a wonderful wick. They do not go out and burn for approximately 20 seconds. But so that our charge does not detonate ahead of time, it is necessary to monitor the sparks flying off the matches.
5. Poplar fluff. extraordinary summer version wick, from the fact that poplar fluff is allowed in June. But making a wick out of fluff is easier than everyone else and nothing needs to be impregnated. Primitively we will collect fluff, take it and wrap it inside with a folded tube of newspaper or paper.

You will need
- – Zippo lighter;
- - the latest wick;
- - sharp scissors;
- - screwdriver;
- - tweezers or tweezers.
Instruction
1. It turns out that even the well-known lighter, which will burn invariably and everywhere, also needs to be taken care of. In particular, she needs to change the wick. Yes, Zippo advertises that the wick will last forever, but if you use not the purest gasoline, the impurities contained in it can contribute to the burning of the wick. When ignited, the wick may spark, or it may not ignite immediately at all - this means that it is time to change it.
2. Try to pull the wick up a little with tweezers (finally, at a non-burning lighter). When the wick stretches up a little, cut off the upper part with scissors - the one that protrudes above the edges of the windshield.
3. If this procedure does not help, or if you decide to replace the entire zippo wick, first of all, pull out the lighter-insert. To do this, with one hand, grasp the windshield - the upper protruding part of the lighter, and the 2nd - for lower part corps. Now look at the bottom of the insert. Did you see the screw head? It is he who holds the wick. Loosen the screw carefully.
4. Now it is allowed to remove the felt pad from the insert. After that, using tweezers, remove the cotton filler and the old wick from the body. Take the newest wick and thread it through the insert, carefully insert it from below into the hole, pick it up with tweezers from above and pull it up.
5. When inserting the cotton filler back into the body of the lighter, place the long part of the wick between its layers. Carefully cut the top of the wick flush with the edge of the windscreen.
6. Replace the felt valve and secure the structure with a screw. The screw must be tightened sufficiently so that the lighter is coolly inserted into the body. Before inserting the lighter into the body, check that the flint is free in place. If there is a need for this, insert the newest flint. Assemble the lighter and see if it opens and closes nicely.
Advice 3: How to make a panel of poplar fluff depicting a kitten
Poplar fluff is an annual misfortune of cities where poplars are planted in large numbers. During his “departure” there is no escape from him anywhere! If you show imagination, it is allowed to use poplar fluff with benefit and pleasure - for example, for the manufacture of genuine panels. Soft and fluffy white fluff is beautiful natural material for creativity!

You will need
- - thick dark paper - the basis of the panel; ideally - black velvet paper or cardboard, but it is also allowed to use a dark blue, dark chestnut or dark green base;
- - a photograph or a picture depicting a kitten;
- – Blank sheet paper and a sheet of carbon paper;
- - chalk or white pencil;
- - scissors;
- - glue stick;
- - small cosmetic tweezers;
- - clean and dry poplar fluff, de-seeded;
- - frame with glass (optional).
Instruction
1. Put a carbon paper and a photo or picture on a blank sheet of paper. Transfer the silhouettes of the image of the kitten onto a blank sheet of paper, not forgetting the eyes, nose, mouth. Cut out the resulting silhouette; carefully cut out the eyes with small scissors. It turned out a sample for the panel.
2. Apply the sample on a dark base, with the support of chalk or a white pencil, circle the silhouettes of the sample, strictly draw the silhouettes of the eyes.
3. First make the eyes of the kitten. Poplar fluff flagella are used to make silhouettes. In order to make them, you need to take a small ball of fluff, stretch it and roll it between your fingers to the state of a rope. Apply a small amount of glue to the eye area and carefully apply a poplar flagellum along the silhouette. To make pupils, roll up small balls and fix them with glue inside the silhouettes of the eyes.
4. The torso and head of the kitten are made as follows: the silhouettes are circled in the necessary places with glue, and after that flagella from fluff are superimposed. Inside the silhouettes, the surface of the base is also smeared with glue, and after that, with the help of tweezers, fluff is laid out. The more fluff, the whiter and furrier the kitten will turn out. The muzzle is two loose balls rolled from fluff. It is allowed to “draw” the nose by pushing the fluff to the sides reverse side tweezers or the tips of scissors. Whiskers and claws on paws are made of flagella.
5. Lastly, it is allowed to make a landscape: grass, clouds, etc. In order to fix the image, and also so that the panel does not gather dust, it is recommended to insert it into a decorative frame with glass.
Related videos
Note!
In a similar way, it is allowed to make an image not only of a kitten, but also of another animal: a dog, a bunny, a polar bear and other white-colored animals, and not only animals - what fantasy tells!
At the current time, the production of candles at home has become famous. The necessary thing for this is a wick. It is allowed to extract it from ready-made, store-bought candles, but it is not always of great quality. Consequently, it is allowed to make a wick with your own hands.

You will need
- Thick cotton thread (twine, tourniquet or floss is also suitable) about 30 cm long
- Salt - 2 tablespoons
- Bura - 4 tbsp. l.
- 1.5 cups of water
- Utensils for soaking
- Dishes for melting wax
- paper clip
Instruction
1. Pour one and a half glasses into a cup or other dish warm water, dissolve in it 2 tbsp. tablespoons of salt and 4 tbsp. l. Boers. Soak the thread or tourniquet in this solution for 15 minutes.
2. After soaking, hang the thread on a clothesline to dry clothes in a dry room. In order for the thread to dry completely, let it hang for five days.
3. Melt the wax in a specially prepared dish. Secure the thread with a paper clip. Dip it in melted wax 3-4 times. It is necessary that the future wick be completely covered with wax. Later, hang it up again on a clothesline to dry. In a few minutes, the handmade wick will be ready.
4. To make a candle, cut the required length, not forgetting the reserve. It is allowed to keep the finished wick rolled into a skein.
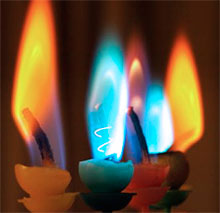
5. To create a colored fire, one teaspoon of chemicals can be added to the mixture for soaking the wick. Let's say strontium chloride will give a red flame, table salt - clear yellow, borax - yellow-green, potassium nitrate - violet.
Related videos
Note!
When creating a wick with a colored flame, it is impossible to apply several chemicals at the same time, because. it can cause a chemical reaction.
If you have oranges or lemons and obscene candles at home, then make genuine candles from them to decorate your home and ceremonial table. Their production will take a little time at all, and the result will certainly please you.

You will need
- - oranges or lemons;
- - candles or paraffin;
- - kapron thread.
Instruction
1. Cut the orange into two identical halves and carefully scoop out all the pulp with a spoon. You won’t need it much more, so you can squeeze juice out of it or eat it easily. It is allowed to use not only this fruit, but also lemon, tangerine or grapefruit. The result is a half, similar to a saucer. Now take paraffin or candles, put them in a saucepan and melt on a hefty small fire or in a water bath.
2. Make a wick from a slice of kapron thread, its length should be slightly larger than the height of your candle. It is allowed to take already prepared wicks from candles that have been melted if they are suitable in height. Then with one hand hold the wick in the middle of the “saucer”, and with the other hand carefully pour melted paraffin into it. It is necessary that a small slice of the wick remains on the surface. Wait for the paraffin to harden, this usually takes a few minutes.
3. This candle looks amazing on the table and has a great smell. If desired, it is allowed to lay out a few stars of cloves or slices of cinnamon along the edges of the peel. It remains only to light a candle and arrange romantic dinner. Do not forget about safety precautions when using a candle, be careful with fire.
Related videos
As you know, candles can be made at home. Basically, they are all made from paraffin. Now I bring to your attention a water candle. Make it much faster and much easier. Go!

You will need
- – water;
- – sunflower oil;
- - stack;
- - a candle;
- - plastic bottle;
- - stationery knife.
Instruction
1. First you need to cut out plastic bottle a circle equal to the diameter of the stack. After that, take a clerical knife and make a small hole in the middle of this circle.
2. The next step is to pull the wick out of the candle. This can also be done with the support of a clerical knife. After that, take a perforated plastic circle and stick a wick into it. For this, it is allowed to use a primitive rod from the handle.
3. Now we pour water into the stack. After that, we pour vegetable oil there. Its layer should not exceed 5 millimeters.
4. After that, we take a circle with a wick inserted into it and wipe it thoroughly so that there are no traces. Then we put it in a pile of water and vegetable oil. Your candle is ready! It is allowed to try to set it on fire. Is it on? I think how! Luck!
Useful advice
The candle will stop burning when the oil runs out. If this happens, diligently pour it into the water candle, pulling out the plastic circle with the wick in advance.
Do you want to create romance in nature? But there is nothing at hand. From a dilapidated bowl and a candle, you can create a unique designer accessory, one that will delight you and your companions on a chilly evening.

You will need
- - A dilapidated hiking mug;
- – Candlestick;
- – Blue acrylic paint;
- - Matches (toothpick);
- – White acrylic paint;
- - Clear varnish for fixing.
Instruction
1. Take a mug, rinse, clean. Dry thoroughly. Cover with blue paint. Leave to dry for 2-3 days.
2. Using a match or a toothpick, apply small white or yellow dots - these will be stars. Dry thoroughly.
3. Cover your product with clear varnish. Insert a candle inside. Ready! Enjoy the charming romantic mood while the candle wick is smoldering.
Gel candles add originality and mystery to any interior. They will create a romantic atmosphere and serve as a good present. Do gel candles with your own hands is very easy. In the presence of imagination, they will turn out to be not almost trashier than those sold in stores. In addition, the production of candles is an interesting process, to which children can also be involved.

You will need
- Glass cup, small vase or flask
- Decor: shells, pebbles, beads, etc.
- 1 st. gelatin spoon
- 1 st. l. glycerine
- 1 glass of water
- Mug or bowl
- Saucepan with water for a steam bath
- Pencil, pen or stick
- Essential oil
- Food coloring
- Wick (it is allowed to make independently, buy ready-made or extract from an ordinary candle)
Instruction
1. Mix glycerin and gelatin in a mug or other bowl, pour into a glass cold water and leave for 1 hour. During this time, the gelatin will swell.
2. In a glass, the one that will later be a candle, put decorative elements, say shells. When you wake up to fill with liquid, they can float up, therefore it is allowed to stick them on superglue or pour a gel mixture into them and force out the air. Lower the wick into the glass and fix it on a pencil or stick so that it stays even.
3. Heat the mixture on a steam bath so that the grains of gelatin are completely dissolved. Care must be taken that the solution does not boil.
4. After that, add a few drops of essential oil and dye to the gel mixture. These ingredients are not indispensable, they are allowed not to be used.
5. Carefully pour the mixture into the decorated glass, making sure the wick stays upright. After this, you need to leave the candle for a while, let it harden.
6. Check and make sure the mixture has set. DIY gel candle is ready!
Related videos
Note!
The amount of essential oil should match the size of the candle. It is allowed to add about 5 drops to a small glass.
Useful advice
To speed up the process of solidification of the candle, it is allowed to put it in the refrigerator.
Pyrotechnics, both large and small, have long been an integral part of almost any holiday. Moreover, we are talking not only about fireworks, but also including sparklers, crackers and firecrackers.
The key to safety when using pyrotechnics is, first of all, strict adherence to the operating instructions. However, there are situations when it is necessary to improvise in order for the holiday to really succeed. For example, a purchased firecracker has a too short wick, and it is dangerous to use it, but I really want to. Then there is a way out: make a wick for firecrackers with your own hands.
There are several ways to do this. The difference in them mainly lies in the choice of combustible substance.
Therefore, each method has its own characteristics:
- As a cord, you can use insulation from wires or a rod from a pen that has run out of ink. We fill the wire with sulfur, removed from the match heads and crushed into powder. We tamp the filling well with a needle or toothpick. Be careful as the force of friction can cause an accidental fire. The denser the sulfur is packed, the longer the wick will burn.
- In order not to grind the sulfur heads, you can simply gently break them off and lay them in a row on adhesive tape. Then roll the tape into a tube so that the sulfur is inside. The more heads, the longer the cord.
- Ordinary thin rope can be soaked in a solution of saltpeter, which can be purchased at a gardening store (this good fertilizer). Saltpeter will need to be dissolved in water to a good saturation, and then lower the cord there for several hours.
- Combustible composition can be made from potassium permanganate and super-glue. These two components must be combined and mixed well. At first, the mixture will turn out to be liquid, but over time it will thicken to the state of plasticine. Roll the resulting substance into a thin sausage. Here is the wick for you.
- In summer, poplar fluff is suitable for making a wick. Collect it, remember well and wrap it in a paper tube.
How to make a firecracker without a wick
You can independently make not only the wick, but also the firecracker itself. There can be several options for fillings: these are sulfur from matches, and saltpeter mixtures, and much more. If you understand chemistry, you can easily choose the right composition. The body is also made from improvised materials. It is possible to make it from cardboard, foil, small plastic jars ... It all depends on what effect you are counting on.
Making a firecracker without a wick is difficult, but possible. True, it’s not very clear why the wick is preventing you ... And there are much more ways to make it as it should be, rather than vice versa. But still there are such options.
Our faithful friends, matches, will come to our aid. We clean off sulfur from them, usually one whole box is enough. Then we carefully grind it into powder and pour it onto a piece of foil about 10x10 cm in size. Next, cut out the side of the box - phosphorus cherkash. We clean it from the remnants of paper. Cut into two or three parts and put to the sulfur powder. We wrap the foil to make a small square with a flammable core inside. Ready! In order for the firecracker to detonate, you just need to hit it with a hammer.
Another way is to use napkins, electrical tape, caps and small stones for making. First you will need to exfoliate the napkin. Cut the resulting thin part into eight equal squares. Grind the contents of the caps in the center of the cut out piece of napkin, and put the pebbles on top. Wrap the resulting mixture so that the shape of the firecracker resembles a small onion. For tightness, wrap the tail of the bulb with electrical tape. To detonate, throw your invention against a wall or throw it hard on the pavement.
And yet, we will include one in our list of recipes, how to make a firecracker with a wick and gunpowder. Take a piece of thick cardboard and roll it into a cylinder. Choose the parameters of the piece yourself, it will serve as a case for the future firecracker, respectively, it should not be very large.
On the one hand, we make a plug. It can be made from plasticine or the same cardboard. If you prefer the second option, coat it well with glue so that right moment the plug remained in place. Next, we make gunpowder. It can be made from potassium nitrate, coal and sulfur. The proportions must be observed as follows: six parts of saltpeter, one part of coal and the same amount of sulfur. Mix all ingredients thoroughly. The quantity depends on the size of the case. We fall asleep our gunpowder inside the case and proceed to the manufacture of the wick. Any method can be used, but the option with a rod from a handle and sulfur from matches is still recommended.
The length of the wick should be such that you have time to move to safe distance. We are preparing a plug for the other side of the case. We insert it and make a hole in it that matches the diameter of the wick. If it turned out more, we additionally wrap the wick with paper so that it is tightly fixed in the cap of the firecracker, and the design itself is airtight. Firecracker is ready.
Where can I buy firecracker wick
If you are not eager to make a firecracker or its components yourself, then you have a direct road to a pyrotechnics store. There, experienced salesmen will tell you which wick better fit for your product. Usually wicks and strings (for professional fireworks) are sold in skeins, meaning either mass use for big holidays, or cut off as much as you need.
In order not to make a mistake with the choice of the wick, decide for yourself how many firecrackers will go into action, and how far you will have time to move away from the moment of arson. If in doubt, ask a professional for advice. Let him give you comprehensive recommendations on exactly how many centimeters of wick you need to purchase. If you don't want to leave the house in search of the right product, online stores also have plenty to choose from. At your service there will always be a manager or administrator who will give you no less detailed information about the quantity, quality and cost.
We hope you found this lesson interesting and you learned useful information. Today we want to talk about some of the nuances of making candles, which are useful to know about for both a beginner and an experienced candlemaker.
For candles, it is very important to make the wick correctly.
How correctly the thickness of the wick is chosen depends largely on the burning characteristics of the candle. If the wick is too thin, it will burn out quickly, and the candle will go out endlessly. Too thick a wick will smoke, and the candle will quickly melt.
A wick is a collection of capillary channels through which molten wax or paraffin rises to the place where the flame burns. The molten base rises along the wick, evaporates, decomposes into hydrogen and hydrocarbon vapors. They react with oxygen and burn to form water particles, carbon dioxide and soot. If there are too many hydrocarbon vapors, they will not have time to burn out completely, forming soot.
Since wax is thicker than paraffin, oil, fat or gel, the wick for wax candles is twisted weakly, from thick cotton fibers. For other types of candles, the wick is twisted tightly, from thin threads, so as not to create an excess of combustible material in the flame.
The thickness of the wick also depends on the diameter of the candle itself. As a rule, each master himself determines the thickness of the wick by trial and error. For beginners, it will be useful to know the basic ratios for simple thin threads of the floss type:
- for candles with a diameter of 2-7 cm, the wick is twisted from about 15 threads;
- for candles with a diameter of about 10 cm, 24 threads are taken;
- for thicker candles - at least 30.
 The easiest way to do the wick is to dip the required number of threads into the melted base, then twist tightly and dry well by weight.
In order for the wick to burn for a long time and evenly, and the base not to burn out too quickly, the wick is soaked in various solutions, dried thoroughly for several days, and only then soaked in the molten base. Here are some solution recipes:
1. In 700 ml of water, dissolve 1 g of ammonium chloride and sodium nitrate, bring to a boil, lower the wick there and boil for 15 minutes.
2. In 450 ml of water, dissolve 8.5 g of borax and 4.5 g of calcium chloride, saltpeter and ammonium chloride, filter. The wick is soaked in this mixture.
3. Dissolve 10 g of boric acid in 370 ml of water, take the container out to the cold and soak the wick there for several hours.
4. Prepare a solution of 550 ml of water, 8.5 g of saltpeter, 30 g of lime, soak the wick in it.
Interesting: if the wick is soaked in a solution blue vitriol, then the candle flame will have a bluish tint, and the salt solution will give the flame an orange color.
A few short tips:
- In order for the base to melt quickly and evenly, it is best to finely cut it or rub it on a grater.
- Do not use a large number of flavorings, as due to excess essential oils the candle may smoke.
- Rose oil is not very suitable for aromatization, as the smell of burning rose oil is too strong, “suffocating”.
- Do not force the cooling of candles, especially wax candles, by placing them in the refrigerator - they may crack.
Gel candle recipe
Transparent gel candles look very beautiful and stylish - they are original, they burn for a long time and without soot, they do not smell. Making such a candle is not at all difficult, and the possibilities for decorating it are simply endless. You will need transparent dishes, gelatin, glycerin and tannin, a little time, desire and imagination.
The wick, as usual, is twisted from cotton threads. Pour 5 g of colorless gelatin with 20 ml of cold water, let it swell for 40 minutes. Add 25 ml of glycerin and heat with constant stirring in a water bath until the gelatin is completely dissolved and a transparent mixture is formed. In another bowl, heat 10 ml of glycerin in a water bath until 2 g of tannin is completely dissolved in it. 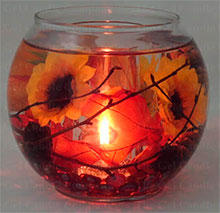
We mix both parts. The mixture will immediately become cloudy, but this is not scary. We heat the mixture in a water bath until it becomes transparent again and all the water has evaporated.
Attention! You can only heat it in a water bath, otherwise the overheated mixture will hopelessly become cloudy, an unpleasant odor will appear.
Pour a small amount ready mix into a transparent form with decorative elements laid out (shells, beads, flowers, sparkles, pieces of fruit ...), let the gel harden, pierce it in the middle and fix the wick in it so that it does not come into contact with the decor elements. Pour the remaining gel and wait for the candle to be ready. You don't need to take it out!
Flavors and water-soluble dyes can be added to the glycerin-gelatin candle - food colorings are better so that the candle remains transparent.
First, for a homemade candle, you need to make a wick. A wick is a kind of capillary through which the melt of the candle mass enters the combustion zone. The wicks are woven from cotton threads. wax candles must have a loosely woven wick of thick fibers; for all other candles, the wicks are made of tightly woven threads. This is due to the viscosity of the candle mass in the molten state: viscous wax needs wide capillaries, and easily mobile paraffin, stearin and fats require thinner capillaries, otherwise the candle will smoke heavily due to an excess of combustible material.
The wick is impregnated with solutions containing sodium nitrate, for example, of the following composition:
- 8.5 g of sodium nitrate and 30 g of slaked lime in 550 ml of water;
- or 1 g of sodium nitrate and 1 g of ammonium chloride in 700 ml of water;
- or 5 g sodium nitrate, 5 g ammonium chloride, 5 g calcium chloride and 10 g borax in 500 ml water.
Prepared wicks are soaked in these solutions, and then they are dried.
Using wicks from white Ikea (17 cm) candles has only one drawback. The form should be no higher than 17 centimeters. This wick is equally suitable for candles with a diameter of 20 to 100 mm. Using thicker wicks is impractical (candles burn out quickly and give a very high, smoky flame).
If you don't have a ready-made wick, make it from ordinary cotton thread (twine). Such burning will be meaningful. Do not forget that the wick may simply be twisted, or enchantments may be woven into it.. In doing so, you use weaving with the pattern of the element you are working with. For example, an ordinary pigtail is the element of water.
Where to buy candle wicks
If you do not want to make wicks yourself, you can buy ready-made ones. candle making kits, they have everything you need in the kit (including wicks).
There are also wicks for heating candles.
In order for the candles to burn better and the fat does not drain, several methods are recommended:
a) Dip the wicks in a solution of lime water, to which saltpeter is added: for 5.5 water, take 85 g of saltpeter and 300 g of lime. Dry the wicks before use.
b) Prepare a solution of 85 g of borax, 45 g of calcium chloride, 45 g of saltpeter and 45 g of ammonium chloride in 4.5 liters of water and filter. Soak the wicks in this solution, then dry.
c) Soak the wick for several hours in the cold in a solution of 1 kg boric acid in 37 liters of water.
d) Prepare a solution of 4 kg of boric acid, 2.5 kg of sulfuric acid in 370 liters of water. Proceed as in the previous recipe.
e) Dissolve 10 g of ammonium chloride and 10 g of sodium nitrate in 7 liters of water. The wicks are soaked in this solution for 10-15 minutes at the boil and then dried at 40-50°C.
e) Place the wicks for 24 hours in a bath of sulfuric acid and 100 times its weight of water. Dry at low temperature and put in another bath consisting of 12.5 kg of boric acid, 9 kg of ammonium sulfate and 370 liters of water. The wicks are then dried in a warm room.
For impregnation, a little wax is melted, then the end of the wick is immersed in it for a short time and removed, allowing the drops to drain into the pan. After that, the wax is allowed to cool a little, the wick is placed on the board for further drying (by the way, the wick, soaked to the full length, is well suited for lighting many candles on the Christmas tree).
The tip of the wick of a burning candle should be as short as possible - this prolongs its burning. Therefore, at a lit candle, it is constantly cut off.
Wicks with knots
Candles with such wicks have an additional magic power. To make such a candle, first take the wick in your hands and after the exercise "filling with light" mentally focus on the purpose for which this candle is needed. Let's say you want to get rid of bad habit- For example, stop smoking. To do this, you have planned a ritual with candles. Previously, you smoked a pack, that is, twenty cigarettes a day, or 140 cigarettes a week. You want to quit smoking in one week.
Holding the wick in your hand, mentally focus on your smoking habit. Imagine reducing the number of cigarettes you smoke in a week from 140 to 120. It's easier to imagine that you smoke one less pack in a week. Imagine that this will make you feel much better, improve your breathing, improve your mood. Concentrate as hard as you can on this picture and tie a knot in the wick.
Then do it all over again, but imagine that you smoke a hundred cigarettes a week. Imagine again that you feel better. Focusing on the imaginary picture, tie another knot on the wick. Continue in the same spirit: mentally reduce the number of cigarettes smoked per week to eighty, then sixty, forty, twenty, and finally stop smoking. Tie a knot every time. As a result, you will get seven knots tied to the wick at equal distances.
Now make a candle. Cast it in a mold, in a vessel, or by dipping it in wax. In short, use any method, but personally I would recommend making a candle in a jar - so that the knot on the wick, corresponding to 140 cigarettes a week, is at the top of the candle. During the ritual, you will burn the candle in seven stages. You light it at the time you smoke 140 cigarettes a week and let it burn until the wick burns down to the first knot. At this point, you will repeat the ceremony, receiving the additional energy that you have invested in making a thin candle. Ideally, it takes a whole day for the candle to burn down to the first knot, so you will repeat the ritual every day to keep the candle burning almost continuously. But if the candle burns down to the next knot before you are ready to move on to the next day's ritual, snuff it out as soon as you see the next knot. At the appointed time, repeat the ceremony and light the candle again. By the beginning of the seventh day, you will reach the zero point of the thin candle and quit smoking. Let the candle burn out completely, do not extinguish it.
Quitting smoking or getting rid of any other bad habit is quite difficult, even with the help of magic. Additional energy can be of great help in this matter.
The process of making bulk candles is simple and safe: just place the wick in a glass and fill it with stearin granules. There are many ready-made kits that include everything you need.